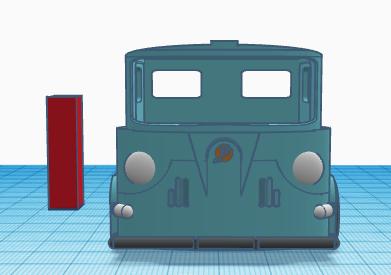
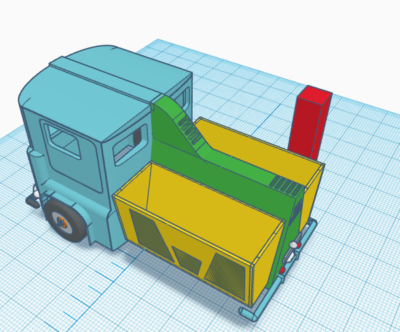
Build Something 2018 continues and I have been pretty quiet for the last week. Part of this is because I am waiting on the warrantied printer board, so motivation is low. Also been busy with other things. But today I kicked myself into gear and go the first printable draft done of the 1956 PANG. Take a look below (the red rectangle is 32mm high and is there for reference):
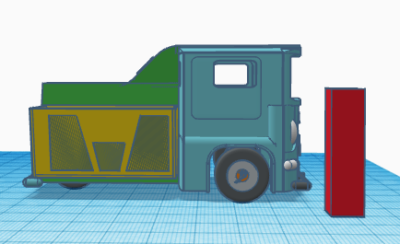
Front ViewFront angled viewRear view of the 1956 PANGSide view of the 1956 PANGRear angled view of the 1956 PANG
Well, Build Something 2018 is well underway at Lead Adventure. You can follow all the entries, including at least two other 3D printed things, over on the subforum.
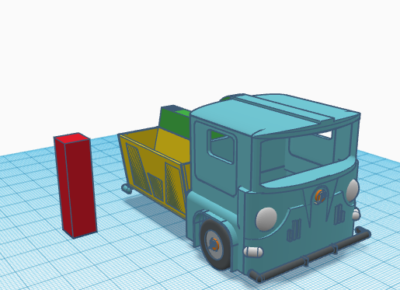
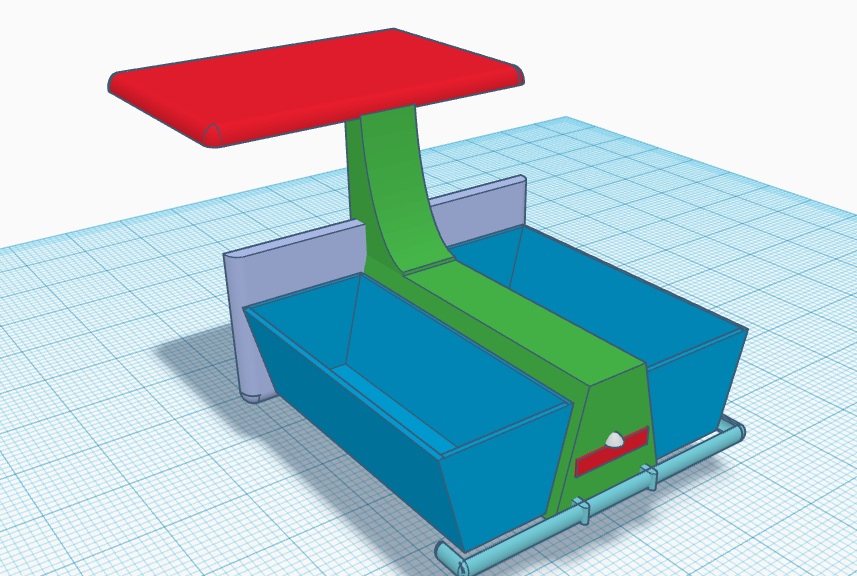
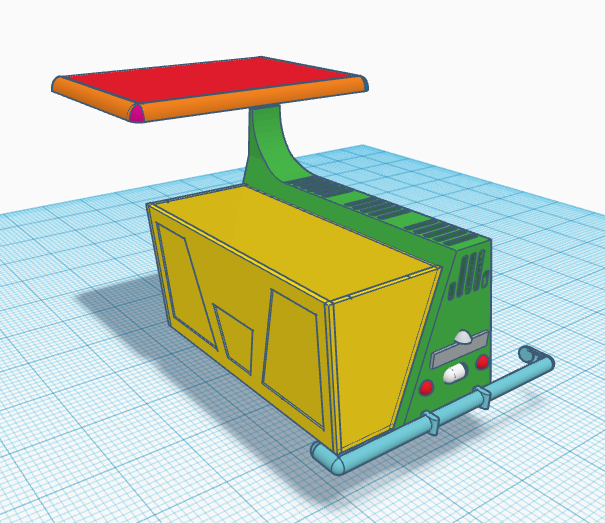
And what of our 1956 PANG tricycle truck? Yesterday saw a lot of work on the back end. As of two days ago it looked like this:
I really didn’t like the aspect ratio of the truck – height, etc. So I completely rebuilt the back end so it was taller and thus looked narrower:
Early work on 1956 Pang
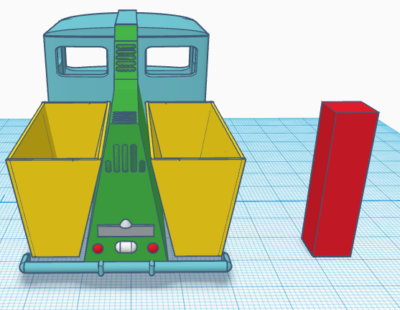
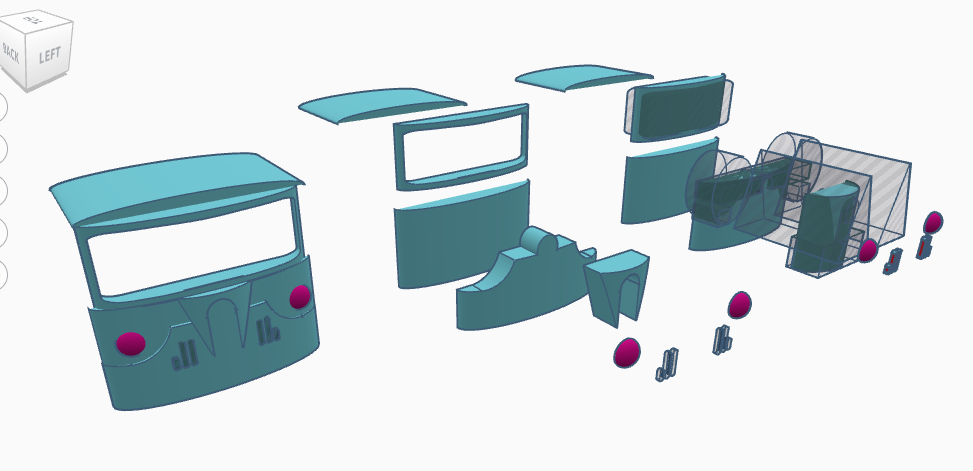
Today I started working on the front end, which is a lot harder. It has a lot of curves with curves, so it going to be a real challenge to do well. I am not overly happy with the look (too wide and squat) so might rebuild the front. Here it is in exploded view.
Front end of 1956 PANG, exploded view on right
What I love about modelling this way is that if you don’t like something, it is trivial to rebuild it. Play with the ratio, etc.
I posted my Round 1 entry for the recently concluded Lead Painters League 11 (run over on the awesome Lead Adventure Forum) way back in mid-April but never got around to posting my other entries.
So here they are all at once, including Round 1 again for completeness sake.
Note that I repeated one entry in a later round, so there are only nine entries here instead of ten. My Round 2 entry, Patients of Ward 13, were re-run as my Round 9 entry after the English Civil War musketeers I’d hoped to run didn’t get finished in time. Interestingly, the Patients lost their initial round but won their re-appearance, which is unusual as repeat figures rarely win LPL rounds in my experience!
There’s captions for each photo with more details, including manufacturer info for all the figures.
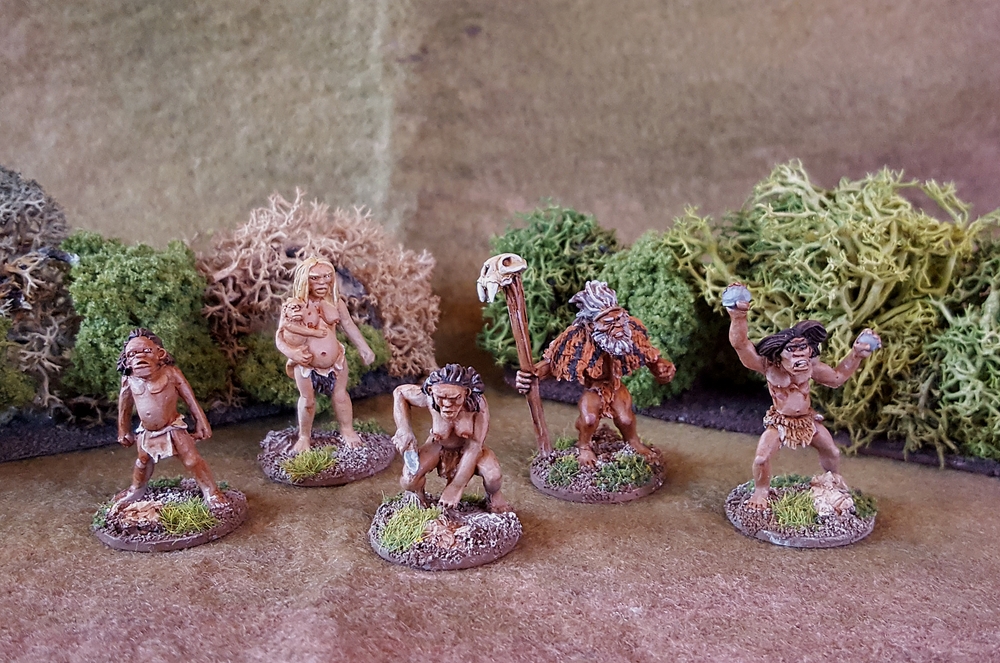
LPL11 Round One – Old Sabertooth’s Clan. Pulp Figures 28mm pulp cave-persons!
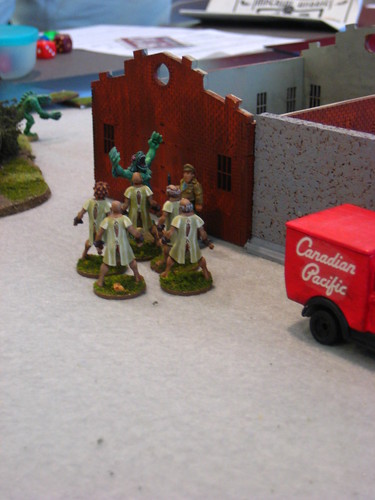
LPL11 Round 2 – The Patients of Ward 13. Statuesque Miniature’s Pulp Asylum line, 28mm. A strong contender for my favourite set of figures in my LPL11 entries, and they also wound up being my Round 9 entry after the planned ECW figures didn’t get finished in time.
LPL11 Round 3 – Backalley Bruisers. Thugs and petty criminals from Pulp Figures.
LPL11 Round 4 – The Young Majarah And His Minders. 28mm Pulp Figures, probably my favourite group of figures and favourite photo of this LPL!
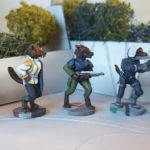
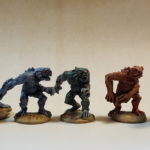
LPL11 Round 5 – Last Hydrant For 12 Parsecs. Really old 25mm Vargr dog-aliens from the Traveller universe, produced by MegaMinis at least ten years ago and finally finished!
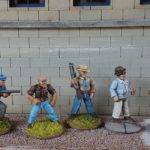
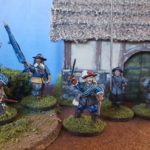
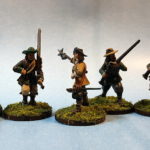
LPL11 Round 6 – For the King And England! 28mm Warlord ECW figures.
LPL11 Round 8 – Parliament And England! 28mm Warlord ECW figures; my least favourite round of all. The figures were rushed and incomplete and the photo is just straight-up bad!
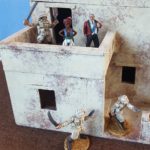
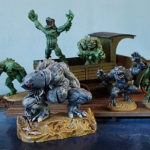
LPL11 Round 10 – Dagon At Dockside. The bonus theme was “Big Brother/Little Brother”, and I happened to have Pulp Figures’ Dagon and fishmen around!
Bonus photo – this was the setup for Round 6’s English Civil War shot, on my dining room table!
If you want to see all 300+ entries (30+ participants, 10 rounds!) you can head over to the LPL 11 forum on Lead Adventure Forum. I highly recommend it, loads of awesomely talented painters participate, not just hacks like me!
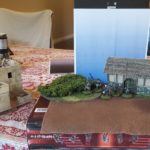
More progress on detailing the lasercut MDF church from Warbases that I started previously.
Stonework & Doors
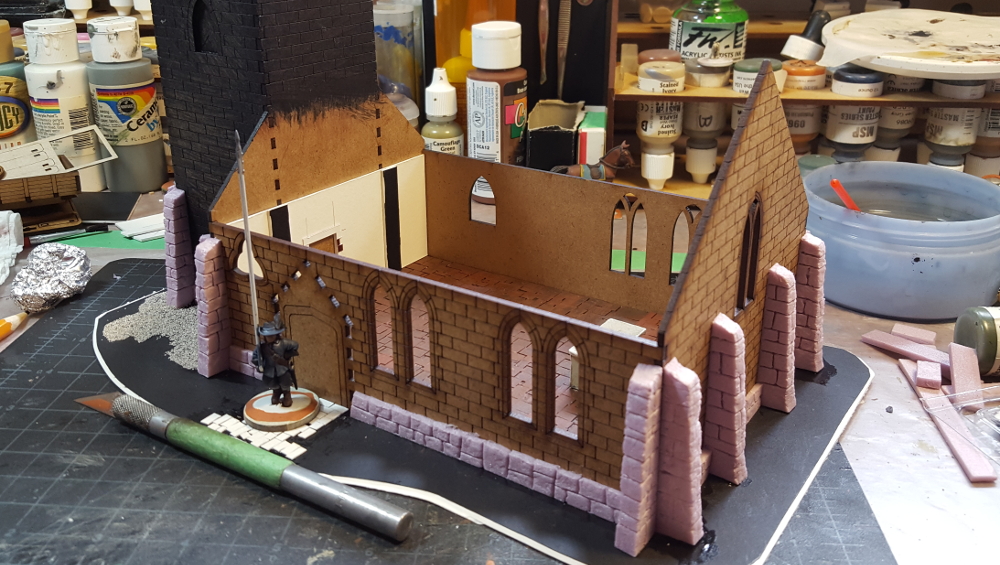
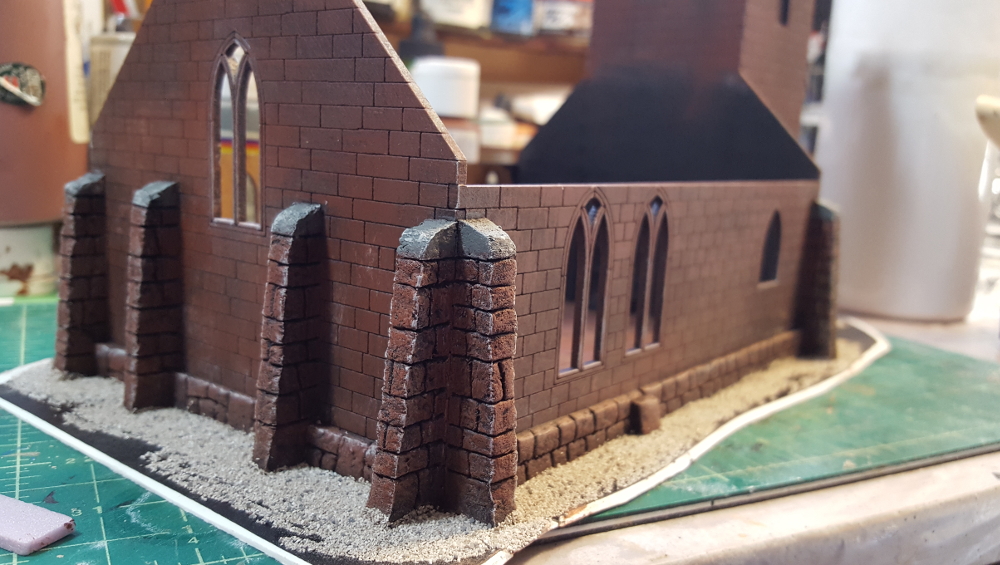
Buttresses and a double row of foundation stonework have been added with pink styrofoam insulation cut with a new Xacto knife. I used scrap card to create a small jig to keep the angle of the front of the buttresses the same across the fourteen buttresses around the outside of the church. The buttresses are roughly a quarter inch wide, two inches tall, and about half an inch deep at the base of each.
Styrofoam stonework in place on the church; Warlord 28mm pikeman on 25mm base for scale. Click for larger.
Buttresses and stonework on the other two sides of the church. The extra stone partway down the side disguises a join in the foundation strips. Click for larger.
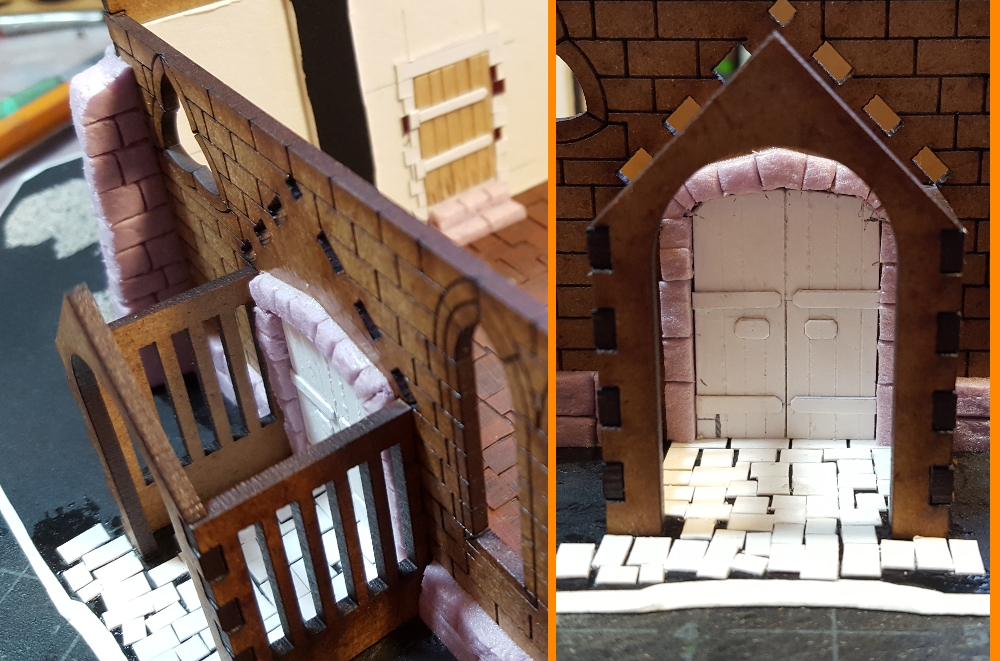
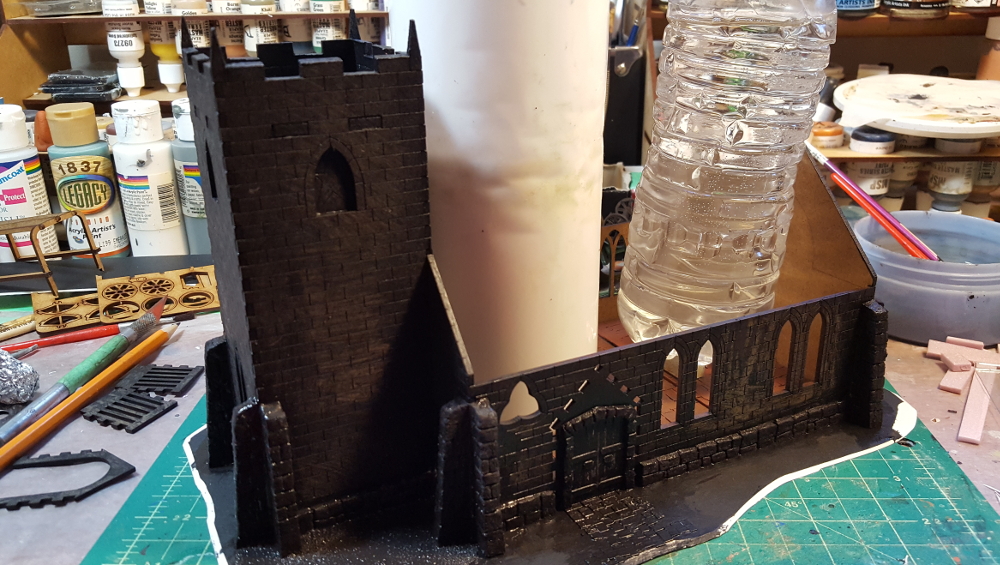
The front door is card with planks scored into it, with more light card for the hinges and handles. The door arch is more pink styrofoam. Inside the church I’ve added an interior wall of 1/16th matt board on the tower end to hide the tabs where the tower walls slot into the end wall. That’s had some added detail with matt board and card, and the door was done with offcuts of coffee stir stick wood and card.
On the left, both doors at once, with the porch walls in position but not glued. Right, close-up of the front door. Click for larger.
All of the styrofoam was glued down then carved and textured after the glue had dried; I used a ball of tin foil to add a stone texture, then my usual knife-and-pencil stone carving technique.
Priming & Painting
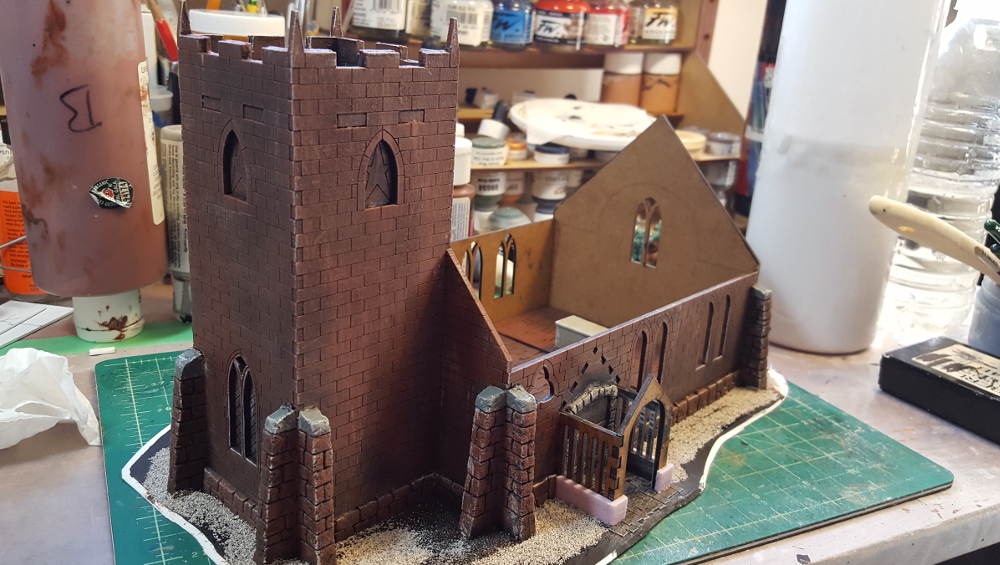
The whole building got a coat of black paint as primer. Rather than the default grey stone that I always seem to use I took some inspiration from churches I’ve seen online from Shropshire county in England and decided to do mostly reddish stone with some grey stone used as accents, similar to the Cound Church of St Peter
I started with brown paint drybrushed heavily on, then a fairly light grey paint, and finally a drybrush of red oxide/burnt umber. I’ve done a bit of edge highlighting so far, but will do more and might yet do another paler drybrush over the whole building to pop some more details out.
The capping stones on each buttress were done in dark grey then drybrushed a paler grey, as was the arch around the main door. I might yet do more stones in grey, just to add some variation to the building. I also glued the porch walls and front down, and added more strips of styrofoam for the foundation of the porch.
Black primer paint drying, with some weight inside the building to keep the base from warping. Click for larger.
Tower end of the church all painted, and with the porch glued down and stonework added around the base of it. Click for larger.
Altar end of the church all painted. Click for larger.
The Roof(s)
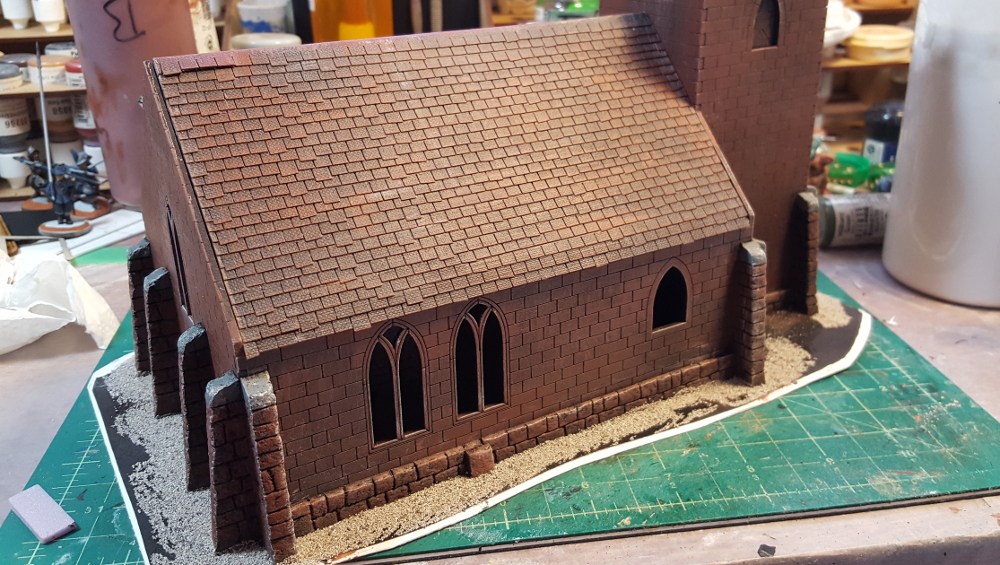
Both the main roof and the porch roof got covered in Warbases’ very nice lasercut slate tiles and primed black like the rest of the building. So far the main roof is painted more or less the same as the rest of the building, with an extra grey drybrush to pop the texture a bit more and make it look a bit different from the walls.
Main roof, painting in progress. Click for larger.
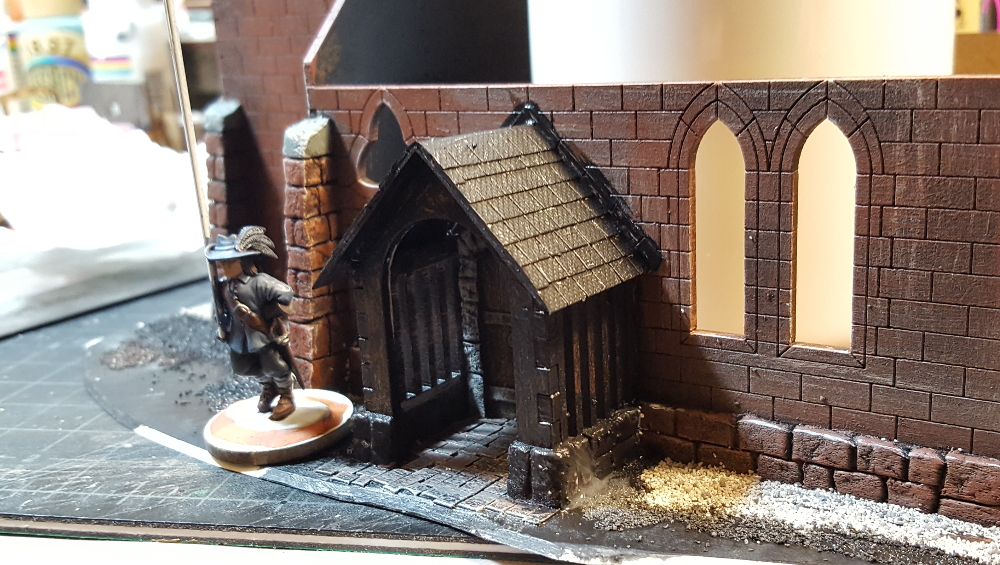
The porch comes with MDF panels for the roof, but they look quite thick so I cut a strip of light card the same size, folded it, and glued it into place. Before gluing the roof down I added strips of card against the stone wall to hide the slots where the MDF roof panels should slot in; they’ll be painted to look like lead flashing eventually. As mentioned, the porch roof got more of the Warbases lasercut slate tiles, and will get bargeboards on the front edges eventually to hide the edges of the slate.
Porch roofed and primered, with Warlord pikeman for scale. Click for larger.
Up on the roof of the tower I doubled the thickness of the walls with matt board, then put down a wooden floor using styrene plank sheet, with a roof hatch from a bit more styrene. The upper edges of the walls got a bit of GW Liquid Greenstuff to help disguise the line between the MDF wall and the matt board additions, and painting is in progress.
Tower roof and main roof from overhead. Click for larger.
Still To Do…
The outside edges of the base has a layer of fine scenery grit – coarse sand – glued down and mostly painted black; I’ll paint it up dark brown with a bit of a drybrush, then put various kinds of flock and turf around.
The porch still needs work, mostly paint, and a bit of detailing on the roof. The tower roof also needs painting, and I’m not entirely happy with the colours on the main roof.
Inside is still the big job. The Warbases kit comes with solid lasercut windows that look good from the outside but will make the accessible interior look a bit odd. I might use square grid plastic mesh – the same stuff you use in screen doors – to fill the windows, with inside walls of more matt board, like I did with the inside of the wall between the tower and church proper. Still, with the exterior done including scenic groundwork I’ll be happy to put the church on the table and put finishing the interior off for a bit!
Warbases started doing vehicles in lasercut MDF and cardboard (greyboard) a few years ago and I was intrigued right away; a lot of 28mm vehicles are fairly expensive or (especially for World War One, Russian Civil War, or other early 20th C gaming) simply don’t exist.
It took me a while to get around to ordering any of the vehicles, but I now have a Pierce Arrow truck and an Albion truck that I’ve built, and I’m pleased to say these are really nice kits, great value for their cost, and quite easy to build!
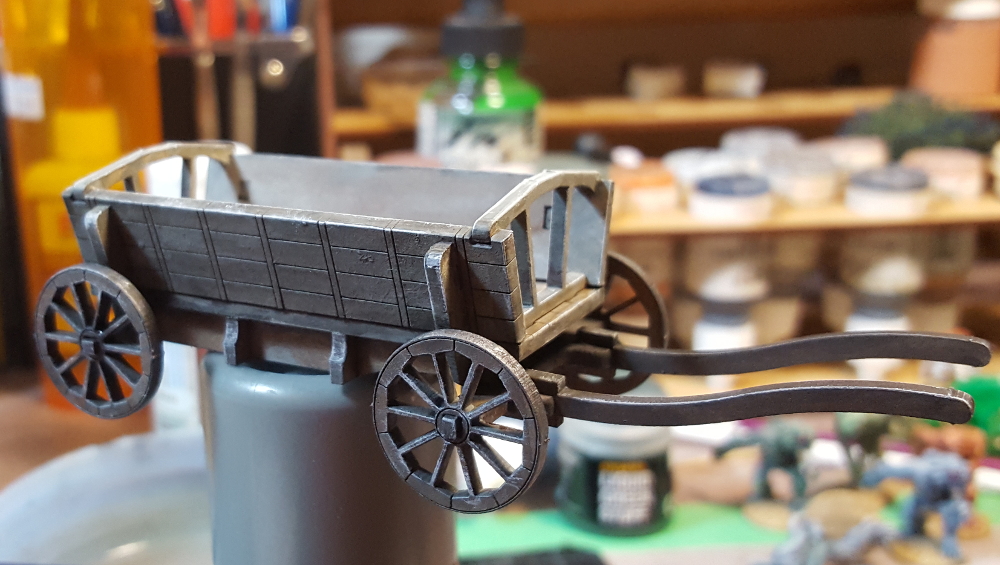
The Peasant Cart
I also picked up Warbases’ Peasant Cart 2, which is part of their Carts & Wagons line, listed separately from the Vehicles line. This is a straightforward little model, about 20 pieces including the wheels, and produces a nice solid piece of wargaming scenery. It’s called a cart, but it is a full four wheel wagon.
Assembly and painting didn’t take much time at all, maybe half an hour. I used a random grubby wash of green-grey over the whole wagon, added a bit of pale grey for the insides of the wagon, then did a bit of edge highlighting with a grey-white mix just to pop some of the edges a bit. I’ll probably glue some straw (cut from manila cord) down to the inside of the wagon just for a bit more easy detailing.
Assembled and painted wagon, resting on top of a paint jar. Click for larger.
The wagon is big enough that two or three figures on 20mm bases could fit in the bed of it, although it’s too narrow for 25mm or larger bases to fit flat.
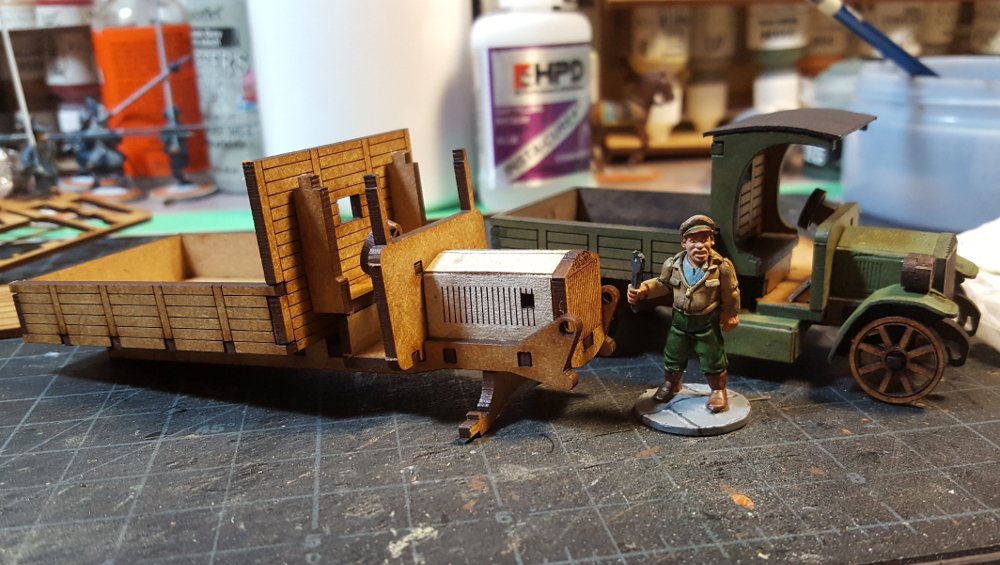
The Trucks
The Pierce Arrow is a relatively small truck, with room for two or three figures in the truck bed. The Albion is quite a bit larger, with room for 6 figures on 20mm bases or 3-4 figures on 25mm bases in the bed.
Albion truck under construction in the foreground, Pierce Arrow in the background. The figure is a 28mm Pulp Figures mechanic on a 20mm base. Click for larger.
Each truck comes as a couple of small sheets of MDF and an even smaller (business-card sized, roughly) sheet of greyboard card, with roughly 30 or so parts per vehicle. The instructions are photo-illustrated PDFs on the Warbases website, which does mean you can check them out before purchase. It sometimes takes a bit of peering at some of the photos to figure out which part is being fitted where, and as always I highly, highly recommend carefully dryfitting everything before you start adding glue!
One thing I noticed and appreciated about both trucks and the wagon is that any part that isn’t unique is actually identical to any corresponding part – the sides of the truck beds are identical and interchangeable, for example. Most parts aren’t labelled or numbered, but this nice design touch makes it hard to screw up the build process. Warbases has also put on-sprue/on-sheet photos of the parts of all three of these kits on their website, which helps sometimes with keeping track of parts.
The Pierce Arrow truck took me maybe an hour to assemble and paint to the point you can see in these photos; it’s got a bit of detail painting and cleanup left to do, and maybe some more weathering, so these are fast kits to assemble and get onto the table. I stopped assembling the Albion at the point you see in these photos so that I could paint the undercarriage before adding the wheels and fenders, as the Pierce got a bit cramped to paint with the wheels in place and the Albion has fenders on all four wheels, not just the front. I’ve also skipped putting the cab roof on the Albion for now to make painting the inside of the cab less painful.
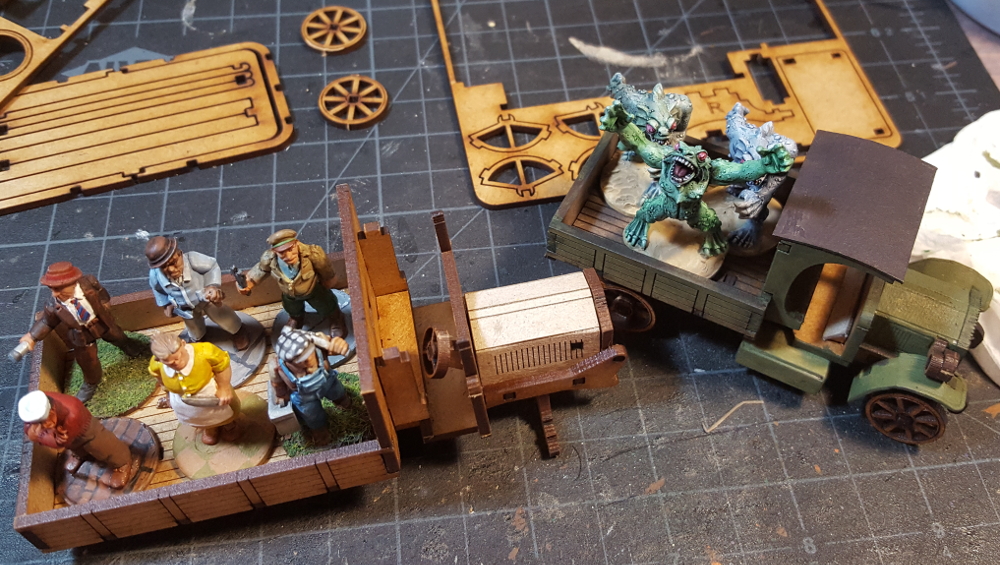
Top view of both trucks with figures on 20mm bases in both. Six fit easily in the Albion (left) while three only just fit in the Pierce Arrow (right) with the third one overlapping. Figures all by Bob Murch/Pulp Figures. Click for larger.
The Pierce Arrow has been basecoated dark green with a black roof; I’ll do a round of highlighting (mostly of the edges) and there’s some detail areas like the wheels, headlight, and front grille left to paint. I haven’t decided what colour to do the bigger Albion; possibly dark grey or tan. Both colour schemes will do for either military or civilian vehicles of the era, especially in the chaos of the Russian Civil War!
The fenders, incidentally, are the only really fiddly bit of these kits. They’re lasercut card (greyboard) that you have to bend gently and then glue to an MDF inside piece to get them to hold the needed curve. Neither fender on the Pierce Arrow is quite right, although both are acceptable given the battering such fenders would take on the real vehicles! The instructions from Warbases say to bend the fenders over a pen or the handle of an Xacto, but doing this caused the greyboard to crease for me. I had better luck gently pressing the pieces against the pad of my thumb with another finger and gently flexing the card into a sort of curve that way.
That quibble aside, these are great kits and I’m sure I’ll get more eventually. They’re very sturdy once assembled, well designed for easy assembly, and it’s nice to have such an inexpensive source of vehicles for Early 20th C gaming!
I headed over to Vancouver for my annual pilgrimage to Trumpeter Salute again at the very end of March. My girlfriend and I decided to tie it in with a road trip the week before to visit my folks a few hours inland from Vancouver and her folks up on the Sunshine Coast just north of Vancouver, which had the affect of making sure I was tired even before Trumpeter weekend started!
Regardless, it was a great show. I’ve been going for eight or nine years now, with one or two gaps, and there’s a number of folks I only ever see at the Trumpeter Salute show every year that I look forward to reconnecting with and seeing what spectacular gaming projects they’ve been up to.
This year we started off on Friday night with some 15mm WW2 Eastern Front action, leading a German mix company to a really marginal victory against the Russians. No photos of that, unfortunately, which is especially sad as Troy runs a spectacular looking game and each vehicle and infantry stand is a tiny work of art!
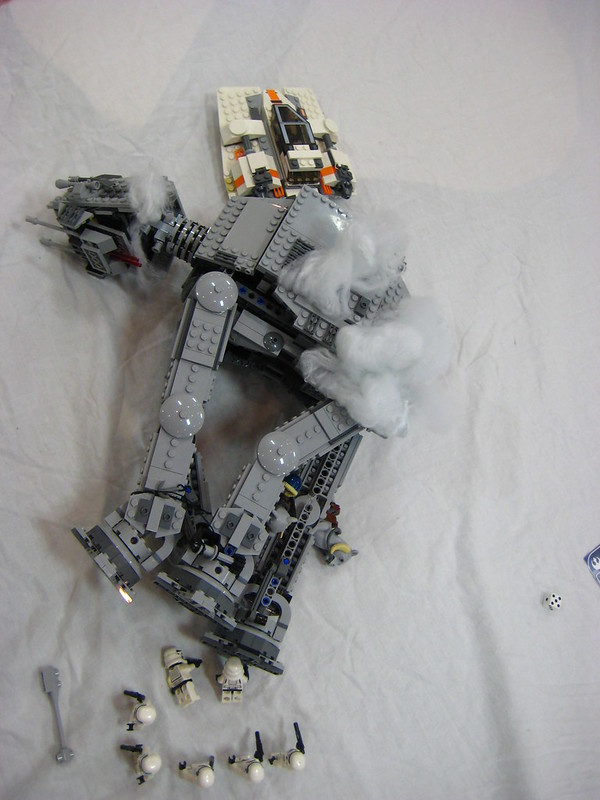
Saturday morning we started off by borrowing Martin’s son’s Star Wars Lego collection to run a good sized Star Wars Lego Battle of Hoth, complete with AT-AT, snowspeeder, and a fierce Bantha! Luke in his snowspeeder managed to bring down the AT-AT, but when he went back out to rescue the pinned-down Wookie squad, Darth Vader managed to capture him (and Han!) in the middle of the snowfields.
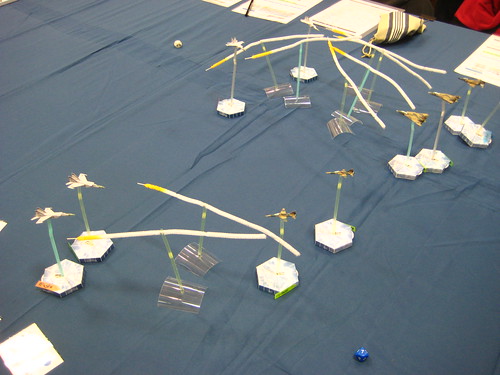
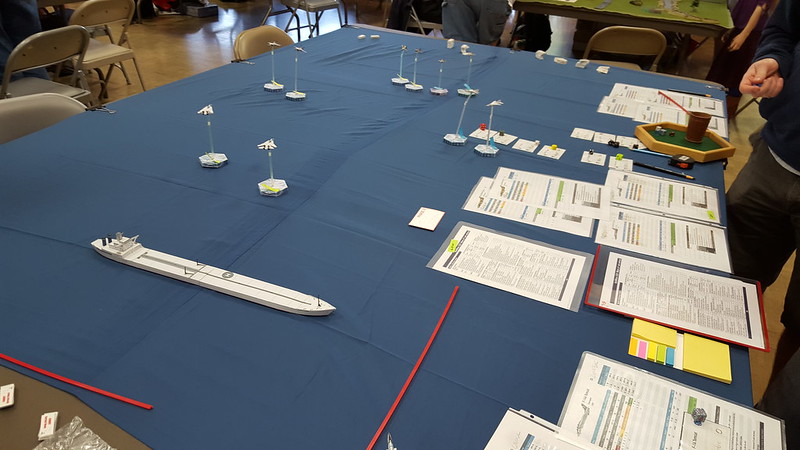
Saturday afternoon we ran a 1980s air war scenario based on the Iran-Iraq War. The Iranians had all American fighters, including the F-14 Tomcats the Shah had purchased before the Revolution, and the Iraqi Air Force had then-new MIG-25 Foxbat fighters, straight from the USSR. Unfortunately for the Iraqis, Iranian luck and high tech American missles meant it rained Foxbats and parachutes into the Persian Gulf all afternoon!
Meanwhile, this spectacular Vimy Ridge game was being put on by the White Rock Gamers.
Sunday I ran a Pulp Alley game with six players. There were three groups of fishmen, a Miskatonic University research team, a team of human cultists, and a mad scientist all competing to find or recover a lost Treasure of Dagon! Lots of action and pulp hiliarity ensued, ending in the cult leader blasting multiple other characters with terrible occult power and preventing the recovery of the Treasure.
The Lead Adventure Forum runs a great painting contest about once a year called the Lead Painter’s League. I’ve participated before but not for a number of years now, but when LPL11 was announced a while ago I decided to get back at it and enter.
LPL was originally conceived as a way to help participants clear their stockpiles and lead mountains of figures, so the requirements for small groups of figures – the minimum entry has to be five figures – and relatively loose theme allow you to paint whatever you feel like. There’s bonus rounds with slightly more specific themes on the first, fifth, and tenth round but they’re intentionally loose as well. This year’s bonus themes are Tribes for Round One, Ship’s Crew for Round Five, and Big Brother/Little Brother for Round 10.
I was able to get ten rounds worth of figures together, including satisfying all three bonus rounds, just from my stockpile of figures, in classic LPL style!
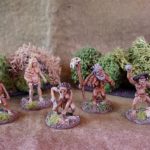
For Round One, Tribes, I used a family group of cavemen (cavepersons?) that Bob Murch of Pulp Figures sculpted. There’s a grizzled old shaman, an older woman, a young mother with baby on her hip, a teenage boy, and a younger child. I think they’re some of Bob’s older sculpts and it looks like he’s taken them out of circulation at the moment – which means we might see resculpts sometime soon!
Old Sabertooth’s Clan, my Round One entry for LPL11. Click for larger.
Bit quiet around here but I’ve been busy painting up a storm for my Trumpeter Salute 2017 game!
“The Faithful of Dagon” will feature several competing sects of fishmen, some human cultists, and various other factions all competing to recover things Man Was Not Meant To Know, all powered by the Pulp Alley rules. Look for it Sunday morning at Trumpeter Salute.
I’ll get the WordPresss app reinstalled and running on my smartphone before Trumpeter and try to show off some photos and such from the show, but I’m on a holiday road trip right until Friday when I rock up to Trumpeter, so posting is going to be light until then.
See you at Trumpeter, hopefully, and hope March was a productive wargaming month for you like it was for me.
Several years ago now I did a whole banker’s box full of jungle terrain, but it was all fairly low-lying stuff, thickets and bushes and that sort of thing.
I’ve always intended to add some bigger trees to the set, inspired by the nice trees DM Scotty does in this video…
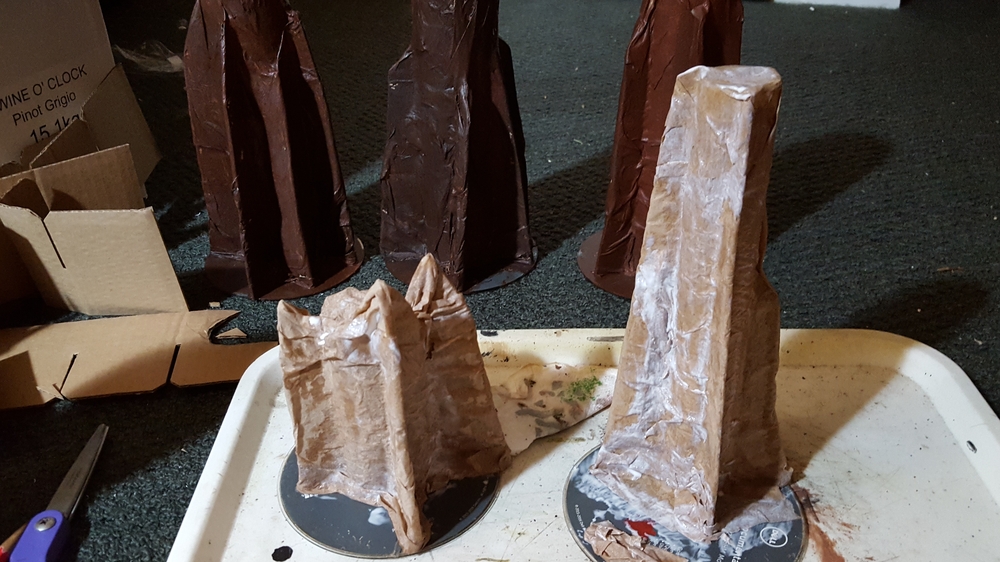
Our paper towel dispensers at work are the large commercial models, and staff are expected to refill them on their own when they’re emptied, so I’ve brought home a few of the heavy cardboard tubes from the centres of the big rolls of brown paper towelling, as well as a couple of lighter tubes from home, and a few shorter toilet paper tubes.
This weekend I sat down to crank out a few trees! I started with the hot glue gun, the tubes, some CD-ROMs salvaged from the recycling bin, and some scrap cardboard to produce four trees and one big stump.
Fourth tree and stump all covered in paper towel. Three other trees drying in the background. Click for larger.
The three big trees and the stump basically fill the entire CD base edge to edge, with space between the buttress roots for figures to duck for cover. The smaller tree (from a tube that originally held glow-ropes) covers about half the CD it’s on.
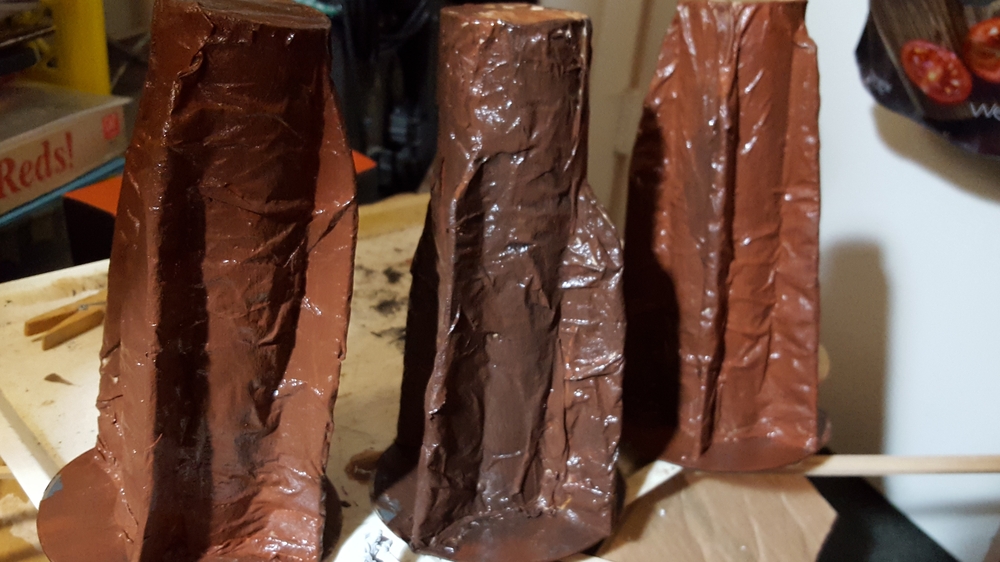
I used lots of white glue to attach a layer of brown paper towel to the trunks, let that dry, then slapped on a base coat of reddish-brown and black mixed. After that dried I gave the trunks a heavy drybrush of tan, then blotches of two different shades of green here and there to suggest moss or jungle fungus.
Basecoated trees drying, before drybrushing and foliage. Click for larger.
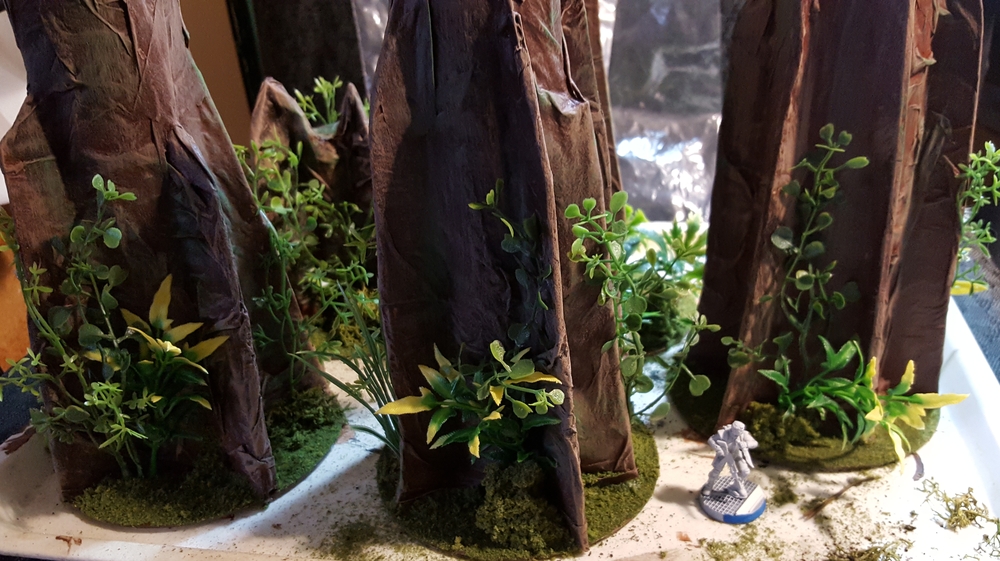
After that had mostly dried I broke out my box of random plastic plants, gathered from craft stores over the last couple of years. Vines, random bushes, and some low-lying lichen filled some of the gaps around the trunks and provided some colour, then I put a generous layer of flock around the bases and declared these things done!
All flocked and foliaged. The white primered figure in the lower-right is an Infinity Ghulam infantry on a 25mm base. Click for larger.
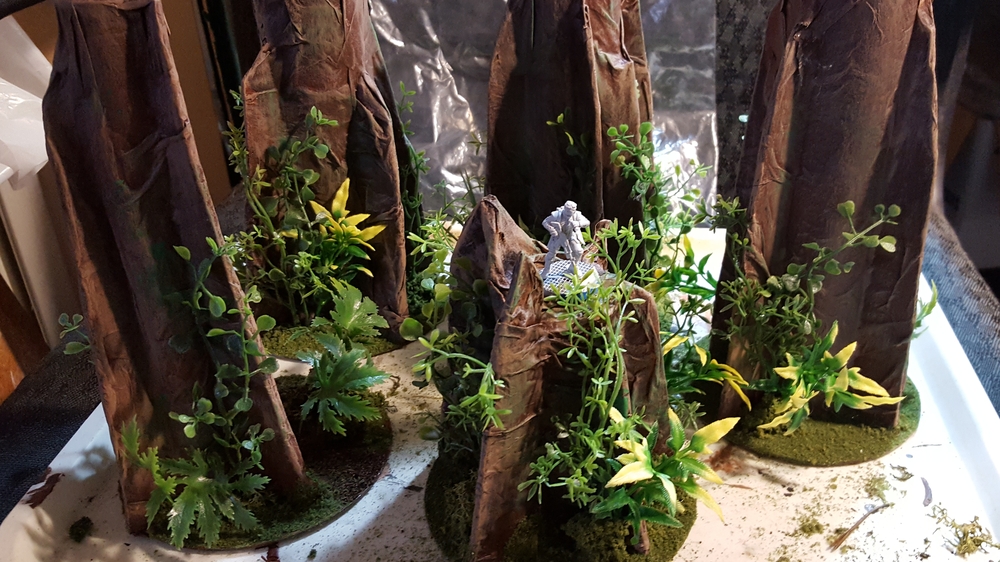
Stump speech! Using the toilet paper roll for a giant stump gives the tabletop some vertical tactical possibilities, which always makes games more interesting. Click for larger.
It’s nice to have a quick down-and-done project, sometimes, and I’m really pleased with how these all came together. Looking forward to getting them onto a table for a pulp or Infinity game!
Saturday morning we ran a Libya vs US Navy air war scenario, based on an amped-up version of the real Gulf of Libya incidents in the mid-1980s. The Libyan MiGs humiliated the US Navy Tomcats, shooting down two and barely losing any aircraft, while blowing up the oil tanker they had come to strike!
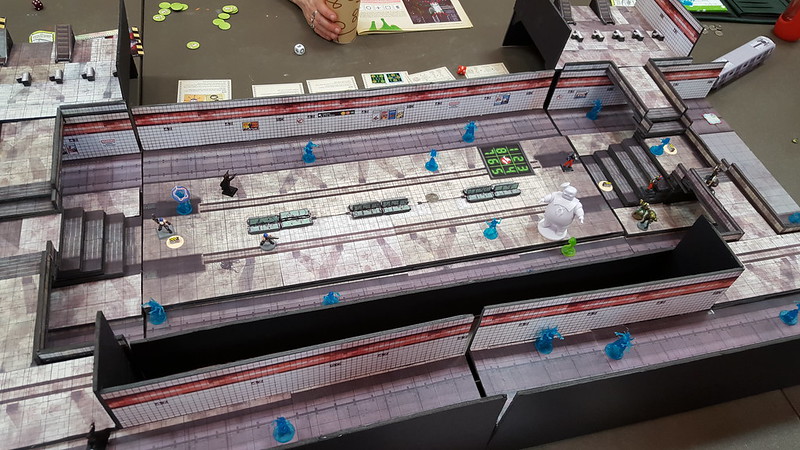
I didn’t play in this one, but it certainly caught my eye. Rival teams of Ghostbusters (they’ve become a franchise, apparently) try to clear a haunted subway station. This was one of Lisa’s games, she always runs awesome creative games that are very welcoming to gamers of all ages!
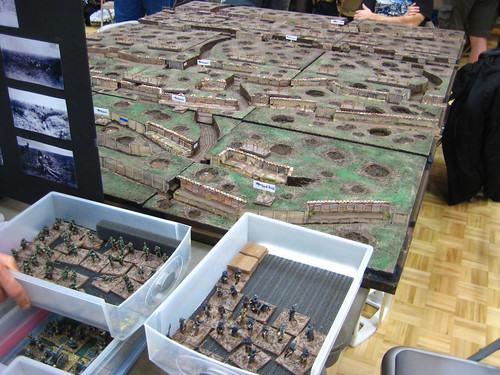
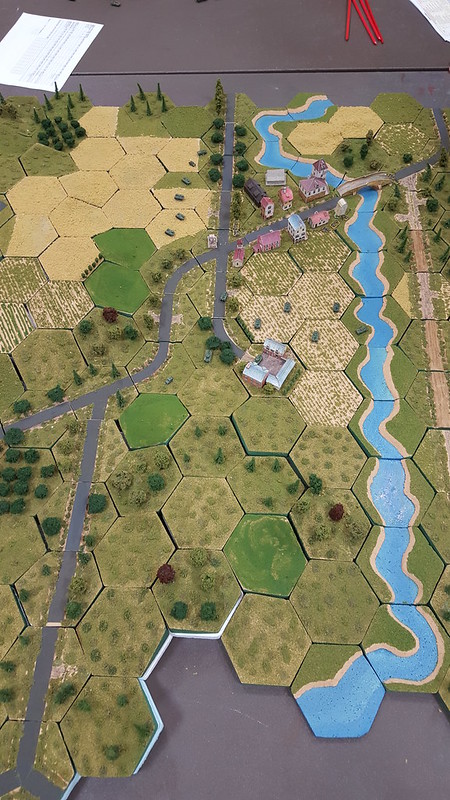
Another 1980s based scenario for Saturday evening, this time using Martin’s awesome 6mm hex terrain to do a complex West German vs Soviet scenario. Soviet air-landing battalion vs West German home guard, then a counterattack by West German armour that runs into a spearhead group of Soviet armour coming to relieve their paratroopers! Great game and a decisive Soviet victory.
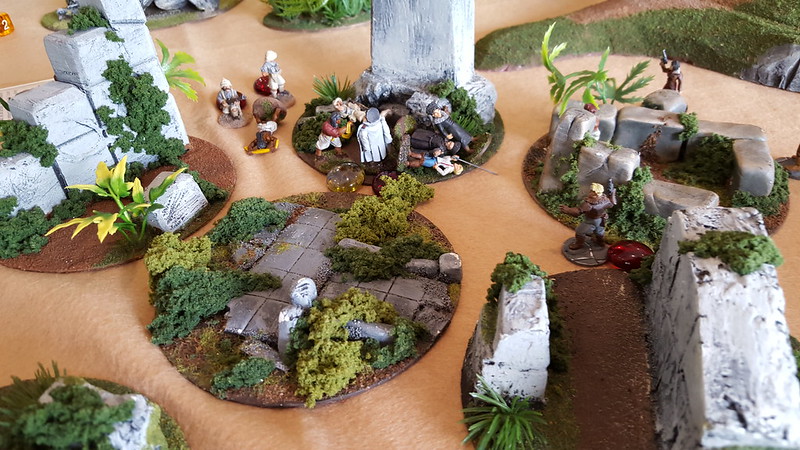
Sunday I ran a big Pulp Alley game for six players. It was somewhere in India after the Great War, and we had rival teams of Thugee cultists (the cult wasn’t as extinct as everyone thought…), various interfering foreigners including White Russians and Red Air Pirates, and two rival British Army Lieutenants each out to prove themselves the best! It all ended in a giant brawl in the collapsing cursed temple of Kali, with the Thugee generally being seen as the winners!
As always, a great time in Vancouver. It was good to see most of the regulars there and catch up with them, and see all the great games being put on. Until next year!