It’s been a bit of an odd year for gaming, I’ve been having fairly regular games but not painting or building things on a consistent basis.
Obviously I’ve been very lax about updating the old blog but I have gotten a few bits and pieces done since the last update here at the end of February!
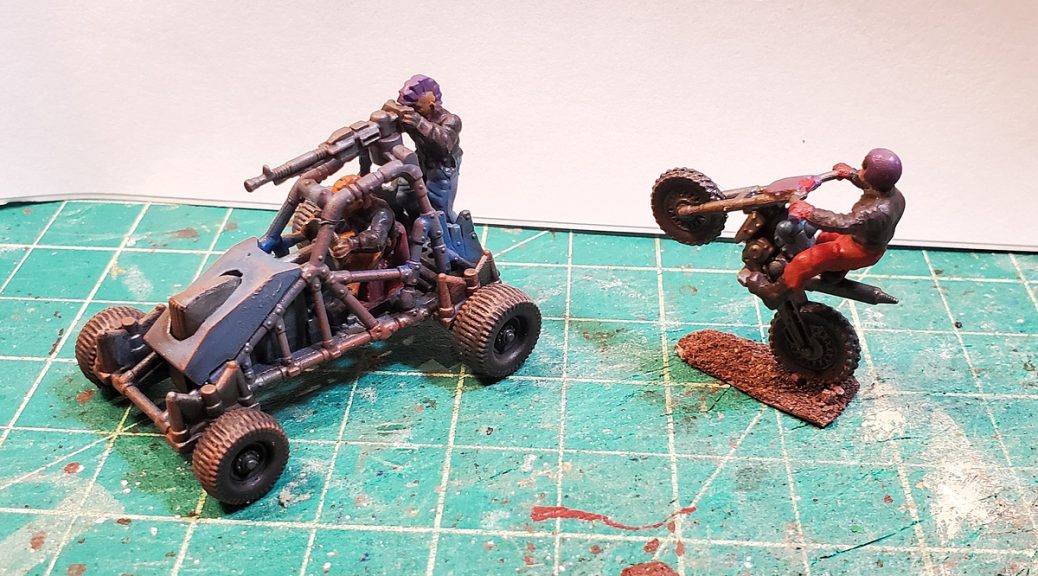
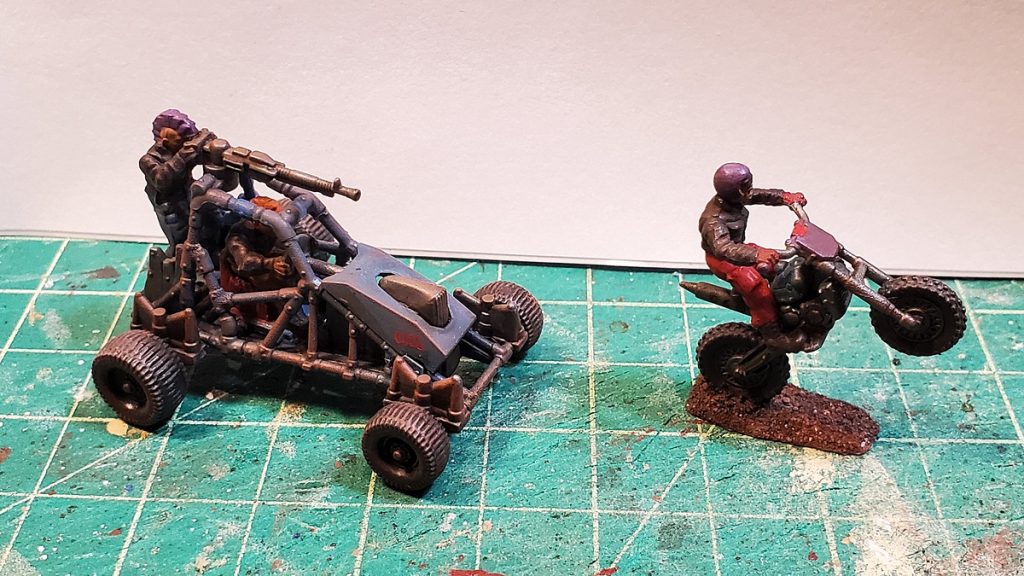
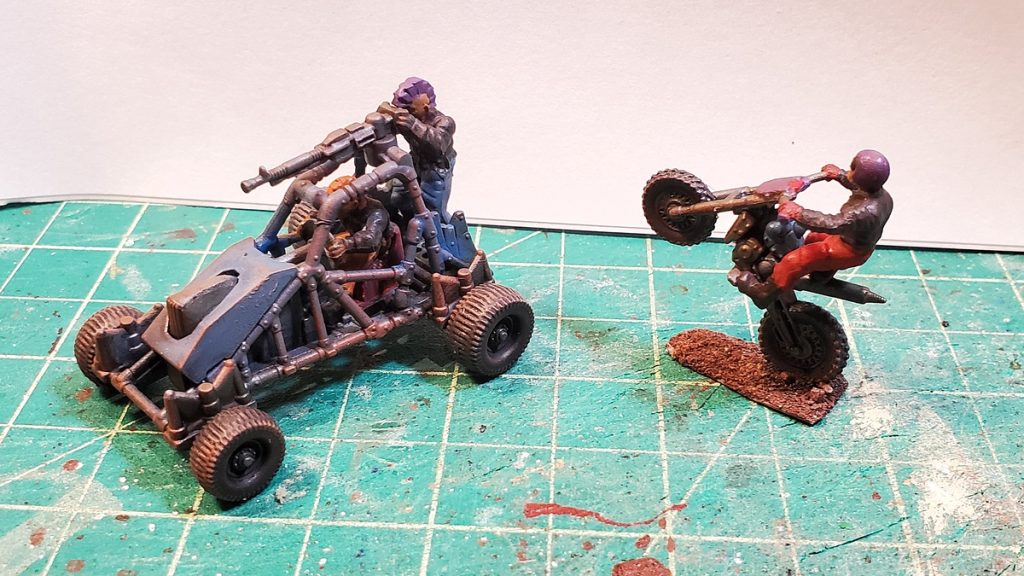
Gaslands buggy and dirtbike, from the plastic Implements of Carnage II set.
Sometime earlier this year I assembled and painted up this pair of little Gaslands vehicles, both from the North Star Implements of Carnage II plastic sprues. Both very cool Hot Wheels-scaled (20mm, nominally) little vehicles of a type that (unlike normal cars) you can’t easily get commercially.
Buggy and bike heading the other way.
By way of a mini review, I’d say buy Implements of Carnage II if you’ve already gotten into Gaslands, want the specific two vehicles on it, and probably already have the Implements of Carnage I set, which has lots of regular weapons, armour plates, and other bits that are more useful for converting Hot Wheels/Matchbox cars than what comes on the 2nd set!
There’s no instructions included with the sprues. The dirtbike is three pieces and goes together easily; the buggy is a bit more complicated but some test fitting should show you how it assembles. There’s two pieces of armour plate designed to go on either side that I’ve left off mine – they cover the sides of the roll cage either side of the driver.
More soon as I sort photos and try to get back into the swing of active gaming and blog posting!
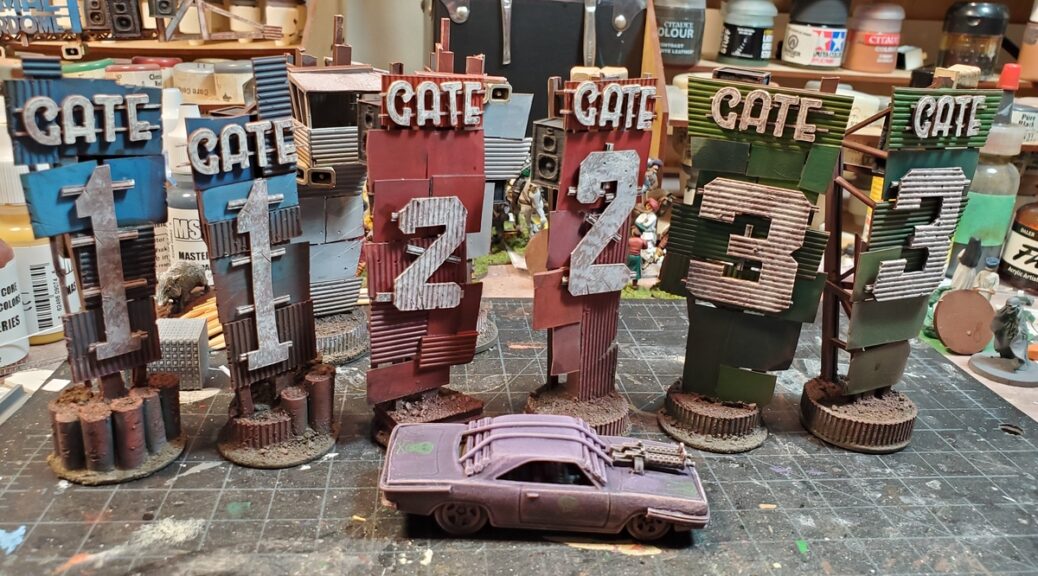
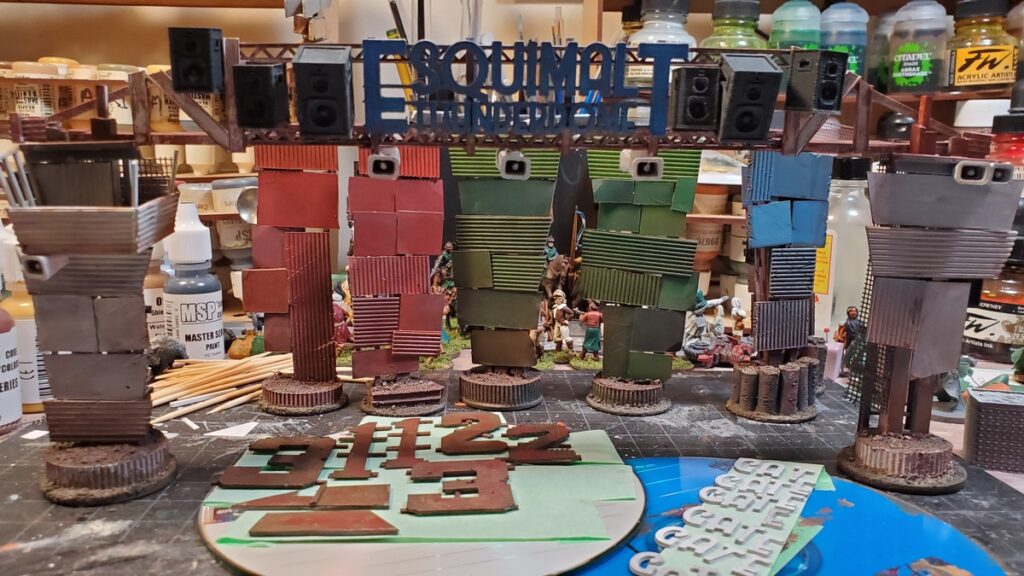
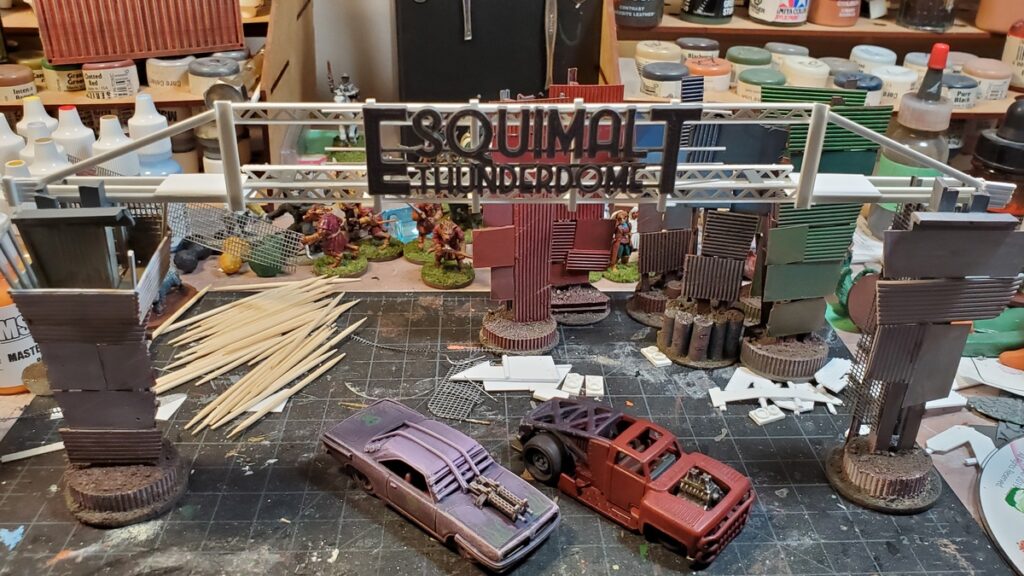
Up next was the “GATE” lettering and giant numbers for the three numbered gates.
Mid-project roundup. Rust basecoat on the big numbers, front centre; GATE lettering primed on the right, and the gate towers all lined up behind and overhead. Click for larger.
I cut the giant numbers from sheet styrene and mounted them on strips of scrap styrene. The GATE lettering was 3d printed as separate letters and then mounted on very thin square section styrene strip. To make that easy I taped long pieces of the styrene strip down to my cutting mat, glued the letters down, then once the glue had cured cut each word out.
Everything got spray primed grey and then basecoated the same blotchy rust I’d used on the overhead gantry and elsewhere. I stippled and drybrushed everything with a couple of different shades of off-white (Reaper Linen White and Leather White, primarily) before a final drybrush of Reaper Pure White.
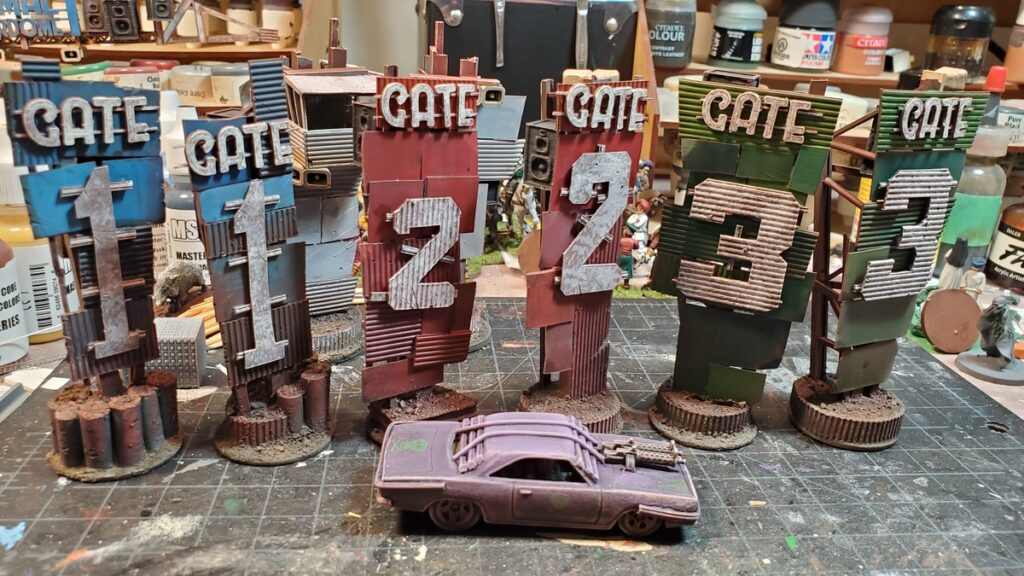
The GATE signs and numbers all mounted and final weathering begun. Click for larger.
After that it was back to the weathering, primarily drybrushing with a big soft makeup brush. I only just picked one of these up, a super cheap dollar store special, and it really is the bomb for drybrushing! I used a fairly random selection of browns, reds, tans, and off-whites for this, going back and forth over all the towers and the gantry as well.
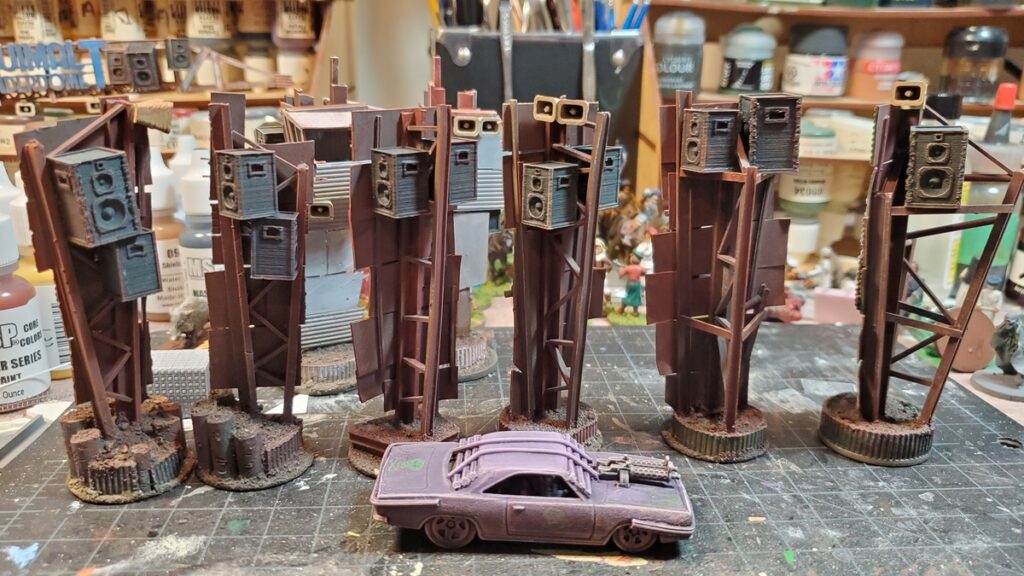
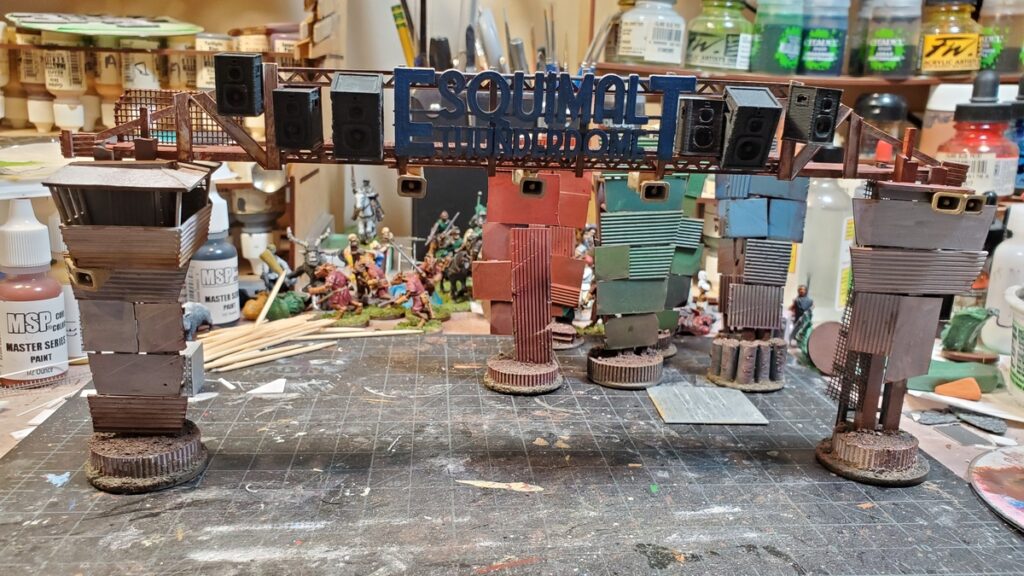
Back view of the six gate towers, with speaker cabinets and loudspeakers mounted. Click for larger.
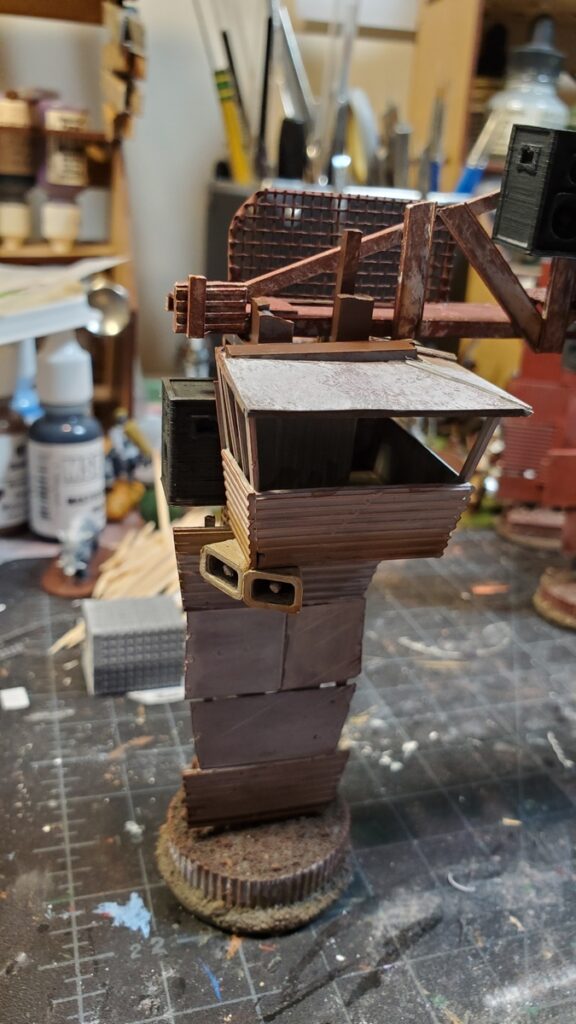
While adding the lettering I had finally primed, painted, and installed the roof on the announcer/race official cab on the lefthand start gate tower. I thought about installing mesh on the windows but decided to leave them open for now; I might go back in and add some additional protection for the folks who wave the chequered flags but the current form will do for now!
Roof installed on the announcer/official cab. It had to be cut to fit around the fairly random structure of the tower itself. Click for larger.
Final touches and some finished shots soon as this project finally wraps up and might actually hit the table sometime soon!
When we last saw our gates they were basecoated but stalled due to missing 3d printed parts. Those arrived, thanks to my brother’s 3d printer, and I was able to move on with the project.
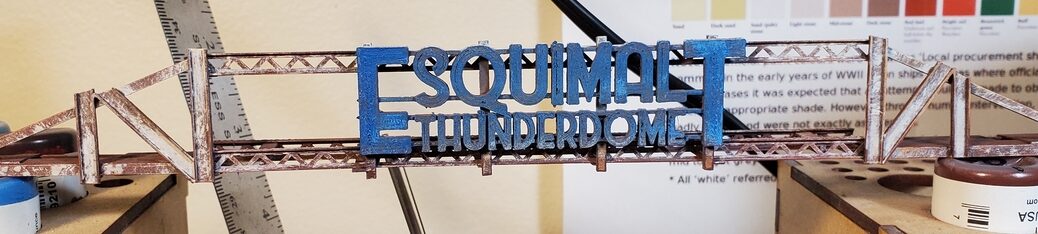
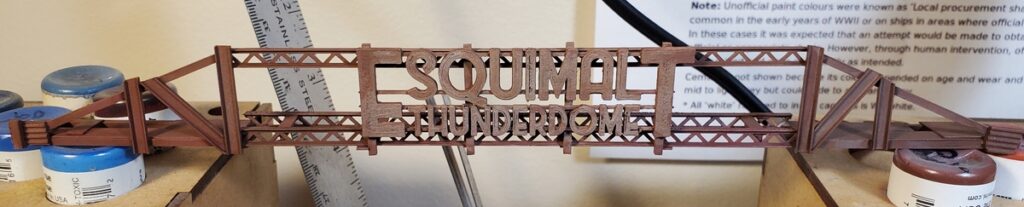
I didn’t want to start the overhead gantry on the Start/Finish gate until I had the 3d printed “Esquimalt Thunderdome” sign in hand, but once I had that the basic construction went together quickly.
The three openwork girders have been in my stash for decades and the packaging is long gone, but they’re from Plastruct – possibly these ones, which seem to be about the right size. You can find all the similar openwork web girders from Plastruct by searching their site for “web”.
The girders are only six inches long, so I knew I’d need to extend the gantry with other materials as the Gaslands rules call for gates the same width as a Long Straight movement template, which is roughly 7 inches long, and Corey’s Thunderdome racetrack dirt track is roughly 8 inches wide. Fully finished, this gantry is almost 10 inches long, and slots into the roof structure of the two vertical gate towers to hold everything together.
The start of the overhead gantry. I later pulled off the plastic mesh as it was getting in the way of construction and painting, and replaced it much later in the process. Click for larger.
The rest of the gantry was a random scatter of styrene shapes from the stash – there’s some flat C-channel, different T- and H-girder bits, and lots of square or rectangular cross section stuff. It had to both look structurally sound and actually have a certain amount of structural integrity, but the beauty of post-apoc engineering is that it still looks great if you bodge extra bits on to fix earlier problems!
in progress but before priming. You can see here how the gantry’s beams slot into the tops of the two gate towers. Click for larger.
After grey primer I covered the whole thing in a blotchy rust coat using a couple of different shades of browns, reds, and oranges.
Rust coated. Click for larger.
After the rust coat I did a blotchy coat of white, partly drybrushed and partly stippled into place. This came out far better than I’d hoped, and really looks like white paint that’s flaking off as the metal under it rusts and weathers.
Stippled and drybrushed white, and first coats of blue on the sign. Painting of the actual gantry is basically done at this point; the sign got a bunch more weathering and highlighting and touchups. Click for larger.
The speaker cabinets and loudspeaker horns were 3d printed from STLs on Thingiverse, both from a very nice collection of Gaslands parts. The speaker cabinets were printed in two different sizes, which added some visual interest.
Speaker cabinets and loudspeaker horns in place and weathering started. Click for larger.
The speakers got painted a blotchy off-black (Reaper Pure Black with a dot of one of their greys mixed in) and the loudspeakers got one of the many tan off-whites in my collection, I can’t remember which one.
The clutter of speakers and loudspeakers really makes this piece pop, it’s exactly the visual clutter I’d pictured in my head when first thinking these designs up!
I’d like to add some light fixtures, but it seems nobody makes 20mm 3d printable floodlight fixtures, at least not that I can find, and I’d want enough of them that scratchbuilding isn’t really an option unless I can come up with a really simple design…
The back of the gate, with mesh back on the walkway and all the 3d printed stuff getting weathered.
Next up, painting and installing the big “GATE” signs and numbers on the rest of the gates, and loads more weathering. So much weathering…
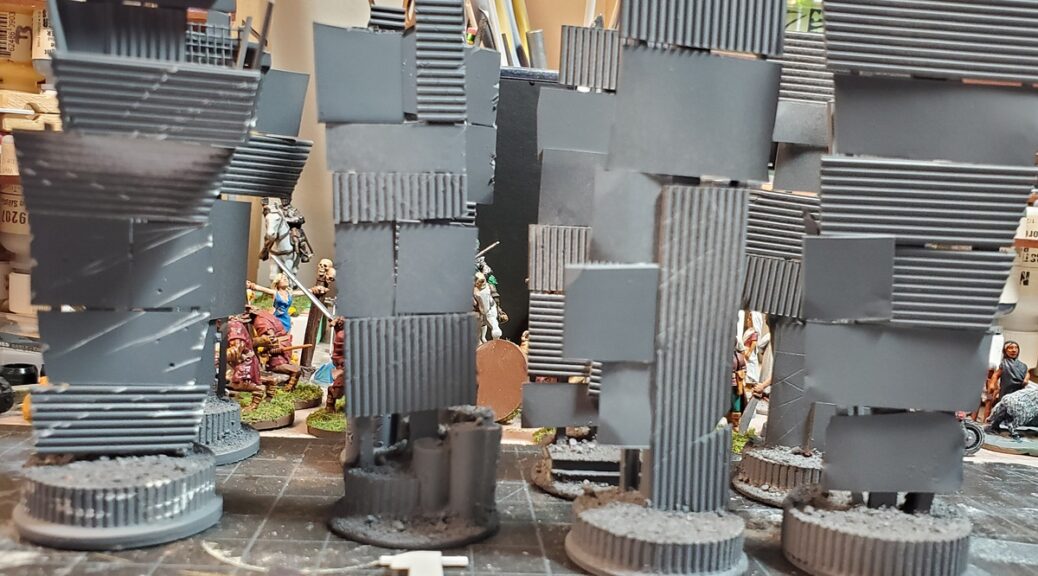
Got the base gate towers primed, and cut out the huge numbers that will go on each gate.
Primed gate towers. I forgot to add damage and scuffing to most of them before priming, hence the white streaks on the leftmost tower. Most of that was done with a small file, with bullet holes added with a very small drillbit in a pin vise. Click for larger, as always.
The plan is to label each pair of gates with large numbers cut from scrap styrene sheet, and to have 3d printed lettering for “GATE” above that, because I do not want to create styrene sheet lettering six or eight times if an alternative creation method can be found!
I’m going to scar up and then do the base colours on all the towers before the lettering goes on, so that I don’t have to try to paint under the lettering. But I cut the huge numbers last night and added the scrap bars that lift them off the surface of each tower.
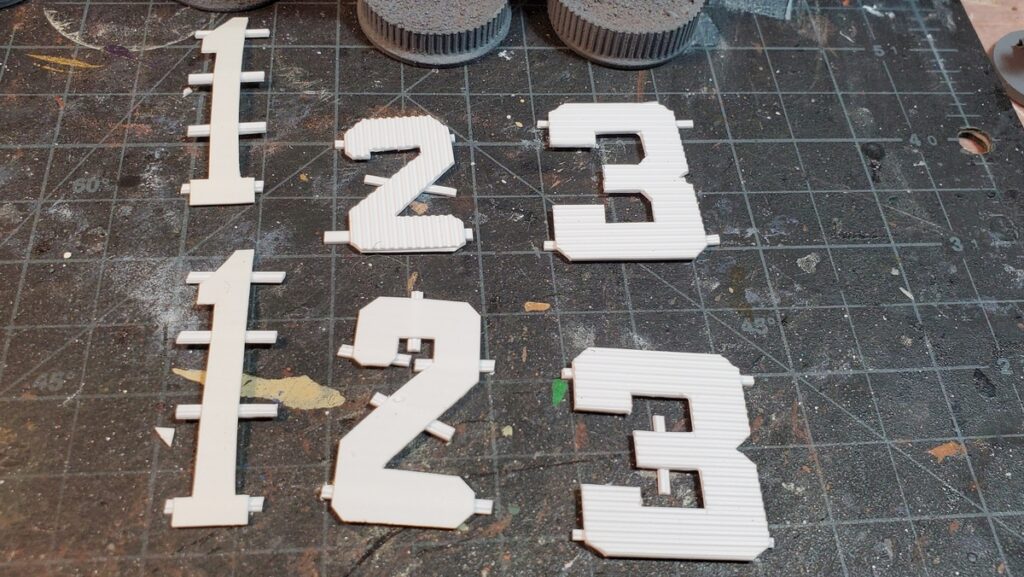
Numerals for Gates 1, 2, and 3. The squares on the cutting mat are half inch; the 1s are just under 2″ tall and the 2s and 3s are between an inch and a quarter and an inch and a half tall. Click for larger.
Base colours tonight and priming the lettering, then I kind of have to pause until Corey gets his 3d printer fully functional again before I can add the GATE signs and start work on the overhead gantry for the Start/Finish line.
The Death Race scenario for Gaslands calls for at least three or four gates, for start/finish line (which might not be the same gate) and a couple along the course. We’ve been using various random scenery bits, which works fine, but proper gates have been a obvious piece of scenery I wanted to make.
The scrap metal look worked well for the jumps I made last year, so it was the asthetic I followed for the gates as well. I decided to do freestanding gate pillars, essentially, with no permanent overhead horizontal pieces but with the vertical construction to allow modular overhead gantries to slot in if desired.
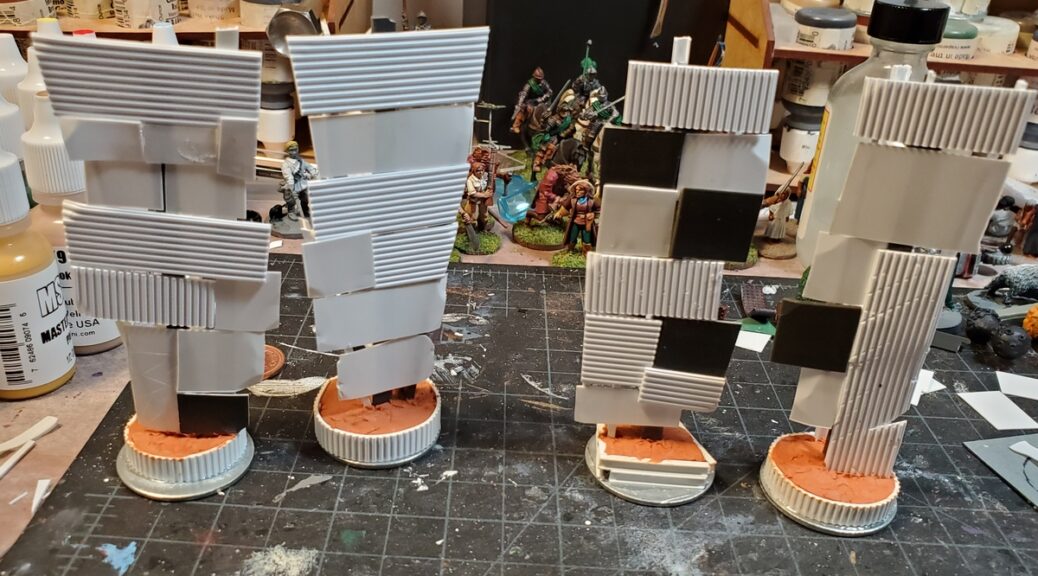
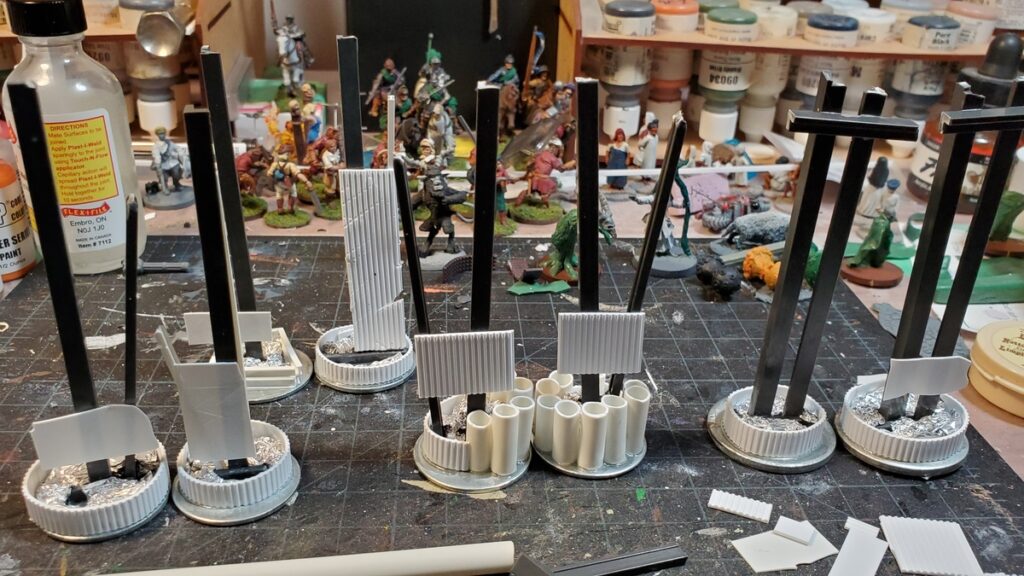
To keep the tall gate posts ballasted I started with solid 1 1/4″ washers from the stash, then sank the main vertical beams for each into a footing of styrene plastic filled with Milliput epoxy putty, which dries rock hard. Because it’s a fast technique and super cheap, I filled the lower levels of the foundation footings with crumpled tinfoil tacked in place with superglue, then put a layer of Milliput over that.
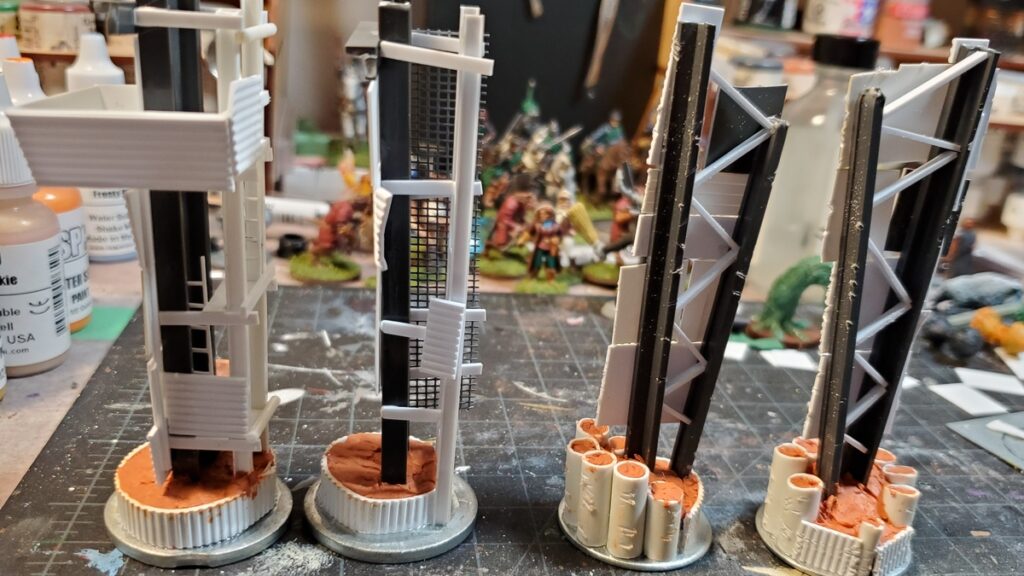
Early in construction, tinfoil filler visible in the footings. The three course gates are on the left, and rightmost is the start line, which is more substantial. Click for larger.
I used a couple of different methods to construct the footings; roughly circular lengths of corrugated sheet styrene were fast and easy but I really like how the vertically-embedded heavy pipe (styrene tube) came out.
This entire project was done from the Ancient Stash of Doom; I’m pretty sure some of these random girder pieces date back to the family model railroad we had in the early 1990s when I was in junior high. The dark grey plastic is all Plastruct; all the white plastic is Evergreen Plastics. There’s three or four sizes and styles of girder, a couple sizes of tube, and sheet styrene in at least four thicknesses and styles.
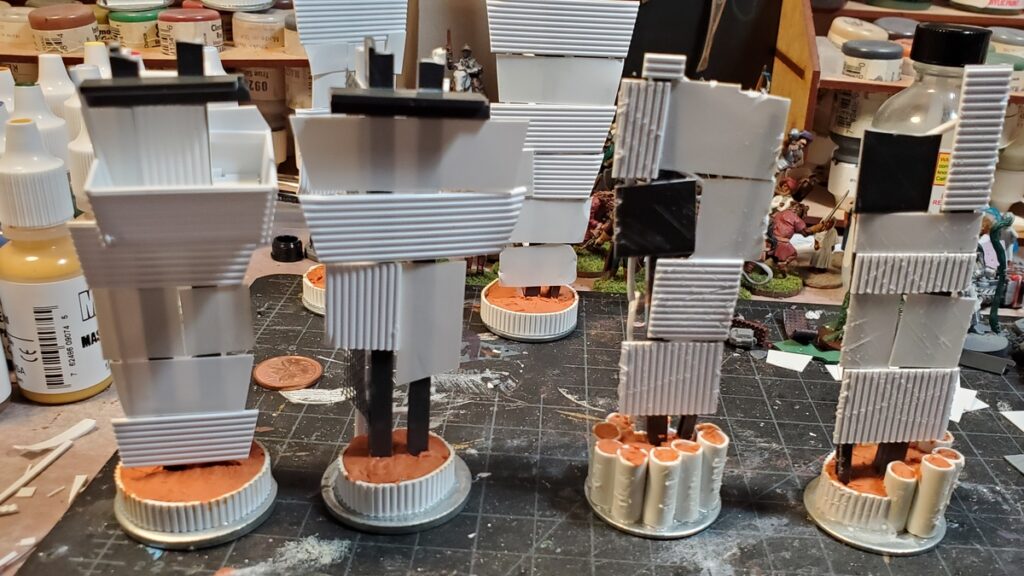
Beyond making sure all the main vertical beams were roughly the same length (about 4 inches) I did very little planning ahead. Each pair of gate pieces is in roughly the same style… more or less. After making sure the main vertical beams were solidly anchored to the washers, I filled in the rest of the structure from whatever sheet and beam bits were handy and looked the part.
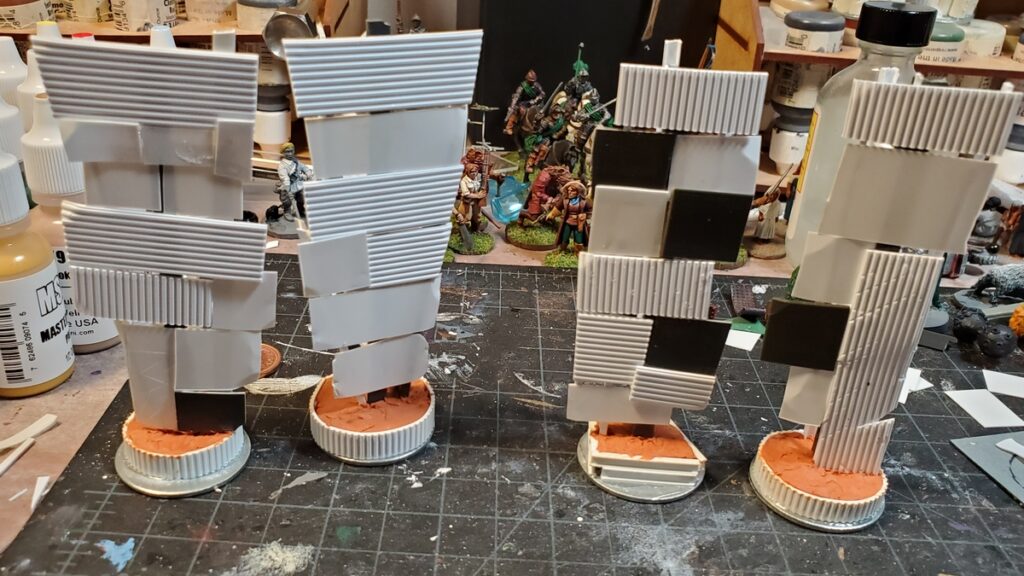
Left, the Start Gates, with an elevated box for race officials, announcers, media, etc. I’ve decided that the “pipe” gates are Gate One, for no particular reason. Click for larger.Gates Two and Three, basically finished and awaiting primer. Click for larger.The backs of Gates Two and Three. The scrap-built girder structures are actually fairly solid now! Click for larger.The backs/sides of the Start Line Gate and Gate One. Gate One has by far the simplest struture, but I really like how it turned out and if we need more gates will definitely be copying the basic design. Click for larger.
Gates One, Two, and Three are basically done, structurally, although I might yet put more details (floodlights, maybe loudspeakers) on them, and the plan for all three is to get Corey to 3d print lettering for “GATE” and then add the gate number in sheet styrene like they were cut out of sheet metal.
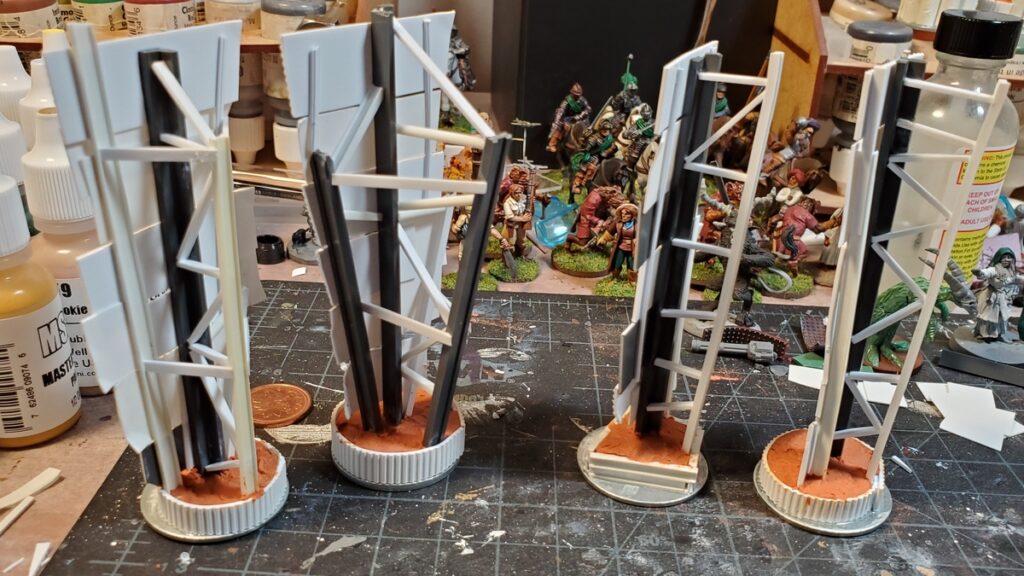
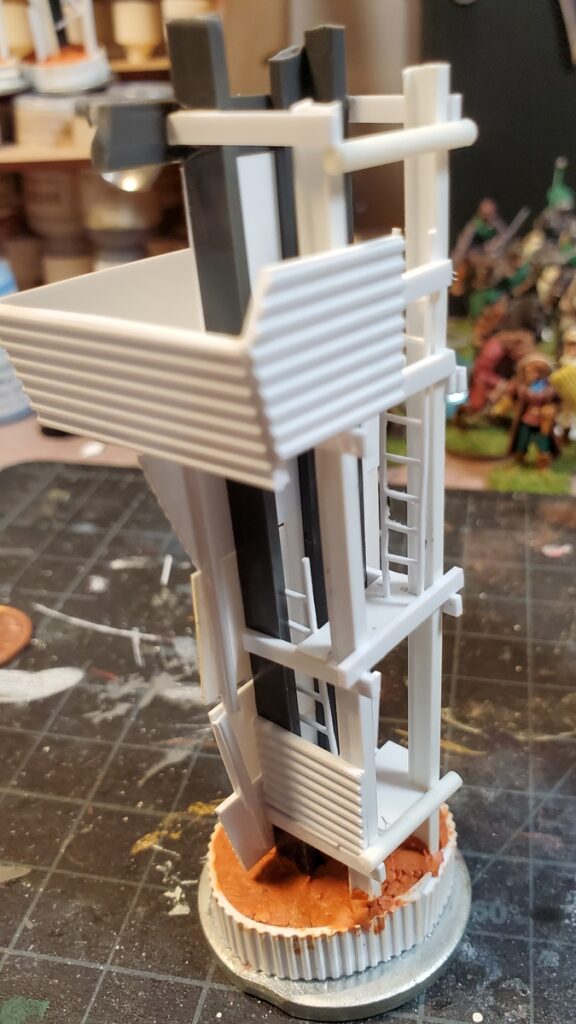
The Start Line Gate is still undergoing detailing. There’s ladders to get the crew up into the announcer’s cab, and I’ll be covering the sides and back with some solid metal sheet and a bunch of mesh – you can see the first piece of that on the offside Start Gate pillar, second from left above. The ladders are scratchbuilt from very thin strips of styrene; I’d have used HO scale plastic ladders but my awesome local hobby shop was out of stock.
The Start Gate is also going to get a fairly substantial horizontal gantry spanning the course between the two pillars. It’ll have floodlights, speakers, and a 3d printed “Esquimalt Thunderdome” sign on it, or will when Corey coaxes his 3d printer back to life. I’ve got some very cool openwork styrene girders to form the main central part of that gantry.
The main vertical part of the Start Line Gate, with partially constructed announcer’s cab. This photo was mostly taken to show off the scratchbuilt ladders, which came out really well. Click for larger.
More on these gates soon, and in the meantime stay safe, everyone.
No conventions, no in-person gaming at all for a good part of the year thanks to our local COVID precautions, and yet things still got painted, finished, and even played with.
Before COVID (Remember That?)
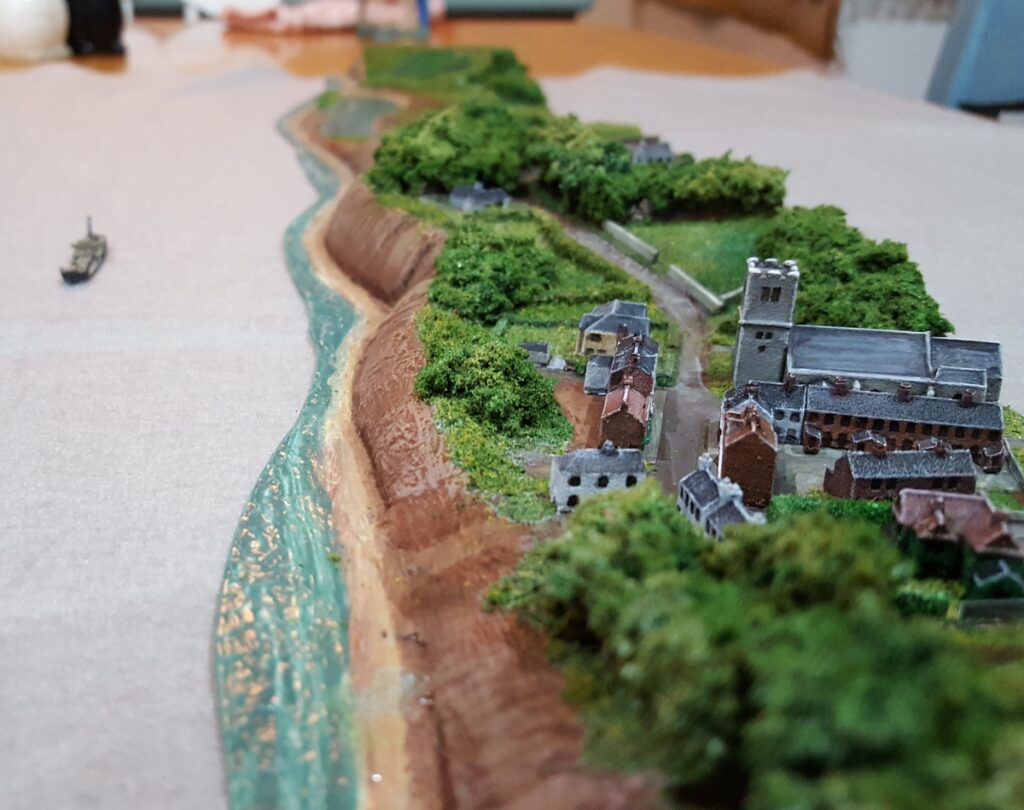
Low over the coastline, approaching the village. Click for larger.
We started the year damp and cold off the 1/1200 coasts of England with a lot of naval gaming and scenery for that, then we were briefly visited by a very strange bartender indeed and got a few games of tiny ships done in-person.
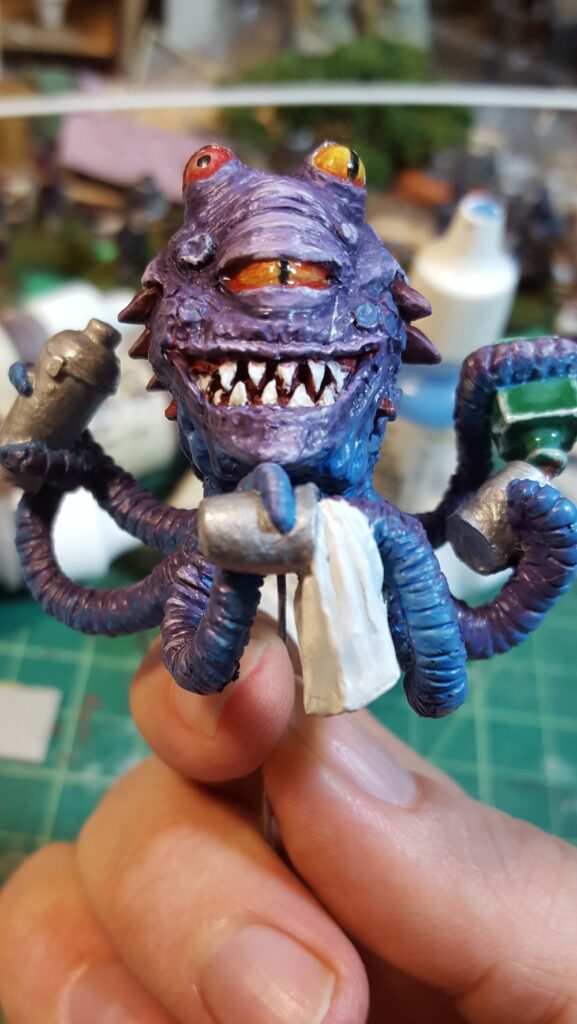
Narthoks all finished except for basing. Go on, tell the bartender your troubles! Click for larger.
The Weird Begins…
March was when it all went weird. The high point of my own gaming year, Trumpeter Salute over in Vancouver, was cancelled on less than two weeks notice, work-from-home started abruptly, and all sorts of other things went very, very sideways. I did spend some of the money I’d have ordinarily have spent on other things on orders from Bad Squiddo and Forge of Ice, two tiny one-person companies I’ve been meaning to order from for many years now, so that part was nice, but the fact that March/April/May 2020 have fewer blog entries here, combined, than I made in January indicates how off-kilter everything was!
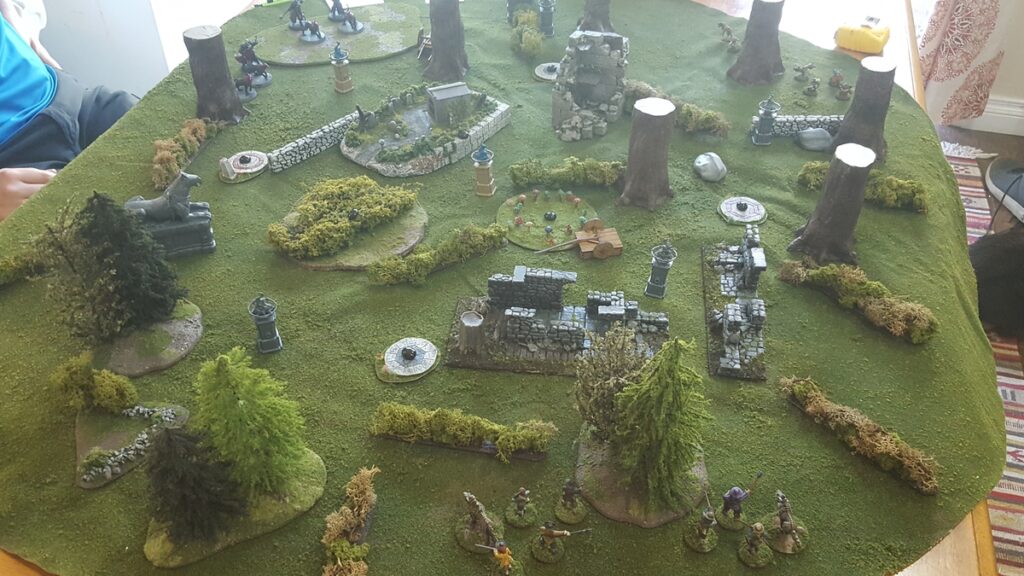
The end of May did see the modification of our local COVID restrictions so that we could have “pods” of up to six or so people, so my brother and a friend resumed gaming most Sundays, starting up a Frostgrave campaign that eventually morphed into a fantasy-flavoured Pulp Alley campaign.
Start of the game. My chaps centre foreground, Sean’s ogre ladies top left, Corey’s mousling bravos top right. Click for larger.
COVID Bubble Gaming
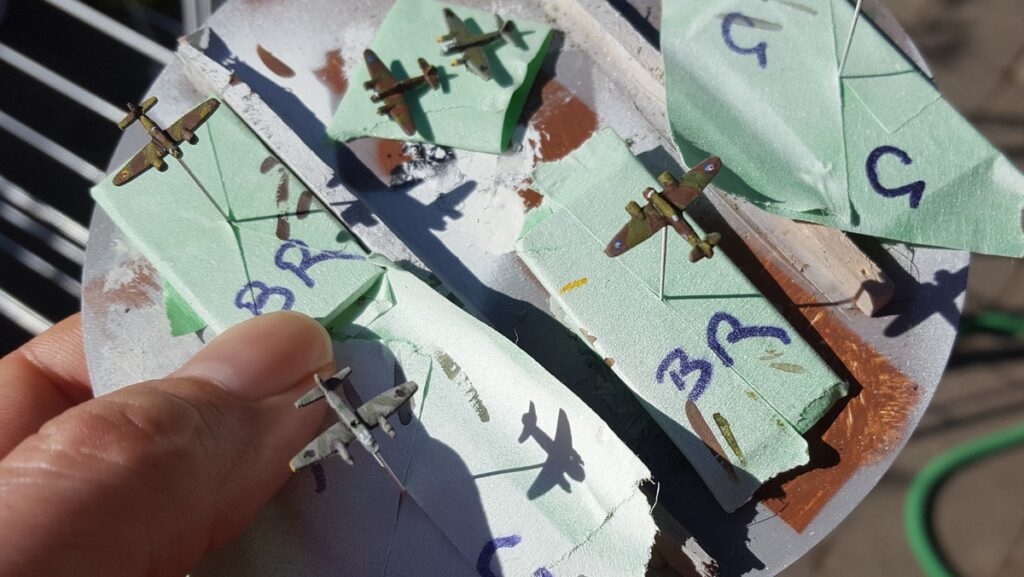
June and July saw something like a normal posting pace resume here as I cranked out a bunch of fun quick fantasy scenery to add to our Forestgrave tables including a standing stone and a big tree. There were also a few impossibly tiny planes as a diversion from fantasy!
Tiny, tiny 1/1200 RAF and Luftwaffe airplanes to trouble boats not quite as tiny.
August saw a return to naval stuff and small scale scenery, and September saw the arrival of Gaslands on the scene, which has provided much pandemic diversion since!
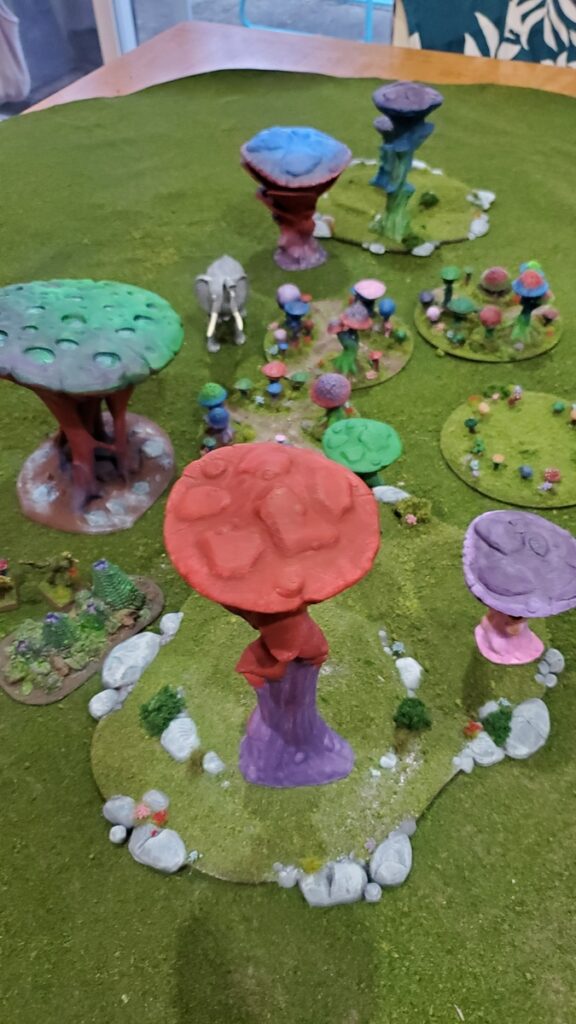
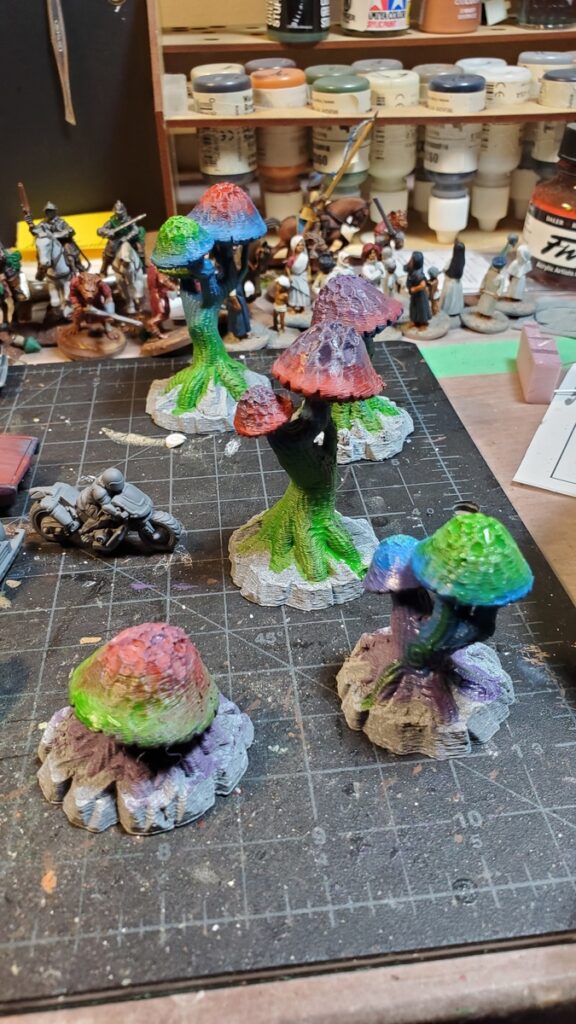
Mad mushroom jungles for properly fantastical fantasy gaming!
The Bubble Bursts…
The last quarter of 2020 saw tightening of our local COVID restrictions and the end of even limited in-person gaming, but before that we did get to see some mad mushroom jungle terrain and some other weird fantasy terrain before we finally turned to that most 2020 of communication solutions, online webcam conferencing, for a Gaslands gaming fix.
Gaslands by webcam, via OBS and Discord.
So, that was our 2020 here at the Warbard! A weird, stressful, very strange year but here’s hoping that sometime before the end of 2021 we’re back to in-person gaming, conventions, and something vaguely like pre-pandemic normality.
In the meantime, wear a mask, keep an eye on how soon you can get your COVID vaccine, try to get some hobby time in if your situation allows, and stay safe. Happy New Year, I guess!
It’s the pandemic. We can’t meet in person, we can’t meet in each other’s houses, the university and board game cafe we sometimes use locally to host games are all closed for that sort of thing. What’s a gamer to do to get their fix?
Zoom, zoom zoom… and I’m not talking the Gaslands cars, but of course webcams. Gaslands is especially good for webcam gaming, it turns out, as all movement is template based and there’s relatively few stats per car to track.
Corey has promised to write a more technical post here in the next while on the setup at his end as he hosts and runs these games, but the most recent game used Discord for the video feed and voice chat with some OBS voodoo at his end for the game table feed and Gaslands stats tucked into a Google Docs spreadsheet.
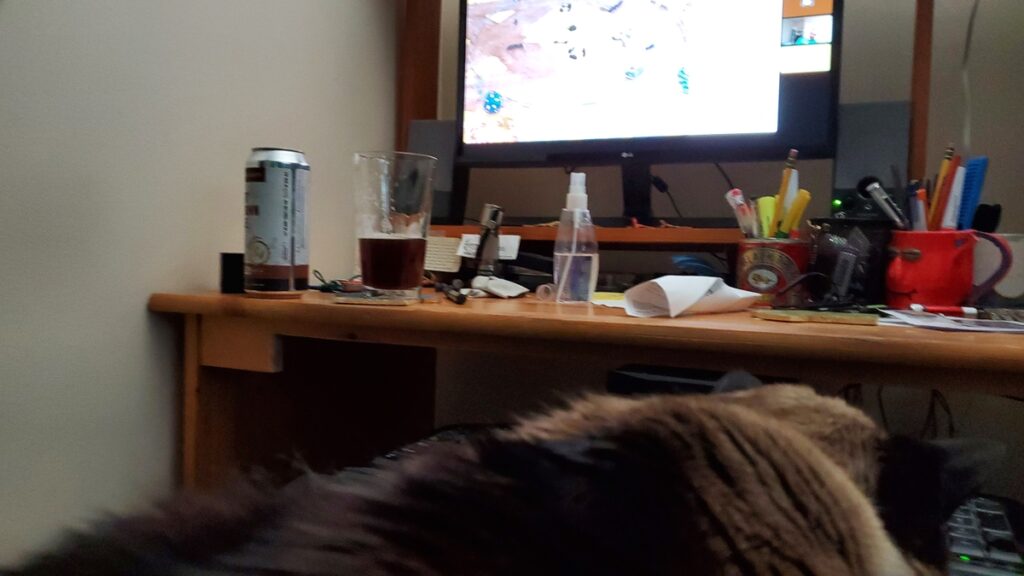
From my end, it looked something like this. Well, from the cat’s perspective, that is. (If Cat is your copilot, you shall fear no hairball!)
Cat, beer, computer, all the components of online tabletop gaming in late 2020!
We actually got three games done in about two hours in as we were only running one car each and the Death Match arena setup (last person standing) is pretty straightforward.
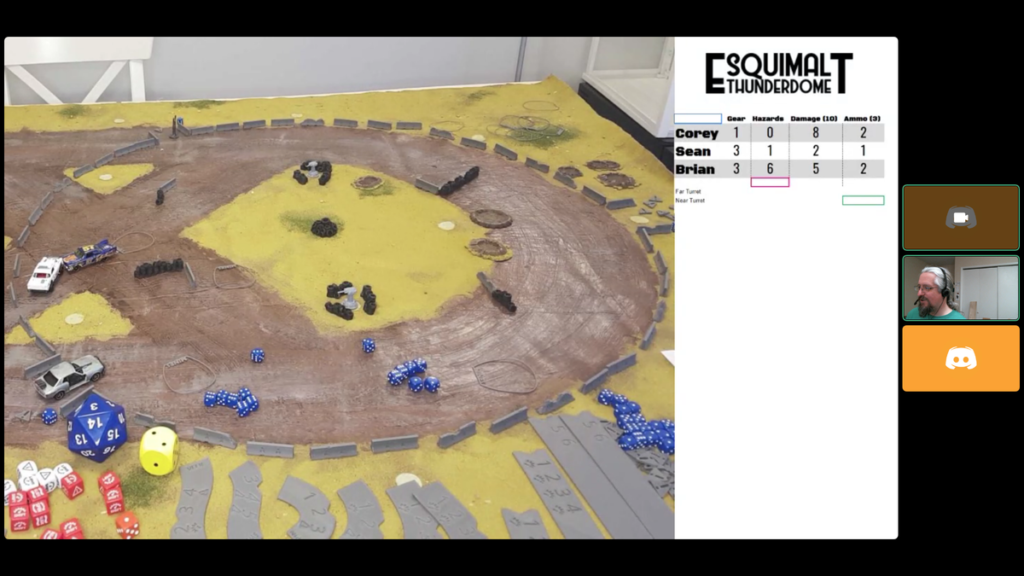
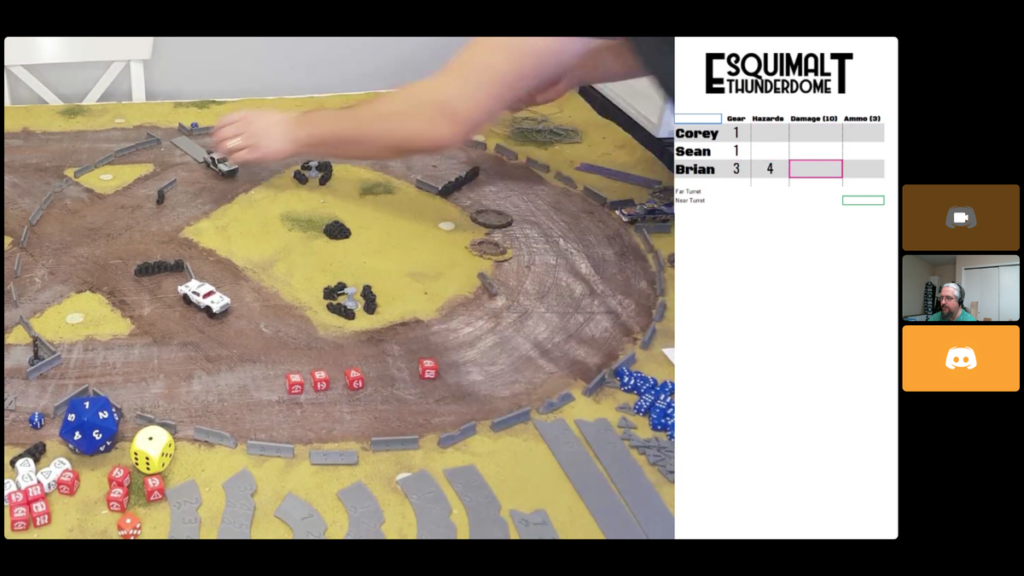
One of our Gaslands games in progress, screenshot showing the Discord view. Corey acting as Ivana White (a very hardworking lady!) and game host.
With Discord for voice chat and the OBS integrated video feed it worked out really well for Gaslands.
The ending of our third game featured the most spectacularly destructive head on collision we’ve seen yet. The screenshot below captures the dice rolls; the left hand pile of ten (!) damage was what I did to Sean, and he in turn did seven points to me, destroying both of us and leaving Corey the overall winner, best of three games!
Crazy high dice rolls for the collision over on the left there between the white car and the blue one. My white car did ten points to Sean’s blue car but took six in return, destroying us both and leaving Corey in the silver car with the win!
There’s a few other games we think would work well with this basic setup; the current GW airplane game being hex based and having simple maneuvers would be one, as would some of the naval games that have written orders with templates, although there’s more recordkeeping for that sort of game.
Hope everyone has been having a good, safe holiday season, however you celebrate, and that you’re able to get some sort of gaming fix in somehow!
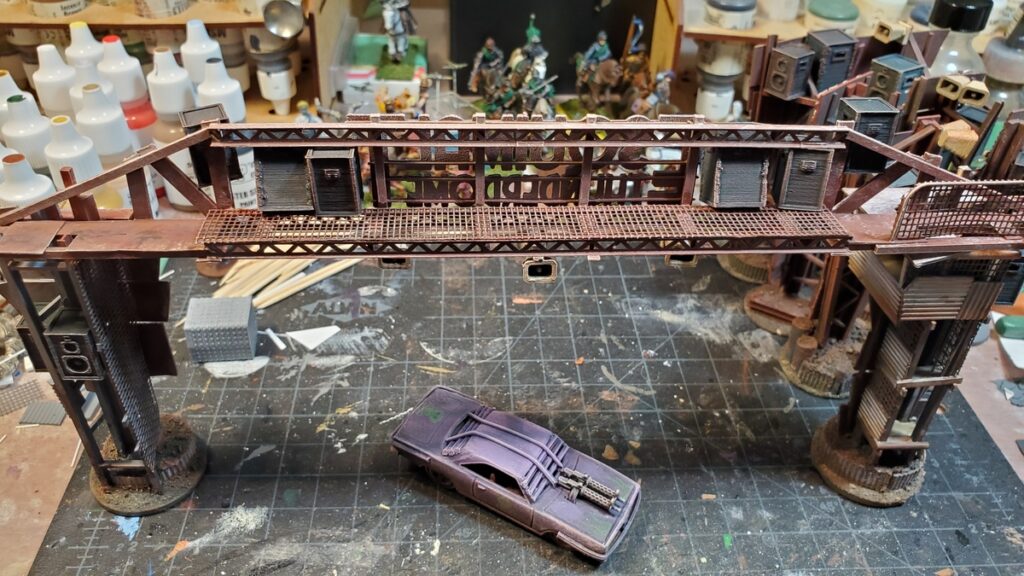
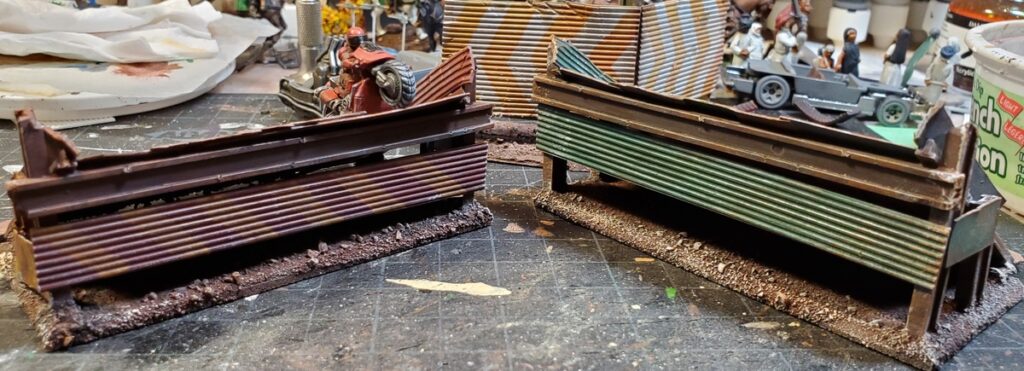
Reading through the rules, I realized that Gaslands Refuelled has rules for jump ramps and jumping, so naturally I had to scratchbuild a pair of ramps to make a dangerous lunatic game even more dangerous and lunatic!
Scrap plastic and bits for a couple of pieces of Gaslands scenery. Click for larger.
The two ramps are about 4 inches wide. They’re based on scraps of 1/8th plastic board and mostly made of random bits of styrene plastic. The big beams are from Plastruct and I’m pretty sure they’re leftover from the model railroad we had when I was in junior high in the first half of the 1990s… that’s more than long enough to have something in your Bin Of Interesting Parts before using them!
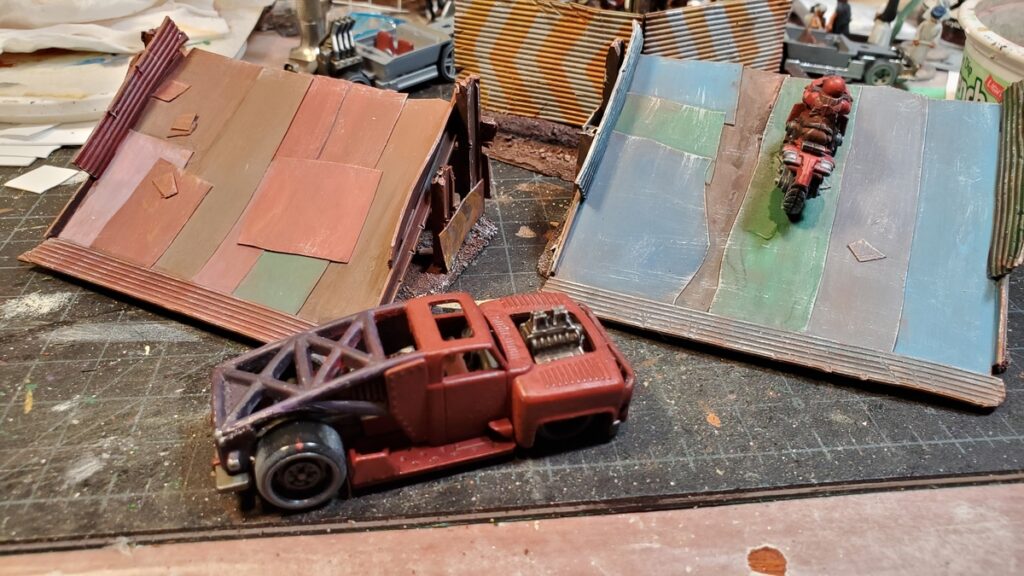
The other side of the ramps. The left hand one is actually reddish but came out looking very purple in this photo from some reason. Click for larger.
The great thing about the mostly-post-apocalyptic Gaslands setting is that nothing has to be really cleanly constructed or painted, so I just layered sheets of styrene up until it looked right, and used pliers and a knife to attack various bits, warp them, and chew the corners off.
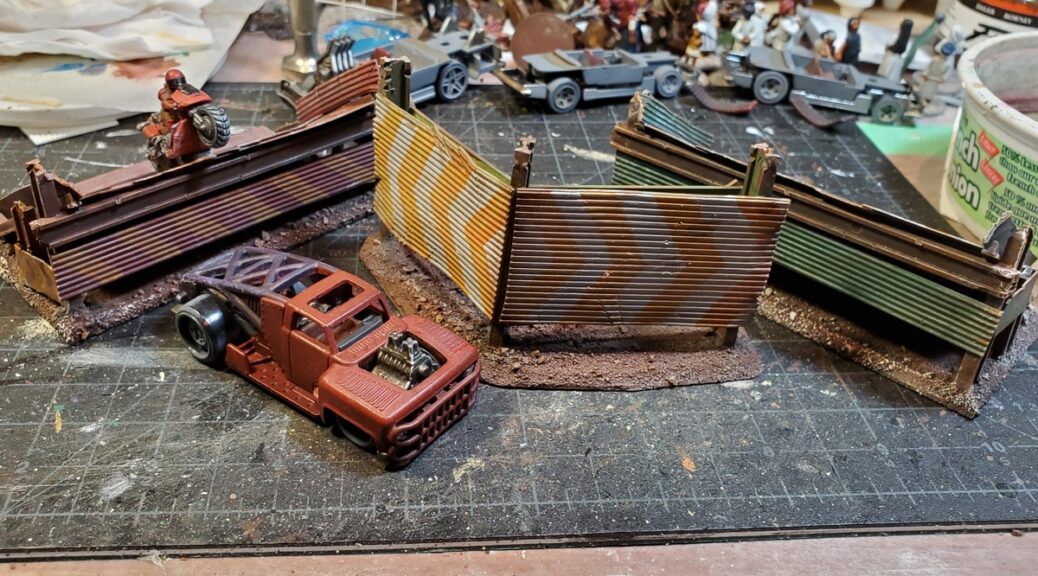
Crash barrier thing, with random hazard stripes because why not?
The billboard/crash barrier piece started as a way to use up the leftover stub of heavy I-beam I had left over after the ramps were done; it’s based on more scrap 1/8th plastic board and roughed up the same way. It got orange and white hazard stripes on the fronts, because, well, why not?
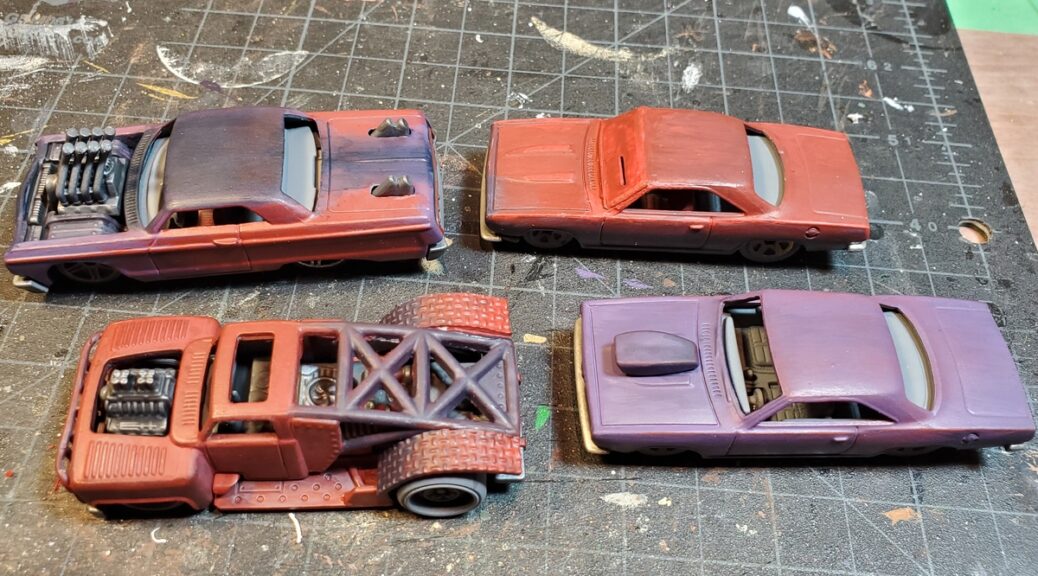
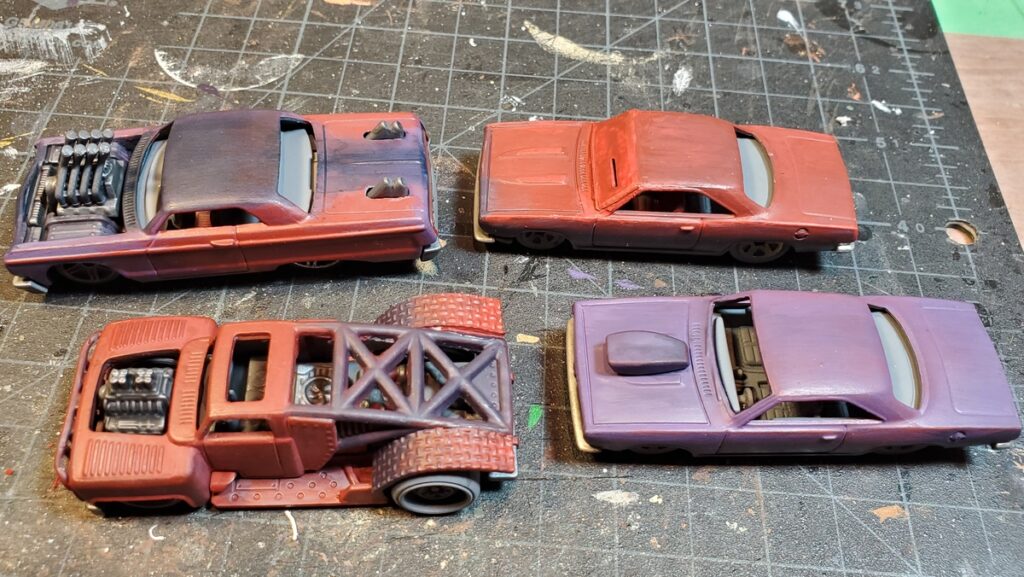
All the scenery together, plus one of my in-progress cars. The motorcycle is from the North Star Gaslands accessories sprue. More in-progress cars can be glimpsed in the background!
I’ve got four cars and a motorbike in progress; the first coat of primer on several of the cars didn’t take so they’re in paint stripper to get reset back to bare metal. I’ll probably fish them out this weekend to scrub them down and reprime.
We’re back in lockdown here for at least another ten days and realistically probably longer, because the second wave of COVID is well and truly here. Stay well, stay safe, ignore the goddamn idiot ratlicking anti-mask morons, and when we’re able to game in person again, hopefully there won’t be any gaps around the gaming table.
Oh, and happy American Thanksgiving to any American readers!
No posts for a month? Sorry! The irony is that I’ve been gaming more regularly than ever, as our little COVID-compliant pod of gamers are now meeting every Monday daytime (all three of us are on reduced work hours, again due to COVID…) and on Thursday evenings due to my lovely wife’s heartfelt desire to kick me out of the house every so often.
We have gotten into Gaslands, and been running through the Perilous Island campaign for Pulp Alley with a fantasy flavour to it instead of the classic early 20th C pulp we’ve done in the past.
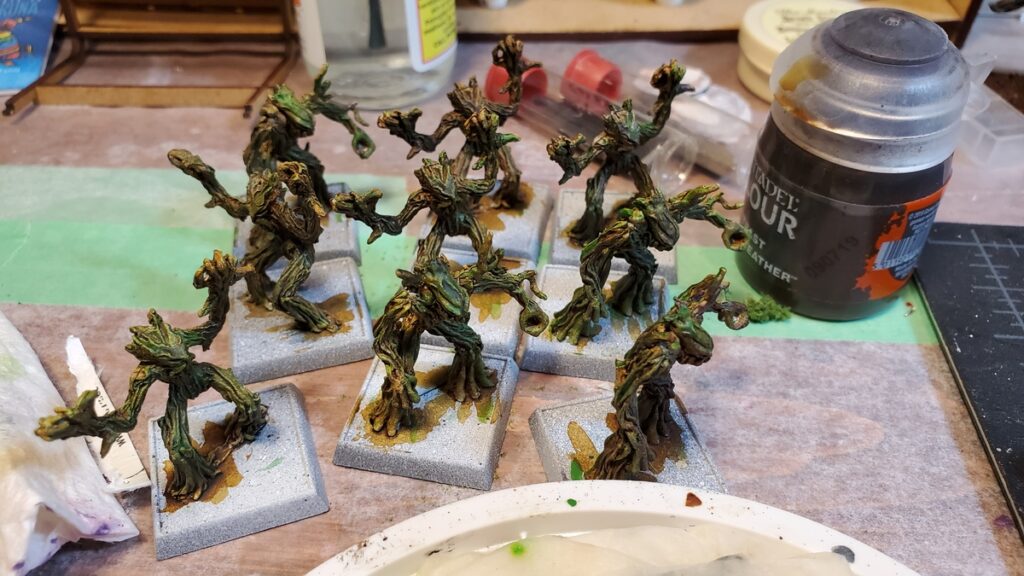
Gaslands cars in progress. Mostly stock and no weapons for now. Click for larger.28mm Saproling from Reaper Minatures. Really neat figures, roughly human sized. Click for larger.Giant weird mushrooms for fantasy scenery. From a recent Kickstarter. I’ll do a review of that KS sometime soon, I promise. Click for larger.
Anyway, I’m going to try to get back to August’s regular blogging schedule, or something like it. I spent September and most of October gaming but hardly doing any painting or scenery building, and have now painted or built more stuff in the past week than in the previous two months!
As I am fairly new to 3D printing, I am learning a tonne about what not to do. One of the biggest issues I have discovered is that things that look good in CAD can look absolutely terrible once printed, given the resolution of the printing or the limitations of FDM 3D printing. Today I wanted to talk about three different, but similar errors I made: making a part too thin to print correctly.
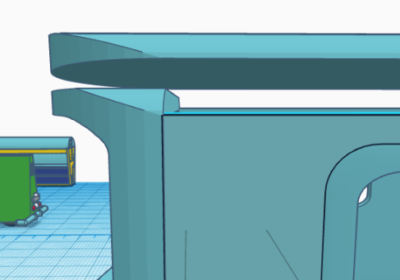
Back corner of the cab
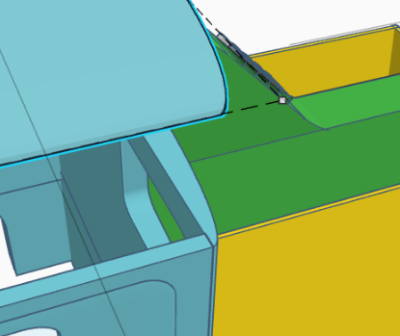
First up – the back corner of the cab. As the backside of the cab is curved, it thins quite a bit at the very back corners.
Back corner of cab in blue. See the thin joint at the very end
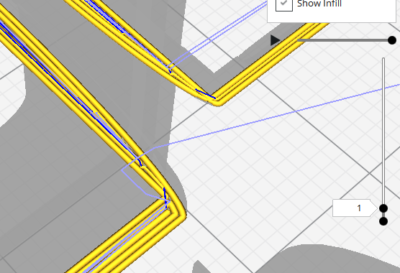
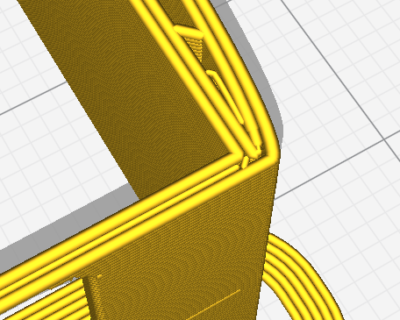
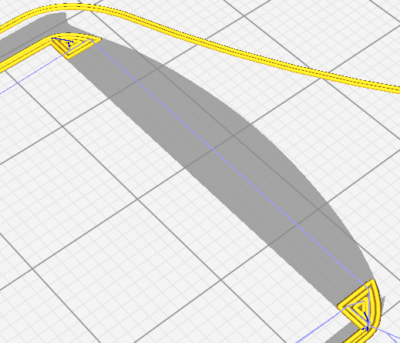
When you bring this into Cura to slice it for printing, the problem becomes obvious.
Back corner of the cab, showig that when printed, it will only be two layers thick (~0.8mm)
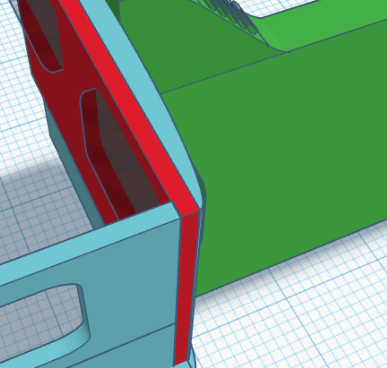
The solution to this is to thicken the back wall of the cab, which I did by adding a flat piece to it:
Back corner corrected with additional piece (in red)
Once you bring that into Cura, you see that the narrowest part is now at least 1mm thick, so the piece shouldn’t be so weak.
Thicker corner sliced in Cura
Fenders
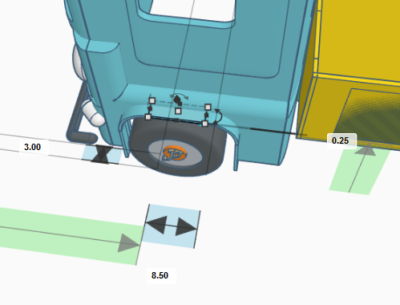
The next piece I tackled was the fenders. They were originally 0.25mm thick, which means that they were just over one layer thick when printed at 0.2mm and only two layers thick at 0.1mm. This meant they basically didn’t print at all.
Fender dimensions
Fender sliced, showing no overlap
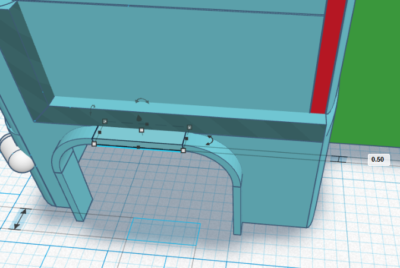
The solution to this problem is two-fold: thicken the fender up to 0.5mm and also only print at 0.1mm (considered Fine quality).
New fender, now 100% thicker!
New sliced fender, showing overlap
Top of the windshield
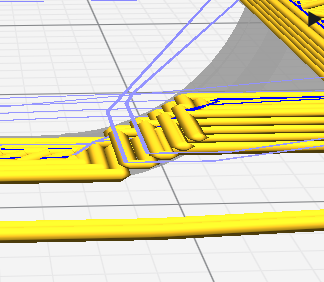
This is actually entirely my error. I made the windscreen and frame around it taller than the sides or back of the cab. This meant when I cut up the model to slice, the top of the windscreen disappeared. Oops.
Top of the windscreen, showing the height difference
Top of the cab when sliced. That grey area is supposed to have yellow lines for printing