Found, buried in my harddrive, another couple of forgotten work-in-progress shots from the first round of shoreline/riverbank construction back in June 2009. The rest of the construction was written up last week.

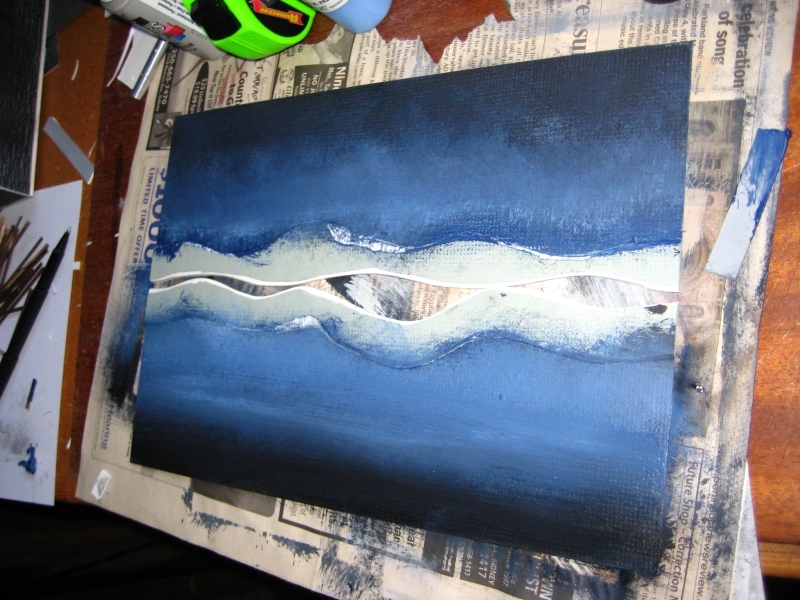
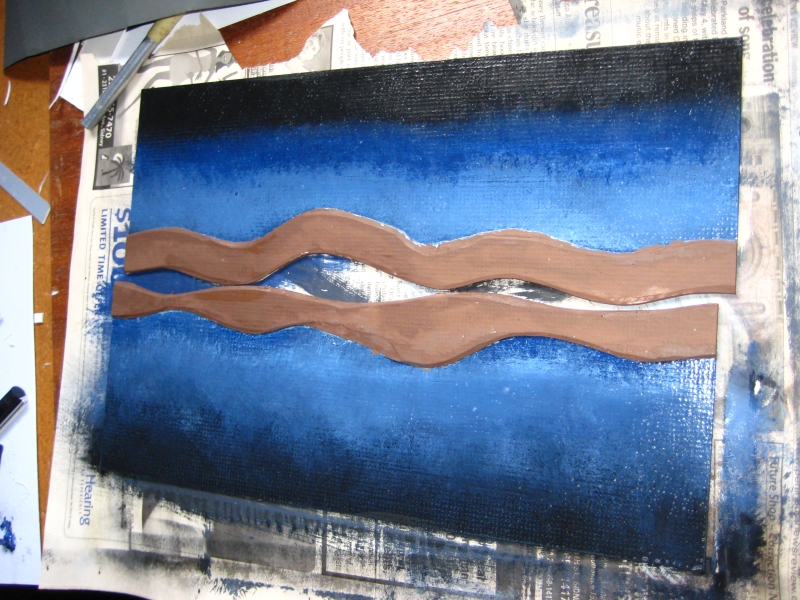

Found, buried in my harddrive, another couple of forgotten work-in-progress shots from the first round of shoreline/riverbank construction back in June 2009. The rest of the construction was written up last week.
[R]attrap Productions has just released the demo PDF of .45 Adventures 2nd Edition!
There’s a 22 page set of demo rules which include the full movement, combat, wound, vehicle, explosive and flying rules, as well as enough Archetypes to build some characters and teams to test the new shiny out.
There’s also a draft copy of the 2nd Edition Special Abilities PDF, with a good selection of the skills & special abilities that’ll be available in 2nd Ed.
More later perhaps when I’ve had a chance to look it over properly and build a character or two! Short version is that I like what I see, lots of streamlining and good tweaks to an already great system.
Full release of the rules is pencilled in for mid-March, apparently.
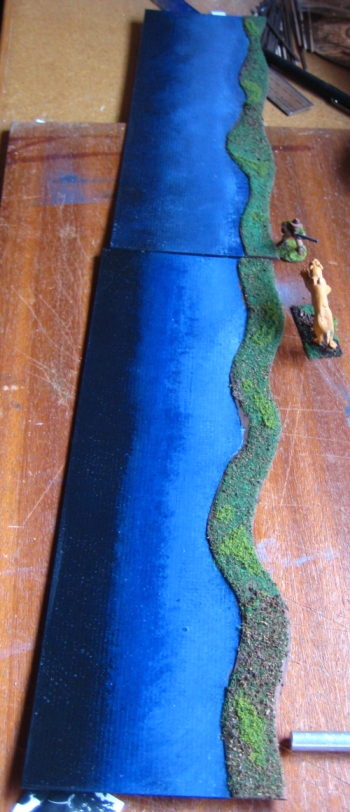
These riverbanks or shorelines made from picture-framing board (mattboard). I did the first set back in 2009 and another batch in the winter of 2010. They’re designed to form one edge of a playing board, especially on the 2’x2′ playing areas common to .45 Adventures. One of the really nice things about games like 45A that encourage smaller playing areas is that terrain projects become a whole lot more managable — no more having to crank out eight feet of river just to have enough to be usable on the table!
Each segment is 12″ (1 foot) long and 5″ deep, 4″ of river and 1″ of banks. The banks are the same mattboard as the rest, to keep them as low-profile as possible. The painting is black and two colours of blue, damp-blended right on the card. I tried to keep the edges mostly matched while painting the pieces. The water portions then got about six or so coats of acrylic gloss varnish so they looked like water. If I was going to paint them again, I’d do the water areas a greener shade with less black, as is often seen in murky jungle rivers.
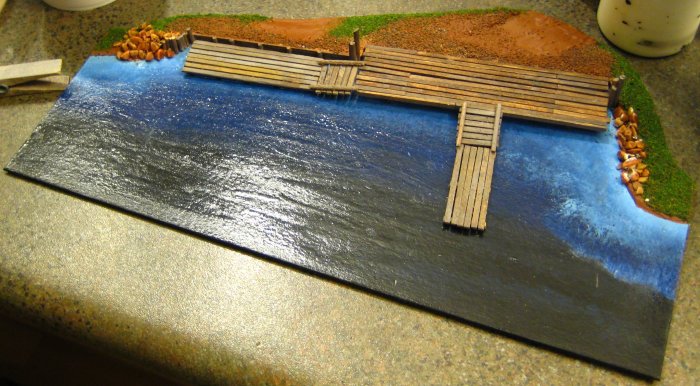
In the winter of 2010 I added two new segments to the set, one another copy of the existing riverbank pieces, and the second incorporating a ramshackle wooden dock. The dock segment was wider than the others for most of the length, although obviously the same width at the ends. The docks were built up with baswood planks, with toothpicsk and bamboo skewers for the piilings. The large dock section is glued to the base; the three smaller sections are freestanding for flexibility.
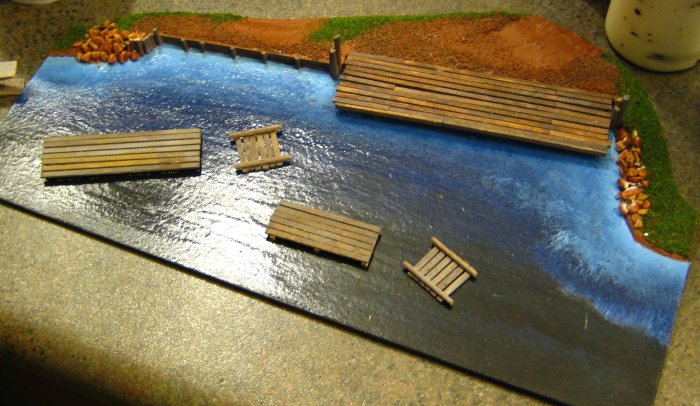
All four sections have been largely free of warping or damage, although the docks section does havea tendency to bow when stored. The eventual plan is to rebuild these riverbank sections in 2mm or 3mm MDF, using a bandsaw to cut the curves, but mattboard will do until then!
(these photos have been seen over on the Lead Adventure Forum and elsewhere previously, if you’re thinking they look a bit familiar…)

I got five players, four of whom were among my regular 45A crowd and one friend who’d never made it to our previous pulp games. We got set up, factions picked and off and running on the 1st Act, “The Missionary Position”.
Random highlights – the two Russian factions (White & Red Air Pirate) immediately started a brawl that lasted the whole Act and resulted in some sword wounds, lots of wasted lead, and one Red shot in the head. The British and the White Russians stitched up some sort of truce, based mostly on a mutual distaste for Bolshies.
Continue reading GottaCon Gone
Under 24hrs to go until my Gottacon game… checklist time.
Figures, Scenery & Stuff
Glue drying on the bases of the last figure needed. Dullcote tonight if I get to it, otherwise they’ll do for one game.
No scenery needed to be built, save a couple of small pieces. My brother has those under control, he assures me.
Vehicles… we have more than enough.
Black felt game cloth just to put under the scenery tiles… forgot that, will have to run without it. Not a big deal, it just would have looked neater with it.
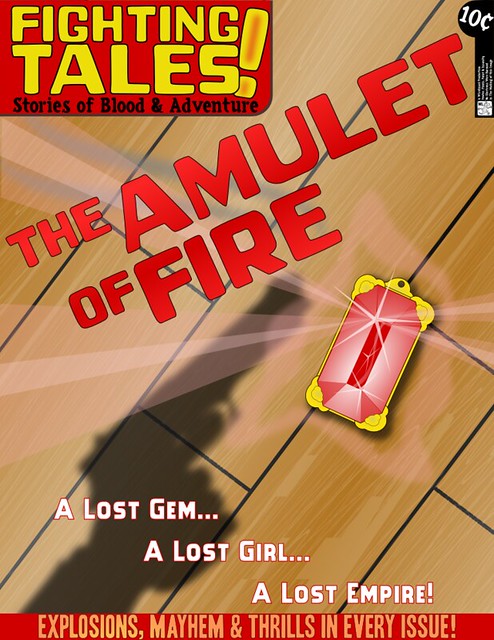
Scenario & player handout material… all neccesary stuff finished, proofread and printed. I even have an 11×17 full colour version of the Amulet of Fire cover to put on one corner of the table!
Con Survival Kit
Bottle of water, large. Check.
Bottles of Coke (2)(Caffeine IS life). Check.
Chocolate bars (simple carbs = fast energy). Check.
Cold pizza (complex carbs are good, too). Check.
Comfy shoes. Check.
Still To-Do Tonight
Rearrange figure cases so all the figs I need for the scenario are in one case, instead of spread over five.
Rearrange scenery slightly so everything is in one banker’s box, not two.
Pick up car, deliver large scenery stuff to convention site, to stash under organizer’s table instead of wrestling with everything tomorrow morning.
Decent night’s sleep.
To-Do, Tomorrow
Find something worth playing in the morning.
2PM PST, inflict pulp mayhem upon the world!
Next Friday GottaCon 2011 opens here in Victoria, and a week today, Saturday the 5th, is my pulp adventure game, “The Amulet of Fire”.
I’ve just finished the Encounter Cards for both Acts of Amulet. Here’s a few of the possible Encounters for Act One, “The Missionary Position”:

Continue reading One Week Until GottaCon & “Amulet of Fire”!
After running last year’s .45 Adventures convention scenario at least six times, it was time to retire it. Few things worse than a bored gamemaster, trust me.
So this year’s convention scenario is going to be a two-act thing (two smaller scenarios instead of one larger one), and because my mind works in strange ways sometimes, the first thing I’ve finished is another “Fighting Tales” faux cover. (First three together here)
The rest of the scenario should be finished, first draft at least, this weekend, then it’s a playtest and on to it’s first public showing at GottaCon 2011, 4-6 Feb.
There’s been previous versions of this tutorial posted on Lead Adventure and the Speakeasy, but I figured it’s worth reposting here.
After killing a dress shirt (black ink leaking does that to white cotton) I realized it would work nicely as material for a large safari/expedition tent. I used a CD as the base, with small blobs of milliput holding long toothpicks vertically as the poles — three on the front, three on the back. After the putty holding the poles was dry (and reinforced with a bit of superglue) I wrapped thick sewing thread around the tips of the poles, with a dab of superglue holding it in place and a bit more superglue stiffening the thread after it was secured.
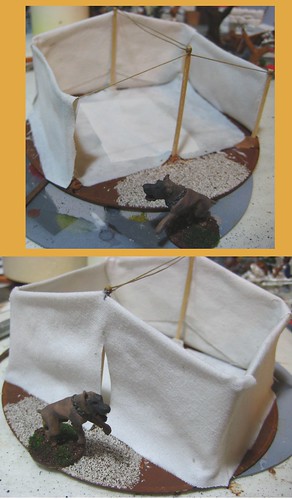
(click through to Flickr for a full-size image)
The fabric was cut twice as tall as it needed to be, and draped over the thread at the tops of each wall, with a generous layer of white glue on the inside of each piece. The walls were folded over, squeezed together and held whilst drying by clothspegs.
Two layers of shirt-weight cotton plus white glue makes for very solid walls!
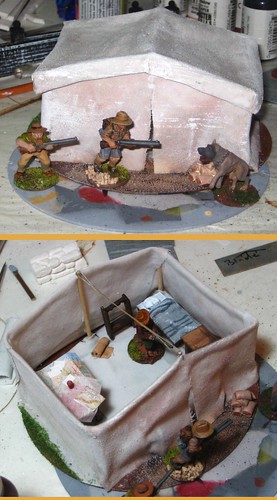
(click through to Flickr for a full-size image)
The removable roof was made by first draping a piece of plastic wrap over the tent walls, then carefully folding and pinning the piece of glue-soaked cotton into position. I folded the eves up and trimmed them after the first coat of glue was dry, and it fits well; between the glue and the folding it’s more than rigid enough to hold it’s shape.
There’s an extra piece of cotton to form the floor, and most of the interior furniture is made of offcuts of basswood and styrene, with putty for the blanket and pillow. The maps were found on the internet, shrunk to appropriate tiny sizes, and printed out. The red coffee mug in the centre of the large map is a scrap of round styrene.
I’ve still got a good sized piece of this shirt; eventually more of it will live again as smaller tents to accompany this one. Recycling — it doesn’t just involve a blue bin, you know. Not for wargamers, anyway!
Some graphics inspired by interwar pulp magazine covers. Done in Inkscape primarily, with some of the photos manipulated first in GIMP.
Continue reading “Fighting Tales!” Magazine Covers