
Several of the scenarios in Pikeman’s Lament ask for a bastion or earthwork to be attacked or defended, but at a maximum area of 9″x9″ it isn’t going to be some grand fortification or anything.
I wasn’t sure what, exactly, could be done in that area, so I cut a piece of heavy plasticard that size and started arranging my Assault Group guns and crews around the 3d printed gabions we found over on Thingiverse.
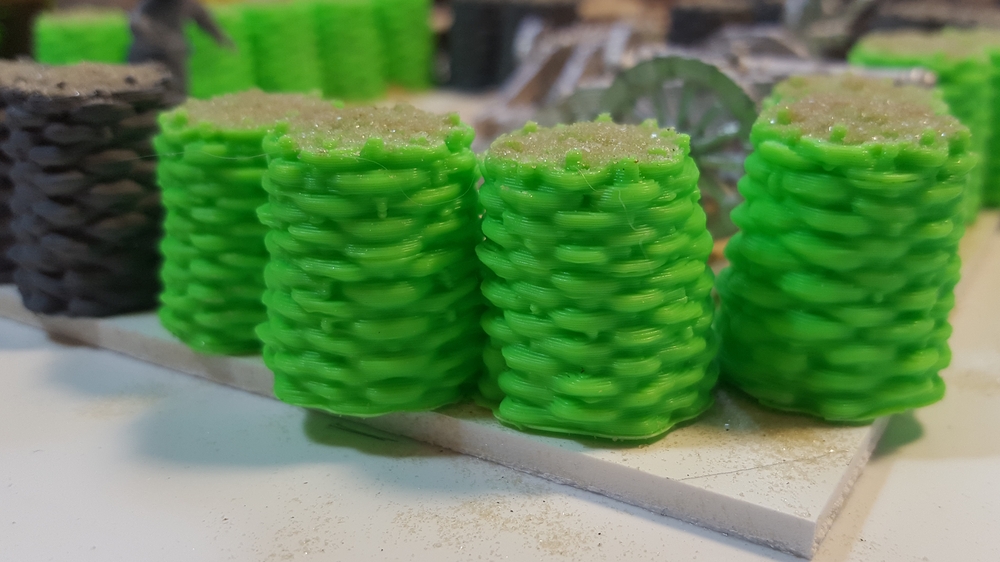
The 3d Printed Gabions
As seen previously here on The Warbard, my brother Corey owns a 3d printer. A Creality Ender 2, apparently. Gabions are big roughly-made wicker tubes filled with dirt, basically, used for temporary fortification for centuries – right up until at least the First World War, in fact. They’re iconic looking but would be really, really fiddly to scratchbuild. Finding the set of 3d modelled gabions for free over on Thingiverse was what kicked this whole project off.

If you haven’t got access to a 3d printer, Renedra will sell you a couple of sprues of quite nice-looking gabions for a very reasonable sum.
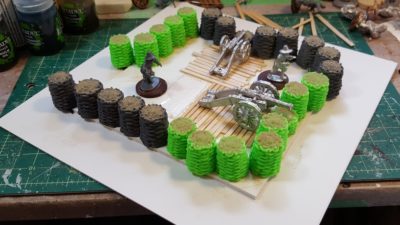
The Bastion
The 9″x9″ footprint was dictated by the Pikeman’s Lament rules, but proved to be a good size anyway for a bastion that could hold one gun with crew or a full unit of 12 infantry in the Pikeman’s system while not dominating the table. It’s still a very, very small bastion; even single-gun emplacements in the English Civil War were usually bigger than this once you included their surrounding ditches and such. Compromises are always made for tabletop usability, however!
The actual gabions and fortified part of this are raised slightly on a 6″x6″ offcut of 1/8th” EPVC plastic board, with openings for cannon to fire through on two sides and a ramp leading down and out on the third side.
I used chunks of styrofoam to fill in the area outside the gabions, sloping up slightly from ground level, holding it in place with hot glue to speed up construction.
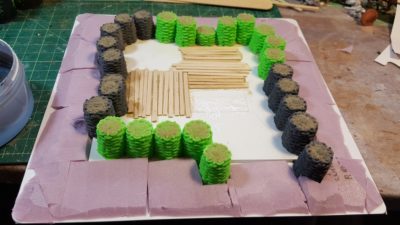
To cover the styrofoam I mixed up premixed plaster, white glue, sand, and a bit of water to make a tough textured fill, then pushed it into place with a tongue depressor. The interior has flooring/duckboards made from wooden coffee stir sticks, with sand filling the gaps between the boards.
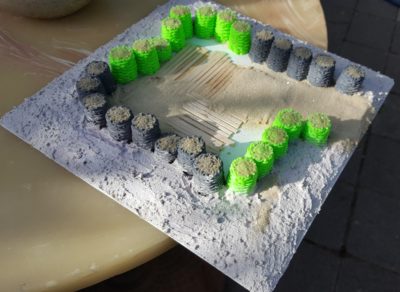
Paint tomorrow after the plaster has had a chance to dry fully. I thought about putting extra obstacles in the ground outside the gabions, but have decided to leave it mostly bare earth. I do have my recently-bought Renedra chevaux-de-frise to add around the bastion once it’s on the table, after all.