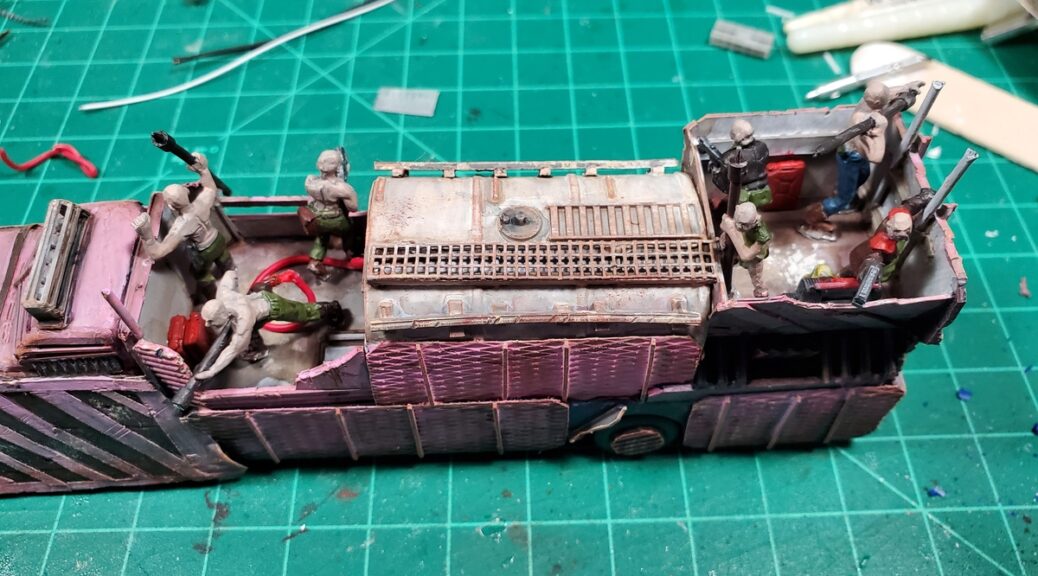
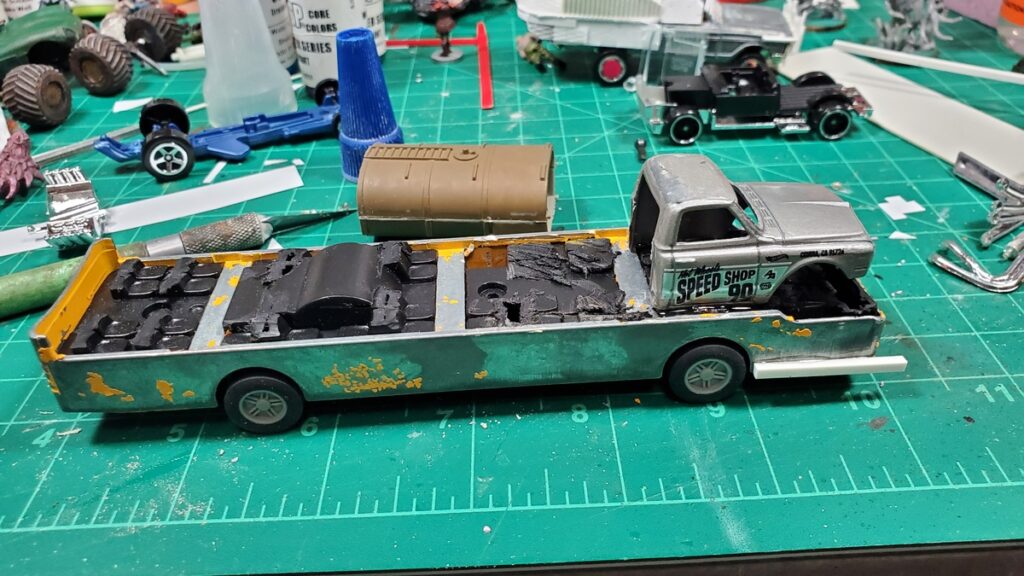
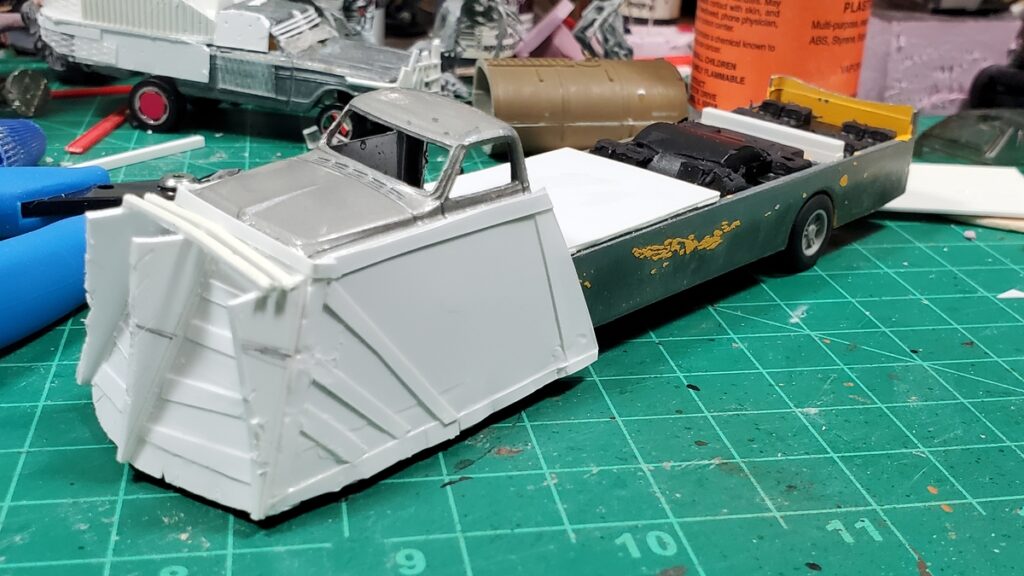
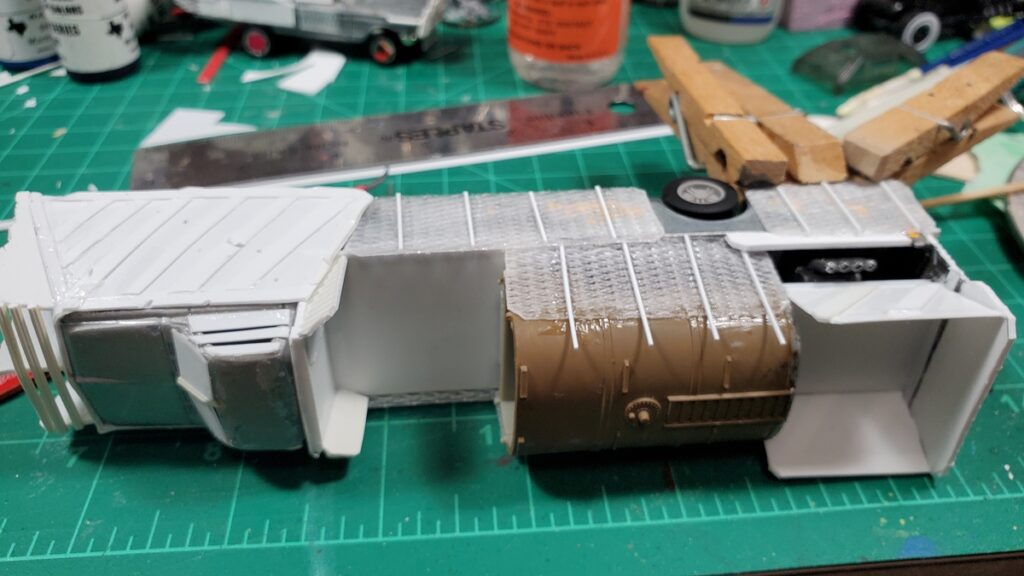
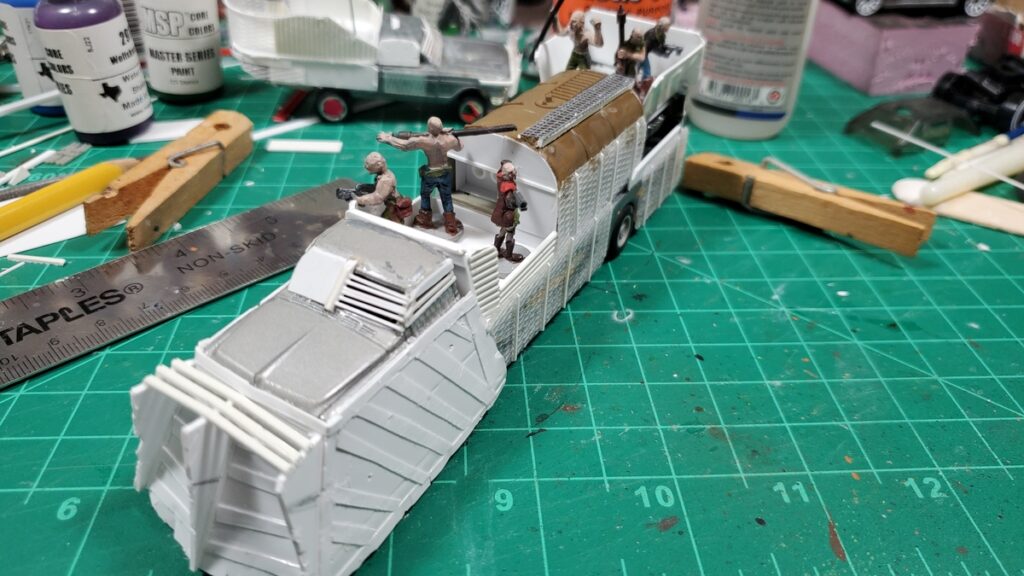
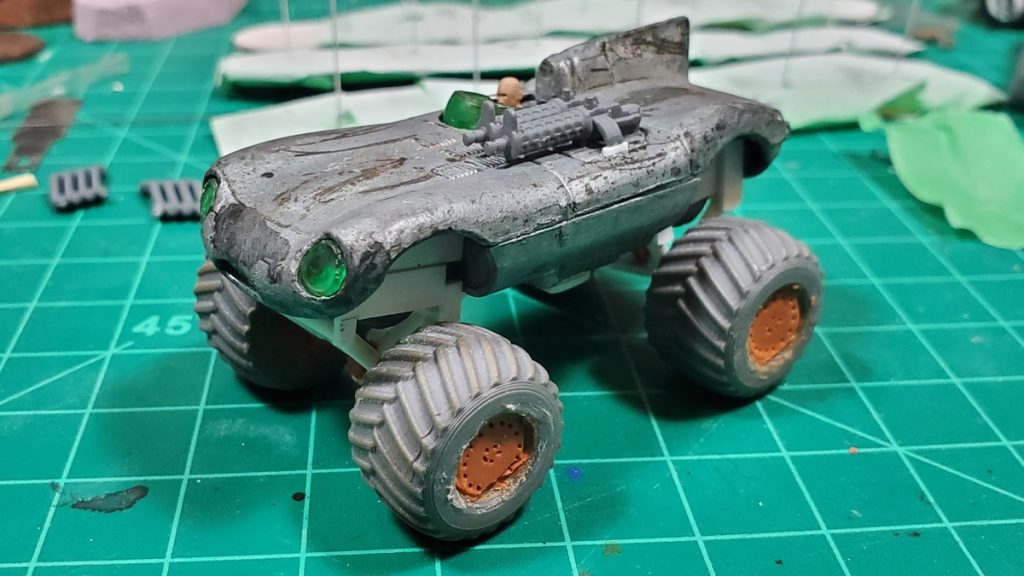
The Queen is the largest Gaslands vehicle I’ve done so far and by far the most complex conversion I’ve done for the game!
She started life as a city busy of some sort, sourced I think from Ali Express by Corey, sat around in his stash for a while, then became mine when I volunteered to make something cool to terrorize our Gaslands games with! She’s true-scale to Matchbox/Hot Wheels cars, so very close to six inches long now that I’ve finished a full post-apoc war bus conversion job.
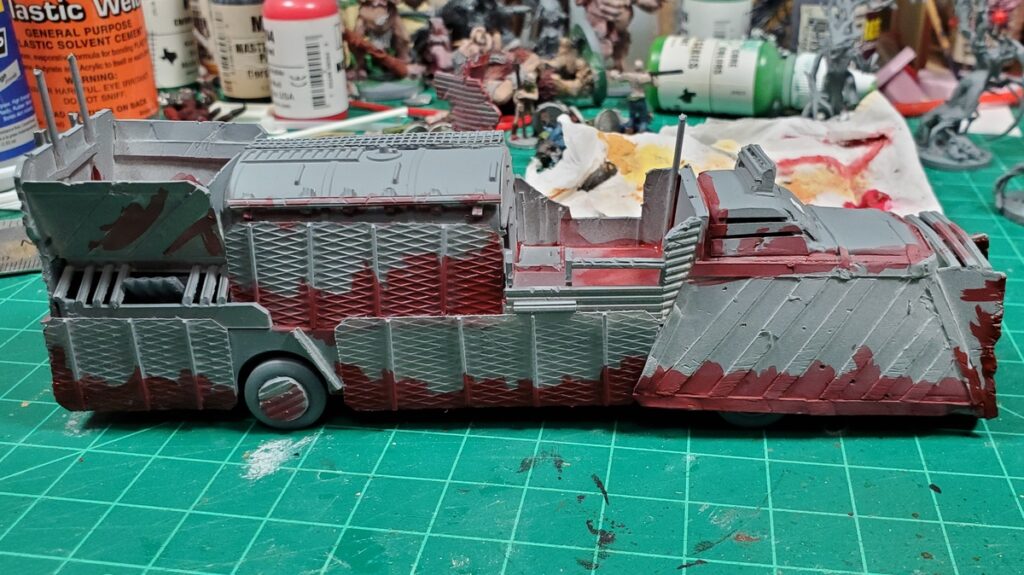
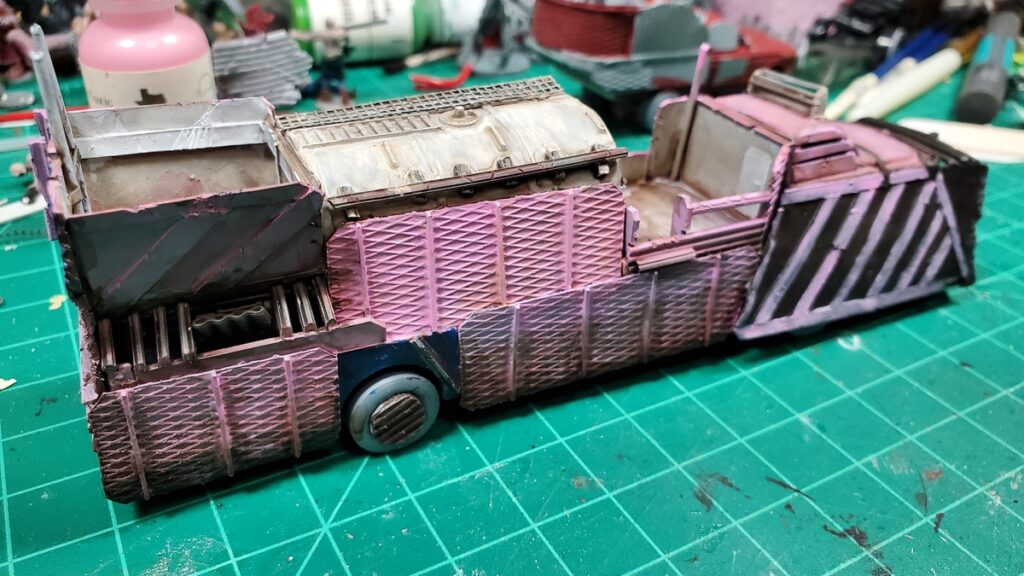
Planning the Queen. Bus chassic, truck cab, tanker truck parts, and the engine from the dragster.Dremelled the truck apart, first step of construction!The massive front ram taking shape.Flamethrower deck.Armour. Very important.Test fitting some crew, first glimpse of the rear fighting platform.The ram from the front.The tail of the beast.Primed and painting started.Pink? Why not?Weathered, crew installed, other details installed on both fighting platforms.The Queen rolls out! Her first in-game appearance.
Been doing gaming fairly regularly, had a good weekend at Trumpter Salute 2024 in Vancouver early in March, but apparently haven’t managed to blog a thing in ages.
Here, have a chill painting video in lieu of original content.
Bunch of stuff in progress including a gloriously over the top Gaslands war-bus based on a city busy chassis, which I have been taking a bunch of progress photos of and will try to assemble into a gallery here to show off sometime soon.
Speaking of Gaslands, and somewhat time-sensitive as the Kickstarter closes in 3 days, Fogou Models are running a KS for various Gaslands-scale scenery items. These aren’t STLs but actually physical cast resin pieces. Rad Trax Toy Car Scale Terrain on Kickstarter. The items will likely be available on Fogou’s webstore post-KS, useful for those of us who (say) just had to cough up a home insurance deductible after a plumbing leak and are a bit short on cash…
We played a lot of Gaslands in 2020/2021 when COVID restrictions meant we couldn’t game in person, because Gaslands is fairly simple to organize overwebcam, and we kind of burned out on it.
Then we took Gaslands to Trumpeter Salute 2023 back in April, because it’s also really easy to set up pickup games for, and our pair of great chaotic games re-ignited our interest!
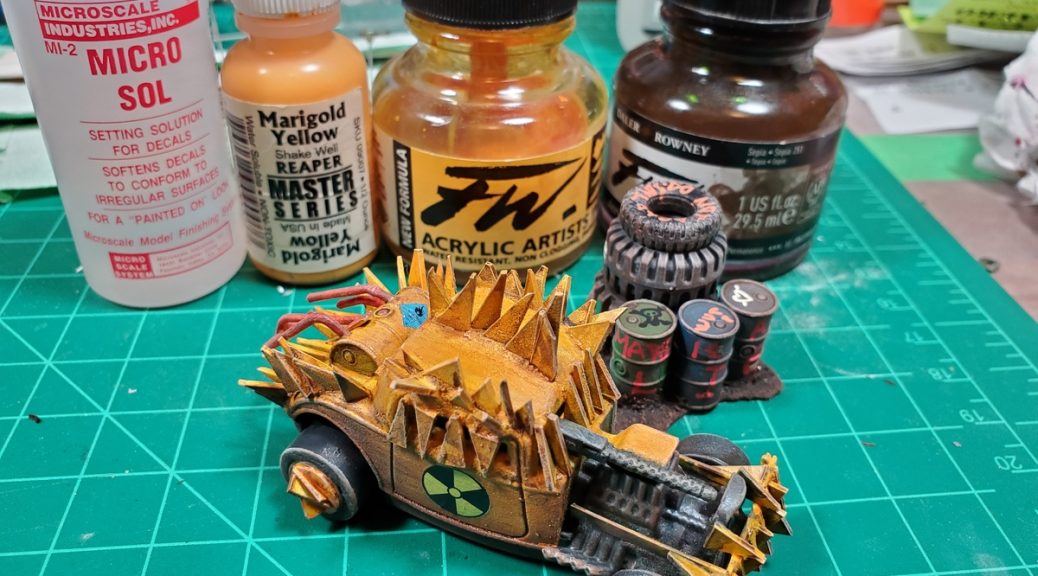
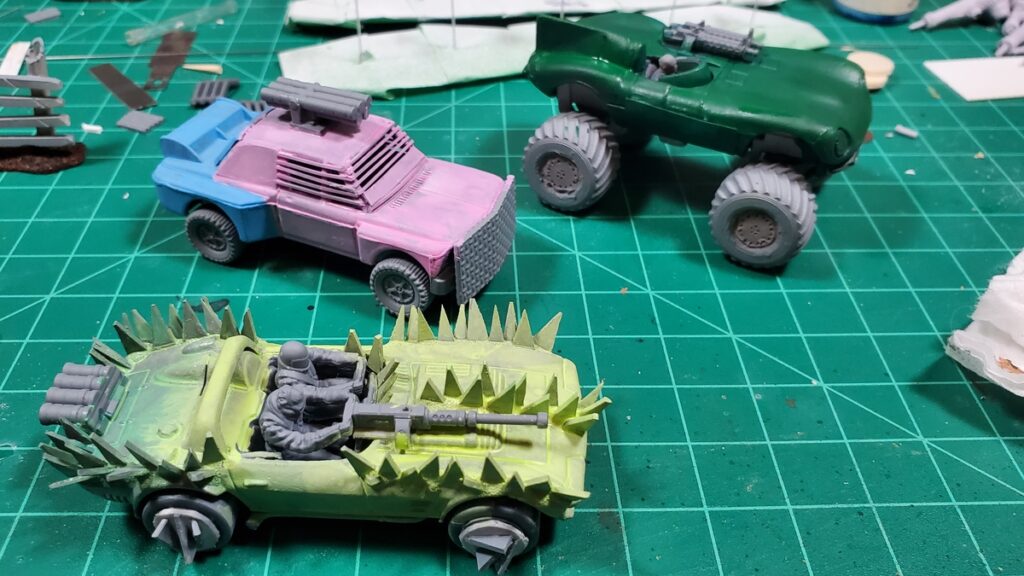
I’ve cranked through a trio of new cars since Salute, and then moved onto a new set of three cars. Two of the first set had been partially converted back in 2020/2021 and then neglected (and apparently I took no photos of them…) and the ’34 Ford hotrod was a new purchase while we were in Vancouver for Trumpeter.
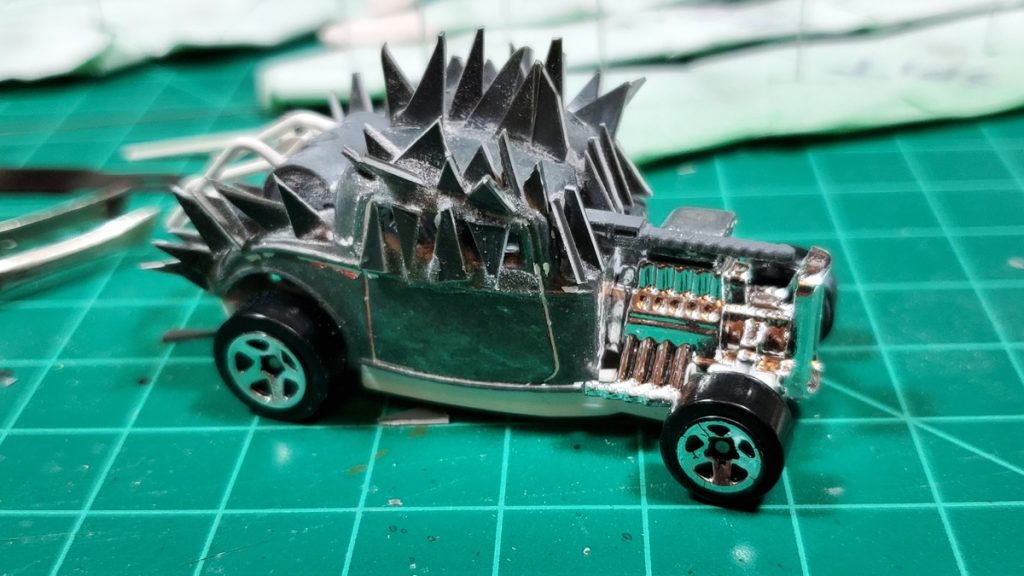
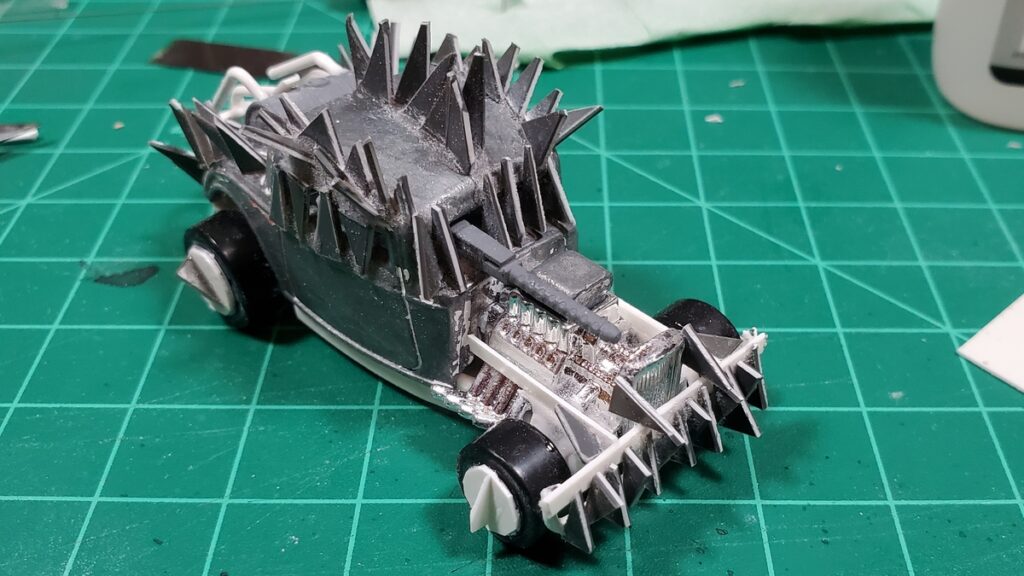
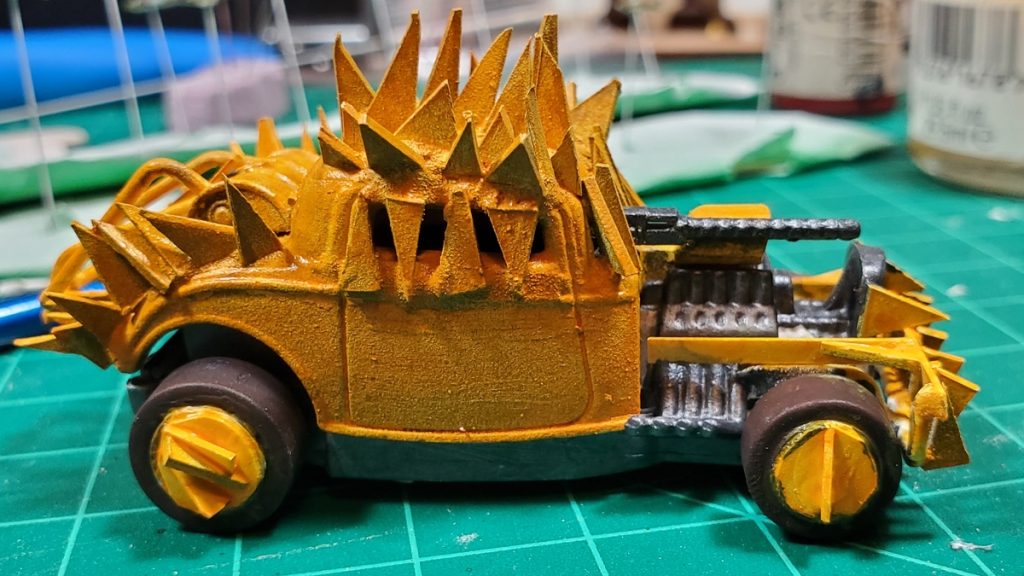
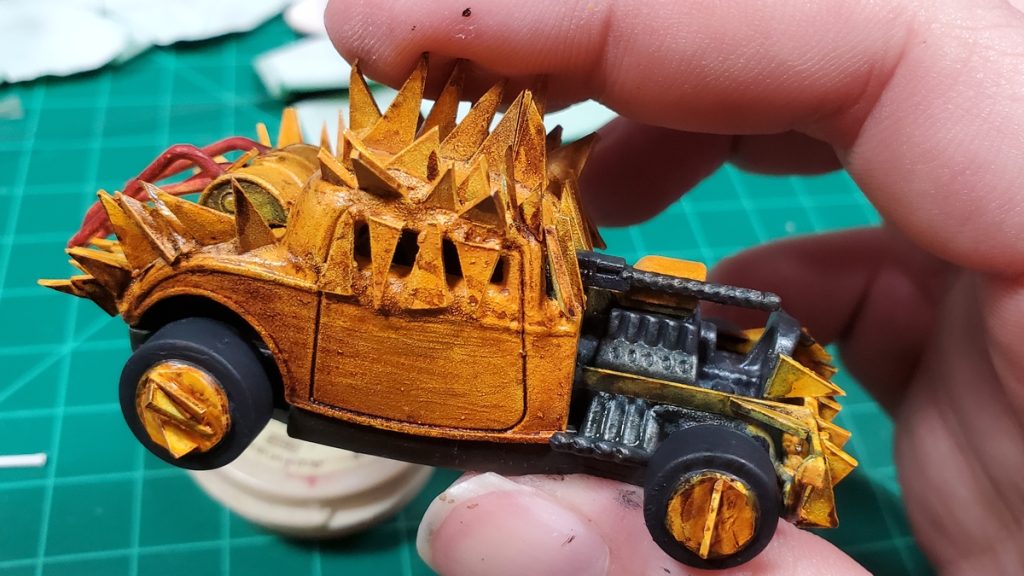
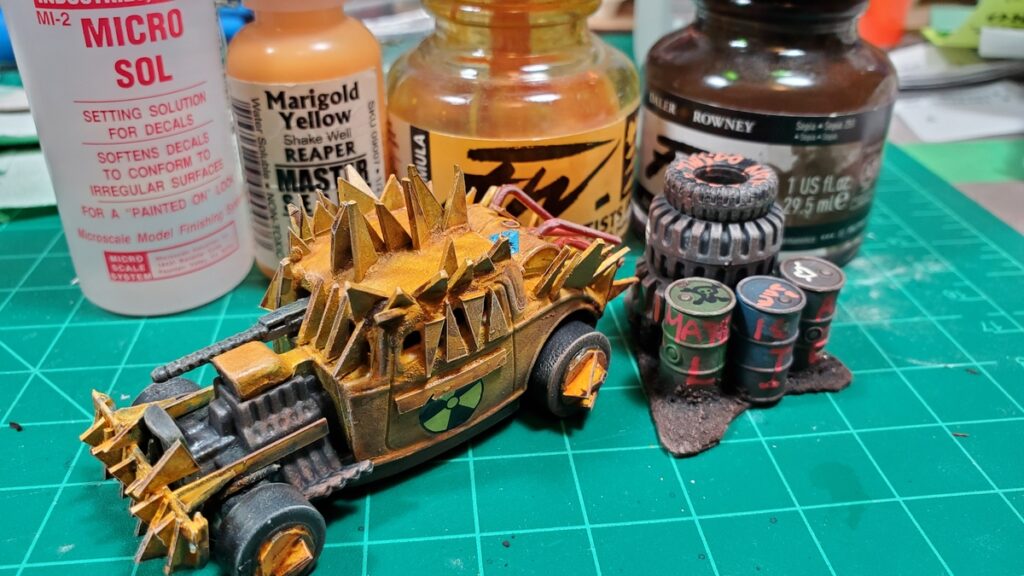
’34 Ford hotrod being Gaslanded.Spikes!Yellow basecoat – paint was Reaper’s Hearth Fire with FW Acrylic Ink Indian Yellow over that.Weathering – mostly FW Acrylic Ink Sepia.Rad symbol wet transfer on the door, just for fun.The right hand side of the critter.’34 Ford conversion.
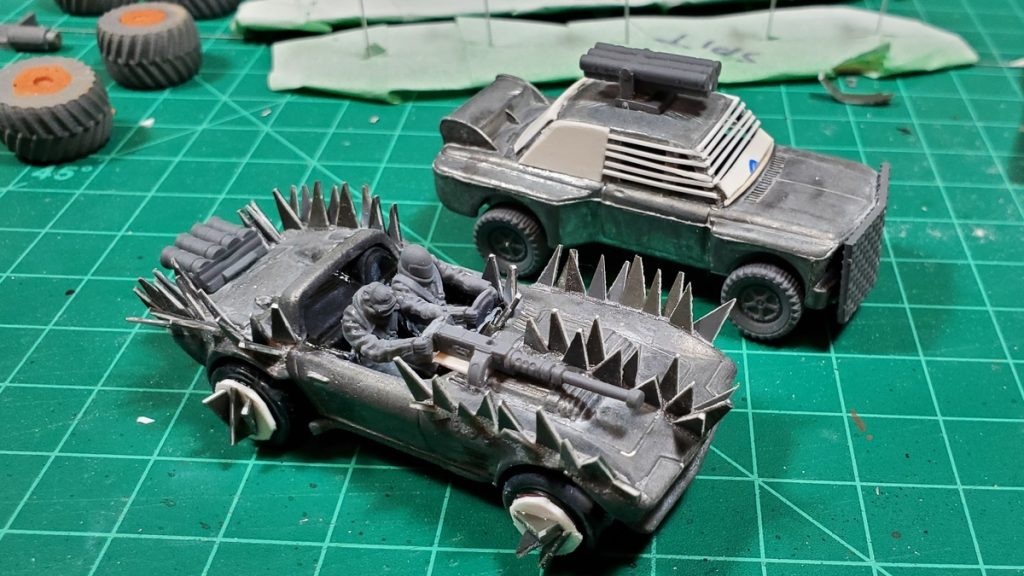
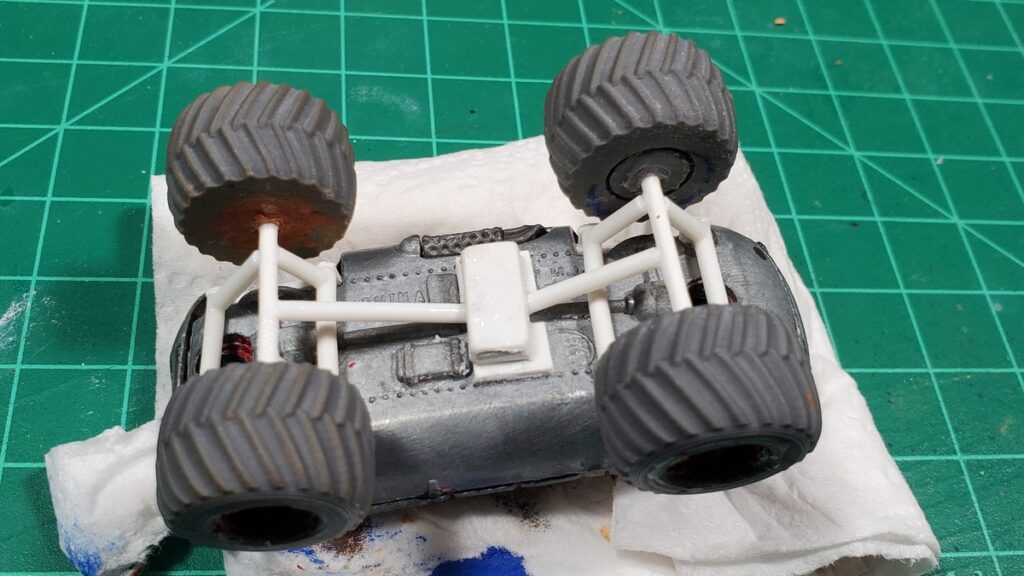
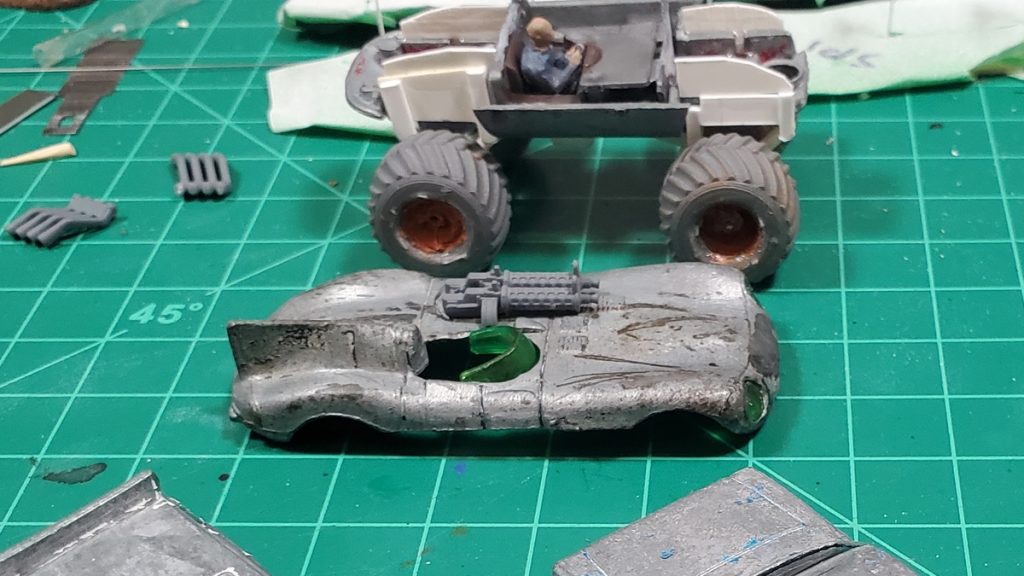
The second trio of cars include another sports car all spiked up, a rally car up-armoured, and a Jaguar D-type converted into a monster truck. The Jag was the most complex conversion I’ve done for Gaslands yet, and started with a set of 3d printed monster truck wheels.
Conversion finished on the rocket rally car and spiked sports car.Underside of the Jag D Type monster truck.Monster truck suspension under the D Type.The D Type in progress.Assembled, just missing the armoured panels on the sides.Paint started!The second batch – spiked sports car, rocket rally car, and the Monster D-type.
The basecoats are coming along nicely. The Jag is starting as British Racing Green, the spiked sports car is a gloriously weird yellow/green that Reaper calls Dungeon Slime, and the rocket rally car seems to have gotten trans pride colours, because why the hell not? Lots of weathering to do still, of course!
These three done will give me eight or so cars, a buggy, and three bikes for Gaslands just in my own collection. I have ideas for a heavy truck conversion starting with mashing together two big American 60s/70s Yank tanks, but I think I’ll switch gears slightly after this trio is done.
Brian and I (plus friends) attended Trumpeter Salute 2023 last weekend. No, not the UK one, the smaller one in Vancouver, Canada. We all had a great deal of fun, our first major miniatures convention since 2019 – after Bottos Con, which is primarily a board game convention, in Nov of last year.
Under Alien Suns (working title) – Coop scifi rules under heavy development
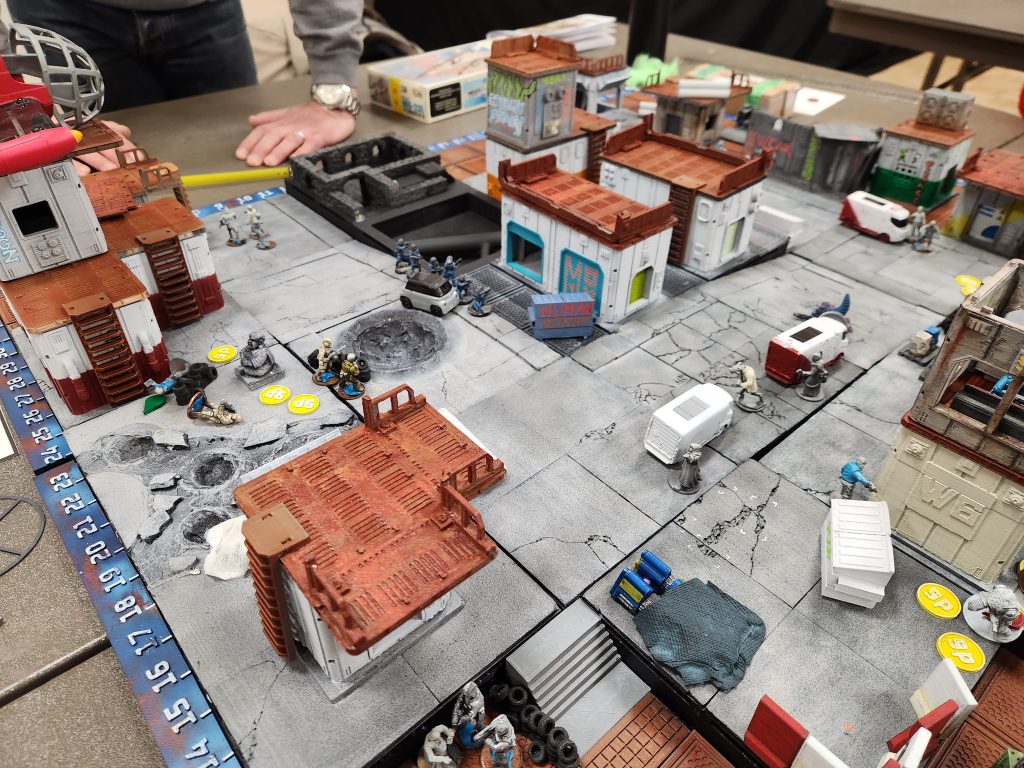
Friday afternoon in the first slot I ran another public beta test of my under development coop scifi skirmish ruleset, Under Alien Suns (the working title). It was a great deal of fun, autonomous vehicles got used as weapons, and there were many laughs. Also lots of great feedback.
Players were fighting in New Antares – against a mixed enemy – zombies from the former townsfolk & Halite Confederation soldiers
Vikings vs Saxons – Aftermath of the Raid
There were a pair of linked games both using Ravensfeast (a free online ruleset)- one of a Viking raid and then a 2nd of the Vikings attempted to get their stolen booty home. I missed the first game, but caught the second one. Also a chance to try out my new camera – a Canon RP with my older 60mm macro lens!
It ended up being a minor Viking victory, as they got the major loot (the laden donkey) off the table, and took down both my lord and the local bishop with his
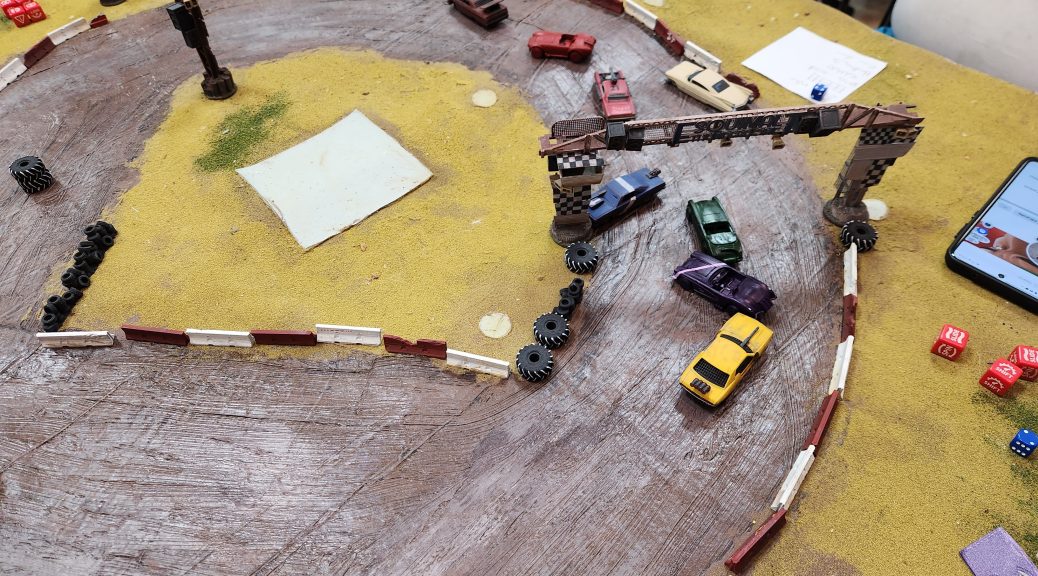
Gaslands pickup game – Death Race!
As we were late getting back to the main hall after dinner on Saturday, we ended up running the first of a pair of pickup Gaslands games. This death race ended up with the leaders taking each other out and the person in last place at the start claiming victory.
But the most glorious moment was the double jump – jump, slide, spin, jump again. Amazing to watch
Operation Sea Lion – Bolt Action
Sunday is one big slot, but we ended up having time to play a pair of games. First up, a four-table Operation Sea Lion, the start of a larger Bolt Action Campaign. On our table, it is a very minor German victory, as we cheeseweasled some troops off at the end.
It all started badly, however, as the Brits took out 1/3 of our force on turn 1 and we failed our prepatory bombardment roll. But our crowning glory was storming the ruined house held only by Dad’s Army types, who inflicted huge casualties, but we did more.
One last Gaslands game – Flag Tag
We had one last Gaslands game – Flag Tag. Team red vs the other colours, which also happened to be the younger players, including a friend’s son, against the older players (Brian, Martin and Tony).
All in all, twas fun but you never get enough photos. I did also have a participatory art project this year – I asked players to graffiti my buildings for my scifi terrain. Photos of those shortly and thanks to all that participated, I got some great stuff.
Til next year!
Update! Martin has uploaded his photos to flickr – he played many of the same games as Brian and I and even has shots of Brian’s boat game – something apparently Brian himself failed to get
It’s been a bit of an odd year for gaming, I’ve been having fairly regular games but not painting or building things on a consistent basis.
Obviously I’ve been very lax about updating the old blog but I have gotten a few bits and pieces done since the last update here at the end of February!
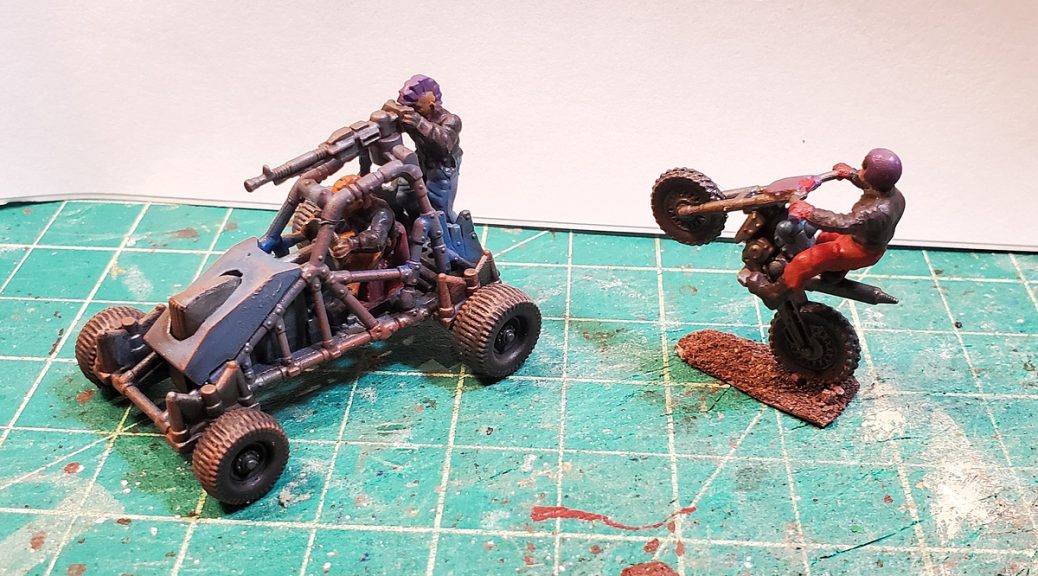
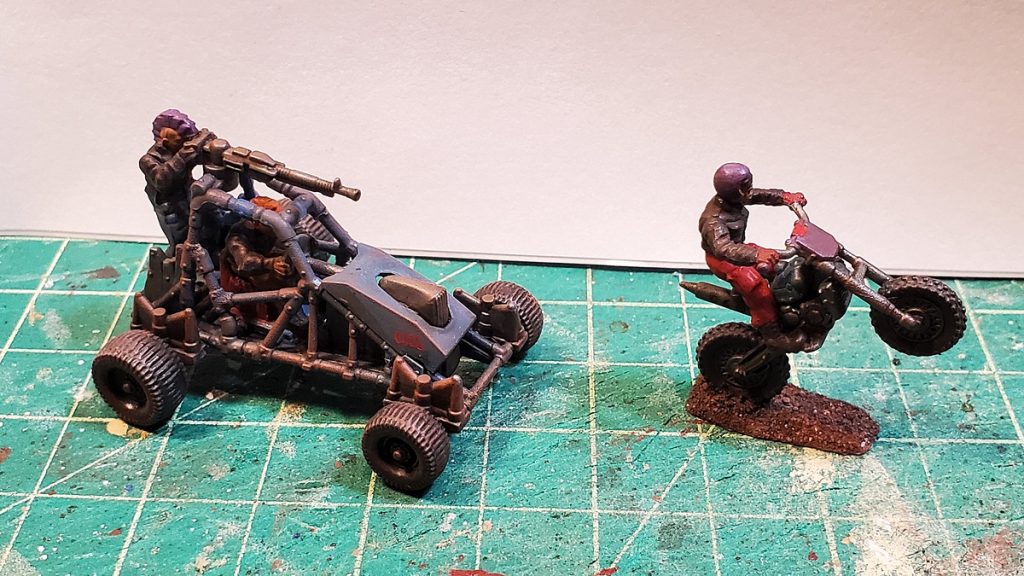
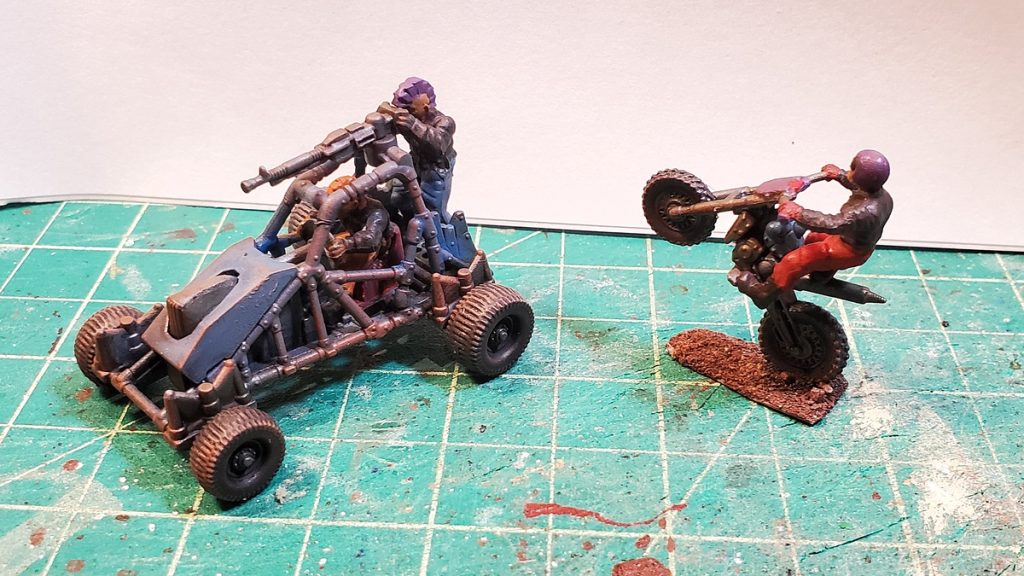
Gaslands buggy and dirtbike, from the plastic Implements of Carnage II set.
Sometime earlier this year I assembled and painted up this pair of little Gaslands vehicles, both from the North Star Implements of Carnage II plastic sprues. Both very cool Hot Wheels-scaled (20mm, nominally) little vehicles of a type that (unlike normal cars) you can’t easily get commercially.
Buggy and bike heading the other way.
By way of a mini review, I’d say buy Implements of Carnage II if you’ve already gotten into Gaslands, want the specific two vehicles on it, and probably already have the Implements of Carnage I set, which has lots of regular weapons, armour plates, and other bits that are more useful for converting Hot Wheels/Matchbox cars than what comes on the 2nd set!
There’s no instructions included with the sprues. The dirtbike is three pieces and goes together easily; the buggy is a bit more complicated but some test fitting should show you how it assembles. There’s two pieces of armour plate designed to go on either side that I’ve left off mine – they cover the sides of the roll cage either side of the driver.
More soon as I sort photos and try to get back into the swing of active gaming and blog posting!
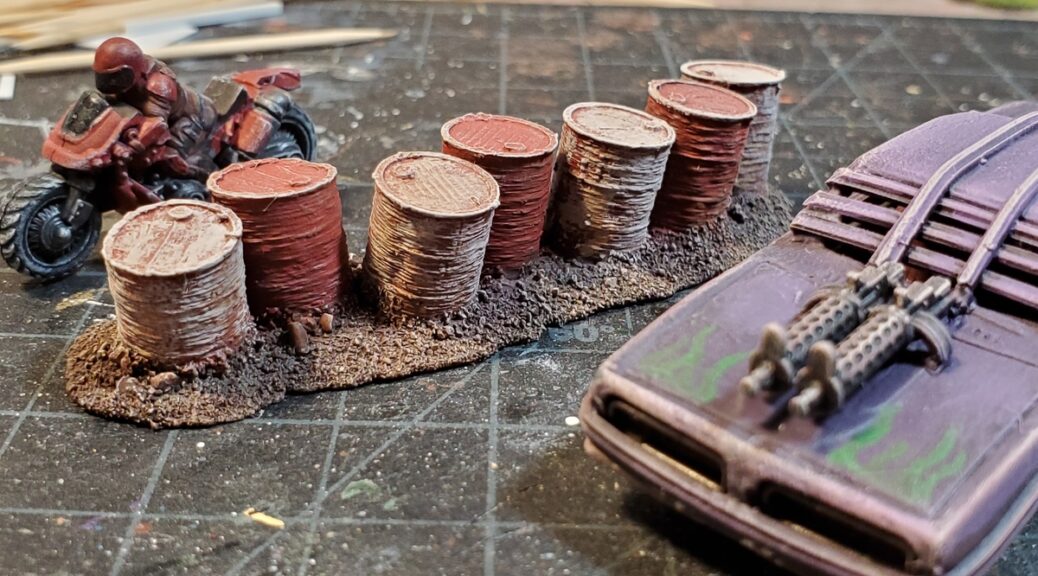
Corey has a 3d printer, as has featured here many times, and a little while ago he cranked out half a dozen barrels in Gaslands-ish scale. His printer was being temperamental, however, and they wound up a bit lumpy and mis-printed. The care and feeding of 3d printers appears to be an entire hobby unto itself, one I’m happy to leave to him…
Waste not, want not, though and on a post-apoc deathtrack battered misshapen barrels seem more likely than pristine clean ones anyway, so I took them, stuck them in a rough line on a base made of a lump of Milliput, and chucked some paint on ’em.
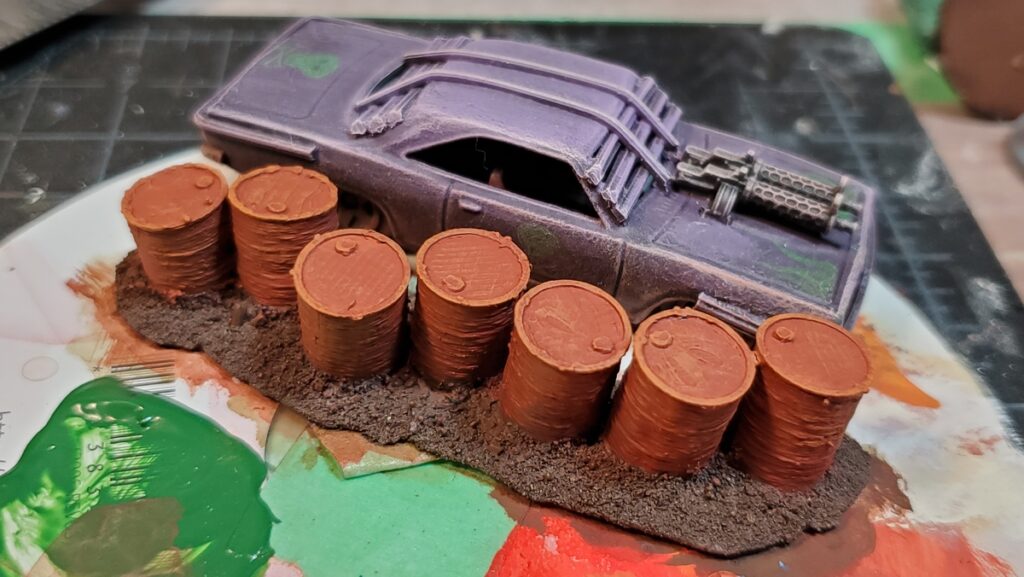
Rust basecoat after priming.
After my usual grey spray primer the barrels got a reddish-orange rust basecoat, then I painted them alternating white and red, to fit with the general colour scheme on our Gaslands arenas.
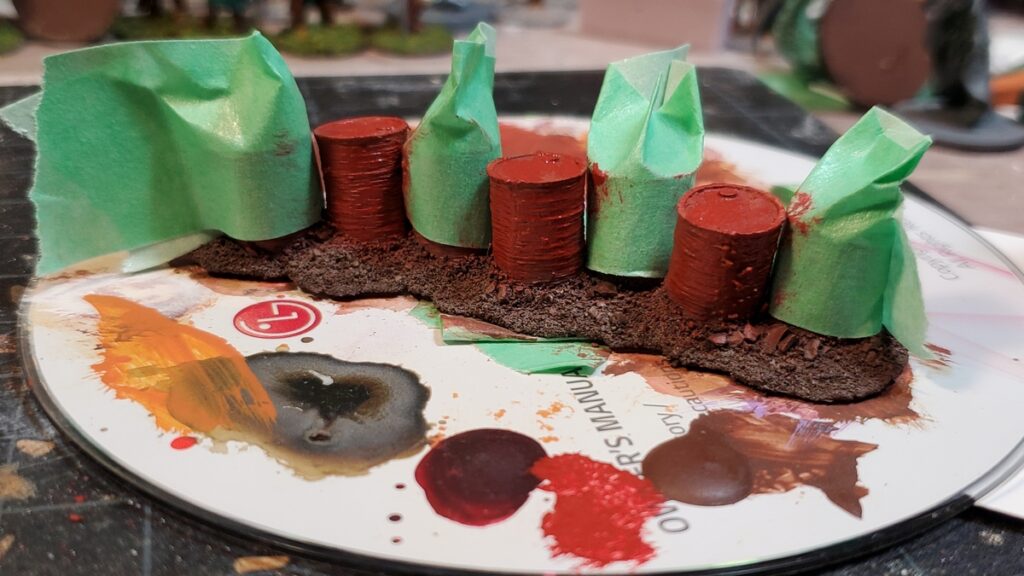
White barrels masked while I paint the red ones.
All the paint was stippled on to be deliberately scruffy and let the rust basecoat show through, and then I drybrushed various shades of rust, dust, and grime back over everything. I think there was a dark brown wash in there too, but can’t actually recall.
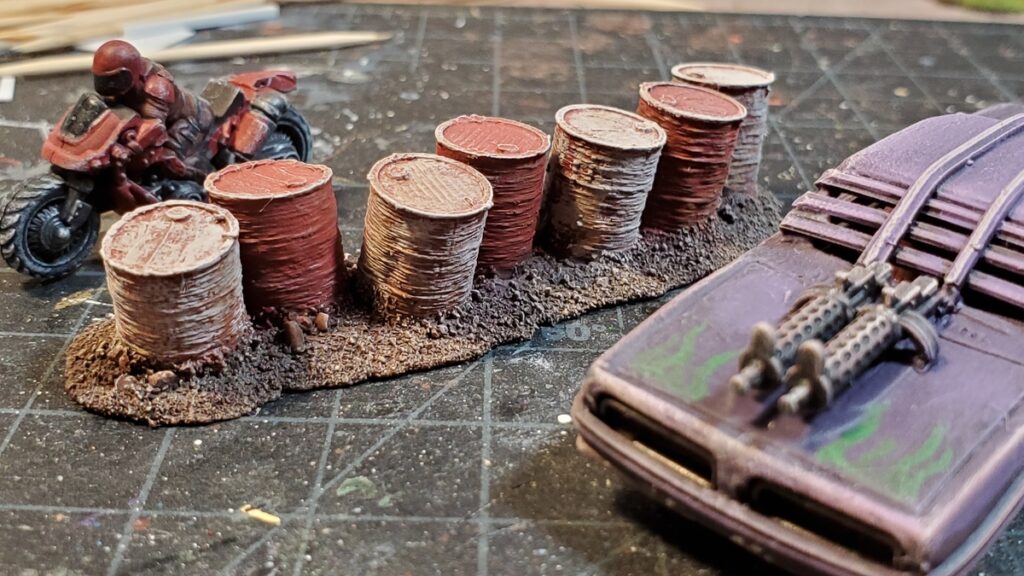
Finished and ready to be put out in the arena to be crashed into!
This was a nice quick little barricade, done over a couple of short sessions, and a good way to reuse slightly misprinted but still basically intact bits!
Cement Saul is a fairly new YouTube channel that has been doing a bunch of interesting Gaslands-related videos. I especially like the video on Weathering with Coloured Pencils and Pigments. Pigments (pastel chalk dust, or similar) are familiar to me and I’ve used them in the past, but weathering with actual coloured pencils hadn’t occured to me and I’m going to have to try that out! It’s part of a series on painting, stencilling, detailing, and weathering cars that’s well done, approachable, and worth your time.
Light Industries is a Canadian outfit that do various decals including custom work; I always like to find Canadian sources for things when I can!
Misc Minis do various decals as well, including tiny decals suitable for 1/1200 vessels or aircraft. I contacted him back in January 2021 about getting a little sheet of his smallest decals, got it in just a few weeks for much less money than I was expecting, and will do a proper review of them sometime soon!
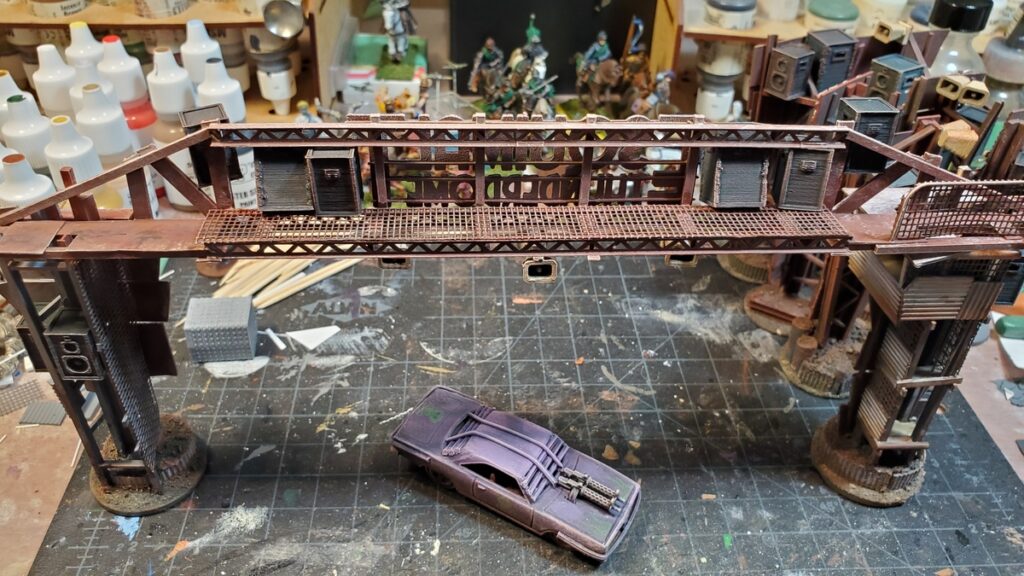
When we last saw our gates they were basecoated but stalled due to missing 3d printed parts. Those arrived, thanks to my brother’s 3d printer, and I was able to move on with the project.
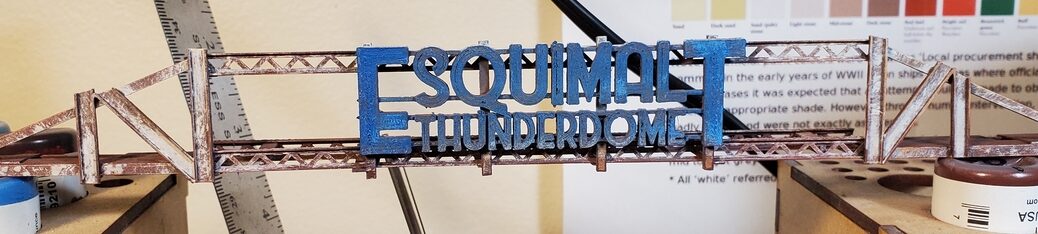
I didn’t want to start the overhead gantry on the Start/Finish gate until I had the 3d printed “Esquimalt Thunderdome” sign in hand, but once I had that the basic construction went together quickly.
The three openwork girders have been in my stash for decades and the packaging is long gone, but they’re from Plastruct – possibly these ones, which seem to be about the right size. You can find all the similar openwork web girders from Plastruct by searching their site for “web”.
The girders are only six inches long, so I knew I’d need to extend the gantry with other materials as the Gaslands rules call for gates the same width as a Long Straight movement template, which is roughly 7 inches long, and Corey’s Thunderdome racetrack dirt track is roughly 8 inches wide. Fully finished, this gantry is almost 10 inches long, and slots into the roof structure of the two vertical gate towers to hold everything together.
The start of the overhead gantry. I later pulled off the plastic mesh as it was getting in the way of construction and painting, and replaced it much later in the process. Click for larger.
The rest of the gantry was a random scatter of styrene shapes from the stash – there’s some flat C-channel, different T- and H-girder bits, and lots of square or rectangular cross section stuff. It had to both look structurally sound and actually have a certain amount of structural integrity, but the beauty of post-apoc engineering is that it still looks great if you bodge extra bits on to fix earlier problems!
in progress but before priming. You can see here how the gantry’s beams slot into the tops of the two gate towers. Click for larger.
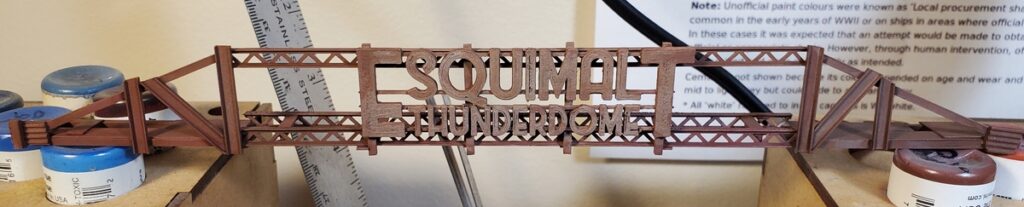
After grey primer I covered the whole thing in a blotchy rust coat using a couple of different shades of browns, reds, and oranges.
Rust coated. Click for larger.
After the rust coat I did a blotchy coat of white, partly drybrushed and partly stippled into place. This came out far better than I’d hoped, and really looks like white paint that’s flaking off as the metal under it rusts and weathers.
Stippled and drybrushed white, and first coats of blue on the sign. Painting of the actual gantry is basically done at this point; the sign got a bunch more weathering and highlighting and touchups. Click for larger.
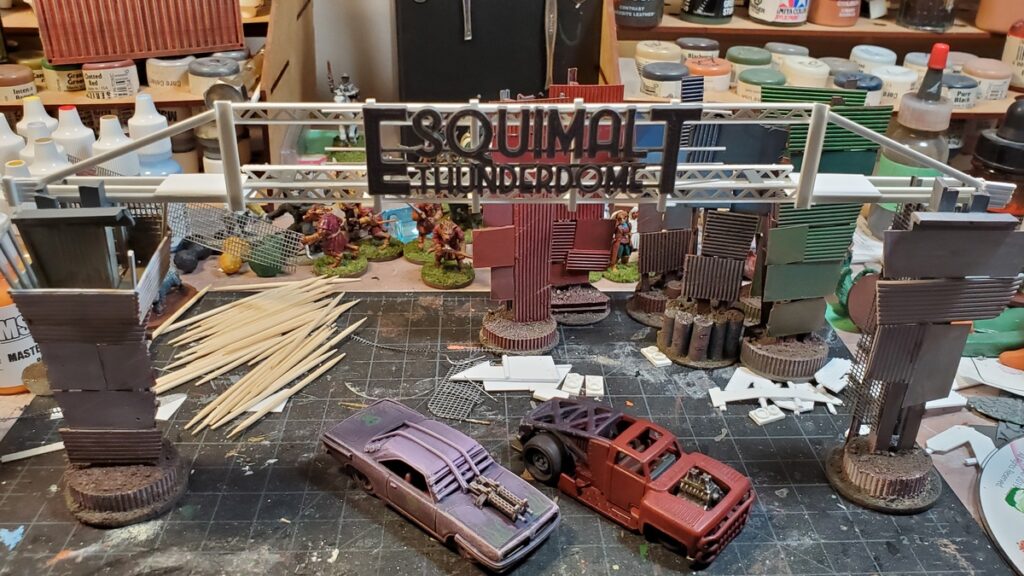
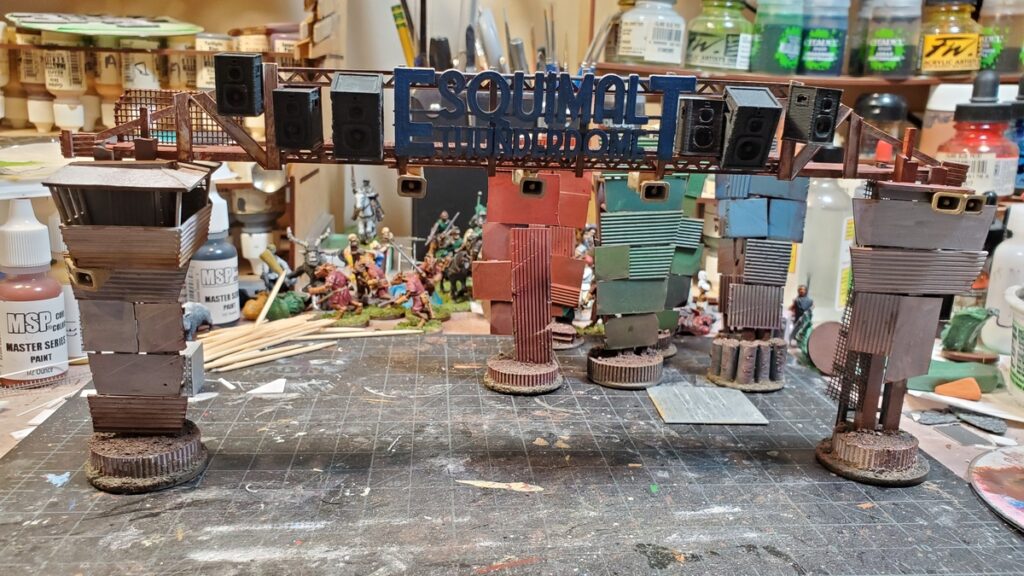
The speaker cabinets and loudspeaker horns were 3d printed from STLs on Thingiverse, both from a very nice collection of Gaslands parts. The speaker cabinets were printed in two different sizes, which added some visual interest.
Speaker cabinets and loudspeaker horns in place and weathering started. Click for larger.
The speakers got painted a blotchy off-black (Reaper Pure Black with a dot of one of their greys mixed in) and the loudspeakers got one of the many tan off-whites in my collection, I can’t remember which one.
The clutter of speakers and loudspeakers really makes this piece pop, it’s exactly the visual clutter I’d pictured in my head when first thinking these designs up!
I’d like to add some light fixtures, but it seems nobody makes 20mm 3d printable floodlight fixtures, at least not that I can find, and I’d want enough of them that scratchbuilding isn’t really an option unless I can come up with a really simple design…
The back of the gate, with mesh back on the walkway and all the 3d printed stuff getting weathered.
Next up, painting and installing the big “GATE” signs and numbers on the rest of the gates, and loads more weathering. So much weathering…
Kind of slow on the gaming front around here; we are still in COVID lockdown so no in-person gaming is permitted, but Thursday evening Gaslands by webcam is still going strong – we’ve had six players the last couple of games, which is probably pretty close to the limit for webcam gaming and keeping things organized and moving.
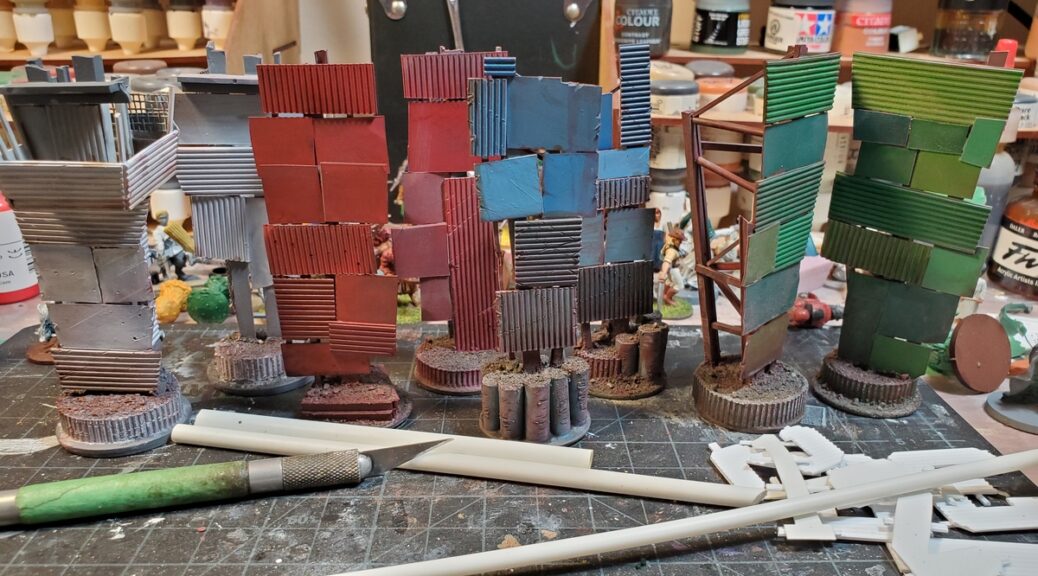
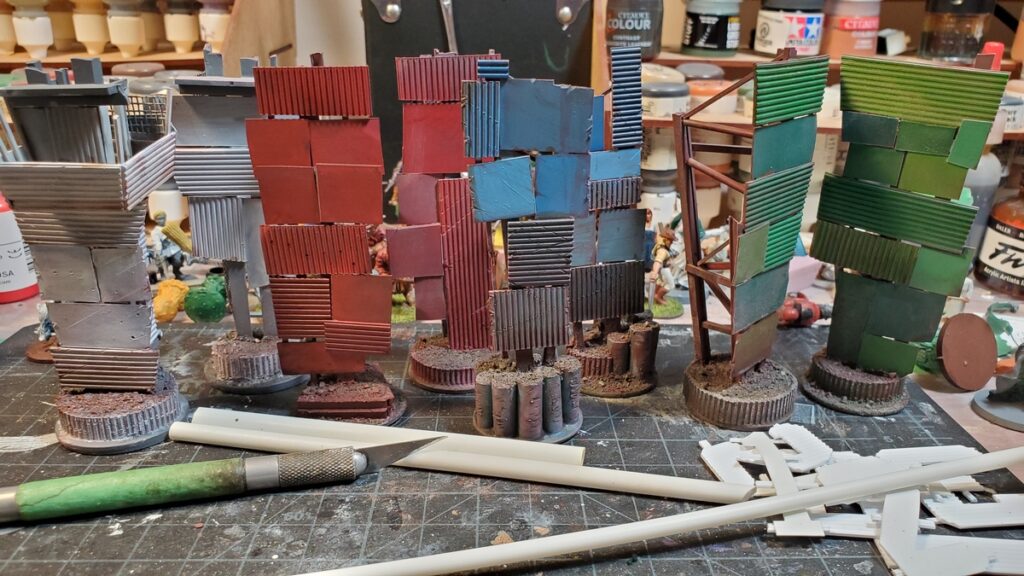
The gates have their basecoats and a first pass of weathering done, at least. I’m especially fond of the blue pair, they’ve taken the weathering really well so far.
Base colours and a bit of weathering on all four gate towers. Click for larger.
We had a blast of unusually cold weather and snow which has meant that my brother’s 3d printer (which lives in his garage) has been out of order, so everything is on hold until he can print the “GATE” lettering the six or eight times I need to add to each gate. It’s warmed up to normal winter temps again so hopefully he can get that done this week and I’ll be able to finish these up!
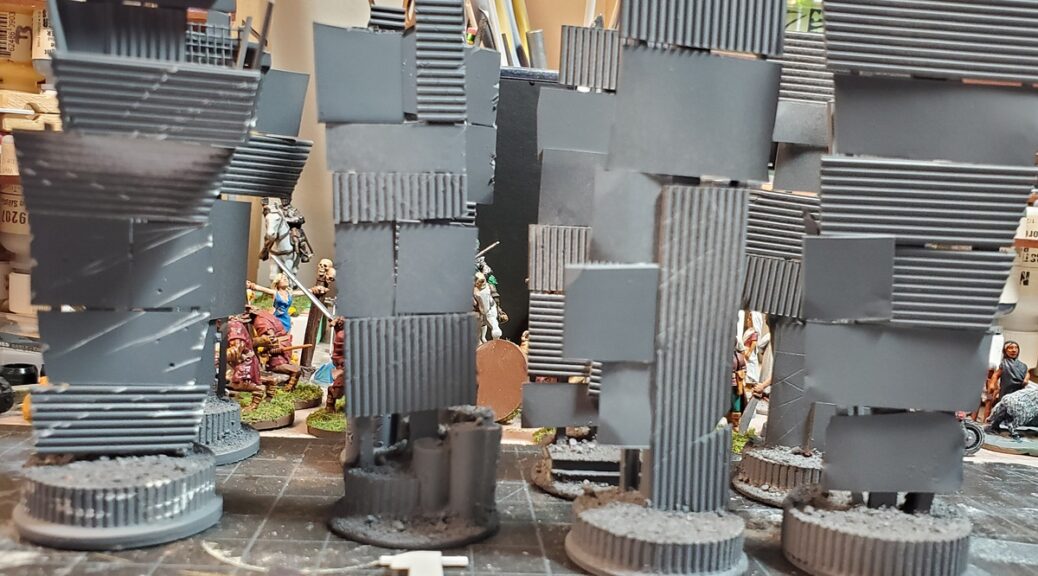
Got the base gate towers primed, and cut out the huge numbers that will go on each gate.
Primed gate towers. I forgot to add damage and scuffing to most of them before priming, hence the white streaks on the leftmost tower. Most of that was done with a small file, with bullet holes added with a very small drillbit in a pin vise. Click for larger, as always.
The plan is to label each pair of gates with large numbers cut from scrap styrene sheet, and to have 3d printed lettering for “GATE” above that, because I do not want to create styrene sheet lettering six or eight times if an alternative creation method can be found!
I’m going to scar up and then do the base colours on all the towers before the lettering goes on, so that I don’t have to try to paint under the lettering. But I cut the huge numbers last night and added the scrap bars that lift them off the surface of each tower.
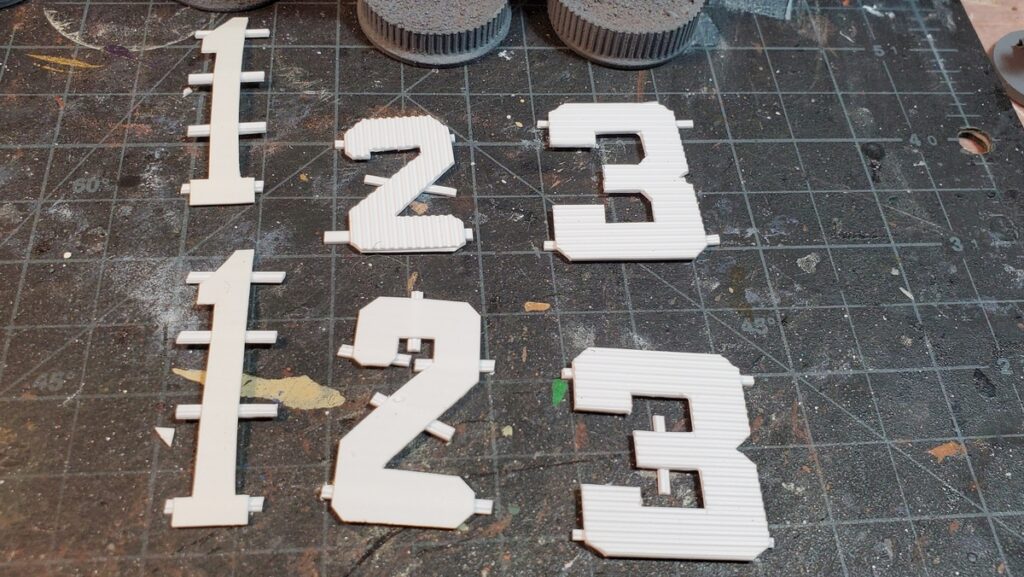
Numerals for Gates 1, 2, and 3. The squares on the cutting mat are half inch; the 1s are just under 2″ tall and the 2s and 3s are between an inch and a quarter and an inch and a half tall. Click for larger.
Base colours tonight and priming the lettering, then I kind of have to pause until Corey gets his 3d printer fully functional again before I can add the GATE signs and start work on the overhead gantry for the Start/Finish line.