Off for a While!

I’m off to Europe first thing tomorrow (Tuesday) morning, heading to Vienna to join a group riding all the way to Nantes, France. That’s roughly 2200-2300km over 44 days on the road; we leave Vienna on May 30th and arrive in Nantes on July 14th, Bastille Day! I’ve got a few days in France and then I fly out of Paris on July 20th back to Canada.

I might make a couple of short posts here from Europe, but please don’t count on it! On the other hand, I am going to be trying to update my personal blog semi-regularly from the road, as wi-fi and spare time allows.

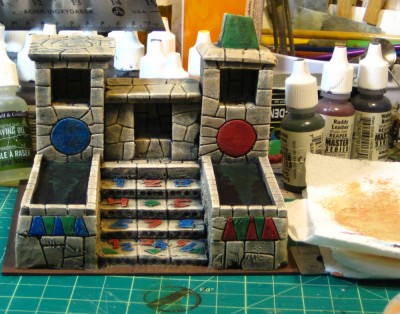
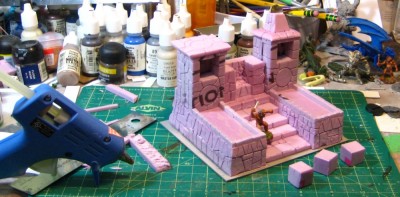
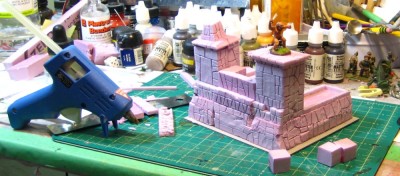
Someone elsewhere on the web asked me how much planning and design work I do for projects like the just-completed Bloodbowl Temple/Scoreboard; the answer is “really, not a lot“, but I will visualize things in head and try to work project details out mentally long before committing pencil to paper or knife to foam.

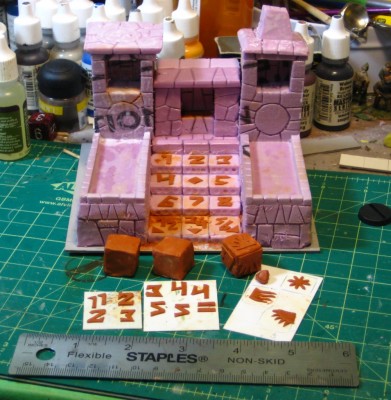
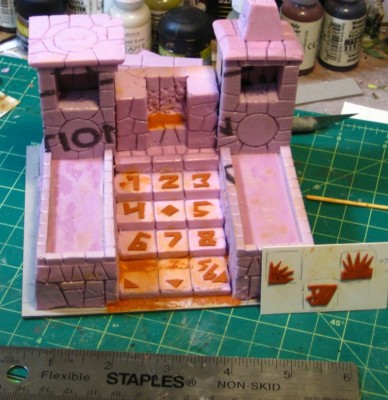
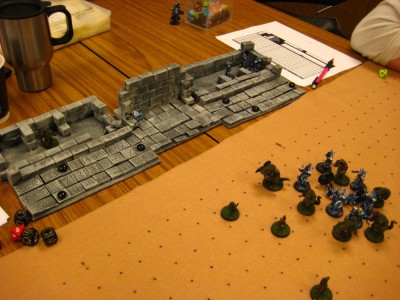
For the BB temple, aside from wanting to keep the footprint about the same as the previous one, the major critical dimensions are the main staircase which also displays the two BB scatter diagrams the game needs. I knew that if I got that main component set up properly the rest was much less exact and could be done largely on the fly.

temple_plan
Slightly smudged temple plans. Click for larger, as usual.

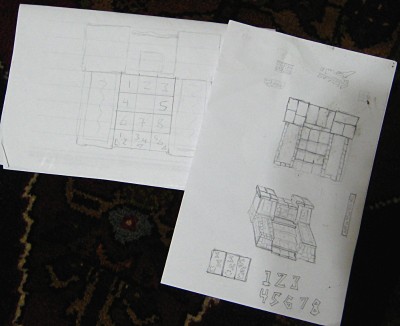
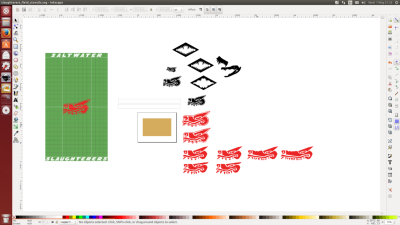
Above are the two scrap sheets of paper I used for sketching and planning. The right-hand one was first and has a top-down view and a rough perspective sketch. The left-hand one I actually used a ruler to lay out the main steps/scatter diagrams full size (the tiles are 15mm x 15mm), then roughed in the rest of the temple structure around it.

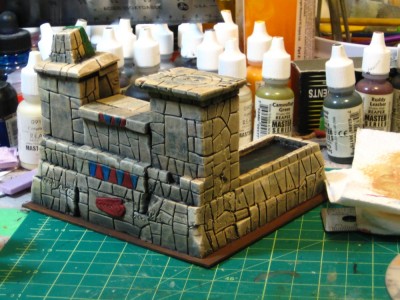
The build was more or less a matter of going through my bits of scrap styrofoam insulation board and fitting pieces to the left-hand plan, then eyeballing the dimensions of the three parts of the upper level once the base layer of 25mm thick styrofoam was in place. I measured the three indicator alcoves, but eyeballed just about everything else.

More precise architecture would be less forgiving, but this style of temple can withstand quite a lot of sloppy building and still look just fine in the end! Confession time: there are a number of places on this build where I shaved pieces of foam off after it was all glued together, disguised things with putty, or even added extra foam back after realizing I’d misjudged something.

After I’m home from Europe in July I’m going to start in on new BB dugouts and tracking scenery (Turns & Rerolls per team) to match the new temple scoreboard.

Back in July, and please do check out my main blog for news of the bike trip!

BB Scoreboard Temple Part Five – Finished!

Three coats of gloss varnish on the water, flock around the edges of the base, and the two score indicators and weather indicator all finished – the temple is done!

Currently it’s 2-1 in the Very Sunny weather for whoever is on the blue side today! A Baby Croc, Saltwater Croc and Leviathan Croc observe from on and around the sacred structure.

temple
Temple all finished, with all three indicators in place. Click for larger, as usual.

I’m not entirely happy with the three markers, but they’ll do just fine for now and they’re easy to replace at some future date if I get inspired!

Off to the left of the temple in the photo above are a quartet of small temple platforms and ruined wall pieces from foam offcuts from the temple; they’ll probably get used in some future pulp jungle lost temple but might also appear in a future Bloodbowl-related project.

BB Scoreboard Temple, Part Four: Paint!

The Blood Bowl scoreboard temple now has paint on it and is largely finished except for some gloss varnish over the two pools for a water look and some flock on the base and around the temple here and there.

temple
Temple front view. Click for larger.
temple2
Temple rear quarter view. Click for larger.

The three indicator cubes are basecoated and will get drybrushing and colour paint tomorrow.

Almost there!

BB Scoreboard Temple, Part Three

Bits and pieces of detailed putty-pushing this evening, mostly. I finished the last three icons for the weather indicator – Blazing Heat (fire), Snow (snowflake) and another Nice Weather (quarter sun). The three indicator cubes got the last of their putty, and I got all the numbers needed to to null to five on both cubes – they’re laid out on the scrap styrene in front of the temple in the pic below.

temple
The temple/scoreboard progresses. Major puttying operations should be finished. Click for larger, as usual.

I also got the roof glued down over the central portion, after patching the back wall of the alcove with a new piece of styrofoam to make it the same depth as the other two alcoves. The indicator cubes should stick out enough to be easy to grab and move in and out without picking the entire structure up.

I also slapped a coat of white glue across most of the temple to strengthen the styrofoam. When I do the primer coat on it tomorrow I’ll include a generous portion of white glue in the paint mix as well, to really help toughen the whole thing up. Wargaming scenery should, ideally, be as wargamer-proof as possible, after all!

New Bloodbowl Scoreboard, Part Two

Followup from yesterday afternoon’s post, I got the Milliput out and did a first pass on the piece.

As well as patching a couple of seams between blocks of styrofoam and rebuilding one stone I’d accidentally sliced too much off, I laid out the numbers of the main scatter diagram down the top three steps and got started on the throw-in scatter diagram that will be on the lowest step. The first and second tile of that are incomplete because there’s Milliput filling in some tears in the styrofoam at the rear of those two slabs; it’s much easier to wait until that batch of Milliput is cured before I try to add the numbers.

temple3
Main steps and other putty work. Click for larger.

To the right of the temple are the first three weather icons. Left to right, I intend to use them as Fair Weather, Torrential Rain (with a lightning bolt too, just for interest) and Bright Sun. I still need to do a snowflake for Blizzard, another partial sun for the second Fair Weather icon, and do something for Sweltering Heat – flames, probably, as I’ve already got three sun-based icons.

The weather icons will be added to one of the three styrofoam cubes I also partially coated in Milliput but didn’t include in the photo. They need Milliput on the other couple of sides and some cleanup with sanding paper, then I’ll probably sculpt the additional weather icons and the numbers for score right onto the cubes after this.

I’ll probably also use Milliput to add a few decorative bits around the numbers on the temple steps after they’re cured and safe to work around. The round stones on the front face of each tower are crying out for some sort of decorative bit, but I’m not quite sure what to put there at this point…

People more experienced in putty-pushing than me almost certainly already know this, but a bit of olive oil on your tools (Xacto knife blade, mostly) works perfectly to keep Milliput from sticking. I understand it works on greenstuff and most other hobby putties, too. Can’t recall where I read that tip not long ago, but I finally tried it last night and it does indeed work!

Stonework & A New BB Scoreboard

A while ago via Google Plus, I stumbled over the Terrain Wench and her work, specifically the nicely done Lizardman spawning pool she had created. She’d taken the trouble to do a really well-done video of her technique for doing stonework in styrofoam insulation board – embedded below.

(She has more videos on YouTube as well.)

As I mentioned in the last post, I’ve been wanting to build a new scoreboard setup for my Blood Bowl pitch, one with a few features I missed in the first one built last December. I sat down and started it last night, and except for a few details here and there it was one of those projects that has (so far!) just worked, and in person it looks pretty much like I was visualizing it in my head. Always cool when a project works out like that.

temple1
Front view of the new Blood Bowl scoreboard/temple. See text for details, click for larger.

The base is about 5.5″ wide and 4.5″ deep, with the temple made out of two different thicknesses of pink styrofoam insulation board and standing 4″ tall to the top of the right-hand tower. The stairs will have a BB scatter diagram “carved” into them with Milliput, and the three square holes are for score markers in the tower and a weather indicator in the central piece. There’s a roof piece that still needs to be glued down over the central piece, and the two “arms” alongside the stairs are going to be done up like pools of water with gloss varnish eventually.

I’m going to be using the cubical styrofoam offcuts in the foreground of the photo above to make both score and weather indicators. I’ll layer Milliput over the cubes; the score markers will basically be d6s numbered 0-5; the weather indicator cube will have icons for the five types of Blood Bowl weather, and probably a second “Fair Weather” indicator on the sixth side, just because.

temple2
Rear view of the scoreboard temple. As usual, click for larger.

I’m quite pleased with the way the base of the temple turned out, with that slight inward slope as the wall goes up which is so typical of a lot of monumental architecture. I’ll be cleaning a bit of the stonework up with Milliput, but I’m generally pleased with how it’s turned out as well. Terrain Wench’s technique of using an Xacto then a pen or pencil to carve stonework gives a much nicer result than my few previous attempts at stonework in styrofoam where I’d just used a pen or pencil to carve the stone.

Blood Bowl Action!

I posted way back in early December about the Blood Bowl pitch and scenery I was working on, and it’s been in use regularly in the months since, but in all that time I’ve never managed to get a photo of it in action!

Here we go, finally.

bbpitch
Blood Bowl pitch & pitchside scenery in use. See text for details, click for larger.

At centre is the scoreboard, which also has a scatter diagram engraved in the tiles of the courtyard area. There should be magnetic sheet number panels up on the stone backdrop to show the score, but I left them at home (derp) so the d6 is showing the 1-0 score at present.

Either side of the scoreboard structure is each team’s dugout and tracking area – three tracks for First Half Turn, Second Half Turn and Re-Rolls, and the usual three dugout spaces behind for Reserves, KO’d and Casualties.

The whole Blood Bowl setup is at that mildly irritating “80% done and usable but not really finished” stage; the fabric pitch itself needs a couple of passes of green and brown spraypaint to get a bit of a grassier look going on, then masking and spraying for the white pitch lines. I also want to do a Lizardman team logo at the centre of the pitch, and possibly team name in the endzones, so that’s more masking and spraying.

The pitch-side pieces need at least one more coat of drybrushing, then flocking, vines and various greenery to complete the desired jungle temple look.

I’m actually starting to build a whole new scoreboard structure, the same footprint but quite a different design that will, among other things, incorporate a Weather indicator as well as the score and scatter markers. Photos of that later this week, probably.

The Atlantic on WW1

The Atlantic magazine is running a ten-part World War One in Photos series with some very interesting images I’ve not seen before. They’re doing a post every Sunday for ten weeks.

The most recent post, WW1 in Photos: Technology has some great photos of obvious interest to wargamers, although the whole series so far is very high quality and has a great selection of photos.

As usual, avoid the comments, there’s far too much stupidity and pointless arguing…

Crocodilian Logos with Inkscape

I decided that my primary Blood Bowl team, made up of Impact Miniatures Sarcos crocodiles (run as Lizardmen in BB) needed a team logo.

I spent some time messing around on Google Image Search, and tried another jaw/tooth-based logo out for a bit before tripping over the Aztec “cipactli” glyph, which is a cayman/crocodile and also “e;a primeval sea monster, part crocodile, part fish and part toad, of indefinite gender”e; (from this Wikipedia article) which sounded cool enough as a concept, fit the jungle/tribal/vaguely-Central American theme usually found with Lizardman teams and looked easily reproducible and scalable as a team logo. I found a couple of versions of the cipactli glyph I liked, redrew them in Inkscape so I could work in SVG vector format, then started messing around.

One of my favourite things about Inkscape is that the canvas is infinite. Unlike GIMP or Photoshop where you define an image size and usually have to fiddle around to expand it, Inkscape will show you your defined page size, but the canvas around that page has no boundaries. Want to grab a copy of some part of your image, drag it to one side and fiddle with it separately or create different versions of it? Copy or duplicate the objects you want, and go right ahead and drag them somewhere out of the way to play with them!

inkscape_may2014
Inkscape working file screenshot. See text for details of what you’re actually looking at!

Above is a quick screenshot I took of Inkscape and the working file I’ve got for Croc team logos and related graphics. See the tan rectangle in the centre? The grey box surrounding it is a North American-standard Letter-sized sheet of paper (roughly A4 for the rest of the world) so the “real” size of this working area is theoretically huge.

The green box on the left is an entire standard-size Blood Bowl pitch with 30mm squares (a 26 x 15 square pitch, for non-BB players!) that I set up to check scale and sizes. The collection of black toothy shapes were an earlier, now abandoned idea for a team logo; the various red things are interations of a possible cipatcli logo.

cipactli
Variations on a cipactli theme. See text for details and click for larger.

The closeup screenshot of possible cipactli logos above shows where Inkscape really shines. Rather than work on just the one image and rely on undo/redo to track changes, or creating lots of versions of a single file and having to have them all open at once, if I want to tweak an object in Inkscape I can just grab a copy (Ctrl+D for Duplicate is useful, it’s Copy+Paste right over the existing object) then drag it off a bit on that infinite canvas. Rinse and repeat until you have a version you’re happy with!

Oh, and the cipactli varient I’m most likely to use, at least at this point, is the third down and third along. The slightly longer snout makes it look more croc-like, but for some reason the even longer nose of the rightmost one doesn’t work for me. I might well try another few variants, there’s no shortage of room!

The Thugee’s Bronze

This sculpted bas-relief is by Bob Murch of Pulp Figures fame, and is included in his Mad Guru set of Thugee. I own most (possibly all, I’ve lost track) of the PF Thugee packs; they’re among my favourite figures from Mr. Murch and regularly appear in our Pulp Alley games. (Thugee previously on the Warbard here and here!)

kali
A bronze bas-relief of Kali, Hindu goddess of death, change and rebirth. Click for larger, as usual.

The bronze relief, though, has sat around unpainted and ignored for at least a year until it fell into the current round of “clear off the painting bench” mania! The main colour is GW Dwarf Bronze over a grey primer, then a coat of GW Gryphonne Sepia wash/ink. A very, very thinned green ink over that for a bit of verdigris here and there, and finally a few highlights back with straight Dwarf Bronze. (Note that all my GW paints & washes are from the previous range, not the current GW paint/wash range, and I’m afraid I have no idea what the current equivalents of these colours are!)

The base is just a scrap of plastic sheet and a bit of Milliput with some flagstones scratched into the putty to tie it in with the flagstones already on the pewter. The whole thing has come out very nicely, and really shows off the incredible details of the piece, with the six-armed Kali with her necklace of skulls, skirt of human hands and forearms, and one foot on the body of her consort Shiva. (Good stuff on this Wikipedia article about Kali, btw.) Mr. Murch did his homework!