Over on Lead Adventure, in a thread about some nifty laser-cut bits someone had commissioned, I randomly commented that I wanted a dozen or so Orthodox crosses for Russian scenery, didn’t think they’d be strong enough if built from bits, but couldn’t see commissioning laser-cut ones because, well, I only wanted a dozen or so.
Whereupon Andy Slater (best known as the administrator of the long-lived and fantastic TerraGenesis wargaming terrain site) contacted me; turns out he has started up a small-run bespoke lasercutting service for wargamers. If he could sell them afterward on his site, was I interested in my dozen or so Orthodox crosses?
You see more and more laser-cut terrain everytime you turn around these days, lots of it very nice indeed, but I’d honestly never considered commissioning short-run custom pieces. Andy has, though, and has set up a small laser-cutting operation with exactly that aim.
I now have a batch of laser-cut MDF Orthodox crosses (and a few other bits from Andy’s store) making their way across the world to me. You can see Andy’s photo of the crosses already, and as soon as mine arrive (probably in a week or less, the Royal Mail->Canada Post pipeline is fairly efficient) I’ll post up my own photo and finally start a few Russian cemetery pieces to go along with last year’s onion-domed church.
Finished up the new pieces of scatter terrain I started last week. Mostly, I’ve spent a lot of time the last four days or so waiting for glue to dry! Do one stage of greenery, wait for glue, next bit of greenery, wait for glue, add second coat of glue to really secure everything, wait for glue… You get the idea!
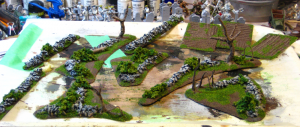
First layer of greenery, my usual mix of flock and ground foam, with coarse ground foam bushes. Click for larger.For a better idea of the heights of the tree trunks. Click for larger.
The bushes are coarse ground foam from Woodland Scenics, soaked in dilute white glue and pressed gently into place, then set aside for at least 24 hours to dry. They’re solid enough once dry you can lift the smaller pieces of terrain by them, although I don’t recommend doing this regularly!
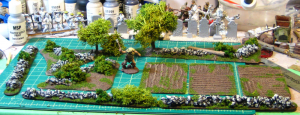
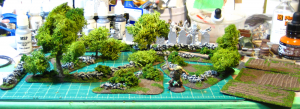
Lichen added to the trees, caveman for scale. Click for larger.
The lichen got hot-glued into place, and I was finally able to declare these terrain pieces done!
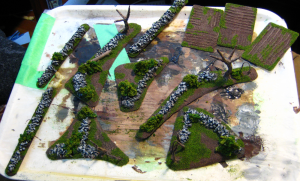
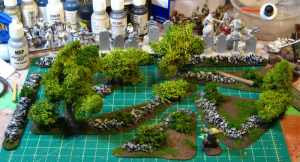
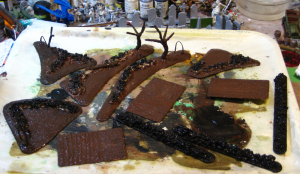
All the pieces – three 6″ rock wall pieces, three 3″x2″ fields/gardens, five random-shaped scatter pieces. Copplestone 28mm caveman for scale. Click for larger.Lower angle to show the heights of the trees. The lefthand tree is about 4.5″ tall, the shorter two are about 3.5″ tall.
This is not a new project, just something I remembered while waiting for glue to dry on my current scenery and decided to revisit.
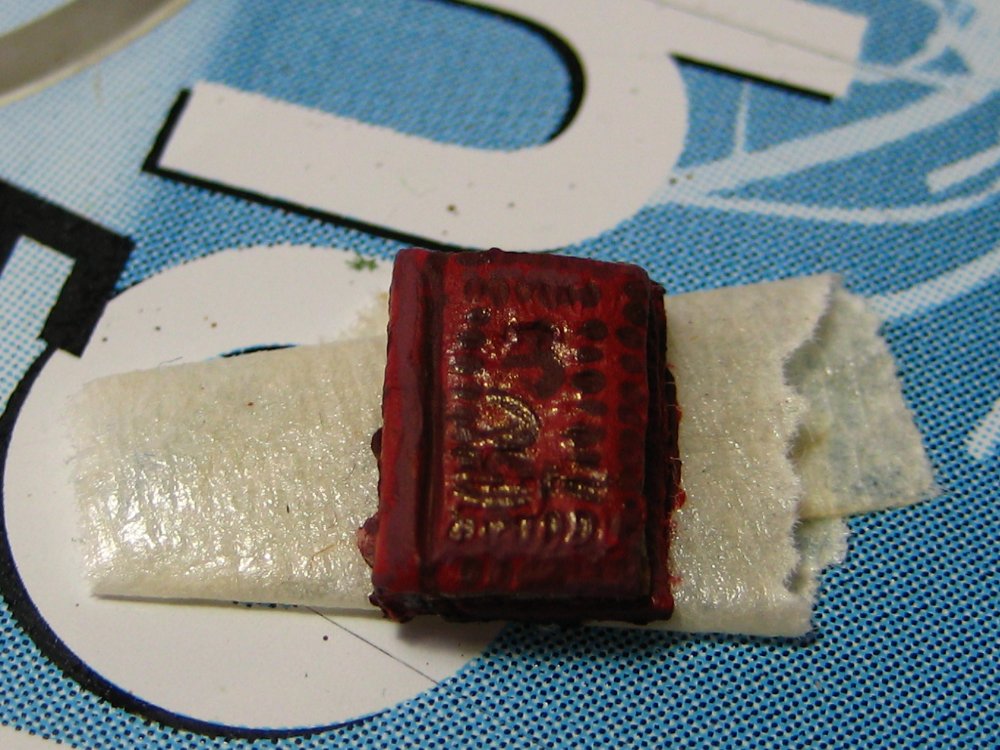
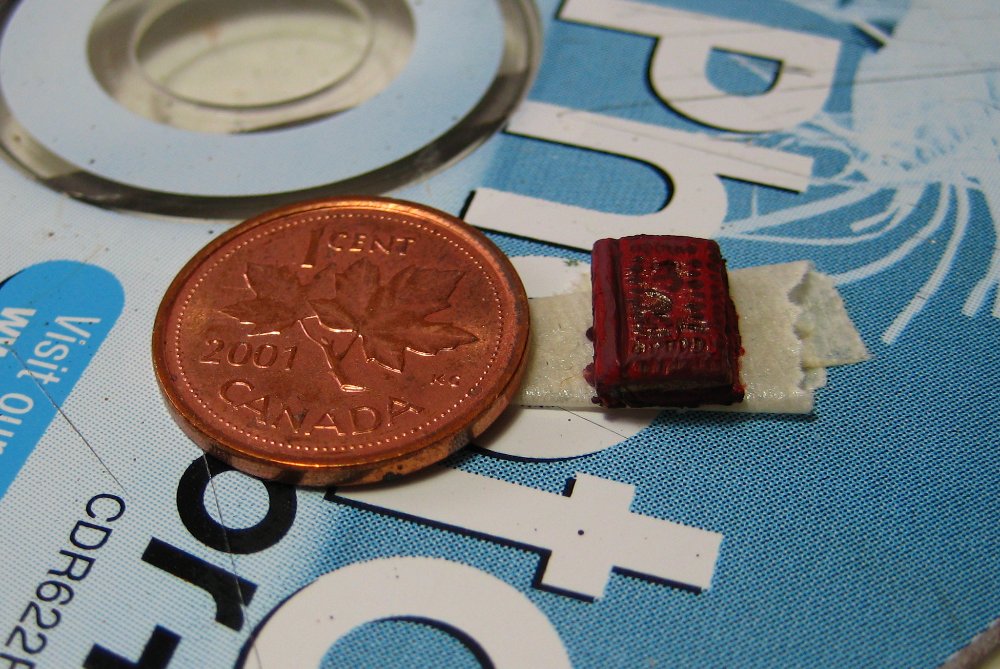
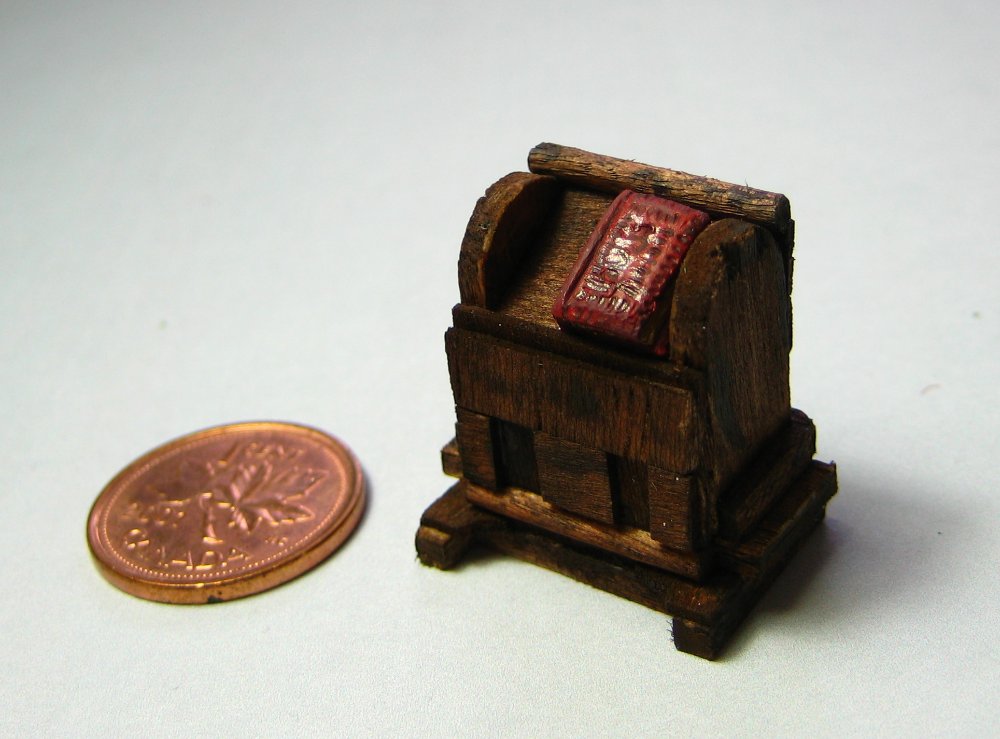
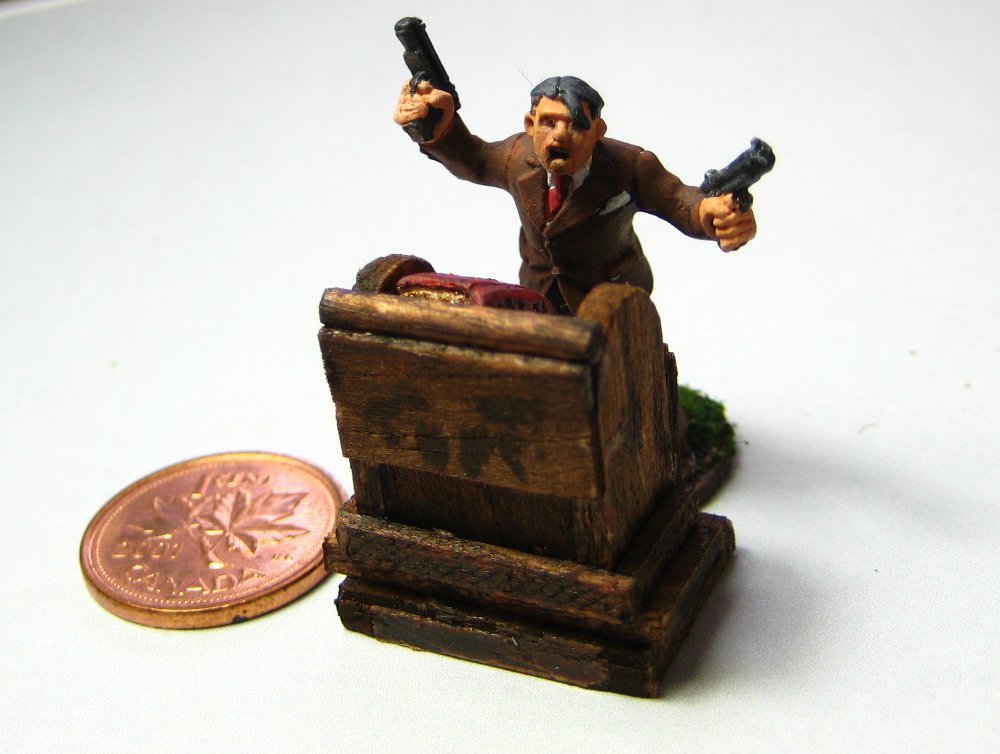
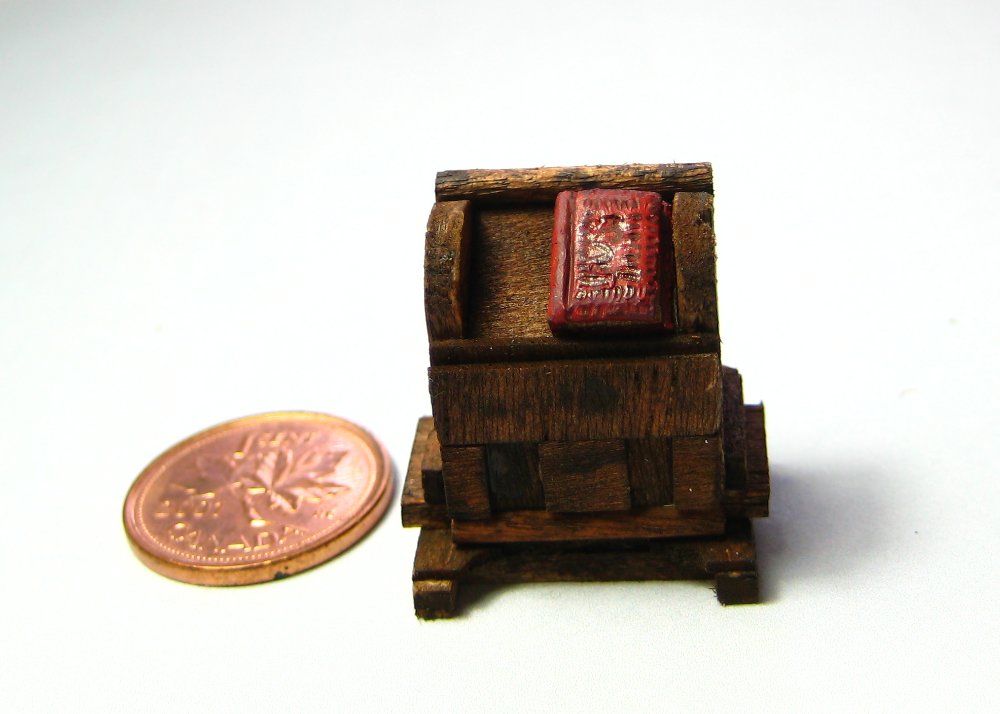
In September of 2009 I sat down with a bit of Milliput and some scrap wood and created the following lectern, upon which resides a Tome of Madness, filled with eldritch verses of great power and bound in the red leathery hide of captured demons. Or something like that, anyway. It was a birthday gift for my brother as he was busy painting a group of cultist figures from Pulp Figures. That pre-dates the current version of this website, so it never got featured here, although I did show it off over on the Lead Adventure Forum. Enjoy!
Having done hedgerows and fields, I wanted some rougher, more overgrown terrain, and I also wanted to start experimenting with tree creation, as trees are the one thing I’ve been lacking in my scenery so far.
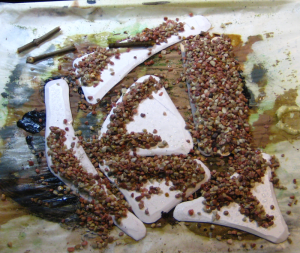
I started with the last reasonable-sized offcuts of the 3mm plastic I used as the base for the fields. The rock walls are decorator’s gravel and Gorilla Glue. I mentioned Gorilla Glue briefly in the article on fields, but briefly it’s a thick glue (the colour and consistency of honey) that activates with water, and expands as it dries, foaming outward. I wet the surface of the plastic card with a damp paintbrush, ran a bead of Gorilla Glue were I wanted the wall, dumped gravel in roughly the formation I wanted, then sprayed the whole thing liberally with plain water. The expanding Gorilla Glue will fill some of the gaps between the pieces of gravel, and also fill out the bulk of the wall slightly. After it dries (a couple of hours) you can always run a second bead of glue across the top of the wall and dump more gravel on. Two layers of gravel like this will get a wall up to just over waist high on a 28mm figure, which is enough for my purposes.
The three straight rock walls are based on tongue depressors, so 6″ long and about 3/4″ wide. The three small fields/garden bits are old credit card sized gift cards I had lying around, with the raised beds and plow furrows done with hot glue. The larger pieces are all from the 3mm plastic card offcuts, the longest being about 8″ long, the triangular piece about 4-5″ a side.
Gravel and Gorilla Glue for rock walls. Click for larger.
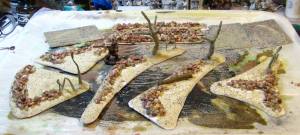
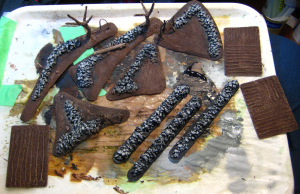
The trees are fairly heavy wire (sold in local hardware stores as “utility wire”, I seem to recall) bent and folded with pliers, then glued down with hot glue. Once they’re secured, I used more hot glue to bulk out the trunk and major branches. Everything – ground and trees – got slathered in white glue and had sand dumped over it at this point.
Rock walls done, on to tree trunks, then sand over everything. Click for larger.
After the sand had dried overnight, everything was basecoated with dark brown paint, mixed randomly with a bit of black paint. The rock walls got straight black as a basecoat. All my basecoats also have a healthy dose of white glue mixed right on each piece to secure the sand and gravel.
Basecoat – brown over everything but the rocks, which get black. Click for larger.
Last bit of painting is a pale brown/tan drybrush over the dirt and trees, dark grey then pale grey/white over the rocks, and finally a pale grey/tan/white mix drybrushed on the tree trunks so they’re a slightly different colour from the ground.
Drybrushing done – light brown & tan on the dirt parts, dark grey & pale grey (almost white) on the rocks, final grey/tan drybrush of the tree trunks.
In Part Two, flocking, scenic foam and other scatter on the ground, lichen for bushes, shrubs and tree foliage. Coming soon!
I picked up a copy of the recently published pulp skirmish rules Pulp Alley sometime last month, and we finally got a game of it in today.
Pulp Alley is published by the father & daughter team of Dave & Mila Phipps; the $10 45-page PDF has all the basic rules for pulp mayhem, designed around teams (“Leagues” in PA) of about 5-8 Heroes, Sidekicks, Allies and Followers. I’ll likely do a full review of PA soon, but the basic rules are well-written and well-edited, with nice pulpy graphic touches throughout.
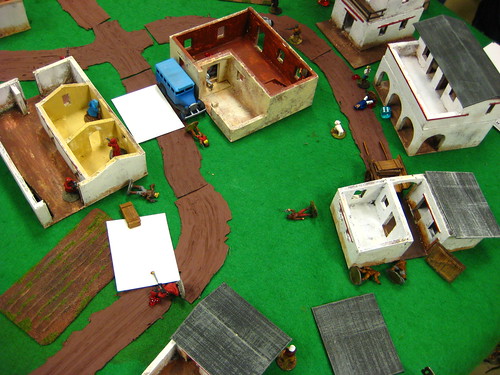
For this game I copied the sample League provided in the book, hacked together a second League quickly, then assembled two more Leagues by getting players to play mix-and-match between the two existing Leagues. This left a lot of rules and features unexplored, but as a quick-and-dirty method of assembling four not-quite-identical teams it worked OK. We got out my underused tropical buildings and a few bits of jungle terrain and got to it.
Early in the game. Air Pirates in the foreground, Sailors barely visible bottom-right, Russians in a clump top-right. Cultists are off-camera top-left. Click to view on Flickr.
Fairly late in the game. My Air Pirates are mostly down, the Cultists have forted up in the lefthand building, and the Russians and Sailors are brawling in the street to the right. Click to view on Flickr.
I’ll be writing up a proper review of Pulp Alley sometime soon, probably in a few weeks after we have another couple of games. The initiative system is different and interesting, with initiative changing hands based on winning fights or capturing objectives. The Fortune Card deck is a great idea and added quite a lot to the game, especially a few turns into the scenario when we were all a bit more comfortable with the rules. The combat system is elegant, although I can tell I need to stop at my FLGS to get a few more d8s before our next game. Before next weeks game I want to properly build several Leagues to get a better idea of the character and League creation rules; there’s also several questions I’ll need to ask over on the Pulp Alley forums, mostly to do with wounding and recovery from wounding, which we got slightly confused by!
It was great to get back to pulp gaming again, and I’m looking forward to getting more familiar with the Pulp Alley rules.
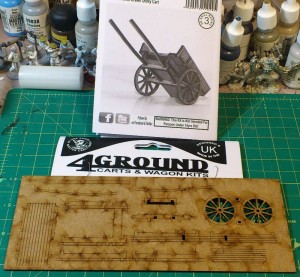
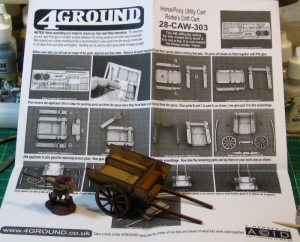
As part of an order that arrived this week from Brigade Games I picked up one of 4Ground’s neat looking laser-cut carts. This one is “28-CAW-303 C19th C Horse Drawn Utility Cart”, known on 4Ground’s own site simply as “Horse Cart”! I’ve been meaning to get some of these 4Ground carts & wagons for ages, as carts and wagons are nearly universal scenery and the pewter & resin ones out there tend to go for larger sums than I usually want to spend on waht i
It comes as a 8’x3′ sheet of 2mm MDF, laser-engraved on both sides, with the parts laser-cut except for very tiny sprues holding them into the sheet. There’s an A4 sheet that is both package label and (black and white) instruction sheet. The instructions are all photo illustrated, over a dozen small but clear B&W photos taking you through the assembly.
Straight from the ziplock bag- instructions at top, cart on it’s MDF sheet below. Bag topper card in the middle, just because. Click for Larger.
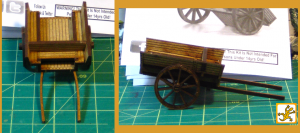
The parts are all marked by clearly engraved letters on the sheet, and the photos and text are more than clear enough to take you through the step-by-step assembly. I should note that there is a typo in the last sentence of the written instructions, though, where the letters identifying two parts are duplicated. The photos are clear enough, and by that point you’re down to so few parts it’s reasonably obvious where things are supposed to slot in.
Finished, with a 28mm Copplestone caveman for scale. Click for Larger.
The finished cart is actually fairly substantial. The body is about 2″ long and 1.5″ wide; the whole cart from tailgate to front of the arms that hold the draft horse is 3.5″ long, 2″ wide across the wheel hubs and 1″ high when sitting level. Resting forward on the arms (what are these pieces actually called? I’m sure they have a name in a real cart…) the back end of the cart is about 1.25″ tall.
Front & side views of the cart. Click for Larger.
I’ve not yet decided how I’m going to, or even if I’m going to, paint this up. I think I’ll experiment this weekend on the offcut pieces of MDF and see how it reacts to washes and other paint. A grey wash and a bit of off-white drybrush might be all it needs to weather the wood a bit and give it a well-used appearance.
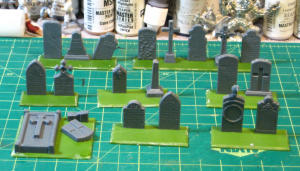
Quick photo of my work-in-progress Renedra gravestones, purchased over Christmas from J&M Miniatures. The bases are leftovers from my long-neglected English Civil War/Thirty Years War forces, which are Warlord sets and come to think of it, also cast by Renedra.
Quick and rough late night snapshot of half the Renedra graves. Click for slightly larger.
This is half (one of two identical sprues) of the Renedra gravestone set, and spread out to allow figures between the bases, it comfortably fills my 11″x9″ cutting matt. Adding the second sprue and some other bits like trees and such would give you an extensive graveyard to skulk in!
First “Links of Interest” miscellaneous post for 2013, so it’s a long one!
The fantastic blog Wargaming with Silver Whistle is, like I was recently, also making fields. His are spectacular, and might inspire me to re-visit the subject again in the near future! He’s got fields and allotments, large wheatfields, and finally some haystacks, all lavishly illustrated.
TutoFig.com is a multilingual European website that aggregates links to all sorts of tutorials – figure painting, sculpting, terrain, and all sorts of other stuff. Lots of high-quality links there, and I’m flattered they linked to my hot-glue fields tutorial, which is how I discovered them in turn.
Staying with the scenery theme, The DM’s Craft Youtube channel has lots of short terrain videos, focusing on the quick-and-cheap (but effective!) end of terrain making, and especially the many, many uses to which one can put a hot glue gun!
Moving on to the Russian Civil War and World War One, the Photo Palace blog, WW1 & RCW Photos Found is a post about an amazing collection of photos by an American who was working with the YMCA in both France and Russia during World War One, and who then escaped the Russian Revolution via Siberia and China – and he took photos the whole way, as well as buying photo postcards and such as he travelled. There’s only a few photos from the collection up online right now, which is unfortunate, but they’re really neat, atmospheric photos! The same blog also has French WW1 Photos Found Still in Camera, but again, too few of the actual photos posted online so far!
The US Army’s famous West Point Military Academy has, unsurprisingly, a first-rate History Department, who have put online their Atlas of Military History. There’s no maps of the Russian Civil War, despite American forces being involved both in Northern Russian and Siberia as part of Allied Intervention forces, but there are great clear maps of World War One on the Western Front, as well as maps for nearly every other war the Yanks have been involved in.
As is often the case at conventions, I got too involved in actually running or playing games to take many photos, but here’s a few pics from GottaCon 2013! These are all over on Flickr in my GottaCon 2013 Photoset.
Friday evening Corey ran and I played his homebrew fast-and-simple pulp racing game. You can read my Friday writeup for details, but basically it was Our Hero being chased by Evil Henchmen down a narrow, twisting country lane. Sheep, other traffic, skunks and an elephant got involved, and pretty much everyone crashed.
Friday night’s pulp racing game. Our Hero in the black car, two Henchpersons in the red & white cars, innocent but explosive NPC fuel truck getting in the way. Click to see larger over on Flickr.
Saturday morning I played a naval board game with a friend I hadn’t seen in at least four years. Great to reconnect with him again, and totally random – I just happened to wander by the board gaming area looking for something to do, because there was nothing in the miniatures or RPG area I was interested in!
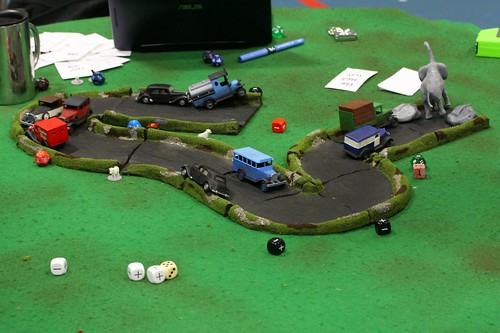
Saturday afternoon was, of course, the first running of my Russian Civil War game. See Saturday’s writeup for a few more details; I’m also going to be posting a more detailed writeup on the two games later this week, because from identical starting positions involving identical forces over near-identical terrain, they wound up radically different games! I didn’t get any photos of the second game on Saturday evening, but the terrain involved changed only very slightly, so this overall table view will work for both games.
Looking down the length of my Russian Civil War table. Reds started on the long left edge; the Whites started in the hamlet ahead of the camera. As you can see, I’m a great believer in getting maximum table coverage, even if it’s just open fields with minimal effect on play! Click to see larger over on Flickr.
Sunday morning Corey and I wound up re-running his pulp racing game, with rules slightly tweaked after discussing Friday’s game. We have a draft system for vehicle damage, which is fun and adds to the tension and chaos.
Sunday morning’s racing game, with Our Hero in the blue-and-white truck getting clean away to see the elephant. Best not to ask why an elephant, really. Click to see full-sized over on Flickr.
Sunday afternoon I played a short demo game of Infinity. The system is interesting, but the terrain being used was fairly bland, so I didn’t bother taking photos.
So that was GottaCon 2013! Same again next year, only more of it – as I said in my Sunday writeup, I’m pretty sure we’ll both be running more games next year, just to get the kind of gaming we like represented!
Short and frankly lazy day of gaming today. Corey and I re-ran our pulp racing homebrew from Friday evening, roping one person in. We’d tweaked the rules slightly, added actual damage to the vehicles, and the mayhem was just as pulpy, daft and destructive as ever!
I spent most of the afternoon being a spectator (and forgetting to take pictures, worse luck) and blowing the last of my GottaCon budget at various vendors. I spent the lion’s share of that at TableTop Scenery on three bases of trees, each base with a pair of threes in the 5-7″ tall range. Trees are the one major pieces of terrain I’ve never gotten around to doing, as good looking, largely gamer-proof trees can be fairly challenging to make. The TableTop trees are “bottlebrush” style, with a wire core and hemp branches shaped and flocked. I also picked up a random scattering of other things – more dice, a Munchkin booster pack, and four or five Reaper fantasy figures that were on clearance at one booth.
I also played a short three-turn demo of Infinity, a game I’ve been intrigued by for a while now. The game seems fast, rules light and incredibly lethal. I scored the free Intro Rules booklet (which seems fairly complete, actually) and a pair of infantry figures from the Nomad faction. I might paint them up soon, actually, just as a change from the Russian Civil War hordes that have lately flooded my painting bench. The nearly insane per-figure cost of the official Infinity figures is discouraging me from actually getting into the game, though. I know you don’t need many figures per team, but still, $10-15 for a single infantry figure puts one off.
Corey spent the afternoon running a D&D 4th Edition Essentials module for three or four teenagers, but didn’t manage to kill every single one of their characters. Pity, that.
I haven’t heard any official estimate of attendance from the guys who run GottaCon, but it felt busier throughout than the last couple of years, and a couple of the repeat vendors I’ve gotten to know in passing said it was a better year than previous ones for them. That bodes well for Victoria’s “big” gaming convention in it’s fifth year.
The one thing that continues to bug me about GottaCon (and has since it started) is the lack of non-tournament miniatures events. I’ve basically come to the conclusion that if GottaCon is going to continue to amuse me, as a gamer, I’m going to have to continue to arrange my own amusement, in coordination with my brother and a few other like-minded gamer friends. I’ll almost certainly be running more stuff next year, possibly making the double-header Russian Civil War games official, as well as working with Corey to bring back our pulp extravaganza games in some form. I may even try to organize an RPG session using Savage Worlds or one of the systems I enjoy, as an alternative to the endless parade of 4E & Pathfinder RPG sessions GottaCon’s roleplaying track is currently clogged with. We shall see!