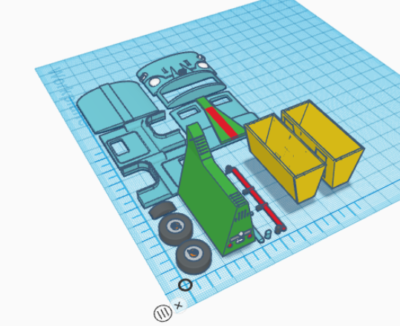
I finally got around to laying out the 1956 PANG for the first printing. As you can see from the pictures below, I am trying to remove the need for supports which will mark the surface of the final print.
Final draft for referenceLaid out in TinkerCAD for printing
I chose not to break out the rear section or the bins for initial printing. I likely will in the final version, as it will speed up print time and make it cleaner.
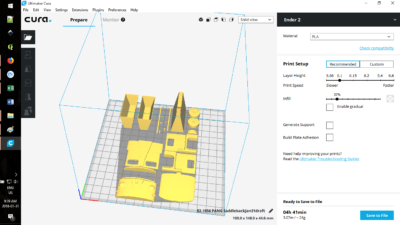
Cura layout, with approx. print time. Note that my printer (Ender 2) has a fairly small print bed, so this will fit on it
One final note: I am certain that there will be tweaks needs to be this and I am missing things, namely an interior and side mirrors to start.
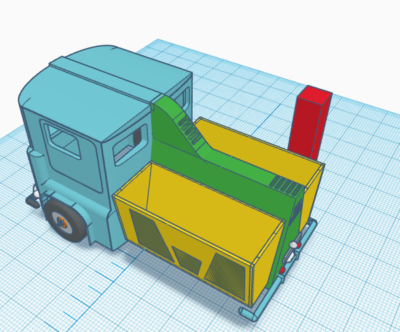
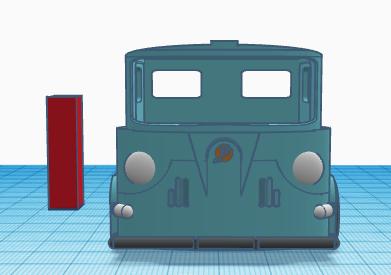
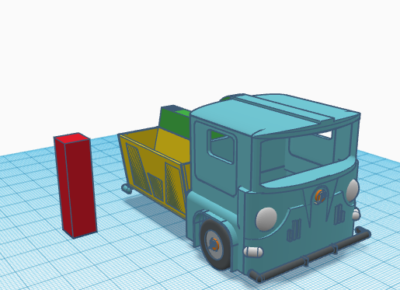
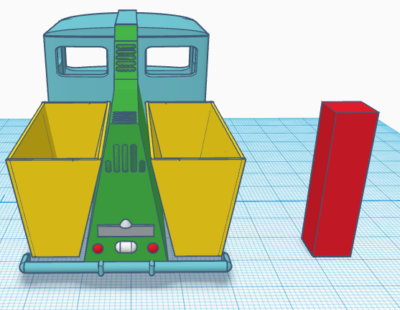
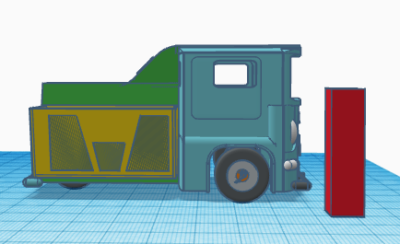
Build Something 2018 continues and I have been pretty quiet for the last week. Part of this is because I am waiting on the warrantied printer board, so motivation is low. Also been busy with other things. But today I kicked myself into gear and go the first printable draft done of the 1956 PANG. Take a look below (the red rectangle is 32mm high and is there for reference):
Front ViewFront angled viewRear view of the 1956 PANGSide view of the 1956 PANGRear angled view of the 1956 PANG
Dogs and cats living together! Chaos and disorder!
Well, something like that. Horses and armour, at least.
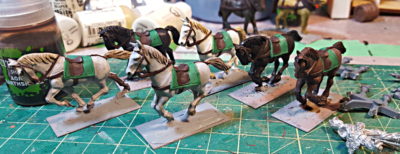
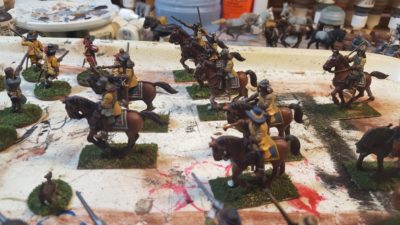
I realized that all twelve horses for my regular ECW cavalry are all brown. Every last one of them. There’s a bunch of variation in tone, mane colour, stuff like that, but they’re all bay, which is horse-speak for brown. Well, some of them might be chestnut, which is horse-speak for “lighter reddish brown”, more or less. For the six horses I needed for the current batch of cuirassier I decided to mix it up a lot. There’s a white horse, two different shades of grey, two different bay, and one black horse.
All six cuirassier horse. Hair, mane, and tail all done. Hooves, tack, and some details still to do. Click for larger.
Unfortunately I totally forgot to write down any of the paint mixes or layers I used for this batch of painting, so I’ll have to re-invent the wheel, or at least the horse paint, next time I do horses!
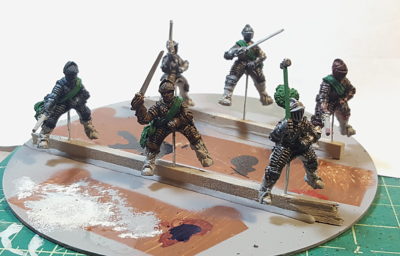
For the armour, I put pins up into the backsides of all six cuirassier, making them extra-long to make painting easier. Then I used a scrap CD, two lengths of scrap wood, and my hot glue gun to create a very useful little painting stand, seen in the photo below.
All six riders got all their armour basecoated bright silver (Reaper’s True Silver), then various inks and washes were layered over to try for a treated-metal appearance as discussed in my last post on coloured armour.
GW’s washes don’t work as a base layer for this, I discovered right away. They’re not designed to stay on flat surfaces particularly well, although they shade crevices and lower areas of a surface very nicely. I used India ink for the three blacked armour sets, Reaper’s Red Ink for the russeted armour, and FW Artist’s Acrylic Inks for most of the rest of the colour.
The three blacked armour riders were basically done after one coat of thinned India ink, and then I went back in with metallic paint to do some of the edges and highlights, especially on the rider in the foreground of the photo with the hammer and plume.
Armoured riders. Front right blacked with silver edging, rightmost russet, two background guys both blacked, blued armour on the far left, then the second russet armour guy foreground centre. Click for larger.
The two russetted armour guys and the one blued rider (far left) got at least a couple of more layers, including either very, very thin India ink or GW’s Nuln Oil to darken the bright initial ink coat. The blue guy especially looked incredibly bright and weird after his first coat of just blue ink – my girlfriend saw him and said, “Seventeenth Century Power Ranger!” and damned if she wasn’t right…
I’ve also discovered that these guys are nearly impossible to get a decent photo of in their current setup, the above blown out and fairly crap photo is less crap than all the rest. I’ll try for better pictures once the riders and horses are all attached to each other. Still to do is boots, saddles, faces, and weapons.
I’m really pleased with how these guys are turning out so far, and I think they’ll look great on the tabletop once they’re all finished. Ink over silver is definitely a win for doing coloured armour!
Well, Build Something 2018 is well underway at Lead Adventure. You can follow all the entries, including at least two other 3D printed things, over on the subforum.
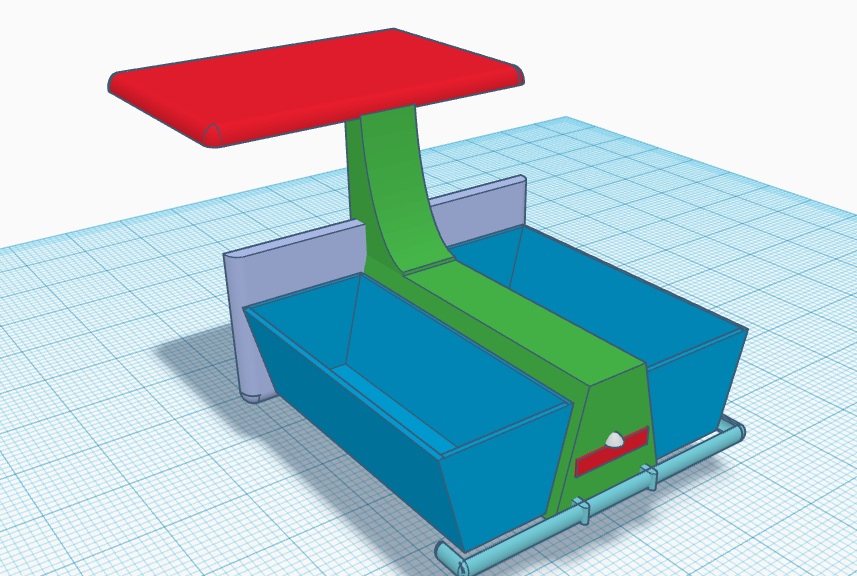
And what of our 1956 PANG tricycle truck? Yesterday saw a lot of work on the back end. As of two days ago it looked like this:
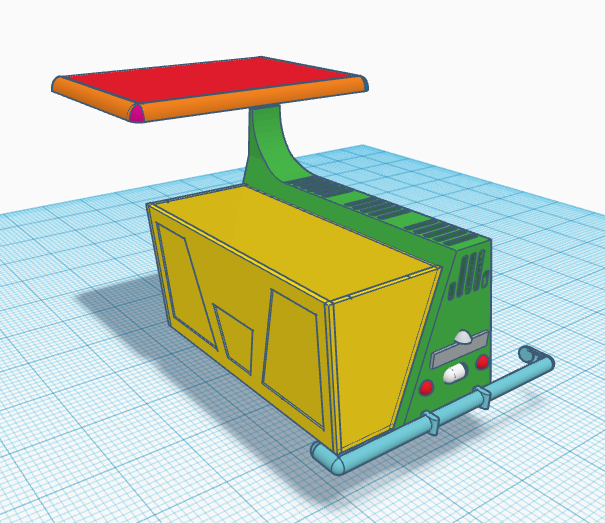
I really didn’t like the aspect ratio of the truck – height, etc. So I completely rebuilt the back end so it was taller and thus looked narrower:
Early work on 1956 Pang
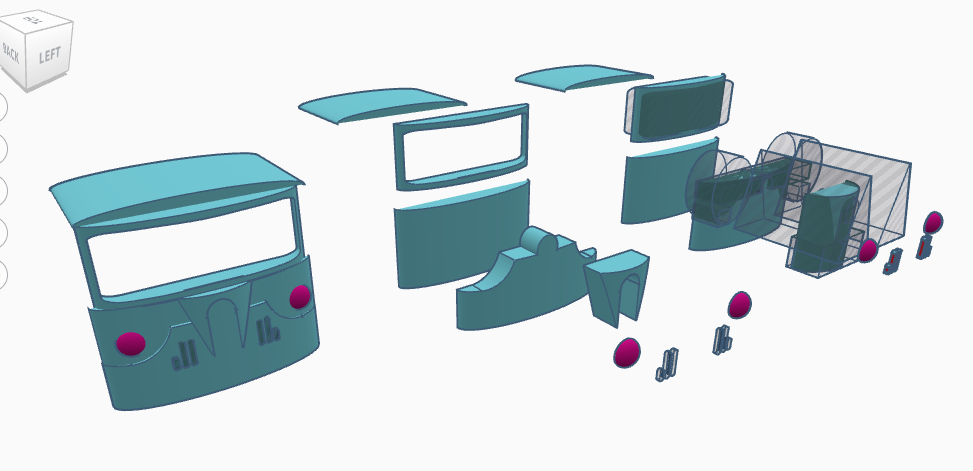
Today I started working on the front end, which is a lot harder. It has a lot of curves with curves, so it going to be a real challenge to do well. I am not overly happy with the look (too wide and squat) so might rebuild the front. Here it is in exploded view.
Front end of 1956 PANG, exploded view on right
What I love about modelling this way is that if you don’t like something, it is trivial to rebuild it. Play with the ratio, etc.
Long time, no post. I (Corey) just got a 3D printer (an Ender 2) and so am working through beginning printing with it. Unfortunately after the first print the board cooked itself, so I am contenting my self with doing some design work in TinkerCAD.
I’ve posted links to horse painting articles and tutorials before, including the exhaustive “horse of a different colour” series over at Trouble at t’Mill. Mike even gives you some rough math on what colours any given troop/regiment/herd/group of horses should be: “One tip – if you’re batch painting, the maths works out roughly that you should pick out your hero horses that are going to be fancy colours, then split about a quarter of the rest off and earmark them for chestnuts, split a quarter of the leftovers from those off and earmark them as blacks, and paint the rest (which should be a bit over half) bay. The further back in history you go, the fewer chestnuts you’ll probably have.”
But what about the riders? Unarmoured or mostly unarmoured riders provide obvious opportunity for colour, depending on the army or era you’re modelling, but if it’s knights or early 17th Century cuirassier in full plate it’s all going to be silver/grey metal armour, right?
Armour can, in fact, be lots of colours than just “shiny metal”. It probably should be, in fact. Blacking, russeting, or even painting seems to have been fairly common. Keeping armour “white” (shiny) was a lot of work on an ongoing basis so a lot of munition-grade ordinary armour was finished in some way.
A lot of the armour in museums that’s shiny these days probably shouldn’t be. As the Wallace Collection says on their website about one partial suit of 17th C armour, “Like the others of its group, this one originally had a ‘black-from-the-hammer’ finish, but was polished bright comparatively recently, almost certainly in the 19th century.” Another thing we can blame the Victorian era for!
Russeting, blacking, and other forms of surface finish are done with various oils, acids, and other chemicals along with heat to seal the surface of the metal and protect it from rust and other corrosion. An interesting and informative thread over on My Armory (an arms/armour collector and creator forum) talks about various historic and modern treatments and the various shades that can be achieved. One essay on russeting I found uses modern Clorox bleach and baby oil!
Heating metal produces a coloration of the surface, which changes from yellow to purple to deep blue as the heat increases. When taken out of the fire at a particular temperature, the metal retains this color. Considerable skill is required to achieve a consistent and even heat-patination of large areas (e.g., a breastplate) or groups of objects (e.g., a complete armor, 32.130.6
). The favored color for armor, edged weapons, and firearm barrels was a deep blue, in a process is referred to as “bluing.” A range of colors could also be produced chemically, using a variety of different recipes, such as a rich brown color that was popular on firearm barrels in the late eighteenth and nineteenth century. Besides being attractive, patination and painting also inhibit rust on metal surfaces.
This gorget is contemporary with the English Civil War (c. 1640) and is blued with gilt edging. Image off the Wallace Collection website. Click image to see the listing there.
The entire Wallace Collection website is well worth looking through, by the way. It includes a huge collection of arms and armour through the ages, and a really well organized Advanced Search function to make things (slightly!) easier to find.
Also from the Wallace Collection is a “black and white” set of cavalry armour, almost certainly from an officer, with distinctive polished/silver bands around the edges of otherwise blackened armour. The Wallace writeup say, “Most military armours worn by lower-ranking troopers or infantrymen were left ‘black from the hammer’, that is, the metal was worked only up to the point when the armour would function as required. The surface finish was left black and hammer-marked. Bodies of cavalry wearing such armour were therefore often described as ‘Schwarze Reiter’- black riders. The armours of officers commanding groups of men armed in this way often had the bands and borders of their armour polished bright, producing the distinctive visual effect characteristic of ‘black and white’ armours.”
For a straight-up painted helmet, this one is 15th C, much earlier than the period I’m currently concerned with, but had red and white (now discoloured almost to yellow) paint that is still colourful and must have been spectacular when it was new. I don’t think, from what I’ve seen, that full on painted armour was still current by the mid-17th C, but blacked, blued, russeted, and even gilded surface treatments were certainly in regular use.
When it comes to miniature painting and armour, I’m thinking that the best way to represent coloured armour would be a metallic base coat and then inks or washes over that. I’m going to do some experimenting on the six cuirassier current on my painting bench and will report back!
Incidentally, if someone managed to save a copy of the Games Workshop article from back in 2011 I once linked to here I’d love to have it. I recall it opened with joking about how the author just painted all horses brown until his daughter told him his horses were boring, or similar!
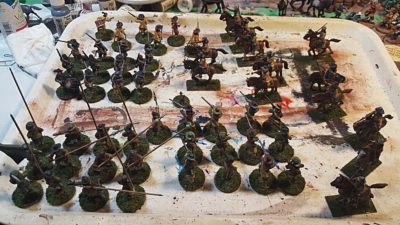
Not the greatest photographs going, but so far the only ones I’ve gotten of all of my recently completed 28mm ECW figures all together!
Every figure finished recently! See text for details, and click for larger.
Starting top left, the dark yellow coats belong to six firelock musketeers (in Pikeman’s Lament terms, either a Forlorn Hope or Commanded Shot). Clockwise we have two troops of regular horse, six per troop. One unit is brand-new and the other had most of it’s painting done years ago but have been touched up and re-based just recently. Somewhere in amongst the other horsemen is the mounted commander as well, finally finished and based.
The bottom centre infantry unit is a dozen muskets in green, then a dozen pike in green, and finally a dozen muskets in blue. There’s a couple of extra officer/sergeant figures in there as well.
The only unit not on the tray in the photo above is the twelve pike in blue I finished back in July 2017.
The new horse, with blue and white horse blankets, as well as some of the older horse with blue and yellow on the horses. Click for larger.
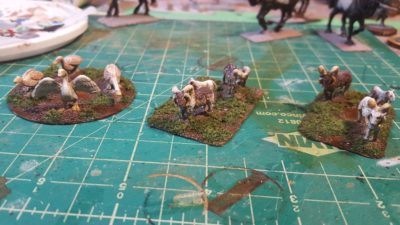
Finally, for fun and extra colour, I’ve been painting up the farm animals I got from Warbases early in 2017.
Geese and sheep, all from Warbases. See text for details, click for larger.
The geese are on a 40mm round styrene base, while the two sets of sheep are on roughly rectangular bases about 1″x2″. They’ll mostly be just scenery, or objectives in games that need loot tokens, but I’m also planning on using the flock of geese as a hazard in games of Pulp Alley, because big geese can be scary psycho critters!
Still in progress on the farm animal side are five or six ducks to go in and around the ponds I made in 2017, two big cart horses, and a couple of goats. I’ll probably get a few more animals on my next Warbases order, they’re fun to paint and provide great extra detail and colour on the tabletop.
On the ECW figure side of things the first six cuirassier heavy horse are in progress, and I’ll be doing up at least one more unit of firelock muskets. There’s also six officer/sergeant/character figures in progress – more on them in another post!
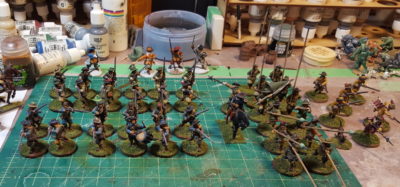
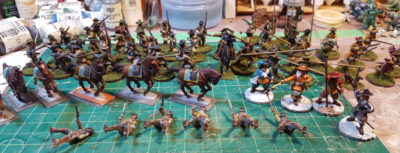
After months of doing absolutely zilch on the gaming front I saw the year out in some style, at least, with a whole bunch of English Civil War 28mm figures pushed through from “almost done” to actually finished in my time off between Christmas and New Years.
Two units of musket, one of pike, one of firelocks, all DONE! Click for larger, see text for details.
This means that all of the regular soldier figures seen on the workbench back in June are now finished and ready to game with, just the four officer/character figures seen there still to finish off.
The cavalry on the table now include five figures that I “finished” for the Lead Painter’s League way, way back in early 2011 (!) that have sat around ever since. I had thought these ECW figures had sat around for four or five years, but apparently it’s been more like seven. Yikes. “Finished” is in scare quotes in here because I was never happy with some of the details and finish on the riders, having put most of the effort in the horses. They’re back on the painting table for touchups, as are the other seven cavalry figures from that box of 12, and the first six heavy Cuirassiers for extra cavalry punch.
Cavalry of various flavours in various stages of completion, and the four officer figures. Click for larger.
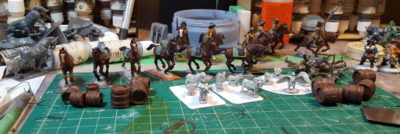
Finally, I pulled out a bunch of farm animals from my Warbases order of early 2017 and cleaned up and based six sheep, two cart horses, and a flock of geese, just for fun and extra flavour in games. They can act as loot markers in Pikeman’s Lament, just as scenery, or (especially the geese, geese are evil!) as unique hazards in Pulp Alley games!
Cavalry, sheep, geese, and some barrels. The unpainted horse on the far left are for the cuirassiers. Click for larger.
Looking forward to a bit more gaming in 2018 than 2017 had to offer, including more Infinity and some games at Trumpeter Salute 2018 in a few months!