Stable Genius

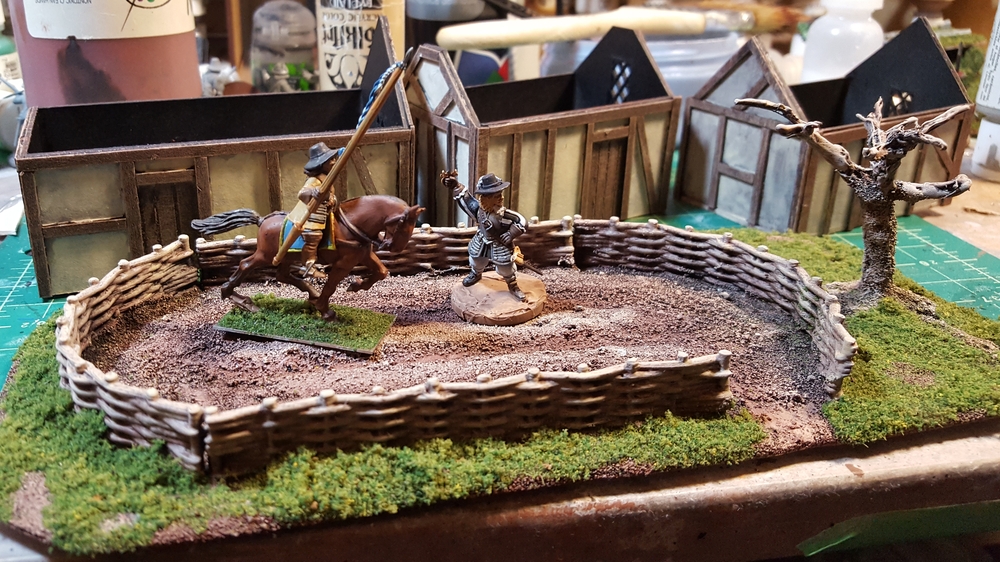
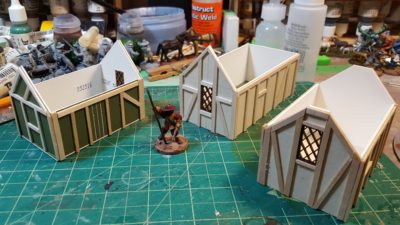
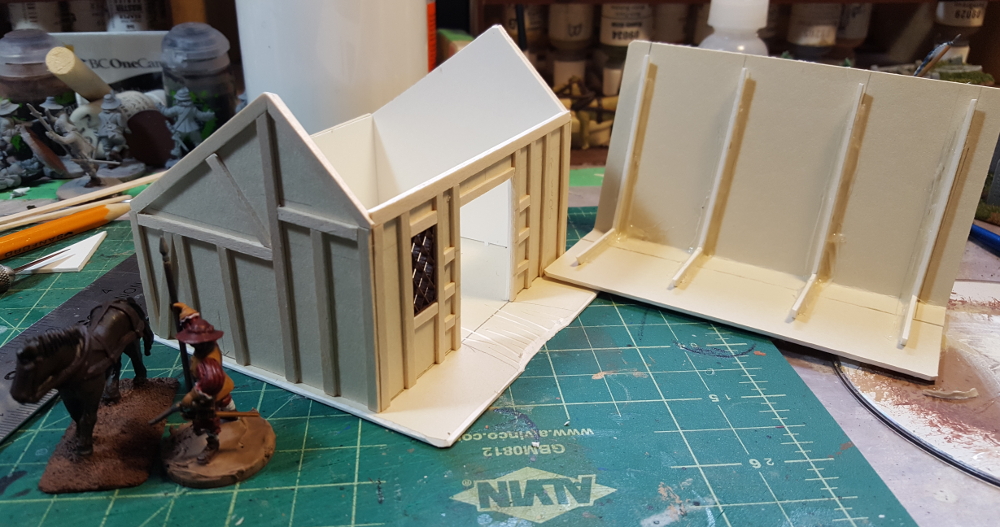
After finishing the three little cottages on Saturday, I decided to do something slightly different on Sunday and made a building that could serve as a stable or other outbuilding for a manor farm on my ECW/English pulp tables.

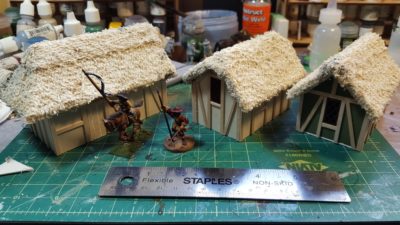
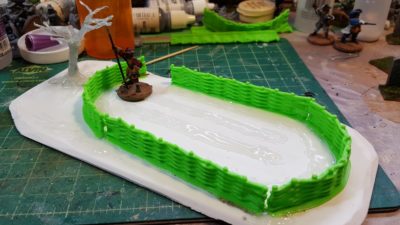
It’s 3″ deep and 4″ wide, so actually larger in footprint than the little hovels. Horse need their space, tenant farmers not so much! Same construction, 1/16th mattboard (picture framing card) with wooden coffee stir sticks for the timbering. The roof is assymetric, with the peak closer to the front of the building instead of down the centreline, for no other reason than it looked more interesting and on a gaming table, people spend a lot of time looking down at rooftops!

Stable “blank” assembled, with window and horse both from Warbases. Click for larger.

A roof with a pitch like this should probably be shakes or slate or something, because a steep pitch is part of what helps keep a thatch roof watertight, but towel thatch is a heck of a lot faster to assemble than a shingled roof, even with Warbases’ nifty lasercut tile cards available! Perhaps I’ll go back and rebuild this roof with tile card in the future, when I’m not under a pre-convention time crunch… but don’t hold your breath!

All the half-timbering complete and unthatched roof in place. Click for larger.
Roof off, showing the card “beams” to give it some strength. Click for larger.
Towel thatch in place, including an extra strip across the top ridge. Paint to follow! Click for larger.

I’ll add open doors on the big doorway on the front; the doors are built but not installed yet. I might whip up a couple of horse stall walls to put in the interior, but honestly that seems like a post-Trumpeter addition to me…

Hovels & Gardens

With the clock running on toward Trumpeter Salute 2018, I need to get serious about producing the new scenery the linked pair of games I’m running there need!

I’ve got more than enough hedges, dirt roads, and other greenery bits from previous scenery projects, but the farmhouse/manor, dovecote, and barn I’ve built previously need more buildings to hit the table along with them if I want to do a 17th Century English hamlet up properly.

This weekend I sat down and cranked out a trio of little (tiny, really!) thatched and half-timbered cottages or hovels, along with a pair of fenced gardens.

Three cottages underway. 28mm Warlord officer on a 25mm base for scale. Click for larger.

These are simple little buildings of 1/16th” mattboard with half-timbering from wooden coffee stirrers and thatch from towel. The windows are lasercut from Warbases in the UK. For a bit more bulk the roofs have a substructure of corrugated cardboard with the towel hot-glued to that and then further stiffened with white glue. All three roofs are removable.

Towel thatch roofs in place. Click for larger.

For the gardens I started with 1/8th” foamed PVC board as a base, then used some of the 3-d printed wattle fencing from Thingiverse that Corey has run off from me the new 3d printer he’s also using for the tricycle truck project.

Large fenced garden with a tree. 28mm Warlord officer on 25mm base for scale. Click for larger.

The tree has a core of paperclip wire, bulked out with soft iron craft wire, then covered in hot glue to fill in between the wires. The garden beds are also just hot glue “sculpted” into place with the hot tip of the glue gun.

Painted cottages and painted and flocked garden. Click for larger.

I’ve also done a second garden piece, slightly smaller, but haven’t gotten a photo of it yet. The cottage roofs need one more drybrush to really pop the thatch texture, but the cottages themselves are all done, and the gardens are fully painted and flocked outside the fence. The tree needs some foliage, and the gardens inside the fences need greenery and detail, but not bad for part of a weekend’s focused effort!

BSC 2018: Correcting some too thin errors

As I am fairly new to 3D printing, I am learning a tonne about what not to do. One of the biggest issues I have discovered is that things that look good in CAD can look absolutely terrible once printed, given the resolution of the printing or the limitations of FDM 3D printing. Today I wanted to talk about three different, but similar errors I made: making a part too thin to print correctly.

Back corner of the cab

First up – the back corner of the cab. As the backside of the cab is curved, it thins quite a bit at the very back corners.

Back corner of cab in blue. See the thin joint at the very end

When you bring this into Cura to slice it for printing, the problem becomes obvious.

Back corner of the cab, showig that when printed, it will only be two layers thick (~0.8mm)

The solution to this is to thicken the back wall of the cab, which I did by adding a flat piece to it:

Back corner corrected with additional piece (in red)

Once you bring that into Cura, you see that the narrowest part is now at least 1mm thick, so the piece shouldn’t be so weak.

Thicker corner sliced in Cura

Fenders

The next piece I tackled was the fenders. They were originally 0.25mm thick, which means that they were just over one layer thick when printed at 0.2mm and only two layers thick at 0.1mm. This meant they basically didn’t print at all.

Fender dimensions

Fender sliced, showing no overlap

The solution to this problem is two-fold: thicken the fender up to 0.5mm and also only print at 0.1mm (considered Fine quality).

New fender, now 100% thicker!

New sliced fender, showing overlap

Top of the windshield

This is actually entirely my error. I made the windscreen and frame around it taller than the sides or back of the cab. This meant when I cut up the model to slice, the top of the windscreen disappeared. Oops.


Top of the windscreen, showing the height difference


Top of the cab when sliced. That grey area is supposed to have yellow lines for printing

BSC 2018: First print of 1956 PANG

The new printer board for my 3D printer finally showed up, so I got to printing the first print of my 1956 PANG. It was less than a full success. As you can see in the pictures below, I have a bunch of work to do.

Printed truck on build plate. Printed without the side compartments. Excuse my messy garage

As can be seen on the build plate, a bunch of details didn’t come out right – the biggest of which was the top of the cab for some reason completely failed to print correctly. I also accidentally selected brim intead of skirt, so I had lots of cleanign to do.

Front & side view. Lledo Model A, Copplestone Chinese and Infinity Ariadna for scale

The sides of the truck aren’t very smooth, and a bunch of the finer details simply didn’t print.

Side rear view of the truck
Side rear view of the truck with Lledo Model A, Infinity Ariadna and Copplestone Chinese for scale

Front and side view of the truck

So what next? First of all,my printer needs some upgrades:

  • A part cooling fan (the Ender 2 lacks it by default)
  • Belt tighteners (and the belts replaced with metal-core of some kind)
  • A more modern Marlin (the firmware that runs the printer)
  • A lot more tuning

On the truck, the first thing I am going to do is shrink it by 25 to 30%. It is too large for what I want. Then I need to some work on the model itself

  • Thicken some of the walls so that they print, especially the fenders, which didn’t print at all
  • Clean up some of the smaller details, possibly removing them for now
  • Re-cut up the cab so it prints correctly

Anyway, I have my work cut out for me!