Modular River, Part Six: Resin Water Photos

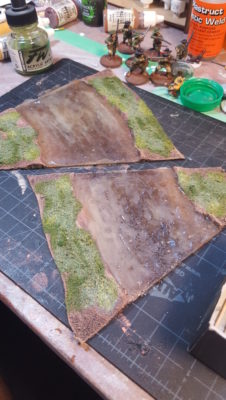
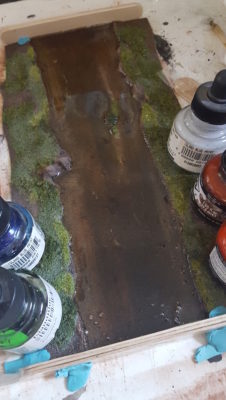
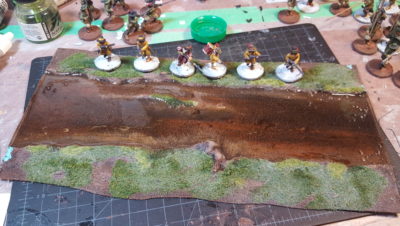
Gradual progress on pouring resin into the river segments, doing one segment every night. I work on an old plastic cafeteria tray and cover the tray with a box lid to keep out dust, cat hair, the cat, and other household sources of lint, dust, and fluff that will happily glue themselves to freshly poured resin.

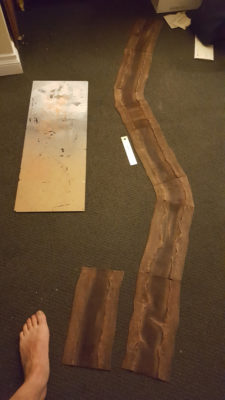
One ounce of resin (half an ounce each of resin and hardener) is enough for one of the long 12″ river modules, which makes for easy measuring. I bought a batch of disposable plastic 3oz shot glasses to mix the resin in, and those seem to be working out nicely so far.

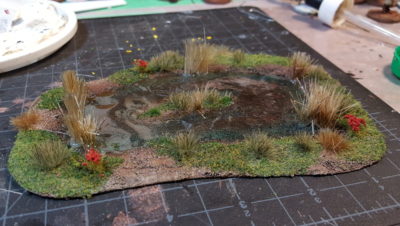
I add 8-10 drops of GW brown wash as I mix the resin, just enough to darken it a bit and add a bit more depth to the water effect. Between that and the shading I painted into the river bed sections I think I’ve gotten a reasonable feel of depth from a layer of resin that’s only about 1/8th” deep or so!

Overhead view with some almost-finished Warlord firelock musketeers about to charge into the water. Click for larger.
Lower view, nicely showing off the reflective surface of the resin. Click for larger.

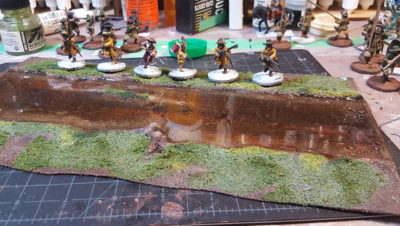
There’s a little bit of a lip on the ends where the resin has crept up the sides of the dams, but I’ll use a knife and wet sanding to get rid of that and a bit of gloss medium (or an additional dab of resin) to fix any scuffing from that process. I need to scrape off or cover the bits of blu-tak that have been glued into place by the resin, too, but I’ll do that last while I’m fixing the discoloured flocking along the banks, the places where the resin has soaked up into the flock, and adding the rest of the foliage.

Onward to the next resin pouring session!

(Semi-random aside: This is the 480th post here on The Warbard! Here’s to 500 before the end of 2017! September 2017 will mark seven years of our current WordPress based format; November 2017 will mark 19 years (!) of a wargaming web presence of some sort or another for me. I should probably organize something interesting for our 20th anniversary in November 2018…)

Modular River, Part Five: Resin Water Effects

I had used basic hardware store 5-minute epoxy glue for the swampy pond test piece, and had more or less intended to just keep doing that for all ten river segments. I did the two smaller corner/curve river segments as a further test, and was really irritated when one of them came out all lumpy and matte instead of glossy.

Two corner segments done with 5-minute epoxy glue. Click for larger.

I also realized that given the price of 5-minute epoxy, actual casting epoxy resin was actually going to work out cheaper for this whole project, especially given that 40% off coupons for large chains of craft stores are a thing! I picked up some EnviroTex Light Pour-on Epoxy from the aforementioned large craft store, for a total cost of about three more tubes of 5-minute epoxy after that useful discount coupon.

First resin pour on one of the full-sized river segments! Click for larger.

One US fluid ounce of resin nicely fills one of the full size 12″ long river segments; I could probably cut the quantity down just a bit, even. I did the resin pouring in an old cafeteria tray I use to help contain potentially messy projects. The dams at either end of the river segment are hardwood craft sticks (tongue depressors) wrapped in packing tape, secured with more packing tape from underneath the river segment and then further secured with blobs of blu-tak. I also pushed more blu-tak in along the edges of the river banks to block up possible gaps there.

As far as I can tell everything has gone smoothly with this first pour; I did it last night in bad light, working on our back patio to keep from stinking the apartment up. The Pour-On product is much less volatile and stinking than 5-minute epoxy glue, though! I didn’t see any leaks onto the tray and everything seemed to be cured up OK when I checked this morning before work, too, although the material info does warn this stuff takes up to 72 hours to full cure.

I’ve got seven river segments still to do water on – five more long straight pieces, the bridge, and the ford (both 6″ long) – so at one piece a day it’s going to be sometime next week before I can put the epoxy away.

The resin is much, much more aggressively self-levelling than the epoxy glue. I might go back and do a few ripples with gloss medium just so the river water doesn’t look completely still and stagnant. The one curved river segment that went all lumpy is going to get a very thin skim of resin to fix that and get a proper wet glossy look, as well.

At that point, once all the epoxy has cured hard, I need to go back and fix the flocking along the river banks. If you look at both photos above you can see some white staining on the banks. I put a coat of dilute matte medium over the flock, which I’ve used before many many times to properly secure flock and foliage on terrain pieces, and this time it left a distinct milky residue behind. I painted over that where it had stained the river bottom, and once the resin water is properly hardened I’ll re-do all the flocking to fix the discolouration there.

I’ve never had a matte medium and water (or white glue and water) mix do this to me before, in years of using it to secure terrain material of all types. Any readers have any good ideas about what the heck happened here?

Modular River, Part Four: More Paint

Quick update on the river project! I’ve been taking a lot of summer holiday time recently, including all of last week away, so not a lot of progress or action, but there has been some, at least.

I’ve got all the river segments except the bridge basecoated and drybrushed up, ready for foliage and then water effects.

All the river segments except the bridge all laid out on the floor. Click for larger.

I snapped this photo after dark, so I apologize for the generally crap image quality, but it shows the current state of everything except the bridge. Black basecoat over the sand layer, then heavy brown drybrush on the banks and shallow bits and a lighter brown drybrush down the centre of the river channel. Finally a drybrush of tan on the banks and the shallow parts of the river channel.

The bridge segment is a bit behind the others; it just got the black basecoat on the banks and channel so no picture for now as I didn’t want to put wet paint down on my carpet for some reason.

The long straight sections are 12″ long, 6″ wide overall, and the river channel is 3″ with 1.5″ wide banks on either side. The short straight is intended to be a ford and is 6″ long; the two short curve segments are roughly 4″ or 5″ long on the long outside sides. The bridge is on another 6″ segment, and the eventual plan is for different 6″ segments to add flexibility – a high tech bridge for my Infinity gaming will be one of the first, probably.

Next up will be foliage and flocking along the banks, and then the smelly, messy business of resin water effects on the whole set!

Swampy Pond Resin Water Test

I started a pond as a test piece just before starting the whole river section project, and it’s been progressing one or two steps ahead of the rest of piece all along. Like the river pieces, the base is sheet plastic styrene with air drying clay for banks, and it was then covered in fine sand before being primed black.

It got painted and decorated with various foliage bits, and after letting all of that dry for a bit I tried out a new-to-me water effect with cheap resin 5-minute epoxy glue.

Pond all painted and foliage’d with flock, static grass, and tufts from various sources. Click for larger.

For water I’m trying out ordinary hardware store 5-minute epoxy glue, as shown in one of Luke’s APS YouTube videos on water effects – this link is to the main channel page, as I can’t remember which of his water videos actually talks about epoxy glue for water. Sorry – will update if I find it!

Anyway, I squeezed the 5-minute epoxy right into the pond bottom and mixed it with a scrap stir stick. There was a brief scare when it went all silvery while I was mixing part of it, but that cleared up right away, thankfully.

I wound up using three overlapping small batches of epoxy to fill the pond to the current level, then left that for 24 hours to fully cure.

The pond with the first batch of 5-minute epoxy water curing. Click for larger.

It needs a bit more epoxy around the outer edges as the first pour didn’t get right in under and behind some of the reed bunches, but I’m really happy with how it’s going so far! For the second pour I’m going to try getting the epoxy glue a bit thinner by warming the dispensing syringe with a hot water bath before squeezing it out.