Just got back this evening from a fantastic weekend over in Vancouver for the Trumpeter Salute 2015 convention. Lots of great games, I got 2nd Place Best in Show for the Saturday evening time slot for my Chain of Command-powered Russian Civil War game, which was awesome.
Didn’t do a lot of shopping, just a couple of Osprey books related to the RCW and a couple of small packs of figures – except for the 40+ fully painted and based WW1 Turks I bought from a friend who has moved over to Vancouver and is downsizing his figure collection! He gave me a fantastic deal on them, too, and I’ll get some photos up shortly. I’ve had a group of British infantry in tropical kit for several years now that are terribly underutilized due to a lack of a proper opponent for them, so the Turks will provide that. I’m sure they’ll also appear in various pulp games, too.
Photos and a proper writeup in a day or three, tonight I need sleep!
Yet another post of short links, news, random bits, and oddments that wouldn’t warrant a full post.
Laser-cut MDF for early motor vehicles? They look pretty good, actually, and they’re 1/3 the price of resin & pewter vehicles. I might have to make an order to Warbases sometime to expand my pulp/RCW/WW1 vehicle fleet some more!
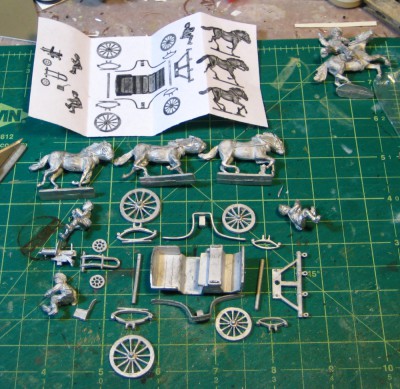
The Eureka tachanka itself (the wagon, that is) comes together fairly easily with a bit of patience and some test fitting. The main body is a single piece, which I had to bend very slightly to straighten as the back end had been pushed very slightly downward during shipping. The rear springs and axle are three simple pieces; the front piece has the bar the horses are harnessed to, then two springs, then a front axle.
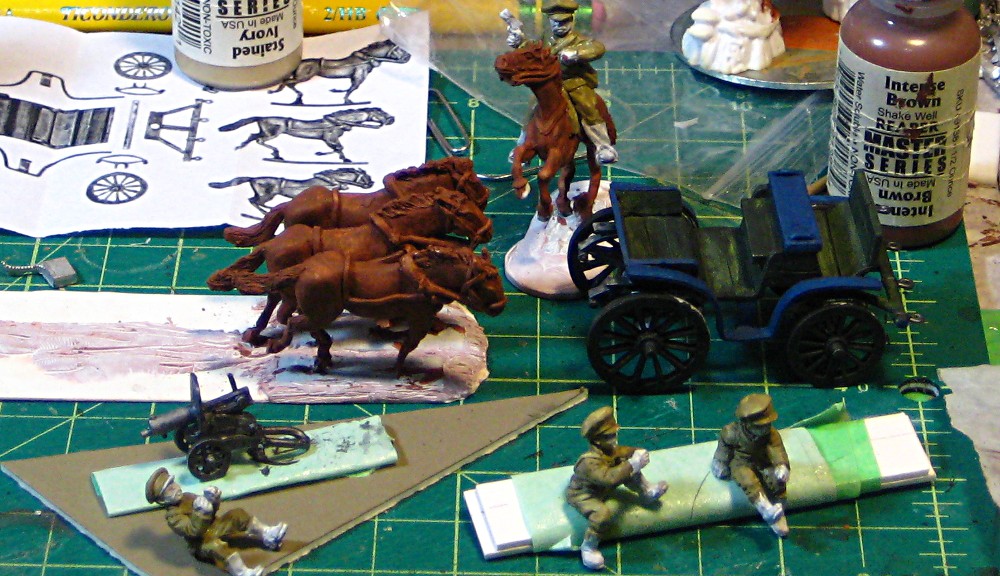
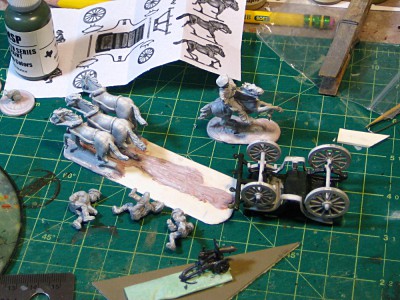
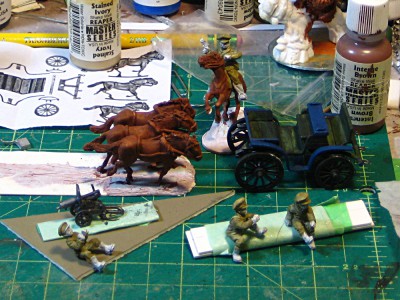
The tachanka itself upside down on the right; the horses mounted and puttied into place on the base to the left. Crew figures int he foreground, along with the Maxim MG. Click for larger, as always.
I glued the whole thing together in one shot, wheels and all, and now that I’m painting it I find myself wishing I’d left the wheels off to make the undercarriage slightly easier to paint. On the other hand, getting the fenders on either side into place and symmetrical is easier when you have the wheels already solidly in place for reference, so it’s one of those “on the one hand/other hand” sorts of things. I can always slop mud around on the underside to hide any minor painting glitches, after all…
The base the whole thing will sit on is a strip of .040″ styrene plastic card, reinforced with Milliput epoxy putty, especially around the horses’ integral bases. I also ran a ridge of putty down the centre of the card base to stiffen it, with some slivers of scrap card under that just to give the putty something to hang on to. The base is just barely big enough to hold the wheels of the tachanka and the horses, but similar minimal “shadow” bases have worked to protect the relatively delicate wheels of other pewter/resin vehicles in my collection for several years now.
The tachanka is getting a dark green basecoat, similar to the paint scheme on the earlier armoured car. I’ve gone with blue trim, either a remnant of civilian finery (a lot of tachankas were lightly converted civilian carriages) or a bit of regimental pride coming through. I’ll leave all three crew in generic Russian khaki so they can be used by either side in my RCW games; I might eventually rig a flag holder somewhere on the thing for it to show off which side it’s fighting for today!
Such basecoating! Horses, tachanka and crew all basecoated, as well as heroic Russian officer dude on his horse behind – also a Eureka figure. Click for larger, as always.
I’m trying to get the tachanka ready for Trumpeter Salute in Vancouver which starts this Friday, so time is pressing and I’m speedpainting like crazy, and feeling rusty because I really haven’t painted much at all in the last eight months or so! At some point I also need to come up with some basic rules for running the silly thing in Chain of Command, but that might be left for the ferry ride over to Vancouver Friday afternoon…
What the heck, you ask, is a tachanka (also found spelled “tchanka”)? It’s a Russian vehicle developed during the Great War and used, in various forms, right through the Second World War. A lightweight, sprung carriage with two, three, or sometimes four horses out front, a Maxim machinegun mounted to fire out the rear, and a few crew holding on for dear life. It was designed to give machinegun support to cavalry units. Wikipedia has a bit more, if you’re interested.
The Eureka tachanka has been around for ages, but it has a bit of a mixed reputation among RCW/BoB gamers. The crew figures are undersized, is the usual complaint, and I’ve also heard comments about the beastie being fussy to build.
That said, it’s the only easily-available tachanka, and the presence of such an eccentric and unique unit in an RCW/BoB force is a powerful lure!
So to start off, here’s what you get.
The Eureka tachanka all laid out. 25 parts including crew and horses.
Three horses, three crew (driver, gunner, assistant gunner), a Maxim on the usual Russian wheeled cart (4 pieces) and 15 parts for the tachanka carriage itself, most of which are suspension. The whole thing is cleanly cast and there was a minimum of mold lines and flash to remove, most of it between the horses’ legs.
The small piece of paper with the exploded view is useful as a reference, although I think I’ll wind up printing the photo of the assembled tachanka off the Eureka website as well for additional reference. The front wheels/suspension/horse-attachment bit is the only really complex subassembly, although the fenders on the sides are going to require some gentle, careful bending to fit them into place and keep them symmetrical. I’ll put it on a “shadow” base like I did the armoured car I did a couple of years ago to help strengthen the whole thing, and probably use a small amount of putty out of sight on the underside to reinforce things here and there.
As I assemble the beast I’ll get some photos of it along side Copplestone & Brigade RCW infantry and cavalry, to attempt to answer that whole question about the scale of it. Onward!
Via the US Library of Congress, this fantastic simple British recruiting poster from 1915.
…To Delay Is Dangerous…
Really fantastic handdrawn typography and an eye for proportions. A classic of the type.
The whole Library of Congress WW1 Poster Collection is fantastic and well worth a browse. WW1 and post-WW1 posters from all over the world, not just the English-speaking world. Even better, copyright has long expired on almost all of these items across most of the world, so you can re-use them for your own purposes if you like.
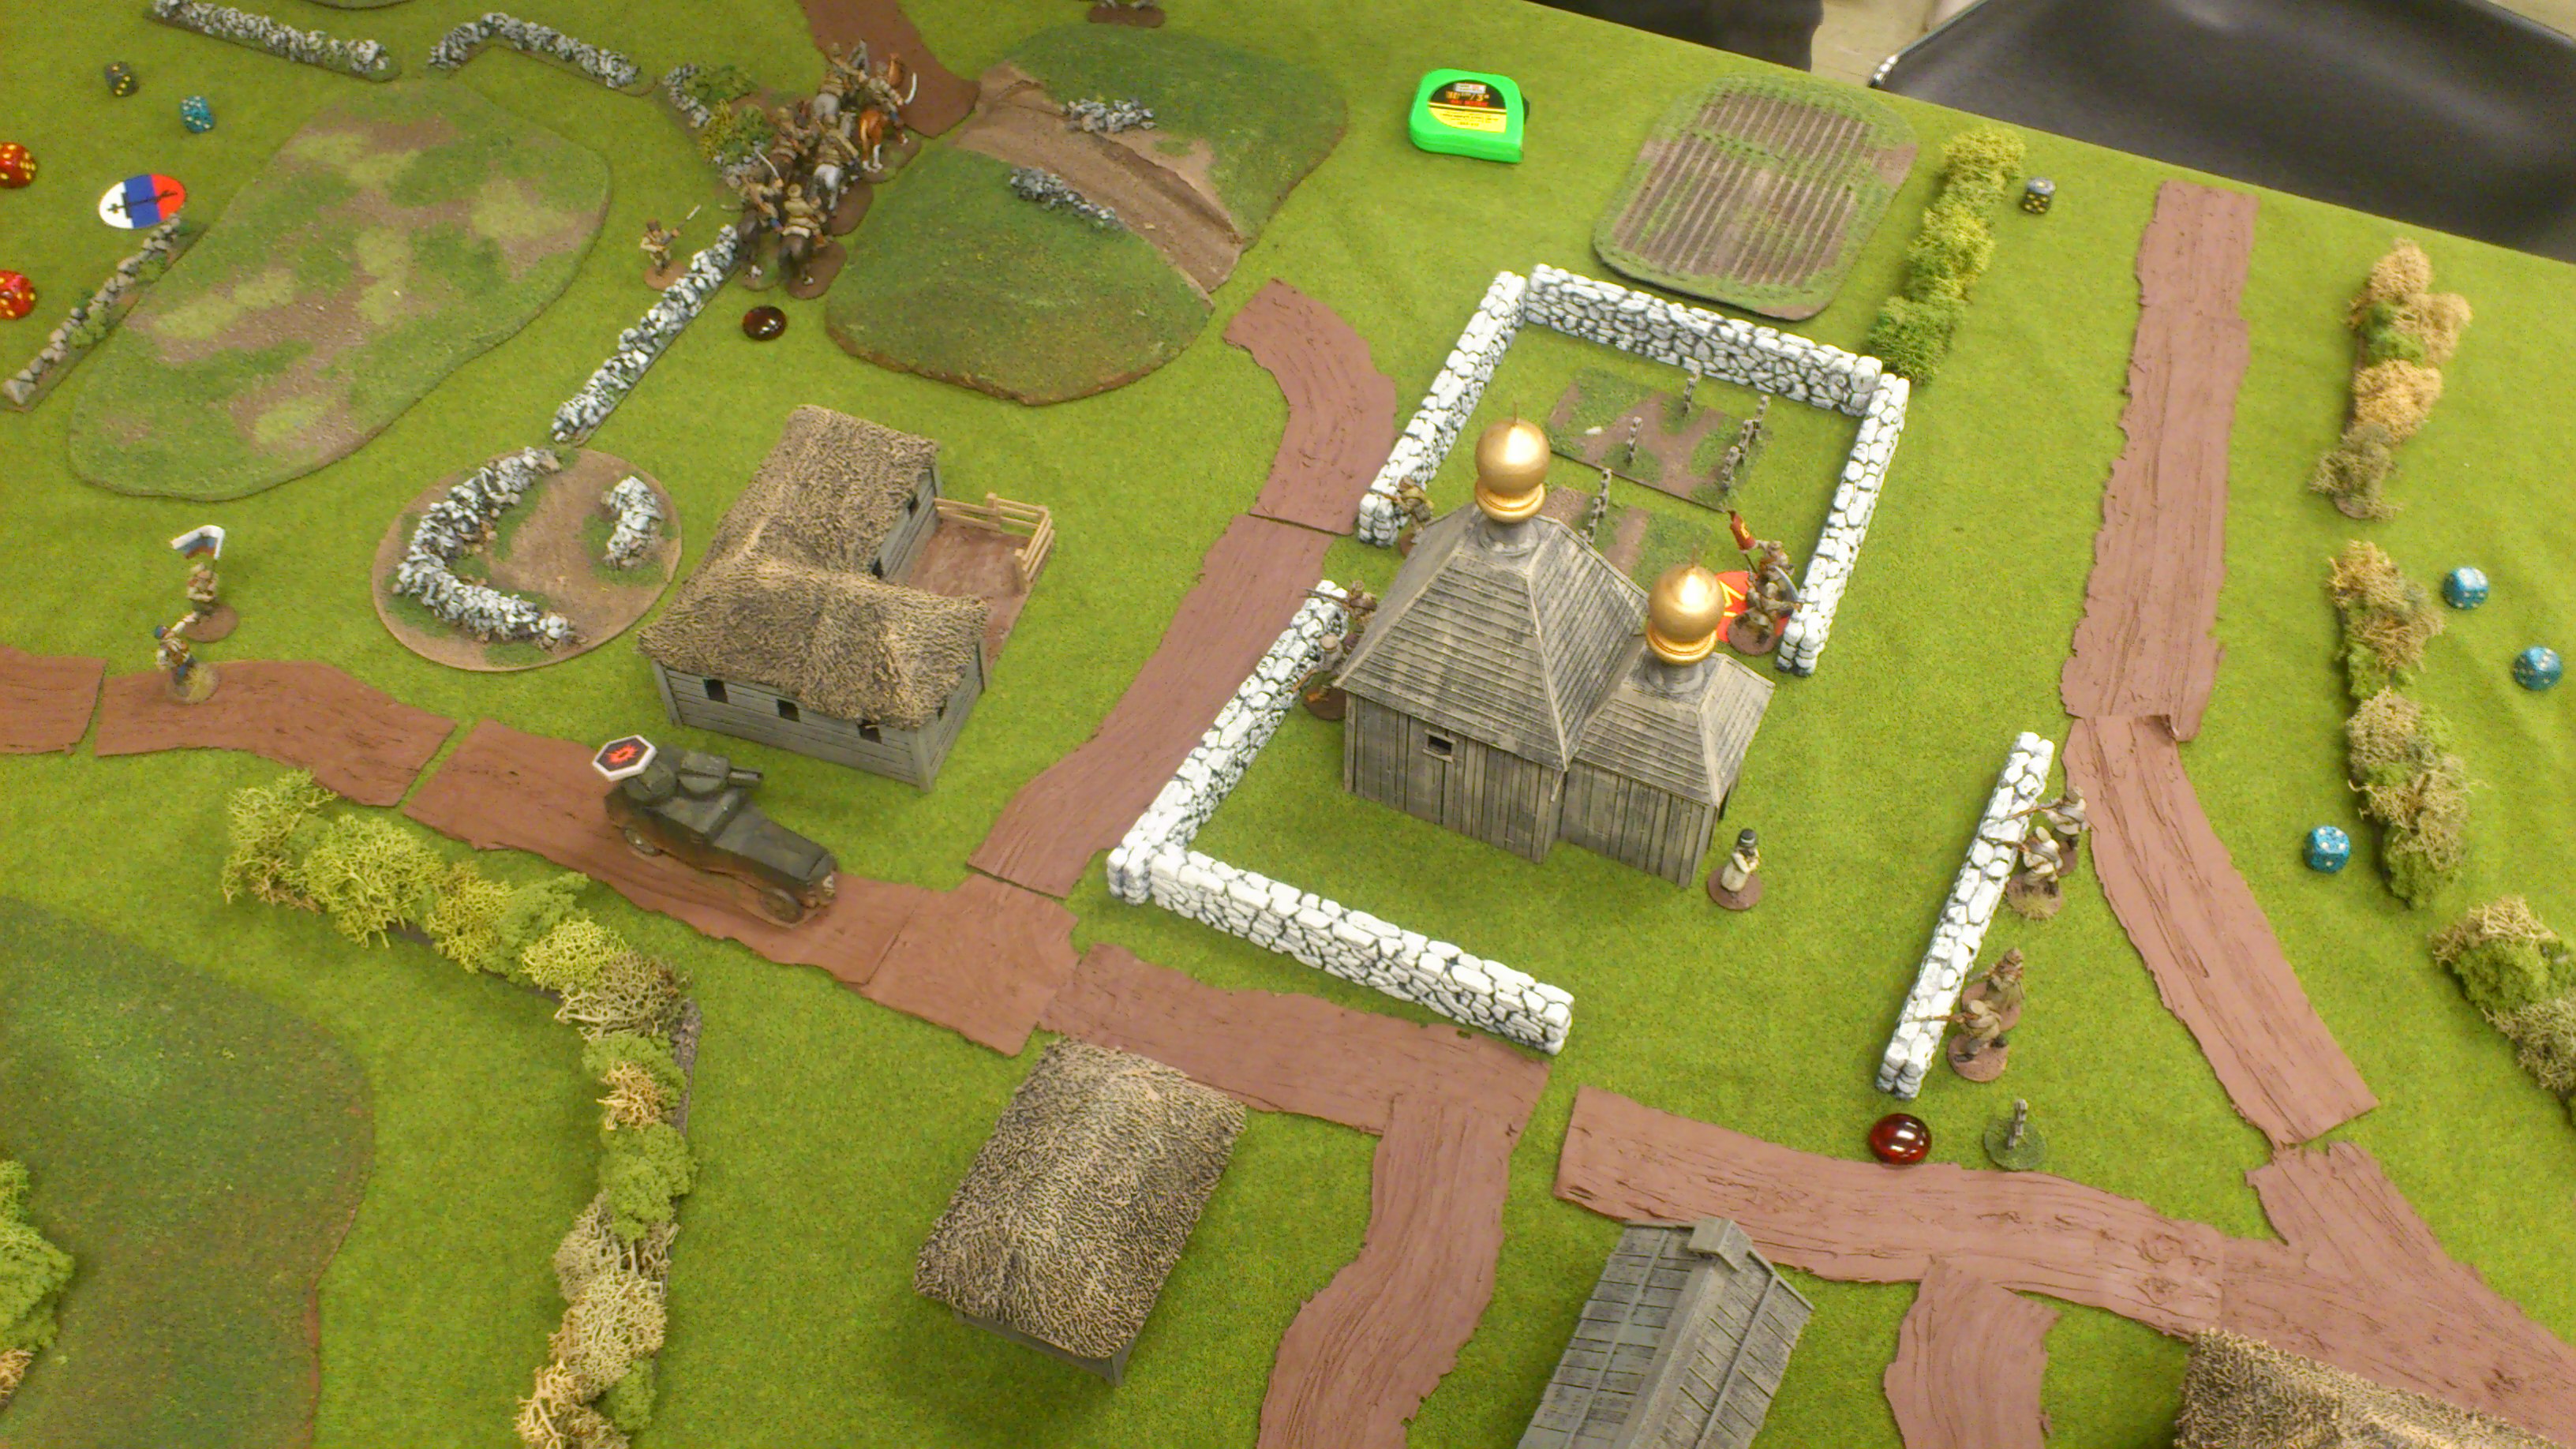
Last Sunday (15 March) got us another bash at using Chain of Command/Mud & Blood (I’ve taken to calling it “Chain of Mud”) for Russian Civil War adventures. I umpired the game for Mike, who has played RCW previously a number of times and once with the current Chain of Mud rules, and his brother Stewart, who was visiting from Vancouver and had heard interesting things about my RCW games and wanted to try it out.
We had a scratch White force of a short platoon of White Rifles (three sections), supported by two small troops (Teams) of Cossack cavalry and an armoured car attacking a hamlet around a small walled monastery defended by two sections of Red militia backed up by a single section of Red Guard and a single Team of especially enthusiastic local Reds lead by one of the Red Guard leaders.
It was a good game that saw the White rifles driven off by Red rifle fire before the Cossacks and the armoured car finally rout the Reds in a really, really tight game that saw both players convinced it was all over for them several times.
Late in the game, the White armoured car (lower left) brings its machineguns to bear on the walled monastery compound defended by Red Guard.
I realized afterward that I’d gotten the Force Morale tests wrong in the heat of the moment, so the Whites missed two tests that would almost certainly have damaged their Force Morale and could have cost them the game.
I’m really starting to enjoy the Patrol Phase of the game and the use of Jump-Off Points. The tactics of the Patrol Phase, once new players catch on, can be almost as fascinating as the main game itself, with the limits on movement imposed on the Patrol Markers and the conflicting desires to set up good JoPs for yourself and also deny the enemy good JoP positions. This was the first game we’ve played where one Jump-off Point marker wound up right on the table edge, nearly halfway up one long side of the table, which gave the Whites a flanking position on the whole hamlet that gave the Reds quite a lot of trouble in the first half of the game.
I’ll be running an expanded and tweaked version of this scenario at Trumpeter Salute in Vancouver in a couple of weeks; I might swap the ordinary Red Guard out for a section or two of Red Sailors, just because they’re such a colourful set of figures to put on the table! With a bit of postal luck I might also have a tchanka from Eureka Minis to add to the fun!
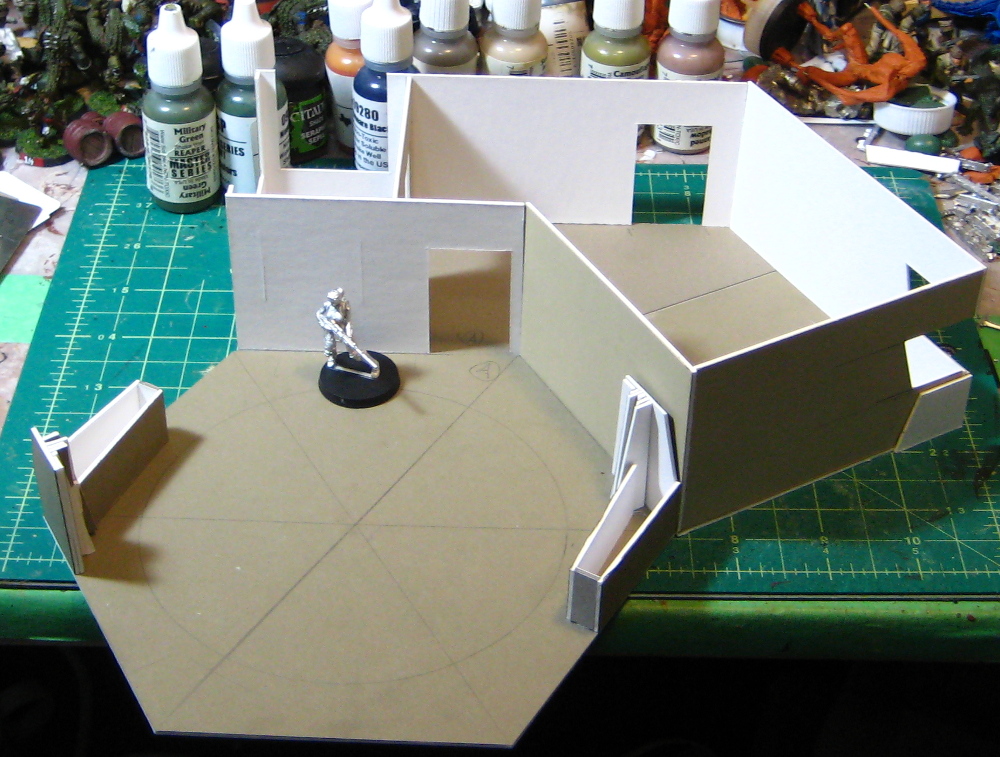
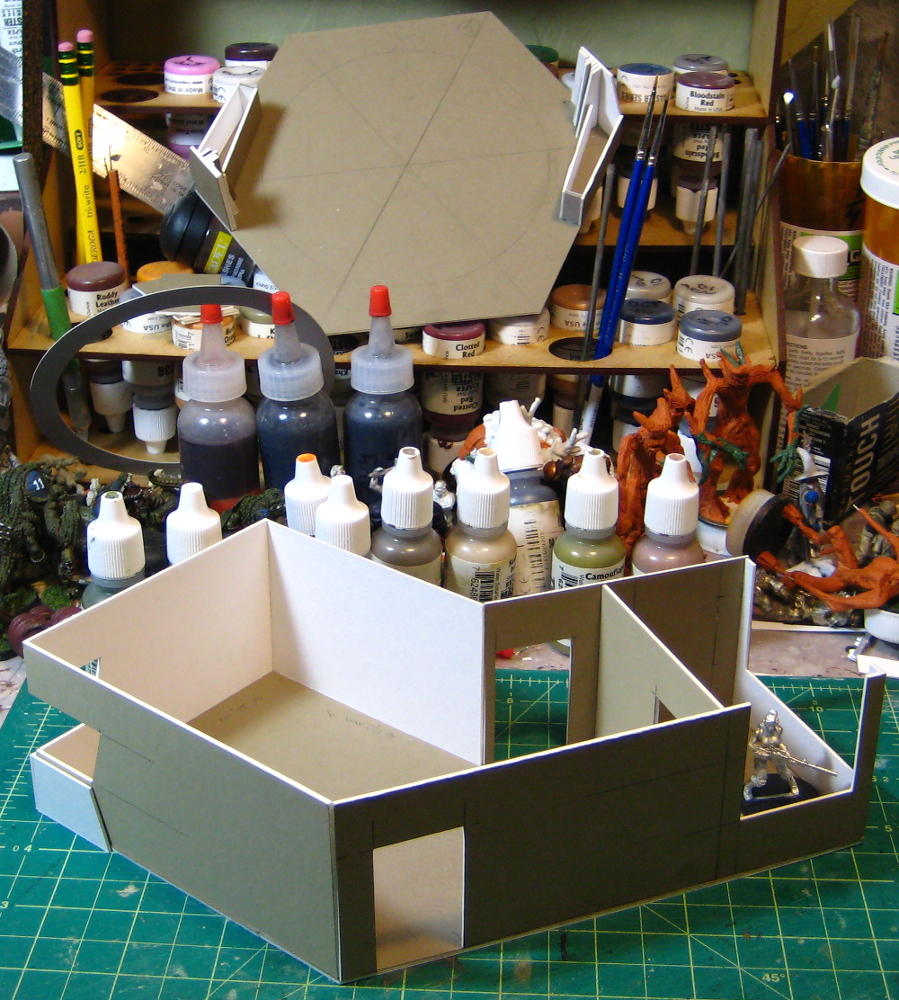
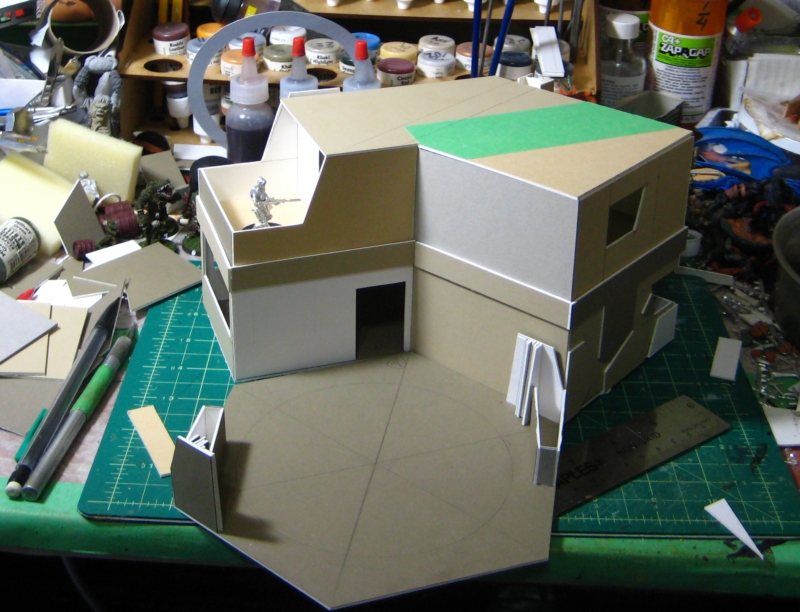
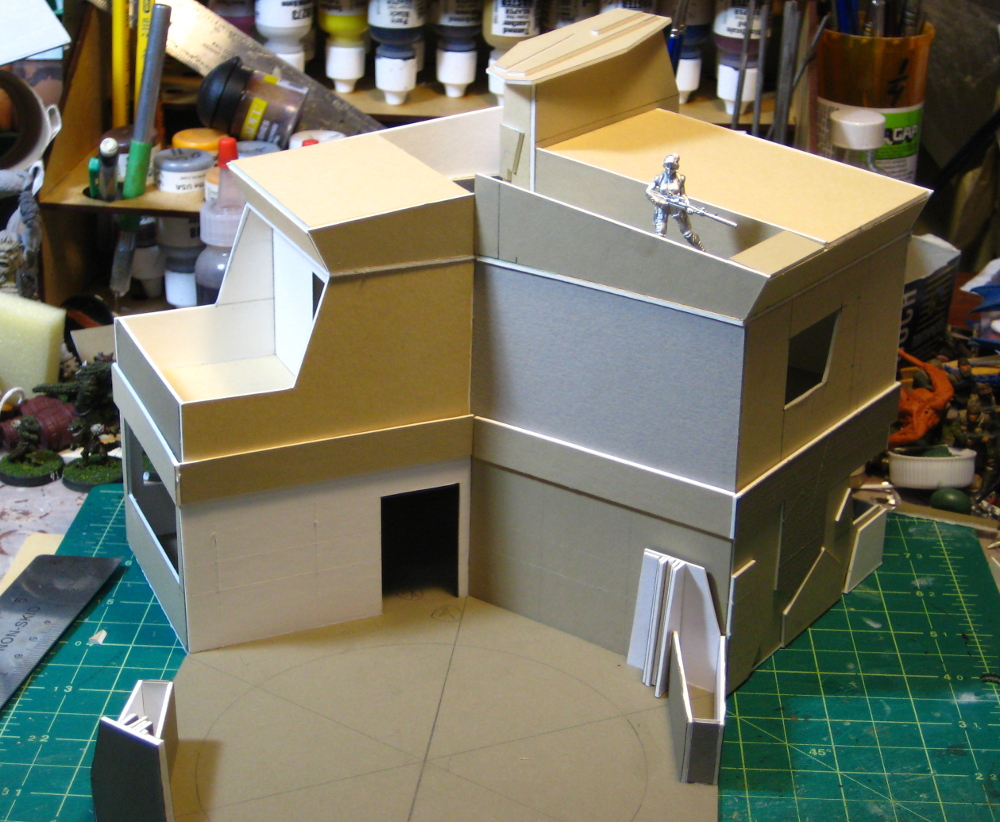
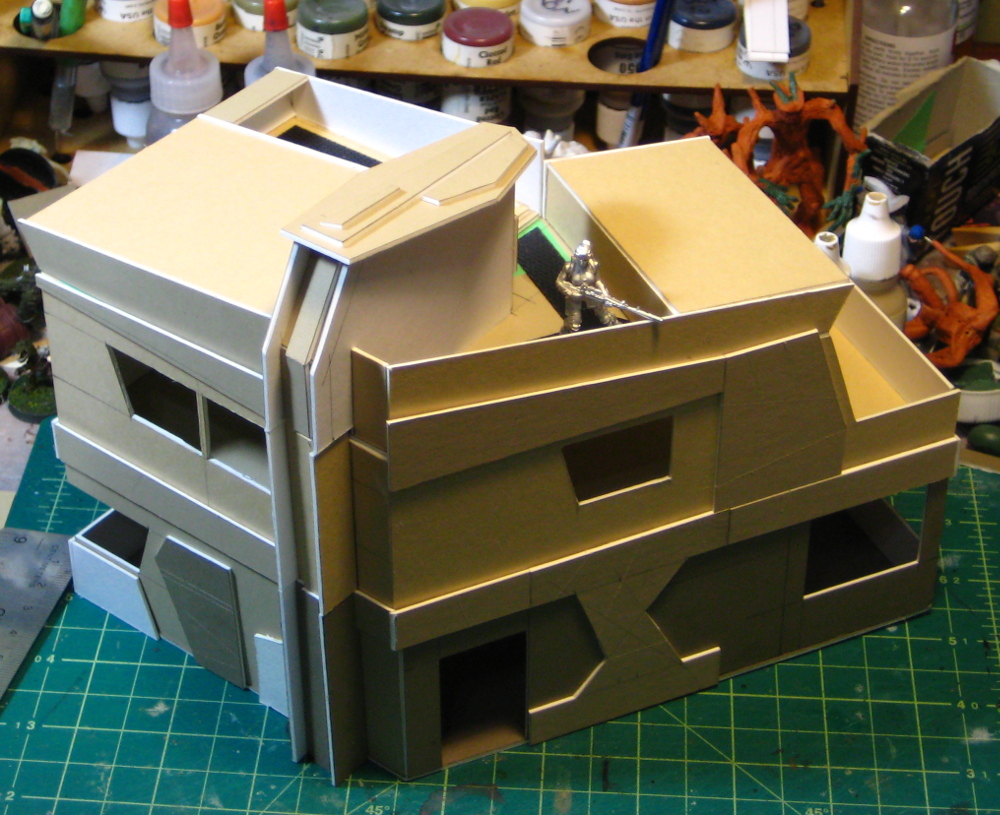
I’ve previously shown my urban scatter terrain for Infinity, and after getting that assembled I decided to tackle something more challenging and larger.
Quite a bit larger, actually. It’s a two-storey building that wound up being about 10″ long, 6″ wide and almost 7″ tall!
The building is entirely made of mat board, usually used as picture framing board. It’s good quality cardboard, easy to work with and it takes paint and glue well. Our local art supply place, Island Blue, sells the offcuts from their framing business off cheap! The roof and second storey come off to allow full access to the entire building during games, and I think I’ve managed to make the building tactically interesting for games of Infinity.
Check out the gallery below; the captions have a lot more detail.
If you’re interested in doing similar buildings for Infinity or any other skirmish game, I really like the ongoing “Cardbuilding” series of articles over on the Infinity news site Data Sphere: Part 1, Part 2, Part 3, Part 3.5, Part 4. Errhile is much more organized than I am, designing a whole system so that his buildings nest and stack for storage and reconfiguration, and he’s got lots of great techniques and ideas in his lavishly illustrated articles. I might well do some similar modular buildings, but for now it’s fun to just bust out a big, complex building — I haven’t done much terrain building recently!
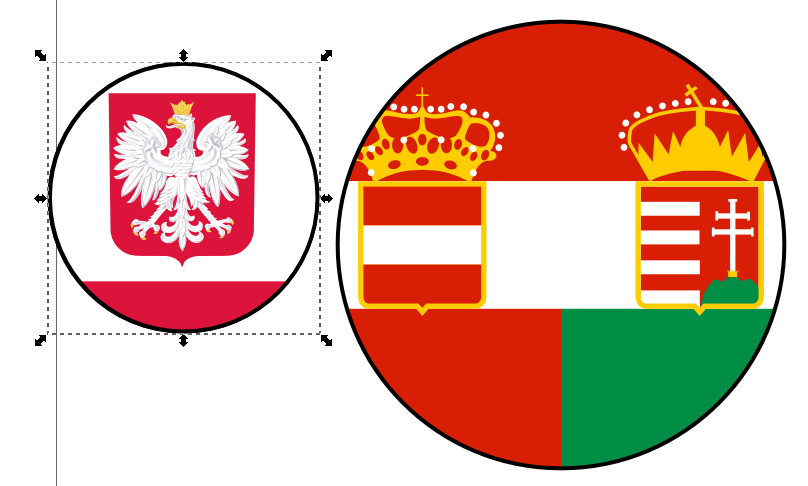
As I was finishing up that first set I realized that I was pretty close to actually having a full set of markers for everything that happened in and around (western) Russia between 1914 and 1921 or so, with German, Imperial Russian, Red, and White markers. All I was missing was the Poles for the Russo-Polish War and the Austro-Hungarians for their front against the Russians in WW1.
Polish and Austro-Hungarian markers (in draft form) for expanded Eastern Front/Russian theatre action.
The Polish eagle works nicely as a symbol, with red and white from the Polish flag in the background. The Austro-Hungarian symbol, like that Empire itself, is a bit of a colourful mess which incorporates a circular slice from the A-H Imperial Flag.
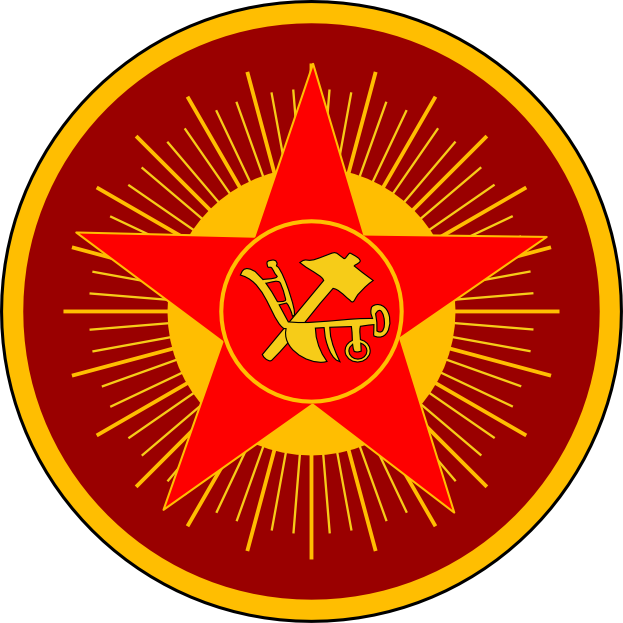
After I put the original markers up on Lead Adventure one of the other members posted some splendid but rough versions of his visions for alternate and extra markers. I especially liked his alternate Red marker, which used the hammer-and-plough symbol of the very early Russian Revolution, before widespread adoption of the hammer-and-sickle. I can easily see why the plough lost out to the sickle, it’s a difficult thing to draw well and tends to turn into a lumpy blob at the best of times!
Nevertheless, I sat down with Inkscape last night and finally produced a hammer-and-plough I’m happy with. Here’s an oversized version.
The hammer-and-plough, as used early in the Russian Revolution by the Bolsheviks.
I’ve got a few more ideas for additional markers, and I’d like to add markers for the various international intervention forces (Britain, France, the Americans, maybe even Japan), especially as doing the intervention forces would pretty much also finish the Western Front marker set I’ve been considering making!
Decided that the blog had worn it’s old skin (WordPress’s functional but basic Twenty Eleven theme) more than long enough and have updated it to WordPress’s much more recent Twenty Fourteen theme. Still trying out features and playing with things, but the actual content hasn’t gone anywhere and neither have most of the navigational features. A few things have moved, though.
Twenty Fourteen also makes it easier and more interesting to use Featured Images and Featured Posts, so I’ve fiddled with a dozen or so of the older posts to make them more colourful.
For those of you who primarily read the blog via RSS or over the TGN Blog Network, mind you, this all makes no difference at all. Still the same content, I promise!
James Ernest of Cheapass Games has a short video on three ways to make cards. Nothing earthshaking, but a good short video laying out three easy ways to make cards for your games.
Corrugated metal from disposable roasting pans, via Rusty Robot, which has all sorts of fantastic modelling posts. A lot of his stuff is too detailed/too fragile for wargaming, but the roasting pan thing looks like it would survive gamers if given basic respect!
I’ve gotten into Infinity recently, which is a game that uses on-table markers quite a lot. Corvus Belli has PDFs of the markers available to download and print, and the idea of using 1″ clear epoxy stickers (Youtube video link) to make tough and easy-to-handle marker tokens is inspired. (Clear epoxy stickers on EBay.ca. They’re a crafting thing originally, apparently.) I’m actually considering doing some tokens for Chain of Command up as 1″ rounds with epoxy stickers on top now too… might have to fire Inkscape up!
Also from the Infinity side of the gaming world, Toposolitario has a great website with all sorts of paper terrain and some tutorials. Great stuff and all free.
I’m mostly painting up Infinity models these days, getting ready for Trumpeter Salute at the end of March, and considering entering the 9th Lead Painter’s League over on the Lead Adventure Forum – I’ve been in the 3rd, 5th & 7th LPLs, so continuing the “every odd LPL” streak seems like a good idea. Plus it’ll be a kick in the butt to get painting again, I’ve done far too little actual figure painting in the last year or so!