After doing a pair of new sandbanks, I wanted to do something slightly different but still on the theme of “stuff to crash boats and ships into” and decided on a trio of rocky reef pieces.
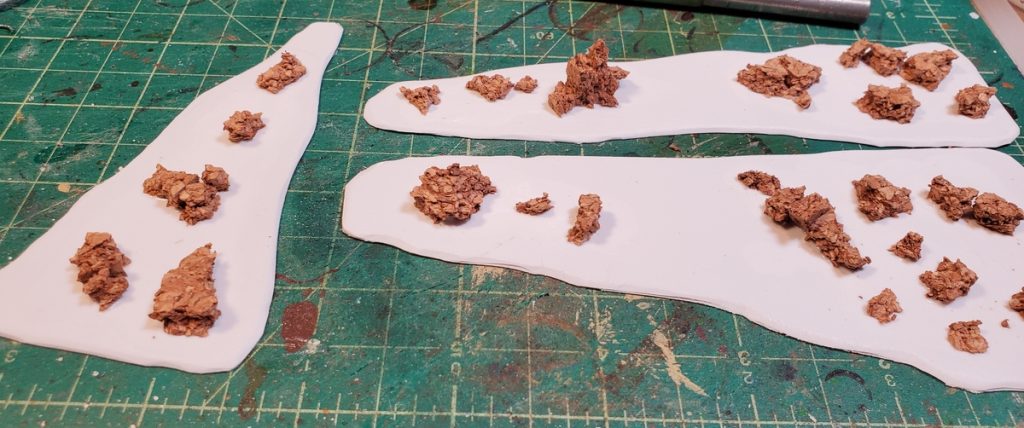
As with the sandbars I started with a chunk of .040/1mm plastic sheet, cut it up into three roughly triangular pieces, and carved and sanded the edges down so they met the table smoothly. Then I took some scrap quarter inch cork board, the stuff cheap bulletin boards are made of, and broke it up into crumbs and small pieces for rocks.
Cork rocks glued down to plastic card. I just used ordinary white glue, nothing fancy.
It helps to remember that 1″ = 100 feet in 1/1200 scale, or 1mm = 4 feet in scale – so a rock big enough to seriously inconvenience a ship can still be just a few millimeters high! I wanted rocks and islets, not proper islands (those are coming!) so I kept most of the cork bits small, breaking it up with my fingernails as needed.
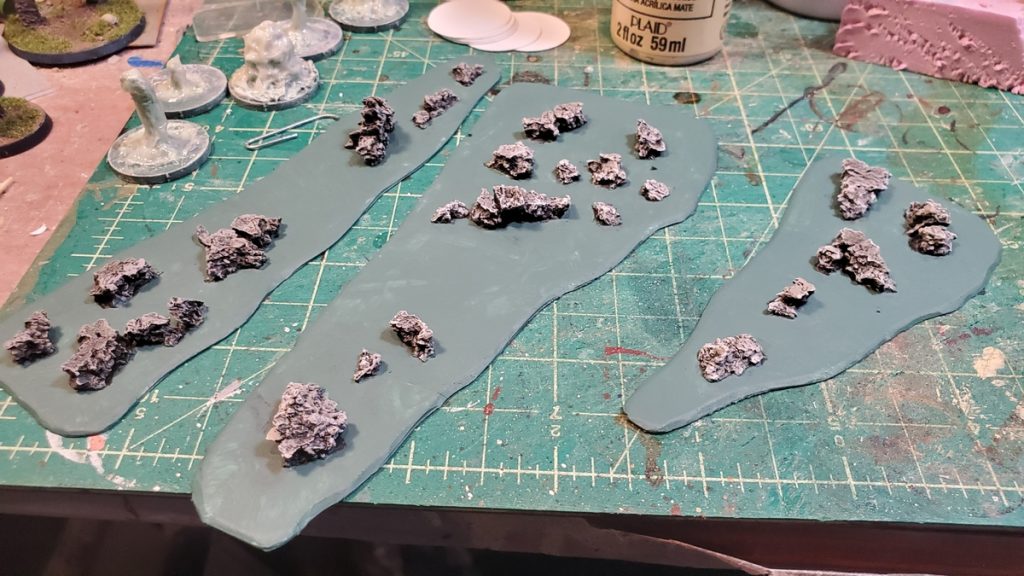
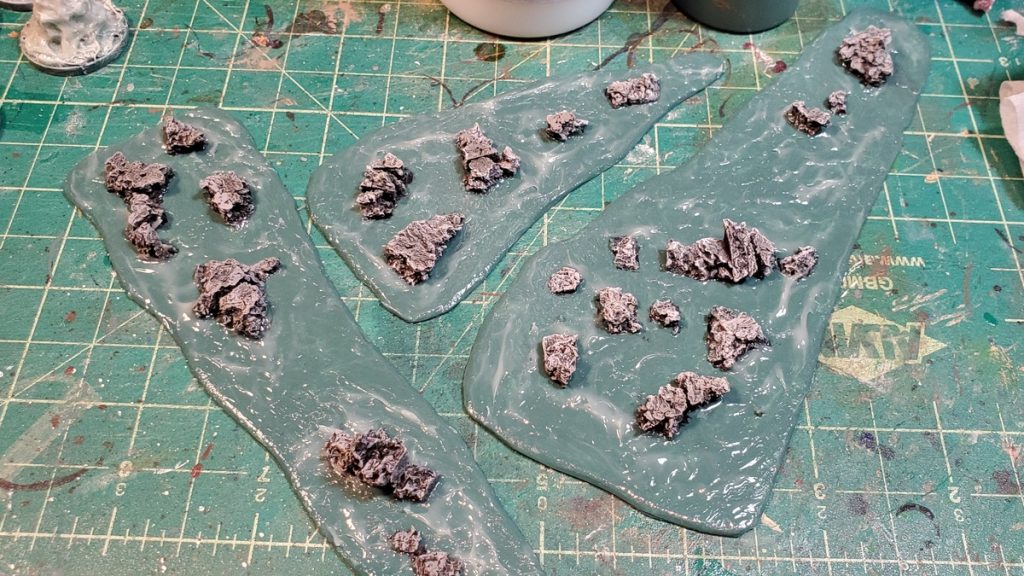
The bases got my usual blue-green ocean colour while the cork rocks got a black basecoat, and then successive drybrushes of grey-brown, pale grey, and finally just a bit of pure white.
Rocks after painting and drybrushing and a second coat of ocean colour. All ready for water effects!
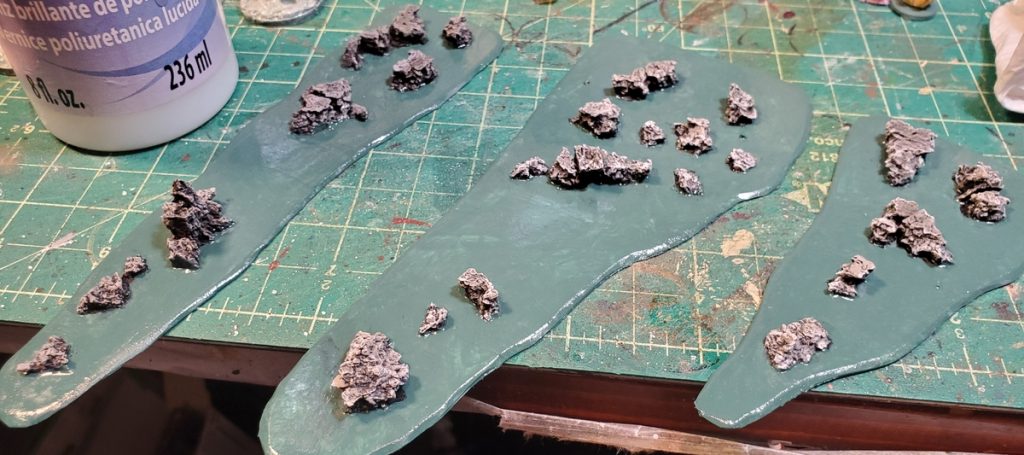
As with the sandbars, I did two coats of gloss varnish over the water parts and then a thick layer of gloss gel for waves, pushed around with a really old brush.
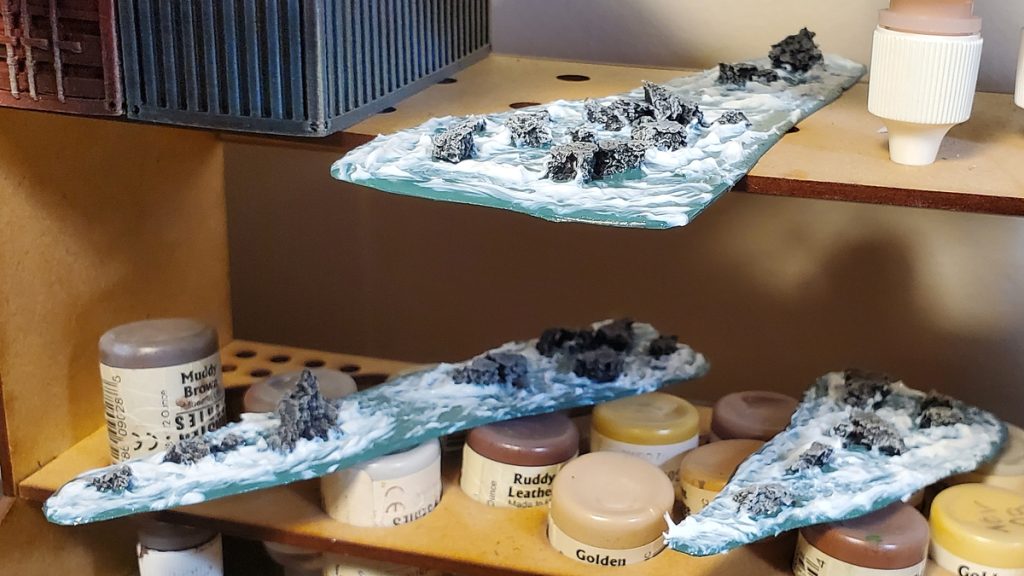
Gloss varnish down.Gloss gel down and pushed around to make some lines of breakers and waves around the bases of the rocks.Finished rocks after the gloss gel has dried for several days, all ready to ruin the cunning plans of 1/1200 scale captains!
These were almost as quick to create as the sandbars, you use literally crumbs of cork for the rocks so one small piece of cork will go a long, long way, and they look good. I’m looking forward to seeing them on the table menacing players who forget that no matter how dangerous the enemy is, the sea is even more deadly and far, far more unforgiving!
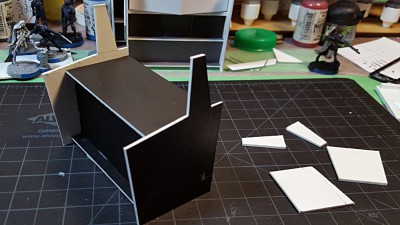
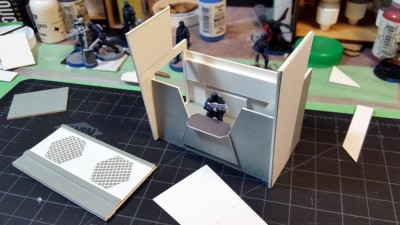
One of the goals with the spacestation terrain set was to make the whole thing look like not just a collection of tactically interesting obstacles but also a (relatively) sensible, lived-in/working facility. Right now the non-cargo bay area is a bit plain, really just the Impudent Mortal walls in my collection arranged in various ways. I did up some lockers recently to add colour and interesting cover, and now I’ve found a really simple way to do food booths or other fairly small terrain pieces.
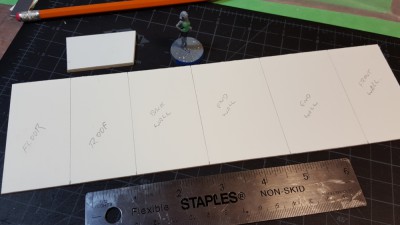
Rough cutting guide for one booth. See text for details, and click for larger.
Start with a strip of card 3″ wide and at least 11″ long, or multiple 3″ wide pieces making up roughly the same length. I use 1/16″ mattboard, the stuff used by picture framers, but for this project you could use just about anything. There’s only one measurement in the whole thing that depends on the thickness of the material being used (the height of the front wall of the booth) and that’s easily adjustable or even avoidable if you tweak the design a bit.
You’re cutting as follows:
1″ wide for the under-floor brace/foot. Cut this piece in half again.
1 1/2″ floor
1 1/2″ roof
1 3/4″ back wall
1 9/16″ front wall (NOTE)
2″ end wall
2″ end wall
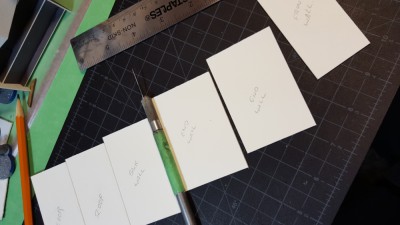
One booth’s worth of pieces. See text for details, and click for larger.
Start by gluing the two foot pieces to the underside of the floor. Centre it under the floor — exact placement isn’t important, they just exist to lift the front edge of the booth above ground level and add a bit of visual interest. Note that in the layout photo below, I forgot to allow for the foot pieces, as I’m using that scrap of 1/8″ foamed PVC plastic above the card strip instead.
While that dries a bit, cut the two end walls some more to make them interesting. They stand vertically, and you can see from the photos that I’ve cut each in a different way to add variety and provide support for the booth’s large overhead sign(s). You don’t need to get fancy, just a couple of angled cuts can do nicely, especially if you re-use the offcut pieces again as I’ve done on several of the roofs in my set.
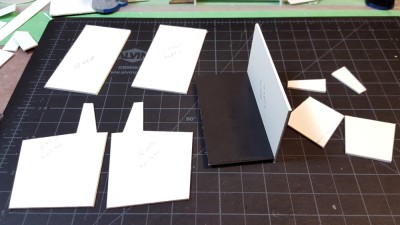
Glue the back wall to the back of the floor, with the bottom edge of it resting on the ground. Use the end walls to make sure the back wall is vertical and square, then glue them on, again with the bottom edges resting on the ground.
Floor on it’s foot and back wall in place, side walls cut. See text for details, and click for larger.
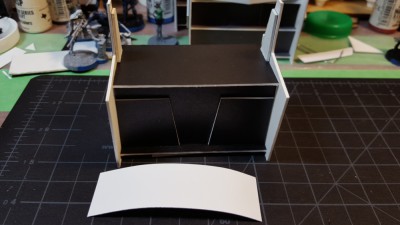
Fit the front wall in between the end walls, again making sure it’s square and vertical. Exact placement isn’t important and will depend on how you intend to detail the front wall. I’ve recessed all my front walls and used various offcuts of card to add a few bits of detail. I figure these are automated booths using various machinery to process FoodGoop9000 (or possibly Soylent Green…) into various forms of fast “food” by adding flavour, so there’s no order window or anything specific on the thing.
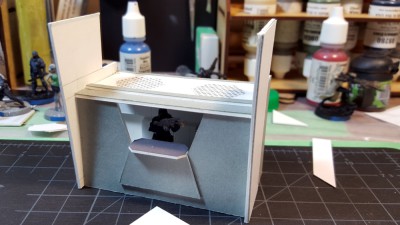
Basic assembly done, front wall and roof in place. See text for details, and click for larger.
I’ll probably eventually do some graphics to add to the fronts and signs of these booths, including various fast food brands we all know and love like Ariadna Fried Chickenoid and such! They’ll get posted here to the blog when they happen!
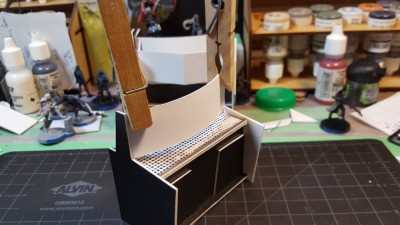
Details on front wall and inside the sign supports on the roof, first layer of the sign in front. See text for details, and click for larger.
Glue the roof on last, and put the resulting box aside for the glue to dry a bit. Time to move on to the overhead sign.
This could be as simple as a single strip of the same 3″ wide card you’ve used for the rest of the thing, or any number of more elaborate constructions. If you want a really, really striking sign, there’s H-Archive’s awesome how-to on making “holographic” displays, which I want to follow myself sometime soon!
Extra layers of the sign being held while the glue dries a bit. See text for details, and click for larger.
The curved sign is simply three layers of light card (65lbs, I think it is) cut 1″ high and 3 1/8″ long, just slightly longer than the gap between the vertical bits of the end walls, so that it curves. I glued one strip in place, let it cure for a bit, then gently pushed the second and third strips into place and held them with clothspins until the glue dried. Pre-curving the strips by running them over the edge of my workbench helps.
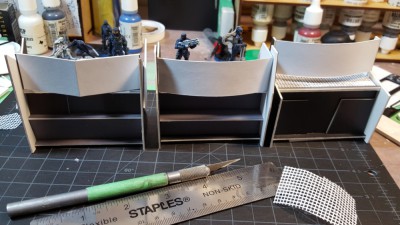
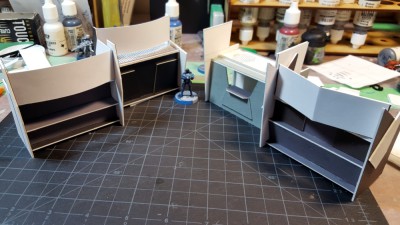
All three autobooth designs together, with various Hassassin Bahram troopers posing for scale. Click for larger.
The grid on the roofs of my booths is some sort of embroidery/craft mesh stuff that I got a leftover chunk of from my girlfriend. It adds interesting texture if you can get some, or something similar like the plastic mesh used in window and door screens.
The Manned Booth
The fourth and final booth is a variant design that is actually run by a person (or humanoid robot, you never know in Infinity) with a door in one end wall and an open order window/bar in one side wall.
Manned booth assembled, roof off. Click for larger.
Design is identical to the autobooths above except I cut two of the “back walls” and instead of cutting the roof 1.5″ I cut it 1 5/8ths” wide so it would go over the top edges of the walls properly.
Manned booth, roof on. Click for larger.
The inside is outfitted with various bits of card for the bar counter, a side bar/prep table, and a whole bunch of cupboards along the walls.
The outside end walls will eventually be painted and decorated to look like drinks glasses, and there will be a sign of some sort on the roof, although of slightly different design than the autobooths because this roof actually comes off.
Any comments or suggestions please leave them below, I do read and reply to comments but due to the spam filters it might be a while before I approve your comment!
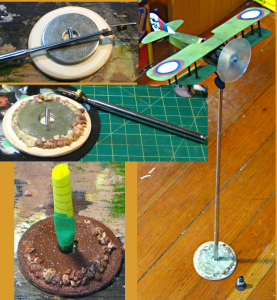
…it’s a bird, it’s a plane… well, actually, it’s a flying stand to get my existing SPAD and Nieuport fighters onto the table properly!
Flying stand construction. See text for details, and do click for larger!
The lower part of the base is two 3″ plywood circles from Micheal’s craft store, the lower one with a hole drilled in it wide enough to accommodate the head of the M4 20mm long bolt. The top circle has a smaller hole to let the bolt through, and I used a woodworking rasp to bevel off the edges. The two washers are fairly heavy 2″ fender washers. I used superglue to tack them in place, then ran a bead of Gorilla Glue around the edges to lock them in place and round off the base. The gravel imbedded in the Gorilla Glue adds nicely to the weight of the base, as well.
The base will get a quick paintjob to match the rest of my terrain, then some lichen or foam foliage to break up the outline a bit.
The actual flying stand is a cheap mechanic’s extending inspection mirror from a local auto parts store. The base unscrews and is threaded for a metric M4 bolt – that’s a 20mm bolt coming up from the centre of the base. Once the mirror at the top was removed, the round ball it swivelled on turned out to be easy to shape with 120 grit sandpaper, so I sanded it roughly cubical and tacked the alligator clip (also cheap from the electrical section of a hardware store) on with superglue just to hold it. Then I used fine wire to lash the clip into place, saturating the lashings with superglue after I was done. The result is low profile and more than solid enough to be gamer-proof. I did nearly glue the hinge of the alligator clip shut, though… try not to do this!
The small square of basswood on the handle of the alligator clip is just to make it easier to open all the way; the way it’s mounted on the telescoping rod centres the airplane over the stand – which is a good thing – but the rod gets in the way of your fingertip when you try to open the clip to it’s widest point. The screw I put in the belly of the SPAD turns out to be almost too big for these clips; if you look closely you can see I bent the handle of the clip outward to allow the clip to open just a bit wider. The whole clip has also been bent forward slightly to improve the angle the planes sit at when they’re clamped in.
Total cost of the whole thing is about $10 or $12. The extending inspection mirror is the most expensive part at about $8; four alligator clips were $2 total; four 20mm M4 bolts were about the same; the 2″ fender washers are about 50 cents each; and a package of six 3″ plywood craft discs was $3. If you had a workshop area full of random stuff (which I don’t) and could scrounge bits you could build these for not much more than the basic cost of the inspection mirror.
The whole assembly is just over 20″ tall to the tip of the alligator clip, more than tall enough for my purposes. The telescoping post will still unscrew from the bolt in the base, which I will probably maintain as being able to take it apart makes it much easier to transport, and the telescoping rod and alligator clip is the part most likely to be damaged and need to be swapped out.
My brother has a big 1/48 DH4 that we’re not sure will balance securely on this stand; I might wind up making a larger flying stand, probably based on CDs, for that plane. I’ll eventually make one or two more flight stands this size, too, but given that for the near future there’s never going to be more than one plane over the table at a time, we’re good to go and it was easier than I thought it was going to be to construct a solid flying stand.
This is not really a new idea, but it’s one that I only twigged to in mid-2011, so it’s fairly new to me. The idea of using greenstuff for flags and banners came to me one evening as I was experimenting with a small blob of greenstuff putty. I sculpt about as well as whales fly, and I find the rubbery used-bubble-gum consistency of greenstuff quite frustrating to actually do anything with (the clay-like feel of Milliputt is far more agreeable) so I was messing around wondering what I could do with the 36″ roll of greenstuff lurking in one corner of my desk.
Pressed out very thin, I discovered greenstuff is actually strong enough to hold itself up even before it cures. Once it’s cured it’s still moderately flexible, with a springiness to it. You can actually gently press folds flat to paint them, which is a bonus. It takes three dimensional folds and ripples better than paper, and unlike lead foil it won’t crease easily. A quick shot of primer and it paints up nicely.
The excellent Brushthralls website has a great Greenstuff Gizmos article with more detail, including the use of light vegetable oil to keep greenstuff from sticking to things, which I must admit I hadn’t heard of before. (link dead, alas, the entire Brushthralls site is no more – Sept 2020)
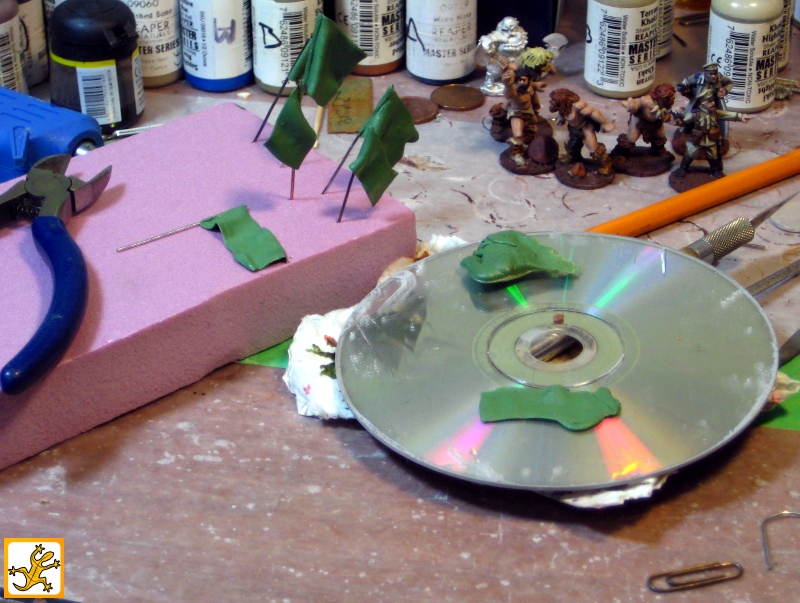
Greenstuff flags in progress. Click for full size.
Above, my greenstuff flags in progress. Squash greenstuff into thin sheets on the back of a CD, cut flag-shapes with a knife, wrap around lengths of wire donated by paperclips, gently prod some folds and ripples in with a sculpting tool or just a fingertip, stab into a scrap of foam to cure. Done, pretty much.
Incidentally, I love big paperclips as a source of wire. Not as strong as piano wire, true, but far, far easier to work with and more than strong enough for most modelling purposes.
So, there you have it, flexible, good looking flags from greenstuff, and a use for greenstuff even a non-sculptor like me can manage!
A 1930s WPA job-safety poster. Via x-ray_delta_one on Flickr.
A necessarily brief, personal and idiosyncratic tour through some websites with noteworthy archives of 1920s/30s posters, postcards, luggage tags and other graphics. Some photos, some stuff that’s technically outside our chosen era but still cool, and far too short, but enjoy, be inspired, and get a feel for the graphics of the pulp era!
This is the second in a series of posts (three or more) aimed at introducing gamers to some of the resources out there they might not be aware of for making their own graphics & such. It’s based on our current areas of interest, the 1920s & 30s interwar pulp period, but should be of interest to anyone wanting to add some graphic design details to their gaming!
A 1930s Canadian Pacific poster for the Empress Hotel. Via Boston Public Library's Flickr account (CC BY-NC).
Have a look at the image to the right; it’s a good basic distillation of the design principles shared by many of the 20s/30s graphics we’re trying to replicate for our own uses. There were, of course, a number of different styles and variants in use in the period, this one just happens to be a favourite of mine and also easy to replicate in Inkscape!
There’s no gradients, just areas of solid colour. Shading is done with smaller areas of another solid colour — see the area along the golfer’s inner thigh or around his arms — or not done at all. Notice that the grass and sea are simply solid colours; the sea and sky are even exactly the same shade of blue, with the horizon sketched in with a thin tan divider. No outlines or sketch lines, either, just areas of colour. Continue reading Pulp Design Tools & Resources, Part Two: Fonts→
This is the first in a series of posts (probably at least three) aimed at introducing gamers to some of the resources out there they might not be aware of for making their own graphics & such.
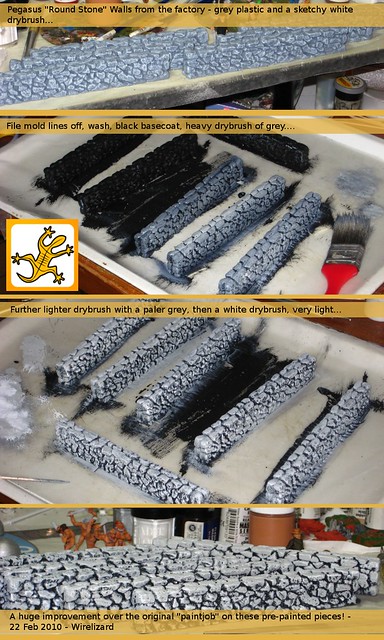
Pegasus produce a range of prepainted plastic 28mm wargaming scenery; all the stuff I’ve seen has been well cast but mostly badly painted. The stone wall sections are good value for money, though, with six 6″ sections for $10 at my Friendly Local Gaming Store.
I picked up a pack, took them home and while repainting them, took enough photos to assemble into a quick, hopefully inspirational, how-to.
(Click the image to see the full-size version at Flickr)