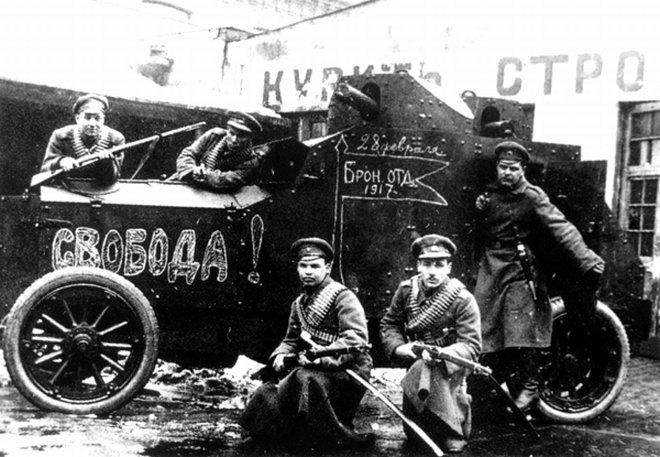
The first armoured car for my Russian Civil War forces now has wheels attached, and I did the first round of weathering with pastel chalk dust. Before I talk about my model, though, check this photograph out:
A 1917 photograph showing soldiers of the interim Russian government (after the February revolution but before the Bolshevik Revolution of October/November) posing with an awfully familiar looking armoured car. The word chalked on the side of the hood is “Freedom”.
That photo also nicely answers the question about the scale of the Copplestone vehicles — they’re pretty much right on scale!
Weathering with Pastel Chalk
You can buy pre-made “weathering powders”, but I’m not sure why you would when a couple sticks of cheap pastel chalk will set you up for life. I bought a black stick and two shades of brown (burnt umber, technically) for a few dollars from one of our local art supply stores. Run an Xacto knife edge along the pastel stick to create powder, then use a beat-up dry paintbrush (trust me, don’t use good brushes for this) to dust it onto your model. You could also use a bit of pastel dust on your fingertip for more definite smudges.
Apply the pastel powder much more heavily than you think is reasonable, because to fix it in place you spray it lightly with Dullcote or other matte sealer spray, and that always dissolves some of the powder. I might do a second round of powder weathering on this vehicle, depending on how much the Dullcote takes off.
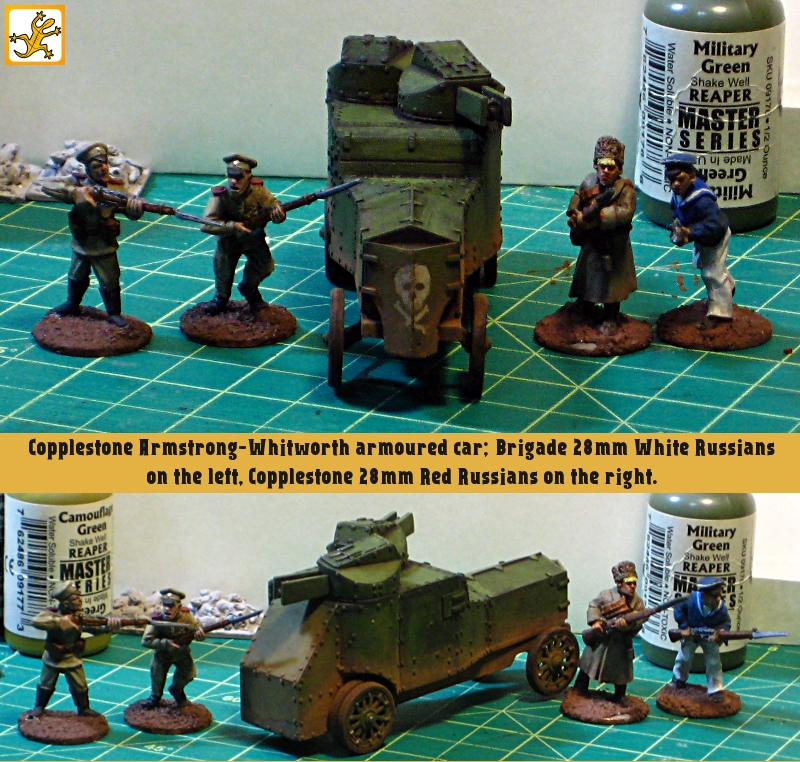
Here’s the current state of the car, with figures for scale. On the left, two of Brigade Games’ Storm in the East line of Russians, painted up as White Russians. To the rigt of the car, two of Copplestone’s Back of Beyond Bolsheviks, one rifleman and one sailor. The car has not yet been sprayed with Dullcote, so this is unfixed pastel chalk dust on display.
My 1:56 Armstrong-Whitworth armoured car, alongside figures for scale. Click for full size, as usual.
Speaking of things on display, this is the first photo I’ve managed to get of the Bolshie sailors I painted last month. Must get proper photos of them soon!
Still to do on the Armstrong-Whitworth: the minimal base, just big enough to go under the wheels, then Dullcote and possibly more weathering. Oh, and a name for the thing, which is going to mean doing freehand painting of Cyrillic, which should be fun. The thread I started over on the Lead Adventure forum for this vehicle build has become a great source for possible vehicle names — having a Russian local active there helps with local sources (he supplied the great historical photo at the start of this post) and translations.
I’m away for the weekend, but should have the armoured car done early next week.
We track basic visitor stats here at the Warbard, as most websites do. What people are reading, which links they’re following, the usual stuff, including how people find this site – what inbound links they’re following, and (to some extent) what search terms they’re using to find us. We use the open-source web app Piwik for most stats, and the built-in WordPress Stats for a few details.
Over on Flickr, both Corey and I can track views on our accounts in a similar fashion, which photos are being looked at and what search terms people are using.
We’ve both noticed, this year and last (in other words, since we rebuilt Warbard in it’s current format) a mildly amusing thing: every year after the huge Salute wargaming show in London, over the water and far away in the United Kingdom, we get a big jump in viewership stats. The reason? About a month before the world-famous Salute show, we have the Trumpeter Salute show in this part of the world, and for four of the last five years, I’ve been there, taken lots of pictures that’re up on Flickr, and for the last two years, posted here about it as well.
So gamers hit Google looking for eyecandy from Salute, and get our blog and our Flickr photos because of the similarity in event names. Oops.
Trumpeter Salute is a great convention, the highlight of my gaming year in many ways, but it’s not the immense and justly famous show in London, which I got to in 2000 and badly want to go back to one of these years! If you’ve come looking for Salute pics, sorry to disappoint you! But have a look around, you might find something else of interest, and thanks for the bump in traffic and the minor amusement!
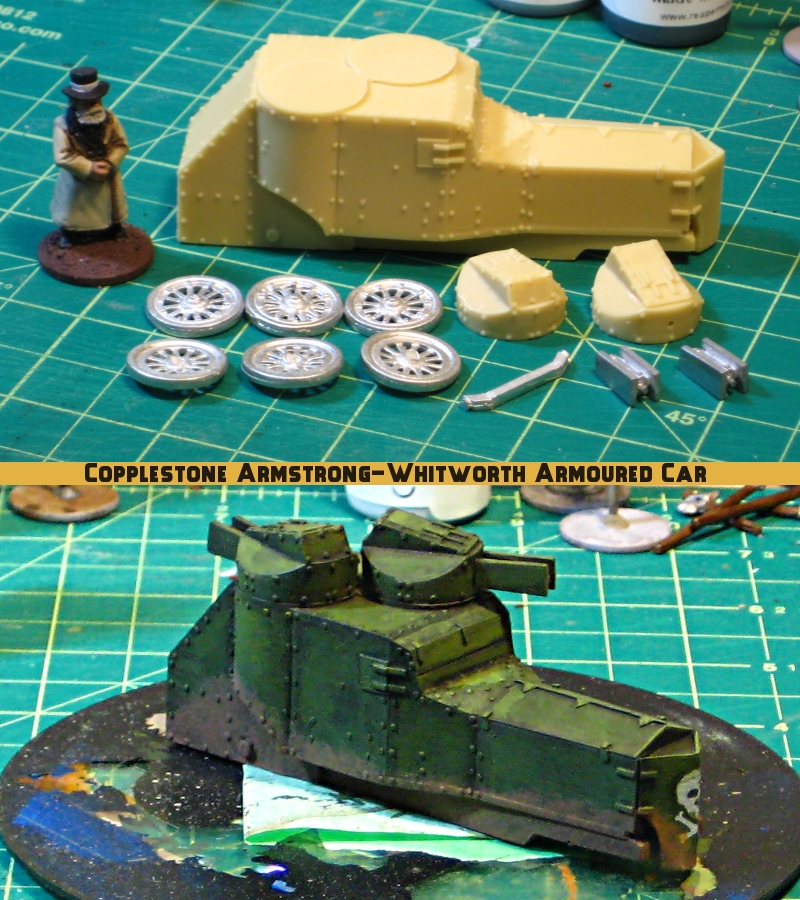
My recent order to Copplestone Castings included the first armoured vehicle for my Russian Civil War forces, a very nice resin and metal 1/56th scale model of an Armstrong-Whitworth Armoured Car. It’s a pretty typical design for a WW1/RCW Russian armoured car, with a pair of machine guns each in their own turret on a six-wheeled armoured body.
The resin and metal are all very cleanly cast, with practically no flash, no casting errors, and minimal seam lines on the metal parts. You get the resin body, two resin turrets, two metal machine gun barrels, a metal front axle, and six metal spoked wheels. The body is roughly 3.5″ long
After cleanup I drilled and pinned the gun barrels to the turrets, but haven’t bothered pinning the turrets to the body — I think there’s more than enough contact area, despite superglue’s notoriously poor shear strength.
Here’s the beast in bare metal, with a Brigade Games 28mm White Russian priest for scale, and below, as it currently sits on my workbench.
Copplestone’s 1/56th Armstrong-Whitworth armoured car. The lines on the cutting mat are half-inch.
The paintjob so far (all paints Reaper Master Series acrylics) is a basecoat of 2:1 Swamp Green:Pure Black, then a GW Devlan Mud wash. The green is gradually highlighted up with straight Swamp Green, a 1:1 mix of Swamp Green:Military Green, then straight Military Green.
The skull on the armoured radiator cover is freehand from Leather White, with a bit of a highlight of Pure White.
The undercarriage got a basecoat of Blackened Steel, then a mix of browns (Earth Brown, Muddy Brown and a couple of others) to muddy it up. I used a cheap, stiff brush to stipple the browns up the body for the muddy effect.
The paint job so far on the Armstrong-Whitworth has to trace it’s inspiration to Sidney Roundwood’s spectacular article on painting British tanks for the Western Front. The plan from here is to get the wheels on and the base installed (a minimal “shadow” base from styrene card and Milliput) then break out the pastel chalk for another round of dust and dirt.
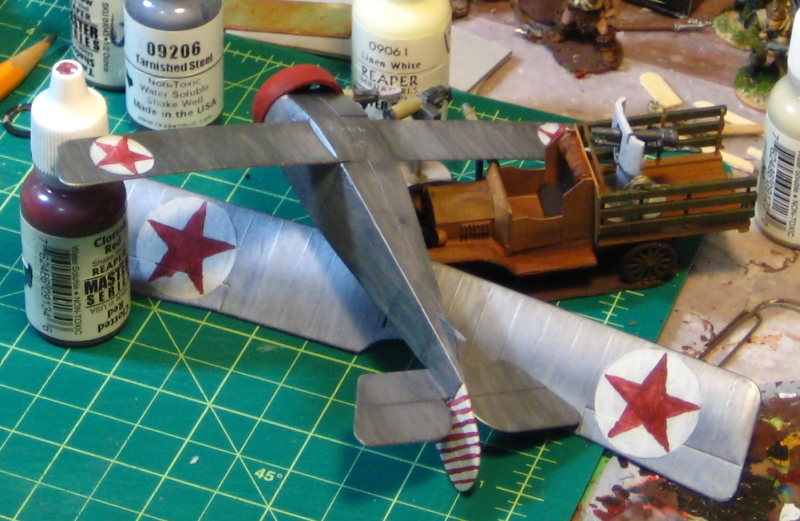
Got the star insignia finished up on the Bolshevik Nieuport 17. Some of the stars are a bit wonky, but frankly that’s historically accurate — a lot of actual insignia during the Russian Civil War had a definite hand-painted look to it!
I gave up on the red-and-white striped vertical tail as a bad job, and went with solid red to go along with the red cowling at the nose.
Painting all done on the Nieuport, Now to swear the upper wing into position!
Now to get the upper wing into position, always a job likely to provoke swearing. At least the Nieuport only has six struts, instead of the even dozen on the SPAD! After that there’s just the landing gear and prop disc to do.
Got started on the insignia for the Bolshevik Nieuport. This is going to involve at least six freehand red stars; to skip one pair I’ve decided to go with a red-and-white striped tail, although freehand stripes might make freehand stars look easy…
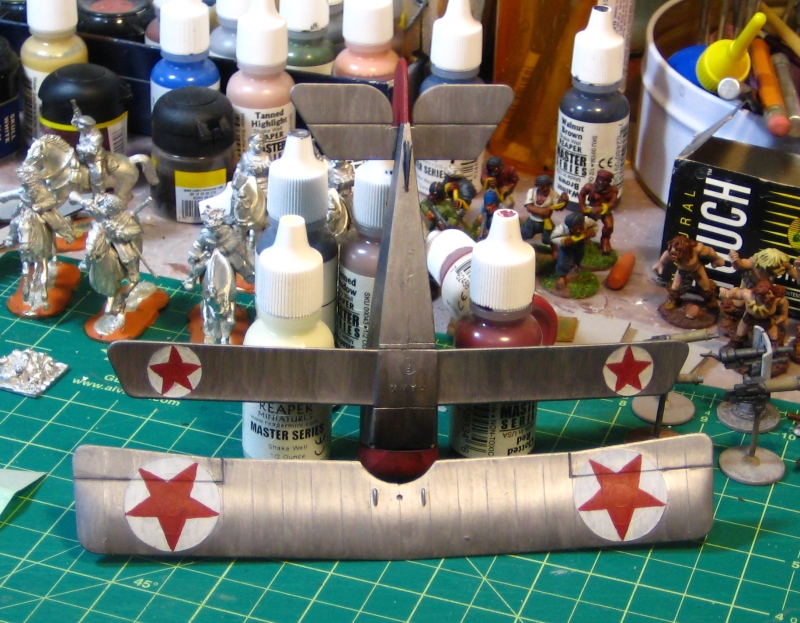
Anyway, here’s the current state of the beast. Like the SPAD, this Nieuport has roundels moulded right into the wing surfaces, so I’ve used those to put the stars in white circles. This appears to have been fairly common on Bolshevik aircraft, for the simple reason that the Imperial Russian Air Service roundel had to be blanked out somehow!
The Bolshie Nieuport upside down, showing four of the six Red stars on it. The upper wing has insignia on both the upper and lower surfaces of the wing, which was fairly common for Nieuports.
The insignia and tail stripes will get at least one more coat of paint, and they need some cleanup, then highlighting. Colours, for anyone following along at home, are Reaper Master Series Clotted Red and Reaper MS Leather White; highlights will be with Reaper MS Pure White and Carnage Red. I might yet abandon the striped tail in favour of a red tail, possibly with white star. It depends on how frustrated freehand pinstriping gets me…
Having built the White Russians a SPAD (Parts One, Two, Three), it’s time to build the Nieuport 17 for my Bolshevik forces!
As I mentioned in my original RCW Aviation article, the basic scheme for the Nieuport in Red service will be silver/grey dope with as many red stars as I can stand to freehand onto the thing. At a minimum, I”m committed to six: two on the vertical tail, two on the upper surface of the top wing, two on the lower surface of the bottom wing. Nieuports, because of their very small bottom wing, often had insignia on the lower surface of the upper too. We shall see.
Thankfully the Reds freehanded their star insignia too, so lumpy, misshapen and odd stars abound!
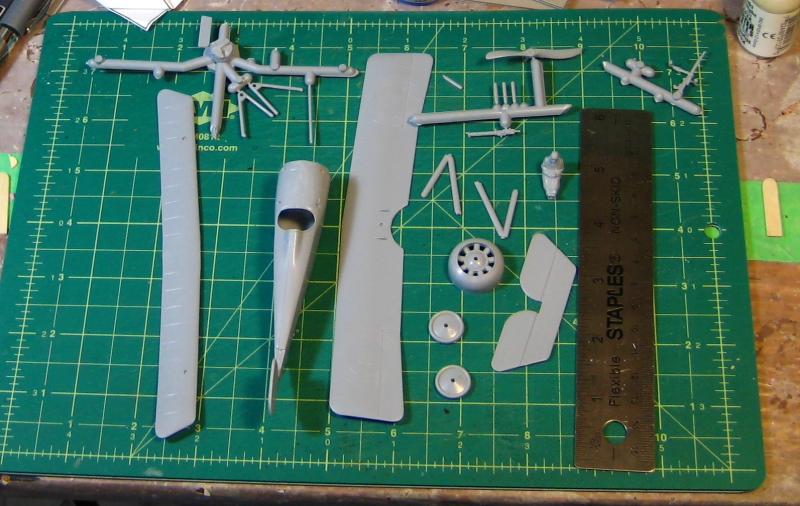
Here’s all the kit parts laid out on my cutting mat. Only about two dozen parts all told, and a much simpler strut setup than the SPAD which will hopefully be easier to assemble than the SPAD’s upper wing… (the fuselage is in two halves, I just had them popped together to check the fit when I took this photo.)
The Testors Classic Nieuport 17 kit all laid out.
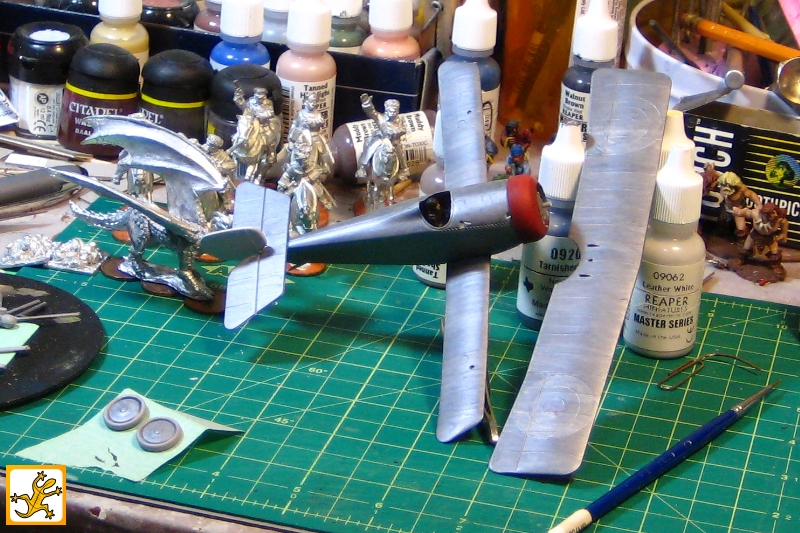
Here’s the current state of the Nieuport. Basic assembly of fuselage and lower wing done, and basecoat of silver, red (on the nose) and white (on the tail) done.
The Bolshevik Nieuport 17, base colours done, ready for insigia then weathering.
The English Civil War has become a definite back-burner project around here, but it is still around, along with ambitions to make some more Western European/British buildings and other scenery for dual use in both ECW and pulp gaming. Dark deeds in the pastoral countryside, that sort of thing, whether it’s with horse and musket or Mauser and sporty roadster!
It turns out that the ever-valuable Internet Archive (previously here on the Warbard) is stuffed with old books on English traditional architecture and buildings. Here’s a fairly random sampling of ones that caught my eye as being useful for inspiring suitable wargaming terrain.
Finally, you can find many more books in this vein by searching the Internet Archive’s Texts collection for Architecture, Domestic — England.
The Shire Publications book Discovering Timber-Framed Buildings is one I’ve seen recommended several places. As usual, check the various other recommendations Amazon and other customers make, good stuff there too. Shire do a whole series of inexpensive English history books that look very useful for those of us who aren’t in the UK but want some inspiration and authentic local details.
Inspired and begun by a thread over on Frothers Unite, of all places.
A few people on the Lead Adventure Forum and elsewhere have asked how the thatch on my variousRussianbuildingswas done, and I”ve been promising some in-progress photos.
I got those shot last month, and finally sat down to edit the pictures and write this tutorial. The basic materials are mattboard (good-quality picture framing card, used for most of the underlying roof structure), light card (used to bridge the spaces between the mattboard pieces and support the towel) and a cheap hand towel I picked up at the nearby dollar store, for the actual thatch.
The roofs pictured below are more complex than many, first because they’re hipped roofs, with all four sides sloping inward, and second because both buildings I happened to be building while I took these pictures have a complex floorplan, one T-shaped and the other L-shaped. I’ll discuss some of the peculiarities of doing towel thatch over a hipped roof in a bit.
I also design most of my roofs to be removable, which complicates design of the underlying structure. All that aside, the basic towel thatching technique is going to be basically the same for a simple gable roof permanently attached to a building or a complex removable roof like I’m doing here!
The roof structure - about as complex as a model roof is ever hopefully going to get!
Above, the main structure of mattboard, with light card over some of the bigger gaps in strips. I don’t bother trying to cover the whole roof, the towel is more than strong enough to support itself once all the glue on it is dry. A simple gabled roof with one ridgeline is obviously going to be a lot simpler!
Towel being glued down, cut oversized so it hangs well over the eves.
On this T-shaped roof, I started the sheet of towel on the top of the T, after putting glue over the card and along the edges of the mattboard pieces, then folded it over the main ridgeline and across the ends. I cut the towel on the hip roof ends and in the valley where the stem of the T goes out, and in several places removed triangles of towel to avoid having multiple layers of fabric piled up. The cut edges got an extra smear of white glue worked into them with a fingertip, to secure and help disguise the edge.
For these roofs, because they were complex enough already, I’ve gone with a single layer of towel, but you can get a nice extra effect by starting with strips of towel, and gluing them up from the eve toward the ridge of the roof in slightly overlapping stips. Real thatch is often laid in layers, and this recreates the look nicely. See my older English Civil War barn article for an example of thatch with strips of towel.
An illustrated explanation of how to fit towelling around a hipped roof's ends. With scissors, cut upward from the eve to the end of the ridge, removing a triangle of towel, then glue the ends over each other with an extra smear of glue to hide the edges.
The photo above should explain how to fit the towel around the sloped ends of a hipped roof, removing triangles of towel to avoid having massive amounts of overlapping fabric.
After the towel has been fitted to the roof, leave the whole thing to dry for a while. Note that the towel is hanging well over the eves at this point, and to keep that fabric from being glued to the table, I’ve propped the whole roof up on a couple of bottles of craft paint. I don’t use the building itself, because I want these roofs to be removable and the next step could easily glue my roofs down to the building by accident!
That’s because the next step is to saturate the towel with dilute white glue. I mix a jar of roughly two parts water to one part white glue, well mixed, then apply it liberally with a big paintbrush, a 1.5″ household brush I use for all sorts of scenery painting. You might think a soaking in watery glue would wreck or warp the underlying cardboard structure, but I’ve done four buildings this way in the last few months and none have warped noticeably.
Remember that you are dealing with towel. It will soak up your glue-water mix like, well, towel. Dab gently with the paintbrush, you don’t want to push the towel around or wrinkle it. After it’s well painted with your glue-water mix, leave the roof in a warm place at least overnight to dry.
After the glue-water mix dries, your thatch will be solid and pretty much self-supporting. Time to trim the eves with scissors, then slap on the first coat of paint. I use black primer, but I could probably have just started with a black towel...
After your roof dries overnight, the glue-soaked towel is basically strong enough to stand up on it’s own. Now you can trim the eves back accurately with scissors, making sure to fit the roof to the building (if it’s removable like mine are) to get a good fit and ensure the eves look good and even.
After that, basecoat with a dark colour, I go straight for black, and mix a bit more white glue into the paint to further strengthen the roof. This is also your chance to trim or re-glue any seams or areas you missed during initial construction. You could skip some of this by just starting with a black or dark brown towel — I started with tan as that was the least-objectionable colour the cheap towel I use came in.
After the black basecoat is finished, I do two drybrush coats to bring the texture of the towel out and make it look like tatch. The first, fairly heavy drybrush is with a 1:1 mix of light brown and grey paint; the second drybrush is brighter, more tan or light brown and less grey in the mix, and i concentrate on the ridgelines of the roof, to make the shape “pop” a bit. You could do more of a straw/yellow colour to your thatch, but real thatch almost always weathers to a grey/brown/black colour fairly quickly.
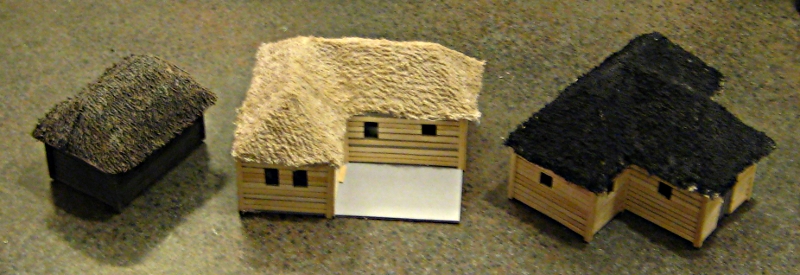
From left to right, a finished building, with thatch painted as described in the text. Centre, unpainted but with eves trimmed. Right, black basecoat only on the thatch, awaiting it's two drybrush coats.
Finally, a photo from my earlier posting about the two buildings featured in this article, with everything finished except the fence on the L-shaped building. You can see the drybrushed finish that brings out the texture on the towel, and the slight highlighting of the ridges and edges of the roofs.
A pair of new, larger Russian-style buildings for our 28mm RCW games. Click for larger.
Hopefully this helps someone out there tackle their own thatch roof from towel. Remember that the roofs I’ve used as illustration for this article are at about the outer limit of complexity for a thatch roof, being hipped, T- or L-shaped and removable all at once! A simple gable roof can just use a single strip of towel, up one side and down the other; this gets even easier if you build permanent roofs instead of removable ones.
Richard Clarke of TooFatLardies has an interesting article on using putty for thatch, if you don’t want to try towel. I’ll have to give that a shot on the next small building I do, although I think towel is easier and more economical on larger buildings.
Any comments, suggestions or questions, fire them into the comments below and I”ll do my best to respond.
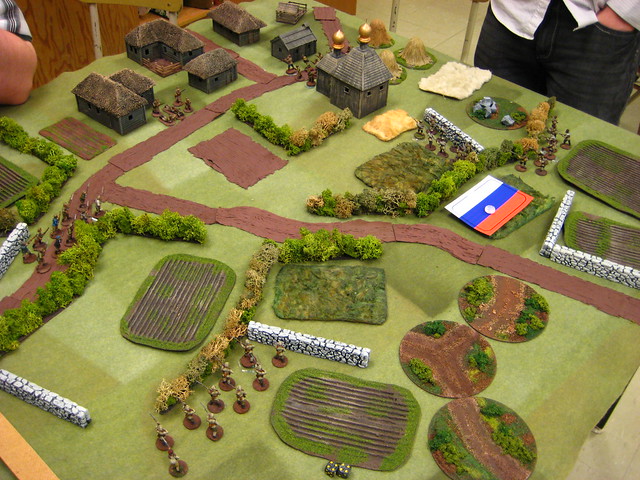
Introduced another local gamer to our Mud & Blood-powered Russian Civil War gaming on Sunday afternoon, it was a good little game although my attacking Whites kind of stampeded his defending Bolsheviks, despite the heavy machinegun they had to assist.
The scenario was another lift out of the great M&B scenario book, Stout Hearts & Iron Troopers, this time the very first scenario, “Attack on a Strongpoint”, which has two infantry sections with an HMG defending against an attacking platoon.
My attacking Whites were able to stay mostly in cover until they were very close to the edge of the hamlet, screening themselves from that lethal machinegun for the most part. There were a few tense moments when the MG caught one White section and another was thrown back after attempting to close assault one of the Red sections, but then the gun jammed, I was able to get another section in to launch a brutal close assault on the same Red section, and on the other flank my single flanking section poured some terrifyingly accurate rifle fire into the other Red section, and it was all over.
Here’s the table fairly early in the game, with my Whites in the foreground advancing and Reds visible on the edge of the hamlet.
The one White Blind (the Russian tricolour marker on the far side of the table) is a rifle section I was able to keep on Blinds right until I got them to the hedgeline behind the church, where they unmasked and proceed to slam the Red machinegun in a hail of fire. Units coming off Blinds get bonus dice to fire, which proved devastating.
We’ll hopefully get a chance to do a larger RCW game in the next few weeks, but today’s smaller game was interesting and Nathan was interested in another go at the system sometime in the future. I’ve got another fifteen or so Bolsheviks to get off the painting table sometime soon, which will finally give me enough Red figures that they don’t have to be on the defensive all the time!
Oh, and I also have an inbound order from Copplestone with some shiny new stuff. It won’t be just infantry in our RCW games shortly, let’s just say!
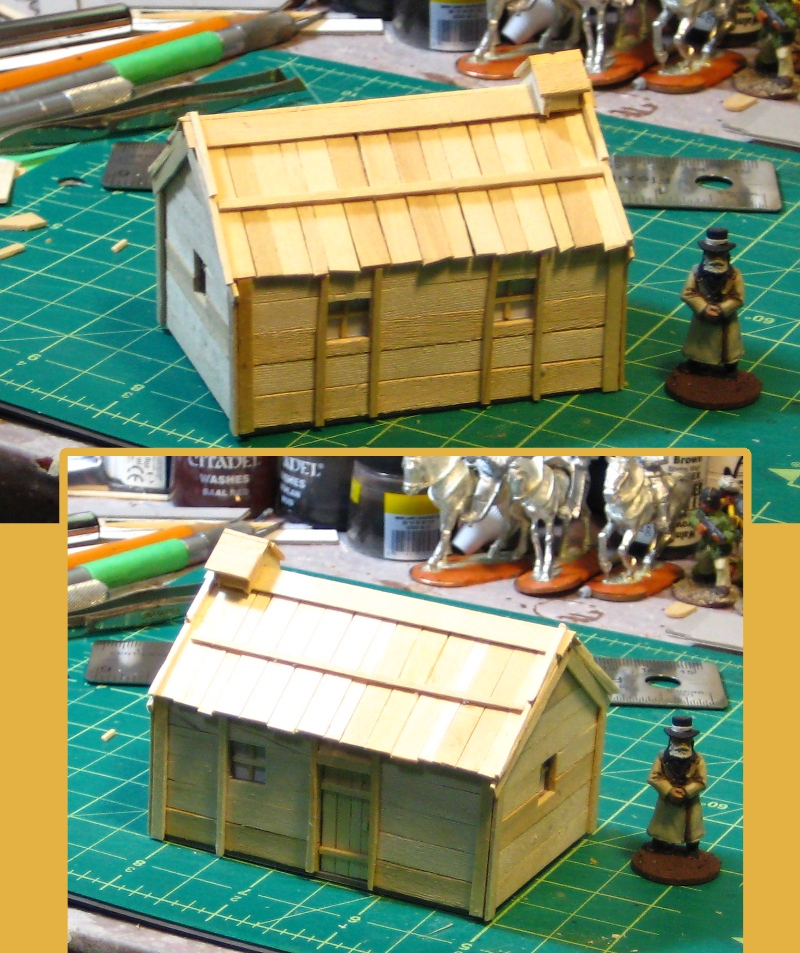
Inspired by Tony’s plank-roof hut tutorial that I linked to in my recent links of interest post, I sat down with stir sticks and my Xacto knives to do up my own version of his hut.
A Russian-style plank-roof hut, after Tony’s tutorial.
My version is 3 inches across the front, 2 inches deep and about 2.5 inches tall to the top of the chimney.
I’ve also been amusing myself recently with fake fur and fabric dye, searching for good loking long grass. I’ll have to write up my discoveries sometime soon, it’s been… interesting.
The new hut will have it’s final paintjob this weekend, more photos of that when it happens.