Looking to assemble unique teams for Blood Bowl without spending a lot of money, I’ve been poking around the Reaper Bones collection – Reaper’s relatively new collection of injection-molded figures in a relatively soft plastic.
I ordered a couple of figures from my FLGS that seemed usable in Blood Bowl, just to check them out. I got an Ogre Chieftain, a Minotaur, and a Spirit of the Forest, intending to remove the weapons (in the case of the minotaur & ogre, at least) and use them as, respectively, an orge, minotaur and treeman in BB teams.
I’ll talk more about all three figures in future posts, but first I have to say that Reaper’s online customer service is awesome. I bought the figures Thursday and realized that evening that the Spirit of the Forest had been packed with two right arms. Friday I confirmed on the Reaper website that the Spirit is indeed supposed to actually have both a left and right arm and sent a short email off to Reaper customer service that Friday evening.
Monday morning first thing I had a short email from Reaper asking for a shipping address so they could send a replacement left arm; I replied around mid-day and that afternoon got another email saying my part would be packaged and shipped soon. Wednesday morning I got a notice (with tracking number) saying my package had left Reaper.
I’d always heard Reaper had good customer service, but because I can order Reaper figures through Curious Comics & Games here in town had never had any reason to deal directly with them. I’m happy to say the rumours are entirely true, and I’m looking forward to getting the replacement part for my Spirit of the Forest soon!
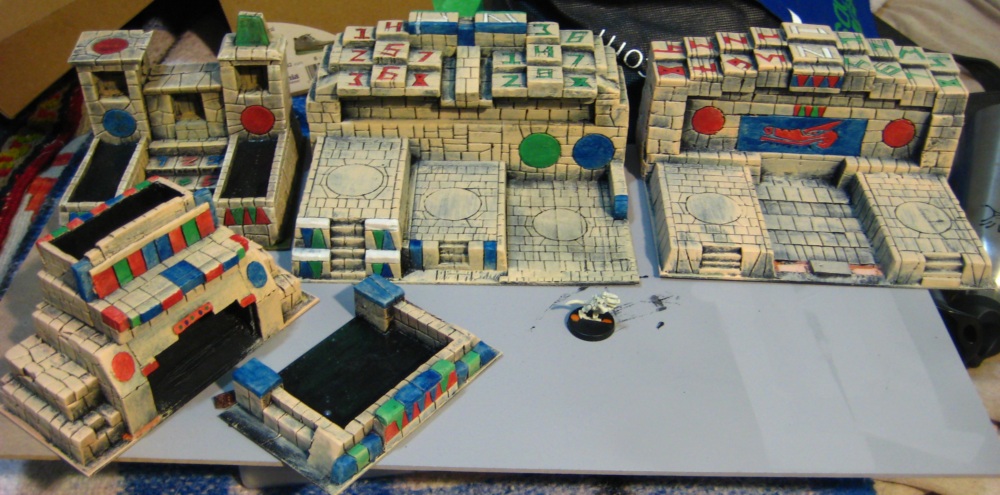
Finally getting paint onto all the Blood Bowl sideline buildings, which means it’s worth pointing a camera at them again – neither bare pink styrofoam nor black primered styrofoam are really all that photogenic.
The BB temples get some paint! Not done yet, mind you. Click for larger.
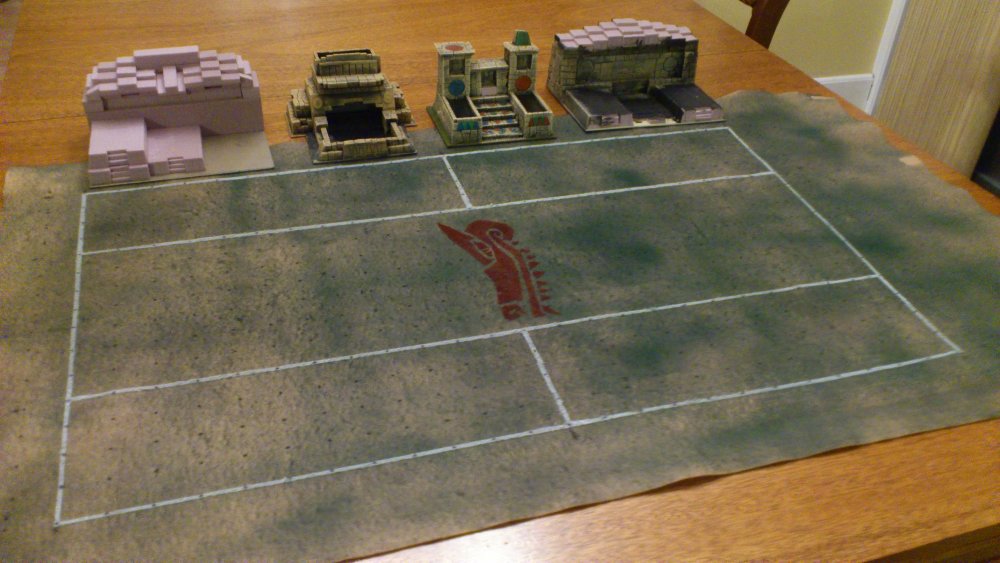
For scale reference, the figure on the black base in the centre of the photo is an Impact Crocling (Skink) on a 25mm slottabase.
Left to right along the back row, we have the finished scoreboard/scatter temple, the Visitors dugout, then the Home (Crocodile) dugout. Front left corner is the dice tower, and next to the tower is the dice catch basin/ceremonial pool that attaches to the front of the dice tower.
Quite a bit of stuff still to do – all the buildings need black washes here and there to tone the colours down and weather some of the stone back down where the drybrushing has gotten too bright, then I need to do at least one pass of much lighter drybrushing with a paler/brighter stone colour to pop the edges and textures a bit.
I’ve already mentioned the magnets to keep the dice tower and it’s catch basin/pool together while they’re in use, and the Home team dugout also has a pair of simple croc-head statues underway to go at the front corners of the centre dugout area, where you can still see unpainted pink foam.
I also need to figure out what symbols to put in the large blank circles in five of the six dugout areas. Blood Bowl’s dugouts are Reserve/Knocked Out/Casualty (RES/KO/CAS) and aside from the obvious skull for CAS I’m not sure what to put for the other two areas. Anyone got any bright ideas or inspiration there? If you do, please comment below, I’d love some help…
It’s been a quiet stretch here mostly because I was away from home for just over a week housesitting for a family member on the other side of town, but the Blood Bowl pitch setup has been progressing slowly.
I posted my stencil tests recently and have since finished the full set of field lines and a logo on the fabric pitch.
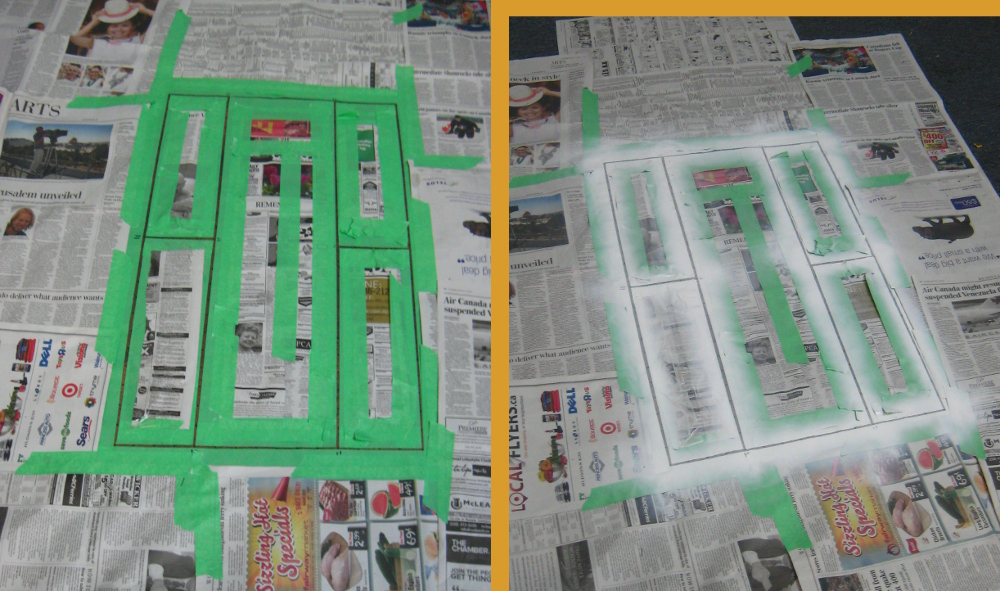
Masking the field off for most of the field lines. Newsprint and lots of masking tape! Click for larger
For the field lines, I used masking tape over the fabric to mask off the edges of each line. Because of the width of the tape I had, I wound up doing the outer lines of each endzone separately. The photo above has the centre line (Line of Scrimmage), wide zone and long edge lines masked off, as well as the inside edge of each end zone. After masking it off I sprayed along each line with white spraypaint, making two or three passes down each line.
The red crocodile head logo in the centre of the pitch I did differently. I laid out the image in the size I wanted in Inkscape on my computer, then printed it on a sheet of full-sheet label paper — the sort of paper where the entire sheet is one giant sticker. After printing it I used an Xacto to cut the stencil out, mostly freehand but using a small steel ruler where needed. Once cut I peeled the backing paper off and stuck the stencil down to the fabric.
You could do this step with ordinary printer paper (ideally a good quality slightly heavier-weight sheet) and secure it in place with masking tape around the edges, but I happen to have a stockpile of the full-sheet label paper around and it does work better than ordinary paper for things like the spirals in this stencil and some of the smaller details — see around the nostrils and eyes, for example.
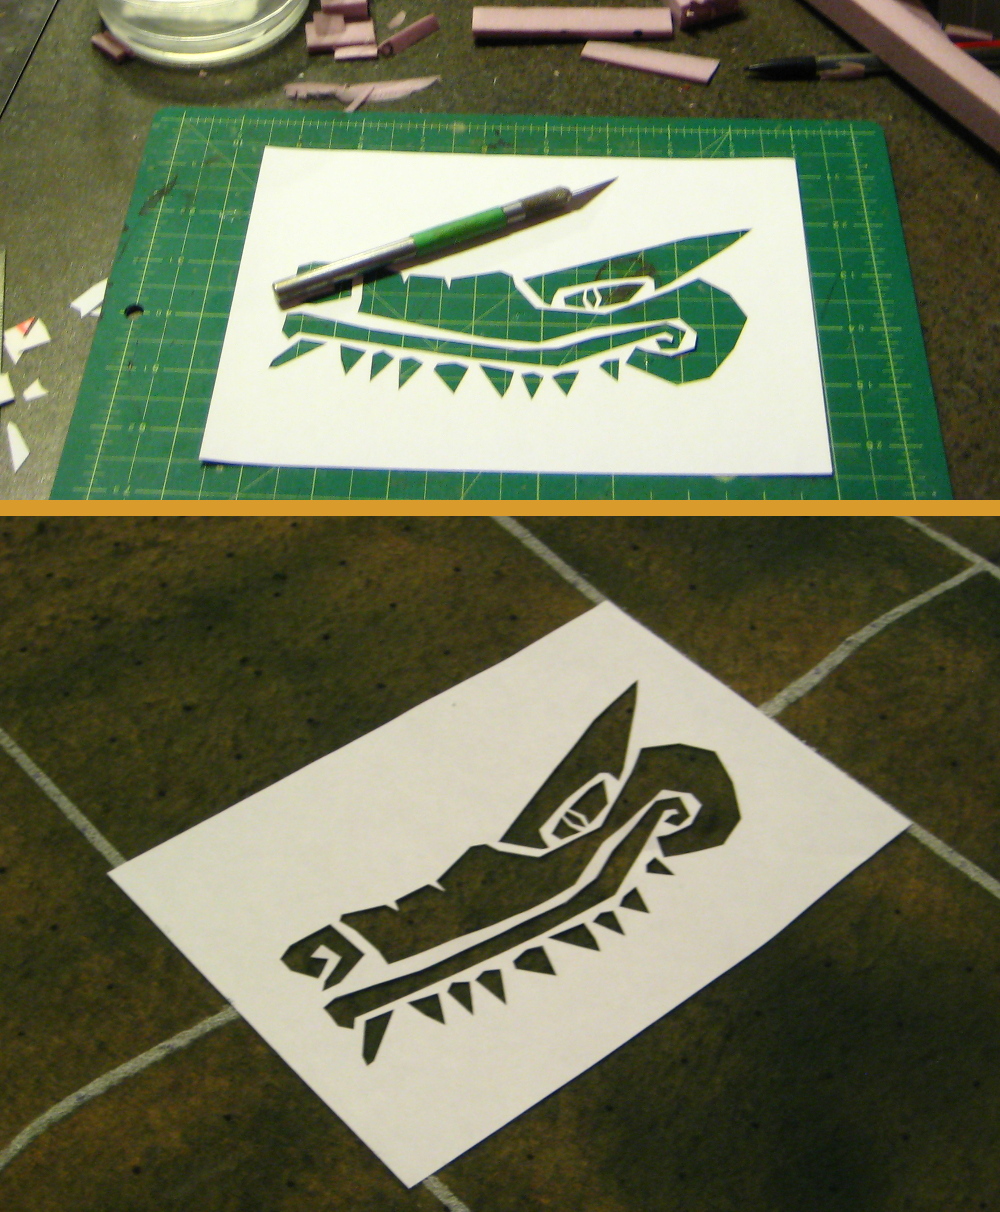
Cutting out and placing the stencil on the felt. Click for larger, see text for details.
After it was carefully pressed into place on the felt I loaded up a regular 1.5″ wide housepainter’s brush with red craft paint and went at the stencil in the classic Martha Stewart-approved way of painting a stencil without getting paint under the edges of it and ruining the outline, namely short vertical stabby strokes down onto the surface, working slowly and being careful not to disturb the stencil as you work. It works on Blood Bowl pitches just as well as it works on bedside tables or whatever crafty random thing Martha does!
Logo done in the background and stencil lifted off in the foreground. Click for larger.
After getting a reasonable layer of paint into the stencil I lifted it carefully off while the paint was still wet, to keep the stencil from getting stuck to the fabric. It came out very clean, no fuzzy edges or paint bleeding under, especially given it was painted onto fabric!
Later I went back and masked off the last field lines around the outer edges of the endzones, same tape-and-newsprint method I used on the main field lines.
If (when!) I do another fabric pitch, I’m going to seriously consider just doing all the field lines and other decorations with a brush instead of spraypaint; protecting the rest of the project (and the rest of the room!) from overspray is a massive pain when using spraypaint. All the masking seen in the first photos of this post took most of an hour to do, while the spraypainting itself only took a couple of minutes after the masking was complete. Brush painting stencils produce no overspray and don’t generally put the rest of the room at risk of being repainted…
The felt pitch is done at this point, except that I might eventually go back and add some colour to the endzone areas, or a team name across one or both endzones if I get really ambitious.
Work on the various sideline temples (last seen here) is also progressing, although taking pictures of black-primered buildings is fairly pointless so a proper progress report from that segment of the project will be a couple of days from now.
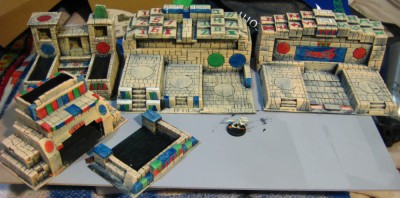
Still loads of things to finish on the project, but after doing the crocodile head logo in the centre of the pitch this evening I just had to lay everything out on the dining room table and see it all together for the first time!
The whole in-progress Blood Bowl pitch laid out. Still lots to do, but it’s nice to have everything set up together! Click for larger.
The pitch still needs white field lines at both endzones, as well as possible decoration in the end zones – I’m thinking of doing a coloured background in each endzone, probably red at one end and blue in the other. I might also do the name of my Lizardman team, the Saltwater Slaughter, across the endzones as you see in a lot of American football fields, “Saltwater” across one endzone and “Slaughter” across the other.
Left to right behind the pitch, there’s the newest dugout/tracker temple, still bare styrofoam with decoration just barely started. Next to the right is the dice tower temple, which has been basecoated and still needs more paint. The plan is to have rare earth magnets built in to hold the temple itself and the sacred pool/dice catch tray in front of it together when it’s in use, so that’ll be some putty work to get the magnets mounted.
The scoreboard temple next is basically complete, except that I’m modifying the centre socket above the stairs with the scatter diagram so it holds the weather indicator cube more securely.
Finally on the far right is the first of the dugout temples, which still needs decoration and detailing on the roof but at least is partially painted on the rest of the building.
Much done and much left to do, but it’s nice to see it all set up!
I’ve got a felt Blood Bowl pitch that I have marked the standard grid on (15×29 30mm squares) but after months of using it I hadn’t gotten any further than that in transforming it from a useful but plain piece of fabric into a proper, good looking BB pitch!
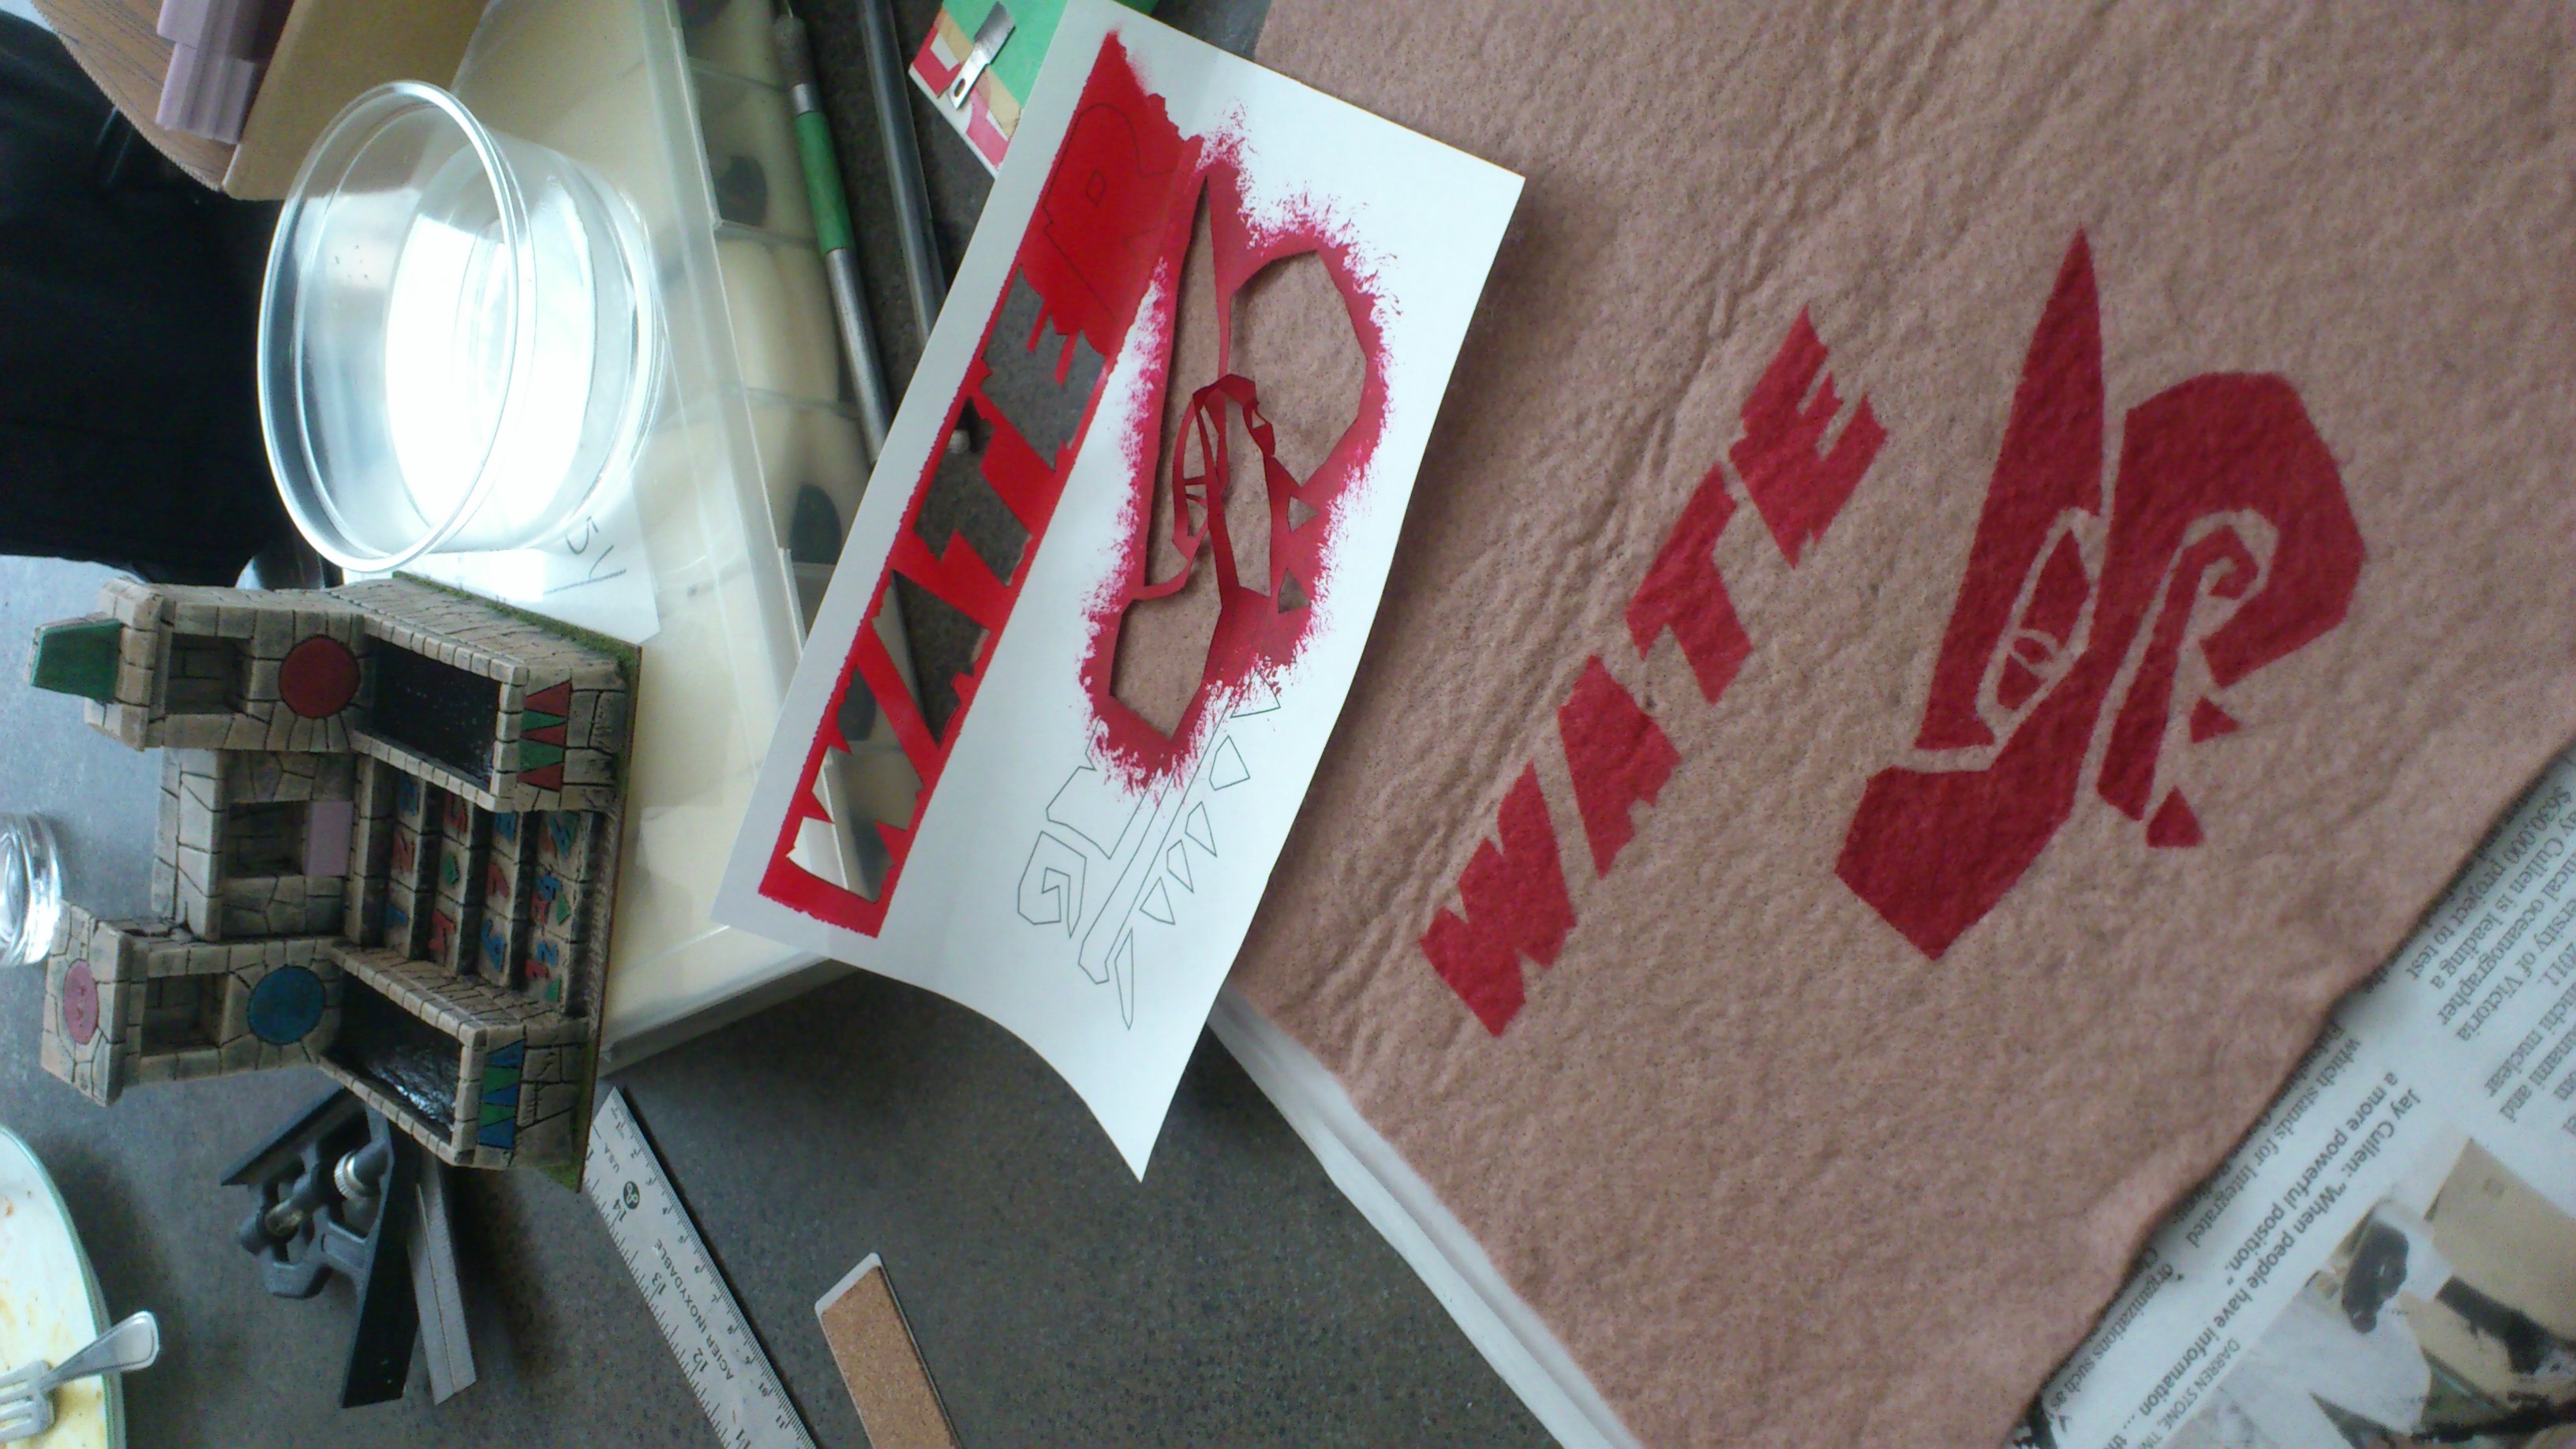
Toward that end, I used some full-sheet self adhesive label paper to create a couple of test templates for stencils, cut them out with an Xacto knife, and stuck them down to a scrap piece of felt.
Phone photo of my test stencilling – the top lettering is with spraypaint, the bottom partial logo is with craft paint and a paintbrush. The stencil I used is just above the felt piece. Click for larger.
I tried red spraypaint on one part of the stencil, then used red craft paint and 1.5″ brush on the other part of the stencil, with the classic crafter’s method of brush painting a stencil – vertical stabbing of the brush down onto the stencil, so as not to get paint under the stencil or dislodge it while working.
Both methods worked just fine, and I’m not sure which I’ll ultimately use for the logo and lettering stencils I want on the actual pitch.
The pitch itself finally has a light spray of green spraypaint over it to make it look grassy (the felt itself is tan) and tomorrow I’ll mask off and spray the field lines a Blood Bowl pitch needs – centre line, wide zone and end (touchdown) zone lines being the most important, although I’ll probably do the field edge lines on all four sides as well, eventually, just to properly finish the pitch.
In the local Bloodbowl league I’m currently involved in, there’s a pair of Lizardman teams, one using the regular GW figures for the team and my crocodile dudes from Impact Miniatures. Our League Commissioner is also playing with an Orc team, and will occasionally write a game report in the persona of his Orcish coaching counterpart. After thumping on the league’s other Lizard team 2-0, the Orcish coach was heard to say, “Herd der is some dat look like those Crocodiles on dem Golf shirts everyone is wearing dees days; CHOMP!!! CHOMP!!!!”
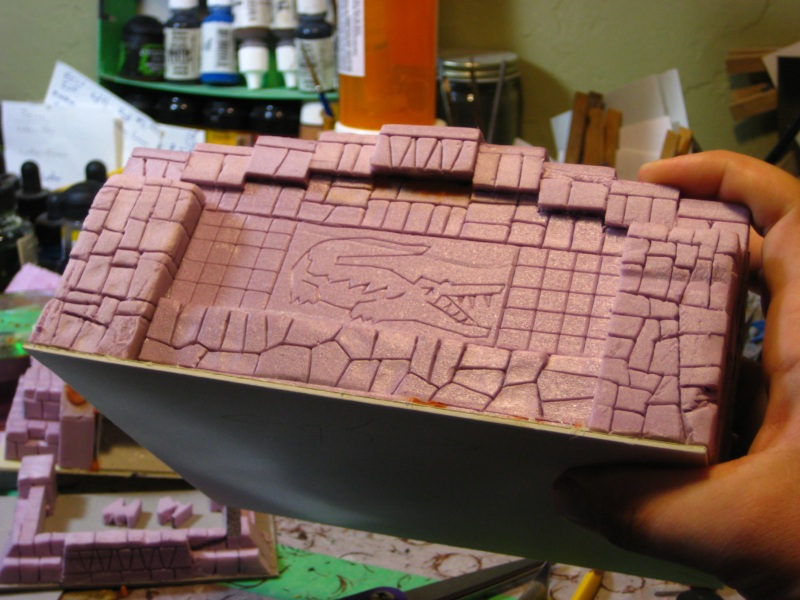
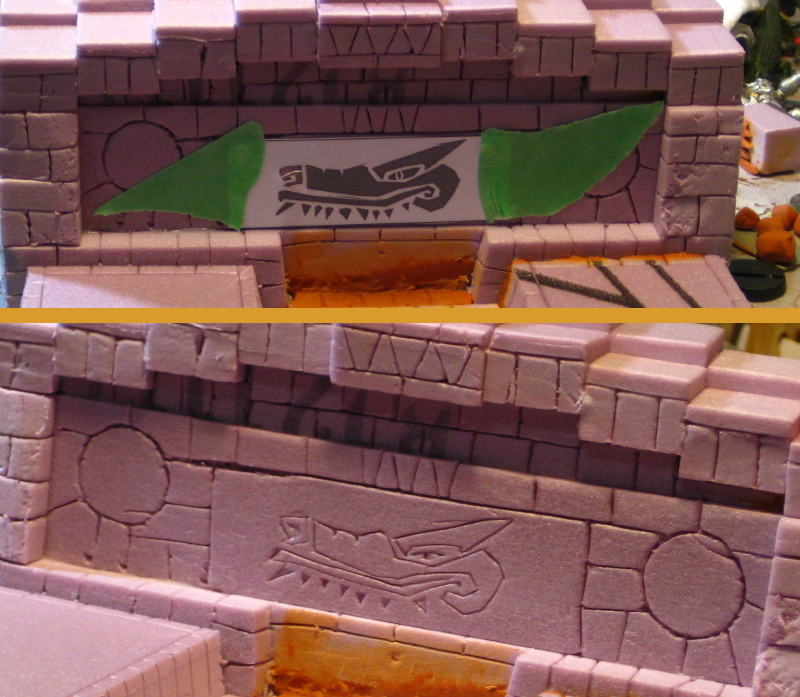
I was, at about the same time, wondering what to do for decoration on the dugout temple. A little bit of Google Image Searching and a little bit of Inkscape fiddling later to produce a basic image to guide my carving, I sat down with the completed temple, a very sharp Xacto blade, and this resulted.
Shirt pocket crocs? Sure! Still needs a fair bit of cleaning up and then of course paint! Click for larger.
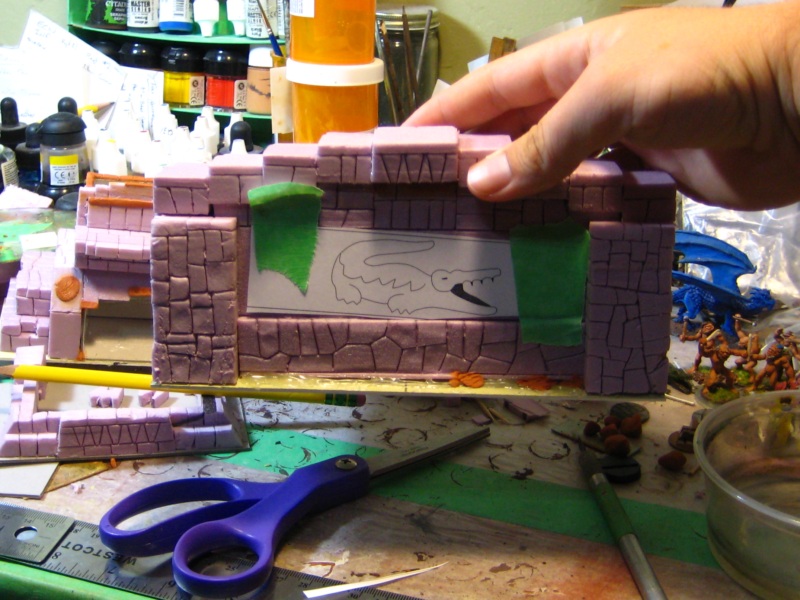
I printed out a simple line-art version of the relevant logo, taped it down across the foam, and went at it carefully with the brand-new very sharp Xacto blade.
The logo in place waiting for carving. Click for larger.
On the front of the dugout above the three actual dugout areas, I put the logo of my lizardman team, as seen in earlier in the year. Same procedure, taped the printout down and carefully went at it with an Xacto.
Saltwater Slaughter team logo on the front face of the dugout. Or a generic crocodile head, as you will. Click for larger, as usual.
When I finished the new BB scoreboard temple back in May I mentioned that when I got back from Europe I was going to be building a new set of Bloodbowl sideline terrain to match the new scoreboard.
I’ve got one of the two dugouts (with turn & reroll trackers) built and ready for detailing, and using leftover bits and pieces I’ve put together a small dice tower as well.
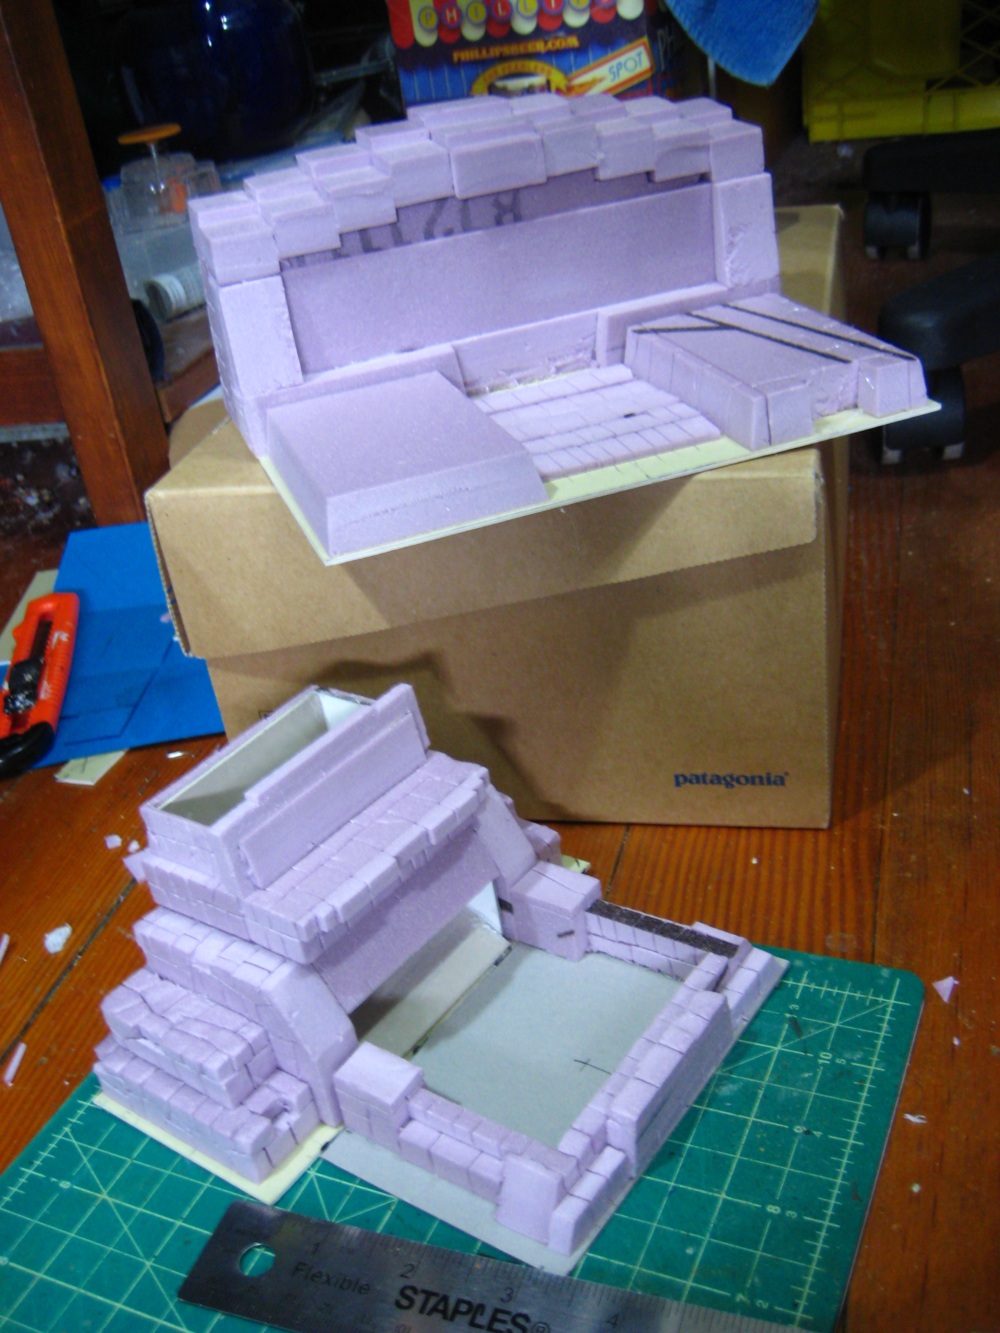
Top, dugout & trackers. Bottom, dice tower. Click for much larger image, and see text for details.
The dugout/tracker temple piece has the three dugouts (Reserve/KO/Casualty) across the front, and the roof will be marked up for tracking turns (the eight tiles down one side), first half/second half (the two larger tiles at the peak of the roof) and re-rolls (the eight tiles down the other side). Overall size is 7.5″ wide, 6″ deep and about 3.5″ tall. The whole thing is styrofoam insulation board.
I haven’t yet started the second dugout/tracker temple because I’m out of full-size sheets of mattboard (picture framing card) to use as the base, but it will have the same footprint. The whole set is designed to fit into the large Patagonia shoebox the dugout is resting on, because I do almost all my gaming away from home and I want to keep the whole BB setup small enough for easy transport, including in my bike panniers!
The second, smaller piece is a dice tower that is just big enough to roll full-size dice. It’s 6″ wide, 2.75″ deep and just under 3.5″ tall, those being the dimensions of the leftover space in the shoebox when two dugouts and the scoreboard temple are tucked into place, and allowing for a couple of inches on top for the fabric pitch to tuck in — which also serves as padding for the buildings.
The internal structure of the dice temple is mattboard; the outer detailing is offcuts of styrofoam.
The catch tray for the dice is a separate piece about 5″ wide and 3″ deep. It’s going to be painted up as a sacred pool eventually, with gloss varnish as seen on the scoreboard temple. I might try to do something clever with magnets to keep the tower and pool attached while they’re in use, or just glue a tab of paper onto the bottom of the pool that sticks under the tower and helps keep them together.
Lots of putty detailing and styrofoam carving left to do on these two, and I need to hit the local art supply store this weekend to restock on mattboard so I can start the second dugout to finish the set.