This has minimal bearing on the 28mm pulp gaming we usually do that might involve a zeppelin, but it’s such a cool and masterful technique I have to share: Creating Zeppelin bodies with foam insulation.
Basically, take long billets of foam, run a hot wire knife across a profile, and rotate the billet to create that distinctive “faceted” look of a Zepp body. Very cool.
Of course, I once calculated a 1/56 (28mm) scale of Graf Zeppelin would be about 19 feet long (nearly six metres!), so doing the gondola and a bit of the body in 28mm is (marginally!) saner. Only marginally, mind you. The small-scale foam zepps in the first link are a lot smaller and saner; they’re still about 3ft long, though.
If you are minded to do some zeppelin construction, in whatever scale, you could do worse than following the useful links from this Propnomicon posting called “Zeppelin Goldmine“, which has links to high-quality scans of a book of speculative 1920s designs for a Graf Zepp-sized trans-Atlantic zeppelin. The gondolas of those look fairly buildable as 28mm skirmish terrain, actually. One of these days…
Everybody has played Cowboys and Indians before, but not many have experienced the insanity that is Pony Wars, a game designed deliberately to emulate the Western TV shows of the 20th century (now give the rules were written in the 20th century, this isn’t surprising). The miniatures (and the rules) were courtesy of one of the long-standing members of our gaming club, Dale, who like most other long-term gamers has all kinds of interesting things collecting dust. Joining in the fun were a few other regulars as well as Josh, a random walk-in we immediately made Colonel (that we couldn’t agree on who should be in charge made this decision much easier).
The table was laid out in a fairly basic pattern, with the US Cavalry fort at one end, two passes in the middle, plus a town, three homesteads, a mining encampment, and an Indian village. Unlike most adversarial games, all the players are nominally on one side: US Cavalry commanders of some rank or another. The Indians and all the civilians controlled through card-driven events and dicing on tables for reactions. In fact, the game was very table-heavy, as is common for games of the ear (1980’s)
I rarely take pictures of the whole table, so here is one taken by another player:
Given our inability to agree on a commander, our inability to agree on an overall strategy meant that we ended up streaming out of the fort without specific orders. David, who had US Indian-ally Dando with him, decided to head off to the far corner of the board to bravely burn out the Indian village, held by old men, women, and children. Malcolm headed off to hold the passes with his artillery and scouts, and the rest of us buggered off to do our own thing. Given the rules told us to head out in single file (it looks better), the looked something like this:
Exiting the fort
The game, like all good stories, has a few chapters in which our heroes get their asses handed to them. Ours included Dando, after heroically deciding not to burn down the Indian village right now, getting slaughtered in one-to-one combat with the Indian chief, Big Eagle, despite Dando have ridiculously good odds. Karma, not yet imported to America, was still a bitch. I got half of my cavalry troopers, on detached duty, chopped up by Indians, moments after telling my fellow commanders I risked defeat in detail. Ah details, never liked them.
After Dando's blunder, civilians pay the price
Other hilarious moments included me failing to bring the wagon train under control (this required a dice roll, which I naturally failed many times) right up until the wagon train ,having crossed the entire board, spotted the Indians. They took a few potshots then freaked out and circled the wagons. Dando’s blunder also lead to the only civilians we lost getting massacred by Big Eagle, which sets us up for our climatic battle for the town.
Oh, there you are! My cavalry "discovers" the Indians
With fresh US Cavalry that entered the board near the town, headed most of the board to the fort then turned around and headed back to the town, I managed to stream my troopers right into Big Eagle, fresh off his scalping of our brave settlers (evil land-stealers to the Indians). You can shoot yourself dry in this game in an awful hurry, which I proceeded to do. I then discovered I had retreated to the saloon. Needless to say, that was it for my troopers. They were “conserving ammo” in case more Indians arrived. None did, and other brave soldiers drove off Big Eagle, so we called the game at that point with no Indians on the table and turns before any would arrive.
"Defending" the Saloon
All in all, it was a blast. The 15mm figures of Dale were beautifully painted, and his town was amazing. Playing with what amounted to AI-controlled enemies allowed us to see what our upcoming Zulu Wars game might be like, and added a nice level of aggravation for their players (Damn civilians, stop running around and get to the fort). The best part of the story-driven aspect was that it allowed all the players to feel involved, even when you could spend several turns do nothing but moving around. For those visual types, I have a few more pictures in my flickr set of the game.
Back one of the before-Christmas sales, I picked up a Fiskars circle cutter on deep discount from one of the local art supply stores. It’s been on my toys-I-want list for ages, and a chance to get it at 40% was too good to pass up.
It’s proven to be a useful gadget, although with some limitations. It will cut paper, light card and styrene up to about .020″ or .030″ thickness no problem; anything heavier than that it’ll score but not cut. With thicker styrene you can score then clean up with a file or sandpaper later, but this obviously means cutting heavier card is out.
Exact alignment of the circle to be cut out can be a bit tricky, but the central rubber “foot” does pull off to reveal a more compass-like needle foot which makes alignment easier. Of course, I only realized the needle foot option existed a few days ago, when I finally got around to reading the “Instructions and Tips” PDF from Fiskar’s site. Amazing what you learn when you read the instructions, isn’t it?
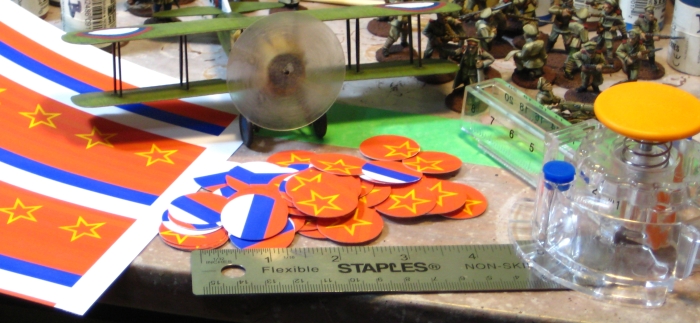
The other work-around for imprecise cutting is to design graphics that don’t have to be cut terribly precisely, of course. That’s what I did when I laid out the graphics for a batch of 1″ circular markers for use in our Russian Civil War games.
On the right, the Fiskars Circle Cutter. Central, the prop disc and M&B markers cut with it. On the left, the sheet of markers I made in Inkscape.
The markers will mostly be used for showing which Big Men & units have activated in any given turn, as we noticed it can be easy to loose track of which units have been activated with multiple Big Men running around in Through The Mud & The Blood. They can also be used to mark things like sustained fire lanes for machine guns or similar, of course.
On the left of the photo, notice the sheet I laid out in Inkscape for the markers; except for the star the solid colours are fairly forgiving of cutter placement. A few of the Red star markers have had their tips clipped by the cutter, but they’re still obviously Red Army stars, so I’m not fussed. Now that I’ve discovered the cutter’s needle foot option, I should be able to cut out the remaining marker discs perfectly.
The SPAD’s prop disc was cut from leftover heavy clear plastic from a blister pack, then put down on a sheet of 600 grit sandpaper and spun by hand to get the hint of motion blur in it. I wound up taping the piece of plastic to my cutting mat, then the cutter worked nicely on it.
So, the Fiskars Circle Cutter. A useful piece of kit, within it’s limits. I’m sure I’ll get years of use out of it — but wait until you find one on sale before getting it!
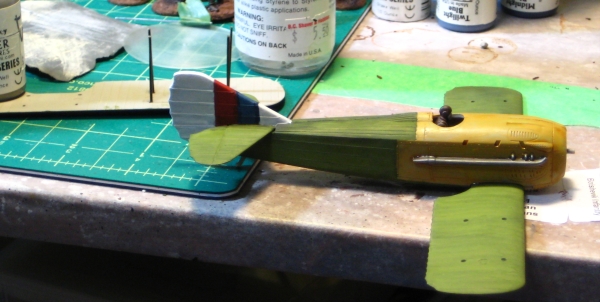
Finally swore the upper wing into place this evening. It’s been years since I built a biplane model, I’d forgotten what a total bugger the struts and upper wing can be. The SPAD 13 as 12 struts, only two of which are especially solidly mounted when it comes to getting the upper wing positioned, the rest of which wobble entertainingly.
Even now the upper wing is very slightly skew and I have doubts about it’s long-term stability when the plane is in wargaming use, but we shall see. After getting the upper wing fixed, the landing gear and prop disc were painless.
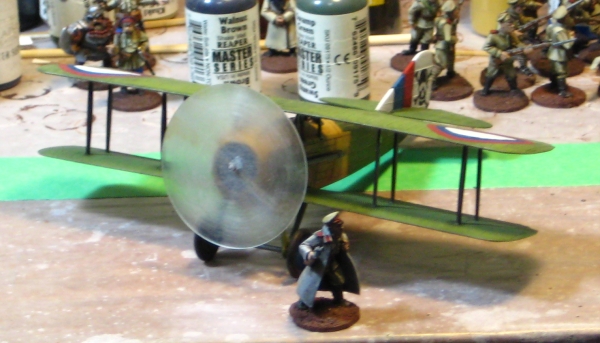
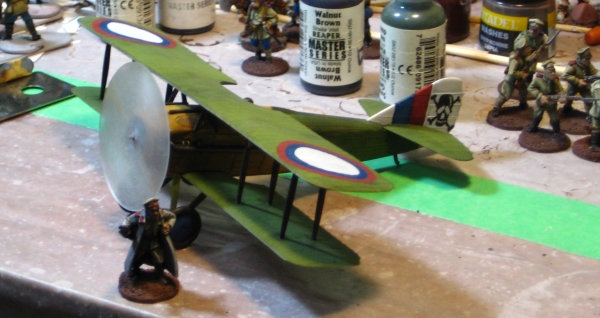
The White Russian SPAD completely assembled, needing only some touchup painting here and there.
Major Vodcanovitch of the White Russian army provides scale; he’s a 28mm Brigade Games officer.
The White Russian SPAD from the front.
That’s the SPAD largely finished, except for a bit of touchup painting and two struts I need to reinforce to help solidify the upper wing.
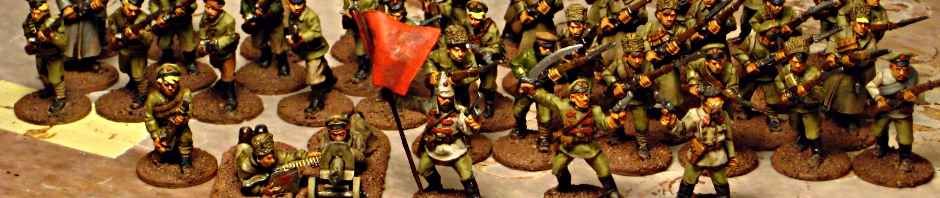
Now, back to finishing that crowd of White Russian riflemen and officers you see cluttering the background of the SPAD photos!
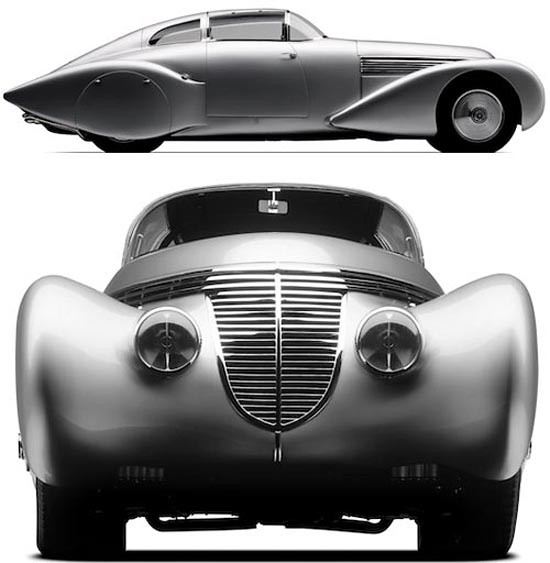
Inspired by this image from Wings Palette, I decided to give a bit of freehand a try.
Via Wings Palette, a Russian SPAD 7 with a nifty skull-and-bones squadron insignia on the rudder.
My version:
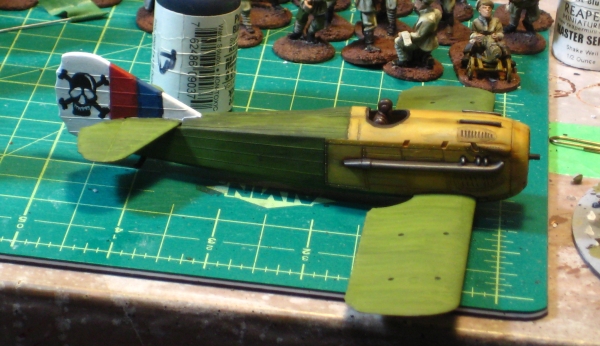
Skull and crossbones insignia on the rudder, and weathering on the fuselage.
There’s a (nearly) matching skull on the other side of the rudder, of course, although this one turned out better so I’ll have to always remember to photograph this plane heading right! I also used thinned paint and washes to dirty up the fuselage, especially around the nose where the engine and guns make a mess.
I’ve also put a half-inch wood screw up into the belly of the plane, right behind the main landing gear, to serve as an attachment point for a flying stand. There’s two layers of plastic there, from the wing and the body, and the screw seems solid so far, especially with a drop of superglue to lock it in place. I had thought about using a block of wood or blob of milliput inside the fuselage before I assembled it to provide a solid attachment point, but got impatient to assemble the plane! Hopefully the screw will be solid enough as-is, worst case scenario I can always carve a hole in the belly of the plane, stuff the hole with milliput and sculpt a patch.
Up next, one last touchup of the roundels and other paint, then final assembly: cursing the upper wing into place, adding the landing gear and prop disc. That’ll be it, then it’s back to my neglected horde of White & Red infantry who need painting up!
I should be working on finishing White Russian infantry, but I’ve allowed myself to become distracted by aircraft, specifically the SPAD 13 I wrote about a few days ago, earmarked to support my White Russian forces.
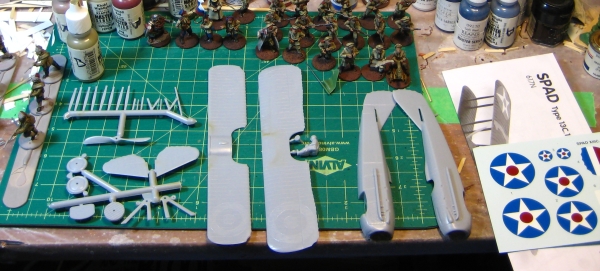
Here’s the SPAD all laid out on my workbench. As I mentioned in the first post, these are incredibly basic kits. The SPAD has 26 parts, at least one third of which are wing struts!
The Testors Classics SPAD 13 kit laid out. The grid on the cutting mat is quarter inch.
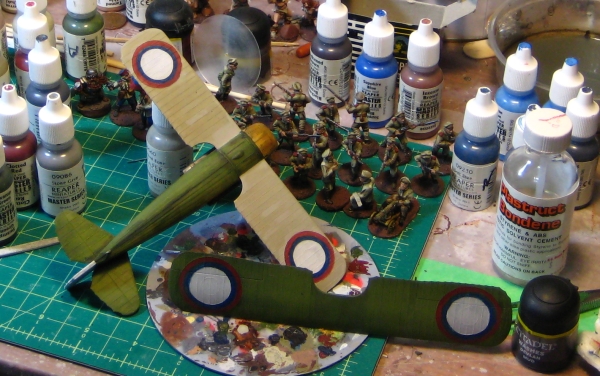
The kit needed minimal cleanup as far as flash, molding gates and such went, so after a quick shot of grey primer it was off to the paint racks. I used multiple coats of well-thinned Reaper Master Series acrylics, and always brushed the same way, from the front of the plane toward the back. This gave the body and especially the wings a nice weathered, mottled appearance without having to do a lot of actual weathering. The wings are Swamp Green; the front of the fuselage is Tanned Leather with a wash of GW Gryphonne Sepia; the undersides of both wings are Polished Bone, with a drop of Khaki Shadow in the base coat. The white is Leather White highlighted with Pure White; the red Clotted Red highlighted with Carnage Red and washed with GW Baal Red; the blue is Old Navy highlighted with Heather Blue.
The SPAD with basic colours completed.
This kit actually has roundels (RAF or French) molded right into the skin of the wings, so doing Russian roundels as used by the Imperial Russian Air Service pre-Revolution and the Whites after was easier than I’d thought it would be. The photo below is the roundels after only the first coat of paint, minimal cleanup and no highlighting.
The Russian roundels – bottom of the lower wing, top of the upper wing.
In the background of the last photo, you can see the clear plastic disc I cut to replace the kit’s prop with a “spinning” prop. I put the disc down on a sheet of 600 grit finishing paper and rotated it around a few times by hand, so it has fairly convincing rotating look to it. It’ll also be a lot stronger than the kit prop.
More to come, I’ve done some freehand insignia on the rudder of the SPAD and of course there’s final assembly of the beast!
Rummaging around our local hobby store, I found the Testors Classics line of 1/48 scale aircraft. They’re cheap (under $10 Cdn per kit) and basic little kits, just right (I hope) for wargaming purposes. I got the shop to order a SPAD Type 13 and a Nieuport Type 17 for me, and finally picked them up earlier in the week.
The Spad 13 apparently never made it to Russia (it was only just entering French service when the Russian Revolution occurred) but the very similar, earlier Spad 7 was in Imperial Russian Air Service use, so close enough for wargaming purposes.
The Nieuport 17 was in pre-Revolutionary Russian service, so I don’t have to fudge at all to include it in my RCW forces.
I’ve decided the Bolsheviks will get the Nieuport and the Whites the Spad. I’ll rig both with a screw or something similar out of the belly to attach to a flying stand, and probably use large washers and steel wire for the flying stand, with an alligator clip at the top so the planes are positionable and removable.
For painting, the classic colour for a Nieuport is dull silver, that being the basic dope the French used on them. The Russian website Wings Palette has a huge collection of colour plates of aircraft from all over, and their page on Red Russian Nieuports includes some nice examples, as does Modelling the VVS: Nieuport 17. I’ll probably go with silver doped body and wings, a white vertical tail, red stars on the tail and as many other places as I can stand to freehand a red star… (actually, I should head back to the hobby shop and rummage through their bins of spare and orphaned decals in search of some basic red stars!)
The Modelling the VVS article on the Nieuport 24 also has some great Red schemes. Red tail, red fuselage stripes, red nose and about twelve red stars plastered everywhere? Apparently a real RCW scheme!
The White Russian Spad will likely be either tan or dark green, for contrast to the Nieuport, with Russian roundels (simlar to RAF or French roundels, except with thin rings of red and blue around a much larger central white circle). Again the Wings Palette page on the Spad 7 in Imperial Russian service has some inspiration, as does White Falcons: Anti-Bolshevik Air Forces. I’m torn between a bold Russian tricolour on the tail, and the awesome skull-and-crossbones on a few of the Wings Palette examples!
A Russian Spad VII, with death’s head tail. Image via Wings Palette.
Sent off my request for a table to run a Russian Civil War game at Trumpeter Salute 2012 over in Vancouver (March 30, April 1 & 2, for those interested!), using the excellent Through The Mud & The Blood rules from TooFatLardies, of course.
I’ve got a pretty good handle on the painting of 50+ White Russians and nearly 70 Reds. The Whites have turned out to be more fun to paint than I thought, as they had some very individualistic units running around, and the habit of wearing items of dress uniform into the field where they could. Pygmy Wars has been a huge help in this regard; if you’re into RCW at all that site is a goldmine of information, and written by a wargamer so it’s far more focused on gamer-friendly information than other sources! I also have a couple of more colourful Red units, so not everything colourful on the table will be White!
As I’ve done in the past, because my mind can work in odd ways, I’ve started a poster (possibly a magazine cover?) for the game. I’m not entirely happy with the current version, although I think the basic idea (a map burnt through, basically) is sound enough. The Devil, as always, is in the details, and those aren’t right yet. Nevertheless:
It seems to be a week for belated followup reports to earlier posts here on the Warbard. Ah, well.
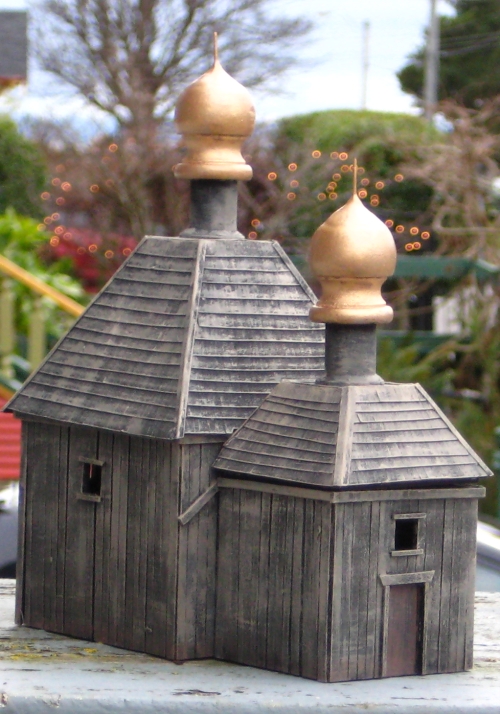
I finished up the Russian church at the end of January, amidst all the prep for GottaCon’s pulp game, and never did get around to posting the finished photos here.
The front of the church:
The Church of St. Boris the Intoxicated. Pardon the background, I had to take advantage of daylight and lack of rain together!
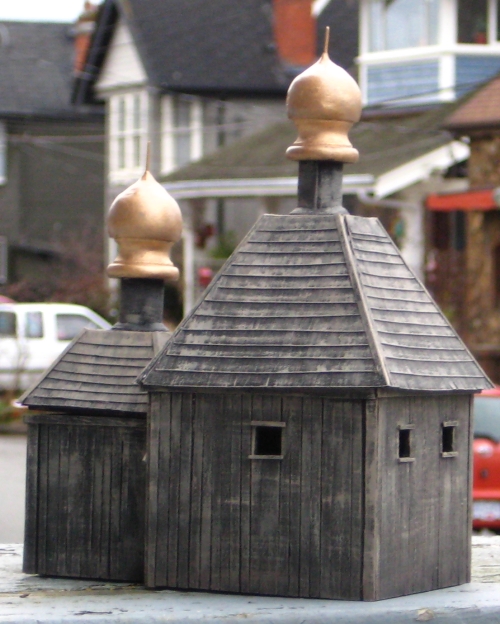
…and your first look at the back, and a better look at the main roof. The whole thing wound up being 5″ long, 3″ wide and 7.5″ tall to the top of the spike on the upper dome. That’s small, but really about as big as I usually build a wargaming building.
The rear view of the Church of St. Boris.
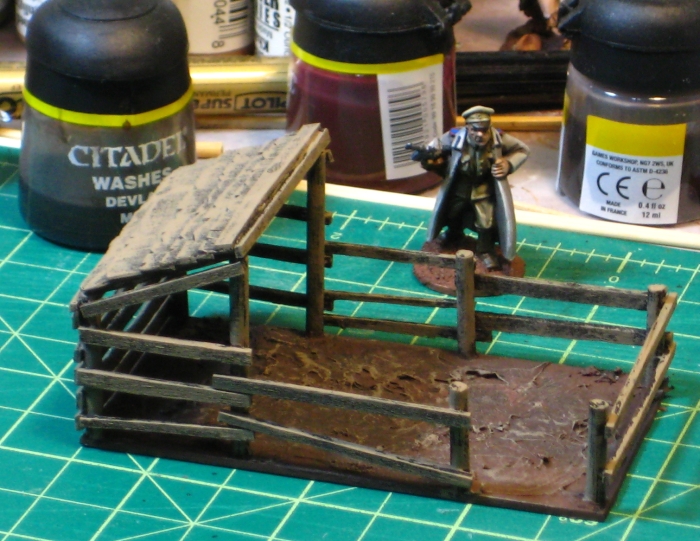
Finally, while I was finishing up the church, I threw together a small detail structure to add clutter and interested to my Russian hamlet. Behold, a pigpen.
A pigpen. Oink. Or do Russian pigs say, “Oinkski”?
The pigpen is random offcuts from the church project and about 2″x 3″. The mud is hot glue, from a glue gun, which is something I did as an experiment. Blob glue on, push it around before it cools. After it cools, pick the points and stringy bits off, paint brown and wash, and done. One advantage of hot glue mud is that it won’t warp cardboard or wood bases, unlike using globs of white glue.


")