I’ve been out of town on a work project for the last seven weeks, after rushing through the last couple rounds of my Lead Painter League entries before I left. While I was gone I was stupidly busy and had no time to game, paint or even really keep up on hobby news!
However, I’m back home now as of Sunday night and can’t wait to get back to my painting bench and some gaming!
I did order some things while I was away — the magic of Paypal and the internet at work — so I have the new Pulp Alley expansion waiting for me to read it and try it in a game, a big bundle of 28mm buildings from Sarissa Precision to start assembling and painting, and another order from Pulp Figures incoming to add to my painting queue.
I had a quick first look at the Sarissa Precision CityBlock 28 buildings earlier this evening, and they look great. They’ll be easy to assemble and paint, but should also reward a bit of extra effort to add detailing and personality to them. Expect a review and a series of build articles here on the Warbard in the near future.
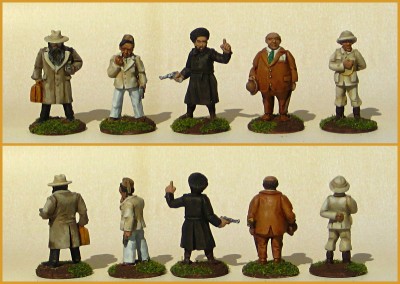
Second-to-last round of the 7th Lead Painters League over on the Lead Adventure Forum, and it’s more Pulp Figures for me, with a cadre of suspicious characters lurking in a back alley somewhere!
Suspicious Characters! 28mm Pulp Figures. Click for full size, as always.
These guys will be great fun in our Pulp Alley games, I’m sure. I’ll be doing up a League for them as soon as I’m back in Victoria and back into my usual gaming haunts!
Off to the last round of the LPL today! It’s been a lot of fun to participate, even if real life has kind of cramped my painting schedule.
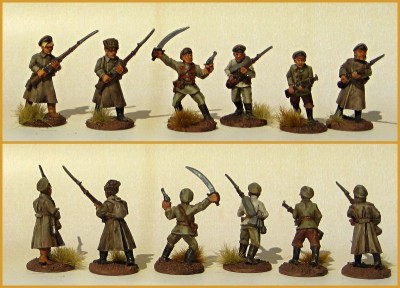
Back to the Russian Civil War again this LPL round with some Copplestone 28mm Bolsheviks. I really like the whole Copplestone Back of Beyond range, even the “rank and file” infantry have loads of character and lots of really nice details.
28mm Bolsheviks from Copplestone. Click for full size, as usual.
The tan background and khaki on the Bolshies gives this photo quite a nice sepia tone overall; that wasn’t really planned but looks good!
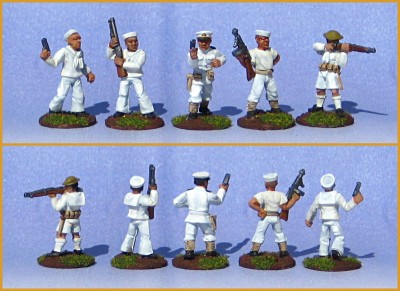
Round Seven of the LPL is up, and here’s my entry. These guys are 28mm U.S. Navy gunboat sailors from Pulp Figures. I used the famous movie The Sand Pebbles as my source for the uniform colours, as I’m pretty sure Bob Murch did when he sculpted these figures.
The all-white uniform is striking, but hard to do and keep interesting. I used a couple of shades of Reaper Master Series paint – they have a very nice triad of off-whites – and these sailors have come up very nicely.
28mm US Navy gunboat sailors from Pulp Figures. Click for full size, as usual.
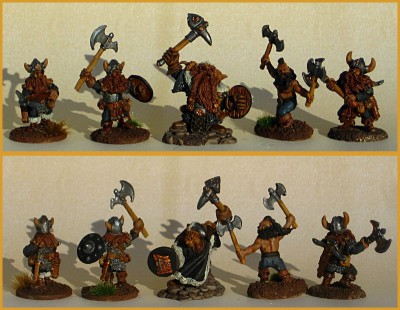
Over to fantasy figures for the first time in this LPL for me, with a team of Reaper dwarves. Lovely figures loaded with detail, as you’d expect from Reaper. These short fellows are a lot of fun to paint, although picking out all the buckles, belt bags and bits can seem like an endless process.
The Blackstone Guard – Reaper Minis dwarven fighters. Click to see full size, as usual.
I’ve painted these warriors up in almost all black livery, although the main colour on them is their extravagant dwarven beards and long hair. Apparently this particular clan of dwarves runs strongly toward red hair.
Round Five of LPL7 was one of three Theme Rounds; this time the theme was “Historical Civil Wars”. This fits perfectly into my ongoing Russian Civil War project, and was one of the reasons I pushed myself to participate in this year’s LPL.
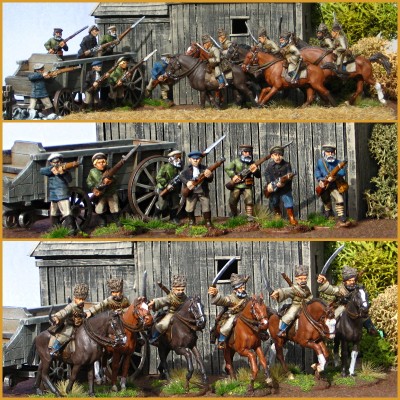
I pulled out some RCW figures that I’d finished very quickly and roughly, stripped them, and repainted them to a much, much higher standard. The main scene depicts a group of raiding Cossack cavalrymen coming around the corner of a village church to find the locals armed and waiting for them, with a big farm wagon pushed across the road as a barricade.
Russian Civil War action – village militia vs Cossack raiders. Click for full size.
The local militia are Copplestone Castings Russian Partisan figures; they’re great figures loaded with character. I own twenty or thirty of these guys (at least two packs worth, maybe three, I’ve lost track!) and I have very few duplicate figures in that collection. I pulled out seven favourite poses to repaint for this scene. I painted them up as a mix of young men & old. The young men would likely be returned frontovik (Russian veterans of the Great War) or, if this is a Bolshevik militia, young radical Bolshies come out from the cities. There were rural militias for every political flavour of the Russian Civil War, and quite a lot of no distinct flavour at all — the “Greens”, who were either peasant militias formed for self-defence or anti-revolutionary bandits, depending on who was telling the story!
The Cossacks are from Brigade Games. Brigade’s Russian Civil War/WW1 in the East range doesn’t get as much attention as the Copplestone Back of Beyond ranges, but there are some lovely figures in that range, including these fairly recent Cossack cavalrymen. There’s a pack of regular riders with swords and slung rifles, and a command pack with officer, trumpeter and standard bearer; all six of these guys are from the regular Cossack pack. They’re very nice figures, a bit more fine-boned than the Copplestone figures but very compatible. The one downside to these Cossack figures is that some of the details are quite delicate, especially the sabres and scabbards.
By the time you read this my Round Six figures will be competing in the LPL; head over to the Lead Adventure Forum to see how they’re doing!
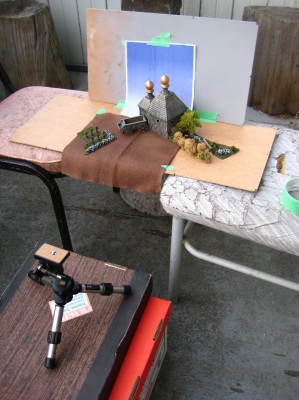
After I was done taking photos of my Lead Painters League Round Five entry, I figured the setup I use might be of interest to others. So here’s a photo of the highly sophisticated setup I used for this week’s Russian Civil War-based entry!
Fancy photo studio… click for full size.
Some leftover 3mm MDF balanced across a couple of junk chairs a roommate pulled out of the basement for some reason, on a porch that badly needs repainting! My little tabletop tripod at lower left is balanced on top of one of the banker’s boxes I used to store and transport scenery. The ground is a square of craft felt I sprayed with brown ink a few years ago; the colour backdrop is one of the ones I have available here on the Warbard for anyone to print.
Lighting was provided by that convenient nearby fusion reaction (eight and a half light-minutes away is nearby by cosmic standards…) and agreeable meteorology.
A home-made lightbox has been on my to-do list for… about a decade now. When the weather allows, an outdoor setup works nearly as well.
There are a number of great photo-taking tutorials aimed at wargamers out there; check Google or YouTube for more details. One of these days I should do a links post to my favourites!
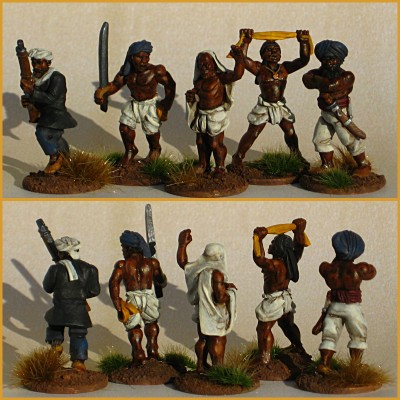
Last week’s LPL entry moves from the Lost Worlds of Round Three to the mysterious corners of the Indian subcontinent with some 28mm Thuggee cultists, also from Pulp Figures.
The Dread Thuggee. Click to view larger.
These murderous chaps come from three different Pulp Figures packs. The three right-hand figures – the leader, acolyte and sword-bearing bodyguard – are all from PBT-24 The Mad Guru. The swordsman is from PBT-21 Thuggee w/ separate assorted Weapons & Picks, and finally the rifleman is from PBT 23 Thuggee Fighters w/Martini Rifles. I’ve got another six or so figures to finish, as well as a couple of neat scenery bits that come in the Mad Guru pack.
Most of the skin tone comes from W&N Burnt Umber acrylic artist’s ink, applied nearly full-strength over a basecoat of Reaper Intense Brown with a quick highlight (before the ink goes on) of Reaper Oiled Leather. The hair is mostly Reaper Walnut Brown, which is a very-nearly-black dark brown.
Unfortunately for them, these skulking murderers ran straight into a really spectacular group of cavalry from one of the best painters in the contest, and got soundly thrashed, although lots of people said nice things about them! Luck of the draw; I’m a pretty solidly middle-of-the-road painter so a lot of how well I do in LPL sometimes comes down to who the random matchup for a given round is!
Round Five of LPL7 is running over on Lead Adventure as you read this. Round Five is one of the Theme Bonus Point rounds, with this round’s theme being “Historical Civil Wars”. That’s right up my alley, so go see how my Russian Civil War figures are faring this week!
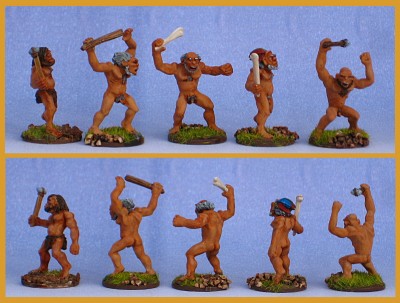
More Pulp Figures goodness from last week’s LPL round. This crew of underdressed primitives was started sometime last year, finished over the winter, and have finally gotten their moment of glory, beating a very nice little regiment of 15mm Napoleonic figures in the third round of LPL7.
The Shaman’s Crew, all from Pulp Figures. Click to view full-size.
Round Four is going on as you read this, and can be viewed over on Lead Adventure. Alas, the Thuggee figures I’ve fielded in Round Four aren’t doing as well as the Neanderthals did. Perhaps they’re overdressed?
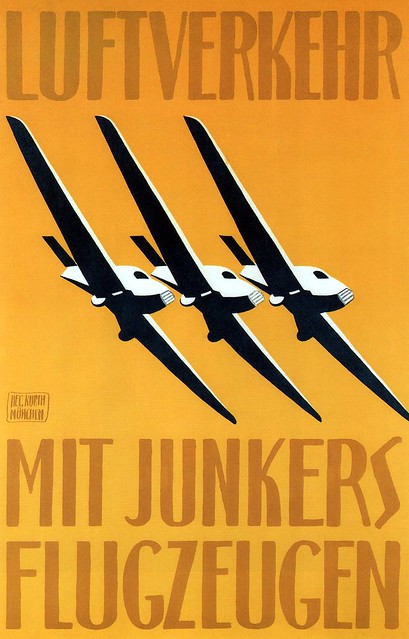
Via the excellent Dieselpunk, an great 1919 poster from Germany, advertising civilian air travel with Junkers aircraft.
“Air Transport With Junkers Aircraft”, 1919. Click to see larger over on Flickr.
This would have been part of the effort by the German aviation industry to “civilianize” as rapidly as they could, to try to salvage something from the post-Great War wreckage, and the restrictions the Allies were imposing on military aviation in Germany. It’s also a fantastic poster, in a style I really, really like and occasionally attempt to emulate.