There’s been previous versions of this tutorial posted on Lead Adventure and the Speakeasy, but I figured it’s worth reposting here.
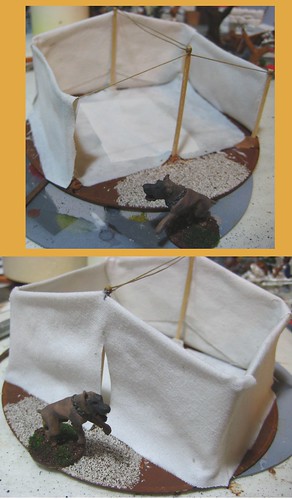
After killing a dress shirt (black ink leaking does that to white cotton) I realized it would work nicely as material for a large safari/expedition tent. I used a CD as the base, with small blobs of milliput holding long toothpicks vertically as the poles — three on the front, three on the back. After the putty holding the poles was dry (and reinforced with a bit of superglue) I wrapped thick sewing thread around the tips of the poles, with a dab of superglue holding it in place and a bit more superglue stiffening the thread after it was secured.
(click through to Flickr for a full-size image)
The fabric was cut twice as tall as it needed to be, and draped over the thread at the tops of each wall, with a generous layer of white glue on the inside of each piece. The walls were folded over, squeezed together and held whilst drying by clothspegs.
Two layers of shirt-weight cotton plus white glue makes for very solid walls!
(click through to Flickr for a full-size image)
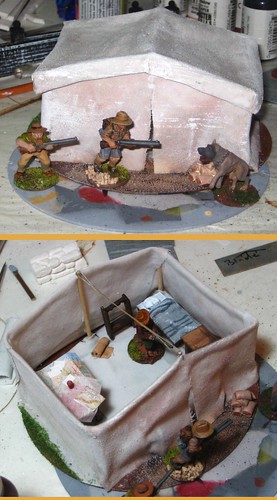
The removable roof was made by first draping a piece of plastic wrap over the tent walls, then carefully folding and pinning the piece of glue-soaked cotton into position. I folded the eves up and trimmed them after the first coat of glue was dry, and it fits well; between the glue and the folding it’s more than rigid enough to hold it’s shape.
There’s an extra piece of cotton to form the floor, and most of the interior furniture is made of offcuts of basswood and styrene, with putty for the blanket and pillow. The maps were found on the internet, shrunk to appropriate tiny sizes, and printed out. The red coffee mug in the centre of the large map is a scrap of round styrene.
I’ve still got a good sized piece of this shirt; eventually more of it will live again as smaller tents to accompany this one. Recycling — it doesn’t just involve a blue bin, you know. Not for wargamers, anyway!