Tag Archives: vehicle

Armstrong-Whitworth Armoured Car, Part Two

The first armoured car for my Russian Civil War forces now has wheels attached, and I did the first round of weathering with pastel chalk dust. Before I talk about my model, though, check this photograph out:

rcw_ac_real
A 1917 photograph showing soldiers of the interim Russian government (after the February revolution but before the Bolshevik Revolution of October/November) posing with an awfully familiar looking armoured car. The word chalked on the side of the hood is “Freedom”.

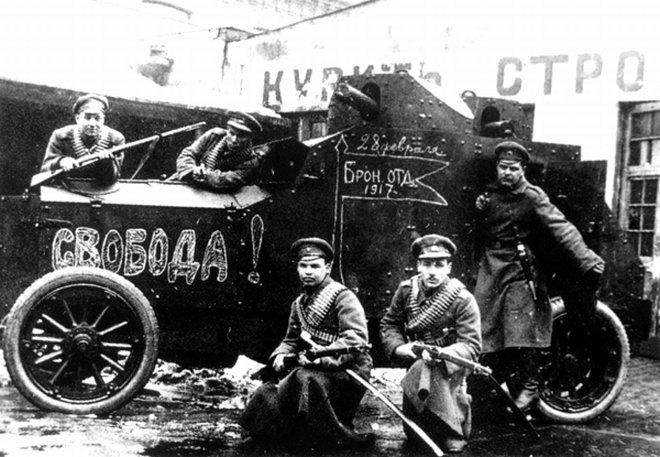
That photo also nicely answers the question about the scale of the Copplestone vehicles — they’re pretty much right on scale!

Weathering with Pastel Chalk

You can buy pre-made “weathering powders”, but I’m not sure why you would when a couple sticks of cheap pastel chalk will set you up for life. I bought a black stick and two shades of brown (burnt umber, technically) for a few dollars from one of our local art supply stores. Run an Xacto knife edge along the pastel stick to create powder, then use a beat-up dry paintbrush (trust me, don’t use good brushes for this) to dust it onto your model. You could also use a bit of pastel dust on your fingertip for more definite smudges.

Apply the pastel powder much more heavily than you think is reasonable, because to fix it in place you spray it lightly with Dullcote or other matte sealer spray, and that always dissolves some of the powder. I might do a second round of powder weathering on this vehicle, depending on how much the Dullcote takes off.

Here’s the current state of the car, with figures for scale. On the left, two of Brigade Games’ Storm in the East line of Russians, painted up as White Russians. To the rigt of the car, two of Copplestone’s Back of Beyond Bolsheviks, one rifleman and one sailor. The car has not yet been sprayed with Dullcote, so this is unfixed pastel chalk dust on display.

ac_26apr
My 1:56 Armstrong-Whitworth armoured car, alongside figures for scale. Click for full size, as usual.

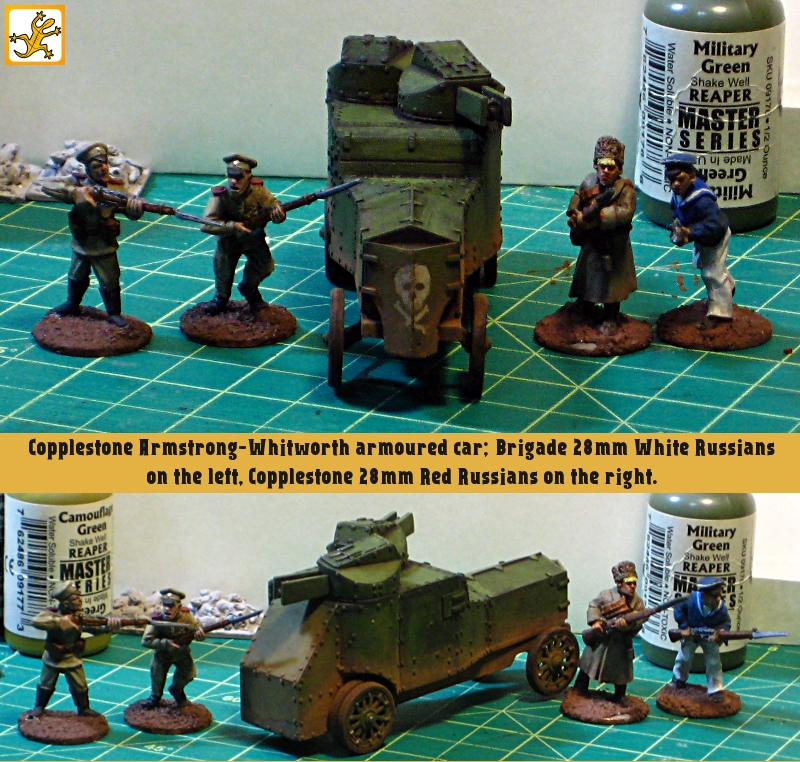
Speaking of things on display, this is the first photo I’ve managed to get of the Bolshie sailors I painted last month. Must get proper photos of them soon!

Still to do on the Armstrong-Whitworth: the minimal base, just big enough to go under the wheels, then Dullcote and possibly more weathering. Oh, and a name for the thing, which is going to mean doing freehand painting of Cyrillic, which should be fun. The thread I started over on the Lead Adventure forum for this vehicle build has become a great source for possible vehicle names — having a Russian local active there helps with local sources (he supplied the great historical photo at the start of this post) and translations.

I’m away for the weekend, but should have the armoured car done early next week.

Armstrong-Whitworth Armoured Car, Part One

My recent order to Copplestone Castings included the first armoured vehicle for my Russian Civil War forces, a very nice resin and metal 1/56th scale model of an Armstrong-Whitworth Armoured Car. It’s a pretty typical design for a WW1/RCW Russian armoured car, with a pair of machine guns each in their own turret on a six-wheeled armoured body.

The resin and metal are all very cleanly cast, with practically no flash, no casting errors, and minimal seam lines on the metal parts. You get the resin body, two resin turrets, two metal machine gun barrels, a metal front axle, and six metal spoked wheels. The body is roughly 3.5″ long

After cleanup I drilled and pinned the gun barrels to the turrets, but haven’t bothered pinning the turrets to the body — I think there’s more than enough contact area, despite superglue’s notoriously poor shear strength.

Here’s the beast in bare metal, with a Brigade Games 28mm White Russian priest for scale, and below, as it currently sits on my workbench.

ac_25apr
Copplestone’s 1/56th Armstrong-Whitworth armoured car. The lines on the cutting mat are half-inch.

The paintjob so far (all paints Reaper Master Series acrylics) is a basecoat of 2:1 Swamp Green:Pure Black, then a GW Devlan Mud wash. The green is gradually highlighted up with straight Swamp Green, a 1:1 mix of Swamp Green:Military Green, then straight Military Green.

The skull on the armoured radiator cover is freehand from Leather White, with a bit of a highlight of Pure White.

The undercarriage got a basecoat of Blackened Steel, then a mix of browns (Earth Brown, Muddy Brown and a couple of others) to muddy it up. I used a cheap, stiff brush to stipple the browns up the body for the muddy effect.

The paint job so far on the Armstrong-Whitworth has to trace it’s inspiration to Sidney Roundwood’s spectacular article on painting British tanks for the Western Front. The plan from here is to get the wheels on and the base installed (a minimal “shadow” base from styrene card and Milliput) then break out the pastel chalk for another round of dust and dirt.