I picked up a few things from Fenris Games back in June or July, and the first pieces are finally getting completed and onto the gaming table!
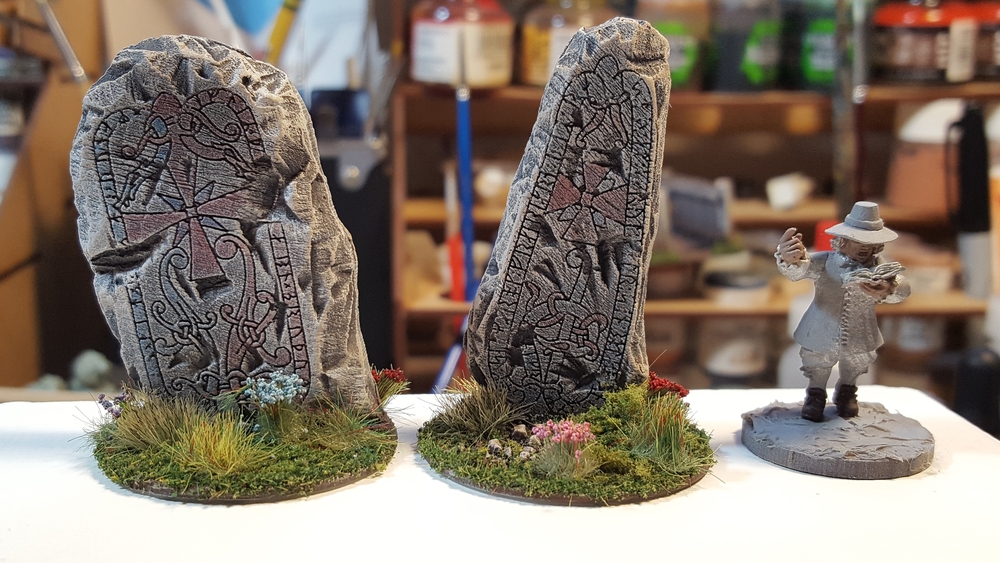
Two Viking Runestones from Fenris Games. Click for larger.
These are “Viking Runestones 2” from Fenris, cast in pale grey resin. Each is about 2″ tall. The carved runes on the front are very finely detailed; I wouldn’t be surprised if they had been laser engraved on something (thin acrylic?) and that was then embedded in putty or something to make up the rest of the stone.
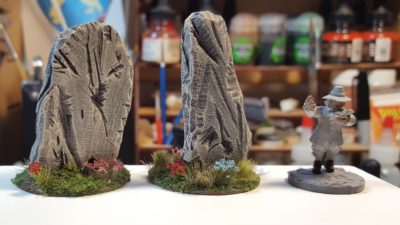
Runestones, rear view. 28mm Warlord ECW figure for scale. Click for larger.
I’ve got a few other bits and pieces from Fenris in progress. All of their stuff is really high quality, their range is huge, and shipping was fast. Highly recommended!
The Assault Group (TAG) has a huge range of Thirty Year’s War/English Civil War/general Renaissance figures that I’d heard good things about, including that they were fairly compatible in size and style to the Warlord figures that make up the entirety of my TYW/ECW collection so far.
The only major piece missing from my 17th C forces so far are guns, so I ordered TAG’s English Battery Builder pack which has a culverin, eight crew, and accessories. To give me some game options I also picked up a falconette light gun on it’s own. That gives me a light gun, a heavier field gun, enough crew to do a full six man gun crew per the Pikeman’s Lament rules for either of them, and some nice extra bits for base decoration – gunpowder barrels, piles of shot, that sort of thing.
Then I waited.
And waited some more.
Then I got an email apologizing for the wait.
This wasn’t a surprise by this point, because a significant number of posts on the TAG blog are, in fact, posts explaining how backlogged their orders are.
Then I waited a while longer.
My initial order was made on June 22nd. The “we’re backed up” email came through on August 4th. My order was apparently “completed” on August 11th. It showed up in Canada on September 11th.
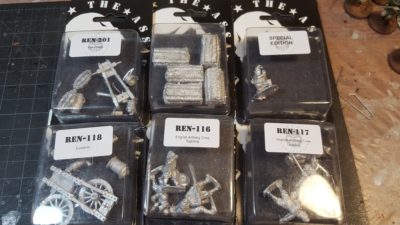
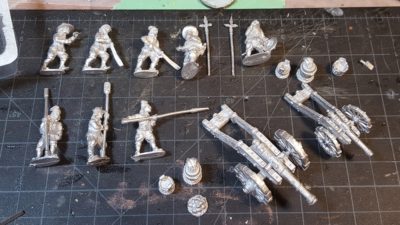
Nearly three months wait for this! The culverin, both crew packs, and the gabions are part of the Battery Deal; the falconette was separate; and the praying cavalryman is, as the sticker says, the ECW/TYW Bonus Figure, apparently. Click for larger.
That’s… goddamn glacial. In nearly two decades of ordering stuff from overseas for wargaming I don’t think I’ve ever had an order take so long from initial order to the toys actually showing up, even back in the late 1990s when I was just starting out and an order to the UK or the States meant snail mail, paper order forms filled out by hand, and an International Money Order.
So, don’t order from TAG if you’re in any sort of hurry for your toys. I have a generous backlog of painting and loads of scenery projects to distract me, thankfully.
Eight figures, two guns, and accessories. Click for larger.
Now that they’re finally here, what about the figures themselves? I quite like them, the casts are very clean, the sculpting is well proportioned and nicely detailed, and while they’re mostly a little bit smaller than the Warlord figures they’ll look fine in adjacent units on the table!
Warlord’s plastic figures are actually slightly bigger than most of their metal figures; their metal ones are a pretty close match for TAG’s while Warlord plastics are bigger. Odd that Warlord has that difference between the two materials they produce figures in…
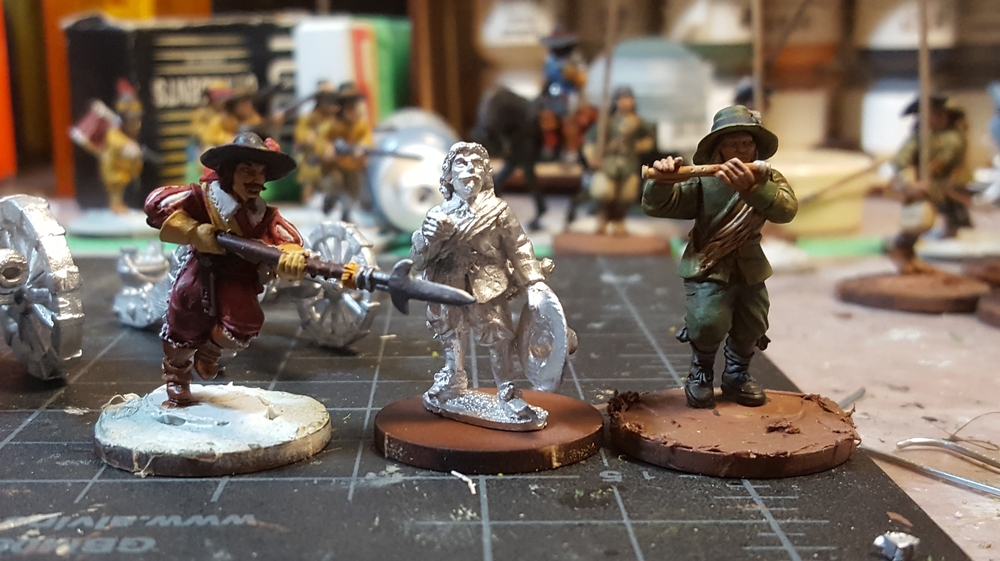
Left to right: Warlord Firelock officer (metal), TAG artillery officer (metal), and Warlord musician (plastic). The two metal figures are a pretty good match, the plastic guy is half or one-third of a head taller than either. Click for larger.
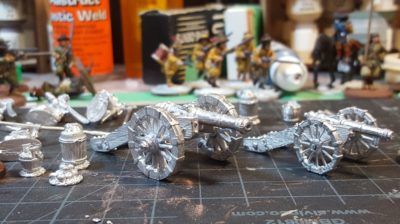
The two guns are four parts, two wheels, the stock (carriage?), and the barrel, and fit together easily. Mold lines and flash are minimal, just a few minutes cleanup for the whole lot.
The two crew packs are available separately as English Artillery crew loading and English Artillery crew sighting, each consisting of an officer/sergeant figure and three crew. The loaders have a powder scoop, rammer, and swab; the sighting crew have two with large timber levers to adjust the gun’s wheels and a gunner doing the actual sighting.
Both guns and most of the extra bits they come with. Click for larger.
The culverin is also available separately; it comes with the gun, a powder barrel, a water bucket, and a small pile of cannon balls. The falconette has the gun, a wedge, water bucket, and a bucket of small shot.
I still haven’t quite settled on how I’m going to base the guns and their crew, but I’m looking forward to assembling and painting them up; the whole unit should be pretty quick to paint up, and while I usually base figures before painting them, I might well tack these guys down to craft sticks to get them painted before I make any basing decisions. Basing might involve a custom movement tray of some sort ordered from Warbases that can fit six crew on 25mm bases and the unbased gun, to match the 2mm MDF movement trays I’ve already got.
I’ll probably order from TAG again; they have some different figures that Warlord don’t offer, I like their sculpting style, and variety is always useful, but the insanely long order times are offputting.
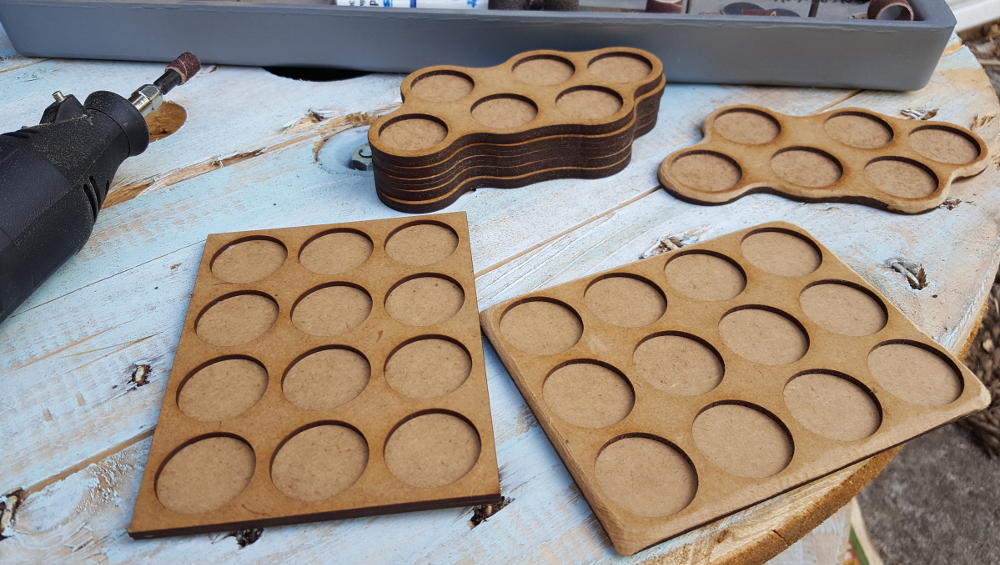
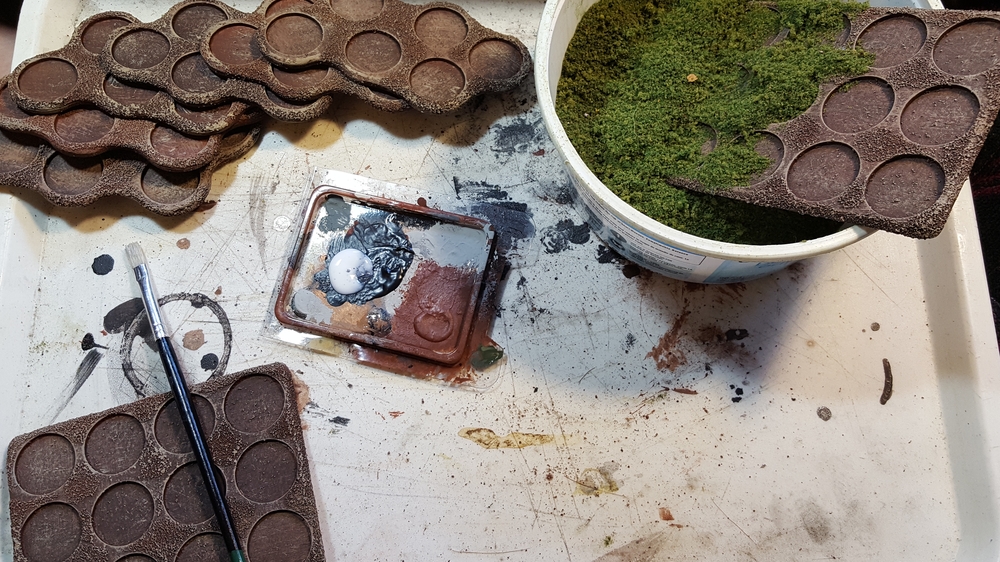
I picked up a batch of simple lasercut MDF trays sized for 25mm bases on one of my recent Warbases order. Pikeman’s Lament uses either six or twelve figures per unit as standard, so I bought a batch of six-base skirmish trays (listed on Warbases’ site as “Dux Brit/Zombie Trays“) and a pair of twelve-base three by four regiment trays for when a PL pike unit is in Close Order, both cut for the 25mm MDF bases I’m using for my English Civil War/Pikeman’s Lament project.
Each tray is two layers of 2mm MDF, lasercut and with the two layers already glued together straight from Warbases. I’d been thinking of replacing the bottom solid layer of 2mm MDF with something thinner (probably .030 plastic card) as I am not a huge fan of big thick bases, so having them arrive pre-assembled forced me to consider different options.
As an aside, if you really did want un-glued movement trays, or even just the tops so you could do your own base layers, I’m fairly sure Martin and Warbases crew can set you up that way. Chuck them an email and ask!
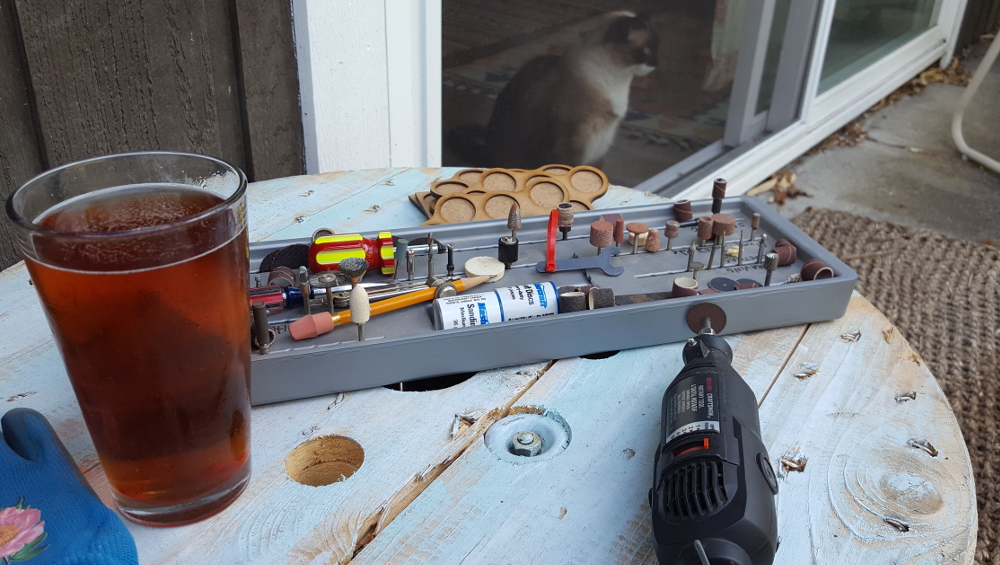
I finally broke out my grossly underused Dremel tool, poured a pint of excellent beer, and sat down on the back patio with this unwise combination to modify my movement trays to my liking!
Beer and power tools, an excellent combination! Also pictured, grumpy cat wondering why it’s so damn hot and why her human servant is insane. Click for larger.
A Note Of Warning: Power tools capable of 30,000 RPM and alcohol is not a recommended combination. Sanding MDF without wearing some sort of filter mask is also not recommended. Even though I was outside while doing this, I can still taste MDF dust on the back of my mouth over a day later. Wear a dust mask of some sort. Don’t combine power tools and beer, even very good beer. Dear readers, be smarter than me. Thank you. Also, should you not be smarter than me, don’t send lawyers after me. They’re scary. Thank you again.
Anyway…
A couple of minutes with a sanding drum on the Dremel per base rounded the top edges off nicely, and the corners of the regiment bases. I touched up a few scuffs from the Dremel by hand with regular sandpaper, knocked the nasty MDF dust off, and then brought everything – including the beer – inside to my workbench to add a bit of sand here and there to the trays.
First two bases done on the right, untouched ones on the left. Click for larger.
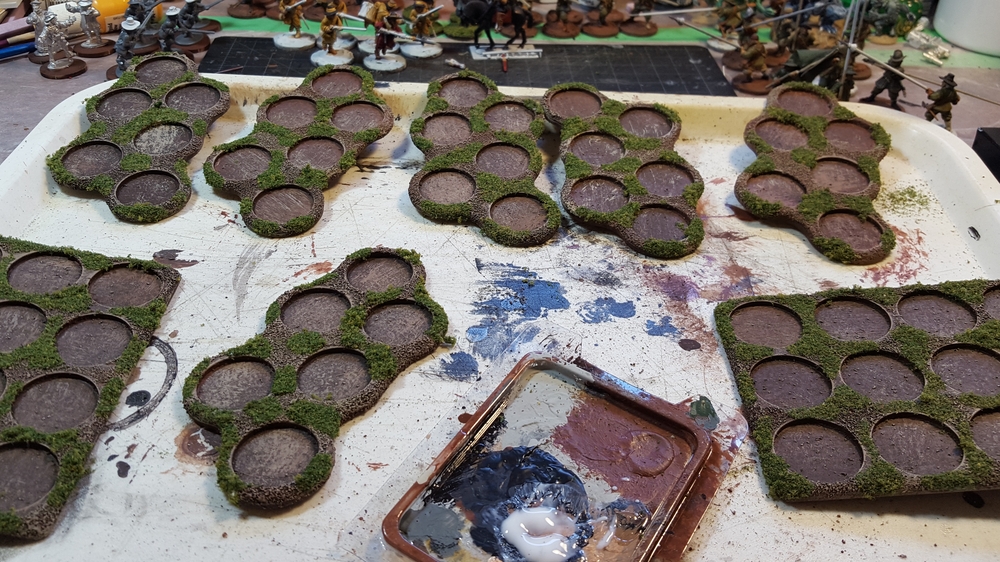
With that done, I put the Dremel away, poured another pint of beer, and put a bit of sand around the edges of the trays, being careful to keep it out of the holes. Dark brown base paint followed, then some drybrushing after that was dry, and finally some of my usual flock/turf mix here and there to help blend everything together.
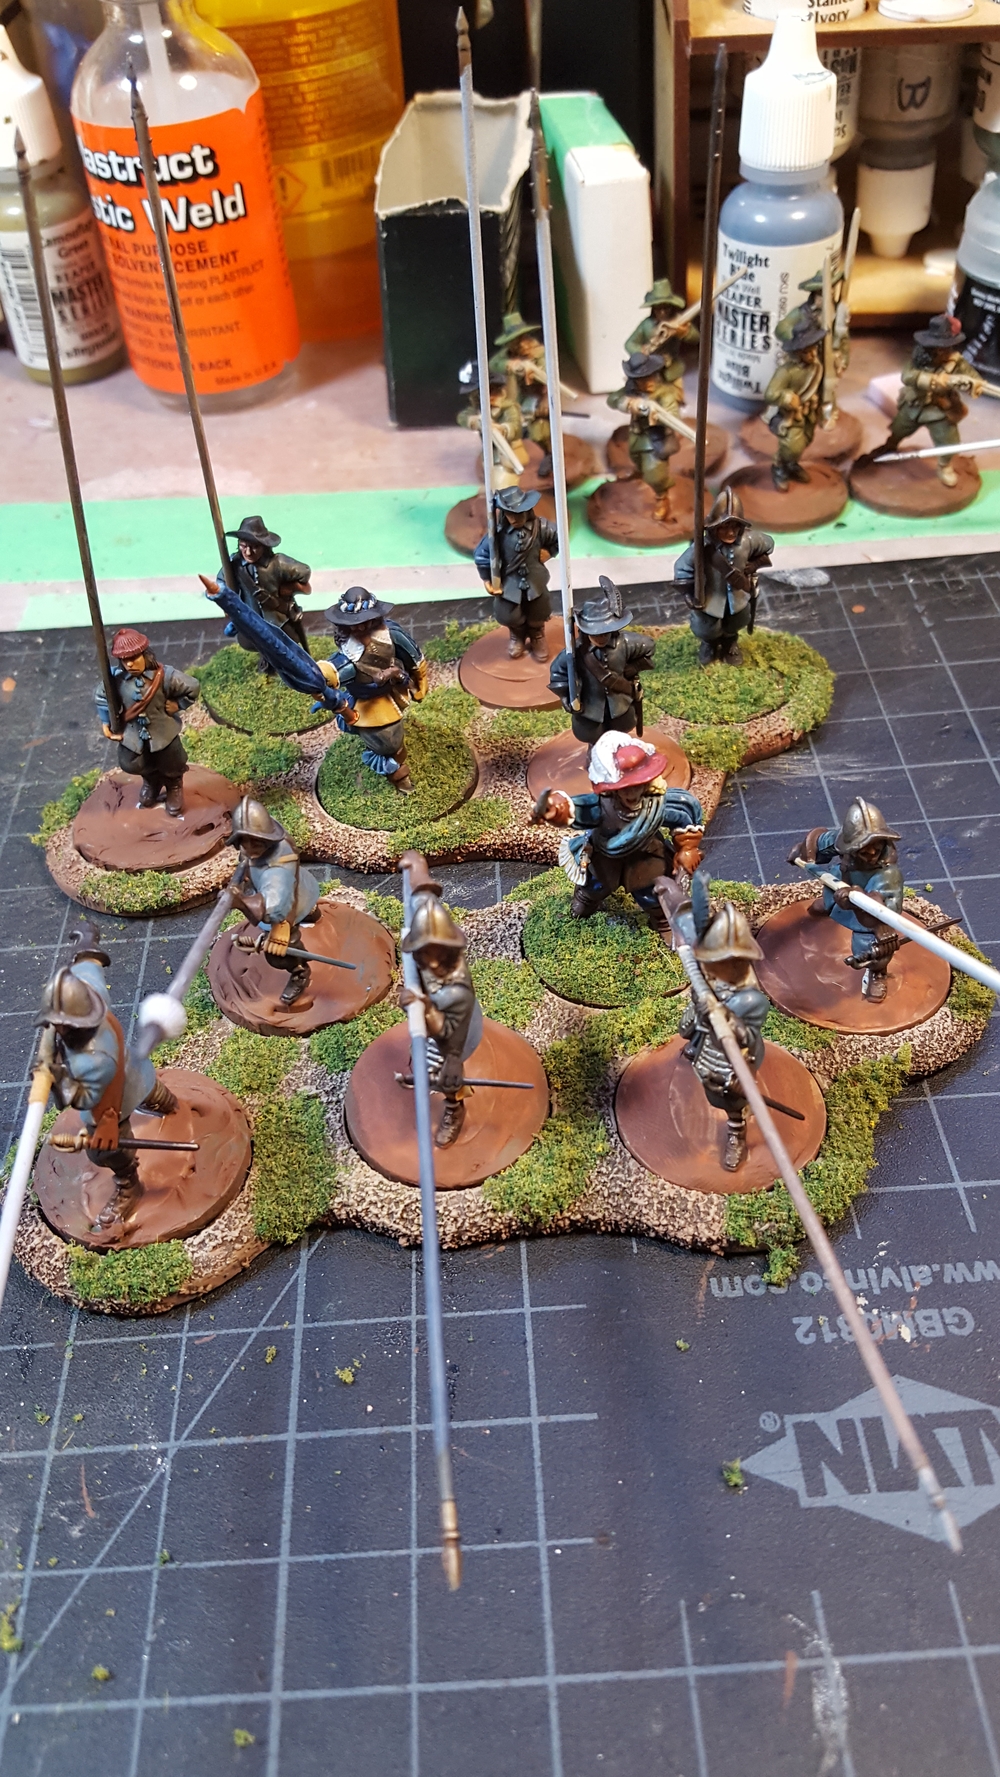
Sand, base paint, and drybrush done, starting flock. Click for larger.Flock all done. I might add some tufts or other detail bits eventually, but this will do nicely for now! Click for larger.The bases in use with Warlord pike in various stages of completion. Click for larger.
These movement trays are a great value and will make “big” skirmish games a bit easier to manage! I’ll definitely be getting more, especially of the six-base irregular trays, and might contact Warbases about some custom irregular trays for my cavalry, who are mostly on 20mm by 40mm rectangular bases, or my artillery, when I add some guns to my Pikeman’s Lament forces. Having the entire force on similar movement trays would look really sharp and make games a bit more streamlined, especially if I’m running convention games for other people.
Warbases started doing vehicles in lasercut MDF and cardboard (greyboard) a few years ago and I was intrigued right away; a lot of 28mm vehicles are fairly expensive or (especially for World War One, Russian Civil War, or other early 20th C gaming) simply don’t exist.
It took me a while to get around to ordering any of the vehicles, but I now have a Pierce Arrow truck and an Albion truck that I’ve built, and I’m pleased to say these are really nice kits, great value for their cost, and quite easy to build!
The Peasant Cart
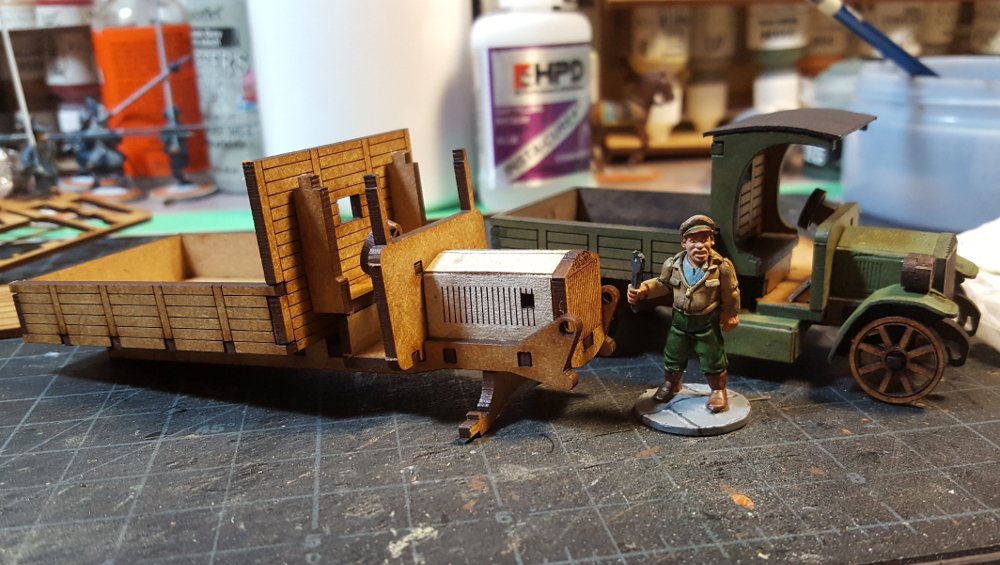
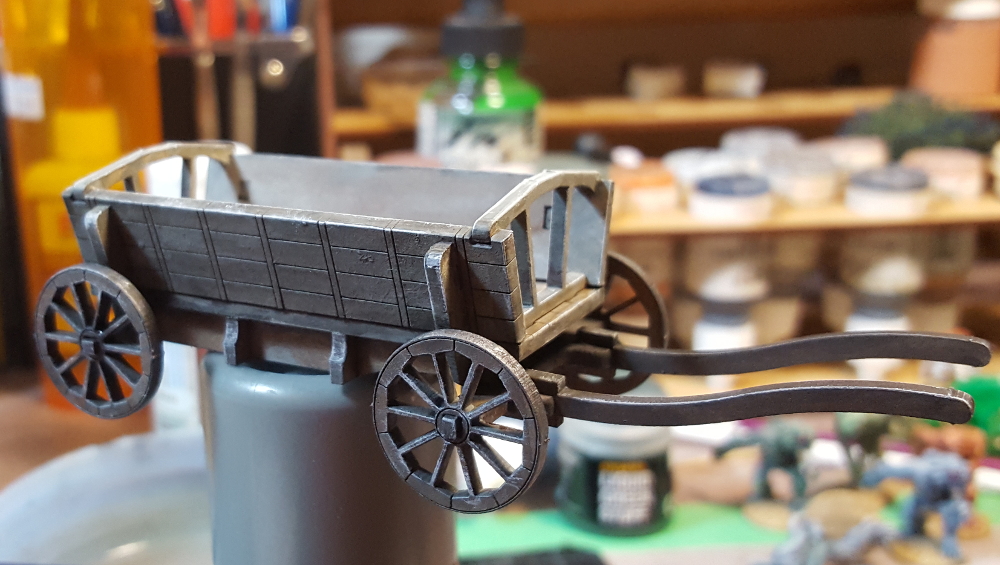
I also picked up Warbases’ Peasant Cart 2, which is part of their Carts & Wagons line, listed separately from the Vehicles line. This is a straightforward little model, about 20 pieces including the wheels, and produces a nice solid piece of wargaming scenery. It’s called a cart, but it is a full four wheel wagon.
Assembly and painting didn’t take much time at all, maybe half an hour. I used a random grubby wash of green-grey over the whole wagon, added a bit of pale grey for the insides of the wagon, then did a bit of edge highlighting with a grey-white mix just to pop some of the edges a bit. I’ll probably glue some straw (cut from manila cord) down to the inside of the wagon just for a bit more easy detailing.
Assembled and painted wagon, resting on top of a paint jar. Click for larger.
The wagon is big enough that two or three figures on 20mm bases could fit in the bed of it, although it’s too narrow for 25mm or larger bases to fit flat.
The Trucks
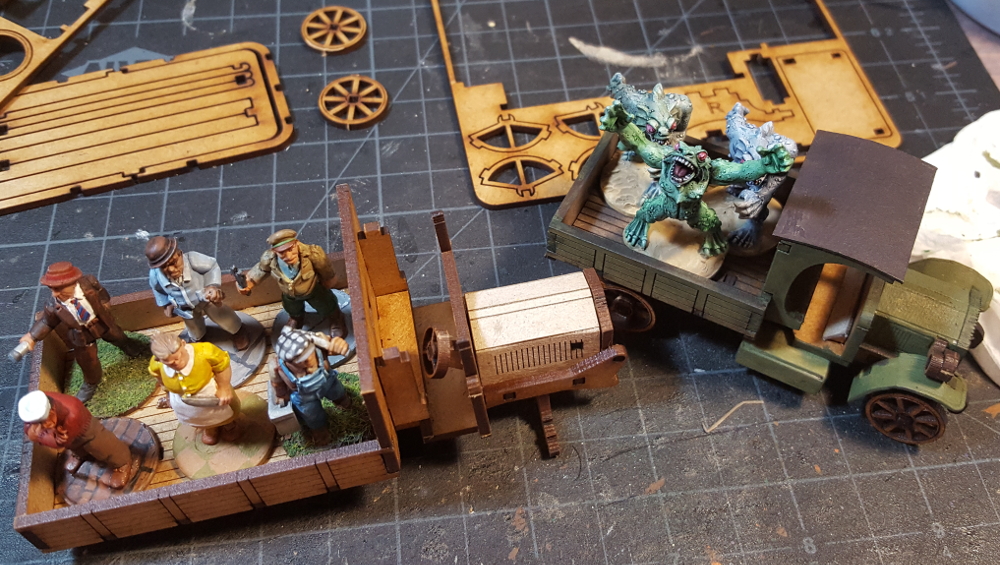
The Pierce Arrow is a relatively small truck, with room for two or three figures in the truck bed. The Albion is quite a bit larger, with room for 6 figures on 20mm bases or 3-4 figures on 25mm bases in the bed.
Albion truck under construction in the foreground, Pierce Arrow in the background. The figure is a 28mm Pulp Figures mechanic on a 20mm base. Click for larger.
Each truck comes as a couple of small sheets of MDF and an even smaller (business-card sized, roughly) sheet of greyboard card, with roughly 30 or so parts per vehicle. The instructions are photo-illustrated PDFs on the Warbases website, which does mean you can check them out before purchase. It sometimes takes a bit of peering at some of the photos to figure out which part is being fitted where, and as always I highly, highly recommend carefully dryfitting everything before you start adding glue!
One thing I noticed and appreciated about both trucks and the wagon is that any part that isn’t unique is actually identical to any corresponding part – the sides of the truck beds are identical and interchangeable, for example. Most parts aren’t labelled or numbered, but this nice design touch makes it hard to screw up the build process. Warbases has also put on-sprue/on-sheet photos of the parts of all three of these kits on their website, which helps sometimes with keeping track of parts.
The Pierce Arrow truck took me maybe an hour to assemble and paint to the point you can see in these photos; it’s got a bit of detail painting and cleanup left to do, and maybe some more weathering, so these are fast kits to assemble and get onto the table. I stopped assembling the Albion at the point you see in these photos so that I could paint the undercarriage before adding the wheels and fenders, as the Pierce got a bit cramped to paint with the wheels in place and the Albion has fenders on all four wheels, not just the front. I’ve also skipped putting the cab roof on the Albion for now to make painting the inside of the cab less painful.
Top view of both trucks with figures on 20mm bases in both. Six fit easily in the Albion (left) while three only just fit in the Pierce Arrow (right) with the third one overlapping. Figures all by Bob Murch/Pulp Figures. Click for larger.
The Pierce Arrow has been basecoated dark green with a black roof; I’ll do a round of highlighting (mostly of the edges) and there’s some detail areas like the wheels, headlight, and front grille left to paint. I haven’t decided what colour to do the bigger Albion; possibly dark grey or tan. Both colour schemes will do for either military or civilian vehicles of the era, especially in the chaos of the Russian Civil War!
The fenders, incidentally, are the only really fiddly bit of these kits. They’re lasercut card (greyboard) that you have to bend gently and then glue to an MDF inside piece to get them to hold the needed curve. Neither fender on the Pierce Arrow is quite right, although both are acceptable given the battering such fenders would take on the real vehicles! The instructions from Warbases say to bend the fenders over a pen or the handle of an Xacto, but doing this caused the greyboard to crease for me. I had better luck gently pressing the pieces against the pad of my thumb with another finger and gently flexing the card into a sort of curve that way.
That quibble aside, these are great kits and I’m sure I’ll get more eventually. They’re very sturdy once assembled, well designed for easy assembly, and it’s nice to have such an inexpensive source of vehicles for Early 20th C gaming!
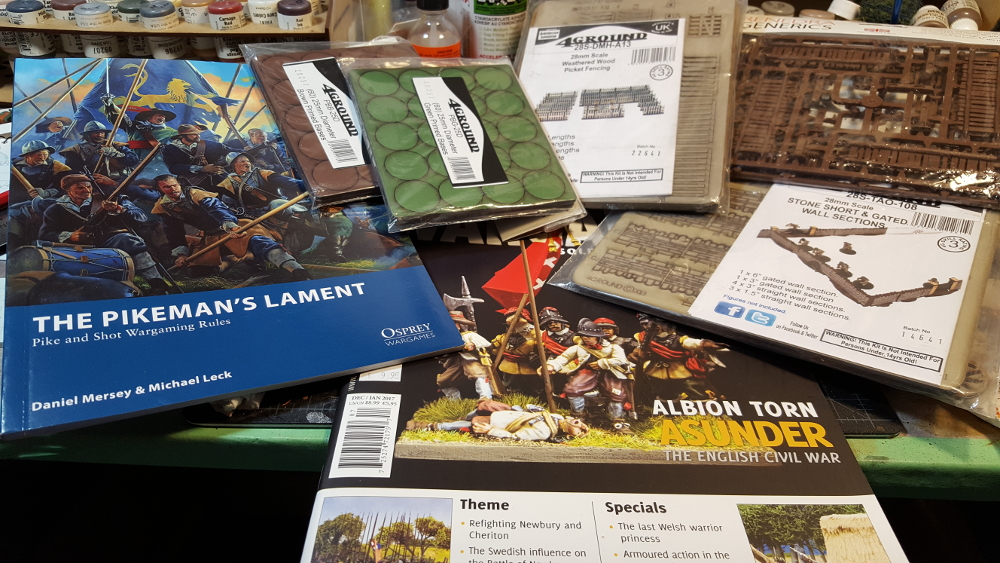
I managed to escape from Trumpeter Salute 2017 at the start of April without buying a single actual figure, but I brought home a batch of scenery bits and pieces and some reading material, at least.
The haul from Trumpeter Salute 2017 all laid out. Click for larger.
It helped my wallet that Bob Murch of Pulp Figures wasn’t there, and neither was Uncle Mike of Uncle Mike’s Worldwide/Strange Aeons. The excellent folks of Imperial Hobbies did help lighten my wallet and bulk up my luggage a bit, at least, although winning a pair of their $20 gift certificates in the very generously supplied door prizes offset the wallet-lightening a good bit!
The centerpiece of my acquisitions are the Pikeman’s Lament rules from Osprey, to finally put my long-neglected English Civil War/Thirty Year’s War figures to use and get them some time on the table! Related to that I snagged Issue #87 of Wargames, Soldiers, and Strategy, their ECW special, which has some great articles including an excellent building how-to by Tony Harwood that I’m going to be doing my own version of sometime soon.
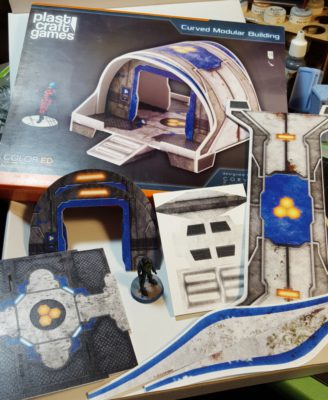
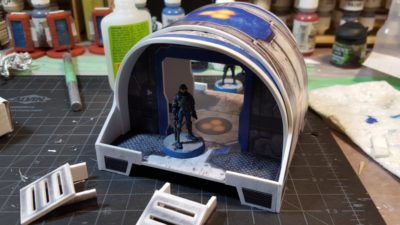
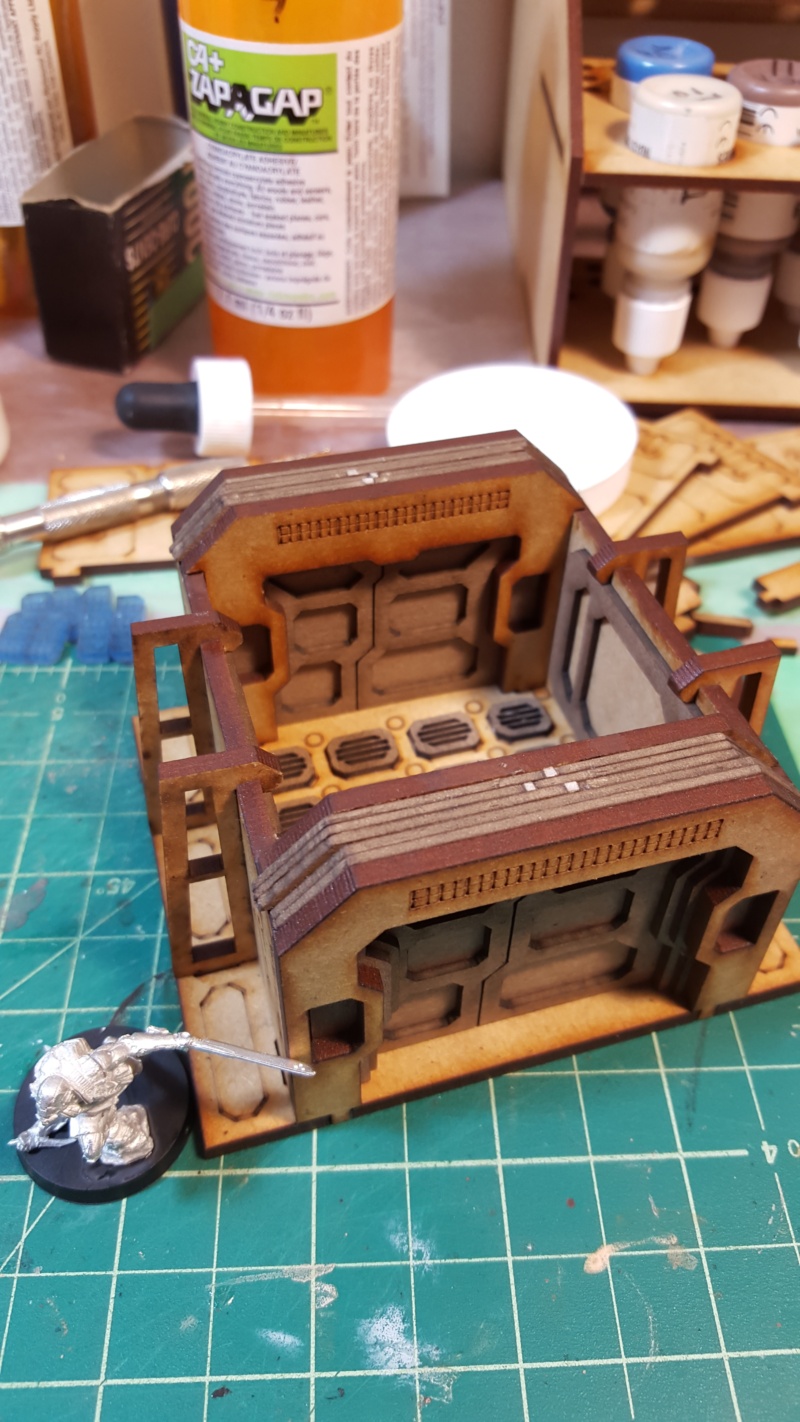
While at Trumpeter Salute I picked up one of PlastCraft’s Designed-For-Infinity plastic pre-coloured buildings, the Curved Modular Building, from the awesome folks at Imperial Hobbies, BC’s greatest wargaming store, and the only reason I do anything in Richmond other than change buses…
Anyway, the Curved Modular Building is a small building, with a footprint about 4″x4″ (not including the ramps) and about 3″ tall. It’s only 16 parts, six of which are for the two ramps off each end of the building.
Curved building parts all laid out. Click for bigger, see text for details.
The material is all 2mm foamed PVC board (Sintra is one common brand name) that’s been colour printed on one side, presumably by computer. The printing seems very solid, certainly enough to handle transport and use on a gaming table, and foamed PVC is good solid material for gaming terrain. My space station walls are built mostly with thicker Sintra (1/8″ or about 3.5mm) that I picked up at our local plastics supply place.
Assembled, with ramps. Infinity (28/30mm) Hassassin Bahram Fiday for scale. Click for larger.
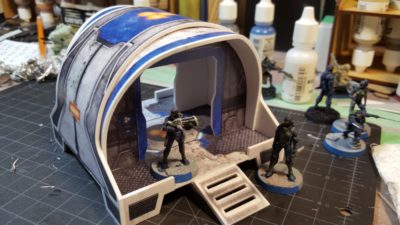
Assembly is pretty straightforward, with the small caveat that you do need to be slightly careful with the curved pieces so you don’t kink them. I glued the two end walls into the floor with superglue, let them cure for a bit, and gently pre-curved the main roof piece with my hands and over the top of one thigh before fitting it in place. Secure one end of the roof with superglue and work patiently around the curve of the piece, adding glue an inch or two at at time along the top edge of the two walls. Once you get the whole roof glued, hold the whole assembly for a minute or two to give the superglue a chance to cure.
Pre-curve and dry fit the two end roof pieces before tacking them into place with superglue, then add the two short end walls on each porch. Glue the two ramp assemblies together and you’re done, one piece of terrain ready to go on the table. I elected to leave the ramps separate from the building to make transportation and storage slightly easier; they tuck nicely into one porch for storage.
End with two CB Infinity figures for scale and the ramp in place. Click for larger, as usual
I like these buildings, they’re super easy to assemble and it’s kind of nice not to have to paint and detail everything yourself. The use of foamed PVC instead of the more usual MDF or cardboard allows the interesting curved roof, and the curved features in some of the other PlastCraft ColorED range. PlastCraft has just announced an expansion of their ColorED Infinity line, and they have a couple of other lines in the same range, some of which could make for fun Infinity tables. They also do most of the range in plain white foamed PVC if you want to paint them yourself.
I picked up a pack of Impudent Mortal’s Near Future Elevator Set, as mentioned in a previous post, and thought I’d put a few pictures up and do a bit of a review.
First, I have to say that Walt, the man behind Impudent Mortal, is awesome to deal with. He’s incredibly quick to reply to emails, worked with me to figure out the best way to ship his stuff to Canada (the US Postal Service having recently cranked it’s foreign rates to moderately silly levels) and I look forward to doing more business with him and his company in the future!
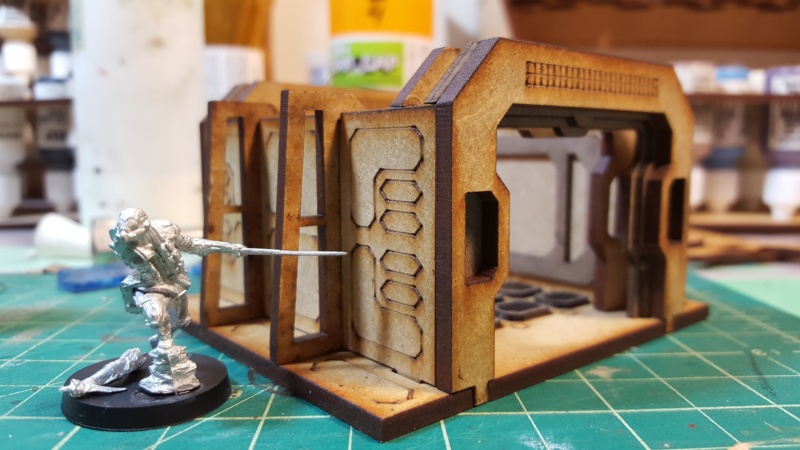
So on to the elevators. They’re laser cut from a mix of 3mm MDF and 1/16th cardboard (greyboard), which gives them some nice details and makes them slightly finer-grained than some of the scenery out there that just uses MDF. The base, walls, and door frames are MDF, while the doors are layered cardboard and card is used for details on the interior walls and floor as well as around the door frame.
Each elevator — you get two in the pack — is 3.75″ wide across the doors, 3.5″ long, and 2 1/8″ tall. There’s 11 pieces of MDF total and about 28 total pieces of greyboard, that count being inflated by the fact that the grilles that detail the floor are all separate pieces, 16 of them.
There are also eight small control panels of laser cut acrylic, which go in the openings on either side of the doors. They’re not visible in any of my photos because I haven’t installed them yet; they’ll go in dead last after I’m finished all painting and weathering.
Everything fits together with the ease we’ve come to expect from laser cut scenery, and while most pieces are pretty obvious in their placement and function, dry-fitting and testing as you go (before applying glue!) is always advised.
The doors slide in and out of the door frames vertically and fit very well, loose enough to actually move but snug enough not to fall out while transporting or handling the piece. Each door is three pieces of cardboard, so it has details on both the inside and outside and they’re reversible, which is nice.
One thing I couldn’t initially find on the IM site is the actual instructions for these elevators; turns out they’re tucked into the ITS and Paradiso Scatter Terrain Instructions PDF as that was the set they were originally part of.
I’ll post more pictures on a future post once I’ve gotten some paint on my elevators. Two is probably enough for any single tabletop so I’m not sure I’ll order more, but I’m very pleased with them; they’re unique cover items for an Infinity table and provide more options and opportunity than the classic packing crate or cargo container. They’ll look great as scatter on the space station terrain I’ve been working on!
If IM ever decide to do more of this style of terrain, the sort of thing you might find in a space station or cargo facility, I’d be very interested.
What the heck, you ask, is a tachanka (also found spelled “tchanka”)? It’s a Russian vehicle developed during the Great War and used, in various forms, right through the Second World War. A lightweight, sprung carriage with two, three, or sometimes four horses out front, a Maxim machinegun mounted to fire out the rear, and a few crew holding on for dear life. It was designed to give machinegun support to cavalry units. Wikipedia has a bit more, if you’re interested.
The Eureka tachanka has been around for ages, but it has a bit of a mixed reputation among RCW/BoB gamers. The crew figures are undersized, is the usual complaint, and I’ve also heard comments about the beastie being fussy to build.
That said, it’s the only easily-available tachanka, and the presence of such an eccentric and unique unit in an RCW/BoB force is a powerful lure!
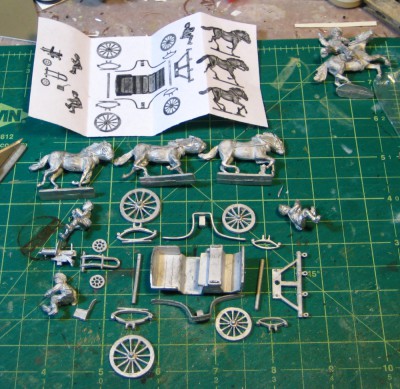
So to start off, here’s what you get.
The Eureka tachanka all laid out. 25 parts including crew and horses.
Three horses, three crew (driver, gunner, assistant gunner), a Maxim on the usual Russian wheeled cart (4 pieces) and 15 parts for the tachanka carriage itself, most of which are suspension. The whole thing is cleanly cast and there was a minimum of mold lines and flash to remove, most of it between the horses’ legs.
The small piece of paper with the exploded view is useful as a reference, although I think I’ll wind up printing the photo of the assembled tachanka off the Eureka website as well for additional reference. The front wheels/suspension/horse-attachment bit is the only really complex subassembly, although the fenders on the sides are going to require some gentle, careful bending to fit them into place and keep them symmetrical. I’ll put it on a “shadow” base like I did the armoured car I did a couple of years ago to help strengthen the whole thing, and probably use a small amount of putty out of sight on the underside to reinforce things here and there.
As I assemble the beast I’ll get some photos of it along side Copplestone & Brigade RCW infantry and cavalry, to attempt to answer that whole question about the scale of it. Onward!
We had a quick and messy intro to the TooFatLardies’ Chain of Command/Through the Mud and the Blood WW1 hybrid today with my Russian Civil War figures. Chain is originally a WW2 platoon-level set of rules with some of the core rules based on the WW1 Mud & Blood rules we have been playing for several years, and in the December 2014 Christmas Special the Lardies closed the circle and provided an adaptation of Chain for the Great War, pulling rules out of M&B as needed to replace or supplement the basic Chain rules.
Our forces were as follows: One short platoon of Bolshie Reds – four rifle sections of 7-10 men each, two Senior Leaders – who rolled hot for their Force Morale which was at 11 to start!
One short platoon of Whites, two Senior Leaders, three rifle sections of 7-10 men, 1 Maxim MMG with four crew, not as into this whole Civil War thing as the Reds with a Force Morale of only 8.
I hadn’t actually sat down to figure out the exact force balance on this particular force mix (TFL provide tools to do that, though) and we ignored the Support Points rules today and just ran with these basic forces, but it got us a good tight game with lots of back-and-forth until the White’s Force Morale collapsed to 0, so I think I was more or less right. Almost certainly too many Senior Leaders for either side at most stages of the RCW, but for an intro game I’m not fussed.
The first third of the game was all in the White’s favour; their Maxim deployed to fire down the village street and blotted out one Red rifle section single-handed, while two of the White rifle sections shot up, Pinned, and then close assaulted a Red rifle section that had pushed across main street and hunkered down in one of the hamlet’s houses but was isolated from any Red support.
The Whites had a string of dead Junior Leaders which pummelled their force morale, though, and pinned their Senior Leaders down acting as section commanders. The breaking point came when one White rifle section and the platoon Lt. launched a singledhanded close assault through the rear door of a house with a basically unsuppressed Red rifle section in it and got bashed all to hell, killing not a single Red and being thrown out into the open ground where irritated Reds quickly Pinned and then Routed them with close range rifle fire, killing the Lt in the process and routing the Whites with a FM of zero…
I’m absolutely certain we did a couple of things wrong, I know we missed rules and in some cases deliberately ignored them, but it was a good quick game and a great intro to CoC.
The Patrol Phase & Jump-Off Points are great, the Patrol Phase is much tenser and more tactical than the opening few moves of most games are, and JoPs mean less random wandering around the tabletop and more direct action!
The Command Dice mechanic isn’t as flavourful as M&B’s cards, but it’s quick and interesting, and often forces you to make difficult choices as to who to activate when. The actual Chain of Command Dice mechanic is also interesting but we didn’t use it much except to end the Turn and once to avoid a Force Morale check – there are more options for using Command Dice that we didn’t explore in this game.
I really like the fact that Chain has a Force Morale setup; sometimes in M&B it felt like you could feed men endlessly into the storm with just a bit of luck on clearing Suppression until everyone was dead. Not happening in Chain!
The actions/activations setup has been both clarified and expanded in Chain over M&B. Movement and fire, suppressive fire, and overwatch are all improved from M&B. The vehicle rules have had some expansion and clarification as well, especially with regards to Shock and vehicle morale.
For larger games, especially at conventions where I want to have two-four players per side I’ll probably stick with straight M&B, but for smaller games Chain/M&B (should we call it “Chain of Mud”?) is probably going to become my go-to system. I’m looking forward to more games and to getting to know the rules better!
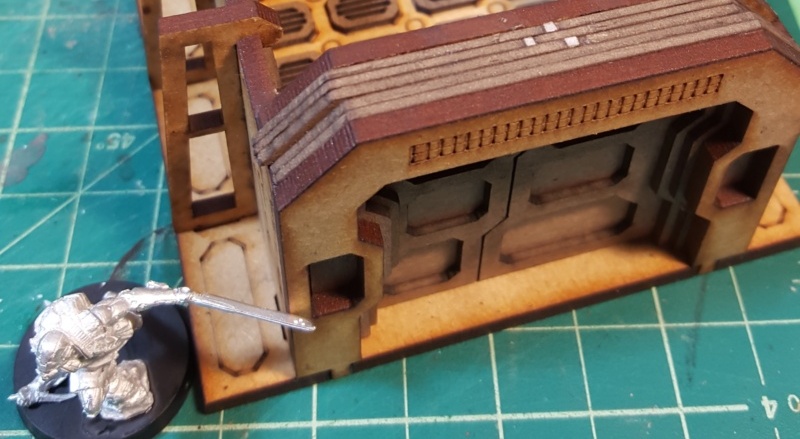
I first heard of Impudent Mortal when Richard of TooFatLardies used two of their buildings to build himself a very nice brewery for WW2 gaming. Rich got his through Minibits in the UK but it turns out Impudent Mortal is over on this side of “the Pond” down in the States.
I was interested in the universal brick look of the industrial buildings, which are the sort of Victorian/early-20th C brickwork you can find almost anywhere in the world right up to the present day, so I finally ordered a pair of brick buildings, a 6″x4″ rectangular building and a larger L-shaped building.
I also ordered one of their paint racks, the 66-bottle 3-level Reverse Eyedropper Paint Rack Extra Shelf, as most of my paint collection is Reaper Master Series in the very nice dropper bottles.
Communication from Walt at Impudent Mortal is fantastically quick and shipping is similar; everything arrived while I was away in northern Alberta then had to wait until I got back to the real world before I could do anything with it! Both buildings and the paint rack arrived tightly wrapped in heavy cling-wrap, the industrial version of your standard sandwich wrap, which kept all the components together very nicely inside the box.
I’ll get the buildings covered properly when I assemble them soon, but my first impression from dry-fitting the smaller building and then properly assembling the paint rack is that everything fits together easily and solidly. All the Impudent Mortal stuff is laser-cut from 3mm MDF, which will make for very solid buildings and a very solid paint rack.
Instead of shipping their stuff with instruction sheets IM has both videos and PDFs on their website, which has the advantage of giving you an idea of how everything fits together even before you buy it. The paint rack I bought is 14 pieces: two vertical sides, six shelf pieces, and the rest bracing at the backs of the shelves. Each shelf level has two pieces, the top piece with larger holes to hold the body of the dropper bottle, and the lower piece with smaller holes intended to hold the top of the lid of each dropper bottle.
Each level also has half a dozen smaller holes in each back corner, intended to hold brushes, sculpting tools, pencils or other small tools. That’s a useful way to use up the corners too small to tuck one more bottle into, but the lower pieces have holes in them too, which is odd – it means only the lowest shelf can actually be used to hold most things, because a brush or pencil put in one of the top shelf’s holes will just fall through. Leaving those corners of the lower pieces of each shelf pair solid would make them more usable.
Assembly was easy and quick and the fit was good. Lay one vertical side piece out, add all six shelf pieces with a bit of white glue, then drop the other side piece in and click everything together one shelf piece at a time. The various braces go on and keep everything square, and you’re done. Maybe ten minutes after I started I had the paint rack on my crowded painting bench and was loading paint into it!
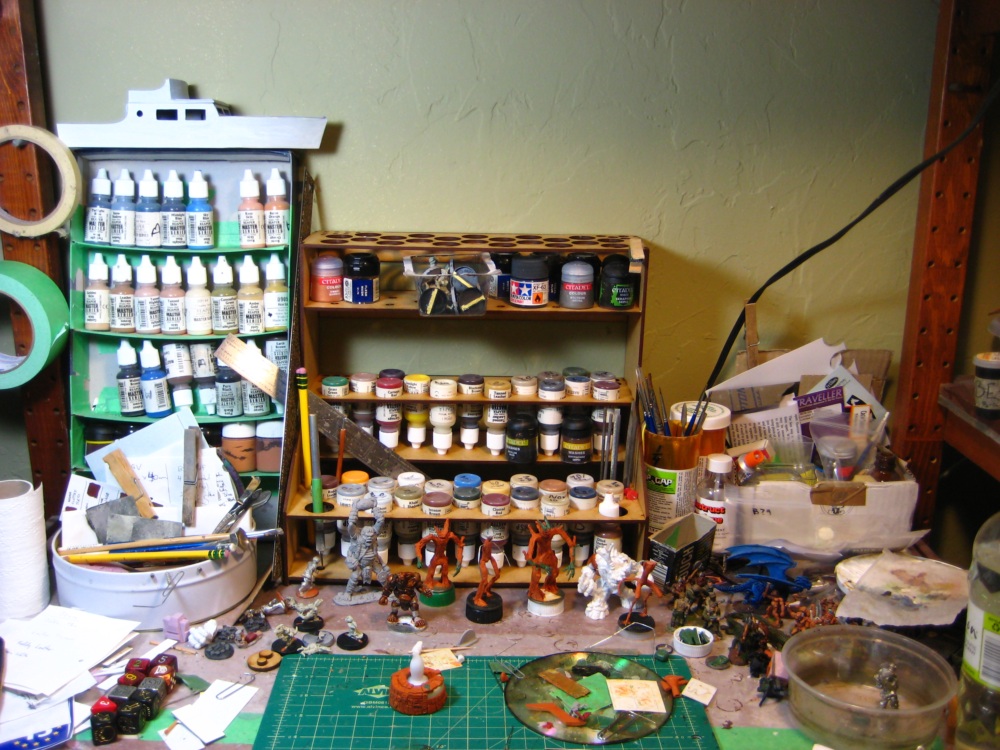
Workbench with new Impudent Mortal paint rack, 12 October 2014. Click for larger, as usual.
Making space for the new rack forced a badly-needed reorganization of my fairly small and very crowded painting bench. The small holes for paint brushes and tools will allow me to downsize the round white tin on the left to some sort of smaller container soon, now that files, pencils and such are tucked into the new rack, and the space-consuming clutter of overflow paint bottles from the homemade rack on the left is now nicely contained in the new rack. The shelves on this particular rack are far enough apart that you can fit GW or Tamiya paint pots between the top and bottom pairs of each shelf level, which is a nice bonus. You even have space to do that with a few pots per level when all the holes have dropper bottles in them – see the right-hand side of the middle shelf in the photo above!
The top shelf of the new rack will eventually hold my collection of acrylic artists inks that I use regularly on figures, but give the weight of those bottles I have had to leave them off until the glue had properly dried on the rack!
The IM racks are available in several different styles to fit different types of bottles; this one is about 12″ wide, 8″ deep and just under 12″ tall. Highly recommended and good value for money.
Hope everyone is having an excellent Canadian Thanksgiving long weekend, if you’re lucky enough to be a Canuck, or a good ordinary weekend if not!