Category Archives: Reviews

Reviews of books, miniatures, possibly other websites, and anything else we think needs reviewing!

Loot from Forge of Ice

Forge of Ice is one of those one-person companies that makes all sorts of cool stuff, and after knowing about them for several years I finally got around to making a small order from them a few weeks ago. Most of the fascinating little one person companies are British, but Forge of Ice is in fact based in Fairbanks, Alaska.

Alex, who is the entirety of Forge of Ice, still doesn’t have an actual website but he’s got a Forge of Ice Facebook page, is very responsive by FB Messenger, and has an illustrated catalog thread over on the awesome Lead Adventure Forum as well, which is frankly easier to navigate than Facebook’s chaotic unsearchable nonsense.

Forge of Ice mostly does Lost World style stuff, small dinosaurs, oddball caveman-style accessories and stuff. I’m not doing much Lost World style pulp at the moment, but I have in the past and I’m certain I will in the future. Besides, I could always cross-pollinate my current weird 17th Century stuff with Lost World, couldn’t I? Hmmm…

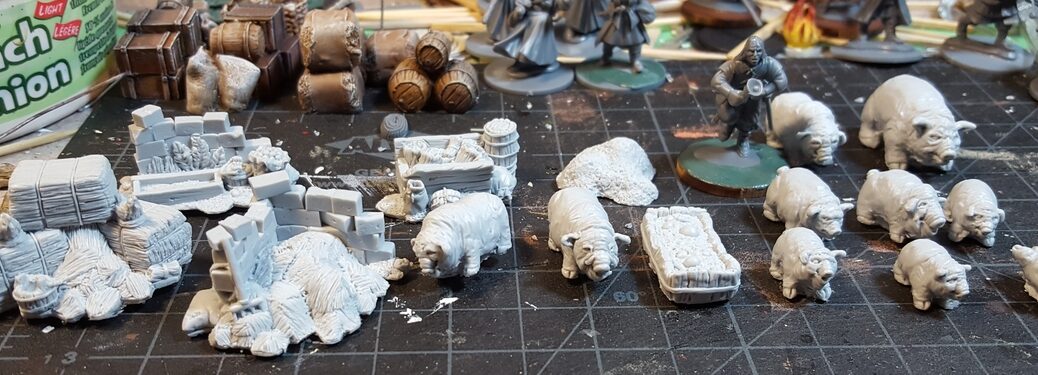
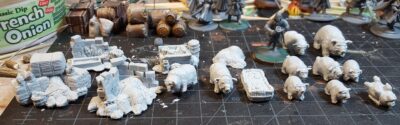
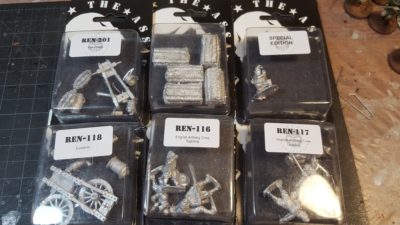
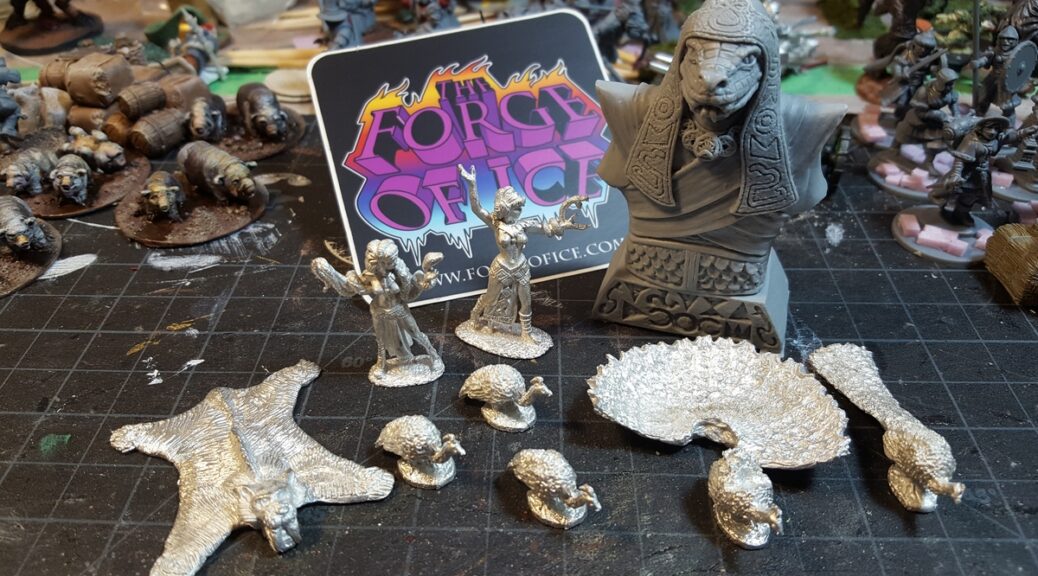
Anyway, what did I get from the frozen depths of central Alaska? A pair of Snake Priestesses, a batch of five peacocks, a sabertooth tiger rug, and the centrepiece of this little collection, a resin Doom Serpent Idol.

Forge of Ice stuff
My little Forge of Ice order – peacocks, priestesses, a rug (it’ll really tie a room together), a Doom Serpent Idol, and a cool sticker! Click for larger.

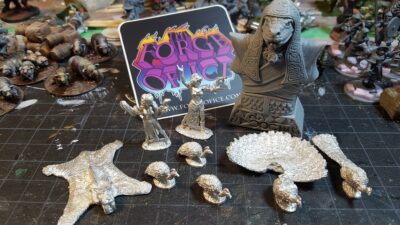
The serpent priestesses are elegantly slim 28mm figures, both slender women with large snakes wrapped around their arms and shoulders. I have no immediate plans for them, but they’re awesomely pulpy and clearly need some sort of group of underpriestesses, guards, and temple lackeys to order about in their sneaky attempts to do whatever it is snake priestesses from a Lost World plot to do.

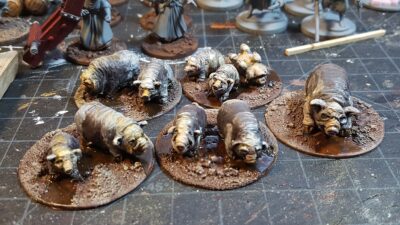
The peacocks are some of the first figures Forge of Ice released, several years ago, and I’m thinking that as well as being just general fancy set dressing, with a couple of house rules they could be mobile alarm units in a Pulp Alley scenario where players are trying to sneak up on a fancy house and don’t dare disturb the peafowl least the damn things scream the place down and alert guards or something! (if you’ve never heard a peafowl scream, they have a glorious bloodcurdling horror movie shriek. It’s awful.) The smaller female peahens and the male peacock with his tail down are both single piece castings; the peacock in full display mode is two pieces. There will need to be a bit of filing and puttying to get the body of the peacock and his tail to match up nicely, but nothing outrageous.

The saber tooth rug was just too much fun to pass up, I suspect I’ll use it as weird decoration in someone’s study or something!

Doom Serpent ido
The gloriously Egyptian-esque Doom Serpent idol, just the thing to be guarded by a couple of serpent priestesses and their flunkies! Click for larger.

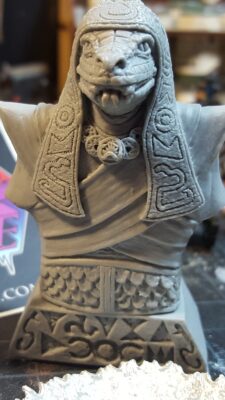
The Doom Serpent idol is a fairly serious chunk of fine grey resin, about 3″ tall and just over 2″ wide at the shoulders. I’m really looking forward to painting this one up, I’m thinking a sort of blond/tan sandstone look like we see in Egyptian statues, with some coloured painted bits here and there, will look great.

Hopefully one of these days Alex gets around to getting Forge of Ice an actual website, but in the meantime go have a look at his Lead Adventure thread (you don’t need a LAF account to see it) and ping him by email, by the message service at LAF, or via Facebook Messenger to get your cool weird Lost World loot from the distant north!

Loot From Bad Squiddo

Ordered a few things from the excellent and varied ranges of Bad Squiddo Games back in March; things took longer to get from the UK to here than I’m used to, almost like some major world event is disrupting trans-Atlantic flights or something. However, everything was dispatched from the UK in good time and I am certainly not going to blame Anne of Bad Squiddo or the various postal services involved for a lack of air mail capacity…

I got a fairly mixed bag of stuff. A few ladies that will probably show up mostly as players or civilians in my English Civil War/Weird ECW games, a fine herd of pigs and some farm scenery, a bunch of cats, and some small scenery to add detail here and there, including a whole lot of mushrooms and toadstools for suitably creepy weird fantasy/horror forest bits.

Bad Squiddo haul
Most of the Bad Squiddo haul all laid out. Clockwise from lower left: mushrooms/toadstools, candles, several female characters, cats, fish seller w/ cats, skoggskattar, and finally in front centre a batch of food. Click for larger.

Skoggskattar
Skoggskattar – giant Scandinavian cats. Compare to the 28mm Warlord guy jogging past them on the right right there. Click for larger.

Everything is really cleanly cast and beautifully sculpted. The scenics are mostly by the very talented Ristul and in an interesting slightly flexible grey resin; the white metal sculpts are by a variety of sculptors and all really well done.

Not pictured above is the pigs, my favourite single part of this purchase. I indulged in the Pigtopia bundle deal which got me ten pigs and six bits of pigsty/farm scenery. I’ve already painted the pigs up, basing them in small groups on 40mm bases.

pigs!
Bad Squiddo pigs! Ten pigs, six pieces of pig-related scenery. Click for larger.

I painted the pigs up to vaguely resemble one of the oldest heritage breeds of pig in the UK, a black-and-white breed that I now can’t find or remember the name of. Anyway, they painted up nicely and I look forward to watching them chase players around the table or be part of someone’s provisions on the hoof in a scenario.

painted pigs
Pigs all painted up, all on 40mm bases. Just a bit of greenery to add and they’re all done. Click for larger.

That’ll do, pig, that’ll do.

Tiny Ships: A Game of Coastal Patrol

As mentioned last weekend after our game of Narrow Seas, we also wanted to try out Coastal Patrol, available in the Summer 2011 Special from TooFatLardies.

I managed not to take a single photo during either of the two games Corey and I ran today, but nothing about the visible setup we’ve got has changed in a week except that all my 1:1200 scale boats are properly based, on 20mm wide by 40mm long by 1.5mm high clear acrylic bases ordered from Litko.

tiny ships on bases
Tiny ships all based on 20mm wide by 40mm long 1.5mm tall acrylic bases from Litko. Gloss varnish makes great glue for this sort of thing and won’t fog the acrylic the way superglue can. Click for larger.

The first game we ran was very small, a pair of Royal Navy Fairmile D MGBs (Motor Gun Boats) escorting a coastal freighter, under attack by a pair of S-38 mid-war Schnellboote. The S-boats roared in, fired all four of their ready torpedoes at the freighter while taking scattered gunfire from the MGBs, blew up the freighter, and roared off. As they were exiting the board one of the pursuing MGBs ran head-on into a stray mine (Coastal Patrol has a random events table that can be pretty lethally random!) and was blown out of the water.

For the second game we gave the Germans a convoy to escort, a freighter and a tanker somewhere along the coast of France early in the war. They had an armed trawler and two Raumsboote (R-Boats) escorting and were under attack by a quartet of tiny, lightly armed Vosper 73′ MTBs. This game ended in an absolute draw, as nobody lost any ships, although part of this was because we were messing with the Coastal Patrol torpedo rules and concluded that we’d taken them from massively powerful (any vessel struck by a torpedo is considered sunk automatically) down to nowhere near powerful enough because although the trawler and the freighter got hit neither took any serious damage. The Vospers all roared off into the night again, although one of them was taking on water quite badly, pumps just barely keeping up.

For both games we were (just like last weekend’s Coastal Patrol games) ignoring the rules for spotting, target ID, blinds/dummy markers, and all that stuff. I’ll be making some blinds and markers before our next games (of either system) so we can incorporate those rules, which are sure to change the on-table dynamic again.

Narrow Seas vs Coastal Patrol

So, compared to Narrow Seas, what are the rough similarities and differences? CP uses a TFL-style actions-per-activation system, with vessels getting between zero and three actions (diced for) every time their card comes up in the activation deck. This leads to some tense decision making, which I like. Do you maneuver your ship, run damage control, or fire, and at who?

One thing we definitely liked about CP vs NS is that CP’s turning circles are considerably smaller than the NS turning arcs. This makes the vessels feel more agile, and increases the effective size of the table.

CP’s firing is much simpler than the NS system, and involves much less dice rolling. We did seem to miss a lot more with CP than with NS, though, which isn’t really unrealistic with small vessels moving quickly over the water!

There are definitely a few rough spots and gaps in the Coastal Patrol rules. Some of the game mechanics don’t seem to be fully explained (damage from collision/ramming, for example) and although Making Smoke is an available order and Smoke Generators are listed as shipboard equipment on some of the damage tables, there are not in fact any rules for how smoke is intended to work… That said, there is a file of Coastal Patrol house rules out there that fill most of the gaps easily enough, but which I can’t currently find online to provide a link to!

We will be coming back to Coastal Patrol, and might stick with it as our main coastal naval rules, but we’ll have at least one more bash at Narrow Seas as there are definitely some things it does better than Coastal Patrol.

An Actual Game of Tiny Ships!

This afternoon we actually got the tiny ships onto the table and had a game using the Narrow Seas rules.

First, of course, I had to use blue-tac and scrap card to base up my tiny ships.

all based up
The Brits and Jerries all based up, for now. Click for larger.

We ran two British coastal merchant ships escorted by a quartet of RN Fairmile D MGB gunboats, being menaced by a quartet of S-boats somewhere along the coast of England. We ignored all the visibility, spotting, and illumination rules for this game, it was purely run-and-gun.

early game
Early in the game, two merchants hugging the coast, British Fairmile D boats maneuvering to intercept the approaching S-boats at the top of the photo. Click for larger.

The Germans kicked up to high speed to maneuver toward the sluggish merchantmen, while the MGBs tried to intercept.

Late in the game. The tape strips are German torpedoes in the water, heading toward the merchants off the top of the photo. Click for larger.

The game ended with three of the four S-boats getting away at high speed, while one S-boat was being scuttled by it’s crew close to shore after taking massive amounts of damage. The Germans fired seven torpedoes, only one of which hit, but that was enough to send one of the merchants to the bottom almost instantly, while gunfire also sank one of the MGBs.

I’m honestly not sure how much of the Narrow Seas rules we were doing correctly, but the basic system seemed to work. Consensus was that damage was awfully dice-intensive to resolve, especially if a ship got hit hard and was up to the Heavy/Wrecked end of the damage table. We also realized we were doing the cascading damage wrong partway through the game, however, so a careful re-read of the firing and damage rules is clearly in order.

As a scenario balance thing, Fairmile D MGBs are scary, scary beasts, each of them having significantly more firepower than an individual S-boat. More S-boats or fewer “Dog” boats, perhaps swapping an armed trawler in for one or two of the Dogs, would probably make the game “fairer”. On the other hand, the Kreigsmarine did manage a minor victory, and trading one S-boat for a coastal freighter and an MGB is more than fair.

We had a good game overall and will definitely be back to Narrow Seas sometime soon; we also want to try out “Coastal Patrol” from the Summer 2011 TFL Special as TFL rules are much liked in these parts. My proper bases are enroute from Litko, and I’ve now got a list of counters I need to produce to make the game run more smoothly.

Tell the Bartender Your Troubles

Way back in December 2018 on Twitter, Bears Head Miniatures showed off pictures of their new Beholder-alike floating eye beastie, Narthoks the Excellent. I made an offhand comment of, “With that expression, somehow I see him as the wholly unexpected barkeep behind a very strange bar somewhere, towel draped over one tentacle, goblets and beer mugs in the other tentacles…”

A few weeks later, Bears Head posted this:

…and naturally I had to join their Kickstarter, even though I had no particular use then or now for a Beholder, in bartender guise or otherwise! (is a bartending Beholder actually a Beerholder? A Barholder?)

My understanding is that the bartender version was a Kickstarter-exclusive, but the regular and sci-fi versions of Narthoks are available over on the Bears Head website, along with all sorts of other interesting figures!

So what did I get for my offhand comment? Narthoks is a big chap, roughly 2 and a half inches across at the tentacles and about 2 inches tall from bottom of tentacles to top of head/topmost eyeball. Taller than that once he’s on his flying base, of course. He’s got a towel and glass in his frontmost tentacles, a cocktail shaker in his right-hand tentacles, and a bottle and glass in the left. All the bar-ware is scaled to Narthoks, which means the glasses and shaker are the size of barrels from a human viewpoint!

barholder, bare resin
Bare resin Narthoks straight out of the box from Bear’s Head back in May 2019. Click for larger.

The figure is resin and nicely cast, with only a bit of cleanup along seams and some casting flash. He’s in two parts, tentacles and base/neck (?) and then head, and while the seam between them has more gaps than I’d normally like to see, the textured nature of his skin makes disguising this seam easy once you break out the greenstuff.

Anyway, after Narthoks the Barholder showed up in May 2019 he sat in his box until just a few weeks ago (end of January 2020), when I felt the need to radically change up my painting after painting a couple of dozen lovely but fussy and tiny 1:1200 WW2 naval boats!

For painting, I was inspired by Dana Howl’s awesome video on using glaze medium, which I’ve linked to at least once already on this blog, and by the splendid and underused (by me, at least, in usual day-to-day painting) Royal Purples triad from Reaper’s paint line.

barholder, wet paint
Blending basecoat in progress. Almost all the paint you can see here is still wet, as the glaze medium slows drying time. Makes for fun and dynamic painting on a big figure like this! Click for larger.

Narthoks’ underside is various shades of bright blue, his topside is mostly Imperial Purple, shaded down with Nightshade Purple and highlighted with Amethyst Purple. The eyeballs were painted Pure White then glazed with a variety of yellows, reds, and oranges.

barholder basecoated
Basecoating done, eyeballs and other detail parts included. Click for larger.

Final highlights on Narthoks’ body were a mix of Amethyst Purple, Pure White, and glaze medium, 1:1:1; this is most visible on the eyelids and on the bits just above the “horns” along each side of the body. The eyeballs have all had a coat of gloss medium, although as I haven’t given the whole miniature the usual coat or three of protective matte varnish, this gloss will have to be redone in due course. Ah well.

narthoks finished, front
Narthoks all finished except for basing. Go on, tell the bartender your troubles! Click for larger.

narthoks finished, left side
Left side of Narthoks. I really like how the shading of the horns and above them has come out. Click for larger.

narthoks finished, right side
Narthoks’ right side. The eyeballs have turned out nicely too. Click for larger.

Narthoks comes with a standard clear plastic flying base; I ran a length of paper clip wire up into him for a painting handle and to help pin the two halves of his body together. I’ll trim that short and slot it into the post of the flying base, but I might replace the clear plastic base with something more bar-like, either flagstones or a wood floor. I’m actually tempted to get a small display dome for Narthoks and put him on one corner of my home bar cabinet as a mascot of sorts, as I currently have absolutely no actual gaming-related use for this awesome figure!

Fenris Games Runestones

I picked up a few things from Fenris Games back in June or July, and the first pieces are finally getting completed and onto the gaming table!

runestones, front.
Two Viking Runestones from Fenris Games. Click for larger.

These are “Viking Runestones 2” from Fenris, cast in pale grey resin. Each is about 2″ tall. The carved runes on the front are very finely detailed; I wouldn’t be surprised if they had been laser engraved on something (thin acrylic?) and that was then embedded in putty or something to make up the rest of the stone.

runestones, back
Runestones, rear view. 28mm Warlord ECW figure for scale. Click for larger.

I’ve got a few other bits and pieces from Fenris in progress. All of their stuff is really high quality, their range is huge, and shipping was fast. Highly recommended!

The Assault Group ECW Artillery

The Assault Group (TAG) has a huge range of Thirty Year’s War/English Civil War/general Renaissance figures that I’d heard good things about, including that they were fairly compatible in size and style to the Warlord figures that make up the entirety of my TYW/ECW collection so far.

The only major piece missing from my 17th C forces so far are guns, so I ordered TAG’s English Battery Builder pack which has a culverin, eight crew, and accessories. To give me some game options I also picked up a falconette light gun on it’s own. That gives me a light gun, a heavier field gun, enough crew to do a full six man gun crew per the Pikeman’s Lament rules for either of them, and some nice extra bits for base decoration – gunpowder barrels, piles of shot, that sort of thing.

Then I waited.

And waited some more.

Then I got an email apologizing for the wait.

This wasn’t a surprise by this point, because a significant number of posts on the TAG blog are, in fact, posts explaining how backlogged their orders are.

Then I waited a while longer.

My initial order was made on June 22nd. The “we’re backed up” email came through on August 4th. My order was apparently “completed” on August 11th. It showed up in Canada on September 11th.

Nearly three months wait for this! The culverin, both crew packs, and the gabions are part of the Battery Deal; the falconette was separate; and the praying cavalryman is, as the sticker says, the ECW/TYW Bonus Figure, apparently. Click for larger.

That’s… goddamn glacial. In nearly two decades of ordering stuff from overseas for wargaming I don’t think I’ve ever had an order take so long from initial order to the toys actually showing up, even back in the late 1990s when I was just starting out and an order to the UK or the States meant snail mail, paper order forms filled out by hand, and an International Money Order.

So, don’t order from TAG if you’re in any sort of hurry for your toys. I have a generous backlog of painting and loads of scenery projects to distract me, thankfully.

Eight figures, two guns, and accessories. Click for larger.

Now that they’re finally here, what about the figures themselves? I quite like them, the casts are very clean, the sculpting is well proportioned and nicely detailed, and while they’re mostly a little bit smaller than the Warlord figures they’ll look fine in adjacent units on the table!

Warlord’s plastic figures are actually slightly bigger than most of their metal figures; their metal ones are a pretty close match for TAG’s while Warlord plastics are bigger. Odd that Warlord has that difference between the two materials they produce figures in…

Left to right: Warlord Firelock officer (metal), TAG artillery officer (metal), and Warlord musician (plastic). The two metal figures are a pretty good match, the plastic guy is half or one-third of a head taller than either. Click for larger.

The two guns are four parts, two wheels, the stock (carriage?), and the barrel, and fit together easily. Mold lines and flash are minimal, just a few minutes cleanup for the whole lot.

The two crew packs are available separately as English Artillery crew loading and English Artillery crew sighting, each consisting of an officer/sergeant figure and three crew. The loaders have a powder scoop, rammer, and swab; the sighting crew have two with large timber levers to adjust the gun’s wheels and a gunner doing the actual sighting.

Both guns and most of the extra bits they come with. Click for larger.

The culverin is also available separately; it comes with the gun, a powder barrel, a water bucket, and a small pile of cannon balls. The falconette has the gun, a wedge, water bucket, and a bucket of small shot.

I still haven’t quite settled on how I’m going to base the guns and their crew, but I’m looking forward to assembling and painting them up; the whole unit should be pretty quick to paint up, and while I usually base figures before painting them, I might well tack these guys down to craft sticks to get them painted before I make any basing decisions. Basing might involve a custom movement tray of some sort ordered from Warbases that can fit six crew on 25mm bases and the unbased gun, to match the 2mm MDF movement trays I’ve already got.

I’ll probably order from TAG again; they have some different figures that Warlord don’t offer, I like their sculpting style, and variety is always useful, but the insanely long order times are offputting.

Warbases Skirmish Movement Trays

I picked up a batch of simple lasercut MDF trays sized for 25mm bases on one of my recent Warbases order. Pikeman’s Lament uses either six or twelve figures per unit as standard, so I bought a batch of six-base skirmish trays (listed on Warbases’ site as “Dux Brit/Zombie Trays“) and a pair of twelve-base three by four regiment trays for when a PL pike unit is in Close Order, both cut for the 25mm MDF bases I’m using for my English Civil War/Pikeman’s Lament project.

Each tray is two layers of 2mm MDF, lasercut and with the two layers already glued together straight from Warbases. I’d been thinking of replacing the bottom solid layer of 2mm MDF with something thinner (probably .030 plastic card) as I am not a huge fan of big thick bases, so having them arrive pre-assembled forced me to consider different options.

As an aside, if you really did want un-glued movement trays, or even just the tops so you could do your own base layers, I’m fairly sure Martin and Warbases crew can set you up that way. Chuck them an email and ask!

I finally broke out my grossly underused Dremel tool, poured a pint of excellent beer, and sat down on the back patio with this unwise combination to modify my movement trays to my liking!

Beer and power tools, an excellent combination! Also pictured, grumpy cat wondering why it’s so damn hot and why her human servant is insane. Click for larger.

A Note Of Warning: Power tools capable of 30,000 RPM and alcohol is not a recommended combination. Sanding MDF without wearing some sort of filter mask is also not recommended. Even though I was outside while doing this, I can still taste MDF dust on the back of my mouth over a day later. Wear a dust mask of some sort. Don’t combine power tools and beer, even very good beer. Dear readers, be smarter than me. Thank you. Also, should you not be smarter than me, don’t send lawyers after me. They’re scary. Thank you again.

Anyway…

A couple of minutes with a sanding drum on the Dremel per base rounded the top edges off nicely, and the corners of the regiment bases. I touched up a few scuffs from the Dremel by hand with regular sandpaper, knocked the nasty MDF dust off, and then brought everything – including the beer – inside to my workbench to add a bit of sand here and there to the trays.

First two bases done on the right, untouched ones on the left. Click for larger.

With that done, I put the Dremel away, poured another pint of beer, and put a bit of sand around the edges of the trays, being careful to keep it out of the holes. Dark brown base paint followed, then some drybrushing after that was dry, and finally some of my usual flock/turf mix here and there to help blend everything together.

Sand, base paint, and drybrush done, starting flock. Click for larger.

Flock all done. I might add some tufts or other detail bits eventually, but this will do nicely for now! Click for larger.

The bases in use with Warlord pike in various stages of completion. Click for larger.

These movement trays are a great value and will make “big” skirmish games a bit easier to manage! I’ll definitely be getting more, especially of the six-base irregular trays, and might contact Warbases about some custom irregular trays for my cavalry, who are mostly on 20mm by 40mm rectangular bases, or my artillery, when I add some guns to my Pikeman’s Lament forces. Having the entire force on similar movement trays would look really sharp and make games a bit more streamlined, especially if I’m running convention games for other people.

Review: Warbases MDF Vehicles

Warbases started doing vehicles in lasercut MDF and cardboard (greyboard) a few years ago and I was intrigued right away; a lot of 28mm vehicles are fairly expensive or (especially for World War One, Russian Civil War, or other early 20th C gaming) simply don’t exist.

It took me a while to get around to ordering any of the vehicles, but I now have a Pierce Arrow truck and an Albion truck that I’ve built, and I’m pleased to say these are really nice kits, great value for their cost, and quite easy to build!

The Peasant Cart

I also picked up Warbases’ Peasant Cart 2, which is part of their Carts & Wagons line, listed separately from the Vehicles line. This is a straightforward little model, about 20 pieces including the wheels, and produces a nice solid piece of wargaming scenery. It’s called a cart, but it is a full four wheel wagon.

Assembly and painting didn’t take much time at all, maybe half an hour. I used a random grubby wash of green-grey over the whole wagon, added a bit of pale grey for the insides of the wagon, then did a bit of edge highlighting with a grey-white mix just to pop some of the edges a bit. I’ll probably glue some straw (cut from manila cord) down to the inside of the wagon just for a bit more easy detailing.

Assembled and painted wagon, resting on top of a paint jar. Click for larger.

The wagon is big enough that two or three figures on 20mm bases could fit in the bed of it, although it’s too narrow for 25mm or larger bases to fit flat.

The Trucks

The Pierce Arrow is a relatively small truck, with room for two or three figures in the truck bed. The Albion is quite a bit larger, with room for 6 figures on 20mm bases or 3-4 figures on 25mm bases in the bed.

Albion truck under construction in the foreground, Pierce Arrow in the background. The figure is a 28mm Pulp Figures mechanic on a 20mm base. Click for larger.

Each truck comes as a couple of small sheets of MDF and an even smaller (business-card sized, roughly) sheet of greyboard card, with roughly 30 or so parts per vehicle. The instructions are photo-illustrated PDFs on the Warbases website, which does mean you can check them out before purchase. It sometimes takes a bit of peering at some of the photos to figure out which part is being fitted where, and as always I highly, highly recommend carefully dryfitting everything before you start adding glue!

One thing I noticed and appreciated about both trucks and the wagon is that any part that isn’t unique is actually identical to any corresponding part – the sides of the truck beds are identical and interchangeable, for example. Most parts aren’t labelled or numbered, but this nice design touch makes it hard to screw up the build process. Warbases has also put on-sprue/on-sheet photos of the parts of all three of these kits on their website, which helps sometimes with keeping track of parts.

The Pierce Arrow truck took me maybe an hour to assemble and paint to the point you can see in these photos; it’s got a bit of detail painting and cleanup left to do, and maybe some more weathering, so these are fast kits to assemble and get onto the table. I stopped assembling the Albion at the point you see in these photos so that I could paint the undercarriage before adding the wheels and fenders, as the Pierce got a bit cramped to paint with the wheels in place and the Albion has fenders on all four wheels, not just the front. I’ve also skipped putting the cab roof on the Albion for now to make painting the inside of the cab less painful.

Top view of both trucks with figures on 20mm bases in both. Six fit easily in the Albion (left) while three only just fit in the Pierce Arrow (right) with the third one overlapping. Figures all by Bob Murch/Pulp Figures. Click for larger.

The Pierce Arrow has been basecoated dark green with a black roof; I’ll do a round of highlighting (mostly of the edges) and there’s some detail areas like the wheels, headlight, and front grille left to paint. I haven’t decided what colour to do the bigger Albion; possibly dark grey or tan. Both colour schemes will do for either military or civilian vehicles of the era, especially in the chaos of the Russian Civil War!

The fenders, incidentally, are the only really fiddly bit of these kits. They’re lasercut card (greyboard) that you have to bend gently and then glue to an MDF inside piece to get them to hold the needed curve. Neither fender on the Pierce Arrow is quite right, although both are acceptable given the battering such fenders would take on the real vehicles! The instructions from Warbases say to bend the fenders over a pen or the handle of an Xacto, but doing this caused the greyboard to crease for me. I had better luck gently pressing the pieces against the pad of my thumb with another finger and gently flexing the card into a sort of curve that way.

That quibble aside, these are great kits and I’m sure I’ll get more eventually. They’re very sturdy once assembled, well designed for easy assembly, and it’s nice to have such an inexpensive source of vehicles for Early 20th C gaming!

The Trumpeter Salute 2017 Loot Haul!

I managed to escape from Trumpeter Salute 2017 at the start of April without buying a single actual figure, but I brought home a batch of scenery bits and pieces and some reading material, at least.

The haul from Trumpeter Salute 2017 all laid out. Click for larger.

It helped my wallet that Bob Murch of Pulp Figures wasn’t there, and neither was Uncle Mike of Uncle Mike’s Worldwide/Strange Aeons. The excellent folks of Imperial Hobbies did help lighten my wallet and bulk up my luggage a bit, at least, although winning a pair of their $20 gift certificates in the very generously supplied door prizes offset the wallet-lightening a good bit!

The centerpiece of my acquisitions are the Pikeman’s Lament rules from Osprey, to finally put my long-neglected English Civil War/Thirty Year’s War figures to use and get them some time on the table! Related to that I snagged Issue #87 of Wargames, Soldiers, and Strategy, their ECW special, which has some great articles including an excellent building how-to by Tony Harwood that I’m going to be doing my own version of sometime soon.

The rest of my Trumpeter Salute acquisitions were scenery, almost all from 4Ground. Short & Gated Stone Wall Sections, Weathered Picket Fencing, two packages of 25mm bases, and finally Renedra’s Palisade Fencing package to round out the set.

I’ll be doing proper review articles on the 4Ground and Renedra fences & walls sometime soon; those posts are already being drafted.