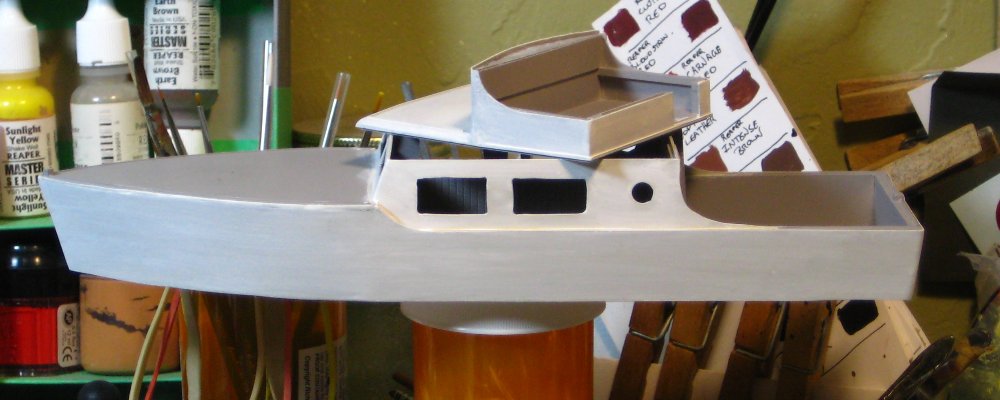
Just to prove that there really is progress being made around here, despite the relative quiet on the blogging front, here’s a fairly bad late night photo of the motor yacht, with it’s second coat of white paint applied!
Motor yacht, with paint on it! Click for full size.
Because of the board expanses of plain, untextured surfaces on this thing, and the tendency of those broad expanses to show brush strokes really well, I’m using very diluted paint, pretty much just using layers of washes to get colour onto the thing. It means a couple of coats to get a good colour, but also no visible brush strokes!
I’m going to do the bow and rear decks dark, glossy wood, and then pick out the railings and other details either in white or in brass — haven’t decided which yet.
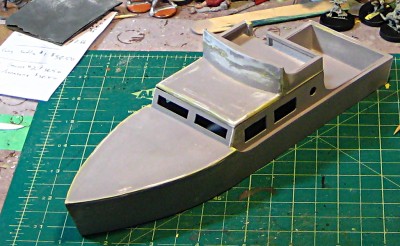
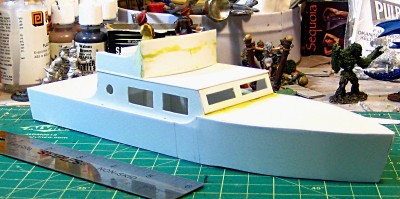
Slow but steady progress on the 28mm pulp motor yacht. I hit it with a light coat of grey primer, to better show the seams and bits that needed additional putty and sanding work — that sort of thing shows up so much better under a thin coat of primer than it does in the blindingly-white bare plastic!
I’ve re-done the edge of the bow deck around the curve of the bow, and several areas on the cabin roof and around the flying bridge. Here’s a pair of low-res after dark images showing the boat in it’s current state.
Easier to take photos of now it’s not blinding white, too. Low quality image, but click for larger.
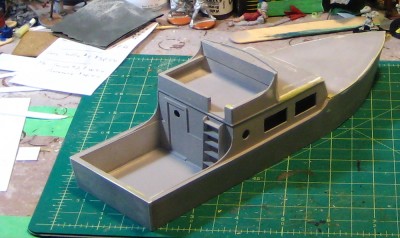
The cabin roof/flying bridge assembly is still removable, and I glued a 1.25″ washer to the roof then skinned over it with another layer of styrene plastic. With that ballast and reinforcement, the roof is a lot more solid and stays in place much more easily. It also visually makes the boat seem more solid, somehow.
Stern quarter view. Low quality image but click for slightly larger.
The rear view shows the cabin door and the ladder up to the flying bridge. The three round windows started out with a hand-spun drill bit, then got carefully and slowly reamed out with a sharp Xacto blade. I thought about doing window frames or something around them, but ultimately decided the boat would have to manage without in the interests of my own sanity!
Second, proper coat of primer tonight, then paint later this week. The paint scheme is going to be pretty simple — white hull and walls, glossy wooden decking — so it should be fairly quick to paint up.
Part One is here, for those of you just joining in. The project is a small 28mm motor yacht for pulp gaming, based loosely on real motor yachts from early in the 20th C and built entirely out of styrene plastic sheet, because I have a lot of it hanging around!
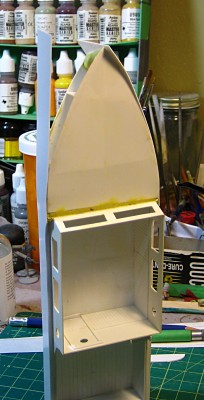
I finally got the hull sides done this weekend, using one long strip of .020″ styrene plastic per side. To accommodate the slight rake of the hull side and the curve of the bow, I cut the strips slightly too wide and wider toward the bow of the boat. After gluing one side at a time, I trimmed the thin plastic down with knife and sandpaper to match the actual lines of the boat.
Adding the hull sides. Right-hand side glued all the way to the bow but not trimmed; left side glued along the stern and cabin. Click for larger.
The stern and cabin area was simpler, except for being careful where the curve was placed that fits the higher bow deck into the hull side. Initial glue was quick-acting Plastruct Bondene solvent; after that set up I used superglue along the bottom seam to strengthen it.
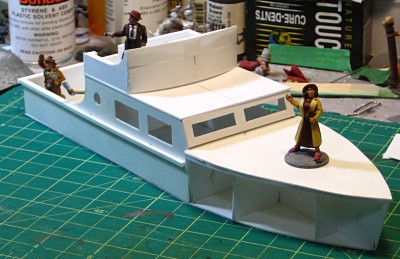
Boat from the stern quarter, with cabin roof in place. Door frame and ladder in progress. Click for larger.
I’ve also gotten panelling into the cabin (see the first photo), door frames on either side of the door at the rear of the cabin, and started in on the ladder up to the flying bridge on the cabin roof.
Boat from bow quarter. Lots of putty work and detailing to do, but it’s structurally complete! Click for larger.
There’s a large amount of cleanup and detailing needed with Milliput and modelling putty to get everything cleaned up and smoothed out, a bunch more details to add, then the first spraycoat of primer to show up any glitches and things that still need to be fixed. The cabin roof needs some weight on it to get it to sit properly on the cabin walls; the seams all need cleaning up, especially around the bow deck and the bow itself; and I might yet put another layer of styrene down on the bow deck, as the single layer there currently is quite thin and I worry about it standing up to the wear and tear of gaming and transport.
Still, it’s great to have the major structural parts of the boat complete!
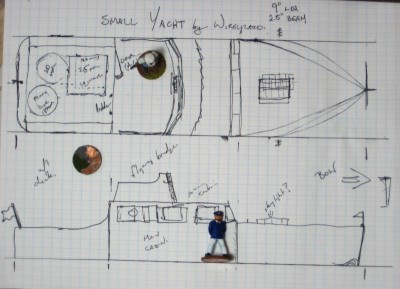
Back in the long-lost days of mid-2009 (OK, four years back…) a contest called “Build Something” was held over on the excellent Lead Adventure Forum, with the contest theme of “Transportation”. I decided to build a small motor yacht/large powerboat sort of boat for pulp gaming, taking inspiration from and got as far as cutting the base of the hull, the cabin walls and the sides of the stern out of styrene plastic before inspiration fled and I moved on to other projects.
The now-lost original plan, from October 2009. Click for larger.
Lots of other projects, in the intervening years, but I never actually threw out the barely-started boat, it just gathered dust and got used as an impromptu container for scrap wood and other bits. Late last week I finally got around to cleaning up my long-neglected hobby bench, didn’t feel like painting, and decided to dust off the motor yacht instead of starting an entirely new project. I still have a large amount of styrene plastic (plastic card) hanging around, so it was still the material of choice for this project.
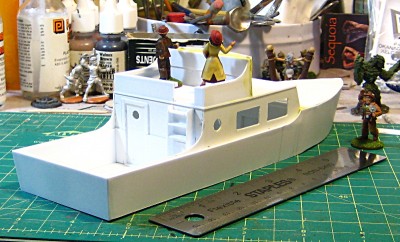
I’ve added frames to the bow and a deck, then added a removable roof to the cabin and a flying bridge on top of that.
The boat restarted, October 2013. Click for larger.
The hull sides will be the next big step. I’m planning on doing each side with a single long strip of styrene, and then use putty up at the bow to properly form the actual point of the bow.
After that there’s still a lot of detail work and cleanup to do. Door and window frames, a ladder up to the flying bridge, and a lot of putty to smooth things out and hide seams.
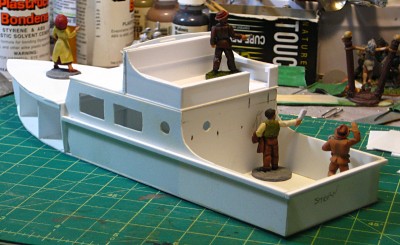
From the stern quarter. Scale provided by 28mm Pulp Figures reporters. Click for larger.
This last photo shows the curves in the aft end of the boat quite nicely. I’m going to use steel wire for railings on the sides and back of the flying bridge, and might put a removable canopy over the rear deck. Also need to come up with a name, to be painted across the stern in large gold letters!