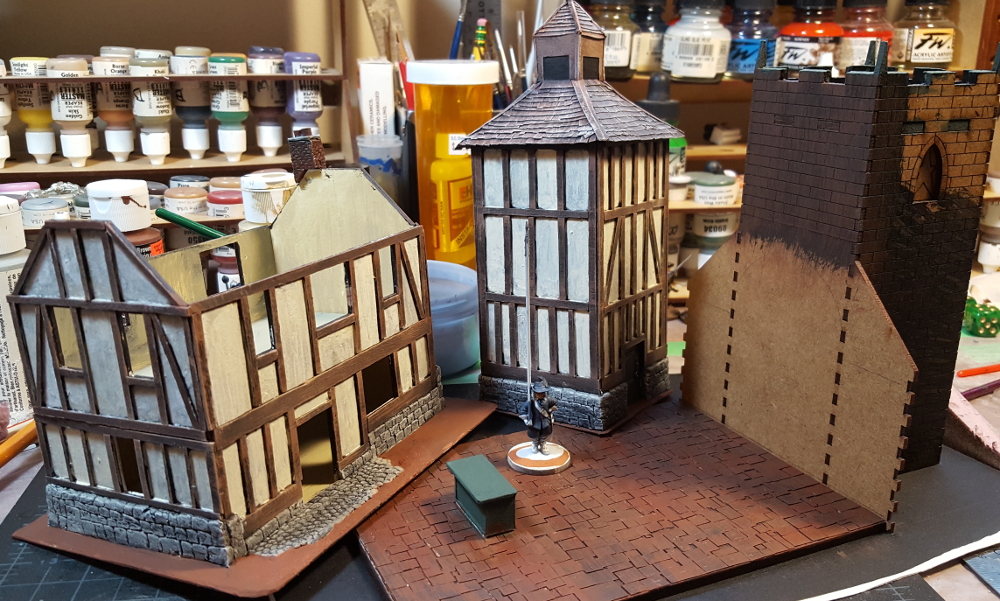
I’ve been painting the dovecote and farmhouse together, so rather than separate updates I’ll just do combined “state of the ECW scenery” update today!
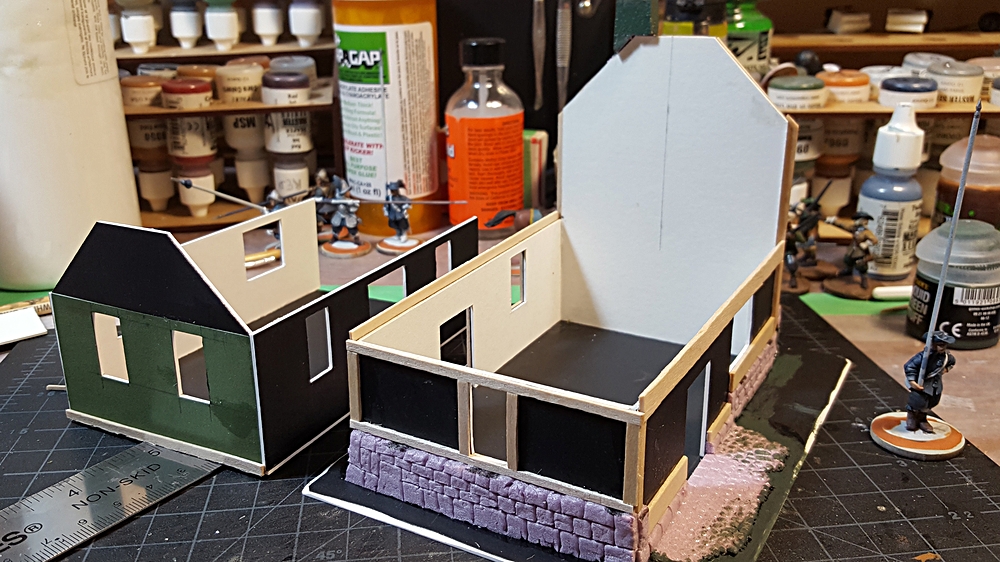
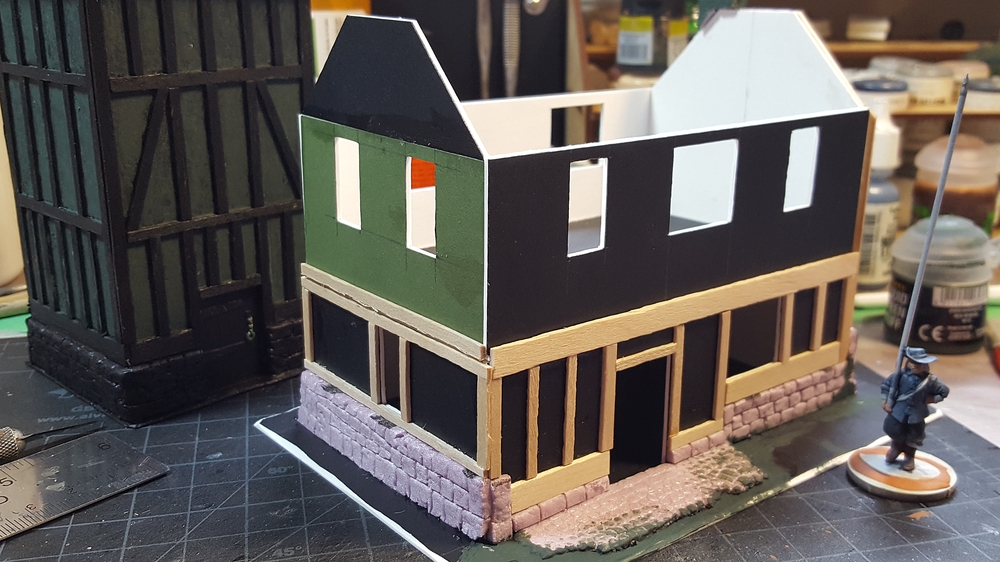
Both buildings have had most of their painting finished, with touchup and work on the bases the main things left to do, along with the roof of the farmhouse.
I’ve also glued the tower section of the Warbases church down to the base, which had already had the floor glued down and cardstock flagstones added earlier. I haven’t posted about the church yet, I’ll do a separate post soon about it, but it’s a nice basic MDF kit that I’m planning on dressing up considerably!
Farmhouse on the left, dovecote centre, and Warbases church on the right and in the foreground. Click for larger.
I’m not entirely happy with the roof and cupola/tower of the dovecote, so might go back and add some more details there, and I think it needs at least one more round of paint to really get the slate tiles (from thin card) looking really good. I’m really pleased with how the rest of both buildings have come together, though, espcially now that they’re painted.
Both buildings got a black undercoat across everything, then the woodwork got a heavy drybrush of very dark brown (brown + black paint mixed), then a lighter drybrush of brown, and finally a very light drybrush of tan mostly on the corners and edges of the bigger beams. The plaster areas between the timber got a brown coat, very thinned, then tan paint, also very thinned, then a final coat of white with a bit of the tan paint mixed in, also very thin. The final colour is a great blotchy not-quite-white that varies between panels.
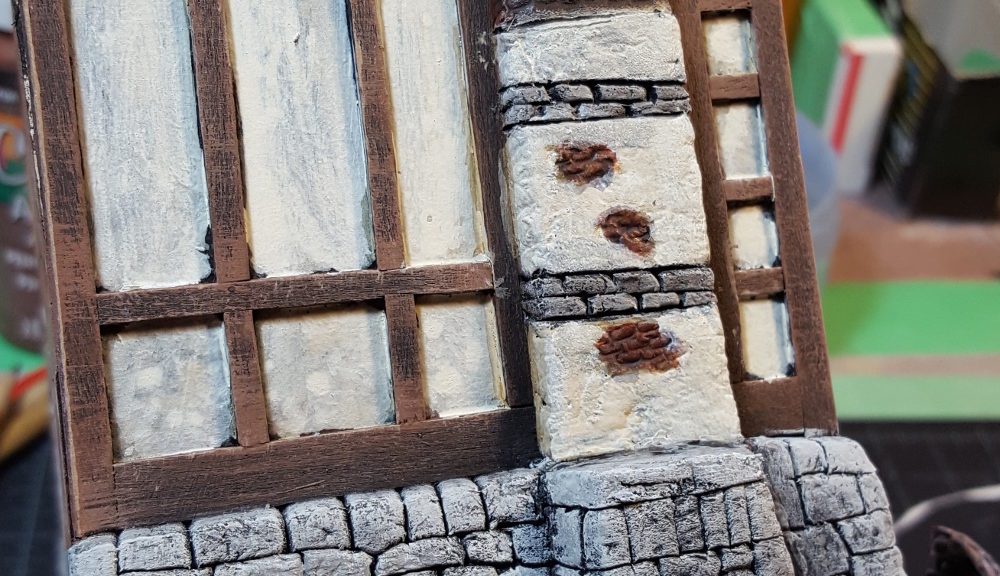
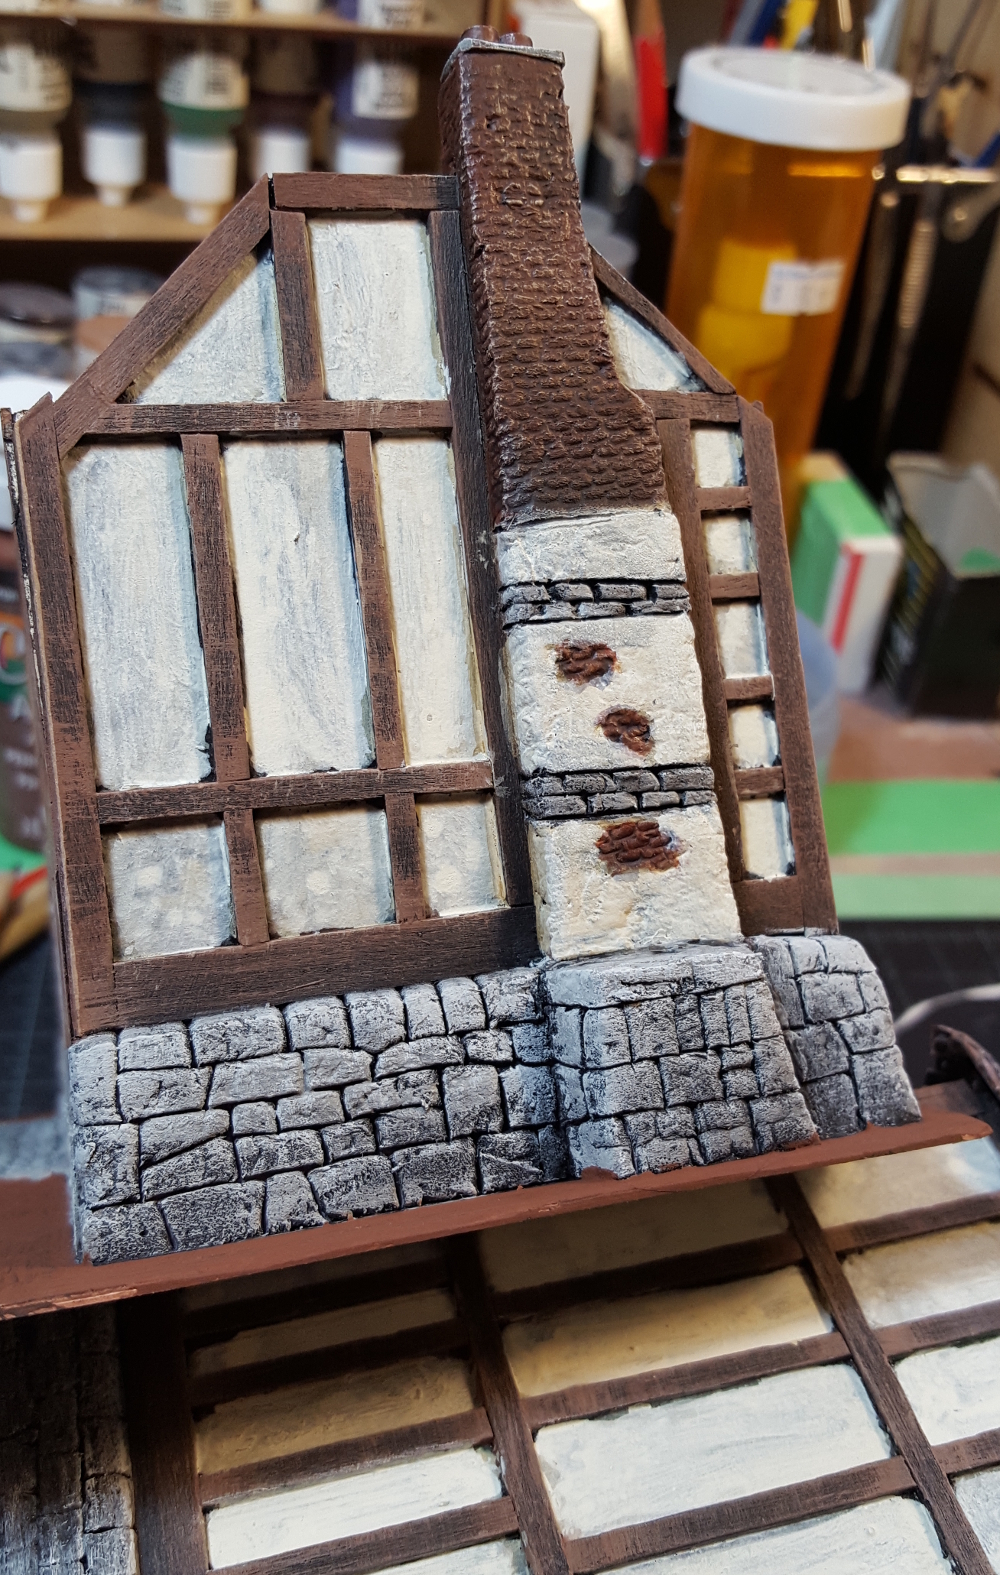
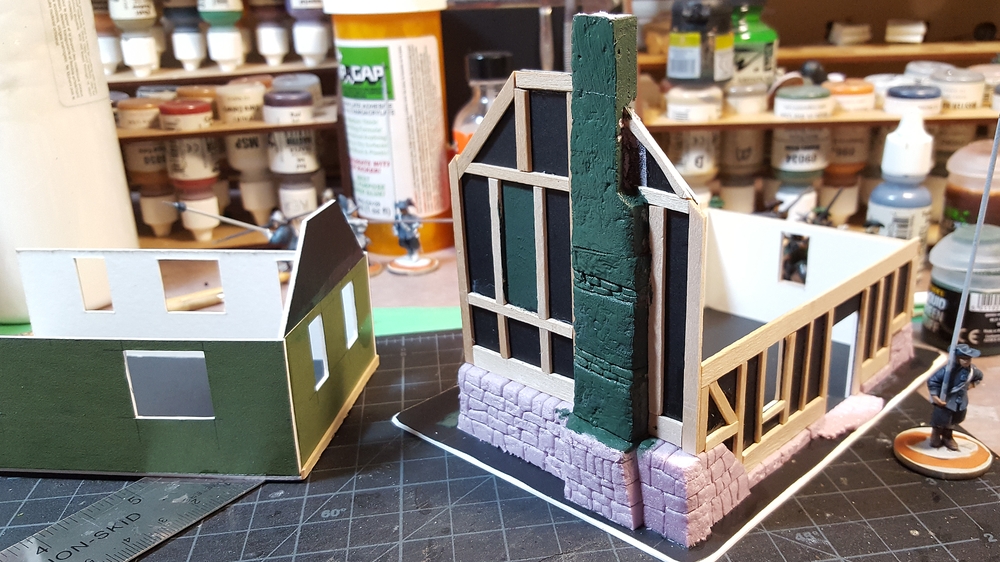
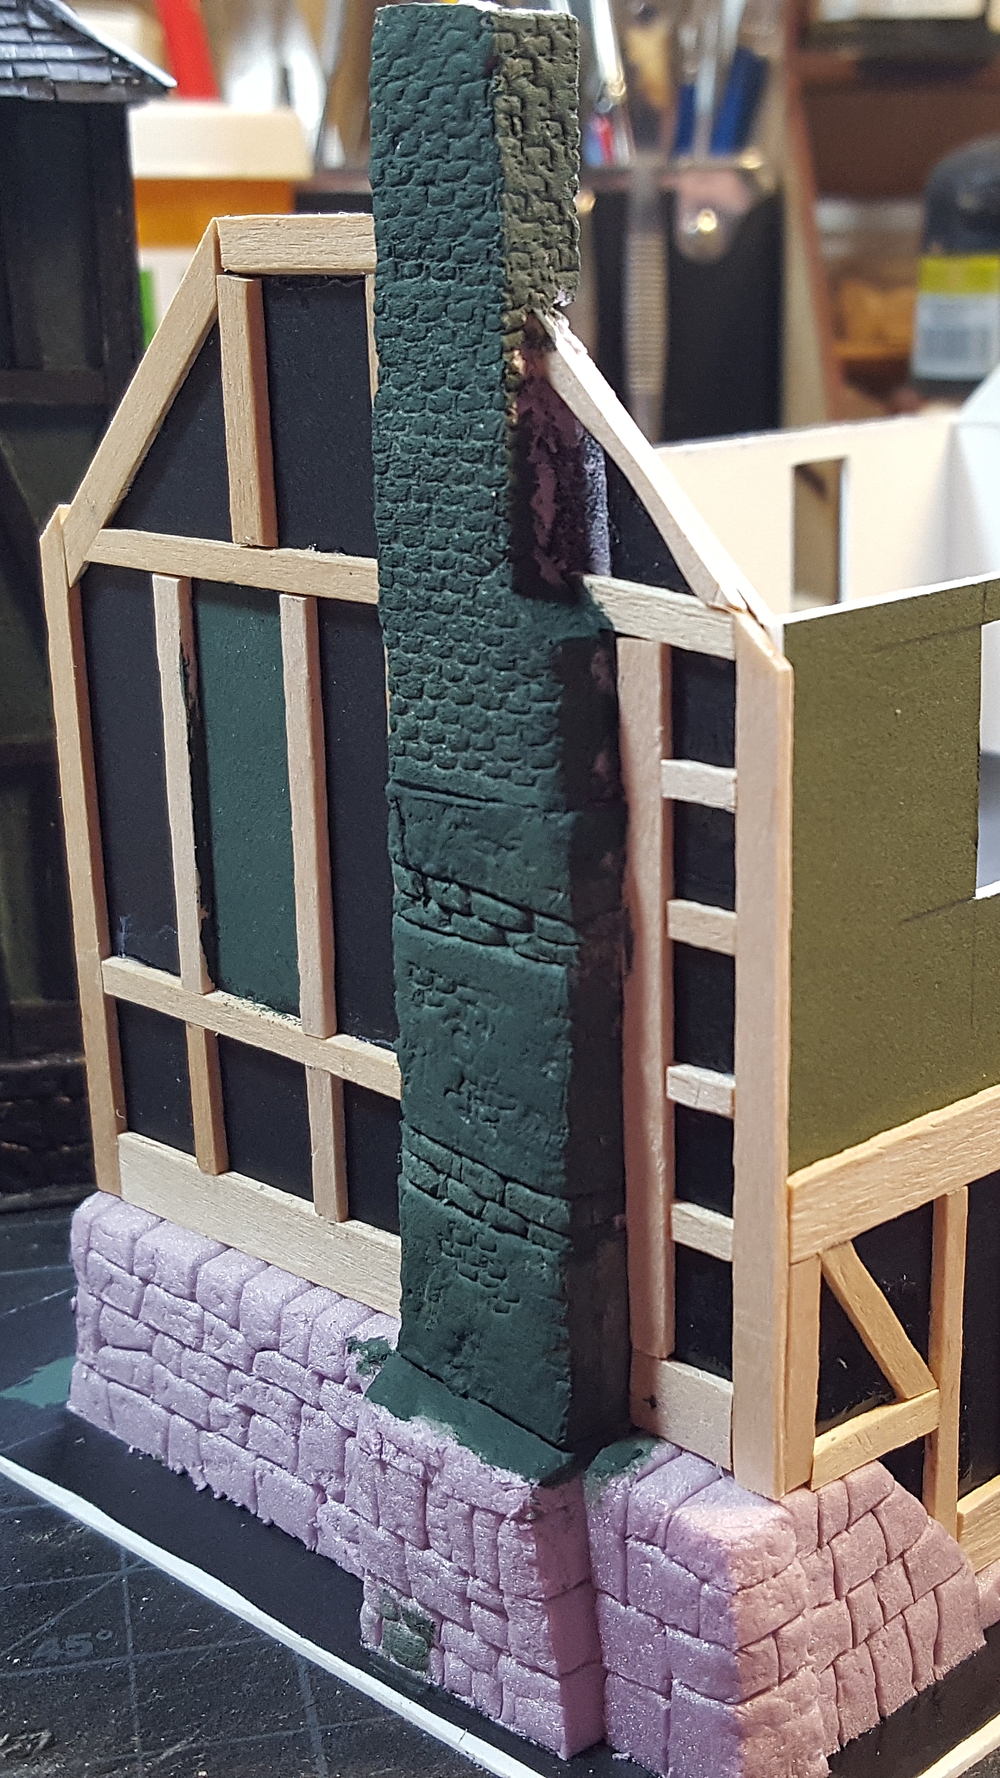
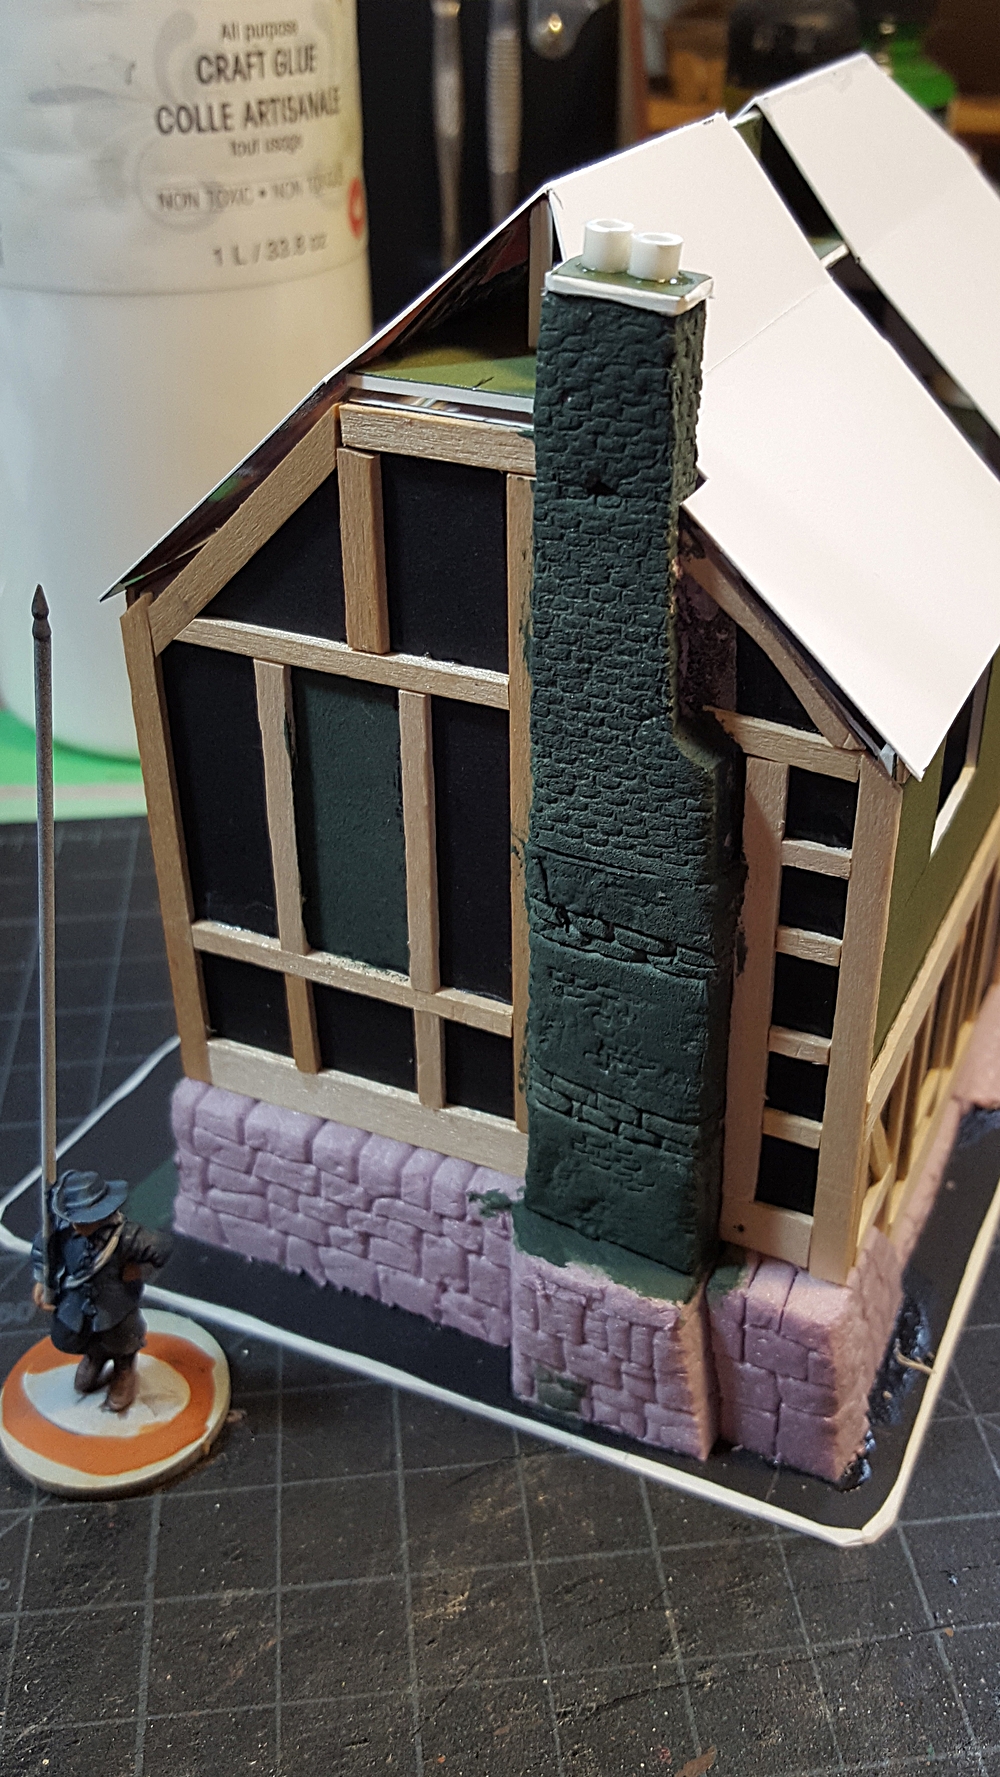
The chimney and end wall of the half-timber farmhouse. Click for larger.
I am really pleased with how the big chimney up the end wall of the farmhouse has turned out. It’s a mix of stone, brick, and plastered areas (some broken with brick showing through) and came out looking great. Paint on the brick is brown base, red oxide, then washes of GW Nuln Oil and Seraphim Sepia, and finally a light drybrush with red oxide and tan. The plaster areas got the same paint mix as the walls.
More soon; I’ll be building a couple of small cottages, hovels, and outbuildings to finish off a bit of a rural hamlet or farm for English Civil War gaming or pulp games set in the English countryside.
After getting the dovecote constructed (although not yet painted) I decided the next building would be a bit more substantial, and that a farmhouse would be the obvious counterpart to the dovecote.
It’s not quite a manor house, except maybe in some rather backwoods shire, but it’s a substantial two storey building with a big chimney rambling up one end. The main structure is all 1/16th matt board, the stonework is pink styrofoam insulation, and the timbering is thin wooden coffee stir sticks, mostly split lengthwise into thinner pieces.
The dimensions, roughly, are 5″ long, 3″ wide, and about 5″ tall to the top of the chimney, which is about where the roof peak will fall too once that’s done. The walls are 40mm high; the total base is about 7″ long and 5″ wide or so.
The earliest construction photo I remembered to take. Walls all up, foam stonework in progress, started the half-timbering on the back wall and one long wall. Second floor off to the left. Click for larger.
The other end, early in construction. Stonework in place and half-timbering just begun on the first floor. Click for larger.
For the cobblestone patches outside each door and the bricks up the chimney, I used two different old paintbrushes that I yanked the worn-out bristles from and then re-shaped the metal ferrule with a pair of needle nose pliers and a small file. The smallest brush became the brick press tool, and a slightly larger round one became the cobblestone tool. There’s also a larger rectangular one that doesn’t appear on this project but will at some point in the near future. I’ll get a photo of the press tools for a future post, they’re a great easy way to do bricks, cobbles, and other semi-regular or regular masonry patterns.
Upper floor in place; it’s basically a three-sided tray held in place by the horizontal half-timbering along the sides. Click for larger.
The second floor is three-sided to make building the big chimney down the back wall easier, rather than splitting the chimney into two or three pieces. The second floor is held in place by the half-timbering horizontal beams along the two long sides of the house, and the beams overlap at the back corners so the join between the floors and walls is nearly invisible when the house is all assembled.
Close up of the end wall, with brick patterning all done on the chimney. The pink foam has been coated in GW Liquid Greenstuff for strength and texture. Click for larger.
Wider view of the chimney end of the farmhouse, with 28mm Warlord pikeman on a 25mm base for scale. Click for larger.
The top cap of the chimney is a scrap of matt board and two little segments of styrene tube, all coated in more GW Liquid Greenstuff for texture.
Timbering all complete and roof structure started. Click for larger.
The roof will be thatch, once I get around to picking up another cheap handtowel to chop up for thatching. The understructure is a mix of 1/16th matt board and lighter card, and will all be buried under towel in due course.
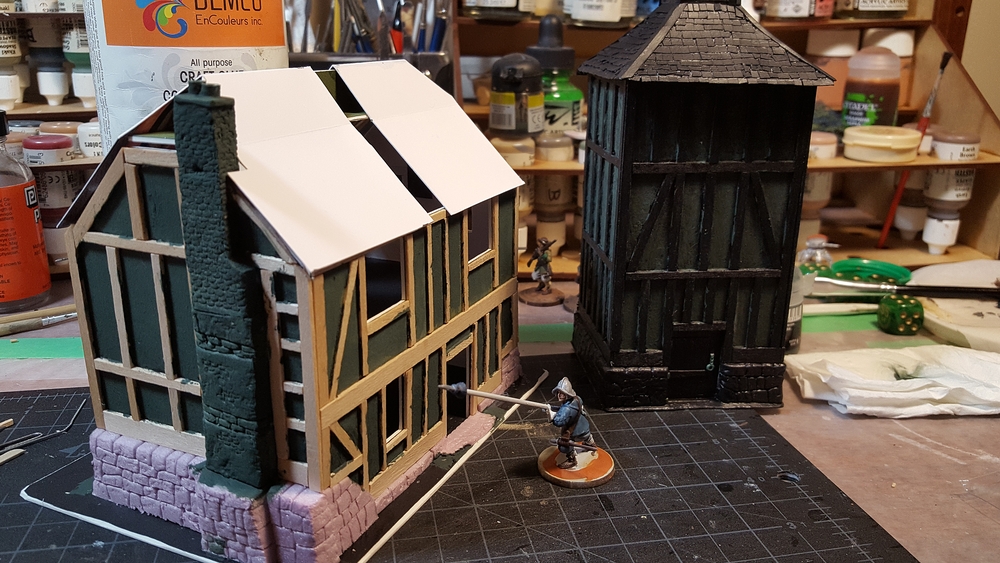
In the background of the last photo you can see the current state of the dovecote, all black primered with yet more GW Liquid Greenstuff to add texture to the wattle & daub panels between the timbering.
I’ll probably paint both buildings together, now that they’re both at the primered stage. More on that soon!
A few people on the Lead Adventure Forum and elsewhere have asked how the thatch on my variousRussianbuildingswas done, and I”ve been promising some in-progress photos.
I got those shot last month, and finally sat down to edit the pictures and write this tutorial. The basic materials are mattboard (good-quality picture framing card, used for most of the underlying roof structure), light card (used to bridge the spaces between the mattboard pieces and support the towel) and a cheap hand towel I picked up at the nearby dollar store, for the actual thatch.
The roofs pictured below are more complex than many, first because they’re hipped roofs, with all four sides sloping inward, and second because both buildings I happened to be building while I took these pictures have a complex floorplan, one T-shaped and the other L-shaped. I’ll discuss some of the peculiarities of doing towel thatch over a hipped roof in a bit.
I also design most of my roofs to be removable, which complicates design of the underlying structure. All that aside, the basic towel thatching technique is going to be basically the same for a simple gable roof permanently attached to a building or a complex removable roof like I’m doing here!
The roof structure - about as complex as a model roof is ever hopefully going to get!
Above, the main structure of mattboard, with light card over some of the bigger gaps in strips. I don’t bother trying to cover the whole roof, the towel is more than strong enough to support itself once all the glue on it is dry. A simple gabled roof with one ridgeline is obviously going to be a lot simpler!
Towel being glued down, cut oversized so it hangs well over the eves.
On this T-shaped roof, I started the sheet of towel on the top of the T, after putting glue over the card and along the edges of the mattboard pieces, then folded it over the main ridgeline and across the ends. I cut the towel on the hip roof ends and in the valley where the stem of the T goes out, and in several places removed triangles of towel to avoid having multiple layers of fabric piled up. The cut edges got an extra smear of white glue worked into them with a fingertip, to secure and help disguise the edge.
For these roofs, because they were complex enough already, I’ve gone with a single layer of towel, but you can get a nice extra effect by starting with strips of towel, and gluing them up from the eve toward the ridge of the roof in slightly overlapping stips. Real thatch is often laid in layers, and this recreates the look nicely. See my older English Civil War barn article for an example of thatch with strips of towel.
An illustrated explanation of how to fit towelling around a hipped roof's ends. With scissors, cut upward from the eve to the end of the ridge, removing a triangle of towel, then glue the ends over each other with an extra smear of glue to hide the edges.
The photo above should explain how to fit the towel around the sloped ends of a hipped roof, removing triangles of towel to avoid having massive amounts of overlapping fabric.
After the towel has been fitted to the roof, leave the whole thing to dry for a while. Note that the towel is hanging well over the eves at this point, and to keep that fabric from being glued to the table, I’ve propped the whole roof up on a couple of bottles of craft paint. I don’t use the building itself, because I want these roofs to be removable and the next step could easily glue my roofs down to the building by accident!
That’s because the next step is to saturate the towel with dilute white glue. I mix a jar of roughly two parts water to one part white glue, well mixed, then apply it liberally with a big paintbrush, a 1.5″ household brush I use for all sorts of scenery painting. You might think a soaking in watery glue would wreck or warp the underlying cardboard structure, but I’ve done four buildings this way in the last few months and none have warped noticeably.
Remember that you are dealing with towel. It will soak up your glue-water mix like, well, towel. Dab gently with the paintbrush, you don’t want to push the towel around or wrinkle it. After it’s well painted with your glue-water mix, leave the roof in a warm place at least overnight to dry.
After the glue-water mix dries, your thatch will be solid and pretty much self-supporting. Time to trim the eves with scissors, then slap on the first coat of paint. I use black primer, but I could probably have just started with a black towel...
After your roof dries overnight, the glue-soaked towel is basically strong enough to stand up on it’s own. Now you can trim the eves back accurately with scissors, making sure to fit the roof to the building (if it’s removable like mine are) to get a good fit and ensure the eves look good and even.
After that, basecoat with a dark colour, I go straight for black, and mix a bit more white glue into the paint to further strengthen the roof. This is also your chance to trim or re-glue any seams or areas you missed during initial construction. You could skip some of this by just starting with a black or dark brown towel — I started with tan as that was the least-objectionable colour the cheap towel I use came in.
After the black basecoat is finished, I do two drybrush coats to bring the texture of the towel out and make it look like tatch. The first, fairly heavy drybrush is with a 1:1 mix of light brown and grey paint; the second drybrush is brighter, more tan or light brown and less grey in the mix, and i concentrate on the ridgelines of the roof, to make the shape “pop” a bit. You could do more of a straw/yellow colour to your thatch, but real thatch almost always weathers to a grey/brown/black colour fairly quickly.
From left to right, a finished building, with thatch painted as described in the text. Centre, unpainted but with eves trimmed. Right, black basecoat only on the thatch, awaiting it's two drybrush coats.
Finally, a photo from my earlier posting about the two buildings featured in this article, with everything finished except the fence on the L-shaped building. You can see the drybrushed finish that brings out the texture on the towel, and the slight highlighting of the ridges and edges of the roofs.
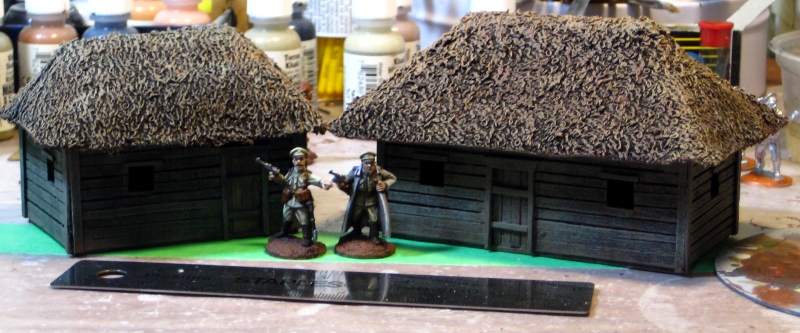
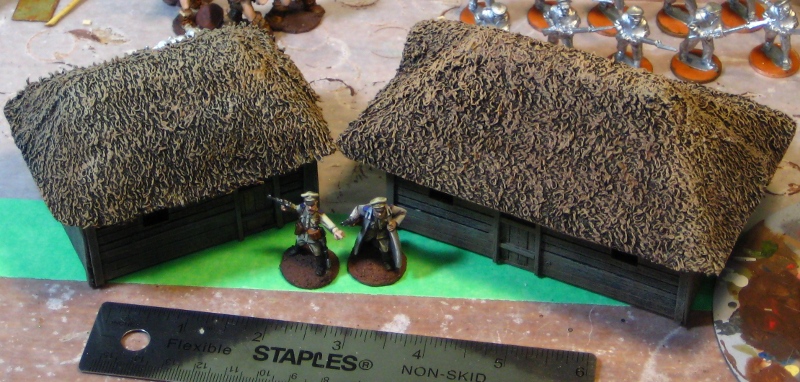
A pair of new, larger Russian-style buildings for our 28mm RCW games. Click for larger.
Hopefully this helps someone out there tackle their own thatch roof from towel. Remember that the roofs I’ve used as illustration for this article are at about the outer limit of complexity for a thatch roof, being hipped, T- or L-shaped and removable all at once! A simple gable roof can just use a single strip of towel, up one side and down the other; this gets even easier if you build permanent roofs instead of removable ones.
Richard Clarke of TooFatLardies has an interesting article on using putty for thatch, if you don’t want to try towel. I’ll have to give that a shot on the next small building I do, although I think towel is easier and more economical on larger buildings.
Any comments, suggestions or questions, fire them into the comments below and I”ll do my best to respond.
It’s been a bit of a slow ten days or so on the wargaming front around here; I wish I could say there was a proper reason, but I just haven’t spent much time at the workbench. One of those weeks.
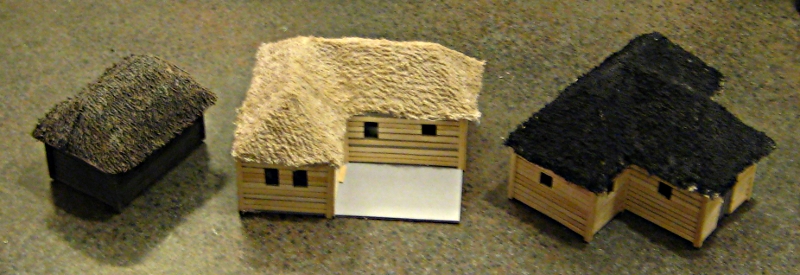
Regardless, earlier this month I did finish bothsmall Russian huts/farmhouses that I started over Christmas, and the Russian church is coming along nicely.
Here they are together, with a pair of Brigade Games’ 28mm White Russian officers for scale. The walls are mattboard and wood from coffee stirsticks, the roofs are towel with cardboard structure underneath.
The fronts of a pair of Russian rural buildings – huts, small barns, possibly small farmhouses.
The smaller one on the left is 3″x2″ and roughly 2″tall, the slightly larger one on the right is 4″x2″and about 3″ tall.
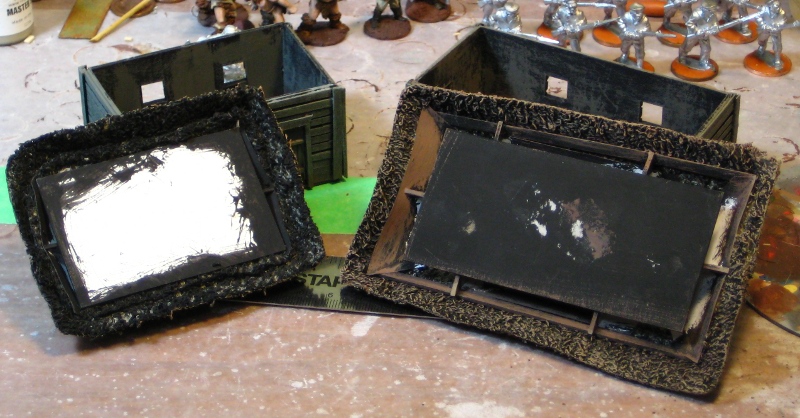
Removable thatch roofs from towel.
The hipped roofs are mattboard and light card underneath with towel soaked in diluted white glue as the thatch.
The roofs removed, showing their structure slightly.
Here you can see the roofs removed and flipped over. The structure of the roofs is all just cardboard and I’ve had no warping at all despite the towel for thatch being fairly liberally soaked in diluted white glue after it’s glued down.
Both buildings got a basecoat of black paint mixed with white glue (my standard scenery basecoat), the woodwork was drybrushed with a grey mixed with some tan followed by a second drybrush of paler grey. The thatch got the same black/white glue base then a couple of drybrushings with various brown/tan/grey mixes. The towel soaks up paint and glue as well as you expect towel to, even during drybrushing — expect to go through paint like crazy.
I have vague plans for a couple more buildings for a Russian hamlet, maybe something in whitewashed plaster more suited to the southern portions of the country, and of course the Russian church is nicely underway. More about that tomorrow!