A green and miniature land! The first two coastal modules are finished, except that I’m still mucking about with forest canopy solutions, so those aren’t done yet either. There is also the chance of me being (more) obsessive and going back to add even more details – cars on the roads and sheep in the fields, maybe?
Imaging that the odd brown-black blocks in the following photos are solid woodland canopy, please.
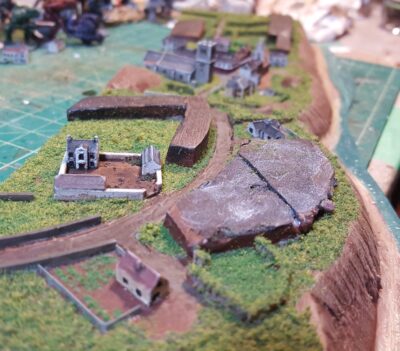
The farms outside the village. Note vegetable garden in the nearest farm. Click for larger.
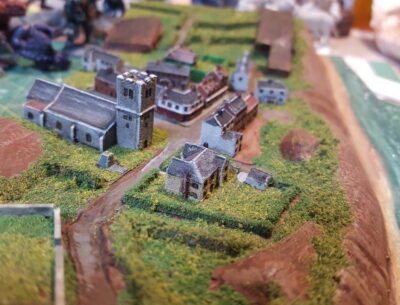
The village up close, looking down the slope. Note war memorial for the Great War next to the church. Click for larger.
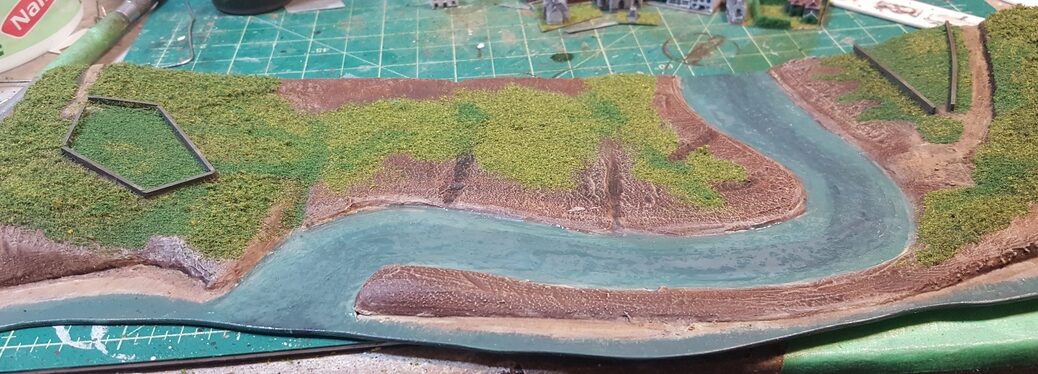
The river module finished except for trees, as with the village, and some more gloss varnish over the river itself. Click for larger.
Incidentally, for some other high-detail microterrain work that covers whole tabletops, not just slivers of coastline, go feast your eyes on the Münsterland Wargaming English blog’s 2mm archive. The towns are all amazing, and the autumn coloured table (for an early winter Franco-Prussian war battle) is gorgeous.
I’ve got a headland module underway now; no photo because it’s currently a slightly glossly white blob under plaster and glue. These three will let me end the coastline on-table sensibly, and the headland is designed to fit at either end of the coast. I’ve got definite plans for at least two more full size coastal sections, but first I’m going to paint boats!
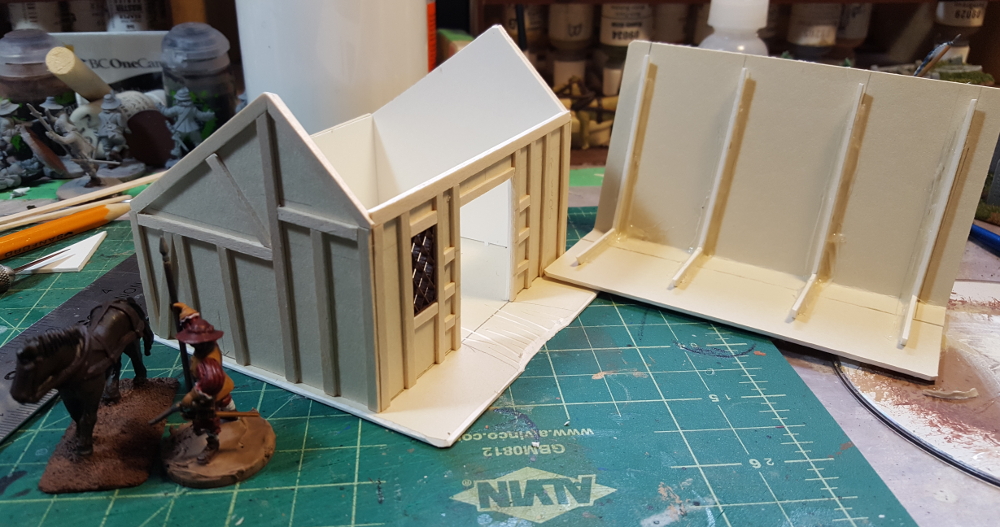
After finishing the three little cottages on Saturday, I decided to do something slightly different on Sunday and made a building that could serve as a stable or other outbuilding for a manor farm on my ECW/English pulp tables.
It’s 3″ deep and 4″ wide, so actually larger in footprint than the little hovels. Horse need their space, tenant farmers not so much! Same construction, 1/16th mattboard (picture framing card) with wooden coffee stir sticks for the timbering. The roof is assymetric, with the peak closer to the front of the building instead of down the centreline, for no other reason than it looked more interesting and on a gaming table, people spend a lot of time looking down at rooftops!
Stable “blank” assembled, with window and horse both from Warbases. Click for larger.
A roof with a pitch like this should probably be shakes or slate or something, because a steep pitch is part of what helps keep a thatch roof watertight, but towel thatch is a heck of a lot faster to assemble than a shingled roof, even with Warbases’ nifty lasercut tile cards available! Perhaps I’ll go back and rebuild this roof with tile card in the future, when I’m not under a pre-convention time crunch… but don’t hold your breath!
All the half-timbering complete and unthatched roof in place. Click for larger.
Roof off, showing the card “beams” to give it some strength. Click for larger.
Towel thatch in place, including an extra strip across the top ridge. Paint to follow! Click for larger.
I’ll add open doors on the big doorway on the front; the doors are built but not installed yet. I might whip up a couple of horse stall walls to put in the interior, but honestly that seems like a post-Trumpeter addition to me…
With the clock running on toward Trumpeter Salute 2018, I need to get serious about producing the new scenery the linked pair of games I’m running there need!
I’ve got more than enough hedges, dirt roads, and other greenery bits from previous scenery projects, but the farmhouse/manor, dovecote, and barn I’ve built previously need more buildings to hit the table along with them if I want to do a 17th Century English hamlet up properly.
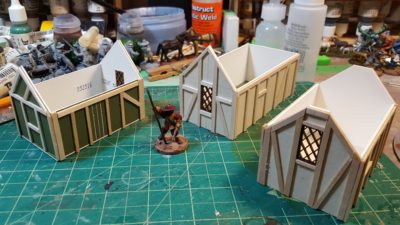
This weekend I sat down and cranked out a trio of little (tiny, really!) thatched and half-timbered cottages or hovels, along with a pair of fenced gardens.
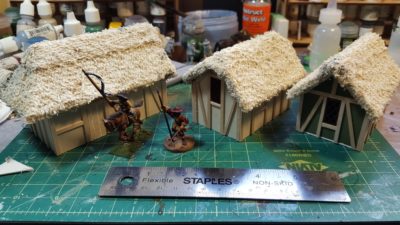
Three cottages underway. 28mm Warlord officer on a 25mm base for scale. Click for larger.
These are simple little buildings of 1/16th” mattboard with half-timbering from wooden coffee stirrers and thatch from towel. The windows are lasercut from Warbases in the UK. For a bit more bulk the roofs have a substructure of corrugated cardboard with the towel hot-glued to that and then further stiffened with white glue. All three roofs are removable.
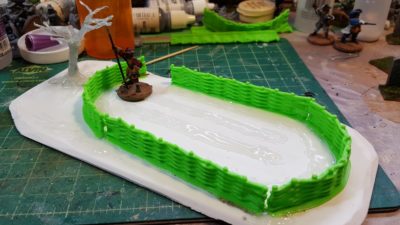
Large fenced garden with a tree. 28mm Warlord officer on 25mm base for scale. Click for larger.
The tree has a core of paperclip wire, bulked out with soft iron craft wire, then covered in hot glue to fill in between the wires. The garden beds are also just hot glue “sculpted” into place with the hot tip of the glue gun.
Painted cottages and painted and flocked garden. Click for larger.
I’ve also done a second garden piece, slightly smaller, but haven’t gotten a photo of it yet. The cottage roofs need one more drybrush to really pop the thatch texture, but the cottages themselves are all done, and the gardens are fully painted and flocked outside the fence. The tree needs some foliage, and the gardens inside the fences need greenery and detail, but not bad for part of a weekend’s focused effort!
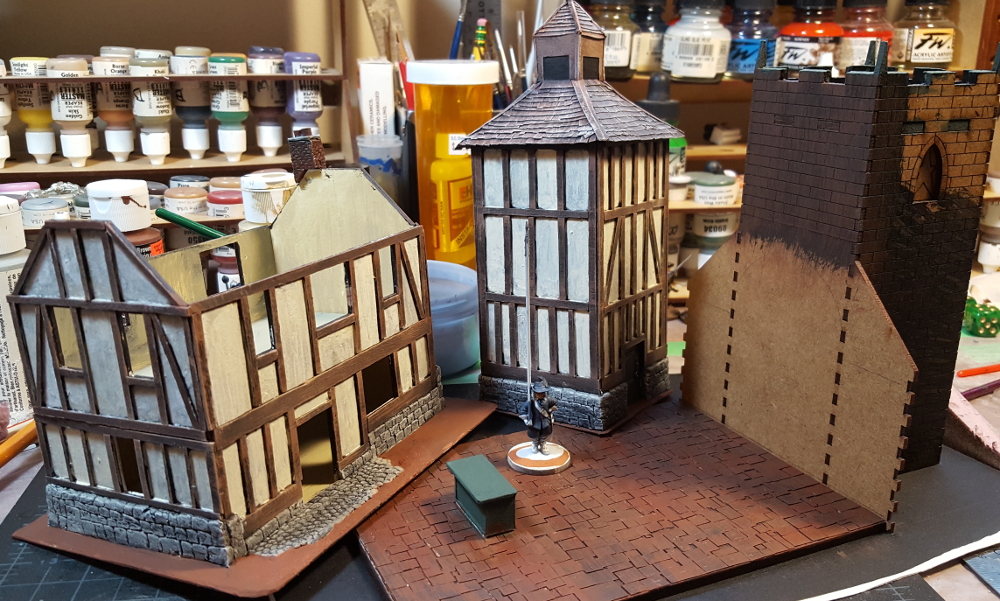
I’ve been painting the dovecote and farmhouse together, so rather than separate updates I’ll just do combined “state of the ECW scenery” update today!
Both buildings have had most of their painting finished, with touchup and work on the bases the main things left to do, along with the roof of the farmhouse.
I’ve also glued the tower section of the Warbases church down to the base, which had already had the floor glued down and cardstock flagstones added earlier. I haven’t posted about the church yet, I’ll do a separate post soon about it, but it’s a nice basic MDF kit that I’m planning on dressing up considerably!
Farmhouse on the left, dovecote centre, and Warbases church on the right and in the foreground. Click for larger.
I’m not entirely happy with the roof and cupola/tower of the dovecote, so might go back and add some more details there, and I think it needs at least one more round of paint to really get the slate tiles (from thin card) looking really good. I’m really pleased with how the rest of both buildings have come together, though, espcially now that they’re painted.
Both buildings got a black undercoat across everything, then the woodwork got a heavy drybrush of very dark brown (brown + black paint mixed), then a lighter drybrush of brown, and finally a very light drybrush of tan mostly on the corners and edges of the bigger beams. The plaster areas between the timber got a brown coat, very thinned, then tan paint, also very thinned, then a final coat of white with a bit of the tan paint mixed in, also very thin. The final colour is a great blotchy not-quite-white that varies between panels.
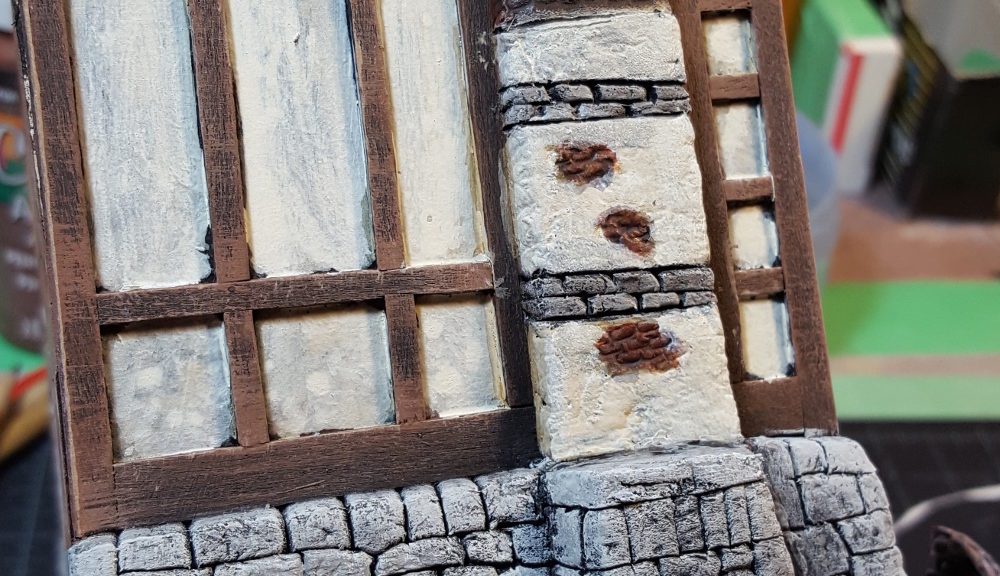
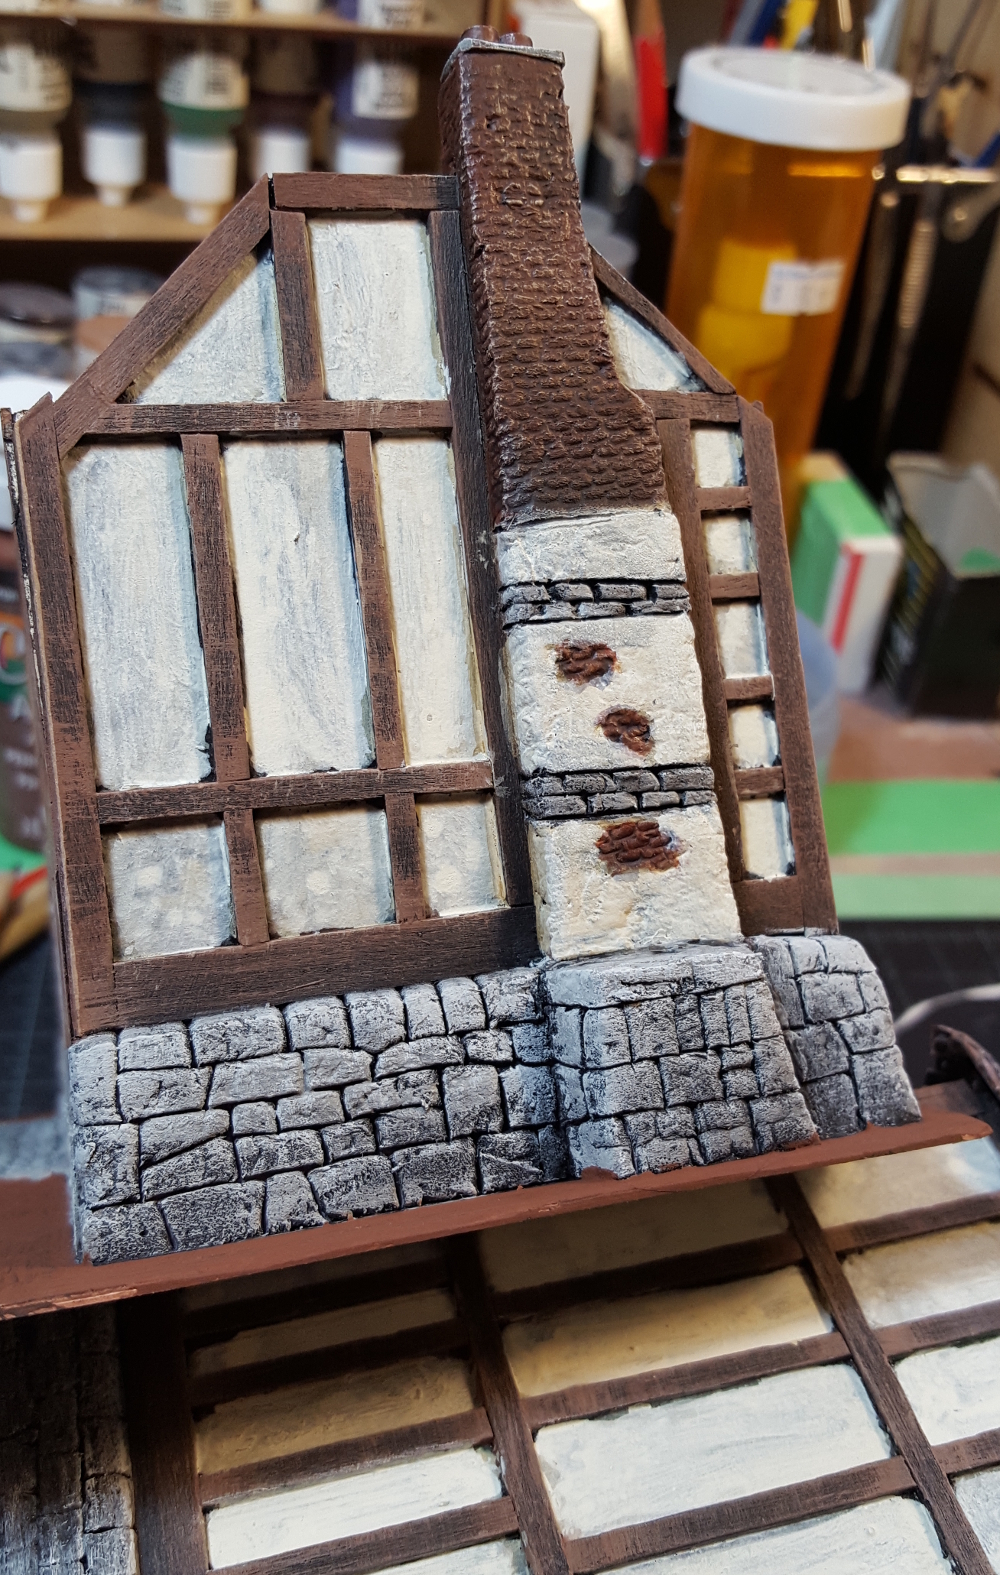
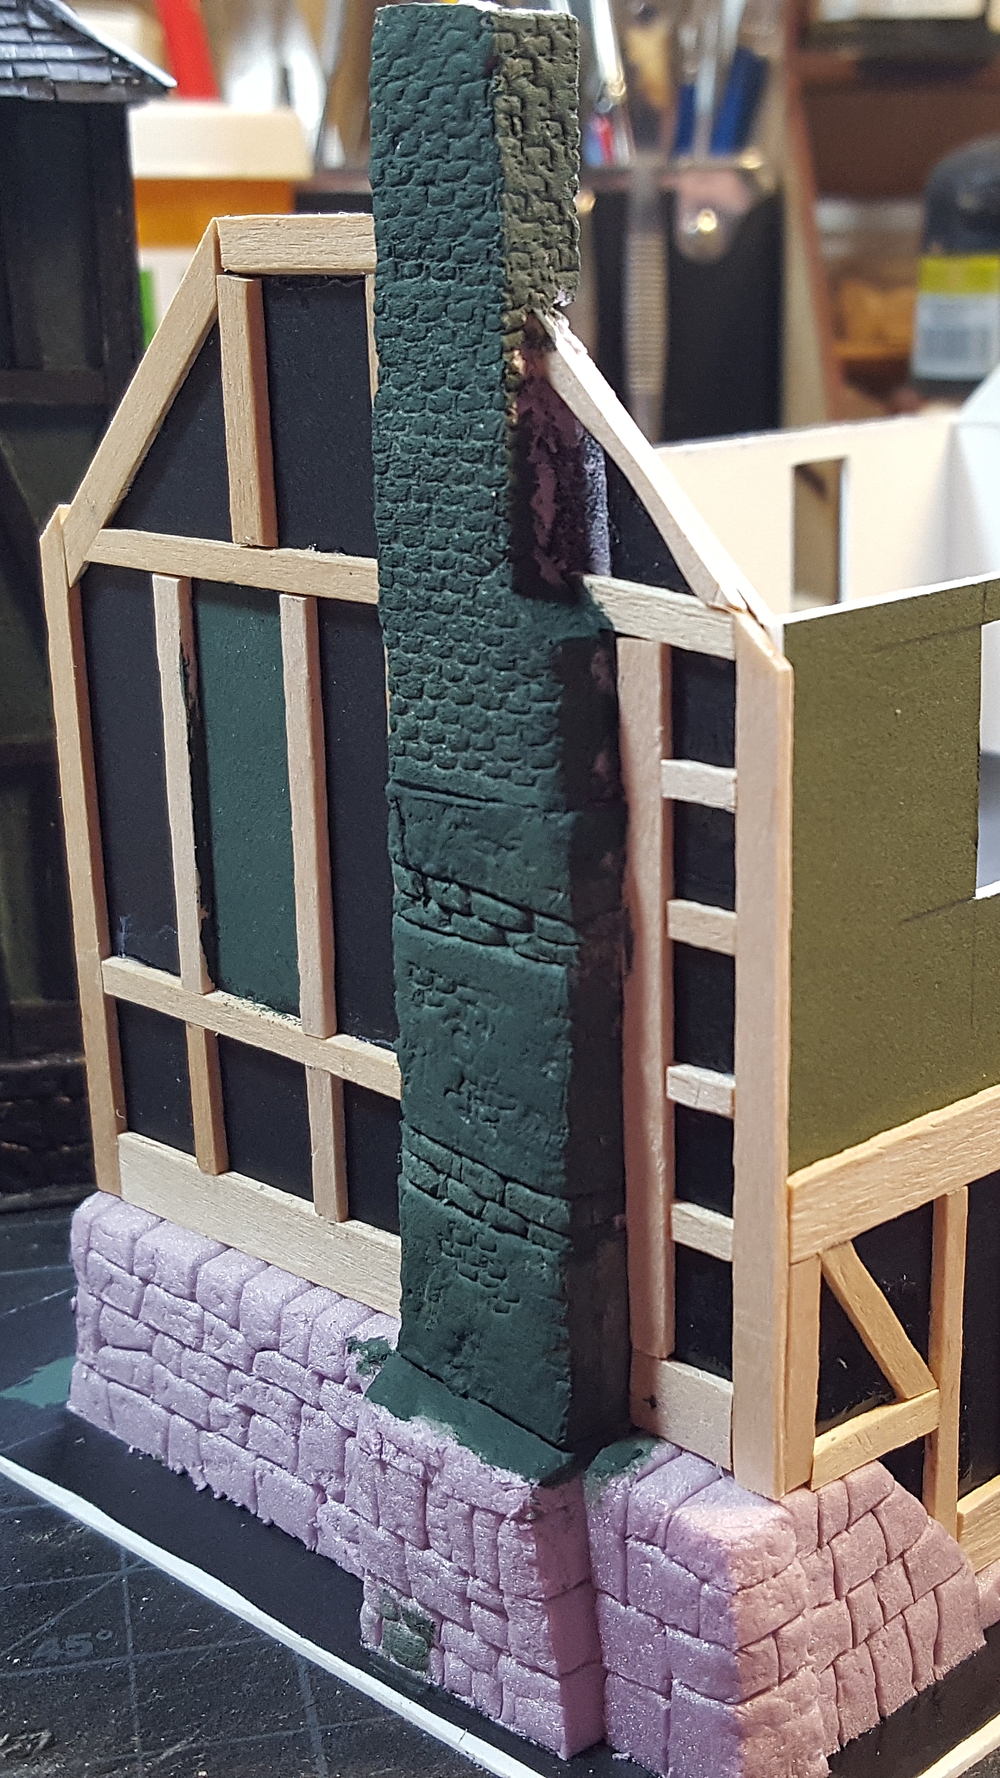
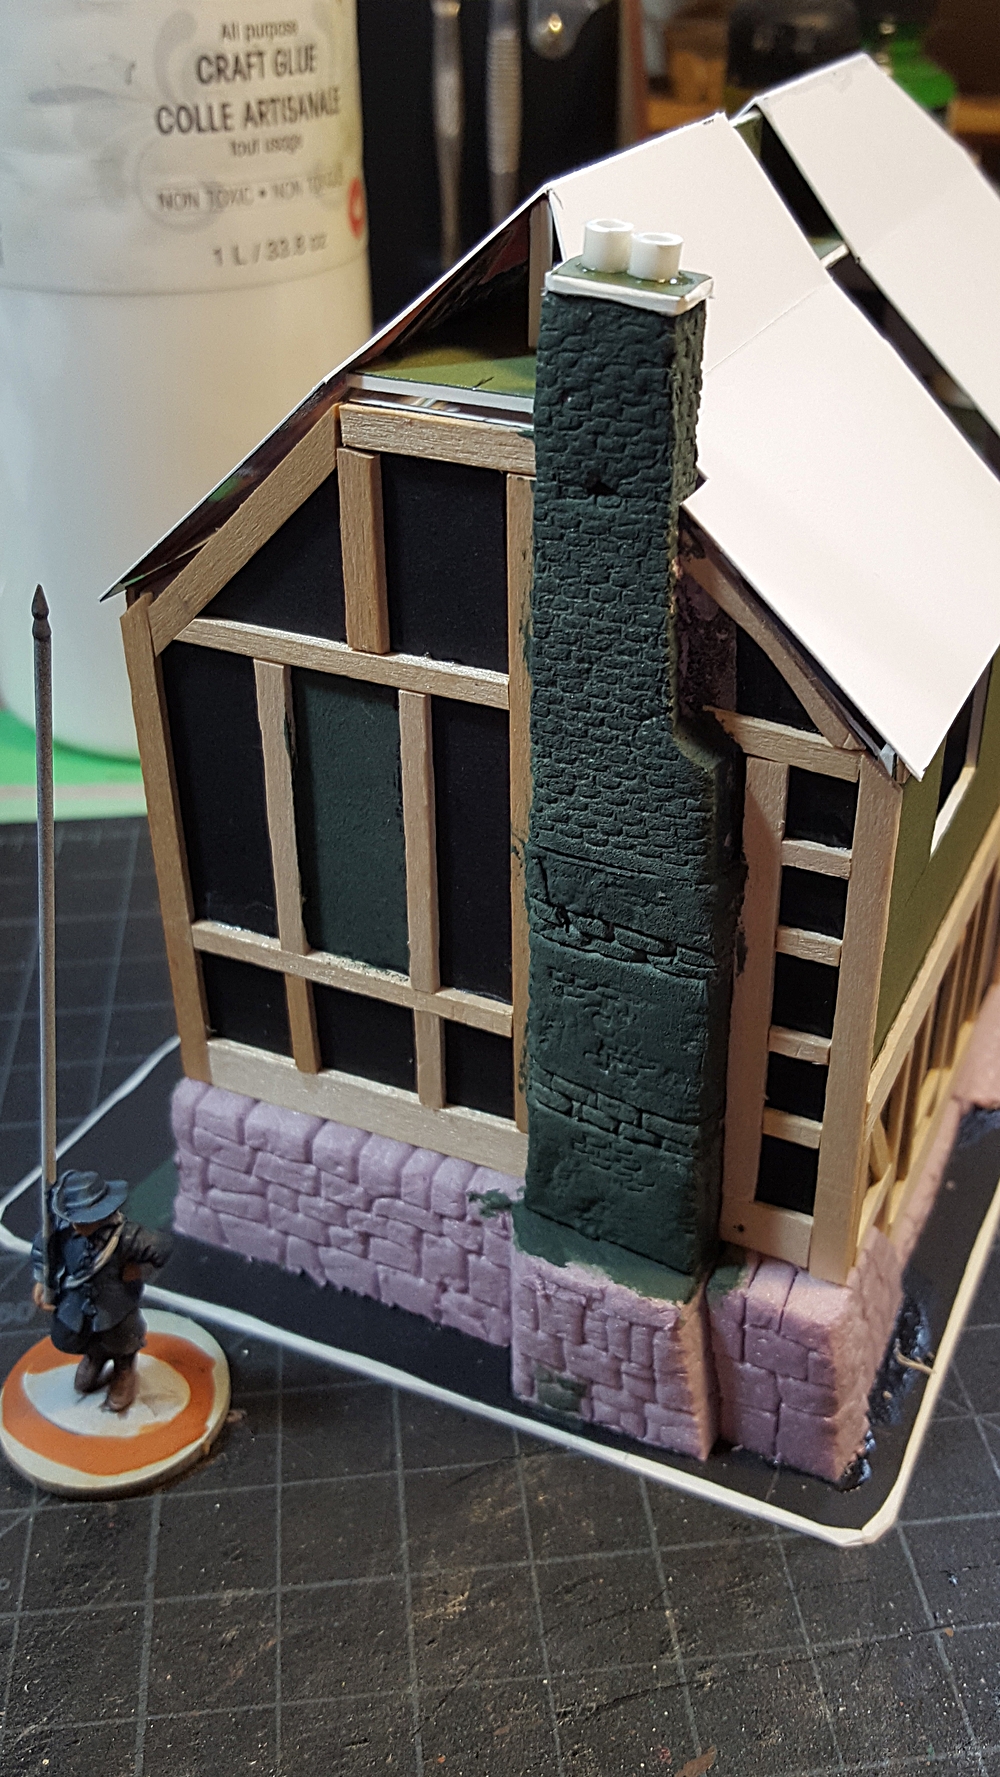
The chimney and end wall of the half-timber farmhouse. Click for larger.
I am really pleased with how the big chimney up the end wall of the farmhouse has turned out. It’s a mix of stone, brick, and plastered areas (some broken with brick showing through) and came out looking great. Paint on the brick is brown base, red oxide, then washes of GW Nuln Oil and Seraphim Sepia, and finally a light drybrush with red oxide and tan. The plaster areas got the same paint mix as the walls.
More soon; I’ll be building a couple of small cottages, hovels, and outbuildings to finish off a bit of a rural hamlet or farm for English Civil War gaming or pulp games set in the English countryside.
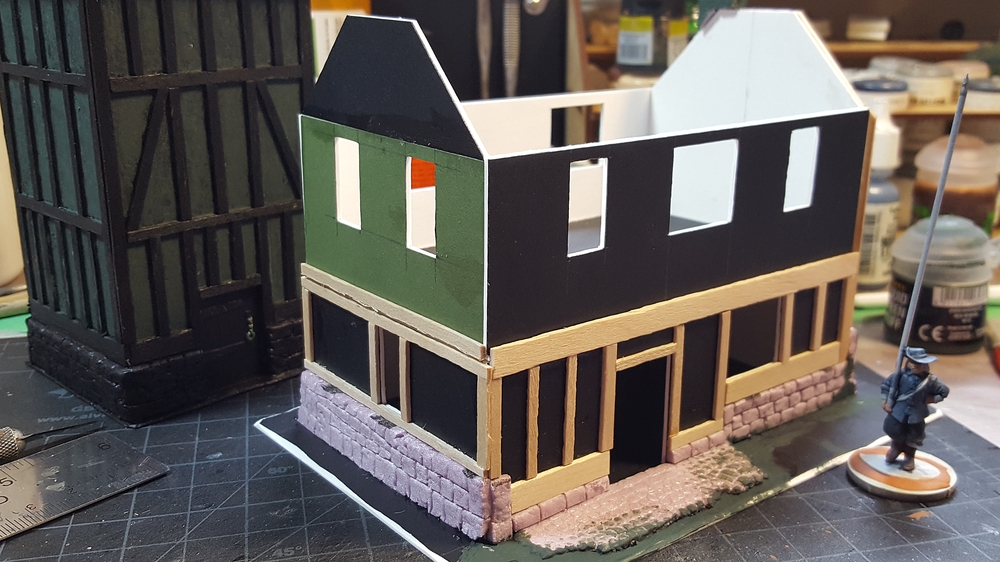
After getting the dovecote constructed (although not yet painted) I decided the next building would be a bit more substantial, and that a farmhouse would be the obvious counterpart to the dovecote.
It’s not quite a manor house, except maybe in some rather backwoods shire, but it’s a substantial two storey building with a big chimney rambling up one end. The main structure is all 1/16th matt board, the stonework is pink styrofoam insulation, and the timbering is thin wooden coffee stir sticks, mostly split lengthwise into thinner pieces.
The dimensions, roughly, are 5″ long, 3″ wide, and about 5″ tall to the top of the chimney, which is about where the roof peak will fall too once that’s done. The walls are 40mm high; the total base is about 7″ long and 5″ wide or so.
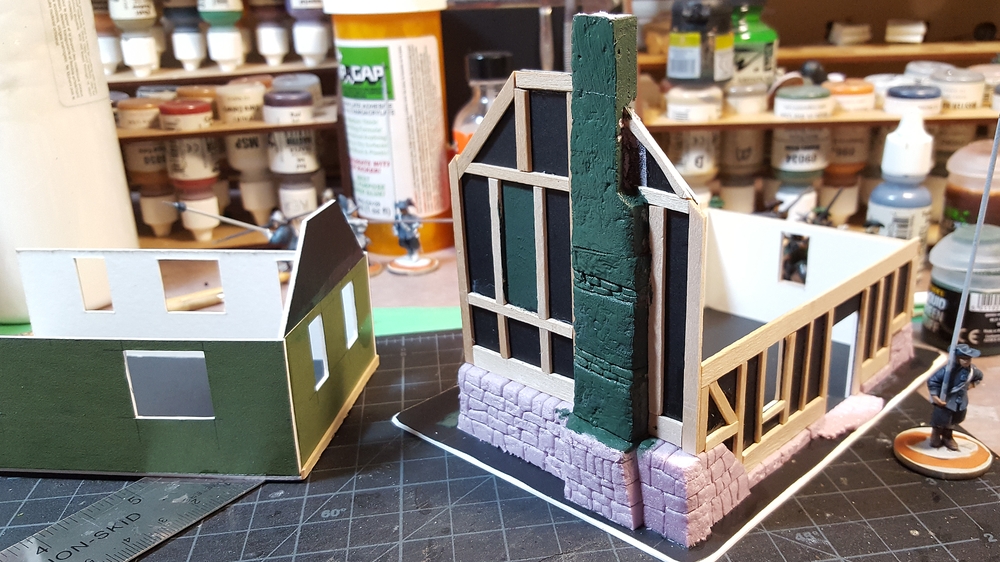
The earliest construction photo I remembered to take. Walls all up, foam stonework in progress, started the half-timbering on the back wall and one long wall. Second floor off to the left. Click for larger.
The other end, early in construction. Stonework in place and half-timbering just begun on the first floor. Click for larger.
For the cobblestone patches outside each door and the bricks up the chimney, I used two different old paintbrushes that I yanked the worn-out bristles from and then re-shaped the metal ferrule with a pair of needle nose pliers and a small file. The smallest brush became the brick press tool, and a slightly larger round one became the cobblestone tool. There’s also a larger rectangular one that doesn’t appear on this project but will at some point in the near future. I’ll get a photo of the press tools for a future post, they’re a great easy way to do bricks, cobbles, and other semi-regular or regular masonry patterns.
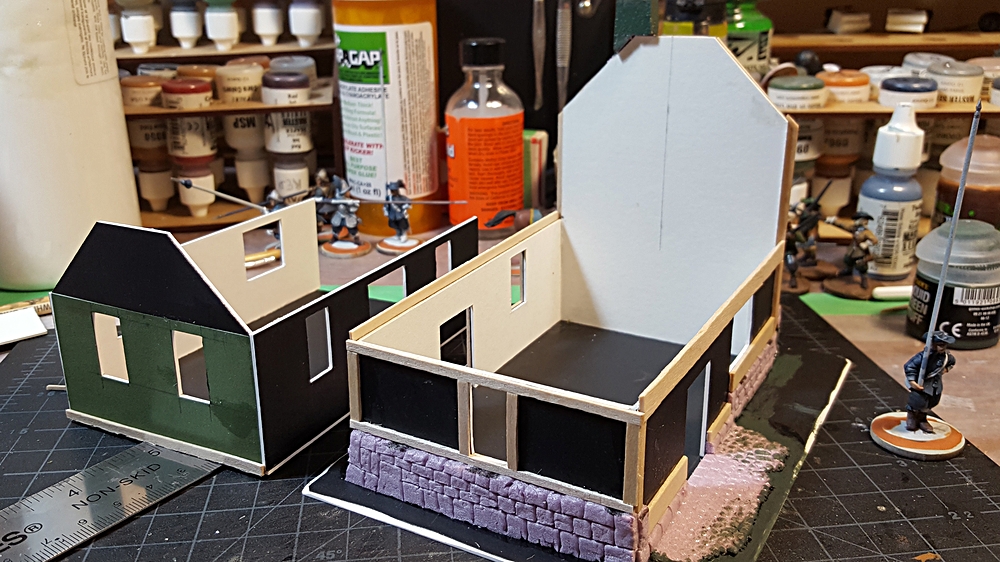
Upper floor in place; it’s basically a three-sided tray held in place by the horizontal half-timbering along the sides. Click for larger.
The second floor is three-sided to make building the big chimney down the back wall easier, rather than splitting the chimney into two or three pieces. The second floor is held in place by the half-timbering horizontal beams along the two long sides of the house, and the beams overlap at the back corners so the join between the floors and walls is nearly invisible when the house is all assembled.
Close up of the end wall, with brick patterning all done on the chimney. The pink foam has been coated in GW Liquid Greenstuff for strength and texture. Click for larger.
Wider view of the chimney end of the farmhouse, with 28mm Warlord pikeman on a 25mm base for scale. Click for larger.
The top cap of the chimney is a scrap of matt board and two little segments of styrene tube, all coated in more GW Liquid Greenstuff for texture.
Timbering all complete and roof structure started. Click for larger.
The roof will be thatch, once I get around to picking up another cheap handtowel to chop up for thatching. The understructure is a mix of 1/16th matt board and lighter card, and will all be buried under towel in due course.
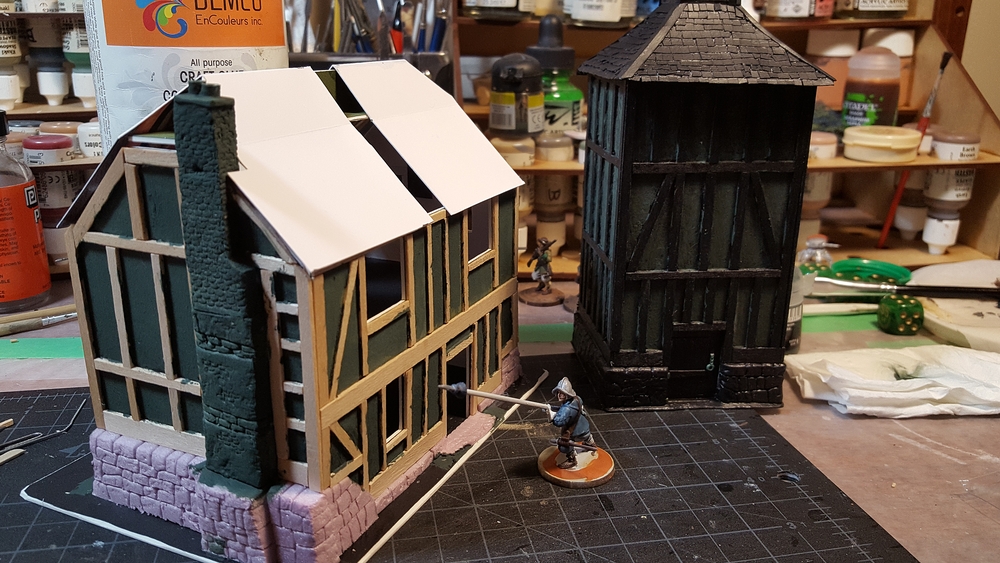
In the background of the last photo you can see the current state of the dovecote, all black primered with yet more GW Liquid Greenstuff to add texture to the wattle & daub panels between the timbering.
I’ll probably paint both buildings together, now that they’re both at the primered stage. More on that soon!