Tag Archives: Russian

How I Paint Russians

It seems “what colours do you use for WW1 Russian uniforms?” is one of those things that comes up again and again. I’ve been painting an awful lot of Russians (of various WW1/Russian Civil War flavours!) for a year or two now, and I’ve been asked for painting recipes in email, in comments here, and on forums. It’s time to do something I should have done months ago – write a flippin’ blog post that I can link people to, to save myself the trouble of typing the same thing out again and again…

I paint with Reaper Master Series paints, largely because they’re carried by my FLGS and the price point (especially when you buy in Triad sets) is better than GW or Vallejo. Reaper has this awesome web-gadget called the Power Palette that you can fire an image in, then extract the closest Master Series colours from. I scanned a couple of images from the Osprey Publishing RCW books and got the Power Palette to suggest a list of colours for me.

Red Horde!
A Russian Civil War Bolshevik infantry force.

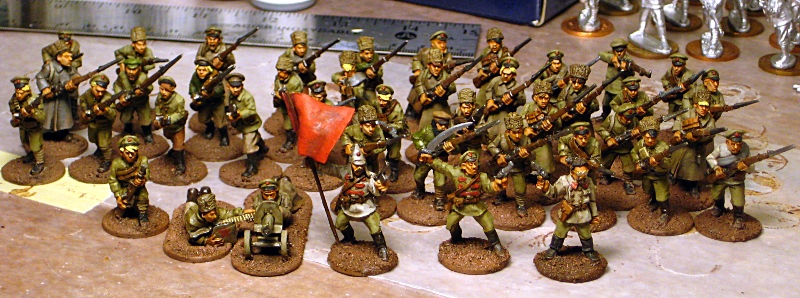
I’ll add better shots of my painted figures eventually, but here’s my basic World War One/Russian Civil War Russian uniform recipe, all paints Reaper Master Series unless stated otherwise.

For all figures:
Base: Khaki Shadow
Wash: GW Devlan Mud (note that this is now out of production (thanks, geniuses at GW…) so I’ll eventually have to find an alternative…)
First highlight back up with straight Khaki Shadow.

My Reds get a much darker Devlan Mud wash, the Khaki Shadow highlight, and that’s pretty much it.

My Whites get another round of highlighting with Terran Khaki. Officers in especially spiffy uniforms get a final highlight with Khaki Highlight.

Some Russian uniforms seem to have darker, greener trousers; I use Military Green as a base there, sometimes just as a wash over Khaki Shadow.

The Russian uniform procurement process, even before the Civil War started, was known to produce quite a bit of variation in what was nominally the same colour of cloth. I use Bone Shadow and Polished Bone as alternate base colours, especially in the Red forces. For the Reds, I also use a lot of other random colours – other greens, browns and greys especially, as the early RCW Red Guard/Red Army had enormous trouble (even by the usual Russian standards, which is saying something!) keeping anything like an actual “uniform” appearance!

The Whites had equal trouble at various stages, but I keep my Whites in neater trim than my Reds, purely so the two forces can be told apart on the tabletop!

For Cossack blue trousers, Soft Blue base. I need to rediscover what I highlight Soft Blue with, I appear not to have written it down in my painting notes… I also have no photos at all of my Cossack infantry plaston, which is a shame.

sailors_16may
Red Sailors! See below for painting notes.

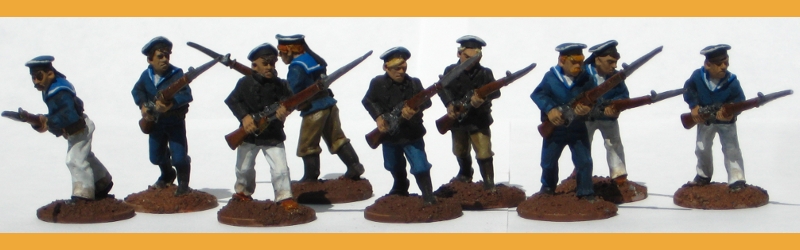
For Red Sailors, Worn Navy for blue base, Leather White for white base, Pure Black for black, Khaki Shadow (again) for khaki/green. Kerchiefs are Sapphire Blue.

The Worn Navy gets a very thin wash of 1:1 Worn Navy:Pure Black for shadows, then highlighted back with Worn Navy and Soft Blue. Pure Black coats get a highlight of 1:1 Walnut Brown:Pure Black. Leather White gets a Pure White highlight. The white stripes on hats and kerchiefs is actually a 1:1 Leather White:Pure White mix.

I’m probably going to go back into my entire batch of Red Sailors and do another round of highlighting on the blue clothing, it’s a bit bland currently. More Soft Blue, maybe with one further brighter highlight.

Hope this helps, I’ll add better photos as I take them!

A Russian Plank-Roofed Hut

Inspired by Tony’s plank-roof hut tutorial that I linked to in my recent links of interest post, I sat down with stir sticks and my Xacto knives to do up my own version of his hut.

plankroof1
A Russian-style plank-roof hut, after Tony’s tutorial.

My version is 3 inches across the front, 2 inches deep and about 2.5 inches tall to the top of the chimney.

I’ve also been amusing myself recently with fake fur and fabric dye, searching for good loking long grass. I’ll have to write up my discoveries sometime soon, it’s been… interesting.

The new hut will have it’s final paintjob this weekend, more photos of that when it happens.

Red Airships!

I am, as mentioned in the last post, neck-deep in prep for my Russian Civil War game less than a week away at Trumpeter Salute 2012. Nevertheless, something near and dear to the very core of the Warbard’s raison d’etre needs to be linked to…

Via the excellent Dieselpunk, who in turn got it from kitchener.lord’s spectacular Flickr stream, this Red Airships photomontage poster:

Nikolai Dolgorukov. Soviet Airships. 1932

I’ve long been a fan of pre-WW2 Russian design; there were some very talented people doing great stuff even in terrible conditions.

Anyway, back to final drafts of initiative cards, then painting the last 16 White Russian infantry for the game!

New Russian Buildings

I’ve been house- and cat-sitting for a relative in town the last ten days, so not a lot of action here on the blog, but I did take advantage of having extra space available to get a bunch of wargaming scenery built.

The most interesting pieces are a pair of houses for my growing Russian hamlet. The first is T-shaped, the second L-shaped with a fenced garden/yard area. Both have thatch roofs from towel; building and covering the more complex roof shapes was an interesting challenge. I even got some step-by-step photographs of the roof-building and thatching process, so expect an illustrated tutorial at some point in April here on the Warbard!

rusbldg_22Mar
A pair of new, larger Russian-style buildings for our 28mm RCW games. Click for larger.

Both buildings have a 5″x4″ footprint and are about 3.5″ to the peaks of the double-hipped roofs. Unlike my earlier church, these two have doors or windows on all sides, so they’re potentially tactically useful instead of just being a line-of-sight blocker like the church.

In addition to the two buildings, I built two large hills (which can butt against each other to form one long ridge) and a smaller hill. I’ve needed more hills for ages, so it was nice to get these made finally. No photos of them, I’m afraid, as they’re buried in the bottom of one of my scenery boxes at present.

I”e also got about about ten new pieces of scatter terrain in progress, not all of which will be ready for my Trumpeter Salute RCW game in ten days, but I hope some of it will be. Photos of that as time allows in the countdown to Trumpeter!

Onion Domes, Part One

Finally made it up to the local branch of Micheal’s craft store after work Wednesday to hunt down material for the two domes of the Russian church. I had planned on using 1″ wooden spheres, but the shelves of random wooden shapes were fairly well picked over and they had no wooden spheres of that size at all.

They did have 1″ wide turned wooden shapes advertised as “decorative rod ends”, though, and I realized they’d make much more interesting onion domes than the simple spheres I’d been planning on.

When I got them home I drilled holes in the top and inserted lengths of wire. One useful thing about turned wood shapes, it’s usually fairly easy to find the centre point, as the lathe tools always leave small ring impressions on the wood. The wire got superglued in, then I used a twist of tinfoil to form the core of the uppermost section of the onion shape. Terracotta Milliput is cheap, sure, but tinfoil is even cheaper!

After that I mixed a small batch of terracotta Milliput and worked it around the wire and foil. I used a 1″ circle I’d cut out of styrene as a rough guide to keep the upward concave curve consistent, and smoothed things down with a wet fingertip. I didn’t fuss with the surface finishing much, a bit of wet sanding after the milliput is dry and another thin layer of putty will finish everything off nicely in due course.

So, behold the domes of the Church of St. Boris the Intoxicated, with the putty still setting on them!

ruschurch_domes1
The onion domes take shape. Click for slightly larger, see text for details!

Aside from the domes, the roofs are finished structurally, all shingles and trim in place. I still have to finish the trim around the door and windows, then it’s off to painting.

Russian Huts Finished

It’s been a bit of a slow ten days or so on the wargaming front around here; I wish I could say there was a proper reason, but I just haven’t spent much time at the workbench. One of those weeks.

Regardless, earlier this month I did finish both small Russian huts/farmhouses that I started over Christmas, and the Russian church is coming along nicely.

Here they are together, with a pair of Brigade Games’ 28mm White Russian officers for scale. The walls are mattboard and wood from coffee stirsticks, the roofs are towel with cardboard structure underneath.

rusbldg_jan12
The fronts of a pair of Russian rural buildings – huts, small barns, possibly small farmhouses.

The smaller one on the left is 3″x2″ and roughly 2″tall, the slightly larger one on the right is 4″x2″and about 3″ tall.

rusroof1
Removable thatch roofs from towel.

The hipped roofs are mattboard and light card underneath with towel soaked in diluted white glue as the thatch.

The roofs removed, showing their structure slightly.

Here you can see the roofs removed and flipped over. The structure of the roofs is all just cardboard and I’ve had no warping at all despite the towel for thatch being fairly liberally soaked in diluted white glue after it’s glued down.

Both buildings got a basecoat of black paint mixed with white glue (my standard scenery basecoat), the woodwork was drybrushed with a grey mixed with some tan followed by a second drybrush of paler grey. The thatch got the same black/white glue base then a couple of drybrushings with various brown/tan/grey mixes. The towel soaks up paint and glue as well as you expect towel to, even during drybrushing — expect to go through paint like crazy.

I have vague plans for a couple more buildings for a Russian hamlet, maybe something in whitewashed plaster more suited to the southern portions of the country, and of course the Russian church is nicely underway. More about that tomorrow!

A White Russian, And Other News

A bit quieter around the Warbard right now; I’m having most of my gaming time sucked up by the Lead Painters League 5 and real life; Corey is however away for the weekend at the Dak-Kon convention up-Island and promises lots of photographs upon his return. He’ll probably be doing a run of Amulet of Fire at some point over the weekend, too.

white rus rifleman
A Brigade Games White Russian rifleman in fur hat, first of a unit. Click for full size.

I’ve been painting various things, most of which I’ll wait for the various rounds of LPL5 to reveal, but here’s one of my new projects – a small foray into the Russian Civil War with a unit of White Russian riflemen, figures from Brigade Games, paint scheme not completely historic but based on inspiration from the Osprey White Armies book and some of the great resources shared on LAF’s Back of Beyond forum. Expect to see five or six of his squadmates in a future LPL5 round!

Minor update, a few hours later: I posted this photo to LAF’s Back of Beyond forum and asked for feedback, and got some excellent advice from some of the local experts. I especially like the fact that Russian troops often had coloured cloth inner parts on their fur hats; this was news to me and it’s a chance to make them more colourful yet!