
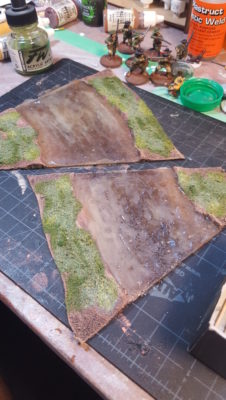
I had used basic hardware store 5-minute epoxy glue for the swampy pond test piece, and had more or less intended to just keep doing that for all ten river segments. I did the two smaller corner/curve river segments as a further test, and was really irritated when one of them came out all lumpy and matte instead of glossy.
I also realized that given the price of 5-minute epoxy, actual casting epoxy resin was actually going to work out cheaper for this whole project, especially given that 40% off coupons for large chains of craft stores are a thing! I picked up some EnviroTex Light Pour-on Epoxy from the aforementioned large craft store, for a total cost of about three more tubes of 5-minute epoxy after that useful discount coupon.
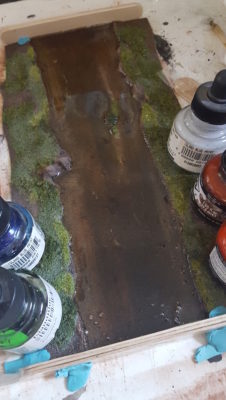
One US fluid ounce of resin nicely fills one of the full size 12″ long river segments; I could probably cut the quantity down just a bit, even. I did the resin pouring in an old cafeteria tray I use to help contain potentially messy projects. The dams at either end of the river segment are hardwood craft sticks (tongue depressors) wrapped in packing tape, secured with more packing tape from underneath the river segment and then further secured with blobs of blu-tak. I also pushed more blu-tak in along the edges of the river banks to block up possible gaps there.
As far as I can tell everything has gone smoothly with this first pour; I did it last night in bad light, working on our back patio to keep from stinking the apartment up. The Pour-On product is much less volatile and stinking than 5-minute epoxy glue, though! I didn’t see any leaks onto the tray and everything seemed to be cured up OK when I checked this morning before work, too, although the material info does warn this stuff takes up to 72 hours to full cure.
I’ve got seven river segments still to do water on – five more long straight pieces, the bridge, and the ford (both 6″ long) – so at one piece a day it’s going to be sometime next week before I can put the epoxy away.
The resin is much, much more aggressively self-levelling than the epoxy glue. I might go back and do a few ripples with gloss medium just so the river water doesn’t look completely still and stagnant. The one curved river segment that went all lumpy is going to get a very thin skim of resin to fix that and get a proper wet glossy look, as well.
At that point, once all the epoxy has cured hard, I need to go back and fix the flocking along the river banks. If you look at both photos above you can see some white staining on the banks. I put a coat of dilute matte medium over the flock, which I’ve used before many many times to properly secure flock and foliage on terrain pieces, and this time it left a distinct milky residue behind. I painted over that where it had stained the river bottom, and once the resin water is properly hardened I’ll re-do all the flocking to fix the discolouration there.
I’ve never had a matte medium and water (or white glue and water) mix do this to me before, in years of using it to secure terrain material of all types. Any readers have any good ideas about what the heck happened here?
I’ve had ‘milky’ residue from the bottom of a poorly mixed bottle of matte medium. It was just the concentrated matting agent (talc?) that I had failed to mix up into the rest of the goo over the years.
I’ll try shaking the heck out of my bottle of matte medium, then, to try to get the talc back into solution. Thanks! — Brian