North Star are an awesome miniatures company who do all sorts of cool stuff, and among them is their North Star Magazine which is completely free and stuffed with awesomely well photographed painting articles by Kev Dallimore, an amazing and awesomely experienced pro painter.
In the tutorials line, Handiwork Games out of the UK have a nice pair of articles on making a simple terrain plinth for miniature photography. Part One is here, and Part Two goes into flocking and detailing.
Finally, for fun and for some period colour in our coastal naval games, this short British Pathe clip from 1943 on the RN’s Motor Torpedo Boats, also embedded below.
MTB in 1943 courtesy of British Pathe footage. Their channel has a bunch of clips like this, well worth looking up!
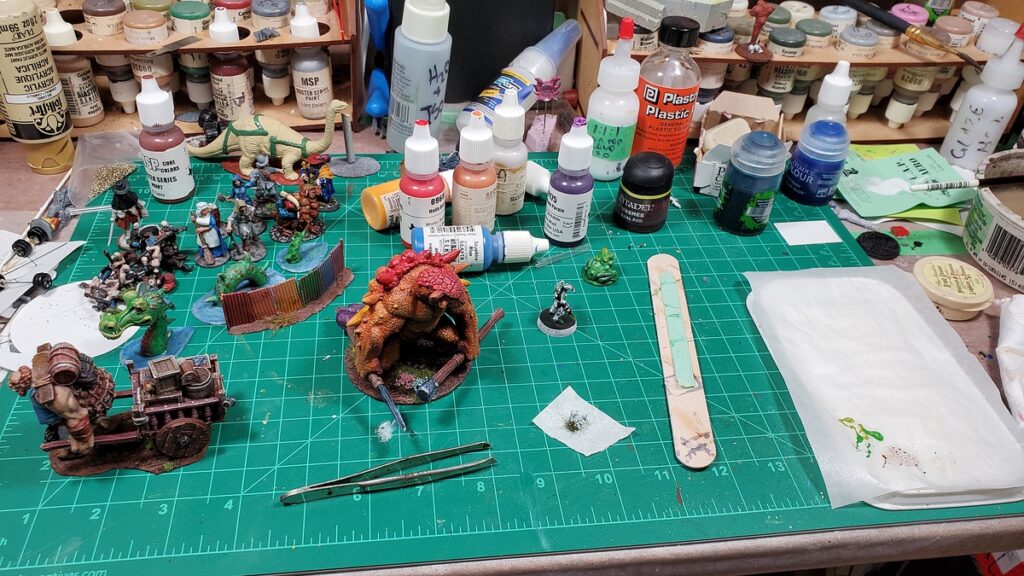
A quick look at the workbench right at the ragged end of the year! After not really painting anything for most of the second half of 2023 I rediscovered painting energy in November and have been plowing through a whole bunch of stuff.
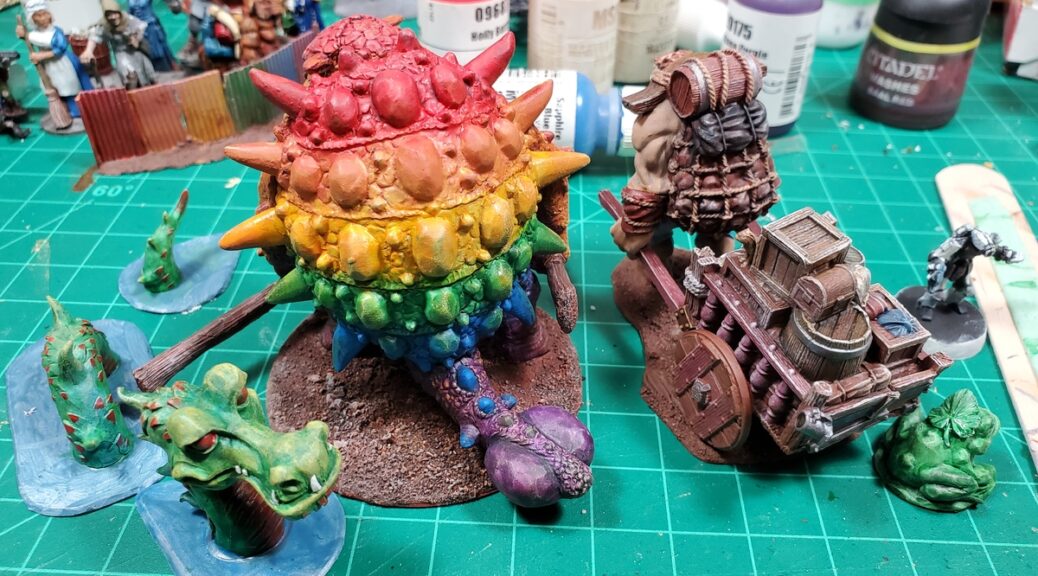
The workbench at the end of 2023. Click for larger.
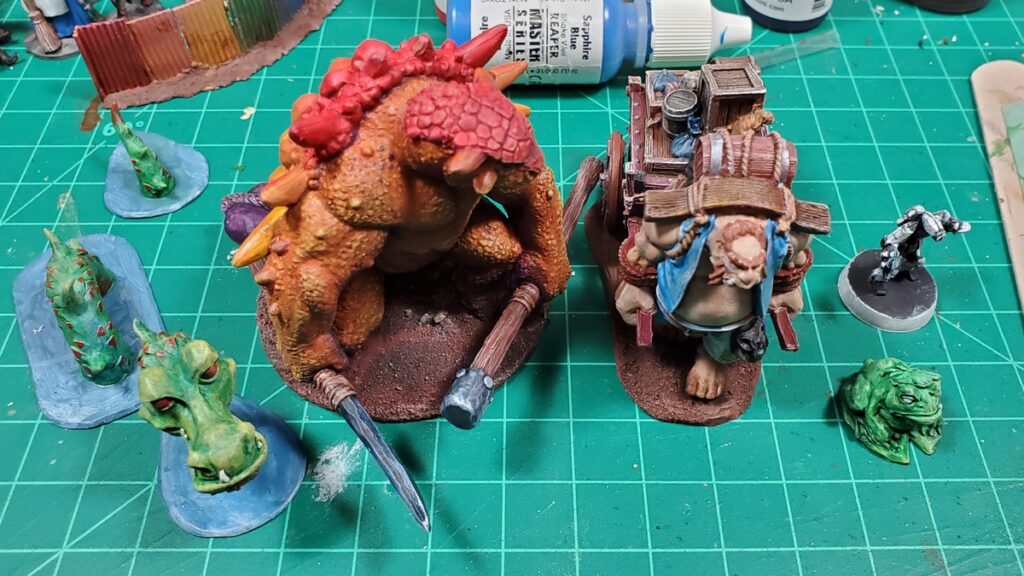
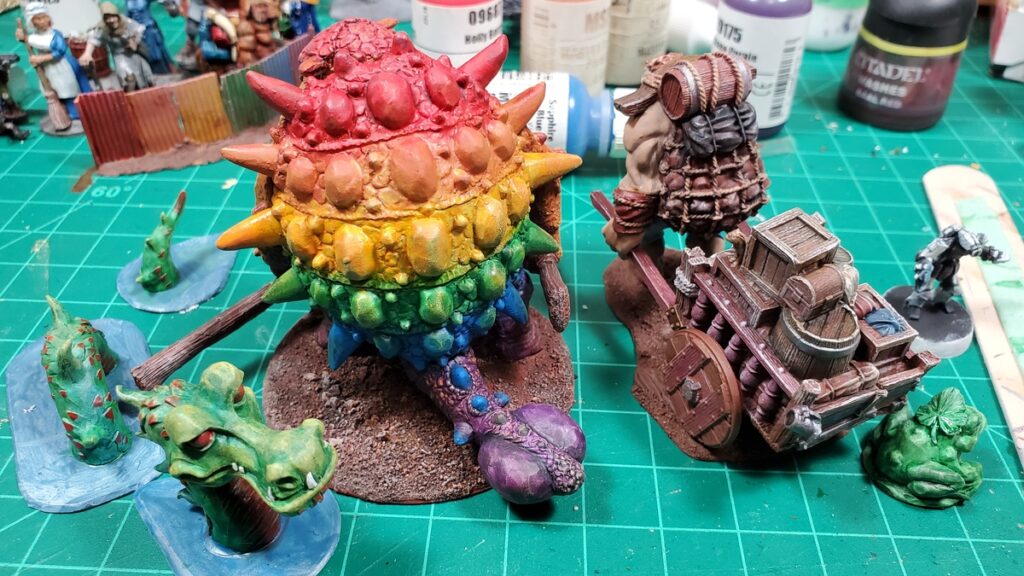
The anklyosaur person is from Fenris Games and is massive – that’s a 60mm base and they hang over every edge. The baggage ogre and little robot are Reaper, as are most of the random humans over on the back left. The sea serpent and big frog are Footsore Miniatures.
Overhead closeup of the current entertainment. Click for larger.
I’ve shown off some WIP photos of the anklyo-person over on BlueSky but they were early, no weapons mounted and painting not quite finished. I’ve got a whole bunch of WIP photos of this figure and will also be taking some good closeups after I finish painting and basing, because I’m really, really pleased with how they’re turning out!
The baggage ogre is just a fun figure, much more interesting than yet another horse and wagon if you need a baggage element for a fantasy game!
Rear view of the anklyo and ogre. Really, really pleased with how the shell of the anklyo turned out! Click for larger.
Hope everyone had good holiday season, and an excellent 2024 as we roll into the New Year!
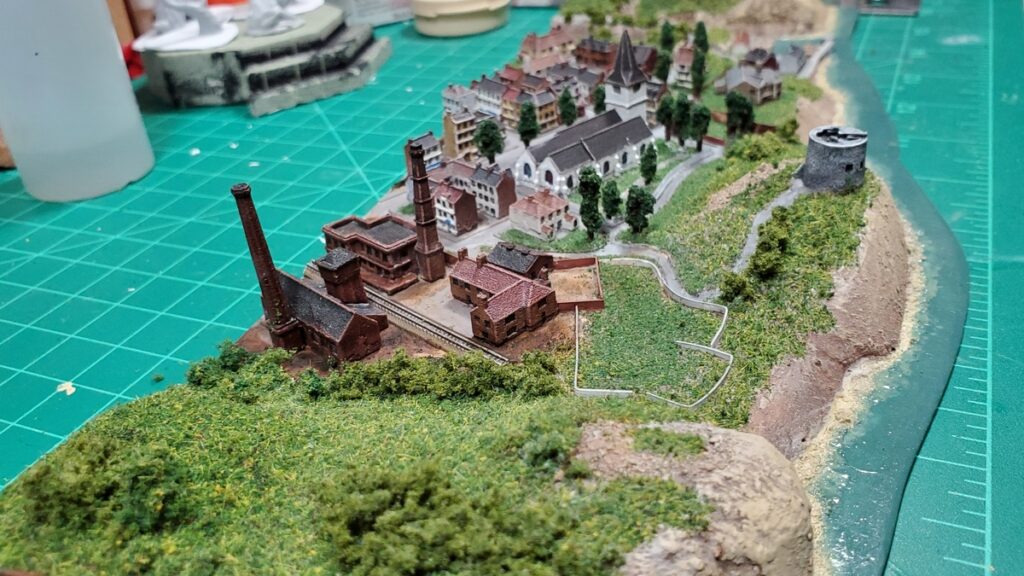
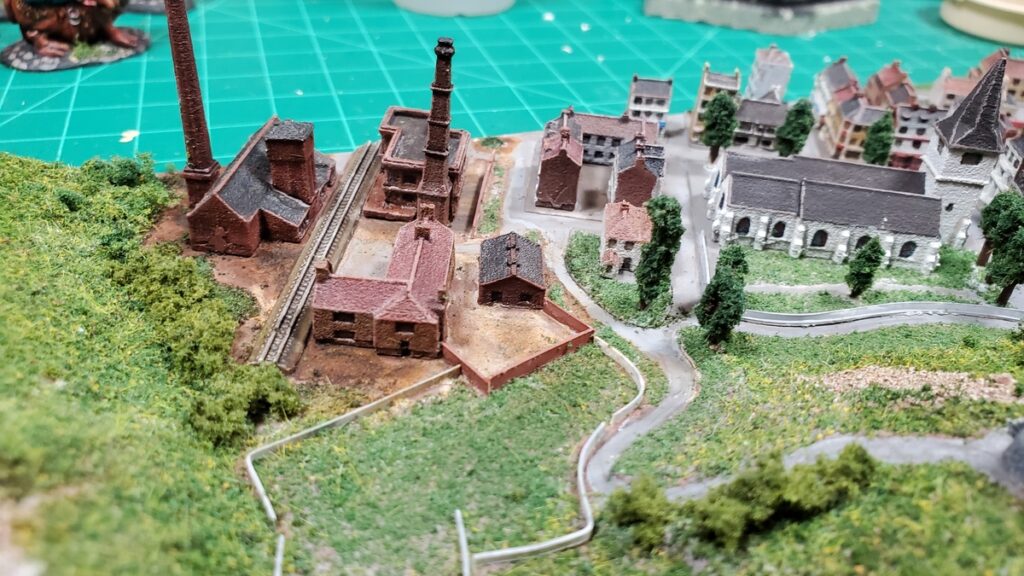
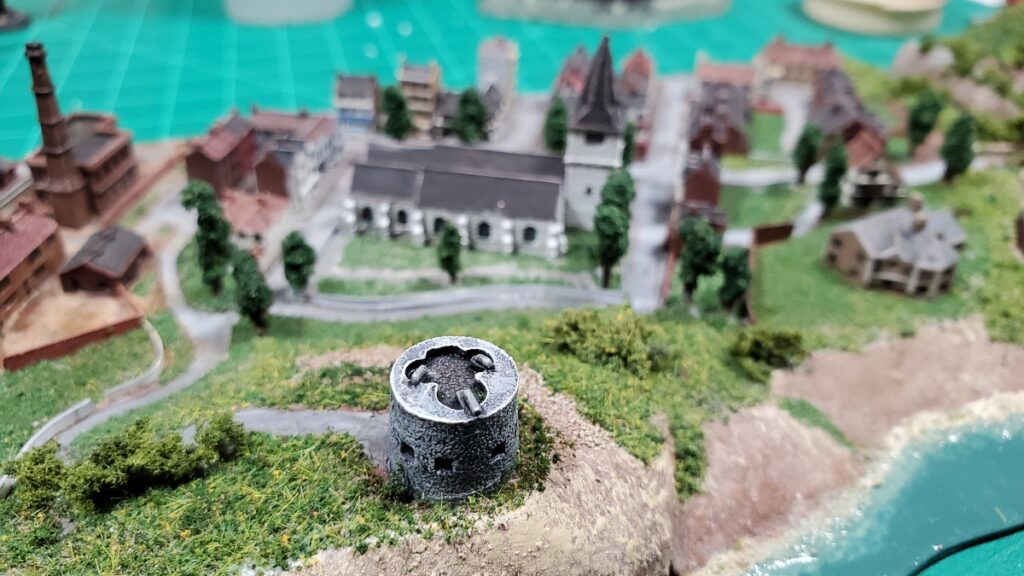
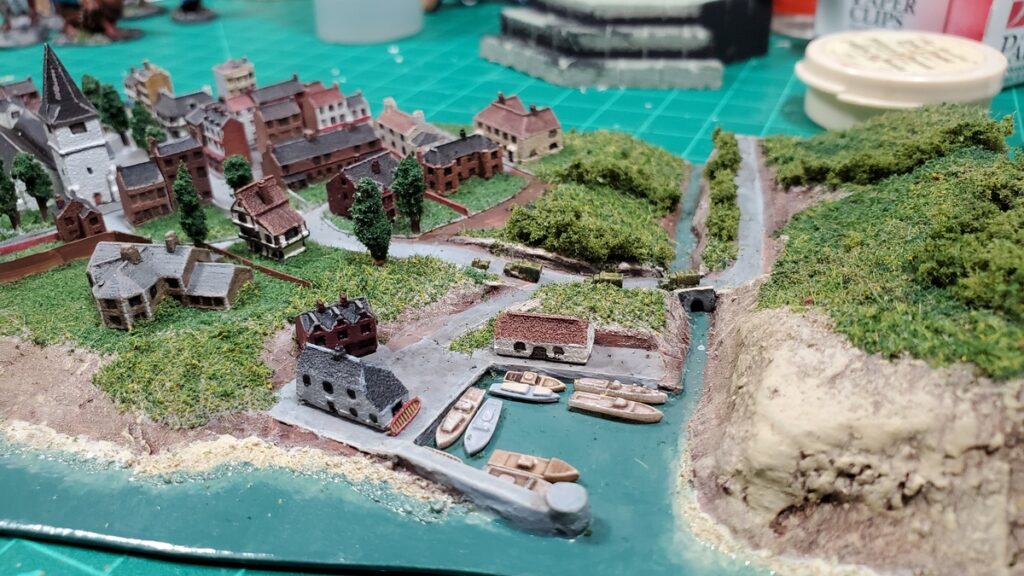
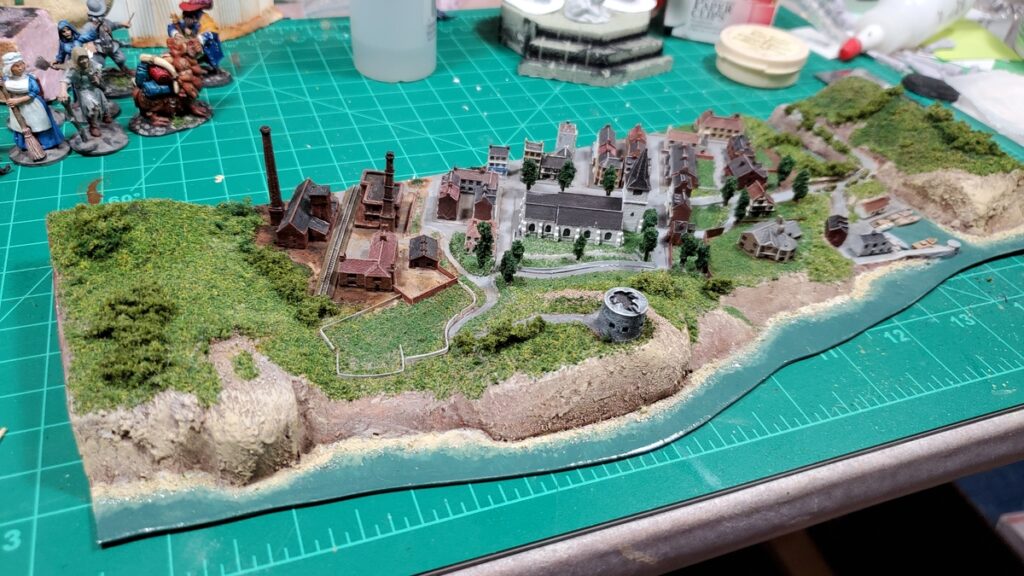
I’ve finally finished another module for my 1/1200 scale coastal naval terrain. This is another 12″ long by 4″ deep piece with part of a reasonable size town on it, and has been sitting around for two years or possibly a bit longer, so it’s nice to get it finished and out of the way!
New coast module from one end, looking into the industrial part of town toward the church. Click for larger.
The other end, looking into the harbour & bridge and down the main street. The breakwater is a bit of sprue from plastic figures, which got me that nice round end and curve. Click for larger.
The construction is my standard setup, written about previously (see other related posts at the bottom or my naval scenery summary post) with a base of 1mm styrene sheet, a mix of materials for the basic ground forms, and a lot of different flocks for ground cover.
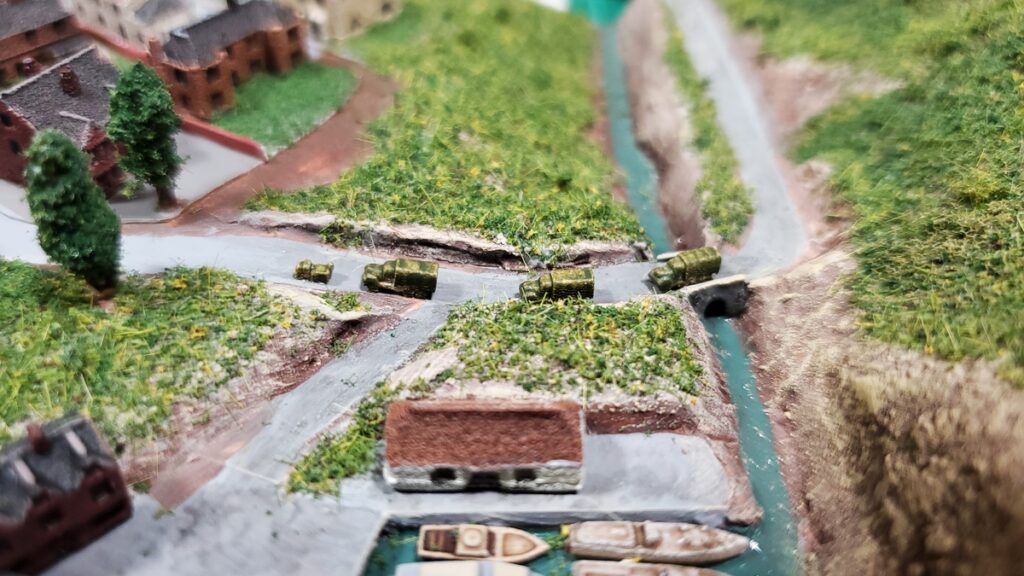
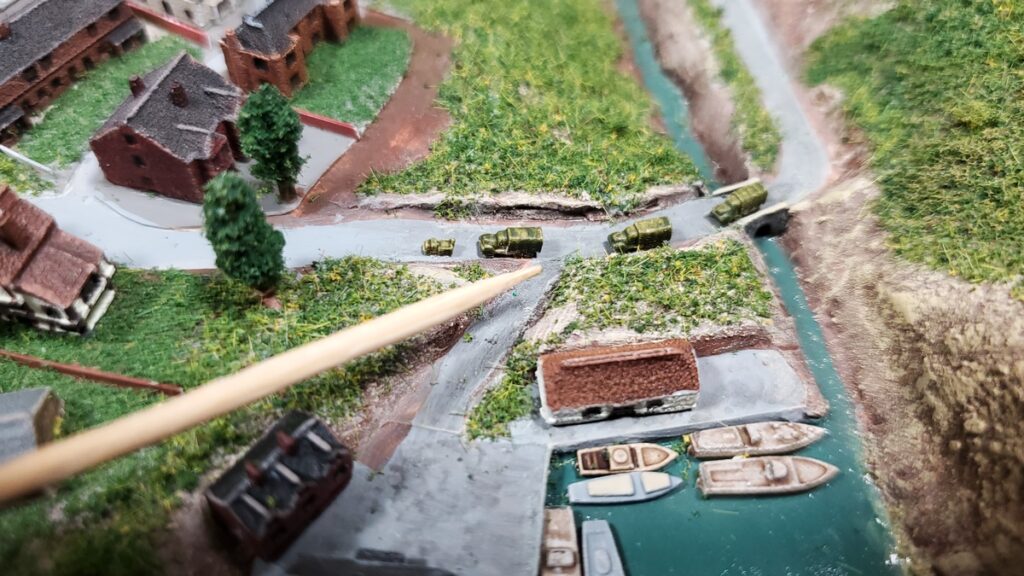
The Shapeways trucks, a small military convoy driving into town.With a toothpick for scale.
The one thing I might still add is some more of the marvelous Shapeways vehicles here and there…
Left end, looking from seaward, mostly industrial.The centre, looking over the old Martello tower toward the church and centre of town.The harbour, stream, and bridge end.The whole module from seaward.
I don’t have any immediate plans for more coastal modules… but I do have a lot more buildings and vehicles to put to use, and I was thinking that a coastal gun battery would be an interesting addition – the British coastal batteries seem to have had a pretty quiet war, mostly engaging aircraft, but the Allies reported regular engagements with German batteries especially along the occupied French coast… so maybe a half-length 6″ module with a bit of a headland, some gun pits, and a couple bunkers? We shall see…
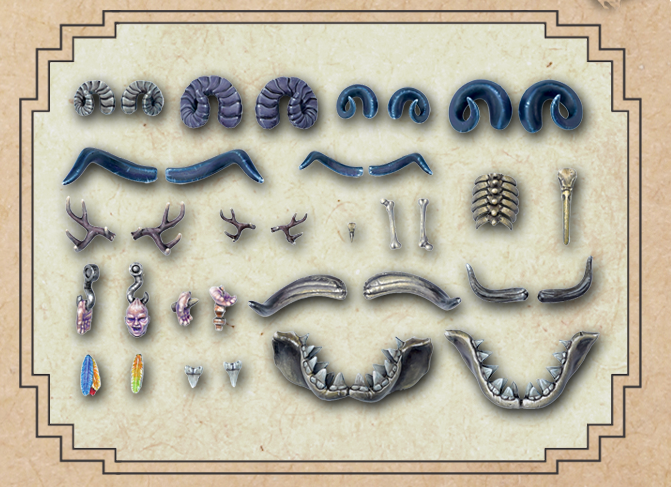
Conversion bits for strange projects can be hard to come by, even these days when high quality plastic figures make kitbashing and bits-finding easier. One of the staples of a certain flavour of folk horror, though, is folks with antlers, either on their helms or straight up growing out of their heads, and nobody has done horns, antlers, and such… yet.
Some of the planned bits. Image ganked from the Kickstarter page and cropped.
His campaign video is also over on YouTube and is nicely done, and one sprue will give you enough related bits to do whole units up similarly, which is always nice.
The Dead Animal Bits intro video
I’ve backed for a pouch of bits, 3 full sprues, and I’m really hoping to see this funded and produced so I can get inspired to get back to my weird folk horror 17th C stuff sometime in the new year!
So, if antlers and horns and bones and teeth and feathers and other gribbly conversion bits are an interest, have a look before December 18 2023 and consider backing Dead Animal Bits.
Not a paid endorsement or anything, just one of those chance finds via social media that slots very, very neatly into some of my specialized wargaming interests!
In the course of adding masts and other details to ships earlier this year, I collected some useful links on various WW2 ships, and leaned hard on the work of some of the amazingly talented ship modellers out there.
Meanwhile over on the gloriously named Last Stand on Zombie Island, a really cool article on how navies made smoke (deliberately). Lots of other cool WW1 to WW2 naval stuff over there too, well worth a look.
Sometime in November 1998 I sat down in one of Camosun College’s computer labs, signed up for a Geocities account, and created my first wargaming website.
Since then, in one form or another, I’ve had a continual wargaming web presence ever since!
I routinely game with folks younger than my website, which is… kind of weird to think about.
It’s been quiet around here lately, I’m gaming regularly but hardly doing any painting or building, busy with other stuff, but here’s to many more years of this nonsense!
We played a lot of Gaslands in 2020/2021 when COVID restrictions meant we couldn’t game in person, because Gaslands is fairly simple to organize overwebcam, and we kind of burned out on it.
Then we took Gaslands to Trumpeter Salute 2023 back in April, because it’s also really easy to set up pickup games for, and our pair of great chaotic games re-ignited our interest!
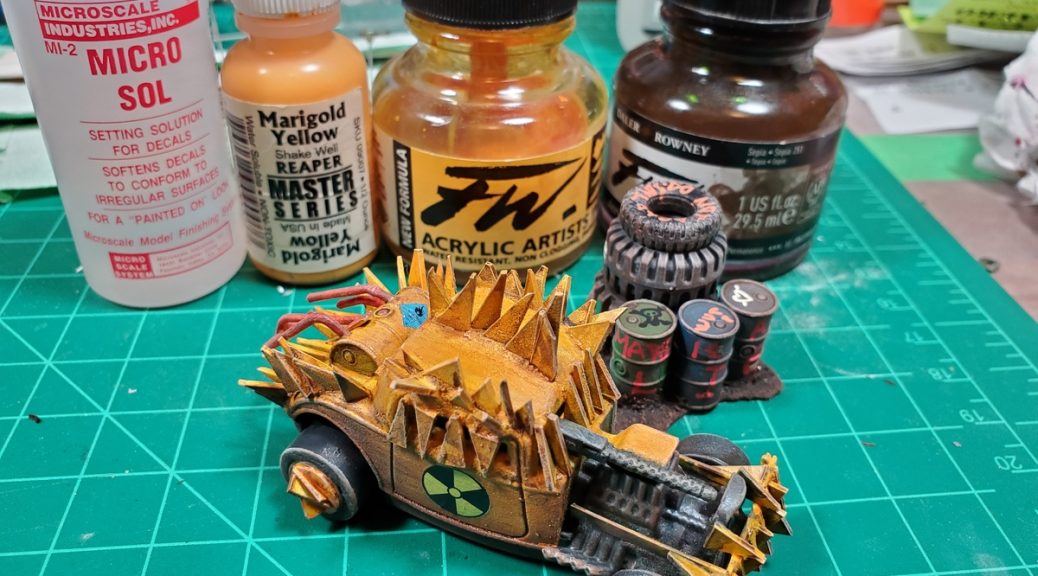
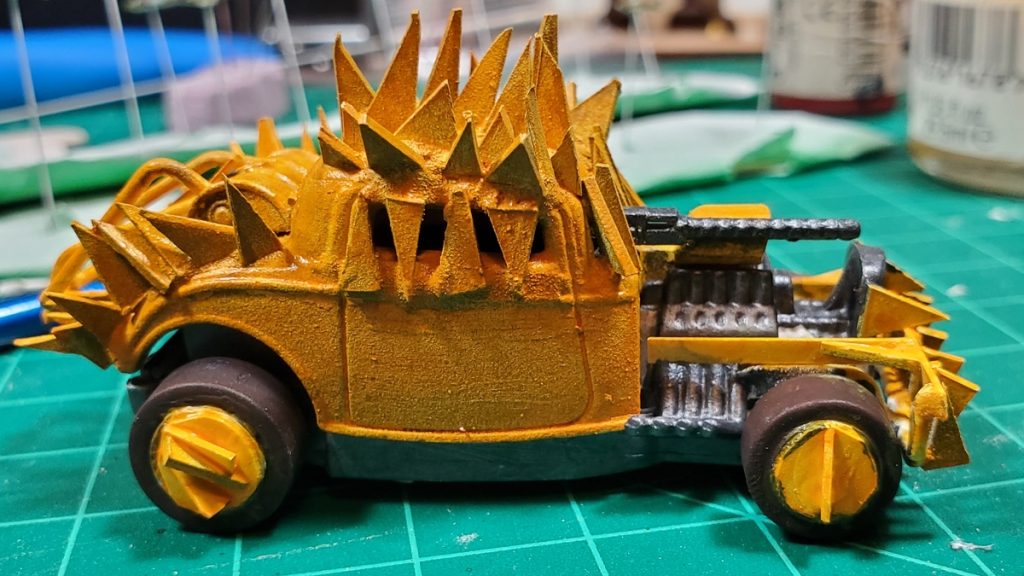
I’ve cranked through a trio of new cars since Salute, and then moved onto a new set of three cars. Two of the first set had been partially converted back in 2020/2021 and then neglected (and apparently I took no photos of them…) and the ’34 Ford hotrod was a new purchase while we were in Vancouver for Trumpeter.
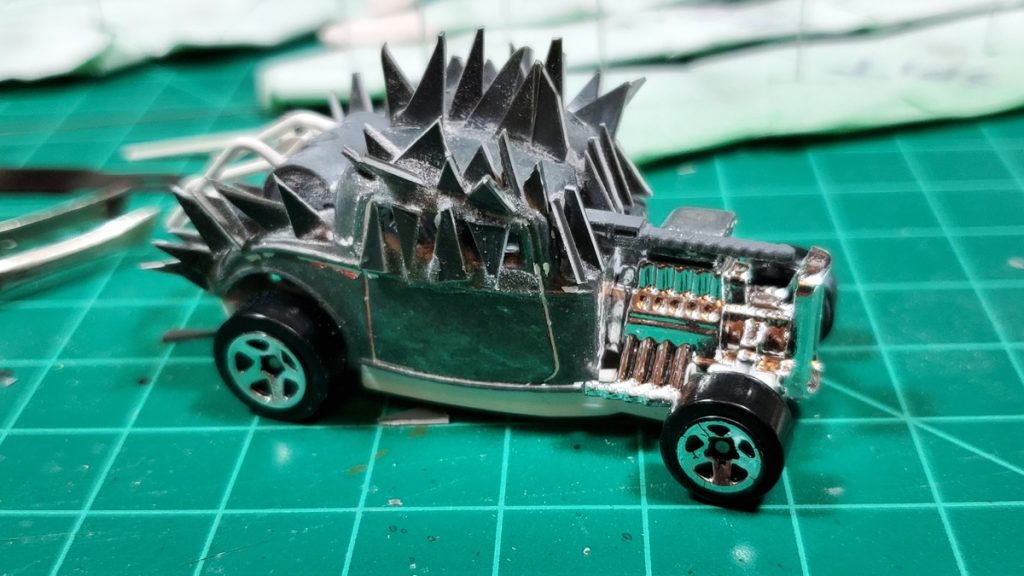
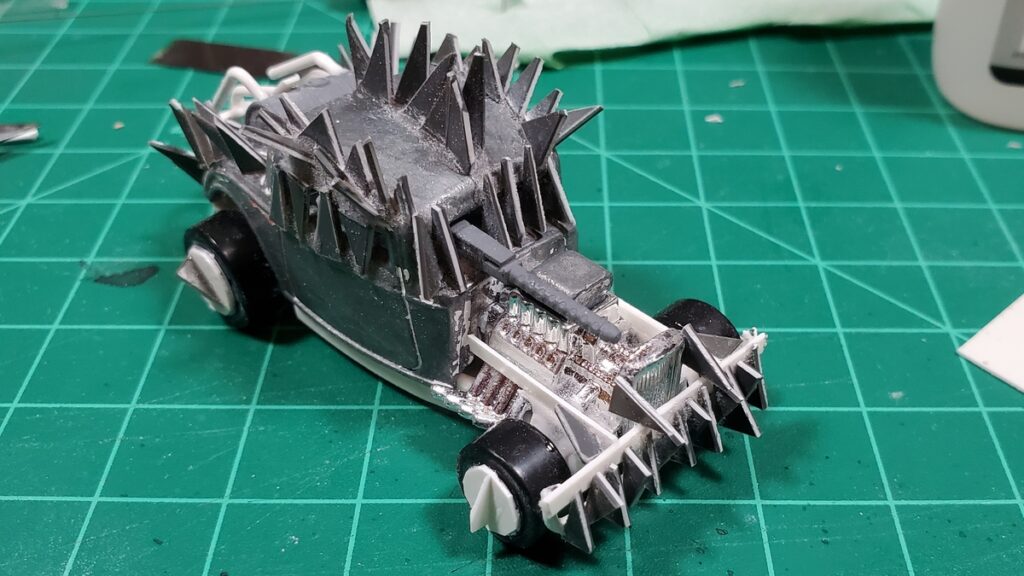
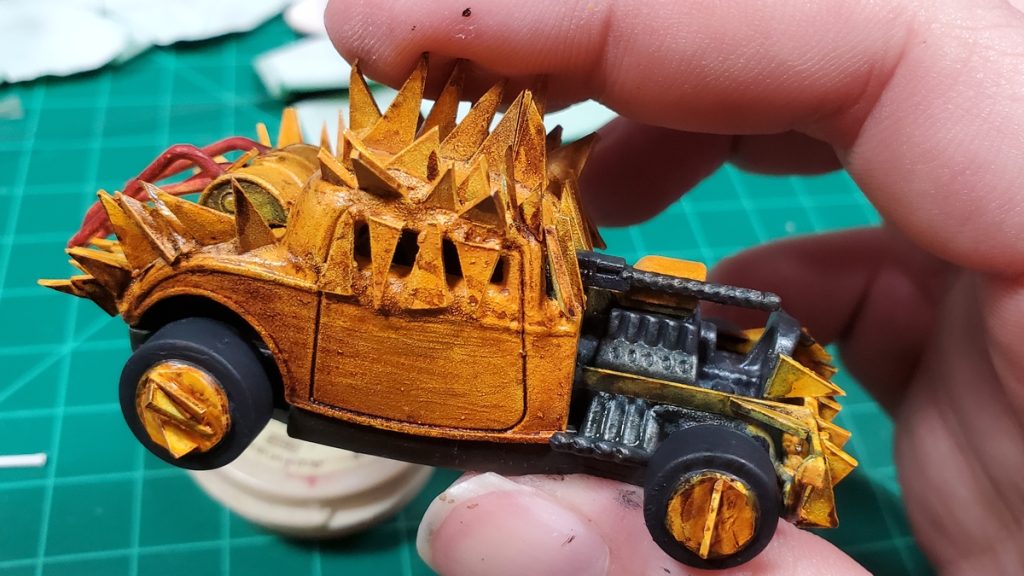
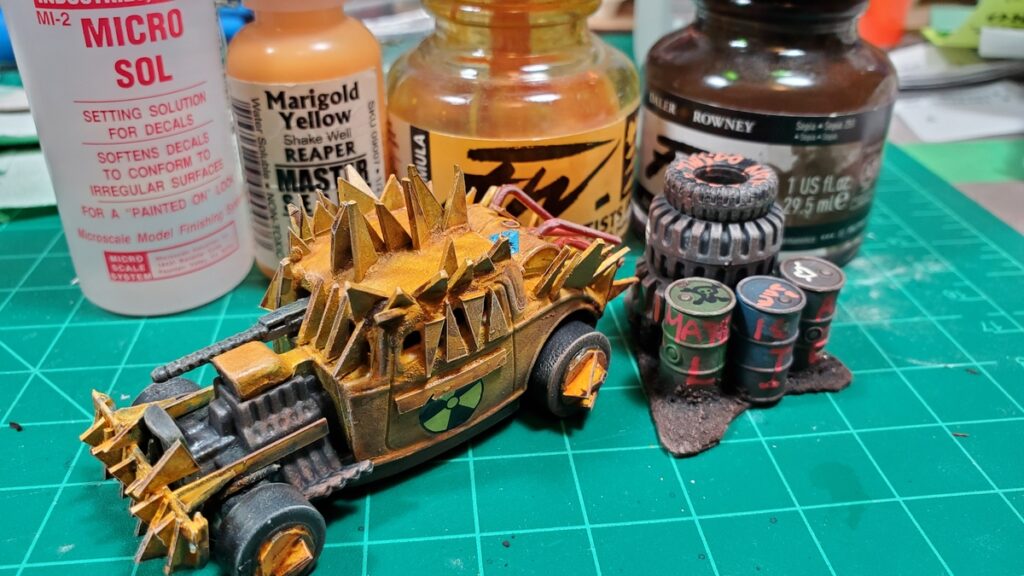
’34 Ford hotrod being Gaslanded.Spikes!Yellow basecoat – paint was Reaper’s Hearth Fire with FW Acrylic Ink Indian Yellow over that.Weathering – mostly FW Acrylic Ink Sepia.Rad symbol wet transfer on the door, just for fun.The right hand side of the critter.’34 Ford conversion.
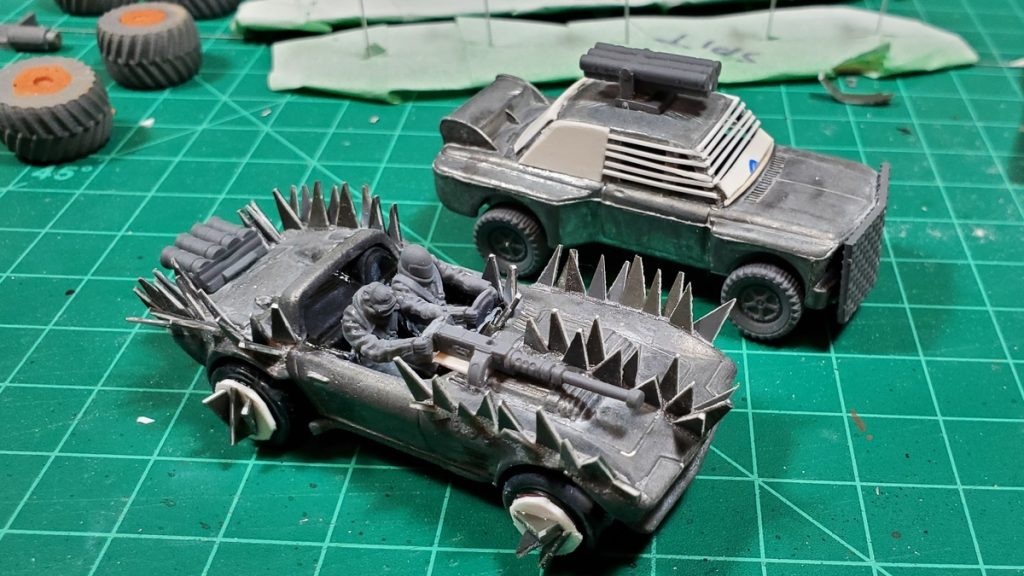
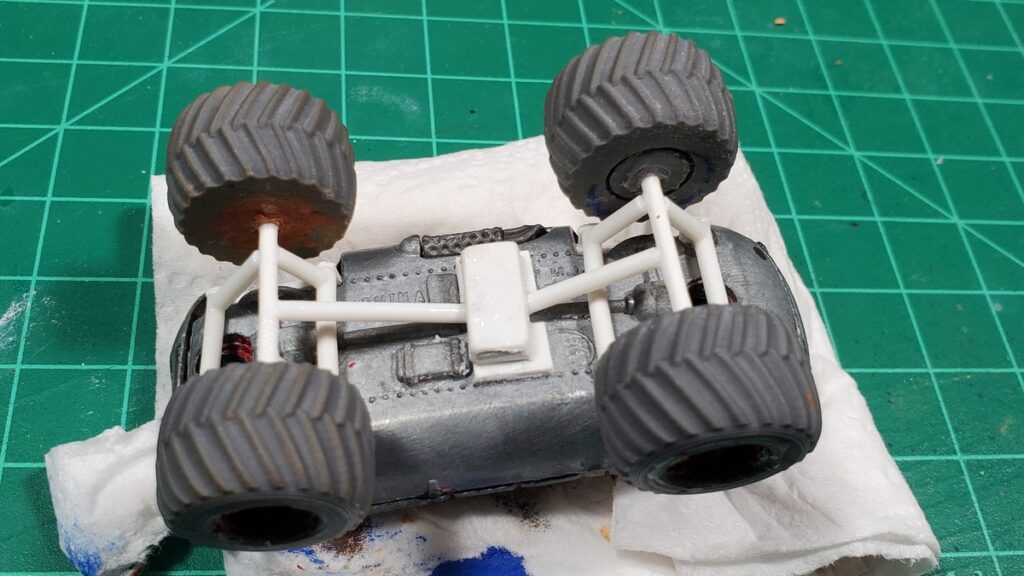
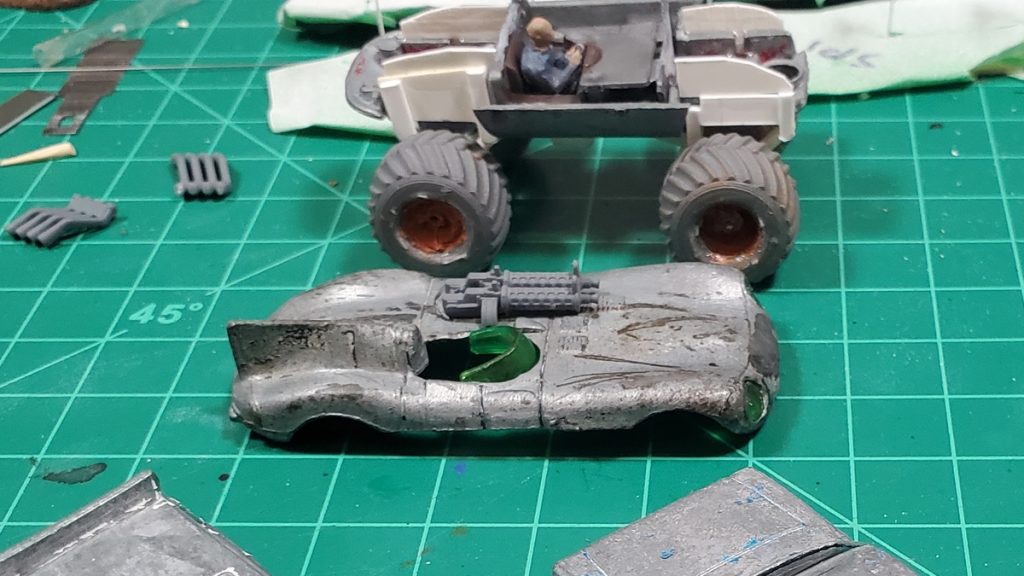
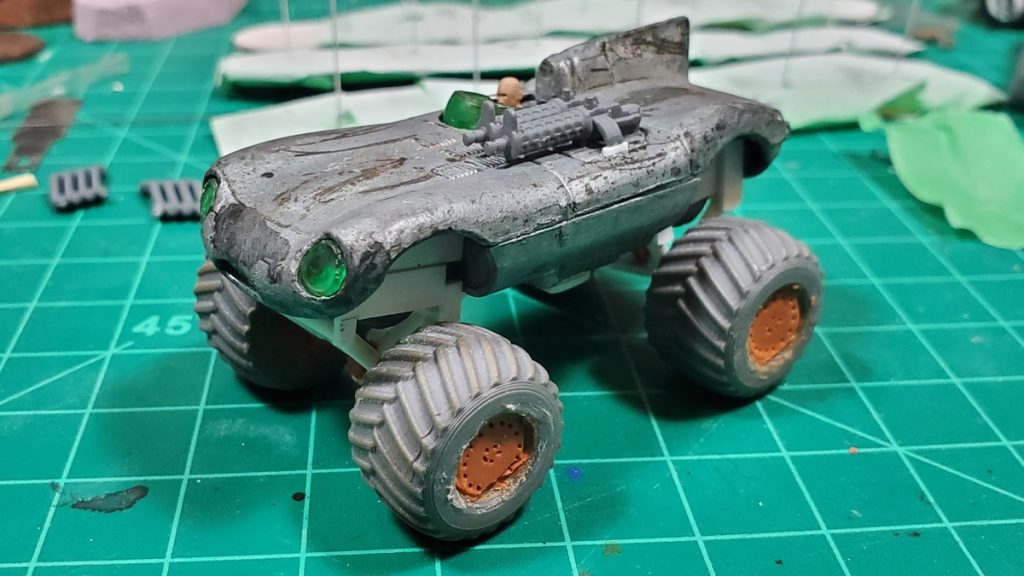
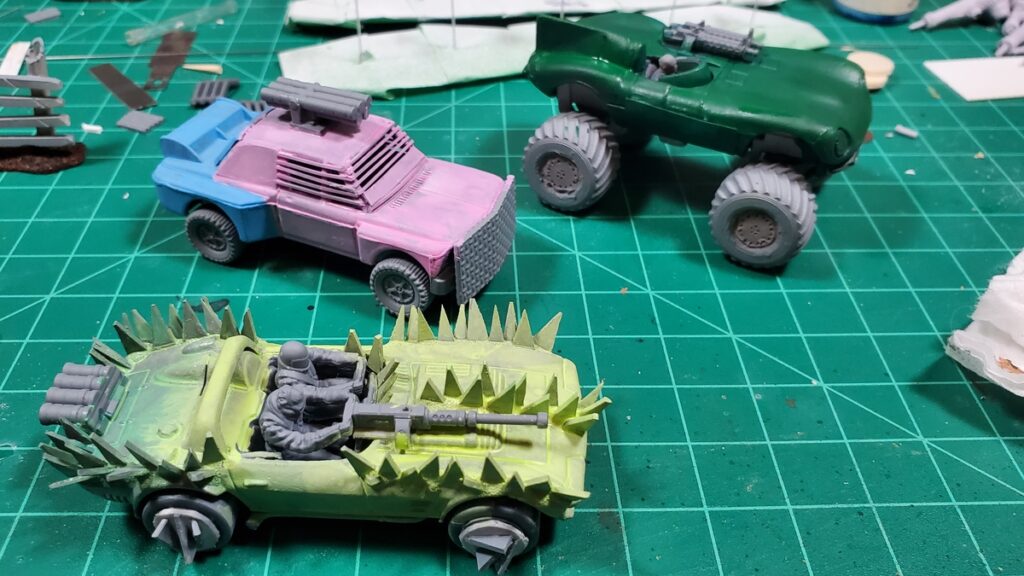
The second trio of cars include another sports car all spiked up, a rally car up-armoured, and a Jaguar D-type converted into a monster truck. The Jag was the most complex conversion I’ve done for Gaslands yet, and started with a set of 3d printed monster truck wheels.
Conversion finished on the rocket rally car and spiked sports car.Underside of the Jag D Type monster truck.Monster truck suspension under the D Type.The D Type in progress.Assembled, just missing the armoured panels on the sides.Paint started!The second batch – spiked sports car, rocket rally car, and the Monster D-type.
The basecoats are coming along nicely. The Jag is starting as British Racing Green, the spiked sports car is a gloriously weird yellow/green that Reaper calls Dungeon Slime, and the rocket rally car seems to have gotten trans pride colours, because why the hell not? Lots of weathering to do still, of course!
These three done will give me eight or so cars, a buggy, and three bikes for Gaslands just in my own collection. I have ideas for a heavy truck conversion starting with mashing together two big American 60s/70s Yank tanks, but I think I’ll switch gears slightly after this trio is done.
My first gaming weekend since 2019 has come and gone and it was good. And as is often the case, I took far too few photos, including exactly none during my own game!
Friday evening Corey ran the sci-fi co-op game based on Sellswords he’s mentioned here a few times, while I played a mid-war What a Tanker game and traded my Sherman for a MkIV panzer.
Saturday morning I got a sturdy crew of Norsemen wiped out to a man by Saxons who were somewhat offended that we’d looted and burned the local monastery.
Saturday afternoon I ran a Coastal Patrol game, four German schnellboote attacking a British coastal convoy defended by a Hunt-class Destroyer Escort and a couple of plucky trawlers. The Hunt crippled one of the S-boats but then got shattered by a pair of torpedoes, and the big ocean-going freighter the Brits where shepherding down the coast also ate a pair of German torps before the S-boats roared off into the night.
Saturday evening we wound up doing a scratch game of Gaslands for eight players, a gloriously chaotic Death Race with lots of wrecks and some amazing driving – both amazingly bad and amazingly good!
Sunday morning I defended the shores of England from the German’s Operation Sealion, which was interesting (I’m not the biggest fan of Bolt Action, it’s a very cartoony rule set…), and then because we had time to kill before we headed off to the ferry, we ran another Gaslands game, this time a Flag Tag game for six players. Explosions, mayhem, and lunatic driving ensued!
I think I have a few photos on my phone, will pull them out. It’s been a weird and complicated week since then, hence the delay in this after-action post!
In all of the coastal naval rules sets that we’ve played, spotting and situational awareness are among the most important factors. Doesn’t matter how many guns you have or how good you are at shooting them if you can’t accurately spot and ID the enemy!
With a bunch of fast-moving boats on the table and a lot going on, it can be hard to keep track of who’s got a proper target spot on who, though, especially with things like the rule in Coastal Patrol that means if you fire automatic weaponry, the tracer glare off your own guns causes you to lose all your spotted targets.
We bounced a few options around, and among the simplest is that each ship or boat has a “Spot Card” and a dry erase pen – just mark the ID of who you spot down on it, if you lose spot on them, wipe their ID off.
I already use 3×4 plastic card protectors for ship record cards, so it was easy to take the same template and whip up a Spot Card to fit a 3×4 card sleeve. With that done, saving in both Letter (for North America) and A4 (for the rest of the world) PDF was trivial.
Way back at the very end of 2020 I contacted Misc Minis about decals suitable for 1/1200 ship and aircraft miniatures. After a couple of rounds of email, Kevin sent me a PDF proof sheet with a mix of 1mm and 1.5mm insignia for the Luftwaffe, RAF, and USAAF, as well as some hull numbers as used by the Royal Navy. He’d started with the smallest size of decals for his standard 1/600 ranges, done some tests, and figured out what would work (and what wouldn’t!) when taken down that tiny.
I mentioned the decals in passing in an April 2021 post here, then tucked them away in the dreaded ‘safe place’ and did absolutely nothing with them until this Easter long weekend, two full years later!
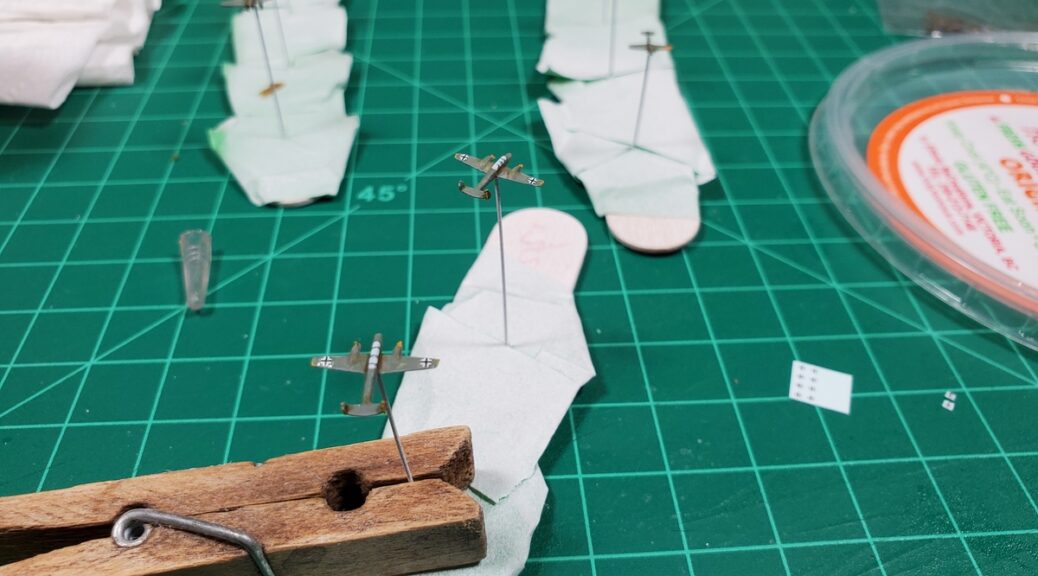
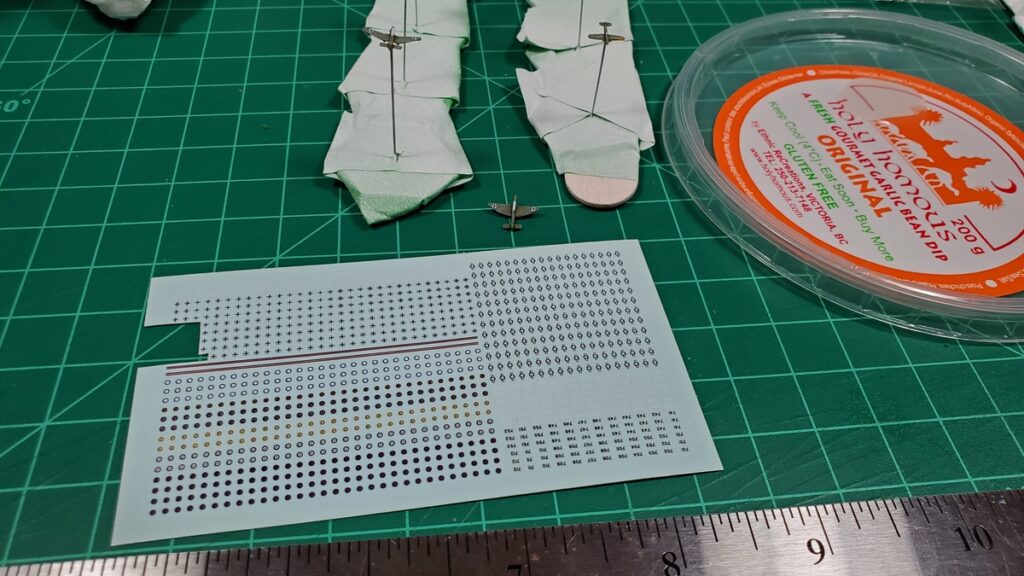
With the various Luftwaffe aircraft seen on my last Workbench post based and painted, I sat down with the tiny 4″x2.5″ decal sheet, carefully cut out even tinier individual crosses, and began putting them on the wings of the Me110 heavy fighters and Ju88 Stuka divebombers.
The full decal sheet, with finished Stukas behind and Me109s still waiting for their turn. Click for larger.
The bulk of the Luftwaffe crosses on the sheet are the black outline/white fill style; there’s also a row of pure white crosses as used (I think?) primarily on night fighters. The lower left has no fewer than six different RAF roundel variants, upper right has a bunch of US Army Air Force winged star roundels, and the lower right has RN hull numbers in both white and black. There aren’t any pure black outline Luftwaffe crosses, but honestly I’m OK with that as the black/white ones stand out a bit better and help ID these tiny, tiny airplanes more clearly!
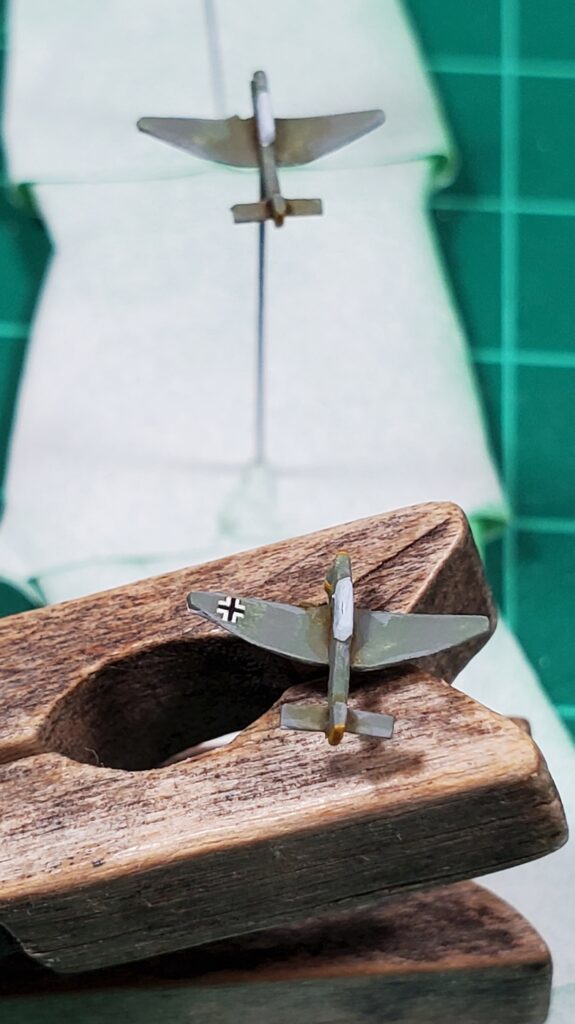
The best closeup I could manage with my cell phone camera. That’s a Stuka with one wing done and the other waiting to be done. Keep in mind that wingtip to wingtip, that entire airplane is about 12mm across! Click for larger.
The Misc Mini decal sheet is full-film so each roundel needs to be cut fairly close to the printed outline. I worked with fine-tip tweezers, a sewing pin, and MicroSet decal solution to get each cross in place. They’ll get MicroSol decal conforming solution next and then matt spray varnish to seal everything in place.
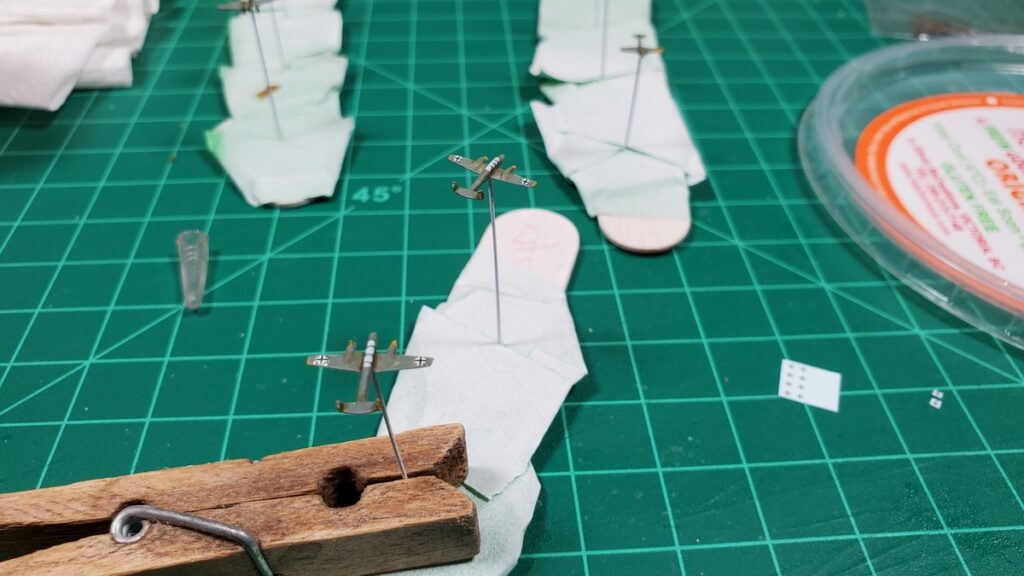
Two Me110 heavy fighters with their roundels in place. Not sure if I’m going to bother doing the insignia on the sides of the fuslage or not – I might just do them with a fine-tip paintbrush as on the Ju88s I painted a couple of years ago for this project. Click for larger.
If you’re in need of tiny decals for tiny aircraft, drop Kevin at Misc Minis a note and ask! This little sheet was thoroughly reasonable for a custom one-off print run (under $10 including shipping) and will last a good long time at the rate I’m using it up. Misc is an American outfit but regular envelope mail for decal sheets is still cheap over the border to Canada at this point!