Historical and quasi-historical gaming of various sorts. English Civil War and Thirty Years War, the Great War (World War One), the Russian Civil War and other interwar conflicts, and whatever else we wander into!
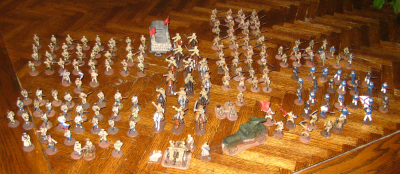
Doing final organization for my Trumpeter Salute Russian Civil War game this evening, I did something I’ve never actually done in the two years of this project — laid out every single painted, game-ready RCW figure and model I have together. The lighting in my dining room is awful, so this is a terrible photo, but it’s fun to see everything laid out for review!
Whites on the left, Bolsheviks on the right. See text for more details, and click for larger.
On the left, the White Russians. Officers and machine gun in front, two dozen Cossack riflemen, then a couple more officers, then 32 rifles from a regular rifle regiment. All of my White Russian figures are from Brigade Games.
In the centre, the 77mm field gun (nominally Red), sixteen cavalry, one armoured car, and one protected railcar. These figures are (so far, at least) all deliberately painted without much in the way of identifying insignia, so they can and have appeared for both sides in our games.
On the right, the Bolsheviks. Officers, machine gun and banners in front, and the long column is forty ordinary Red riflemen. Far right is twenty Red Sailors and their leaders, and behind them is the Red militia of 15 rifles. The Bolsheviks all happen to be from Copplestone.
This gives me a total of 56 White rifles, 75 Bolshevik rifles, and a grand total figure count (including gun crews) of exactly 190 figures, apparently. I’ll tick over 200 fairly soon, as there’s another round of White rifles to paint up. That’ll pretty much finish off the regular infantry, although I do want another section or two of Red sailors. After that it’s off to more of the toys and quirky bits, tchankas, armoured cars and such!
Even more chaotic than usual as I prep for Trumpeter Salute 2013 this coming weekend!
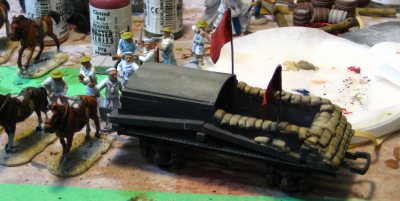
Protected car festooned with Bolshie flags, and other random clutter!
The centrepiece is, of course, the sandbag-and-rail tie flatcar that will be one of the centrepieces of my Russian Civil War game. I got the sandbags to a satisfactory paint job, and if I have some extra time before Friday I’ll do one last round of drybrushing and weathering on the whole car. I can’t really call it an “armoured” train car, so I’ve been referring to it as the “sandbag car” or a “protected railcar”. Anyway, it looks good, especially with some red Bolshie flags hanging off it to proclaim it’s current owners to the world.
The US Navy gunboat sailors crowded around the back of the railcar are part of my “Well, I’m painting, might as well paint something else” drive. They’ve sat on my painting bench for a terribly long time — you can see them in the blurry background of quite a number of previous workbench photos on this blog… a bit of extra paint moves them slightly closer to being done, at least!
The six extra Russian cavalry (Brigade Games Cossack figures, to be precise) are also coming along nicely. That’s the Cossack horses in amongst the sailors there.
Three days until Trumpeter! (although I only really have Wednesday evening to myself, with other commitments Thursday then off to Vancouver Friday… yikes…)
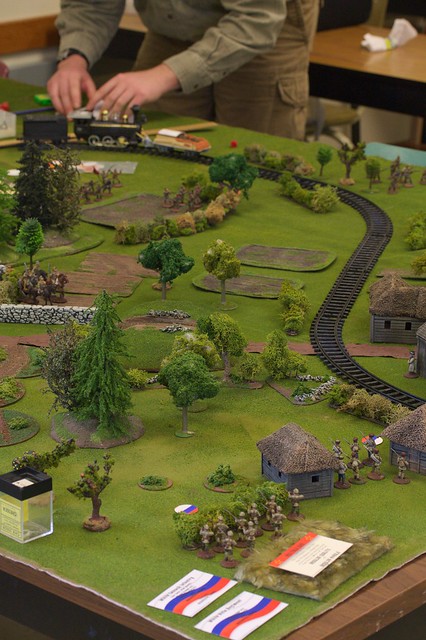
In a cavalcade of firsts this Sunday, my (mostly) freshly-painted Chinese met their match in our new armed train, all being played on our new gaming mat, some 6′ by 9′ of fully flocked canvas drop cloth.
The game, a preview of Brian’s Trumpeter Salute convention game, was the defense of a small Russian town by a combined White and Chinese force. Thankfully for the Whites, they had managed to scrounge up a field gun plus a machine gun. The wealthy Chinese warlord Wu Do also brought one along to the party. Facing against them were a large Red force, including the newly-built armed train and the armoured car.
Opening shot. Red armed train the back, Whites in the foreground. Chinese are out of shot to the left.
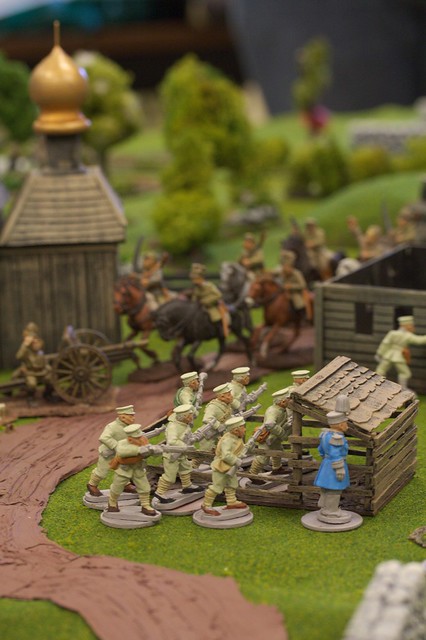
Due to a lot of luck, the Chinese ended up being the central troops in the game. They had lots of officers and their cards kept coming up, so they quickly occupied the central building and started taking fire. Another squad rushed up a hill, only to discover what happens when a HMG opens up on you when you cannot respond.
The maddest moment of the game came when Sean’s Reds cavalry attempted to run down the White field gun. The gun was right in the middle of town, which meant that his close assault was rudely interrupted by two squads of Chinese, including the Warlord’s aggressive Household troops. This did not end well for the Red cavalry, which were slaughtered to a man (and horse).
Red cavalry attempt to run down the White gun. Chinese infantry and Wu Do in the foreground.
By the end the train had done its job and had cleared a route into the town. We called it when it became clear that the Chinese would retreat (having no interest in defending this particular muddy bit of Russia to the death) and the Whites were too weak to hold back the largely untouched Red infantry (even if they couldn’t move due to bad card luck.)
(As usual, we used Through the Mud and Blood from Too Fat Lardies. An excellent rule set all ’round)
Corey recently started painting up a Chinese Warlord force from Copplestone 28mm figures to extend our Russian Civil War gaming in a more Back of Beyond direction, and he’s actually getting units painted and ready for the tabletop (normally I bug him about being the world’s slowest painter…) so I sat down with Inkscape and created a basic set of cards so his Chinese Warlord forces can run in our Through the Mud & the Blood-powered games.
This isn’t quite the full set I made for the Red & White Russian forces; it’s currently missing a LOT of the cards needed for a full M&B game. It works just fine for a Chinese force allied with a White Russian force, though, which is how they’ll be appearing in the next while, until the force gets bigger.
The PDF is four pages long. The first two pages are the cards, set up to match the earlier Russian cards. Page three has the basic graphic needed for colourful markers for a Warlord force – we use these to mark units that are activated or units that are on overwatch (what M&B calls “Wait For It”). The last page is a pair of blinds.
I’ll do up a full set of Warlord Chinese cards eventually. When I redid all my Russian cards in January I reconfigured the SVG file in Inkscape to make it a LOT easier to edit and create new versions. I’ll also be producing a set of British cards, so my long-neglected Brits in tropical kit can join the Back of Beyond madness in proper style.
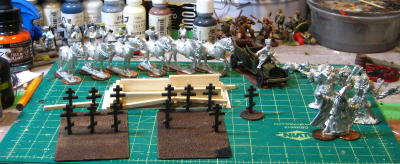
Quiet by our usual standards here on the Warbard this week of both Pi Day and the Ides of March, but I’ve been busy with a couple of small projects leading up to my Russian Civil War game in a few weeks at Vancouver’s Trumpeter Salute convention.
Russian graveyard pieces and other bits. See text for details, click for larger.
Centre foreground and most obvious, some of the Russian Orthodox crosses Archeotech made for me, going into a small graveyard to go alongside my onion-domed church. The wooden thing behind the crosses is the start of a rough wood-and-sandbag-protected train car, as a low-tech armoured train for my Russian games takes place. Behind them, six 28mm horses from Brigade Games; the RCW Cossack riders are mostly lying down in the top right corner of my cutting mat, except for the one who is currently “riding” the hood of the RAFM staff car I painted ages ago and am currently touching up.
Finally, lower right has a random scatter of Reaper fantasy figures for my next “distraction” painting project, the small side project I always have going in case I need a change of pace!
I also learned this week that the Trumpeter Wargame Club, who run the annual Trumpeter Salute convention, mentioned my RCW game as a “Featured Game” in their most recent email newsletter to members… no pressure, then!
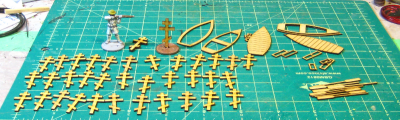
Exactly seven days after I ordered some Orthodox crosses and a few other laser-cut bits from Archeotech, a small padded envelope arrived from the UK. Tucked into a pipe-tobacco tin were 20 of the Orthodox crosses and a pair of small rowboat kits. Amusingly, the tin still smells strongly of pipe tobacco, which combines with the faint burnt-wood smell common to laser-cut MDF in an odd but not unpleasant way.
Orthodox crosses and such from Archeotech. Click for larger, as usual
Andy of Archeotech designed them in pairs out of 1mm MDF, so you glue them back-to-back to get a squarer, cleaner edge than you’d get with a single piece of 2mm MDF. This means that you get a mixed batch of fronts and backs. It’s fairly obvious which is the front and which the back with the MDF Andy uses; one side is noticeably shinier and smoother than the other.
I’ve assembled two of the crosses already, and tacked one of them onto a penny just to get it upright. Scale is provided by a Pulp Figures 28mm U.S. Navy gunboat sailor, also on a penny base.
The other part of my small Archeotech order was a pair of their little rowboat kits. The laser-cut 1mm MDF bits here provide the frame and detail bits (oars and oarlocks) for a small 2″ long rowboat; you provide a strip of light card or heavy paper about 7mm wide for the sides of the boat, as detailed in the well-illustrated instructions on Archeotech’s website. This isn’t a serious figure-carrying vessel, more a small detail piece to appear alongside a dock or as a tender, to provide nautical flavour. It’s a well-designed little kit, though, and the basic idea could easily be scaled up to make a small launch or powerboat that was capable of carrying three or four 28mm figures on small bases.
As I mentioned in my first “Frickin’ Lasers” post, Archeotech is set up to do custom/semi-custom lasercutting specifically for wargamers, and to work with wargamers on designs. I’ve certainly got some things I’ll be approaching Andy about in the future!
Over on Lead Adventure, in a thread about some nifty laser-cut bits someone had commissioned, I randomly commented that I wanted a dozen or so Orthodox crosses for Russian scenery, didn’t think they’d be strong enough if built from bits, but couldn’t see commissioning laser-cut ones because, well, I only wanted a dozen or so.
Whereupon Andy Slater (best known as the administrator of the long-lived and fantastic TerraGenesis wargaming terrain site) contacted me; turns out he has started up a small-run bespoke lasercutting service for wargamers. If he could sell them afterward on his site, was I interested in my dozen or so Orthodox crosses?
You see more and more laser-cut terrain everytime you turn around these days, lots of it very nice indeed, but I’d honestly never considered commissioning short-run custom pieces. Andy has, though, and has set up a small laser-cutting operation with exactly that aim.
I now have a batch of laser-cut MDF Orthodox crosses (and a few other bits from Andy’s store) making their way across the world to me. You can see Andy’s photo of the crosses already, and as soon as mine arrive (probably in a week or less, the Royal Mail->Canada Post pipeline is fairly efficient) I’ll post up my own photo and finally start a few Russian cemetery pieces to go along with last year’s onion-domed church.
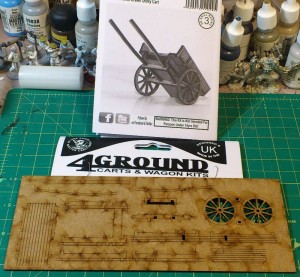
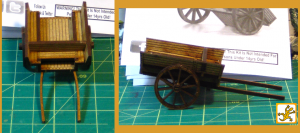
As part of an order that arrived this week from Brigade Games I picked up one of 4Ground’s neat looking laser-cut carts. This one is “28-CAW-303 C19th C Horse Drawn Utility Cart”, known on 4Ground’s own site simply as “Horse Cart”! I’ve been meaning to get some of these 4Ground carts & wagons for ages, as carts and wagons are nearly universal scenery and the pewter & resin ones out there tend to go for larger sums than I usually want to spend on waht i
It comes as a 8’x3′ sheet of 2mm MDF, laser-engraved on both sides, with the parts laser-cut except for very tiny sprues holding them into the sheet. There’s an A4 sheet that is both package label and (black and white) instruction sheet. The instructions are all photo illustrated, over a dozen small but clear B&W photos taking you through the assembly.
Straight from the ziplock bag- instructions at top, cart on it’s MDF sheet below. Bag topper card in the middle, just because. Click for Larger.
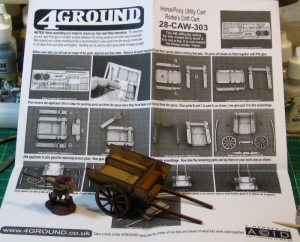
The parts are all marked by clearly engraved letters on the sheet, and the photos and text are more than clear enough to take you through the step-by-step assembly. I should note that there is a typo in the last sentence of the written instructions, though, where the letters identifying two parts are duplicated. The photos are clear enough, and by that point you’re down to so few parts it’s reasonably obvious where things are supposed to slot in.
Finished, with a 28mm Copplestone caveman for scale. Click for Larger.
The finished cart is actually fairly substantial. The body is about 2″ long and 1.5″ wide; the whole cart from tailgate to front of the arms that hold the draft horse is 3.5″ long, 2″ wide across the wheel hubs and 1″ high when sitting level. Resting forward on the arms (what are these pieces actually called? I’m sure they have a name in a real cart…) the back end of the cart is about 1.25″ tall.
Front & side views of the cart. Click for Larger.
I’ve not yet decided how I’m going to, or even if I’m going to, paint this up. I think I’ll experiment this weekend on the offcut pieces of MDF and see how it reacts to washes and other paint. A grey wash and a bit of off-white drybrush might be all it needs to weather the wood a bit and give it a well-used appearance.
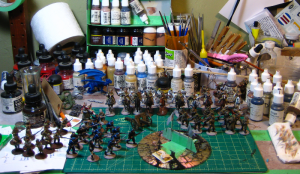
A quick look at my painting bench as a I get ready for Saturday’s Russian Civil War game at GottaCon. On the right, 15 Bolsheviks, a mix of regulars and militia/Red Guard types. Behind them across the back of the cutting matt, a unit of Russian horse. Behind them and currently being ignored, 10 American gunboat sailors from Pulp Figures. On the left of the mat, 14 Bolshevik sailors. Off the mat to the left, a batch of finished Whites from ages ago just waiting to be re-housed as I (yet again) reorganize my figure storage. Centre, a field gun — the crew are lurking behind the Red sailors. The CD has some new greenstuff banners I just primed, and a small pile of ready ammo that will form part of a loaded/unloaded marker for the field gun.
All sorts of things, mostly Russians, being painted. See text for details, and click for larger!
In other convention-related news, I’ve submitted my RCW game to Trumpeter Salute; haven’t had the event confirmed by the organizers yet but it’s nice to have it submitted.
Right, back to the painting mines! Four days to the game!
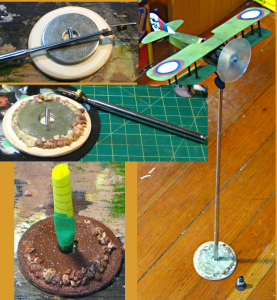
…it’s a bird, it’s a plane… well, actually, it’s a flying stand to get my existing SPAD and Nieuport fighters onto the table properly!
Flying stand construction. See text for details, and do click for larger!
The lower part of the base is two 3″ plywood circles from Micheal’s craft store, the lower one with a hole drilled in it wide enough to accommodate the head of the M4 20mm long bolt. The top circle has a smaller hole to let the bolt through, and I used a woodworking rasp to bevel off the edges. The two washers are fairly heavy 2″ fender washers. I used superglue to tack them in place, then ran a bead of Gorilla Glue around the edges to lock them in place and round off the base. The gravel imbedded in the Gorilla Glue adds nicely to the weight of the base, as well.
The base will get a quick paintjob to match the rest of my terrain, then some lichen or foam foliage to break up the outline a bit.
The actual flying stand is a cheap mechanic’s extending inspection mirror from a local auto parts store. The base unscrews and is threaded for a metric M4 bolt – that’s a 20mm bolt coming up from the centre of the base. Once the mirror at the top was removed, the round ball it swivelled on turned out to be easy to shape with 120 grit sandpaper, so I sanded it roughly cubical and tacked the alligator clip (also cheap from the electrical section of a hardware store) on with superglue just to hold it. Then I used fine wire to lash the clip into place, saturating the lashings with superglue after I was done. The result is low profile and more than solid enough to be gamer-proof. I did nearly glue the hinge of the alligator clip shut, though… try not to do this!
The small square of basswood on the handle of the alligator clip is just to make it easier to open all the way; the way it’s mounted on the telescoping rod centres the airplane over the stand – which is a good thing – but the rod gets in the way of your fingertip when you try to open the clip to it’s widest point. The screw I put in the belly of the SPAD turns out to be almost too big for these clips; if you look closely you can see I bent the handle of the clip outward to allow the clip to open just a bit wider. The whole clip has also been bent forward slightly to improve the angle the planes sit at when they’re clamped in.
Total cost of the whole thing is about $10 or $12. The extending inspection mirror is the most expensive part at about $8; four alligator clips were $2 total; four 20mm M4 bolts were about the same; the 2″ fender washers are about 50 cents each; and a package of six 3″ plywood craft discs was $3. If you had a workshop area full of random stuff (which I don’t) and could scrounge bits you could build these for not much more than the basic cost of the inspection mirror.
The whole assembly is just over 20″ tall to the tip of the alligator clip, more than tall enough for my purposes. The telescoping post will still unscrew from the bolt in the base, which I will probably maintain as being able to take it apart makes it much easier to transport, and the telescoping rod and alligator clip is the part most likely to be damaged and need to be swapped out.
My brother has a big 1/48 DH4 that we’re not sure will balance securely on this stand; I might wind up making a larger flying stand, probably based on CDs, for that plane. I’ll eventually make one or two more flight stands this size, too, but given that for the near future there’s never going to be more than one plane over the table at a time, we’re good to go and it was easier than I thought it was going to be to construct a solid flying stand.