Good, basic techniques, nothing fancy. We’ll be doing more specific terrain ideas and techniques in the future, but for now, a long catch-all cut’n’paste job from the old website.
Basic Scenery & Terrain:
General Scenery:
(any scale, very easy, very cheap)
Felt. Lots of it. (OK, seriously now…) I use lots
of different colored felt all over my gaming tables. It’s often nessecary
to mark the exact edges of woods, scrub and other areas of cover (to avoid
stupid “That’s in cover”/”No, it’s outside the treeline” type arguments)
so I use dark green for forests, light green for scrub/bushes, grey for
urban/built-up areas, brown & tan for cultivated fields, blue for rivers &
streams, and more grey for paved roads.
Forest/vegetation areas are cut rounded & blobby, fields are generally
square or rectangular, urban areas are complex polygons. Dirt roads &
streams I cut 1/2″ wide, paved roads are 1″, rivers are 1.5″ (This is for microarmour (1/300) and 15mm both – I tend towards slight
abstraction of scale)
Cut most pieces fairly small – the size of your palm or hand – you get
more flexibility that way, and can put several pieces together if you want
larger forests etc. You can get commercial things that do this sort of thing (Geo-Hex makes
some) but felt is dirt cheap – less than 50 cents Canadian for a 12″x12″
square – and you know how to use scissors, right?
Back to Top
HEDGES:
(nearly any scale, easy, cheap)
The craft store near work (Lewiscraft) stocks big fat pipecleaners
– they call them ‘Chenille’ – for about 90 cents Canadian,
in packs of 12 one-foot-long pipecleaners.
These cleaners are 2x or 3x the thickness of regular pipecleaners, and
make good 15mm or smaller hedges, or perhaps 6mm hedgerows (Normandy
bocage type of thing). Cut them into whatever length looks right – I cut
mine around 10cm long, getting 3 of them from each fat pipecleaner.
Brush or spray glue (dilute white glue, for me) on them, then pour ground
foam turf onto them for foliage. Let them dry, then carefully shake off
the excess foam. The resulting hedges look pretty good, are fairly durable(the foam will rub off a bit, but you can always add more later). And with
a dozen per pack, that’s 12 feet (!) of hedges – more than enough, really.
Back to Top
TREES & SHRUBS:
(coniferous & leafed trees, 15mm scale or smaller, easy,
cheap)
(For Birnam Wood, and less mobile sorts of trees) The same store that provided my hedges had “Bumpy Chenille” as well –
pipecleaner that’s puffy along the length. Properly cut, these make good
trees, very durable & cheap. 12/pack, roughly 90 cents Canadian for a pack
– each length makes between 4 to 8 trees, of various sizes. (That’s a lot
of trees per pack…)
 A stand of bumpy chenille trees.
The tallest trees you can get from bumpy chenille are around 4-5cm tall –
so those of you with 25 or 30mm figs will call these shrubs. For 15mm or 6mm, they make good trees, though.
I glued mine to pennies, 1 tree per penny. White glue works. After they’re
secure, ‘paint’ dilute white glue onto the tree, working down from the top. This sticks some of the strands together, giving a good branch-like
effect. Then cover the tree in ground foam turf, shaking off the excess.
Let dry, and you have solid, stable trees for you tabletop. The basing
means that you won’t tip them over as easily, and you can move them out of
the way of you figures if you need to – much easier & more flexible that
fixed ‘forests’ of lots of trees on one larger base.
(Pennies are very useful as bases, actually – I’m starting to put all
sorts of things on penny-bases – I’ve finally got something to do with the
jar of them sitting on my desk…)
Back to Top
LARGER TREES
(15/25mm scale, somewhat complex, fairly cheap)
I’m building some trees using pipe cleaners for the trunks and branches and foliage netting for the leafy bits. I use 10-15cm lengths of pipe cleaner, three or four per tree. Twist them together in the middle for a trunk, spread them out at each end for short roots and longer branches. After assembly, paint the trunks – I started with brown spray paint, then brushpainted a coat of grey paint. The fuzziness of the pipe cleaners under the paint makes pretty good bark texture. (Especially if they’re supposed to be alien trees)
You can use lichen or foliage netting for foliage. I happened to find a big bag of foliage netting from model railroading days, so I’m using that. Cut it into inch-long bits (more or less), stretch them out a bit, and drape them down over the branches. Secure them with a spot of glue.
I based my trees on small pieces of matt board, and added foam ‘bushes’ and ground foam ‘grass’ to the bases. They look pretty damn good, I think, and seem durable enough to stand up to the horrors of war(gaming) and transport.
I didn’t invent this method – see the Scenery Links below for Terragenesis, where I originally found the method.
Back to Top
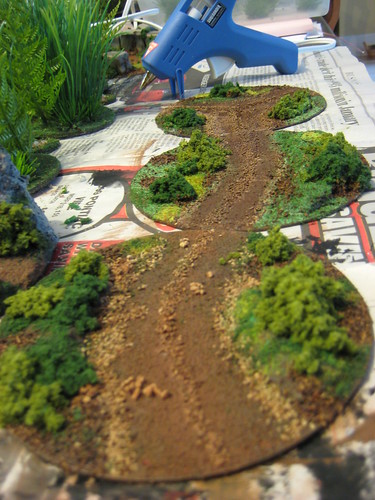
Tom’s FAST FOAM FORESTS
(any scale, more or less)
I have a way of doing forests. It’s not very good but I thought I’d share
it anyway: some blister packs (eg Geohex or even Games Wonkshop) come with foam
backing. Tear this up into little blobs, trim any highly pointy bits with scissors and paint
dark green (spray is best). Paint some card a lighter green (grass green). cover lightly with
glue (eg pva [white glue]), pour on painted foam chunks and squash down. You now have
forest of little foam trees. I did it quickly, so my forests tend to look a bit angular! The
scale is a bit off from how some do 1/300, though. It works fine in 1/1000, and matches
the groundscale, not the model scale, in 1/300.
Tom Anderson
[This could look good as scrub/brush areas for 15/25mm gaming as well. I’ll have to try it
and see – Brian]
Back to Top
HILLS
(any scale; easy; less cheap)
A couple of hill-making ideas to try:
Stryofoam:
This is the blue or pink stuff, sold as building insulation, usually in 1 inch thicknesses. It’s solid, quite tough and strong, and carves fairly easily. (The white beaded stuff isn’t as solid or as strong, and the beads make for odd scenery.) It can be used to make very realistic looking hills.
Using a long razor knife or, even better, a serrated knife, cut out shapes in the sizes you want for hills. Slope the sides inward a bit, but don’t try to carve all the slopes out with the knife – it’s too much work.
Instead, get a sheet of quite coarse sandpaper (80 or 100 grit) in a sanding block, and sand the slopes into the styrofoam. It will come away under the sandpaper very easily, although it will produce a load of styrofoam dust & particles that probably aren’t very good for you. Working on a wet cloth or paper towel will keep most of the dust out of the air, and vacumning up afterward is essential.
A few minutes work will give you a hill with realistic looking sides, sloping gradually up to the peak of the hill. Your hill slopes should mostly be shallow enough to allow whatever figures you usually play with to stand without falling or sliding too much.
Paint the hill (usually green) and after it’s dry, flocking is probably a good idea. Here’s my two-part method to make really, really tough flocking:
- Dilute white glue half-and-half with water, and use a cheap paintbrush to apply it to the hill surface.
- Sprinkle liberally with flocking – I use Woodland Scenic’s ground foam. Let it sit for a minute.
- Then knock the excess flocking – the stuff that hasn’t been glued down – off the hill. Working carefully, you should be able to save most of it for use later.
- Mix white glue and water roughly 1:2 – you want a fairly thin white glue mix – and use an eyedropper to soak the flocking with this mix.
- The drops might create a few holes in the flock coat – it’s easy enough to drop a few pinches of flock back into those holes.
- Let the whole thing dry – usually at least overnight – and it’s done. The doubly-glued flocking can survive a surprising amount of wargaming, transport, and similar abuses, and if the flocking gets thin you can easily apply another layer or new patches.
Cardboard Hills:
This method gives less realistic hills than the styrofoam one, but the hills are even cheaper, solid, and give actual on-table contour lines for your hills.
Using boxes, pizza trays, or some other source of good cardboard, cut out pieces of cardboard in steadily increasing sizes, keeping all the pieces mostly similarly shaped, and use white glue or maybe hot glue to stick them together in a hill. Each piece will act as a contour line for it’s level of the hill, making it easy to determine who’s uphill of whom or what exact LOS is. If each piece is about one inch or so bigger on all sides than the one above it, you will get gentle, usable contours. Cliffs or similar are also possible, of course.
For finishing, a thick coat of green paint and flocking works, although you have to be careful that the cardboard doesn’t warp if you use too much water in either the paint or the glue.
Back to Top
ROCKS
(any scale, slightly complex, variable price)
These are more painting tips than modelling ones. Rocks of various sorts are easy enough to model. Plaster is of course practically stone already once dry, so with a bit of carving and molding makes great stonework, cliffs, and similar. Rock can also be carved into blue stryofoam easily enough, although that requires a bit more skill or luck.
However you make your stone, here’s two ways to get the stone looking good.
Method 1: Good grey stone should start not with grey but with black – paint the stone area solid black, and let it dry. Then do a heavy drybrush of medium grey, leaving the bottoms of the crevices and other low points mostly black. Then do a much, much lighter drybrush of white, hitting only the high points of the rockface. You can get a great look to your stone with this method – far superior to plain grey stones. Varying the exact shade of the stone is as easy as changing the weight of the grey & white drybrushings.
Method 2: This works on plaster, and is borrowed from model railroading landscaping. Use inks, washes or dyes to color the plaster a ‘base color’, using gray, black or any other color of wash. I have used burnt umber artist’s inks, slightly thinned, on plaster rocks, and will be using the method on castle walls soon. After the wash, moderate drybrushing will bring up some highlights, although the wash and the nature of plaster will give some highlights naturally.
Back to Top
Buildings
(15mm, 25mm, other scales; a bit complex, less cheap)
I’ve been building a fair number of structures lately.
Nothing elaborate, but they look all right and work on the gaming
table. I’ve got my three usual methods of building construction here.
Part of the problem with a lot of buildings is that you really need access to the inside of the structure to fully use it in a game. This can make construction a bit of a challenge.
Method 1: Draw & Fold:
If you don’t need access to the inside of a building, and it’s of fairly small size (eg for 6mm or a small 15/25mm shed or something) I often use folding-card buildings. On paper, draw the building’s wall/roof/etc flat, and connected along common sides where possible, then add glue tabs to
the ends of walls. You can either leave the drawings uncolored and then
color them later, or color them now and spring for color photocopying onto
card. Either way, you then get your completed drawn building copied onto
a light card – the stuff that’s about the same weight as file cards.
Then cut the building out (coloring it first if you need to) and carefully
fold & glue it together. Use a ruler to make your folds exact and straight,
and I recommend a glue stick for gluing – it won’t run or warp the paper
the way white glue could.
The best part of this method is that you can draw one building, and then
get it copied as much as you need. Require a dozen towers for a city wall,
or a bunch of huts for a village? Draw it once, then copy & fold as many
as you need.
Method 2: Sheets of Stuff:
I use both foamcore and matt board for building construction.
Matt board is the stuff that is used in picture framing
– most framing shops will sell it to you. It’s not the cheapest material
going, but it is very strong and solid. Get a sheet that’s black on the
back and some building-like color on the colored side (mine is a sort of
grey-green) and you won’t even have to paint it.
Foamcore should be available in art supply or stationary
stores. The usual version is 1/4″ thick, with glossy paper on both sides and
open cell foam between (hence ‘foamcore’). This stuff is murder on cutting
blades, for some reason. Buy a bulk pack of X-Acto blades, and replace the
silly things whenever the blade starts catching on the foamcore instead of
cutting smoothly. The thickness of foamcore makes it very good for modelling
heavily-built structures – big warehouses, armoured structures, etc.
Matt board is better for modelling buildings with lots of doors, windows
and other openings. It’s easier to cut than foamcore, and being stronger,
less likely to suffer from being cut full of holes. They both have their uses,
however.
Cut walls out from the board to the height & length needed, lay out doors &
windows using a ruler, then carefully cut them out – use several shallow passes
of the blade instead of attempting one deep cut, which could easily damage the
board, especially foamcore. Human scale doors are roughly one head-height taller
than a person and about half again as wide as a person’s shoulders. Larger doors
can be of any size & proportion desired.
Two Storey Buildings:
Making a multi-storey building that has the lower floors fully accessible is a
bit more work than normal building, but worth it, I think. Start by constructing
each floor as a single-storey height unit, adding a cardstock floor to all levels
above the ground level. To get the units to stay together when stacked, add
small pieces of scrap board to the outside of each wall which will hold the upper
floor in line with the lower. Make these holders look like utility conduits, vents,
signs, whatever you feel they need to be disguised as.
Alternatively, add strips to the bottom of the floors, positioned to fit against
the inside of the wall of the unit below, again to keep the top floor secure.
When access to lower floors is needed, the upper levels can simply be lifted off
carefully and placed to one side, if need be with figures still inside.
Foamcore is also good for small scenic details and bases for buildings and
small ‘scenes’. You could even make larger hills and similar with it, but it’s
a bit expensive for that.
Back to Top
TRENCHES
(15mm or other scales; easy, cheap)
Easy, good looking trenches and similar earthworks for 15mm can be made from
foamcore by taking advantage of the multi-layered construction of foamcore. Cut
the top layer of paper all the way through, following the desired edges of the
trenchline. Carefully tear away the paper over the trench, then carve the foam
out, leaving the bottom layer of paper to hold the whole thing together. The
bottom & walls of the trench get a muddy brown coat of paint, and the outer
parts of the piece of foamcore should get green paint & flocking, along with some
brown – or all mud, if it’s the Western Front.
Back to Top
BUNKERS:
(15mm or larger scales, cheap,easy)
Next time you buy a blister-packed mini, don’t throw out the blister –
turn it into a bunker. Many of the square/rectangular blisters minis come
in have the slightly-rounded edges & corners that many bunker-type
installations have – just glue the blister to a cardboard base of some
sort, paint it concrete colored, add or paint on doors & firing slits, add
vegetation or details to the base, and there you go…dead easy, and isn’t
it nice that your new bunker came with an interesting mini or several as a
bonus?
Back to Top
CONCERTINA/RAZOR WIRE
(any scale, cheap, easy)
Barbed or razor wire is fairly easy to make for any scale. Get a roll of very fine wire – mine came from a hardware store and was called “Hobby Wire”. I believe the width is .005″. Roll lengths of wire along a cylinder of the right width – wire is usually between knee and waist high in coils, so just match dowels or bits of tubing against the height of your figures. Fairly tight coils are the norm, so you’ll need a lot of wire to make your lengths of concertina. Just keep coiling until you’ve got the length of concertina you need. Base the coils on pieces of card, mounting them with posts or similar methods. These look really good, are fairly durable, and are easy. Get your troops hung up on the wire today!
SCENERY LINKS:
A collection of scenery-related links, to sites that either focus exclusively on miniature wargaming scenery or that have good scenery sections in them:
- Terragenesis This has to be the foremost wargames scenery site out there. Focuses mostly on Goudge Dorkshop games (ewww…) but the techniques are great, the photos are good, and the whole site is very cool. Also has a great collection of scenery links.
- Major General Tremorden Rederring’s Colonial Wargames Page: Great scenery ideas, great photography, good sense of humour – this site even has Kipling, by Jove!
- Schild & Vriend Wargaming Club: A Belgian club, with good scenery ideas, good photos, a good philosophy of scenery, and one of the most literate, clearly written sites I’ve seen – I only wish my site was as well written.
- The WarFactory is an impressive site, mostly concerned with scenery building ideas, including some spectacular plants and trees. Great photographs, too.
- The Miniatures Page The biggest, oldest news & community site in wargaming. Covers everything; check the Workshop section for occasional scenery articles.
Back to Top