Renedra Generics Scenery Bits

A few weeks ago, I took advantage of J & M Miniatures’ offer of free shipping for all of December to order a few bits and pieces of Renedra’s injection-molded plastic bits and pieces.

Before I move on to my quick review of the Renedra stuff, I just have to give a quick shout-out to James of J & M. I was already following his great wargaming blog Rabbits In My Basement, so when he announced he and a friend were launching a web/mail-order wargaming business I checked the site out. He’s got all sorts of good stuff from Perry, Renedra, 4Ground, Plastic Soldier Company and other companies, and is (as far as I can tell) the sole Canadian seller of some of these ranges. Given that domestic shipping is cheaper and skips the expense and irritation of occasionally being dinged by the nice folks at Canada Customs, as well as the great customer service I’ve gotten so far from James, I think it’s safe to say that a reasonable portion of my hobby budget will be heading toward Ontario in the future!

Moving on to the Renedra bits, I ordered two packs of their Mixed Tents, two packs of Barrels, and one pack of Gravestones.

renedra-jan2013
Tents and barrels – all six tents from one of the Renedra sprues, the barrels assembled and unassembled. In the background, barrel sprues, figures and clutter! The cutting matt has a one inch/half inch grid, the figure is a 28mm Brigade Games White Russian priest.

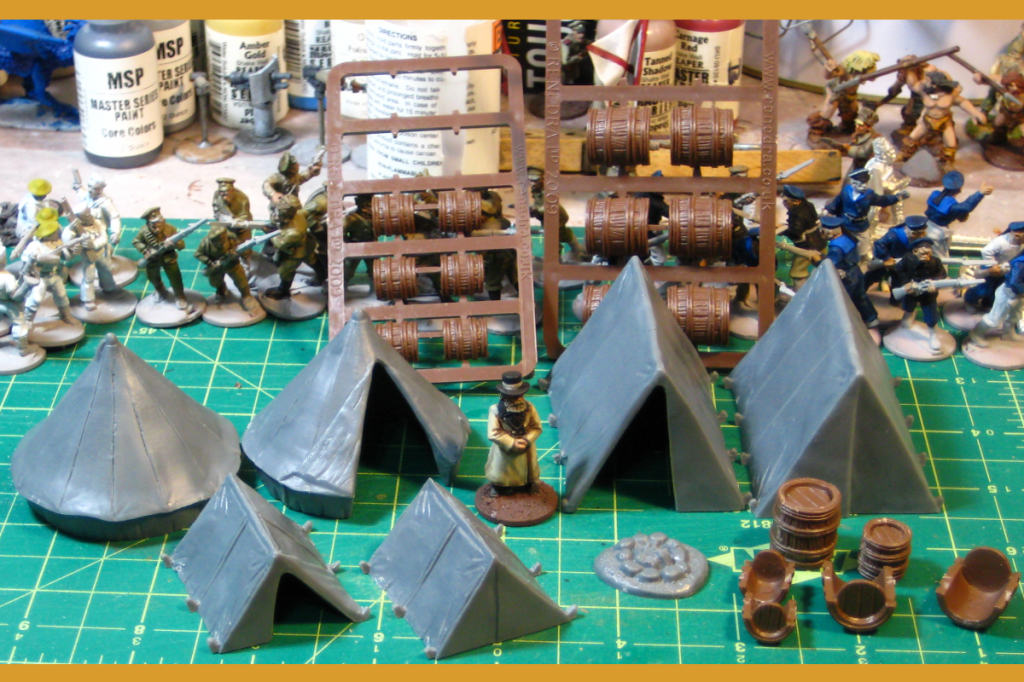
The Mixed Tent sprue has two bell tents, two large ridge tents, and two small ones, each done with one open door and one closed tent. The bell tents are 2″ diameter (55mm) and 1 5/8th” tall (40mm); the ridge tents are 2 3/8ths long (60mm), 1 3/4″ wide (45mm) and 1 1/2″ tall (37mm), while the small ridge tents are 1 1/2″ long (37mm), 1 3/8″ wide (35mm) and 7/8″ high (20mm). They’re done in a medium grey plastic, and very solid – even the tents with open doors don’t flex much if you squeeze them a bit. These are nearly universal tents; you could put them (especially the two types of ridge tent) in nearly any historical setting and they’d fit right in. The bell tent is a bit more specific to the 19th and early 20th Century, but iconic in it’s time and place, up to World War Two or so, maybe later in some areas.

Filling the gaps between the tents on these sprues you get a nice campfire piece about 3/4″ across and two camp beds or stretchers with legs to hold them off the ground. Nice little bits of camp clutter to add detail and life to a camp scene on the tabletop, although the beds are going to need bases of some sort if they’re going to survive transport and use on the table.

I don’t generally base buildings, but I’ll likely base these tents. The ones with open doors especially will look better with a base, with a bit of canvas groundsheet visible in the door – the bell tent especially will have an especially visible interior when on the table, because of it’s design.

The Renedra barrel set has two sprues in brown plastic, one with five large barrels, the other with five small ones. As you can see from the photo above, each barrel half has one round end, which minimizes the visible seams on the completed barrels. Unfortunately, the side hoops don’t quite seem to perfectly align when you glue the halves together, but the tiny mismatch is really only visible when you’re handling the barrels and will be totally invisible on the table! These are an older style of barrel, with thin doubled hoops (wood, maybe?) instead of flatter metal hoops, so they’re more suitable for pre-modern gaming, but will work OK as clutter and freight on most pre-WW2 tables.

Finally, the Gravestone set has two identical sprues in grey plastic. Each has a variety of monument stones, all about 1″ tall and 1/2″ wide. You get 16 slab stones (one broken into two pieces), 4 crosses, a small column, a slab/vault topping, five bases that can fit a variety of the slabs and crosses, and finally a raven. These are all done in the same solid, strong grey plastic the tents are made from, more than strong enough for tabletop use. Two minor things bug me about this sprue, one being that only a few of the stones have any texture or detail on the backs; the rest are just smooth plastic without even a basic stone texture. Fixable with a bit of sandpaper, but still a detail that could easily have been fixed. The other is even more minor – after getting the excellent Ainsty gravestones with their readable, laser-engraved lettering and details the stylus-pushed-through-putty squiggles of these Renedra stones lettering and details does feel like a minor step backward. This is still a great set of grave markers, enough in one set for quite a large graveyard, and the raven is a neat, whimsical (or possibly gothic and ominous) touch!

The last thing in my J & M order wasn’t scenery, and wasn’t something I’d even ordered, but was (I assume) thrown in as a thank you gift from J & M – a very nice large suede dice bag, about 7″ wide and 9″ tall and bright red. My own dice are in a bag I hand-sewed myself nearly twenty years ago in junior high, but I think I’ll press the new bag into service to carry the collection of card decks, markers, tape measures and random gaming accessories that normally slops around loose in my backpack. It’s large enough for a couple of pencils, too.

Prepping for GottaCon 2013

In just under three weeks our local big convention kicks off – GottaCon 2013 is February 1st, 2nd & 3rd at the Pearkes Recreation Centre.

I’ll be running a Russian Civil War scenario, possibly with a Back of Beyond flavour. It’ll be a variant of my Even Whites Bleed Red scenario from last year’s Trumpeter Salute convention, mostly because I haven’t yet come up with a more entertaining title than that!

gottacon_game

I’ve got Red sailors, cavalry and more Red regular troopers on the painting bench as we speak, and some nice scenery bits to add to my existing Russian scenery. Now, to get off the computer and back to that painting bench!

How I Paint Russians

It seems “what colours do you use for WW1 Russian uniforms?” is one of those things that comes up again and again. I’ve been painting an awful lot of Russians (of various WW1/Russian Civil War flavours!) for a year or two now, and I’ve been asked for painting recipes in email, in comments here, and on forums. It’s time to do something I should have done months ago – write a flippin’ blog post that I can link people to, to save myself the trouble of typing the same thing out again and again…

I paint with Reaper Master Series paints, largely because they’re carried by my FLGS and the price point (especially when you buy in Triad sets) is better than GW or Vallejo. Reaper has this awesome web-gadget called the Power Palette that you can fire an image in, then extract the closest Master Series colours from. I scanned a couple of images from the Osprey Publishing RCW books and got the Power Palette to suggest a list of colours for me.

Red Horde!
A Russian Civil War Bolshevik infantry force.

I’ll add better shots of my painted figures eventually, but here’s my basic World War One/Russian Civil War Russian uniform recipe, all paints Reaper Master Series unless stated otherwise.

For all figures:
Base: Khaki Shadow
Wash: GW Devlan Mud (note that this is now out of production (thanks, geniuses at GW…) so I’ll eventually have to find an alternative…)
First highlight back up with straight Khaki Shadow.

My Reds get a much darker Devlan Mud wash, the Khaki Shadow highlight, and that’s pretty much it.

My Whites get another round of highlighting with Terran Khaki. Officers in especially spiffy uniforms get a final highlight with Khaki Highlight.

Some Russian uniforms seem to have darker, greener trousers; I use Military Green as a base there, sometimes just as a wash over Khaki Shadow.

The Russian uniform procurement process, even before the Civil War started, was known to produce quite a bit of variation in what was nominally the same colour of cloth. I use Bone Shadow and Polished Bone as alternate base colours, especially in the Red forces. For the Reds, I also use a lot of other random colours – other greens, browns and greys especially, as the early RCW Red Guard/Red Army had enormous trouble (even by the usual Russian standards, which is saying something!) keeping anything like an actual “uniform” appearance!

The Whites had equal trouble at various stages, but I keep my Whites in neater trim than my Reds, purely so the two forces can be told apart on the tabletop!

For Cossack blue trousers, Soft Blue base. I need to rediscover what I highlight Soft Blue with, I appear not to have written it down in my painting notes… I also have no photos at all of my Cossack infantry plaston, which is a shame.

sailors_16may
Red Sailors! See below for painting notes.

For Red Sailors, Worn Navy for blue base, Leather White for white base, Pure Black for black, Khaki Shadow (again) for khaki/green. Kerchiefs are Sapphire Blue.

The Worn Navy gets a very thin wash of 1:1 Worn Navy:Pure Black for shadows, then highlighted back with Worn Navy and Soft Blue. Pure Black coats get a highlight of 1:1 Walnut Brown:Pure Black. Leather White gets a Pure White highlight. The white stripes on hats and kerchiefs is actually a 1:1 Leather White:Pure White mix.

I’m probably going to go back into my entire batch of Red Sailors and do another round of highlighting on the blue clothing, it’s a bit bland currently. More Soft Blue, maybe with one further brighter highlight.

Hope this helps, I’ll add better photos as I take them!

Draft Versions of New M&B Cards

As I mentioned recently, I’ve been rebuilding my Russian Civil War cards for Through the Mud & the Blood over the last few weeks. I’ve finally got the revised versions of my existing Red & White Russian card sets for RCW to a point where I’m happy with them, so for a change of pace this evening I set out to design some cards for some of the other forces we’ll have available.

rcw-card-draft-jan13
Quickly assembled screenshots of draft M&B cards, some revised, some new.

Above, a quick screenshot of the current state of my cards. The Red Russian card has slightly changed background art; all the Big Man cards have a significantly changed layout with more information, and I’ve got a basic background for both British and Warlord Chinese forces! I have a small force of British in tropical kit, and late in 2012 my brother picked up a starter force of Warlord Chinese from Copplestone, which he promises to paint up one day.

One thing I’m not sure of: flag or star insignia for the Warlord Chinese forces? The flag fits in better with my other force cards, but the star works a bit better with text on top of it, as that black stripe on the flag really gets in the way of legible text. Opinions in comments below, please!

The British are also, of course, likely to be useful for other M&B folks, so I’ll get that set done up next, probably in February after GottaCon 2013, where I’ll be running an M&B-powered RCW game!

WW1 Posters On BibliOdyssey

The often-fascinating website BibliOdyssey has just posted a glorious selection of World War One posters from the US, UK, France, Greece and elsewhere.

I’m hard-pressed to pick a favourite, but purely for graphical awesomeness and a slightly surreal message, it might be this American poster telling people to fund a hungry machine gun.

feed-me
Feed a machine-gun – the Great War equivalent of those “Feed a child” ads we see today, I guess?

BibliOdyssey is also over on Flickr, too.

Pulp-era Aviatrixes

“Aviatrix” is the feminine version of “aviator”, but of course you knew that already. This fabulous pair is courtesy Kemon’s Flickr stream, which has a huge array of mostly aviation-related stuff, a lot of it from the interwar pulp era!

dorothy-seb-pilot
Dorothy Sebastian learns to fly.

Dorothy Sebastian (Wikipedia link) was apparently an early Hollywood actress.

blondell
Joan Blondell, another 1930s movie starlet.

Joan Blondell (Wikipedia again) was also a Hollywood actress, active from the 30s right through to post-WW2.

Need inspiration for a pulp-era glamorous female aviator? Here you go!

Eastern Front Details for the Tabletop

Rummaging through other people’s blogs (as one does) I tripped over this nice two-part series on Eastern Front gates: Part One, Part Two from August 2012 on Miniatures & Terrain.

These gates with the tiny shingle roofs over them seem fairly common in Russia & parts of Eastern Europe, and I’ve been meaning to make one as part of a larger churchyard for my Russian onion-domed church.

Happy New Year, Have a Pulp Travel Sticker!

I haven’t posted any random pulp graphics for a while, so here’s a 1920s/30s style British India luggage sticker featuring the Taj Mahal.

taj-sticker
The British Raj in India, etc – an interwar-style graphic for your amusement.

I’ll probably throw together a “Warbard’s 2012 in Review” type post this coming week, but in the meantime, hope you had a safe and entertaining New Year’s Eve, a good 2012, and are looking forward to an even better 2013!

(Incidentally, the Taj Mahal graphic was originally from the awesome Open Clip Art Library site, home of all sorts of awesome Public Domain SVG & PNG images. I’ve mentioned OCAL here before, but it’s always worth reminding people of!)