Far too quiet around here lately, a post a month or so for far too long! I do apologize; I’m still gaming regularly but my painting has dwindled to a terrible ZERO figures finished since May of this year and since I finished the buildings in August I’ve done no scenery work, either!
I’m going to get the painting desk dusted off and back in production fairly soon; I’d hoped for this weekend but real life and work got in the way. I’ve also got a pile of small and medium-sized partially-finished scenery projects to complete, so I might re-start the whole process by clearing some of them up.
In the meantime, here’s a pair of links, both map related!
Someone in Hungary has digitized a huge collection of 1910 Austro-Hungarian maps of Central Europe in 1:200,000 scale. It covers the entire Austro-Hungarian Empire and nearby portions of neighbouring states, so the whole thing covers from Istanbul in the lower right up to southern/central Germany (around Cologne) in the top left. The quality of the scans is very good, and the relevance for World War One or Russian Civil War gamers should be obvious!
In a pulpier vein, via the always-awesome Propnomicon, this 1885 map of Chinatown in San Fransisco. I’ve linked to both Propnomicon and the David Rumsey Historical Map Collection websites before, but they’re both well worth exploring!
Quiet around here recently; I’ve been gaming regularly through the summer but not doing a whole lot of painting, scenery building or much of anything else!
Here’s a few cool links to share, though. They’re all, mostly by coincidence, on that perennial Warbard theme, zeppelins! First off, some notes, sketches and other cool stuff from Kevin Conran, the lead designer of the movie Sky Captain.
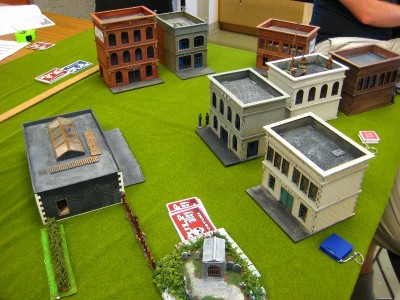
Sunday’s five-player Pulp Alley game set a number of “firsts” locally, as our biggest-ever Pulp Alley-powered game with five players and about thirty figures on the table, and as the first appearance of the “Weird League” rules from the new PA supplement, Perilous Island. It was also the first on-table appearance of my newly finished urban buildings from Sarissa Precision.
Sean pulled out his half-painted The Shadow figure and quickly thrashed together a League based around The Shadow, using the “Dark Pact” League Perk to add a number of powerful and creepy Shadow-like abilities, notably the ability to vanish from the gaze of men (and women…), and the ability to seemingly teleport straight through solid walls, among other things.
Neither of us have built Leagues with the new “Weird” abilities, but as far as I know The Shadow & friends are properly constructed and we used the rules correctly. The “Weird” abilities certainly add a very cool flavour and some great new powers to the Pulp Alley game, and I’m looking forward to future outings of The Shadow, and to building new Leagues (or re-building old ones) to incorporate more of the “Weird” abilities.
I’m also pleased to report that Pulp Alley moves along just fine with five players and thirty figures; it’s naturally a bit slower with that much stuff going on and that many people, and the tabletop can be gloriously crowded, but the system works just as well for a big crowd as it does for two players with six or ten figures total!
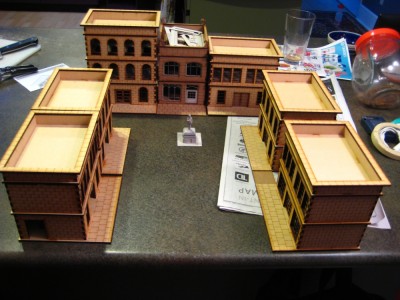
I took a few photos, but only one of them turned out OK. Here’s the setup right near the beginning of the game; only Dale’s Red Air Pirates are visible on the rooftop they arrived at; the other four Leagues are lurking behind buildings or off the edges of the photo! I like how the buildings look, but they really show how I need to crank out a bunch of alleyways, sidewalks and other urban filler/background scenery bits now…
A Pulp Alley game setup, before the action starts. Click for larger, as usual.
Finally have the Sarissa CityBlock 28mm lasercut MDF buildings to a table-ready state, including another hand-painted advertising sign on the side of one of them.
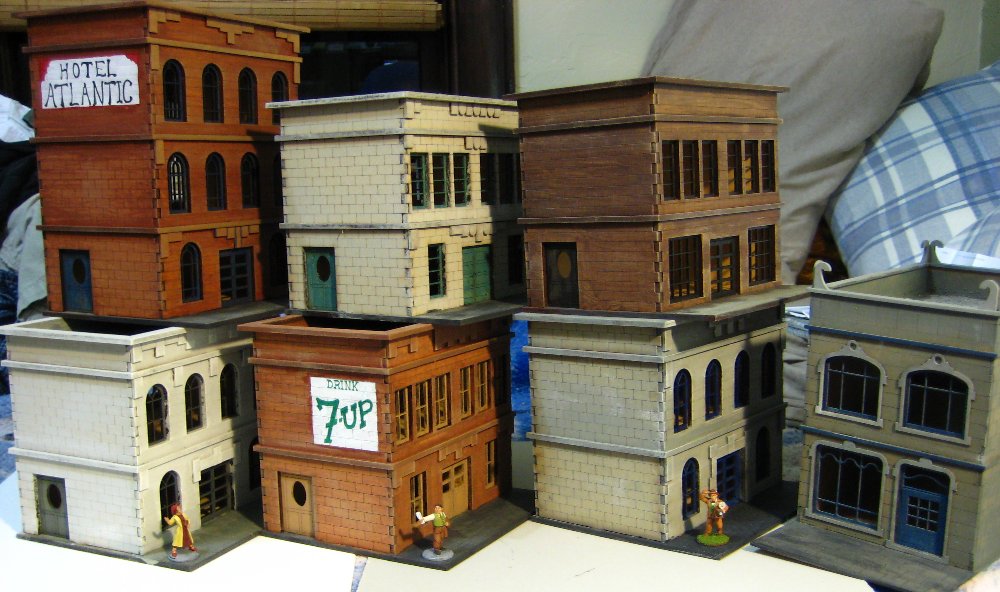
Here’s all seven buildings (six CityBlock plus one Narrow Townhouse from the Gaslamp Alley range) stacked up somewhat awkwardly:
All seven MDF buildings, ready for the tabletop. Scale provide by three 28mm Pulp Figures reporters. Click for larger.
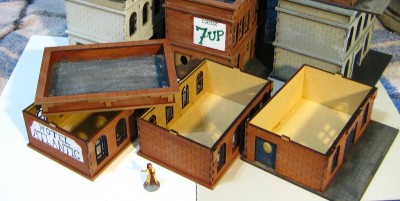
In one of my earlier posts, Chris had asked in comments about how these buildings came apart, so here’s the Hotel Atlantic spread open:
The Atlantic Hotel spread into it’s constituent parts; three floors and a roof. Click for larger, as usual.
You can see I haven’t (yet) done anything with the insides of any of these buildings; beyond possibly splashing a coat of plain paint in, I’m not sure how much I’ll do inside them.
So, having built seven of the things but not actually written a full review, what did I think? First off, I like them, and will definitely be ordering more of Sarissa Precision’s buildings at some point. They’re solidly built, well designed, have enough detail to look good right out of the box, and are also easy to add extra detail to. Everything fits together very well, the laser-cutting is crisp and precise, and the CityBlock & Gaslamp Alley buildings are good generic city filler buildings, similar to thousands of real-world buildings all over the world, pretty much anywhere Europeans influenced architecture. Use them as-is, you could be nearly anywhere in North America, the UK or much of Europe; add a few “local” touches (different street furniture, a few different buildings for flavour, etc) and you could be in Shanghai, Cairo or Singapore just as easily!
I’ll do a couple of things differently on the next batch of MDF buildings I build, though. First of all, painting MDF is like painting a sponge. The stuff absorbs paint and water like crazy, and is actually quite hard to paint as a result. You go through a surprising amount of paint to get decent coverage; and because of the absorbency you can get streaky or blotchy paint coverage very easily. A couple of my buildings required a second coat of their base colour, and painting details like windowframes and the signs was harder than it should have been because you needed thin, wet paints and a well-loaded brush to get good coverage. So I’ll be doing as much painting as possible before assembly next time, instead of rushing assembly this time just for the joy of having complete buildings sitting around!
Spray cans or an airbrush might actually work better than brushes for basecoats on MDF, if you have access to an airbrush or a better selection of spraypaint colours than I do currently.
I’ve got a whole pile of small scenery detail bits that have been building up on the edges of my painting desk recently, so with these buildings out of the way it’s on to them to get them done and into play, then onto more figures! We’re having a Pulp Alley game tomorrow that should feature all my new buildings, so look for photos of that soon too.
Progress continues on my seven Sarissa Precision buildings, albeit at a slower pace than I’d intended!
Basecoat and drybrushing is done on all seven buildings, gravel roof details likewise in place on all seven, most of the doors and windowframes are painted, and I’ve started cleanup and finishing.
I’ve always liked the looks of the big hand-painted signs and advertisements on the sides of older buildings, so given the wide blank side walls of the Sasrissa CityBlock buildings, it seemed natural to break out the smaller paintbrushes and go to it!
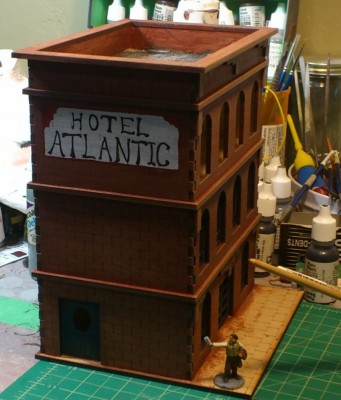
Newly-painted Hotel Atlantic sign on the side of the three-storey Sarissa Precision CityBlock building. Click for larger, as usual!
Still some cleanup to be done on the basic lettering, and I might yet redo the red ornamenting in both top corners, but the basics are done and I like how it turned out. This was all done freehand with a brush over some light pencil lines for guides, after I used Inkscape on the computer initially to play with letter sizes and spacing and figure out some basic guides. The “Hotel Atlantic” seemed like a good generic name, likely to occur anywhere in the English-speaking world, or even in non-English-speaking areas as the hotel set up to cater to English-speaking travellers.
One of the other buildings has a blank white square on it currently; later this week I’ll figure out what sort of sign or ad I want on it, too.
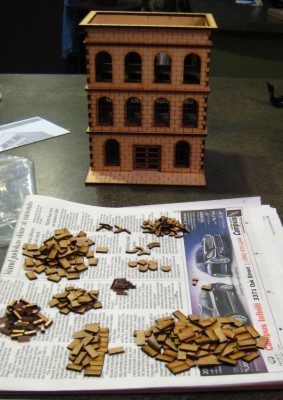
Having assembled my new Sarrisa Precision lasercut buildings, it was time to consider adding some extra details to really make these buildings “pop” and bring them to life. One of the things I wanted to do was add detail to the fronts of the buildings, especially the cornices at the roofline, which are often quite elaborate on brick or stone urban buildings built in the late 19th or early 20th Century.
As I’d assembled these buildings I’d reflexively kept the bits of MDF from inside the windows and other openings in the models, and looking at the little pile of lasercut leftovers, I realized they’d be perfect for basic detailing and adding some relief to the fronts of my new buildings.
The three-storey Sarissa Precision building, and the sorted offcut bits of MDF. Click for larger, as usual.
There were more than enough bits and pieces to do the fronts of five of the seven buildings, with leftovers to keep going on the remaining two if I decide, although I’d like to use some light card in layers for a slightly different look on the last CityBlock building and the Gaslamp Alley townhouse.
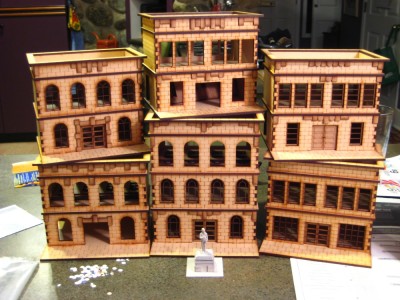
Here’s all six of the CityBlock buildings stacked up, five of them with basic ornamentation added with “scrap” MDF.
All six CityBlock buildings stacked up, five of them with front details added. The statue is roughly 28mm tall, just for scale. Click for larger.
Next step is chimmneys and other rooftop detail. I’ll use basswood and plastic tubing for chimmneys, and create roof hatches, vents and roofwalks from basswood and card. Masking tape for tarpaper or paint and fine gravel will complete the roofs, then there’s painting to be done!
In my last post (two+ weeks ago!) I mentioned I’d bought a bundle of Sarissa Precision’s lasercut 28mm CityBlock buildings to bring our pulp gaming into an urban realm. I’ve finally got all seven buildings assembled; here they are on the counter.
All seven Sarissa Precision 28mm lasercut buildings. Click for larger, as usual.
The six similar buildings are from Sarissa’s CityBlock bundle, with one extra floor purchased to give me five two-storey buildings and one three-storey building. The seventh building is the Narrow Townhouse from Sarissa’s Gaslamp Alley Victoria SF line.
The CityBlock buildings go together quickly and easily; the walls and floors are 3mm MDF, and the window frames are seperate sheets of 2mm MDF designed to slot in behind the walls. The first several buildings I put together with more enthusiasm than consideration and glued the windows in right away; for the ones I’ve finished more recently have had the windows left out for now to make them easier to paint.
The floors and roof all come apart to allow access to the interiors of the buildings during games, and the simple tab-and-slot system should survive many games with no issues. The buildings all feel very solid once assembled.
The Narrow Townhouse from the Gaslamp Alley range is one of Sarissa’s most recent releases, and there’s a number of tweaks, refinements, and added details compared to the older CityBlock buildings. The interior floors have wood planking engraved on them, some of the etched and cut detail is a bit finer, and instead of 3mm & 2mm MDF, the Gaslamp buildings use 2mm MDF and laser-cut light cardstock, called “greyboard” on Sarissa’s website. This makes the Gaslamp buildings lighter than the CityBlock ones (although just as solid) and somewhat more detailed. The windows have both inner and outer frames lasercut from cardstock, for example.
Having assembled the basic buildings, I’m now turning toward detailing them before painting. I want to add some details and bits on the front facades and cornices of the buildings, and to the roofs. I’ll use fine modelling gravel on some roofs for a tar-and-gravel roof, and narrow masking tape on others for tarpaper roofs, and add details like chimmneys, roof walks and possibly even rooftop signs.
After that it’ll be time for paint. The engraving on the CityBlock walls is too large to “realistically” be brick, but I’ll likely paint several of them up in traditional red bricks anyway, as well as some as stone.
Detailing photos and writeup in the next couple of days!
I’ve been out of town on a work project for the last seven weeks, after rushing through the last couple rounds of my Lead Painter League entries before I left. While I was gone I was stupidly busy and had no time to game, paint or even really keep up on hobby news!
However, I’m back home now as of Sunday night and can’t wait to get back to my painting bench and some gaming!
I did order some things while I was away — the magic of Paypal and the internet at work — so I have the new Pulp Alley expansion waiting for me to read it and try it in a game, a big bundle of 28mm buildings from Sarissa Precision to start assembling and painting, and another order from Pulp Figures incoming to add to my painting queue.
I had a quick first look at the Sarissa Precision CityBlock 28 buildings earlier this evening, and they look great. They’ll be easy to assemble and paint, but should also reward a bit of extra effort to add detailing and personality to them. Expect a review and a series of build articles here on the Warbard in the near future.
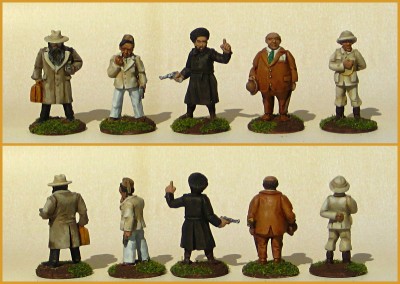
Second-to-last round of the 7th Lead Painters League over on the Lead Adventure Forum, and it’s more Pulp Figures for me, with a cadre of suspicious characters lurking in a back alley somewhere!
Suspicious Characters! 28mm Pulp Figures. Click for full size, as always.
These guys will be great fun in our Pulp Alley games, I’m sure. I’ll be doing up a League for them as soon as I’m back in Victoria and back into my usual gaming haunts!
Off to the last round of the LPL today! It’s been a lot of fun to participate, even if real life has kind of cramped my painting schedule.
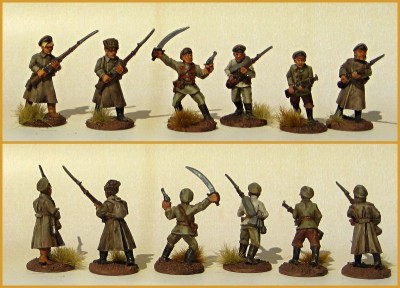
Back to the Russian Civil War again this LPL round with some Copplestone 28mm Bolsheviks. I really like the whole Copplestone Back of Beyond range, even the “rank and file” infantry have loads of character and lots of really nice details.
28mm Bolsheviks from Copplestone. Click for full size, as usual.
The tan background and khaki on the Bolshies gives this photo quite a nice sepia tone overall; that wasn’t really planned but looks good!