
Russian Civil War Cavalry WIP

A quick late night post to alert faithful readers to two short-duration sales of possible interest.
First, in honour of Her Majesty’s Diamond Jubilee, TooFatLardies has 25% off everything except figures until next Thursday the 31st May. A grand chance to stock up on that TFL rulebook you’ve been considering, or grab a couple of their excellent Specials, which are stuffed full of all sorts of goodness. I’ve just topped up my collection of Specials, so I now own everything TFL has ever published for Through the Mud & the Blood…
Secondly, in honour of the American Memorial Day weekend, Brigade Games, maker of (among a huge list of other things!) excellent Russian Civil War 28mm figures, have a deal until the 28th May: orders over $30 US can get a 10% discount by plugging the code “HONOR” (note American spelling…) in while you’re completing your transaction. I won’t be personally taking advantage of this one, but if you’ve been thinking of a new RCW force, or something else from that huge list of good stuff Brigade sells, now might be a good time!
Speaking of Brigade, I badly need to finish the long review article I’ve got on their Storm in the East RCW/WW1 Eastern Front figures. You’ve seen them here as my White Russian forces, but they’re nowhere near as well known as Copplestone’s famous Back of Beyond range. There are some very nice figures in the Brigade range, though, as nice as anything Copplestone put out, and they fit together beautifully on the tabletop. I’ll make time early next week to put the finishing touches on that writeup and get it published here.
Have an excellent weekend, no matter what your excuse for a party is!
I speed-painted these guys in about two evenings back in March so they could add a bit of colour to the Russian Civil War game I ran at Trumpeter Salute, but haven’t gotten photos of them until now.
The figures are Copplestone’s Bolshevik Sailors, although at this point they could fight for either side; the Whites had sailor-infantry too, although nowhere near as well known as that of the Reds. I painted them up in fairly pristine naval uniforms, which is probably slightly more Hollywood than historical, although the various naval units were known to cling to their unique insignia and uniforms in the field — they did have a reputation to maintain, after all! I have to give credit to other people who’ve painted these figures up beautifully, especially over on Lead Adventure, as I cribbed freely from their photographs to get these sailors looking good and fairly accurate.
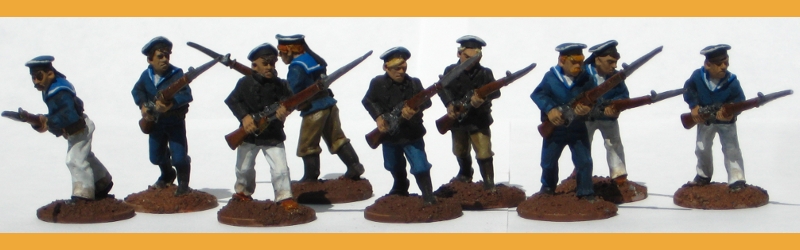
The colourful naval uniforms help break up the unrelieved khaki mass of my Reds; my Whites get their colour from the plaston of Cossack infantry that forms about half of my current White. The sailors will get another round of highlighting at some point, likely when I paint up the new sailors I recently ordered from Copplestone. The faces and blue uniform items especially could do with another highlight. Still, not bad for pre-convention speed painting, I think!
This post also marks the 200th post here on the Warbard! Not bad for less than 18 months of activity in this format, is it? We had a big burst of activity right at the beginning as I turned content from the old site into posts and caught up on a backlog of stuff I’d never documented, but still the average is somewhere around three posts per week.
That’s 200 posts published (plus about a dozen in-progress ones lurking in the background), 250-odd images, 60 or so comments (about two-thirds from actual readers, the rest from myself or Corey replying to those posts) and 5000+ spam comments, only a few of which ever actually got out into the site, the rest died in Akismet or the moderation queue.
Onward and upward; here’s to the next two hundred!
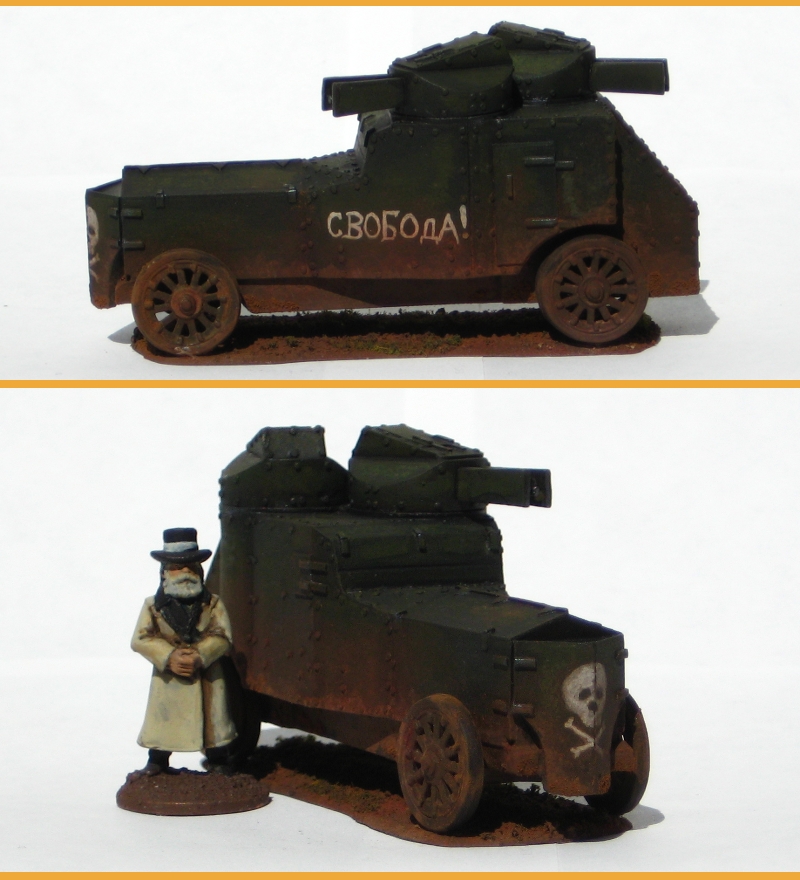
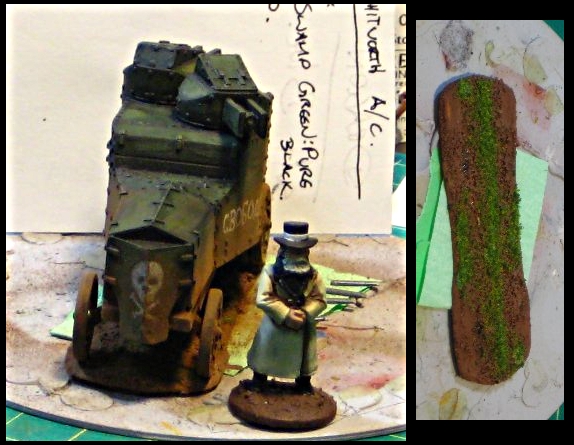
Finally got the Russian Civil War Armstrong-Whitworth Armoured Car from Copplestone completed and photographed. The new monitor and computer I set up ten days ago helps hugely with good photos, not only is processing them faster the new brighter monitor makes contrast and colour balance easier to sort out. (oh, and I remembered how to set custom white balance on my camera again, which always helps picture quality and reduces the amount of work you have to do on the computer afterward…)
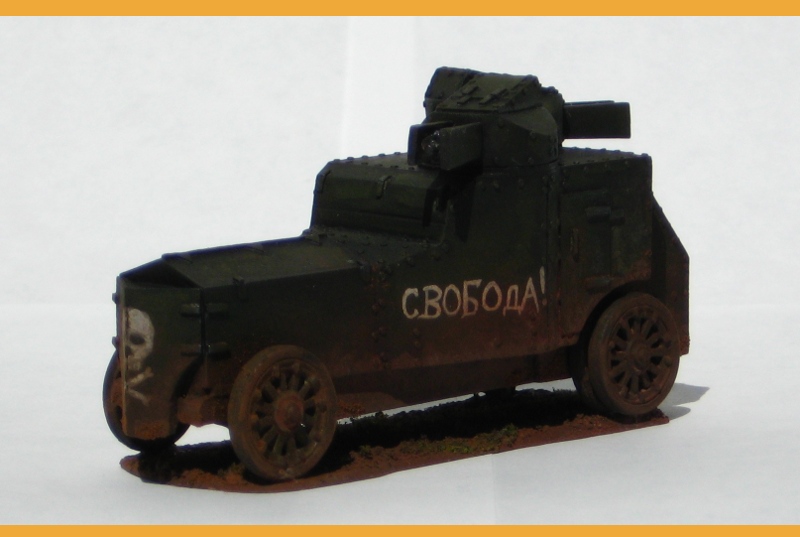
Anyway, the Russian armoured car “Freedom!”, suitable for appearing on nearly any side of the Russian Civil War, all finished and ready for the tabletop:
Two related links, as well. Via Lead Adventure, a very, very high quality (and free!) booklet on vehicle weathering. Most of the techniques aren’t new, but it’s great to have them clearly illustrated in a free, high quality PDF.
Via GWP, this page on Austin armoured cars, mostly focused on the ones that wound up in Polish service but of course it talks about the ones built in Russia that were captured by the Poles. Great photos, including some unique ones I haven’t seen anywhere else.
It’s been a bit quiet around here lately, which is entirely due to the fact that I finally bought a new computer and have spent the last week setting it up and transferring seven years of stuff off my old computer. New monitor and other peripherals with the new computer, and I’ve realized how bad some of the photos I’ve published have been, and how burnt-out the old monitor was!
Anyway, I got back to the painting bench finally, and finished the Copplestone 28mm Armstrong-Whitworth Armoured Car for my Russian Civil War forces. It’s deliberately generic, able to show up in anyone’s service, Red, White or other, and with that in mind I asked over on the Lead Adventure Forum for some good generic Russian names for the beast. One of LAF’s resident Russians suggested “Freedom” as a good universal name, and so here we have the armoured car “Freedom”, ready for service!
The figure is the same 28mm Brigade Games Russian priest as in other pictures. Here’s the front of the vehicle, with the skull & crossbones on the armour protecting the radiator. Random Russian trivia: apparently the skull & crossbones is known as “Adam’s head” in Russian. The smaller photo to the right is the base of the armoured car before I glued the car to it. The base is 1mm plastic car with some Milliput ruts and ridges, a bit of sand, paint, then some basic flock. It’s cut just big enough to encompass the wheels, designed as a brace for the wheels rather than the sort of base you’d handle the vehicle by. I’m always a fan of minimalist bases, and these thin little “shadow” bases are perfect.
These photos were taken after dark on my painting bench, so they’re not the greatest, but I’ll try and get some photos in daylight this weekend, after the last few touches are finished on this vehicle and it’s had a coat of Dullcoat to protect the pastel dust weathering.
Always interested in a new gaming system and being pen and paper roleplayers, Brian and I have been playing a little bit of Songs of Blades and Heroes recently. Like many of our gaming experiences, this one has been long delayed in coming but it was well worth the wait.
Our first game was a wonderful and thoroughly-illegally built three-way match involving two groups of Orcs and my Reaper Mouselings, his Dwarves and my Mouselings have had it out. The game is interesting and fun and very fast (we played three games on an hour and a half ferry ride) but has a few weak points.
Our current warbands are both tricked out minimum figures, maximum damage warbands. Neither has more than 7 figures, each worth at least two dozen points apiece. Hordes of zombies these are not. My mouselings have half their 300 point standard warband allotment between my mounted-on-an-owl, magic-using leprechaun leader, Shamus O’Reilly, and his familiar, Mossy, a captive stone golem with shooter(medium) and combat 5. Brian’s dwarves are just as nasty, with the two flanking dogs and a leader with Quality 2 and Combat 5.
A note about the game: In order to get units moving and fighting, you need to score successes by rolling at or above the quality on a d6. Combat is a simple oppposed d6 + Combat Value + modifiers. Lower Quality scores are better, higher Combat scores are better.
The game itself plays well, with some bad break points. Specifically, magic-users are useless as ranged combat figures, but deadly when they transfix. Combined with Mossy’s powerful combat and throwing ability, this gave my team a one-two killing “punch” that was hard to beat. Add in the dwarves (and mouselings) short-move and you can see where it will go wrong quickly. Where the dwarves beat me was when they were able to get their dogs around into my magic user (only combat 2) and made him move did things go badly.
And then there was the rout. Or maybe I should say “The Rout.” Brian apparently cannot roll combat rolls. I cannot roll quality checks to get people moving. These two phenomenmom manifested in one game where I never made it more than one or two short moves away from the table edge (basically less than 4″). When Brian got my leader to book it off the table, this triggered a morale roll every other warband member. Which I failed. And so my entire warband ran off the table. In a single turn.
In sum, we do enjoy playing the game, but I am not certain if its simplicities truly make me happy. We need to try some different warbands, including zombies, skeletons and cheap soldiers and see how that works.
And where are the pictures? I haven’t taken any and Brian didn’t either, so no pictures for all of you. Besides, we were playing with basically no scenery on a cafeteria table for most of our games, so they wouldn’t have been great photos anyway…
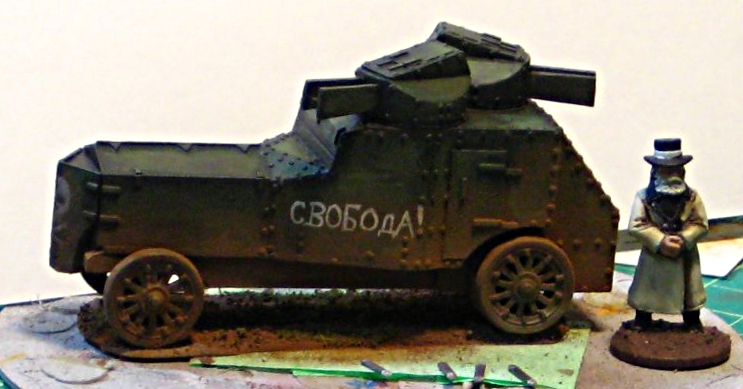
My recent order to Copplestone Castings included the first armoured vehicle for my Russian Civil War forces, a very nice resin and metal 1/56th scale model of an Armstrong-Whitworth Armoured Car. It’s a pretty typical design for a WW1/RCW Russian armoured car, with a pair of machine guns each in their own turret on a six-wheeled armoured body.
The resin and metal are all very cleanly cast, with practically no flash, no casting errors, and minimal seam lines on the metal parts. You get the resin body, two resin turrets, two metal machine gun barrels, a metal front axle, and six metal spoked wheels. The body is roughly 3.5″ long
After cleanup I drilled and pinned the gun barrels to the turrets, but haven’t bothered pinning the turrets to the body — I think there’s more than enough contact area, despite superglue’s notoriously poor shear strength.
Here’s the beast in bare metal, with a Brigade Games 28mm White Russian priest for scale, and below, as it currently sits on my workbench.
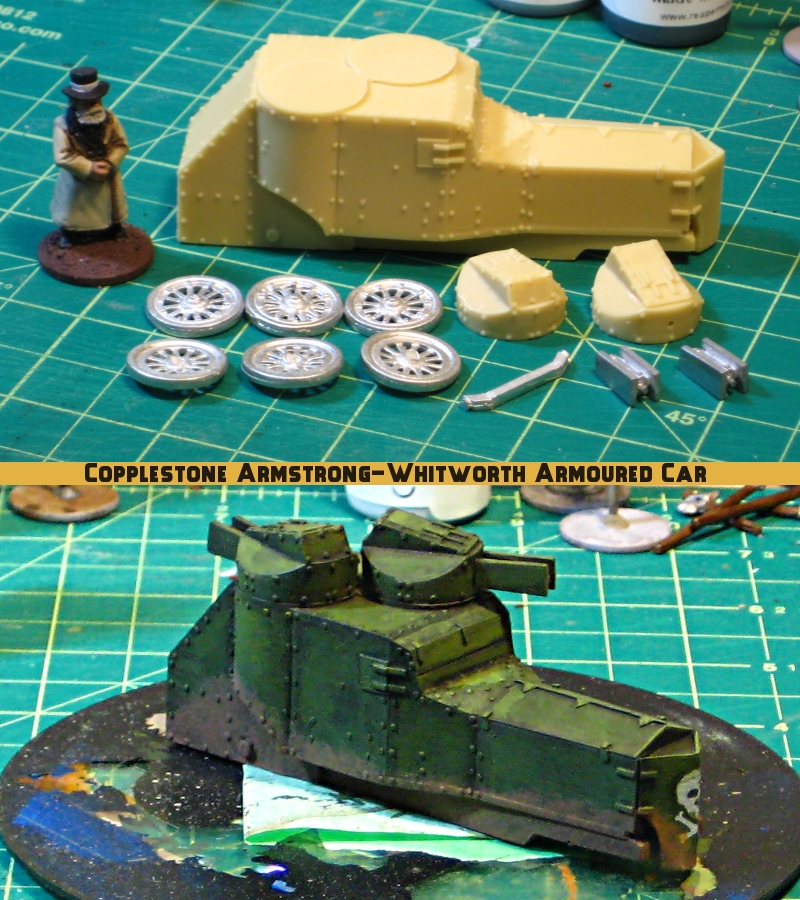
The paintjob so far (all paints Reaper Master Series acrylics) is a basecoat of 2:1 Swamp Green:Pure Black, then a GW Devlan Mud wash. The green is gradually highlighted up with straight Swamp Green, a 1:1 mix of Swamp Green:Military Green, then straight Military Green.
The skull on the armoured radiator cover is freehand from Leather White, with a bit of a highlight of Pure White.
The undercarriage got a basecoat of Blackened Steel, then a mix of browns (Earth Brown, Muddy Brown and a couple of others) to muddy it up. I used a cheap, stiff brush to stipple the browns up the body for the muddy effect.
The paint job so far on the Armstrong-Whitworth has to trace it’s inspiration to Sidney Roundwood’s spectacular article on painting British tanks for the Western Front. The plan from here is to get the wheels on and the base installed (a minimal “shadow” base from styrene card and Milliput) then break out the pastel chalk for another round of dust and dirt.
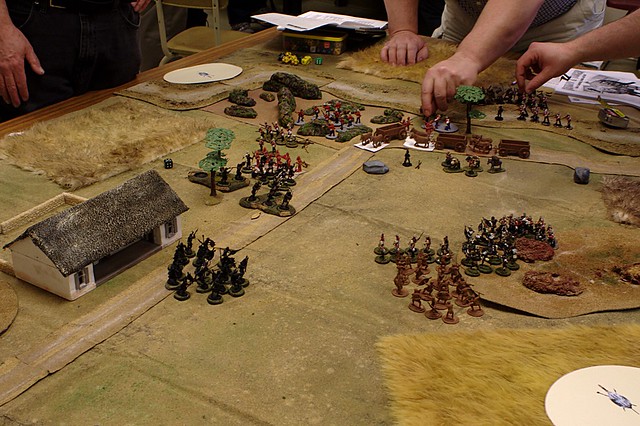
Introduced another local gamer to our Mud & Blood-powered Russian Civil War gaming on Sunday afternoon, it was a good little game although my attacking Whites kind of stampeded his defending Bolsheviks, despite the heavy machinegun they had to assist.
The scenario was another lift out of the great M&B scenario book, Stout Hearts & Iron Troopers, this time the very first scenario, “Attack on a Strongpoint”, which has two infantry sections with an HMG defending against an attacking platoon.
My attacking Whites were able to stay mostly in cover until they were very close to the edge of the hamlet, screening themselves from that lethal machinegun for the most part. There were a few tense moments when the MG caught one White section and another was thrown back after attempting to close assault one of the Red sections, but then the gun jammed, I was able to get another section in to launch a brutal close assault on the same Red section, and on the other flank my single flanking section poured some terrifyingly accurate rifle fire into the other Red section, and it was all over.
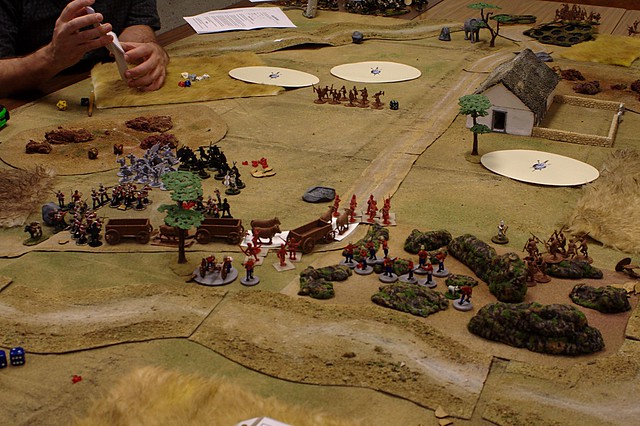
Here’s the table fairly early in the game, with my Whites in the foreground advancing and Reds visible on the edge of the hamlet.
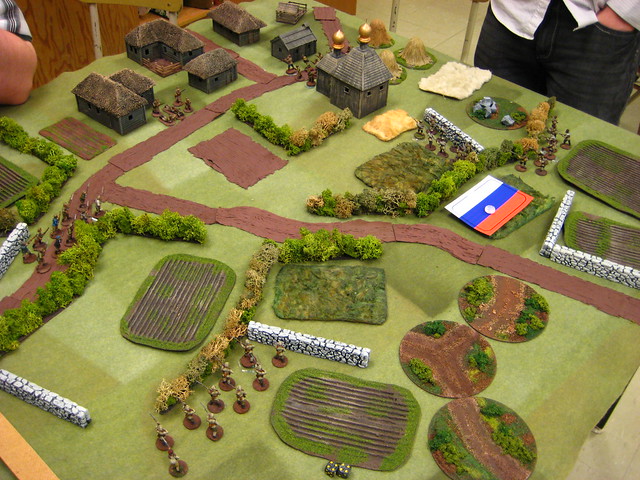
The one White Blind (the Russian tricolour marker on the far side of the table) is a rifle section I was able to keep on Blinds right until I got them to the hedgeline behind the church, where they unmasked and proceed to slam the Red machinegun in a hail of fire. Units coming off Blinds get bonus dice to fire, which proved devastating.
We’ll hopefully get a chance to do a larger RCW game in the next few weeks, but today’s smaller game was interesting and Nathan was interested in another go at the system sometime in the future. I’ve got another fifteen or so Bolsheviks to get off the painting table sometime soon, which will finally give me enough Red figures that they don’t have to be on the defensive all the time!
Oh, and I also have an inbound order from Copplestone with some shiny new stuff. It won’t be just infantry in our RCW games shortly, let’s just say!
And so the day began, much like the day before it, but with the promise of relief. Dust clouds had been seen along the road toward the main force, maybe the good Colonel could see fit to send us some more men. Yesterday’s fight was bloody but at sundown, we still held the hospital, if only just.
-Memoirs of the Zulu War, Col. Reginald Heathe (ret.), commander of the Royal Oak Bay Volunteers 1875-1891
Sunday marked our second Zulu War game, the first to include figures from all five players who have bought in (myself, Malcolm, Dale, Bruce, and Nathan). Also debuting this game was my hospital, built on an imperial-ized version of Matakishi’s detailed plans.
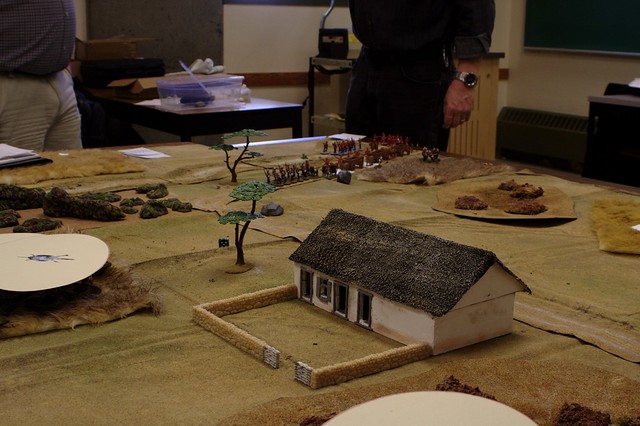
The back story I concocted for this game was that my Royal Oak Bay Volunteers had found themselves under siege yesterday and had narrowly carried the day, but were holed in the hospital and required relief. This explained my single company on the table (my remaining British and Zulu are unbuilt). A large relief column was moving towards the hospital in an attempt to relieve it.
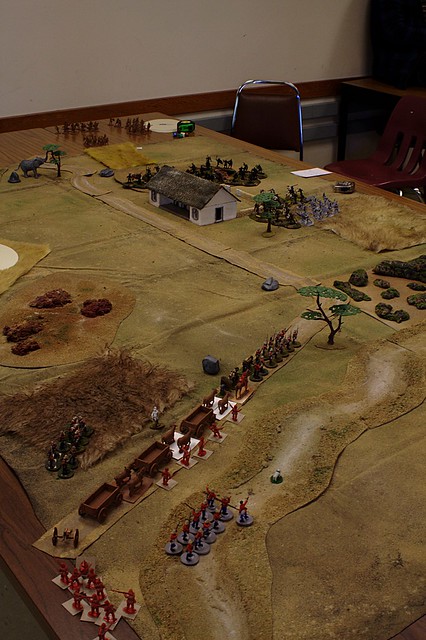
It all began well enough. Zulus appeared at one of six random locations under a blind, usually two blinds at a time. Luck meant that most of the blinds started in one of the two locations nearest the hospital, representing the forces from the day before coming back. The column moved slowly, but ground towards me. As our Zulus are “AI controlled”, the random stance they choose was to stand back and fire their muskets and chuck their spears against me. All was well, the Royal Oak Bay were holding.
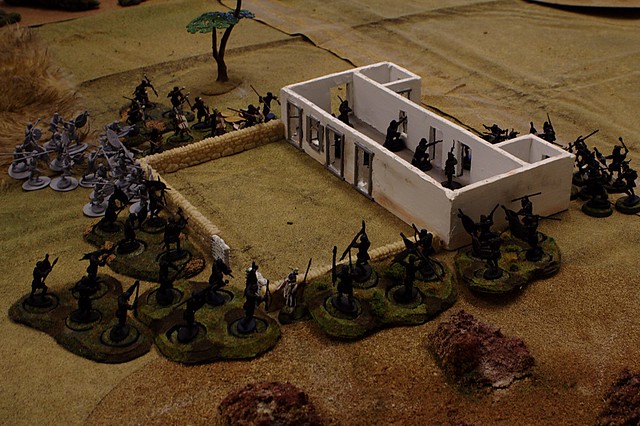
At this point, it all went off the rails. The relief column got bogged down in heavy terrain and by the time any numbers of them could have arrived, Zulus were already attacking the front of the wagon train, leaving the Royal Oak Bay all alone. And then the Zulu’s charged. Given the difficulties both of us had in scoring any hits through the windows and doors, I lasted a surprising long time, outnumbered and worse in melee than the Zulu.
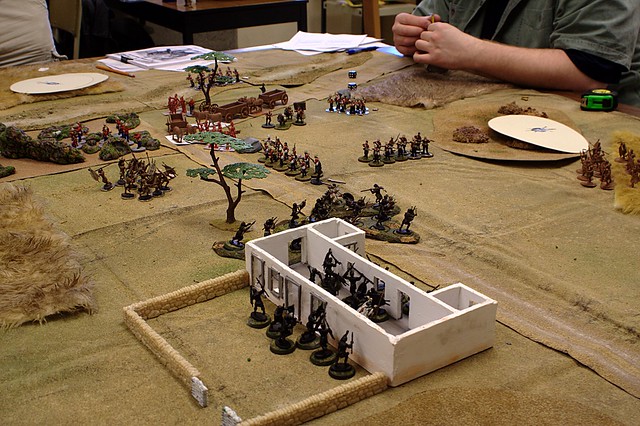
The action was hot and close. The Zulus pressing on all sides of the hospital, finally testing their spears against our bayonets. With many doors and not enough men, I was forced to step straight into the breach, holding the door nearest our relief. I parried their spears thrusts with my saber, finally driving them back. I could see the relief column, but it appeared swarmed under with Zulus. As I turned to give encouragement to my men, I saw not a single standing red coat. What I saw instead was a wall of black Zulu warriors.
– Memoirs of the Zulu War, Col. Reginald Heathe (ret.)
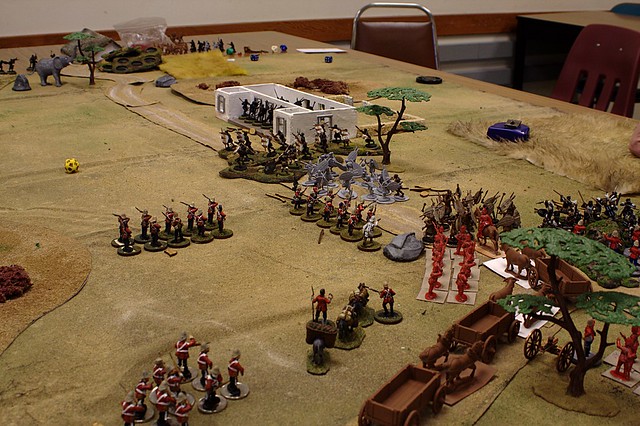
With the hospital fallen, the Zulus ground the British back, forcing them to retreat inch by inch. More Zulus appeared in the right flank of the column, but those Zulus discovered the pain of a gatling gun.

By nightfall, the British were tired and bloody. They retreated in poor order, leaving the hospital and this part of veldt to the Zulus for a little while longer.
As with our last game, we used Triumph and Tragedy, albeit heavily modified. Besides the aforementioned AI Zulus, the action is driven by cards which specify a certain command, either for the British or the Zulus. These include the basic T&T Fire, Fire and Move, Double Move, but also Zulu Charge, Zulu Command (which may change their tactics), and Hordes of Zulus (which puts new blinds on the table). In an effort to bring an end to the game, we decided that each player that had Zulus could lose up to four groups before they could bring no new groups on. Still, with over 250 Zulus between the four, we still didn’t end up with all the Zulus on the table at any one time.
All in all, an enjoyable game. Our rules are still in flux, but they appear to producing a good result. Now we just need to win. There are a few pictures that haven’t been seen here, they can be seen in my A hospital unrelieved Flickr group.
Zulus sir, thousands of them!
Well, dozens at least. We have recently decided to start down the Zulu War path, but haven’t made it very far down that path. In fact, I think we made it about 1/4 across the table today, our first Zulu Wars game.
As my Warlord Games figures have not yet shown up, we were quite light on the troops. I borrowed the 4th Coy of the 14th Fernwood, Malcolm ran his 3rd Coy, Bruce had a wagon train, and Dale another unit of infantry and a gatling gun. We pretty much all died.
I got to lead the whole day, an “honour” for which my slain commander, Captain Bromhead, scored our first Victoria’s Cross. At first, the Zulus were just a hazy sight in the distance (made hazier by Bromhead having lost an eye in the Indian Mutiny of 1857).

However, the Zulus very rapidly became not-so-hazy. Very distinct as a matter of fact. They were kind enough to remain at a distance, allowing me to very sportingly shoot them. (Later arrivals weren’t nearly so accommodating. Hence the VC.)

Bored at being out of action, our gatling gun decided to go and discover some Zulus via running to our extreme left flank. Shortly Zulus were discovered, and sent packing. The Horns of the Buffalo card meant that “sent packing” actually meant “gone to get their friends.” Amusing result on the right flank was a herd of cattle. Horn of the cattle more like.

The left flank went from “Gee, I don’t think they should be all the way over there” to “Oh crap, we are overrun” in very short order. Colonel Spiffer, shiny white uniform and all, quickly found himself surrounded. Being a hero, he was able to extricate himself. Our gatling gun, on the other hand… Let’s just say that rumours of the Zulus using a gatling gun a month later are totally untrue. Slanderous treason, in fact.
 surrounded")
All this action to flank quickly evolved into action across the entire front as Zulus, hot off their success against our gatling gun, attempted a front assault. Flesh was pressed, personal details (and bodily fluids) were exchanged, and everybody got screwed in the deal.

In due course this wave of Zulus was sent packing, but the next wave sent both my brave 4th of the 14th, and Dale’s scurrying for the rear. Which leaves only the 3rd to hold the line. I think the next two pictures tell the story.


And so ends our first action of the Zulu War. We can only hope that better painted troops will fare better (although that is likely to hold true for the Zulus as well).
Our rules are based very loosely off of Triumph and Tragedy (from the superlative Lead Adventure forums) with a great deal of rules changed. First and foremost, we ran our Zulus as AI-controlled with dice to determine action. There are many on the fly changes to the modifiers, as we sought to get the right “feel”. We also changed from i-go-you-go to alternating half-way through, again to test rules.
We also experimented where the overall commander, in this case Malcolm, handed out two order cards (from the standard T&T deck) to each player at the start of each turn. This led to a lot of jockeying for a specific card, especially as our situation became more desperate.
Figures are mostly Warlord Games, with some Empress, Wargames Factory and Essex. Terrain is a mixture of mine and Malcolm’s.