Having done hedgerows and fields, I wanted some rougher, more overgrown terrain, and I also wanted to start experimenting with tree creation, as trees are the one thing I’ve been lacking in my scenery so far.
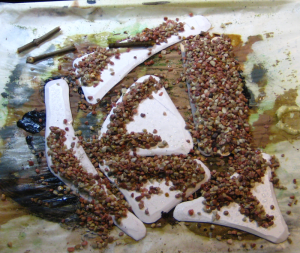
I started with the last reasonable-sized offcuts of the 3mm plastic I used as the base for the fields. The rock walls are decorator’s gravel and Gorilla Glue. I mentioned Gorilla Glue briefly in the article on fields, but briefly it’s a thick glue (the colour and consistency of honey) that activates with water, and expands as it dries, foaming outward. I wet the surface of the plastic card with a damp paintbrush, ran a bead of Gorilla Glue were I wanted the wall, dumped gravel in roughly the formation I wanted, then sprayed the whole thing liberally with plain water. The expanding Gorilla Glue will fill some of the gaps between the pieces of gravel, and also fill out the bulk of the wall slightly. After it dries (a couple of hours) you can always run a second bead of glue across the top of the wall and dump more gravel on. Two layers of gravel like this will get a wall up to just over waist high on a 28mm figure, which is enough for my purposes.
The three straight rock walls are based on tongue depressors, so 6″ long and about 3/4″ wide. The three small fields/garden bits are old credit card sized gift cards I had lying around, with the raised beds and plow furrows done with hot glue. The larger pieces are all from the 3mm plastic card offcuts, the longest being about 8″ long, the triangular piece about 4-5″ a side.
Gravel and Gorilla Glue for rock walls. Click for larger.
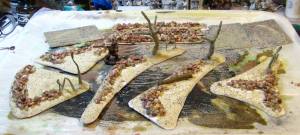
The trees are fairly heavy wire (sold in local hardware stores as “utility wire”, I seem to recall) bent and folded with pliers, then glued down with hot glue. Once they’re secured, I used more hot glue to bulk out the trunk and major branches. Everything – ground and trees – got slathered in white glue and had sand dumped over it at this point.
Rock walls done, on to tree trunks, then sand over everything. Click for larger.
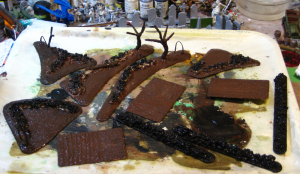
After the sand had dried overnight, everything was basecoated with dark brown paint, mixed randomly with a bit of black paint. The rock walls got straight black as a basecoat. All my basecoats also have a healthy dose of white glue mixed right on each piece to secure the sand and gravel.
Basecoat – brown over everything but the rocks, which get black. Click for larger.
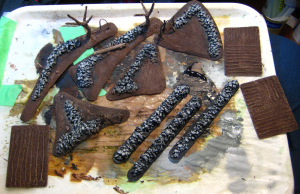
Last bit of painting is a pale brown/tan drybrush over the dirt and trees, dark grey then pale grey/white over the rocks, and finally a pale grey/tan/white mix drybrushed on the tree trunks so they’re a slightly different colour from the ground.
Drybrushing done – light brown & tan on the dirt parts, dark grey & pale grey (almost white) on the rocks, final grey/tan drybrush of the tree trunks.
In Part Two, flocking, scenic foam and other scatter on the ground, lichen for bushes, shrubs and tree foliage. Coming soon!
I picked up a copy of the recently published pulp skirmish rules Pulp Alley sometime last month, and we finally got a game of it in today.
Pulp Alley is published by the father & daughter team of Dave & Mila Phipps; the $10 45-page PDF has all the basic rules for pulp mayhem, designed around teams (“Leagues” in PA) of about 5-8 Heroes, Sidekicks, Allies and Followers. I’ll likely do a full review of PA soon, but the basic rules are well-written and well-edited, with nice pulpy graphic touches throughout.
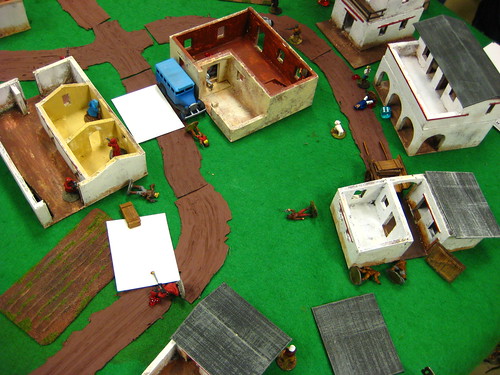
For this game I copied the sample League provided in the book, hacked together a second League quickly, then assembled two more Leagues by getting players to play mix-and-match between the two existing Leagues. This left a lot of rules and features unexplored, but as a quick-and-dirty method of assembling four not-quite-identical teams it worked OK. We got out my underused tropical buildings and a few bits of jungle terrain and got to it.
Early in the game. Air Pirates in the foreground, Sailors barely visible bottom-right, Russians in a clump top-right. Cultists are off-camera top-left. Click to view on Flickr.Fairly late in the game. My Air Pirates are mostly down, the Cultists have forted up in the lefthand building, and the Russians and Sailors are brawling in the street to the right. Click to view on Flickr.
I’ll be writing up a proper review of Pulp Alley sometime soon, probably in a few weeks after we have another couple of games. The initiative system is different and interesting, with initiative changing hands based on winning fights or capturing objectives. The Fortune Card deck is a great idea and added quite a lot to the game, especially a few turns into the scenario when we were all a bit more comfortable with the rules. The combat system is elegant, although I can tell I need to stop at my FLGS to get a few more d8s before our next game. Before next weeks game I want to properly build several Leagues to get a better idea of the character and League creation rules; there’s also several questions I’ll need to ask over on the Pulp Alley forums, mostly to do with wounding and recovery from wounding, which we got slightly confused by!
It was great to get back to pulp gaming again, and I’m looking forward to getting more familiar with the Pulp Alley rules.
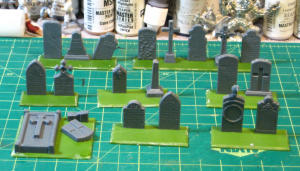
Quick photo of my work-in-progress Renedra gravestones, purchased over Christmas from J&M Miniatures. The bases are leftovers from my long-neglected English Civil War/Thirty Years War forces, which are Warlord sets and come to think of it, also cast by Renedra.
Quick and rough late night snapshot of half the Renedra graves. Click for slightly larger.
This is half (one of two identical sprues) of the Renedra gravestone set, and spread out to allow figures between the bases, it comfortably fills my 11″x9″ cutting matt. Adding the second sprue and some other bits like trees and such would give you an extensive graveyard to skulk in!
As a break from painting up Russians, last night I broke out the scenery supplies and started in on a new set of plowed field pieces. I like fields of various sorts, they provide interesting texture on the table while being easy to make and easy to transport, being largely flat!
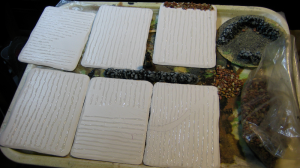
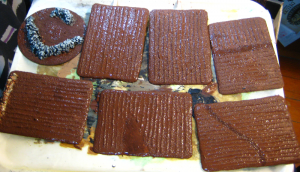
These six are based on the last large piece I have of white 3mm thick plastic. It was salvage from the workshop of a non-profit I occasionally volunteer at, and I have no idea what sort of plastic it is, but it won’t glue with regular solvent cement and not even superglue holds it gracefully, so it’s useless for buildings. Hot glue and white glue will stick to it, though, and being plastic and relatively thick it won’t warp, so we’ve used most of it up as scenery bases of various sorts. The double handful of small scrap pieces (none much bigger than 4″ in any dimension) are being saved to appear under various small bits of filler and detail scenery in the future, but these six 6″x4″ fields are from the last 12″x12″ piece I had left.
Six new 6″x4″ fields, with the plow furrows made from lines of hot glue. Top right is one of my Gorilla Glue experiments – see text. Click for larger image.
For the plowed ridges and furrows in the fields, I broke out my trusty hot glue gun and ran thin lines of hot glue for the plow ridges. A couple of the fields got different or interrupted plowing patterns, just for interest.
The scruffy drystone wall on one end of one of the fields, the larger drystone wall assembly on the CD base, and the freestanding wall on a tongue depressor tucked in between the fields in the above photo are all made from decorative gravel and Gorilla Glue, a technique I first saw over either on Maiwand Days or Rabbits in my Basement, although it was apparently pioneered by TMP stalwart John the OFM.
Gorilla Glue has the fascinating properties of being water-activated and expanding 2- to 4-times as it cures — the stuff foams as it hardens, basically. Lay a thin bead of it down, dump a line of damp gravel over it, and it’ll fill some of the gaps between the gravel as it expands, and even lift and fill your wall out. Pretty cool, and I’ll be using it for producing a lot more scruffy stone walls, blast craters and similar terrain in the near future!
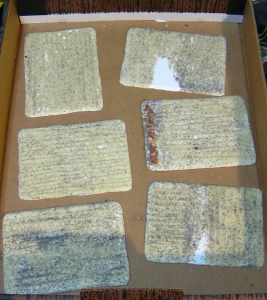
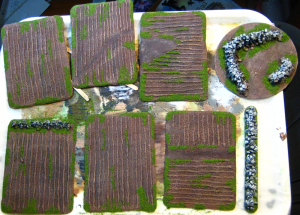
The fields with sand glued down for texture. Click for bigger, as usual.
Next step was a layer of white glue, then sand. My sand mix is actually about four different kinds of “decorator” sand, model railway ballast and similar, so it isn’t totally uniform.
Base coat and a bit of darker brown for some muddy bits. Click for larger.
The base coat is a medium brown, with a bit of a much darker brown mixed in. I wound up having to repeat the base coat, as I’d applied it quickly right at the end of the night, so it was patchy and too thin in spots. I used a bit more dark brown and even a bit of well-thinned black in the second coat, for better contrast with the eventual drybrushing. The ragged rock wall along the one end of one field was basecoated straight black at the same time.
Drybrushed (two passes) and basic flock added. Click for larger.
The day after the basecoat, I did two drybrushing passes, the first with a mix of the same base brown lightened with a pale brown/dark tan colour, mixed roughly 1:1. The second drybrush, even lighter, was a fairly pale tan colour. The stone wall got a fairly heavy dark grey drybrush, a lighter pale grey pass, then a final pass with pale grey mixed with white on just the tips of the rocks. Then it was back to the white glue to add bits of flocking, mostly around the edges. I might go back and add some sprouting crops or something low to some of the fields, but for now they’ll be empty and weedy, mostly because it’s easier to move troops over them this way.
I’m declaring these done for now and moving them out of the way to get back to Russian Civil War figures! Total time on this project, not including photos and writing it up, was a couple of hours over a couple of evenings, all in short bursts, interrupted by figure painting, the Internet, and other distractions!
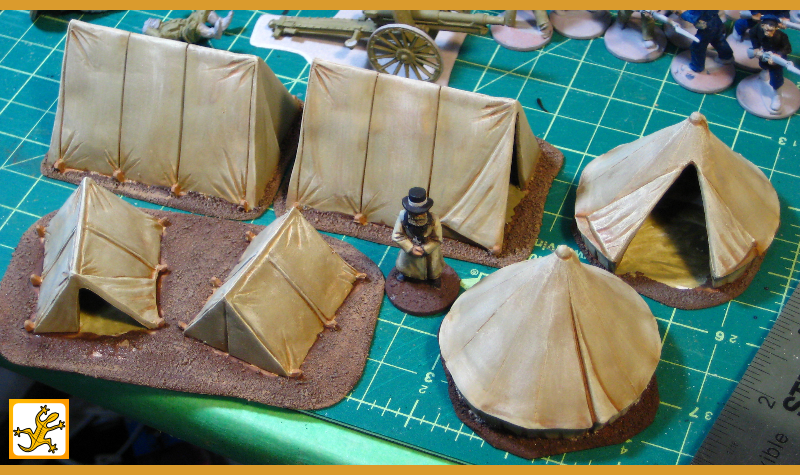
As a diversion from painting Russians, I’ve painted up the first part of my recent Renedra plastics order from J&M Miniatures. I ordered two sprues of the mixed tents, and as I mentioned in my review, was very pleased with them. They’re solidly and cleanly cast and well proportioned, and they’ll suit a huge range of genres and eras.
Here’s the first sprue of tents painted up. The colours are a variety of khaki shades from the Reaper Master Series line, plus GW Gryhonne Sepia ink.
One sprue’s worth of Renedra tents all painted up. Once again Father Vodkanov of the White Russians provides scale. Click for larger.
I’ve got another sprue of tents still untouched (same six again), as well as the barrel and graveyard sprues still to do something with. They’re going to wait until after our local gaming convention the first weekend of February, though.
A few weeks ago, I took advantage of J & M Miniatures’ offer of free shipping for all of December to order a few bits and pieces of Renedra’s injection-molded plastic bits and pieces.
Before I move on to my quick review of the Renedra stuff, I just have to give a quick shout-out to James of J & M. I was already following his great wargaming blog Rabbits In My Basement, so when he announced he and a friend were launching a web/mail-order wargaming business I checked the site out. He’s got all sorts of good stuff from Perry, Renedra, 4Ground, Plastic Soldier Company and other companies, and is (as far as I can tell) the sole Canadian seller of some of these ranges. Given that domestic shipping is cheaper and skips the expense and irritation of occasionally being dinged by the nice folks at Canada Customs, as well as the great customer service I’ve gotten so far from James, I think it’s safe to say that a reasonable portion of my hobby budget will be heading toward Ontario in the future!
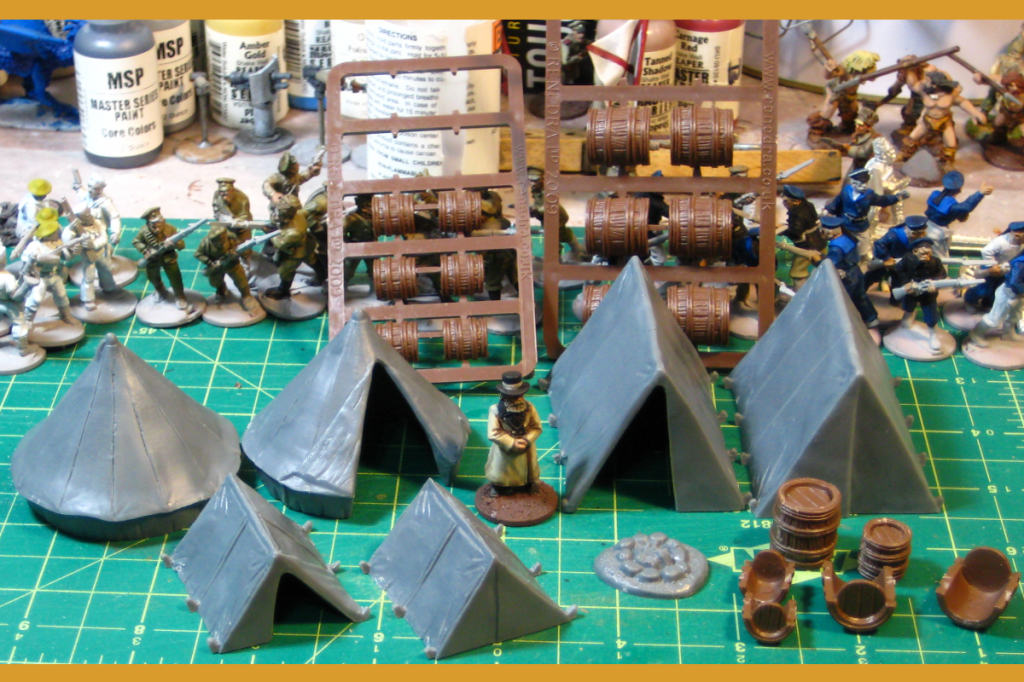
Moving on to the Renedra bits, I ordered two packs of their Mixed Tents, two packs of Barrels, and one pack of Gravestones.
Tents and barrels – all six tents from one of the Renedra sprues, the barrels assembled and unassembled. In the background, barrel sprues, figures and clutter! The cutting matt has a one inch/half inch grid, the figure is a 28mm Brigade Games White Russian priest.
The Mixed Tent sprue has two bell tents, two large ridge tents, and two small ones, each done with one open door and one closed tent. The bell tents are 2″ diameter (55mm) and 1 5/8th” tall (40mm); the ridge tents are 2 3/8ths long (60mm), 1 3/4″ wide (45mm) and 1 1/2″ tall (37mm), while the small ridge tents are 1 1/2″ long (37mm), 1 3/8″ wide (35mm) and 7/8″ high (20mm). They’re done in a medium grey plastic, and very solid – even the tents with open doors don’t flex much if you squeeze them a bit. These are nearly universal tents; you could put them (especially the two types of ridge tent) in nearly any historical setting and they’d fit right in. The bell tent is a bit more specific to the 19th and early 20th Century, but iconic in it’s time and place, up to World War Two or so, maybe later in some areas.
Filling the gaps between the tents on these sprues you get a nice campfire piece about 3/4″ across and two camp beds or stretchers with legs to hold them off the ground. Nice little bits of camp clutter to add detail and life to a camp scene on the tabletop, although the beds are going to need bases of some sort if they’re going to survive transport and use on the table.
I don’t generally base buildings, but I’ll likely base these tents. The ones with open doors especially will look better with a base, with a bit of canvas groundsheet visible in the door – the bell tent especially will have an especially visible interior when on the table, because of it’s design.
The Renedra barrel set has two sprues in brown plastic, one with five large barrels, the other with five small ones. As you can see from the photo above, each barrel half has one round end, which minimizes the visible seams on the completed barrels. Unfortunately, the side hoops don’t quite seem to perfectly align when you glue the halves together, but the tiny mismatch is really only visible when you’re handling the barrels and will be totally invisible on the table! These are an older style of barrel, with thin doubled hoops (wood, maybe?) instead of flatter metal hoops, so they’re more suitable for pre-modern gaming, but will work OK as clutter and freight on most pre-WW2 tables.
Finally, the Gravestone set has two identical sprues in grey plastic. Each has a variety of monument stones, all about 1″ tall and 1/2″ wide. You get 16 slab stones (one broken into two pieces), 4 crosses, a small column, a slab/vault topping, five bases that can fit a variety of the slabs and crosses, and finally a raven. These are all done in the same solid, strong grey plastic the tents are made from, more than strong enough for tabletop use. Two minor things bug me about this sprue, one being that only a few of the stones have any texture or detail on the backs; the rest are just smooth plastic without even a basic stone texture. Fixable with a bit of sandpaper, but still a detail that could easily have been fixed. The other is even more minor – after getting the excellent Ainsty gravestones with their readable, laser-engraved lettering and details the stylus-pushed-through-putty squiggles of these Renedra stones lettering and details does feel like a minor step backward. This is still a great set of grave markers, enough in one set for quite a large graveyard, and the raven is a neat, whimsical (or possibly gothic and ominous) touch!
The last thing in my J & M order wasn’t scenery, and wasn’t something I’d even ordered, but was (I assume) thrown in as a thank you gift from J & M – a very nice large suede dice bag, about 7″ wide and 9″ tall and bright red. My own dice are in a bag I hand-sewed myself nearly twenty years ago in junior high, but I think I’ll press the new bag into service to carry the collection of card decks, markers, tape measures and random gaming accessories that normally slops around loose in my backpack. It’s large enough for a couple of pencils, too.
In just under three weeks our local big convention kicks off – GottaCon 2013 is February 1st, 2nd & 3rd at the Pearkes Recreation Centre.
I’ll be running a Russian Civil War scenario, possibly with a Back of Beyond flavour. It’ll be a variant of my Even Whites Bleed Red scenario from last year’s Trumpeter Salute convention, mostly because I haven’t yet come up with a more entertaining title than that!
I’ve got Red sailors, cavalry and more Red regular troopers on the painting bench as we speak, and some nice scenery bits to add to my existing Russian scenery. Now, to get off the computer and back to that painting bench!
In some ways, this smallish order of Ainsty resin scenery bits has been a decade in the making; I discovered Ainsty sometime in the very late 1990s or early 2000s, and even though I didn’t (at that point) do much in the way of skirmish gaming in 25/28mm, the huge variety of neat stuff Ainsty made stuck with me! So back in November I finally got around to throwing a bit of money Ainsty’s way, on a mix of scenic details that will see service in various pulp skirmish adventures, Russian Civil War battles, and who knows where else.
Here’s a quick late-night snapshot of what I got: Ainsty resin laid out for review. Click for full size.
General sculpting and casting quality is good and clean, although a number of the pieces have a slightly slick, greasy feel to the touch, almost certainly from the mold release used. A good scrub with dish soap and warm water should take care of that, and it should also help get rid of the last of the faint but definite smell of outgassing resin I got when I first unpacked the pieces from the small plastic bags each set was carefully packed in.
Clockwise from top left, here’s a quick review of what I got.
Top left is Trade Goods J Stacked Sacks, three each of four different roughly square sets of stacked sacks. They’re all about 1″ a side at the base, and the tallest stacks are just over 1″ tall. They’ll provide useful cover for docks and warehouses, although a bit more fabric texture on the sacks would have been nice.
Moving clockwise, I got two sets of Trade Goods B Tea Chests. This is described as 18 chests, but it’s really four stacks and three single tea chests. Again, useful cover, and like sacks, the sort of terrain bit that you could build yourself, but which can be fiddly and frustrating to mass-produce at home. I could definitely see throwing another set or two of these into any future Ainsty order; you can never have enough crates cluttering up warehouses in pulp games, especially if they’re in precarious, badly stacked piles just waiting to topple onto someone!
Bottom right we have Trade Goods L Mixed Piles x 4, which is a neat little set of crates, bales, barrels and sacks, up to about 3/4″ tall. This is pretty close to “universal cargo” for anytime from the early-mid 20th Century back at least four or five centuries. Each of the four piles is different, with two of mixed crates, sacks and other baggage, one pile of three canvas bales and one of three small-to-medium wooden barrels.
Moving clockwise once more to bottom centre, we have Mixed Memorials x4, which is a nice mix-and-match set of four bases and four tops for memorials or possibly fancy gateposts. The four base pieces are each different, with two of them having very fine (probably laser-etched?) lettering on the molded plaques on one face. The four top pieces are also each different, with two slightly different obelisk toppers and two lower pieces. One of the bases arrived with a minor chip off one corner, but given that full size monuments out in the real world get dings and chips too, I’m not going to worry about it. The tops of all the bases are finished, so you could even leave the toppers off for further variety. One of the low toppers has been sanded at a bit of a rakish angle on it’s bottom suface, but a few passes on sandpaper will correct that enough to be invisible.
At the centre of the group we have Upright Headstones x8, which are by far the most detailed pieces in my order. Each of the eight headstones is unique, and I’m almost certain they’ve been laser etched, as the lettering is actually completely readable despite being under 2mm tall. The headstones commemorate Kurt Cobain, Bella Lugosi, Gandhi, and others, including two with “A Soldier of the Great War/Known Unto God” on them, which is the wording used for unidentified soldiers buried in the Commonwealth Wargraves Commission’s cemeteries from World War One. My only minor complaint is the massive size of these headstones; the tallest is a full inch tall, or nearly shoulder height on a standing 28mm figure. There certainly are headstones this massive in real life, but memorial stones about 2/3rds this size seem a lot more common in most cemeteries I’ve seen. One of the stones had a tiny casting flaw in each side, but those will be easy to file into minor damage to the stone and won’t be an issue.
Finally, bottom left we have Trade Goods K Rifle Cases x5, with two closed and three open wooden crates holding rifles. One of the seperate crate lids has a rifle resting on it; the open crates show one or two rifles each and the greased cloth that would have been used as packing to preserve and secure the rifles. Everyone always needs more guns (well, in games, anyway), so I suspect these are going to get a lot of use in all sorts of scenarios, as loot or as objective markers of sorts. The detail is very nice on this set, with good wood grain in the crates and enough detail in the rifles to make it obvious what they are. These crates would be suitable from about the mid-19th Century up to modern day, depending on where your adventure was set.
I will definitely put another order in to Ainsty at least once in 2013, after I get this current order all painted up. Shipping time from the UK to Canada was fast, although Ainsty obviously does a lot of it’s casting to order, as there was a delay of about three weeks (November 17th to December 10th) between placement and shipping of my order. The usual fast Royal Mail-Canada Post connection worked nicely in my favour, as it usually does, though, so overall order time was entirely reasonable.
More (with better photos!) as I paint up and finish all the various bits I’ve just acquired!
(oh, and in honour of this being published on December 21st 2012: If you can read this, congratulations, the Mayan Apocalypse never happened. What a surprise…)
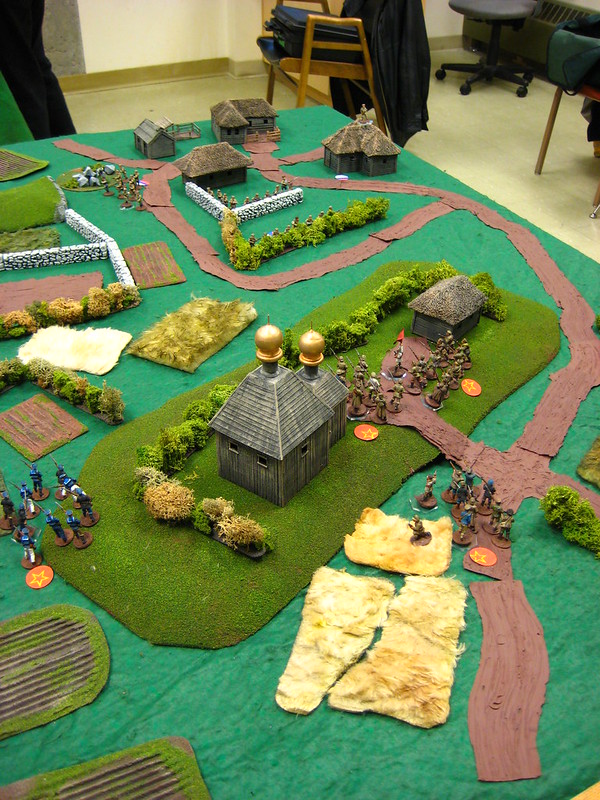
Ran my first miniatures game in ages yesterday (Sunday), with a friend running the defending Whites and a co-worker/friend who’d never played Through the Mud & the Blood before running the attacking Reds. I gave the attackers about a 30% manpower advantage, although they were short of decent officers (as the Reds tended to be, especially earlier in the Russian Civil War).
Back in the Not-yet-USSR — click on the image to view larger over on Flickr.
The photo is from fairly early in the game, with Sean’s Reds working their way around and over the ridge with the chapel of St. Boris the Intoxicated on it. The Reds wound up taking up a firing line along the hedges on the far side of the ridge and clearing the hamlet beyond with sheer weight of fire, while the Red sailors on the far left worked their way across the hedges, trying single-handedly to assault the right flank of the White village. Supported by fire from the ridge they did succeed in destroying one White section entirely, but at ferocious cost to themselves – nearly 50% casualties. Other Red casualties were fairly light, while the Whites got pasted, taking at least 30% casualties to their entire force, two rifle sections rendered non-functional and the other two withdrawing at the end of the game with a few casualties each.
While both players had fun, and so did I, I’ll do a few things differently next time I run a game like this. I should have thrown a Reinforcements card into the deck for the Whites, with some reinforcements (another rifle section or two, or maybe something more potent like an armoured car) coming in after X turns of that card. I was also shocked at how rusty I’d become about the M&B rules. We did movement through rough ground wrong for the first few turns, which really made the initial Red advance a slog — thankfully they were mostly sheltered behind the ridge, so the only effect was to make the first few turns more boring! Thankfully, everything I got wrong affected both sides more or less equally, so while it irritated me it didn’t screw the game up too badly.
Sean, the Red player, had never played Mud & Blood before. I’m not sure, but this might have been his first non-GW miniatures game ever. He’s stoked for more, enjoyed the rules, and I’m sure we’ll have him back in the proto-USSR in the New Year. He said some interesting things about Mud & Blood that I’ll expand upon in a future post, too.
The Sunday gaming club was pretty much at capacity today! We meet up at the University of Victoria and have a classroom reserved every Sunday, and this Sunday we had Corey and I playing Russian Civil War, three of the regulars playing 1879 Anglo-Zulu War with Two Hour Wargames’ colonial rules, and a game each of WHFB & 40K to round it out.
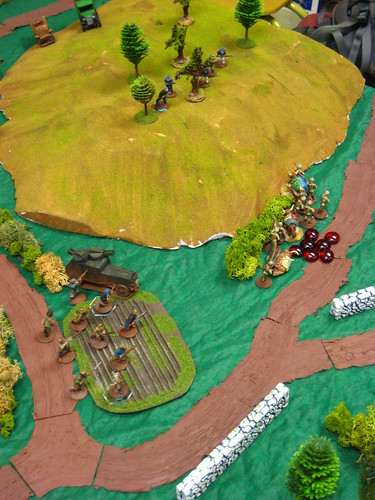
Our RCW game was intentionally light and quick; we had both my new armoured car and the half-painted cavalry on the table and wanted to see how these new-to-us forces ran in Through the Mud & the Blood before we got stuck into another larger game. Corey had a White cavalry squadron and a single section of White infantry, intent on rescuing the retired (but widely admired) General Alzheimerski; I took a Red Guard/partisan section, two small sections of Red sailors on trucks, and the armoured car, all under the nominal command of the hapless Commisar Blotski.
The Whites needed to get Alzheimerski to the nearest open patch of ground a British DH9 could land on, so they could bundle the old general onboard and get him to safety; getting his valuables off the table would be a bonus. The Reds were trying to capture Alzheimerski, as part of some scheme of Blotski’s to help him gain influence in Moscow.
Late in our game, the Red Guard and armoured car catch the White caravan guards while they attempt to flee!
To represent the various Red forces involved not really wanting anything to do with Blotski’s scheme, we threw a Hesitant Troops card into the mix for the Reds. The Whites also had a card for Alzheimerski, such that if his card came up before the actual officers of a unit he was attached to, he had a chance to lead that unit off on a death-or-glory charge — or he might do nothing at all…
The game started with the White cavalry, having gathered up the old man and gotten him on a horse, taking off cross country on a direct line to the planned landing zone of the British aircraft. This left the Red trucks and armoured cars at a disadvantage, as they move slower offroad than horses do. The armoured car took off to meet up with the local Red Guard, while the sailors pushed their trucks uphill a bit then began to get out, intending to get into the woods to fend off the White cavalry.
Unfortunately, that ended badly when the White horse came through the woods and down the hill much faster than the sailors were expecting. The cavalry didn’t even slow down, sabering half the sailors dead and thundering onward toward the rendezvous with the escape aircraft. (When cav catch infantry in the open in M&B, they get to double their melee dice… this lead to the cavalry having about two dozen dice in melee to the sailor’s ten or so… it was ugly.)
On the other side of the hill, the Red armoured car and Red Guard did manage to catch up to the White infantry guarding the pack train with the old General’s valuables. Two heavy machine guns and some rifle fire drove the White infantry off in short order and scattered the pack animals, who ran up the hill into the waiting arms of the surviving half of the Red sailors, who discovered that General Alzheimerski’s valuables were very valuable indeed!
We had a few questions about vehicles in M&B, which I’ll take up with the very helpful folks on the TooFatLardies mailing list, but it was a good quick game overall. The armoured car is slow, clumsy but deadly (which feels about right) and cavalry are fast and lethal when they’re able to run over unsupported infantry. I’m looking foward to more varied games now that we’ve got something other than just infantry on the table!