Heading home from Vancouver and an excellent, exhausting weekend at the Trumpeter Salute show! Good to see most of the Trumpeter regulars, many of whom I only ever see once a year at this show.
Great games all weekend, including the six player Pulp Alley game I ran Sunday, “Terror in the Thuggee Temple”, which was a gloriously confused and messy multi-sided mess enjoyed by all.
I got a good crop of photos all weekend, including a bunch of my own pulp game, and I’ll get them edited and posted here soon!
Heading off to Vancouver today for the always excellent Trumpeter Salute wargaming show this weekend.
I’ve finally gotten around to setting up the Android WordPress app on this phone so I’ll update from the field as I remember to, then do my usual photo dump once I’m home.
I’m running a Pulp Alley game sometime this weekend but can’t actually recall when it is. Looking forward to seeing all the Trumpeter regulars this weekend!
I have a moderate font-collecting addiction. Dafont is my go-to source of high quality free fonts, but I’ll pay money for the right font. Remington Typewriter is probably one of the right fonts, and it’s very inexpensive over at DtRPG for four weights, depending on how short of ink you want your typewritten text to look. Great for player handouts, props, or other documents for pulp gaming or anything WW1/WW2/early 20th C!
Dinosaurs are always pulpy, and now Antediluvian Miniatures are doing some models based on the really early concepts of what dinosaurs were thought to look like. No fast, sleek, feathered raptors here, these are big chunky cold-blooded alligator-y critters, and they look great.
Ending on a Russian Civil War related note, the Russian-language page AviArmour has a page about the Armstrong-Whitworth armoured car with some interesting text (in Russian, but Google Translate will give you the basic idea) and some great period photos of Armstrong-Whitworths in action. Would have been nice to find that page while I was working on my own 28mm A-W from Copplestone a couple of years ago! Lots of interesting information on AviArmour, it’s well worth a browse.
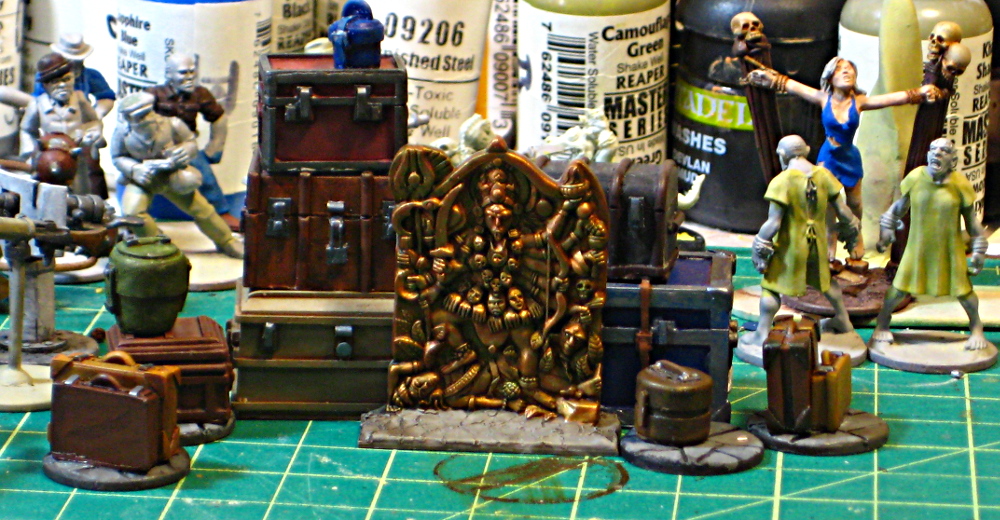
This sculpted bas-relief is by Bob Murch of Pulp Figures fame, and is included in his Mad Guru set of Thugee. I own most (possibly all, I’ve lost track) of the PF Thugee packs; they’re among my favourite figures from Mr. Murch and regularly appear in our Pulp Alley games. (Thugee previously on the Warbard here and here!)
A bronze bas-relief of Kali, Hindu goddess of death, change and rebirth. Click for larger, as usual.
The bronze relief, though, has sat around unpainted and ignored for at least a year until it fell into the current round of “clear off the painting bench” mania! The main colour is GW Dwarf Bronze over a grey primer, then a coat of GW Gryphonne Sepia wash/ink. A very, very thinned green ink over that for a bit of verdigris here and there, and finally a few highlights back with straight Dwarf Bronze. (Note that all my GW paints & washes are from the previous range, not the current GW paint/wash range, and I’m afraid I have no idea what the current equivalents of these colours are!)
The base is just a scrap of plastic sheet and a bit of Milliput with some flagstones scratched into the putty to tie it in with the flagstones already on the pewter. The whole thing has come out very nicely, and really shows off the incredible details of the piece, with the six-armed Kali with her necklace of skulls, skirt of human hands and forearms, and one foot on the body of her consort Shiva. (Good stuff on this Wikipedia article about Kali, btw.) Mr. Murch did his homework!
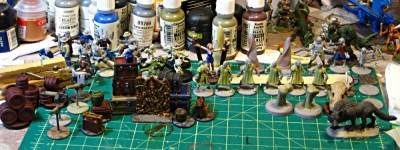
Quick overhead snapshot of the painting bench recently. As you might have guessed from recent posts, I’ve been in a “clear the decks” sort of mood, finally finishing off a number of smallish projects that have sat around ignored and dusty for too long, some of them over a year…
The workbench this week. Lots of stuff going on, see text for details!
Clockwise from the top left we have (deep breath…) a batch of nine Pulp Figures thugs, two-bit crooks and menacing bystanders; a quartet of Baby Crocs for fantasy football from Impact Miniatures; a lady in a blue dress obviously being held captive by a gang of terrifying savages (Pulp Figures again); three twisted and disturbing stone monoliths intended as markers for a friend’s Chaos team in Blood Bowl (previously); Phantom Ace, Pulp Girl and little Lillie Poots from Statuesque Miniatures; some extra bases I whipped up with Milliput and pennies, one of which has an unprimed cobra in a basket on it from Pulp Figures…
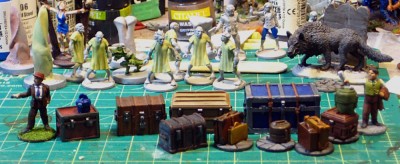
Central to the whole assembly in their hospital-green robes, we have six Frothing Lunatics from Statuesque. (previously…)
Across the foreground from bottom right, we have a really, really massive Warg from Reaper Miniatures, being painted up as a quasi-supernatural Terror to inflict on people in games of Pulp Alley; a dino skull and some bones being done up as Blood Bowl markers for my Lizardman/Crocodilian team; the previously-mentioned finally completed pulp-era luggage and the Kali bronze; a quartet of light deck guns from Pulp Figures suitable to arm all manner of vessel or vehicle; three more Blood Bowl markers made of Renedra plastic barrels intended for my brother’s Scotling team.
Finally, last but not least, clipped into the two wooden clothspins (useful things to keep around a hobby bench!) there’s a pair of spiked footballs from Impact Miniatures. Blood Bowl again, obviously.
This assembly is only slightly tarted up and organized for the photo, everything here really is in progress or was recently finished and it really has been getting that crowded on my painting bench the last while. It’ll be satisfying to get more stuff completely finished, into storage and more importantly, onto the table and into use!
More months ago than I care to admit, I bought some really neat pulp-era 28mm luggage in resin from Slug Industries. I prepped and primed the first batch of the stuff, got some paint on it, then it sat around the edges of my painting bench for the next… thirteen months or so until just this week I finally finished it, as part of a badly-needed get stuff off the bench session!
Pulp luggage! Click for larger, as usual.
Several of the smaller pieces I’ve based together; the bases are pennies with a thin smear of Milliput on them that I’ve roughly sculpted into flagstones or cobbles. The larger trunks I’ve left as-is; they’re big enough not to be particularly fussy scenery pieces. Scale provided by a pair of Pulp Figures 28mm reporters in the above photo; the grid on the cutting matt is 1/4″.
There’s also some fun stuff in the background, but more on that soon enough!
I’ve got another two full sets of this luggage in my bin o’ bits, having ordered three sets from Phil last March. I might have to pull another set out sometime soon and get started on it… and hopefully it’ll take me less than thirteen months to finish the next batch…
Had two small orders come in last week. I have been saving money for an epic bike vacation to Europe in a few months (Vienna, Austria to Nantes, France over six weeks!) and not ordering much new stuff for wargaming the last few months, which is one of several reasons it’s been quiet around here. Nevertheless, some new stuff comes in every so often!
The first order was from Impact Miniatures, all Blood Bowl/fantasy football related stuff. A set of three block dice, two of their football markers, and eight more Baby Crocs – Skinks, basically, for their Sarcos Crocodile team, which I bought last year.
The footballs are neat. I haven’t confirmed with Impact, but I’m pretty sure they’re 3D-printed – they’re a slightly flexible resin-like stuff, with a large spike-adorned football and a ring/loop so you can hang the football of a figure’s arm or around their neck or shoulder when they’re carrying the ball. Imagine the sort of cheap charm ring you get in Christmas crackers, except in white resin and with a spiked football instead of a fake jewel. It’s a great idea for Blood Bowl or other fantasy football games and a much easier way to show which figure has the ball than the freestanding individual balls, which can be awkward to balance on some figure bases.
I already have eight Baby Crocs, so why double the local population? So I can proxy Baby Crocs as Halflings and field a BB team of Croclings, mostly! I’ve heard that Halflings are a challenging team to use and don’t expect them to win much, but what the heck, they’ll be entertaining. Corey also has a team of Impact’s Scotlings (Halfings in kilts with cabers) so a Scotling-vs-Crocling matchup should be entertaining.
I’ll also be using a few of the extra Baby Crocs as auxiliary figures for my existing Sarcos team. Cheer-crocs with greenstuff pompoms added to their hands, maybe an apothecary-croc with a barrel of go-juice to get injured players back on the pitch, that sort of thing – the fun, oddball sideline figures that round out a BB team.
Oh, and for the Treemen on the Croclings team, I’ll probably pick up a pair of these Reaper Bones Spirit of the Forest figures and convert them a bit as swamp-flavoured Treemen. Like the Impact Trollcast resin figures, the Reaper Bones plastic resin figures are a great thing, nice figures in easy-to-convert material for a very good price!
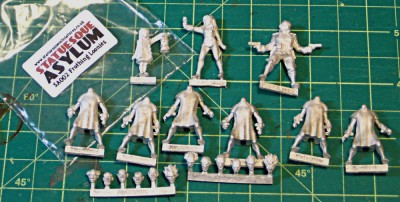
The other order is from Statuesque Miniatures in the UK, and as oddball as the Impact order was, this order was definitely crazier. Crazed, in fact, and lunatic, as it included six Frothing Loonies, a small girl, and a pulp hero & heroine! All part of a special introductory bundle deal Statuesque had put on back in the first week of March.
Lunatics & Heroes. 28mm figures from Statuesque. Head sprues for the lunatics at the bottom, headless lunatic bodies, then (L to R at top) Lillie, Pulp Girl & Phantom Ace. Click for larger, as always.
The six loonies have three different bodies and a sprue of six heads. Because I got two packs of three figures each, I have two of each body and two full sprues of heads, so I have half a dozen spare lunatic heads now – fodder for converting other figures, perhaps! The bodies are in hospital robes (yes, they’re all partially open at the back, in proper hospital robe style…) and have shackles on their wrists. The heads look suitably lunatic, and most have obvious scars across their shaved heads where diabolical, insanity-causing surgery was undoubtedly been performed by mad doctors!
The small girl is Lillie Poots, who wanders the world curious and unafraid, her path lit by the large lantern she holds up in one hand.
The pulp hero is Phantom Ace, a large man in flying leathers, helmet and goggles, with a pair of automatic pistols, one in each hand. Pulp Girl, his crimefighting companion, is a slender teenage girl with some sort of mystical or weird-science apparatus on one wrist and hand.
All the Statuesque figures are very cleanly sculpted and beautifully cast, with hardly a mold line or casting vent mark to be seen. The adult figures are bulky 28mm, sized to go with Pulp Figures, Copplestone and other common pulp lines. The only downside to them is they’re all designed to fit on slottabases, which I strongly dislike – my Blood Bowl teams are the only figures I own that I mount on slottas. I’ll be snipping the mounting bars off all of these figures and putting them on pennies or other flat bases to match my existing pulp collection. That aside, they’re lovely figures and I’ll be keeping an eye on Statuesque in the future as they expand their pulp ranges – I believe they’re going to be adding asylum staff and other asylum denizens at some point.
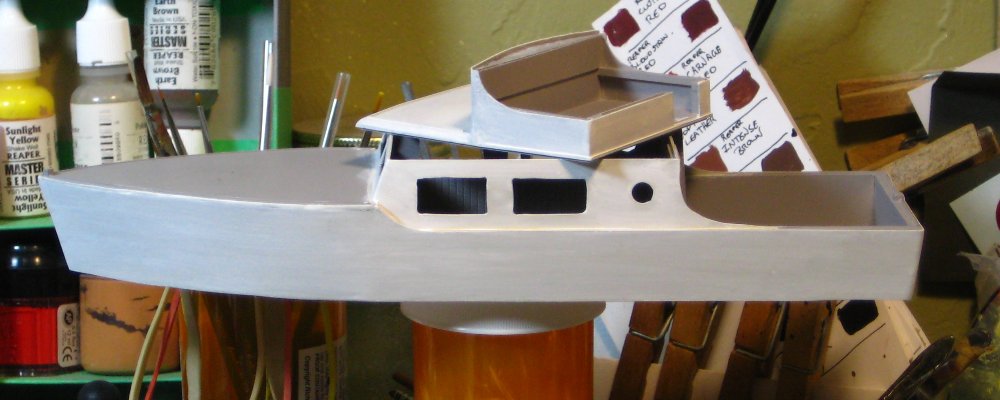
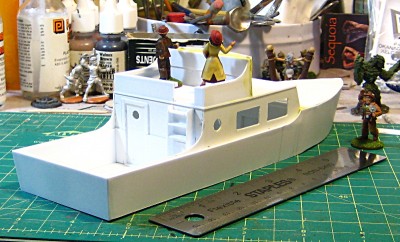
Just to prove that there really is progress being made around here, despite the relative quiet on the blogging front, here’s a fairly bad late night photo of the motor yacht, with it’s second coat of white paint applied!
Motor yacht, with paint on it! Click for full size.
Because of the board expanses of plain, untextured surfaces on this thing, and the tendency of those broad expanses to show brush strokes really well, I’m using very diluted paint, pretty much just using layers of washes to get colour onto the thing. It means a couple of coats to get a good colour, but also no visible brush strokes!
I’m going to do the bow and rear decks dark, glossy wood, and then pick out the railings and other details either in white or in brass — haven’t decided which yet.
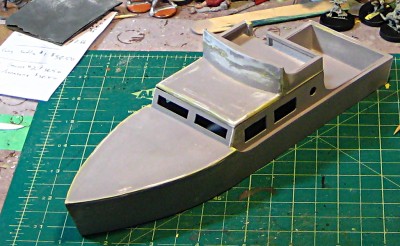
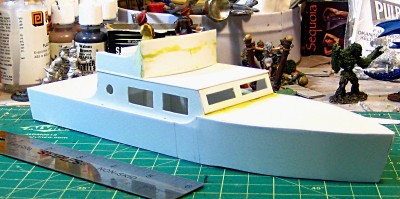
Slow but steady progress on the 28mm pulp motor yacht. I hit it with a light coat of grey primer, to better show the seams and bits that needed additional putty and sanding work — that sort of thing shows up so much better under a thin coat of primer than it does in the blindingly-white bare plastic!
I’ve re-done the edge of the bow deck around the curve of the bow, and several areas on the cabin roof and around the flying bridge. Here’s a pair of low-res after dark images showing the boat in it’s current state.
Easier to take photos of now it’s not blinding white, too. Low quality image, but click for larger.
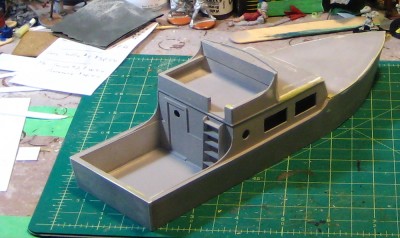
The cabin roof/flying bridge assembly is still removable, and I glued a 1.25″ washer to the roof then skinned over it with another layer of styrene plastic. With that ballast and reinforcement, the roof is a lot more solid and stays in place much more easily. It also visually makes the boat seem more solid, somehow.
Stern quarter view. Low quality image but click for slightly larger.
The rear view shows the cabin door and the ladder up to the flying bridge. The three round windows started out with a hand-spun drill bit, then got carefully and slowly reamed out with a sharp Xacto blade. I thought about doing window frames or something around them, but ultimately decided the boat would have to manage without in the interests of my own sanity!
Second, proper coat of primer tonight, then paint later this week. The paint scheme is going to be pretty simple — white hull and walls, glossy wooden decking — so it should be fairly quick to paint up.
Part One is here, for those of you just joining in. The project is a small 28mm motor yacht for pulp gaming, based loosely on real motor yachts from early in the 20th C and built entirely out of styrene plastic sheet, because I have a lot of it hanging around!
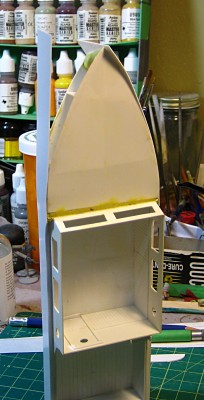
I finally got the hull sides done this weekend, using one long strip of .020″ styrene plastic per side. To accommodate the slight rake of the hull side and the curve of the bow, I cut the strips slightly too wide and wider toward the bow of the boat. After gluing one side at a time, I trimmed the thin plastic down with knife and sandpaper to match the actual lines of the boat.
Adding the hull sides. Right-hand side glued all the way to the bow but not trimmed; left side glued along the stern and cabin. Click for larger.
The stern and cabin area was simpler, except for being careful where the curve was placed that fits the higher bow deck into the hull side. Initial glue was quick-acting Plastruct Bondene solvent; after that set up I used superglue along the bottom seam to strengthen it.
Boat from the stern quarter, with cabin roof in place. Door frame and ladder in progress. Click for larger.
I’ve also gotten panelling into the cabin (see the first photo), door frames on either side of the door at the rear of the cabin, and started in on the ladder up to the flying bridge on the cabin roof.
Boat from bow quarter. Lots of putty work and detailing to do, but it’s structurally complete! Click for larger.
There’s a large amount of cleanup and detailing needed with Milliput and modelling putty to get everything cleaned up and smoothed out, a bunch more details to add, then the first spraycoat of primer to show up any glitches and things that still need to be fixed. The cabin roof needs some weight on it to get it to sit properly on the cabin walls; the seams all need cleaning up, especially around the bow deck and the bow itself; and I might yet put another layer of styrene down on the bow deck, as the single layer there currently is quite thin and I worry about it standing up to the wear and tear of gaming and transport.
Still, it’s great to have the major structural parts of the boat complete!