Category Archives: Pulp

Posts about 28mm 1920s-30s pulp gaming using .45 Adventure rules from Rattrap Productions and other rules.

A Long-Neglected Project Gets Dusted Off

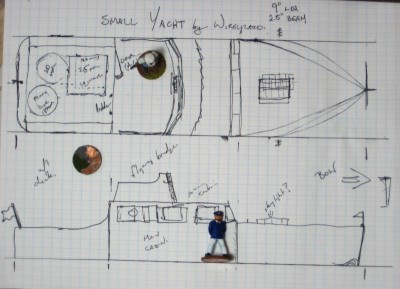
Back in the long-lost days of mid-2009 (OK, four years back…) a contest called “Build Something” was held over on the excellent Lead Adventure Forum, with the contest theme of “Transportation”. I decided to build a small motor yacht/large powerboat sort of boat for pulp gaming, taking inspiration from and got as far as cutting the base of the hull, the cabin walls and the sides of the stern out of styrene plastic before inspiration fled and I moved on to other projects.

boat plan
The now-lost original plan, from October 2009. Click for larger.

Lots of other projects, in the intervening years, but I never actually threw out the barely-started boat, it just gathered dust and got used as an impromptu container for scrap wood and other bits. Late last week I finally got around to cleaning up my long-neglected hobby bench, didn’t feel like painting, and decided to dust off the motor yacht instead of starting an entirely new project. I still have a large amount of styrene plastic (plastic card) hanging around, so it was still the material of choice for this project.

I’ve added frames to the bow and a deck, then added a removable roof to the cabin and a flying bridge on top of that.

boat1
The boat restarted, October 2013. Click for larger.

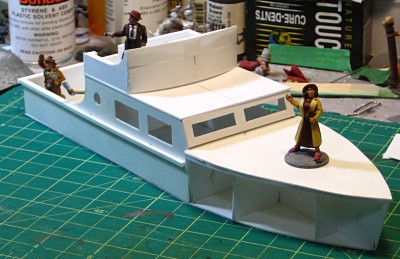
The hull sides will be the next big step. I’m planning on doing each side with a single long strip of styrene, and then use putty up at the bow to properly form the actual point of the bow.

After that there’s still a lot of detail work and cleanup to do. Door and window frames, a ladder up to the flying bridge, and a lot of putty to smooth things out and hide seams.

boat2
From the stern quarter. Scale provided by 28mm Pulp Figures reporters. Click for larger.

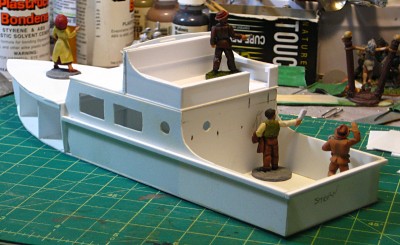
This last photo shows the curves in the aft end of the boat quite nicely. I’m going to use steel wire for railings on the sides and back of the flying bridge, and might put a removable canopy over the rear deck. Also need to come up with a name, to be painted across the stern in large gold letters!

The Dread Thuggee, A Pulp Alley League!

First, on a quick administrative note, the Warbard was offline for part of last week due to an attempted attack on the WordPress installation that runs this site. I was able to work with the my webspace providers and get everything sorted and up and running, I’ve made some behinds-the-scenes changes and tweaks, and hopefully that will be the first and last time I have to worry about crap like that! No content was lost and we’re fully back up and running, at least!

On a happier note, I’ve been very gradually upgrading our pencil-marked handwritten Pulp Alley League sheets to spiffy-looking word processor documents. This also gives me the ability to share them more widely, of course, so here’s the Dread Thuggee stranglers for Pulp Alley (PDF, 80Kb) for everyone’s enjoyment.

Adding Thuggee stranglers to a pulp universe is obvious enough, and was actually something I started thinking about in relation to the pulp-horror game Strange Aeons. There was a thread I started over on Lead Adventure, to which several people contributed excellent links, both to miniatures suitable for India and other related resources. The Thuggee figures are from Pulp Figures. The first of mine appeared way back in LPL5, a more recent batch appeared in LPL7, and I still have a few left to paint to round out the cult and add some variety.

In Pulp Alley, the stranglers re-use and re-brand the useful and flexible Animal skill to show their lack of firepower and dedication to strangling and other brawling skills. The Stealthy Agents perk lets the whole League skulk in the shadows more effectively, but does mean it’s a small League at merely four stranglers. They’re good at what they do, though, and have had a fair bit of success in our games, especially in tight terrain or limited visibility where they can really put their melee skills to use!

Blank League Roster for Pulp Alley

As a followup to last week’s posting of four of our Pulp Alley Leagues, here’s the blank PDF version of the roster I created. Pulp Alley is of course © Pulp Alley; this roster sheet is my own work but anyone can print or modify it for personal use. Enjoy!

There’s a very nice blank roster in the Pulp Alley rulebook, but being able to type one out and print copies as needed is also useful!

We’re probably getting back to some Russian Civil War action this Sunday at gaming; I’ll probably try to get some photos and get a game report of some sort up here to help compensate for the tragic shortage of activity on the Warbard recently…

Four of our Pulp Alley Leagues

Although things have been quiet on this blog (too quiet…) we have been gaming fairly regularly! In fact, this long weekend is the first weekend in quite a while I haven’t gotten a game in. It’s been a Canadian Thanksgiving long weekend filled with museum visits, bike rides and food instead, which is just fine.

Anyway, most of what we’ve been playing has been Pulp Alley, a fast and elegant set of pulp skirmish rules. Teams in PA are called “Leagues”, and we’ve created six or eight that appear regularly. Rather than have one person always playing the same League, we’ve got a “pool” of Leagues that we all take turns playing as the mood strikes us. I created most of the Leagues when I first bought the rules, although most of those early Leagues have been rebuilt and tweaked at least once since then, as our understanding of the rules improved!

I’ve done up a few of our Leagues as proper PDF files thanks to LibreOffice, and I’m putting them up here for inspiration or to use as-is in your own Pulp Alley games. All four of these files are free to print or reproduce for personal use only.

First off, Sir Charles, Aristocratic Investigator (PDF, 81Kb). He may or may not be secretly doing the bidding of His Majesty’s Government in London, but this wealthy, well-connected character, his staff and hangers-on have the habit of turning up in some remarkable places.

Second, Count-General Vladimir Drunkovich and his White Russian Exiles (PDF, 80Kb). Being on the losing side of the Russian Civil War meant exile from Mother Russia and has made these ruthless, dangerous characters even more desperate and daring. No-one is sure anymore if Drunkovich is still fighting for Russia or if he’s gone entirely mercenary… and only a suicidal fool would ask the Count that sort of question directly. If he didn’t kill you himself, the deadly Natalya would skewer you!

Third, the scarred, ruthless and mysterious villain known as “Stahlmaske” or “the Teutonic Schemer” (PDF, 80Kb). A veteran of the brutal trenches of the Great War, Stahlmaske and his flunkies bring ruthless violence wherever they go… but Stahlmaske is nearly as deadly to his followers as his enemies!

Finally (for now…) we have the mysterious, mystical Shadow (PDF, 80Kb). He can cloud men’s minds… and possibly read them! He knows many things, but his opponents know very little about him…

Note that the Shadow is built from the “Weird Abilities” in the first Pulp Alley supplement, Perilous Island; the first three Leagues need only the main Pulp Alley book to use!

Links of Interest, 3 September 2013

Quiet around here recently; I’ve been gaming regularly through the summer but not doing a whole lot of painting, scenery building or much of anything else!

Here’s a few cool links to share, though. They’re all, mostly by coincidence, on that perennial Warbard theme, zeppelins! First off, some notes, sketches and other cool stuff from Kevin Conran, the lead designer of the movie Sky Captain.

Over on Dark Roasted Blend, there’s Airship Dreams, Part One and Airship Dreams, Part Two which both, especially Part Two, have some awesome photographs of real and imagined airships & zepps.

Actual substantial blog posts soon, I promise…

Added Peril & Weirdness in Pulp Alley!

Sunday’s five-player Pulp Alley game set a number of “firsts” locally, as our biggest-ever Pulp Alley-powered game with five players and about thirty figures on the table, and as the first appearance of the “Weird League” rules from the new PA supplement, Perilous Island. It was also the first on-table appearance of my newly finished urban buildings from Sarissa Precision.

Sean pulled out his half-painted The Shadow figure and quickly thrashed together a League based around The Shadow, using the “Dark Pact” League Perk to add a number of powerful and creepy Shadow-like abilities, notably the ability to vanish from the gaze of men (and women…), and the ability to seemingly teleport straight through solid walls, among other things.

Neither of us have built Leagues with the new “Weird” abilities, but as far as I know The Shadow & friends are properly constructed and we used the rules correctly. The “Weird” abilities certainly add a very cool flavour and some great new powers to the Pulp Alley game, and I’m looking forward to future outings of The Shadow, and to building new Leagues (or re-building old ones) to incorporate more of the “Weird” abilities.

I’m also pleased to report that Pulp Alley moves along just fine with five players and thirty figures; it’s naturally a bit slower with that much stuff going on and that many people, and the tabletop can be gloriously crowded, but the system works just as well for a big crowd as it does for two players with six or ten figures total!

I took a few photos, but only one of them turned out OK. Here’s the setup right near the beginning of the game; only Dale’s Red Air Pirates are visible on the rooftop they arrived at; the other four Leagues are lurking behind buildings or off the edges of the photo! I like how the buildings look, but they really show how I need to crank out a bunch of alleyways, sidewalks and other urban filler/background scenery bits now…

pa_4aug2013
A Pulp Alley game setup, before the action starts. Click for larger, as usual.

Sarissa CityBlock Buildings, Finished

Finally have the Sarissa CityBlock 28mm lasercut MDF buildings to a table-ready state, including another hand-painted advertising sign on the side of one of them.

Here’s all seven buildings (six CityBlock plus one Narrow Townhouse from the Gaslamp Alley range) stacked up somewhat awkwardly:

sarissa_4aug2013
All seven MDF buildings, ready for the tabletop. Scale provide by three 28mm Pulp Figures reporters. Click for larger.

In one of my earlier posts, Chris had asked in comments about how these buildings came apart, so here’s the Hotel Atlantic spread open:

hotel_parts
The Atlantic Hotel spread into it’s constituent parts; three floors and a roof. Click for larger, as usual.

You can see I haven’t (yet) done anything with the insides of any of these buildings; beyond possibly splashing a coat of plain paint in, I’m not sure how much I’ll do inside them.

So, having built seven of the things but not actually written a full review, what did I think? First off, I like them, and will definitely be ordering more of Sarissa Precision’s buildings at some point. They’re solidly built, well designed, have enough detail to look good right out of the box, and are also easy to add extra detail to. Everything fits together very well, the laser-cutting is crisp and precise, and the CityBlock & Gaslamp Alley buildings are good generic city filler buildings, similar to thousands of real-world buildings all over the world, pretty much anywhere Europeans influenced architecture. Use them as-is, you could be nearly anywhere in North America, the UK or much of Europe; add a few “local” touches (different street furniture, a few different buildings for flavour, etc) and you could be in Shanghai, Cairo or Singapore just as easily!

I’ll do a couple of things differently on the next batch of MDF buildings I build, though. First of all, painting MDF is like painting a sponge. The stuff absorbs paint and water like crazy, and is actually quite hard to paint as a result. You go through a surprising amount of paint to get decent coverage; and because of the absorbency you can get streaky or blotchy paint coverage very easily. A couple of my buildings required a second coat of their base colour, and painting details like windowframes and the signs was harder than it should have been because you needed thin, wet paints and a well-loaded brush to get good coverage. So I’ll be doing as much painting as possible before assembly next time, instead of rushing assembly this time just for the joy of having complete buildings sitting around!

Spray cans or an airbrush might actually work better than brushes for basecoats on MDF, if you have access to an airbrush or a better selection of spraypaint colours than I do currently.

I’ve got a whole pile of small scenery detail bits that have been building up on the edges of my painting desk recently, so with these buildings out of the way it’s on to them to get them done and into play, then onto more figures! We’re having a Pulp Alley game tomorrow that should feature all my new buildings, so look for photos of that soon too.

Sarissa CityBlock Buildings, Part The Third

Progress continues on my seven Sarissa Precision buildings, albeit at a slower pace than I’d intended!

Basecoat and drybrushing is done on all seven buildings, gravel roof details likewise in place on all seven, most of the doors and windowframes are painted, and I’ve started cleanup and finishing.

I’ve always liked the looks of the big hand-painted signs and advertisements on the sides of older buildings, so given the wide blank side walls of the Sasrissa CityBlock buildings, it seemed natural to break out the smaller paintbrushes and go to it!

hotel_at
Newly-painted Hotel Atlantic sign on the side of the three-storey Sarissa Precision CityBlock building. Click for larger, as usual!

Still some cleanup to be done on the basic lettering, and I might yet redo the red ornamenting in both top corners, but the basics are done and I like how it turned out. This was all done freehand with a brush over some light pencil lines for guides, after I used Inkscape on the computer initially to play with letter sizes and spacing and figure out some basic guides. The “Hotel Atlantic” seemed like a good generic name, likely to occur anywhere in the English-speaking world, or even in non-English-speaking areas as the hotel set up to cater to English-speaking travellers.

One of the other buildings has a blank white square on it currently; later this week I’ll figure out what sort of sign or ad I want on it, too.

Sarissa CityBlock Buildings, Part The Second

Having assembled my new Sarrisa Precision lasercut buildings, it was time to consider adding some extra details to really make these buildings “pop” and bring them to life. One of the things I wanted to do was add detail to the fronts of the buildings, especially the cornices at the roofline, which are often quite elaborate on brick or stone urban buildings built in the late 19th or early 20th Century.

As I’d assembled these buildings I’d reflexively kept the bits of MDF from inside the windows and other openings in the models, and looking at the little pile of lasercut leftovers, I realized they’d be perfect for basic detailing and adding some relief to the fronts of my new buildings.

sarissa2
The three-storey Sarissa Precision building, and the sorted offcut bits of MDF. Click for larger, as usual.

There were more than enough bits and pieces to do the fronts of five of the seven buildings, with leftovers to keep going on the remaining two if I decide, although I’d like to use some light card in layers for a slightly different look on the last CityBlock building and the Gaslamp Alley townhouse.

Here’s all six of the CityBlock buildings stacked up, five of them with basic ornamentation added with “scrap” MDF.

sarissa3
All six CityBlock buildings stacked up, five of them with front details added. The statue is roughly 28mm tall, just for scale. Click for larger.

Next step is chimmneys and other rooftop detail. I’ll use basswood and plastic tubing for chimmneys, and create roof hatches, vents and roofwalks from basswood and card. Masking tape for tarpaper or paint and fine gravel will complete the roofs, then there’s painting to be done!

Sarissa CityBlock Buildings, Part The First

In my last post (two+ weeks ago!) I mentioned I’d bought a bundle of Sarissa Precision’s lasercut 28mm CityBlock buildings to bring our pulp gaming into an urban realm. I’ve finally got all seven buildings assembled; here they are on the counter.

sarissa1
All seven Sarissa Precision 28mm lasercut buildings. Click for larger, as usual.

The six similar buildings are from Sarissa’s CityBlock bundle, with one extra floor purchased to give me five two-storey buildings and one three-storey building. The seventh building is the Narrow Townhouse from Sarissa’s Gaslamp Alley Victoria SF line.

The CityBlock buildings go together quickly and easily; the walls and floors are 3mm MDF, and the window frames are seperate sheets of 2mm MDF designed to slot in behind the walls. The first several buildings I put together with more enthusiasm than consideration and glued the windows in right away; for the ones I’ve finished more recently have had the windows left out for now to make them easier to paint.

The floors and roof all come apart to allow access to the interiors of the buildings during games, and the simple tab-and-slot system should survive many games with no issues. The buildings all feel very solid once assembled.

The Narrow Townhouse from the Gaslamp Alley range is one of Sarissa’s most recent releases, and there’s a number of tweaks, refinements, and added details compared to the older CityBlock buildings. The interior floors have wood planking engraved on them, some of the etched and cut detail is a bit finer, and instead of 3mm & 2mm MDF, the Gaslamp buildings use 2mm MDF and laser-cut light cardstock, called “greyboard” on Sarissa’s website. This makes the Gaslamp buildings lighter than the CityBlock ones (although just as solid) and somewhat more detailed. The windows have both inner and outer frames lasercut from cardstock, for example.

Having assembled the basic buildings, I’m now turning toward detailing them before painting. I want to add some details and bits on the front facades and cornices of the buildings, and to the roofs. I’ll use fine modelling gravel on some roofs for a tar-and-gravel roof, and narrow masking tape on others for tarpaper roofs, and add details like chimmneys, roof walks and possibly even rooftop signs.

After that it’ll be time for paint. The engraving on the CityBlock walls is too large to “realistically” be brick, but I’ll likely paint several of them up in traditional red bricks anyway, as well as some as stone.

Detailing photos and writeup in the next couple of days!