I’ve been spending some more time on YouTube recently, rummaging around the wargaming-related channels. I don’t have the time or the patience for the long rambling unedited vlog-format stuff, but there’s some good, properly edited, to-the-point stuff out there.
Two channels I particularly like are Kujo Painting, who did the great “How To Paint Tartan” video embedded below. The rest of his collection is well worth looking through.
Miniwargamer Jay also has a good Miniature Painting 101 series of vids with lots of good tips. Again, most of them are fairly short (5 to 20 minutes), cover a single topic, and are well edited.
On non-YouTube notes, a couple more links!
Genet Models, formerly Ebbles Miniatures have been around since the early 2000s turning out really good papercraft science fiction models. The creator of them has more or less retired from the papercraft business (I think he works on computer games now) but he’s put his entire portfolio up for free download. I’ll be adding some of these to our Infinity tables soon, especially some of the shuttles and dropships!
I linked to this awesome tutorial in an earlier post about Infinity ads, but it’s worth linking to again. Want pseudo-holograms on your science fiction scenery? H-Archive does ads and holos is well worth a read. He uses printed transparencies and 1mm clear acrylic sheet to awesome effect; I’m going to have to hit up our local plastic supplier for some 1mm clear acrylic sometime soon!
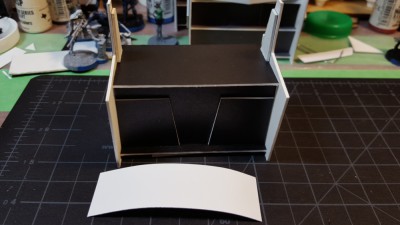
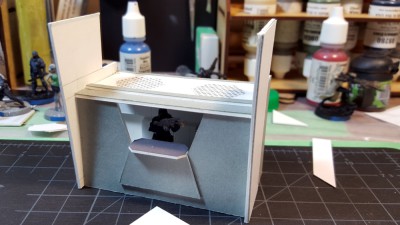
One of the goals with the spacestation terrain set was to make the whole thing look like not just a collection of tactically interesting obstacles but also a (relatively) sensible, lived-in/working facility. Right now the non-cargo bay area is a bit plain, really just the Impudent Mortal walls in my collection arranged in various ways. I did up some lockers recently to add colour and interesting cover, and now I’ve found a really simple way to do food booths or other fairly small terrain pieces.
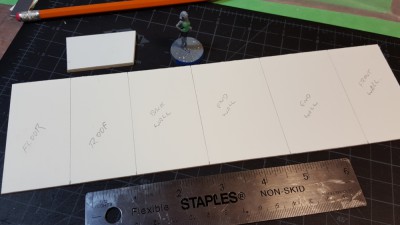
Rough cutting guide for one booth. See text for details, and click for larger.
Start with a strip of card 3″ wide and at least 11″ long, or multiple 3″ wide pieces making up roughly the same length. I use 1/16″ mattboard, the stuff used by picture framers, but for this project you could use just about anything. There’s only one measurement in the whole thing that depends on the thickness of the material being used (the height of the front wall of the booth) and that’s easily adjustable or even avoidable if you tweak the design a bit.
You’re cutting as follows:
1″ wide for the under-floor brace/foot. Cut this piece in half again.
1 1/2″ floor
1 1/2″ roof
1 3/4″ back wall
1 9/16″ front wall (NOTE)
2″ end wall
2″ end wall
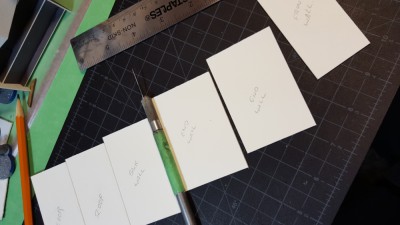
One booth’s worth of pieces. See text for details, and click for larger.
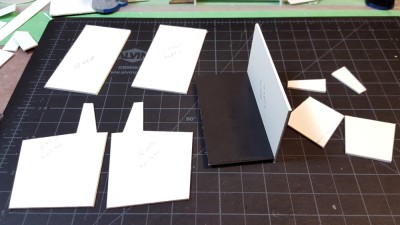
Start by gluing the two foot pieces to the underside of the floor. Centre it under the floor — exact placement isn’t important, they just exist to lift the front edge of the booth above ground level and add a bit of visual interest. Note that in the layout photo below, I forgot to allow for the foot pieces, as I’m using that scrap of 1/8″ foamed PVC plastic above the card strip instead.
While that dries a bit, cut the two end walls some more to make them interesting. They stand vertically, and you can see from the photos that I’ve cut each in a different way to add variety and provide support for the booth’s large overhead sign(s). You don’t need to get fancy, just a couple of angled cuts can do nicely, especially if you re-use the offcut pieces again as I’ve done on several of the roofs in my set.
Glue the back wall to the back of the floor, with the bottom edge of it resting on the ground. Use the end walls to make sure the back wall is vertical and square, then glue them on, again with the bottom edges resting on the ground.
Floor on it’s foot and back wall in place, side walls cut. See text for details, and click for larger.
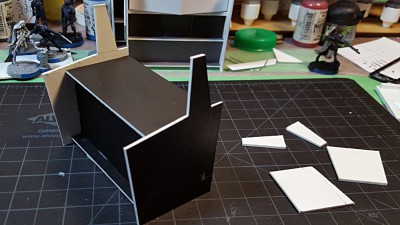
Fit the front wall in between the end walls, again making sure it’s square and vertical. Exact placement isn’t important and will depend on how you intend to detail the front wall. I’ve recessed all my front walls and used various offcuts of card to add a few bits of detail. I figure these are automated booths using various machinery to process FoodGoop9000 (or possibly Soylent Green…) into various forms of fast “food” by adding flavour, so there’s no order window or anything specific on the thing.
Basic assembly done, front wall and roof in place. See text for details, and click for larger.
I’ll probably eventually do some graphics to add to the fronts and signs of these booths, including various fast food brands we all know and love like Ariadna Fried Chickenoid and such! They’ll get posted here to the blog when they happen!
Details on front wall and inside the sign supports on the roof, first layer of the sign in front. See text for details, and click for larger.
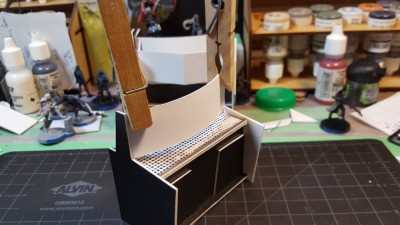
Glue the roof on last, and put the resulting box aside for the glue to dry a bit. Time to move on to the overhead sign.
This could be as simple as a single strip of the same 3″ wide card you’ve used for the rest of the thing, or any number of more elaborate constructions. If you want a really, really striking sign, there’s H-Archive’s awesome how-to on making “holographic” displays, which I want to follow myself sometime soon!
Extra layers of the sign being held while the glue dries a bit. See text for details, and click for larger.
The curved sign is simply three layers of light card (65lbs, I think it is) cut 1″ high and 3 1/8″ long, just slightly longer than the gap between the vertical bits of the end walls, so that it curves. I glued one strip in place, let it cure for a bit, then gently pushed the second and third strips into place and held them with clothspins until the glue dried. Pre-curving the strips by running them over the edge of my workbench helps.
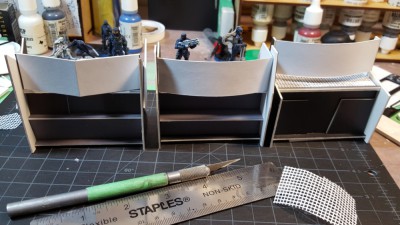
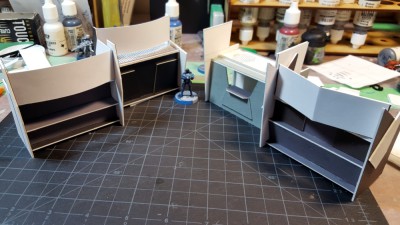
All three autobooth designs together, with various Hassassin Bahram troopers posing for scale. Click for larger.
The grid on the roofs of my booths is some sort of embroidery/craft mesh stuff that I got a leftover chunk of from my girlfriend. It adds interesting texture if you can get some, or something similar like the plastic mesh used in window and door screens.
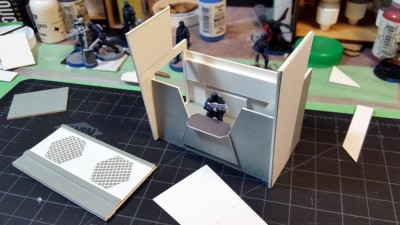
The Manned Booth
The fourth and final booth is a variant design that is actually run by a person (or humanoid robot, you never know in Infinity) with a door in one end wall and an open order window/bar in one side wall.
Manned booth assembled, roof off. Click for larger.
Design is identical to the autobooths above except I cut two of the “back walls” and instead of cutting the roof 1.5″ I cut it 1 5/8ths” wide so it would go over the top edges of the walls properly.
Manned booth, roof on. Click for larger.
The inside is outfitted with various bits of card for the bar counter, a side bar/prep table, and a whole bunch of cupboards along the walls.
The outside end walls will eventually be painted and decorated to look like drinks glasses, and there will be a sign of some sort on the roof, although of slightly different design than the autobooths because this roof actually comes off.
Any comments or suggestions please leave them below, I do read and reply to comments but due to the spam filters it might be a while before I approve your comment!
I’ve also just bought new greenstuff putty finally, to replace the very, very old strip of the stuff that’s been hanging around my desk for far too long. The old stuff had the consistency of used old chewing gum and was pretty much impossible to work with; the new stuff (along with a couple of new sculpting tools!) has reminded me how much fun messing around with greenstuff is. There’s a pile of YouTube video tutorials showing basic greenstuff sculpting techniques – one I rather like is The Dizmo’s skull tutorial.
Green Stuff Industries host a good mix of basic messing-with-green-stuff tutorials, including this Sculpting Bas-Relief Flames tutorial that I want to try out sometime soon.
I’m off next week to northern Alberta for three to six weeks of field work, helping run a project up there, so posting might continue to be fairly light but I’m going to take some putty and sculpting stuff with me and practice the art – it should be more forgiving of hotel suite lighting than painting, which I’ve tried in hotel rooms in the past and always quit because even at a hotel room desk the light tends to be lousy…
A while ago via Google Plus, I stumbled over the Terrain Wench and her work, specifically the nicely done Lizardman spawning pool she had created. She’d taken the trouble to do a really well-done video of her technique for doing stonework in styrofoam insulation board – embedded below.
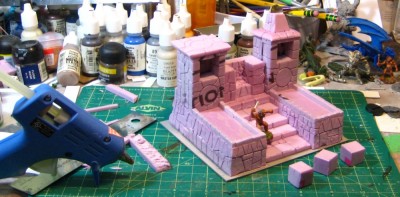
As I mentioned in the last post, I’ve been wanting to build a new scoreboard setup for my Blood Bowl pitch, one with a few features I missed in the first one built last December. I sat down and started it last night, and except for a few details here and there it was one of those projects that has (so far!) just worked, and in person it looks pretty much like I was visualizing it in my head. Always cool when a project works out like that.
Front view of the new Blood Bowl scoreboard/temple. See text for details, click for larger.
The base is about 5.5″ wide and 4.5″ deep, with the temple made out of two different thicknesses of pink styrofoam insulation board and standing 4″ tall to the top of the right-hand tower. The stairs will have a BB scatter diagram “carved” into them with Milliput, and the three square holes are for score markers in the tower and a weather indicator in the central piece. There’s a roof piece that still needs to be glued down over the central piece, and the two “arms” alongside the stairs are going to be done up like pools of water with gloss varnish eventually.
I’m going to be using the cubical styrofoam offcuts in the foreground of the photo above to make both score and weather indicators. I’ll layer Milliput over the cubes; the score markers will basically be d6s numbered 0-5; the weather indicator cube will have icons for the five types of Blood Bowl weather, and probably a second “Fair Weather” indicator on the sixth side, just because.
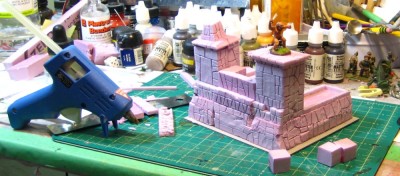
Rear view of the scoreboard temple. As usual, click for larger.
I’m quite pleased with the way the base of the temple turned out, with that slight inward slope as the wall goes up which is so typical of a lot of monumental architecture. I’ll be cleaning a bit of the stonework up with Milliput, but I’m generally pleased with how it’s turned out as well. Terrain Wench’s technique of using an Xacto then a pen or pencil to carve stonework gives a much nicer result than my few previous attempts at stonework in styrofoam where I’d just used a pen or pencil to carve the stone.
I spent some time messing around on Google Image Search, and tried another jaw/tooth-based logo out for a bit before tripping over the Aztec “cipactli” glyph, which is a cayman/crocodile and also “e;a primeval sea monster, part crocodile, part fish and part toad, of indefinite gender”e; (from this Wikipedia article) which sounded cool enough as a concept, fit the jungle/tribal/vaguely-Central American theme usually found with Lizardman teams and looked easily reproducible and scalable as a team logo. I found a couple of versions of the cipactli glyph I liked, redrew them in Inkscape so I could work in SVG vector format, then started messing around.
One of my favourite things about Inkscape is that the canvas is infinite. Unlike GIMP or Photoshop where you define an image size and usually have to fiddle around to expand it, Inkscape will show you your defined page size, but the canvas around that page has no boundaries. Want to grab a copy of some part of your image, drag it to one side and fiddle with it separately or create different versions of it? Copy or duplicate the objects you want, and go right ahead and drag them somewhere out of the way to play with them!
Inkscape working file screenshot. See text for details of what you’re actually looking at!
Above is a quick screenshot I took of Inkscape and the working file I’ve got for Croc team logos and related graphics. See the tan rectangle in the centre? The grey box surrounding it is a North American-standard Letter-sized sheet of paper (roughly A4 for the rest of the world) so the “real” size of this working area is theoretically huge.
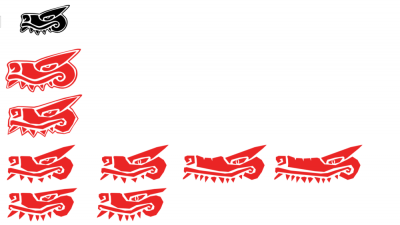
The green box on the left is an entire standard-size Blood Bowl pitch with 30mm squares (a 26 x 15 square pitch, for non-BB players!) that I set up to check scale and sizes. The collection of black toothy shapes were an earlier, now abandoned idea for a team logo; the various red things are interations of a possible cipatcli logo.
Variations on a cipactli theme. See text for details and click for larger.
The closeup screenshot of possible cipactli logos above shows where Inkscape really shines. Rather than work on just the one image and rely on undo/redo to track changes, or creating lots of versions of a single file and having to have them all open at once, if I want to tweak an object in Inkscape I can just grab a copy (Ctrl+D for Duplicate is useful, it’s Copy+Paste right over the existing object) then drag it off a bit on that infinite canvas. Rinse and repeat until you have a version you’re happy with!
Oh, and the cipactli varient I’m most likely to use, at least at this point, is the third down and third along. The slightly longer snout makes it look more croc-like, but for some reason the even longer nose of the rightmost one doesn’t work for me. I might well try another few variants, there’s no shortage of room!
I’d heard of “wet palette painting” before, but for no particular reason hadn’t sought out information on the technique or looked into it at all. Then a few nights ago I was rummaging around among YouTube’s wargaming-related videos, as one does, and this wet palette howto video from Corvus Miniatures caught my attention.
Turns out to be pretty straightforward – an old container lid from the recycling bin, paper towel, water, baking parchment. We had all those things knocking around the kitchen, so I set up a wet palette and tried it out while doing the main blocking colours on six Cossack horses from Brigade Games and a swamp-monster thing from Reaper.
Compared to the dry palette I’m used to (an old CD!) you get hugely extended working time with your paints, which is especially useful when you’re block-coating six 28mm horses and a highly textured monster. I forsee fewer sad little blobs of half-dry unusable paint in my future! Blending is also easier, which is nice when you want slight variations to make your horses (or whatever else) look more interesting.
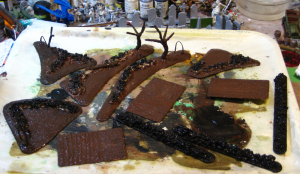
Having done hedgerows and fields, I wanted some rougher, more overgrown terrain, and I also wanted to start experimenting with tree creation, as trees are the one thing I’ve been lacking in my scenery so far.
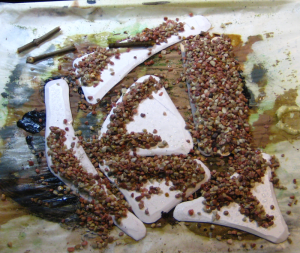
I started with the last reasonable-sized offcuts of the 3mm plastic I used as the base for the fields. The rock walls are decorator’s gravel and Gorilla Glue. I mentioned Gorilla Glue briefly in the article on fields, but briefly it’s a thick glue (the colour and consistency of honey) that activates with water, and expands as it dries, foaming outward. I wet the surface of the plastic card with a damp paintbrush, ran a bead of Gorilla Glue were I wanted the wall, dumped gravel in roughly the formation I wanted, then sprayed the whole thing liberally with plain water. The expanding Gorilla Glue will fill some of the gaps between the pieces of gravel, and also fill out the bulk of the wall slightly. After it dries (a couple of hours) you can always run a second bead of glue across the top of the wall and dump more gravel on. Two layers of gravel like this will get a wall up to just over waist high on a 28mm figure, which is enough for my purposes.
The three straight rock walls are based on tongue depressors, so 6″ long and about 3/4″ wide. The three small fields/garden bits are old credit card sized gift cards I had lying around, with the raised beds and plow furrows done with hot glue. The larger pieces are all from the 3mm plastic card offcuts, the longest being about 8″ long, the triangular piece about 4-5″ a side.
Gravel and Gorilla Glue for rock walls. Click for larger.
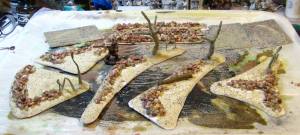
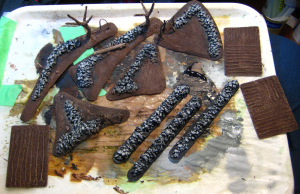
The trees are fairly heavy wire (sold in local hardware stores as “utility wire”, I seem to recall) bent and folded with pliers, then glued down with hot glue. Once they’re secured, I used more hot glue to bulk out the trunk and major branches. Everything – ground and trees – got slathered in white glue and had sand dumped over it at this point.
Rock walls done, on to tree trunks, then sand over everything. Click for larger.
After the sand had dried overnight, everything was basecoated with dark brown paint, mixed randomly with a bit of black paint. The rock walls got straight black as a basecoat. All my basecoats also have a healthy dose of white glue mixed right on each piece to secure the sand and gravel.
Basecoat – brown over everything but the rocks, which get black. Click for larger.
Last bit of painting is a pale brown/tan drybrush over the dirt and trees, dark grey then pale grey/white over the rocks, and finally a pale grey/tan/white mix drybrushed on the tree trunks so they’re a slightly different colour from the ground.
Drybrushing done – light brown & tan on the dirt parts, dark grey & pale grey (almost white) on the rocks, final grey/tan drybrush of the tree trunks.
In Part Two, flocking, scenic foam and other scatter on the ground, lichen for bushes, shrubs and tree foliage. Coming soon!
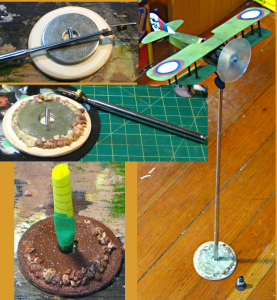
…it’s a bird, it’s a plane… well, actually, it’s a flying stand to get my existing SPAD and Nieuport fighters onto the table properly!
Flying stand construction. See text for details, and do click for larger!
The lower part of the base is two 3″ plywood circles from Micheal’s craft store, the lower one with a hole drilled in it wide enough to accommodate the head of the M4 20mm long bolt. The top circle has a smaller hole to let the bolt through, and I used a woodworking rasp to bevel off the edges. The two washers are fairly heavy 2″ fender washers. I used superglue to tack them in place, then ran a bead of Gorilla Glue around the edges to lock them in place and round off the base. The gravel imbedded in the Gorilla Glue adds nicely to the weight of the base, as well.
The base will get a quick paintjob to match the rest of my terrain, then some lichen or foam foliage to break up the outline a bit.
The actual flying stand is a cheap mechanic’s extending inspection mirror from a local auto parts store. The base unscrews and is threaded for a metric M4 bolt – that’s a 20mm bolt coming up from the centre of the base. Once the mirror at the top was removed, the round ball it swivelled on turned out to be easy to shape with 120 grit sandpaper, so I sanded it roughly cubical and tacked the alligator clip (also cheap from the electrical section of a hardware store) on with superglue just to hold it. Then I used fine wire to lash the clip into place, saturating the lashings with superglue after I was done. The result is low profile and more than solid enough to be gamer-proof. I did nearly glue the hinge of the alligator clip shut, though… try not to do this!
The small square of basswood on the handle of the alligator clip is just to make it easier to open all the way; the way it’s mounted on the telescoping rod centres the airplane over the stand – which is a good thing – but the rod gets in the way of your fingertip when you try to open the clip to it’s widest point. The screw I put in the belly of the SPAD turns out to be almost too big for these clips; if you look closely you can see I bent the handle of the clip outward to allow the clip to open just a bit wider. The whole clip has also been bent forward slightly to improve the angle the planes sit at when they’re clamped in.
Total cost of the whole thing is about $10 or $12. The extending inspection mirror is the most expensive part at about $8; four alligator clips were $2 total; four 20mm M4 bolts were about the same; the 2″ fender washers are about 50 cents each; and a package of six 3″ plywood craft discs was $3. If you had a workshop area full of random stuff (which I don’t) and could scrounge bits you could build these for not much more than the basic cost of the inspection mirror.
The whole assembly is just over 20″ tall to the tip of the alligator clip, more than tall enough for my purposes. The telescoping post will still unscrew from the bolt in the base, which I will probably maintain as being able to take it apart makes it much easier to transport, and the telescoping rod and alligator clip is the part most likely to be damaged and need to be swapped out.
My brother has a big 1/48 DH4 that we’re not sure will balance securely on this stand; I might wind up making a larger flying stand, probably based on CDs, for that plane. I’ll eventually make one or two more flight stands this size, too, but given that for the near future there’s never going to be more than one plane over the table at a time, we’re good to go and it was easier than I thought it was going to be to construct a solid flying stand.
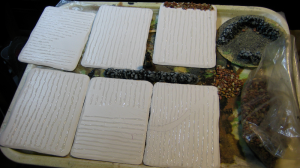
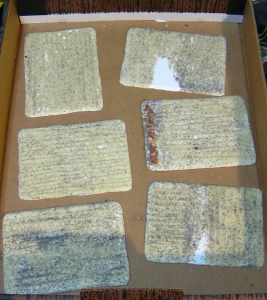
As a break from painting up Russians, last night I broke out the scenery supplies and started in on a new set of plowed field pieces. I like fields of various sorts, they provide interesting texture on the table while being easy to make and easy to transport, being largely flat!
These six are based on the last large piece I have of white 3mm thick plastic. It was salvage from the workshop of a non-profit I occasionally volunteer at, and I have no idea what sort of plastic it is, but it won’t glue with regular solvent cement and not even superglue holds it gracefully, so it’s useless for buildings. Hot glue and white glue will stick to it, though, and being plastic and relatively thick it won’t warp, so we’ve used most of it up as scenery bases of various sorts. The double handful of small scrap pieces (none much bigger than 4″ in any dimension) are being saved to appear under various small bits of filler and detail scenery in the future, but these six 6″x4″ fields are from the last 12″x12″ piece I had left.
Six new 6″x4″ fields, with the plow furrows made from lines of hot glue. Top right is one of my Gorilla Glue experiments – see text. Click for larger image.
For the plowed ridges and furrows in the fields, I broke out my trusty hot glue gun and ran thin lines of hot glue for the plow ridges. A couple of the fields got different or interrupted plowing patterns, just for interest.
The scruffy drystone wall on one end of one of the fields, the larger drystone wall assembly on the CD base, and the freestanding wall on a tongue depressor tucked in between the fields in the above photo are all made from decorative gravel and Gorilla Glue, a technique I first saw over either on Maiwand Days or Rabbits in my Basement, although it was apparently pioneered by TMP stalwart John the OFM.
Gorilla Glue has the fascinating properties of being water-activated and expanding 2- to 4-times as it cures — the stuff foams as it hardens, basically. Lay a thin bead of it down, dump a line of damp gravel over it, and it’ll fill some of the gaps between the gravel as it expands, and even lift and fill your wall out. Pretty cool, and I’ll be using it for producing a lot more scruffy stone walls, blast craters and similar terrain in the near future!
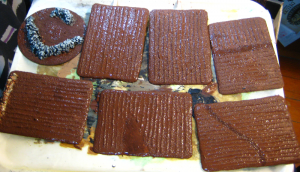
The fields with sand glued down for texture. Click for bigger, as usual.
Next step was a layer of white glue, then sand. My sand mix is actually about four different kinds of “decorator” sand, model railway ballast and similar, so it isn’t totally uniform.
Base coat and a bit of darker brown for some muddy bits. Click for larger.
The base coat is a medium brown, with a bit of a much darker brown mixed in. I wound up having to repeat the base coat, as I’d applied it quickly right at the end of the night, so it was patchy and too thin in spots. I used a bit more dark brown and even a bit of well-thinned black in the second coat, for better contrast with the eventual drybrushing. The ragged rock wall along the one end of one field was basecoated straight black at the same time.
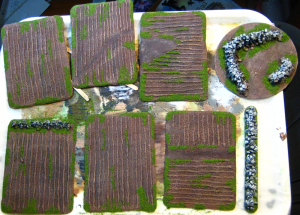
Drybrushed (two passes) and basic flock added. Click for larger.
The day after the basecoat, I did two drybrushing passes, the first with a mix of the same base brown lightened with a pale brown/dark tan colour, mixed roughly 1:1. The second drybrush, even lighter, was a fairly pale tan colour. The stone wall got a fairly heavy dark grey drybrush, a lighter pale grey pass, then a final pass with pale grey mixed with white on just the tips of the rocks. Then it was back to the white glue to add bits of flocking, mostly around the edges. I might go back and add some sprouting crops or something low to some of the fields, but for now they’ll be empty and weedy, mostly because it’s easier to move troops over them this way.
I’m declaring these done for now and moving them out of the way to get back to Russian Civil War figures! Total time on this project, not including photos and writing it up, was a couple of hours over a couple of evenings, all in short bursts, interrupted by figure painting, the Internet, and other distractions!
A few people on the Lead Adventure Forum and elsewhere have asked how the thatch on my variousRussianbuildingswas done, and I”ve been promising some in-progress photos.
I got those shot last month, and finally sat down to edit the pictures and write this tutorial. The basic materials are mattboard (good-quality picture framing card, used for most of the underlying roof structure), light card (used to bridge the spaces between the mattboard pieces and support the towel) and a cheap hand towel I picked up at the nearby dollar store, for the actual thatch.
The roofs pictured below are more complex than many, first because they’re hipped roofs, with all four sides sloping inward, and second because both buildings I happened to be building while I took these pictures have a complex floorplan, one T-shaped and the other L-shaped. I’ll discuss some of the peculiarities of doing towel thatch over a hipped roof in a bit.
I also design most of my roofs to be removable, which complicates design of the underlying structure. All that aside, the basic towel thatching technique is going to be basically the same for a simple gable roof permanently attached to a building or a complex removable roof like I’m doing here!
The roof structure - about as complex as a model roof is ever hopefully going to get!
Above, the main structure of mattboard, with light card over some of the bigger gaps in strips. I don’t bother trying to cover the whole roof, the towel is more than strong enough to support itself once all the glue on it is dry. A simple gabled roof with one ridgeline is obviously going to be a lot simpler!
Towel being glued down, cut oversized so it hangs well over the eves.
On this T-shaped roof, I started the sheet of towel on the top of the T, after putting glue over the card and along the edges of the mattboard pieces, then folded it over the main ridgeline and across the ends. I cut the towel on the hip roof ends and in the valley where the stem of the T goes out, and in several places removed triangles of towel to avoid having multiple layers of fabric piled up. The cut edges got an extra smear of white glue worked into them with a fingertip, to secure and help disguise the edge.
For these roofs, because they were complex enough already, I’ve gone with a single layer of towel, but you can get a nice extra effect by starting with strips of towel, and gluing them up from the eve toward the ridge of the roof in slightly overlapping stips. Real thatch is often laid in layers, and this recreates the look nicely. See my older English Civil War barn article for an example of thatch with strips of towel.
An illustrated explanation of how to fit towelling around a hipped roof's ends. With scissors, cut upward from the eve to the end of the ridge, removing a triangle of towel, then glue the ends over each other with an extra smear of glue to hide the edges.
The photo above should explain how to fit the towel around the sloped ends of a hipped roof, removing triangles of towel to avoid having massive amounts of overlapping fabric.
After the towel has been fitted to the roof, leave the whole thing to dry for a while. Note that the towel is hanging well over the eves at this point, and to keep that fabric from being glued to the table, I’ve propped the whole roof up on a couple of bottles of craft paint. I don’t use the building itself, because I want these roofs to be removable and the next step could easily glue my roofs down to the building by accident!
That’s because the next step is to saturate the towel with dilute white glue. I mix a jar of roughly two parts water to one part white glue, well mixed, then apply it liberally with a big paintbrush, a 1.5″ household brush I use for all sorts of scenery painting. You might think a soaking in watery glue would wreck or warp the underlying cardboard structure, but I’ve done four buildings this way in the last few months and none have warped noticeably.
Remember that you are dealing with towel. It will soak up your glue-water mix like, well, towel. Dab gently with the paintbrush, you don’t want to push the towel around or wrinkle it. After it’s well painted with your glue-water mix, leave the roof in a warm place at least overnight to dry.
After the glue-water mix dries, your thatch will be solid and pretty much self-supporting. Time to trim the eves with scissors, then slap on the first coat of paint. I use black primer, but I could probably have just started with a black towel...
After your roof dries overnight, the glue-soaked towel is basically strong enough to stand up on it’s own. Now you can trim the eves back accurately with scissors, making sure to fit the roof to the building (if it’s removable like mine are) to get a good fit and ensure the eves look good and even.
After that, basecoat with a dark colour, I go straight for black, and mix a bit more white glue into the paint to further strengthen the roof. This is also your chance to trim or re-glue any seams or areas you missed during initial construction. You could skip some of this by just starting with a black or dark brown towel — I started with tan as that was the least-objectionable colour the cheap towel I use came in.
After the black basecoat is finished, I do two drybrush coats to bring the texture of the towel out and make it look like tatch. The first, fairly heavy drybrush is with a 1:1 mix of light brown and grey paint; the second drybrush is brighter, more tan or light brown and less grey in the mix, and i concentrate on the ridgelines of the roof, to make the shape “pop” a bit. You could do more of a straw/yellow colour to your thatch, but real thatch almost always weathers to a grey/brown/black colour fairly quickly.
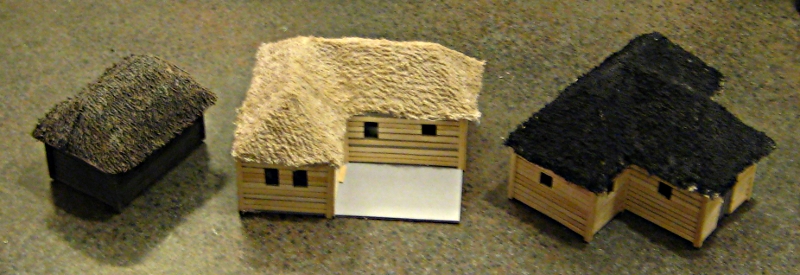
From left to right, a finished building, with thatch painted as described in the text. Centre, unpainted but with eves trimmed. Right, black basecoat only on the thatch, awaiting it's two drybrush coats.
Finally, a photo from my earlier posting about the two buildings featured in this article, with everything finished except the fence on the L-shaped building. You can see the drybrushed finish that brings out the texture on the towel, and the slight highlighting of the ridges and edges of the roofs.
A pair of new, larger Russian-style buildings for our 28mm RCW games. Click for larger.
Hopefully this helps someone out there tackle their own thatch roof from towel. Remember that the roofs I’ve used as illustration for this article are at about the outer limit of complexity for a thatch roof, being hipped, T- or L-shaped and removable all at once! A simple gable roof can just use a single strip of towel, up one side and down the other; this gets even easier if you build permanent roofs instead of removable ones.
Richard Clarke of TooFatLardies has an interesting article on using putty for thatch, if you don’t want to try towel. I’ll have to give that a shot on the next small building I do, although I think towel is easier and more economical on larger buildings.
Any comments, suggestions or questions, fire them into the comments below and I”ll do my best to respond.