Decided to go with the nose next instead of the wings and engines, and as predicted in my last post, it required a lot of mockup work, in two stages.
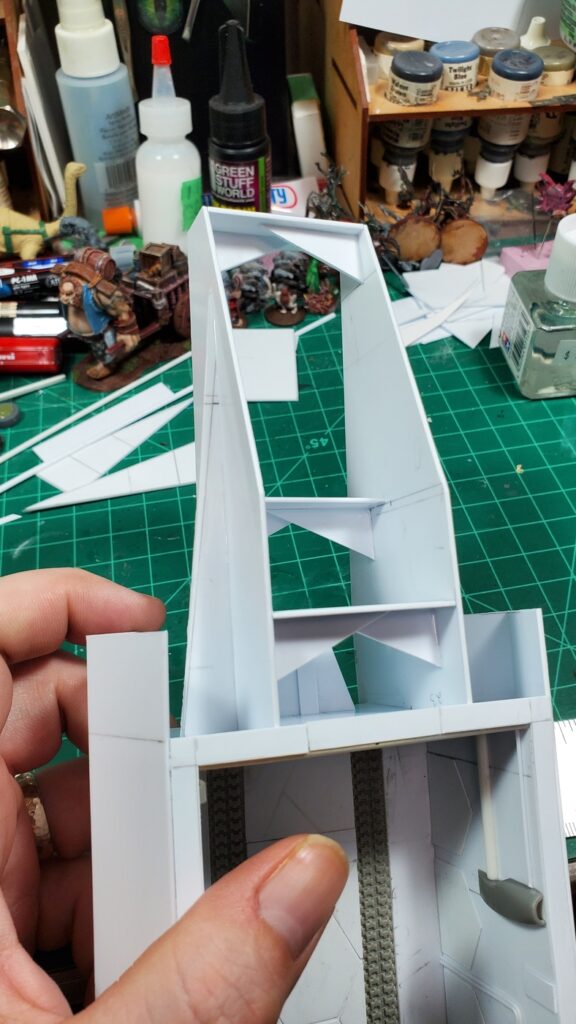
First, I did an internal frame to establish the basic proportions of the nose and give me a nice solid frame to hang the skin from.
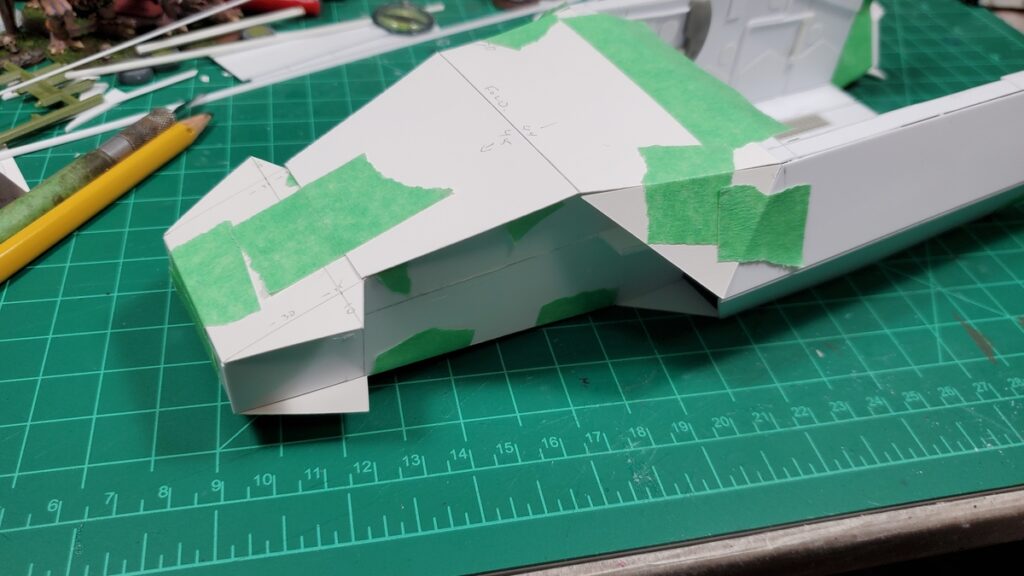
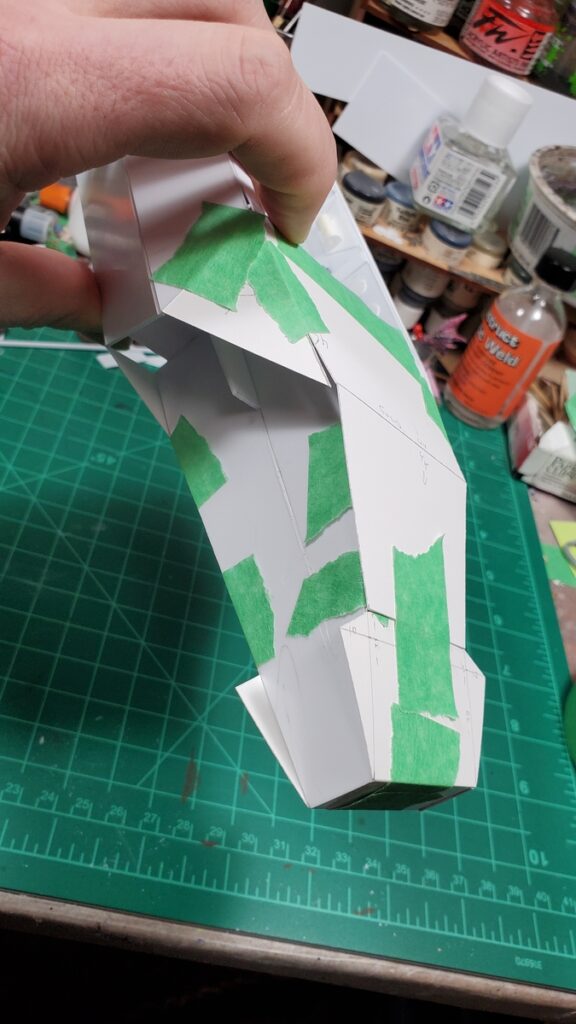
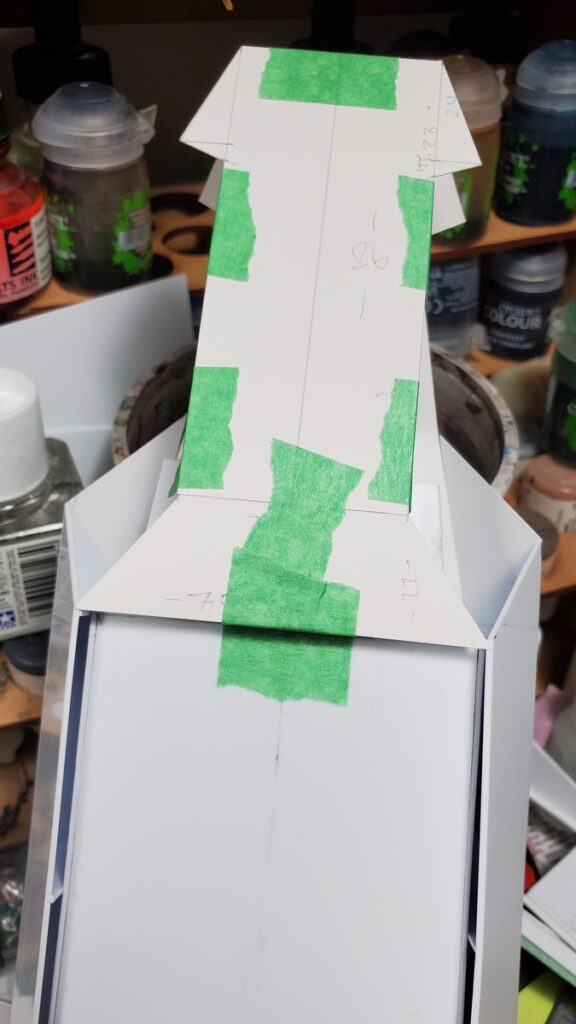
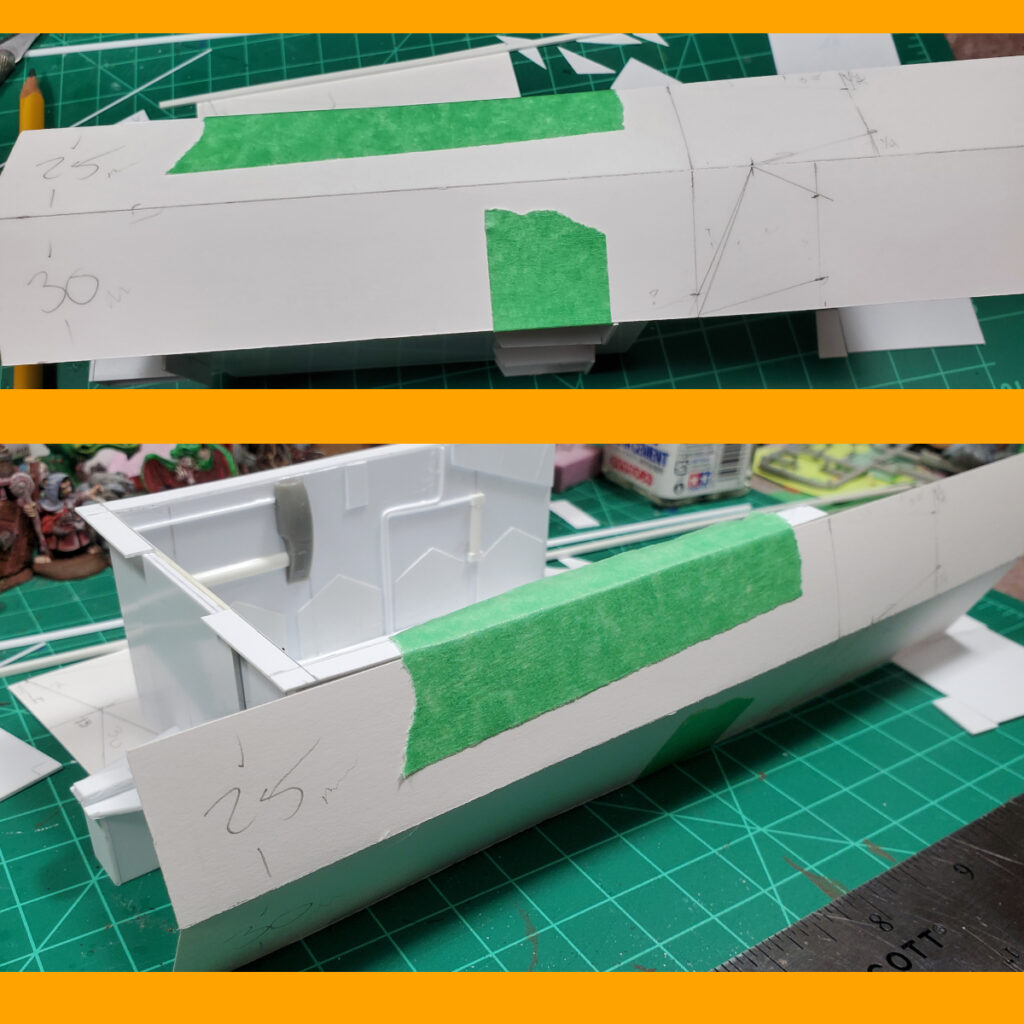
I redid parts of the skin mockup three times, including scrapping round three for part of the sides and going back to round two’s ideas. The advantage of all of the fiddling with cardstock and masking tape, of course, is that I knew what I was doing (mostly) when I switched to 1mm sheet styrene and started the real thing.
I also cut back the outer (top/bottom) corners of the sides where they extended forward, and that was the right call, it made integrating the nose and sides easier.
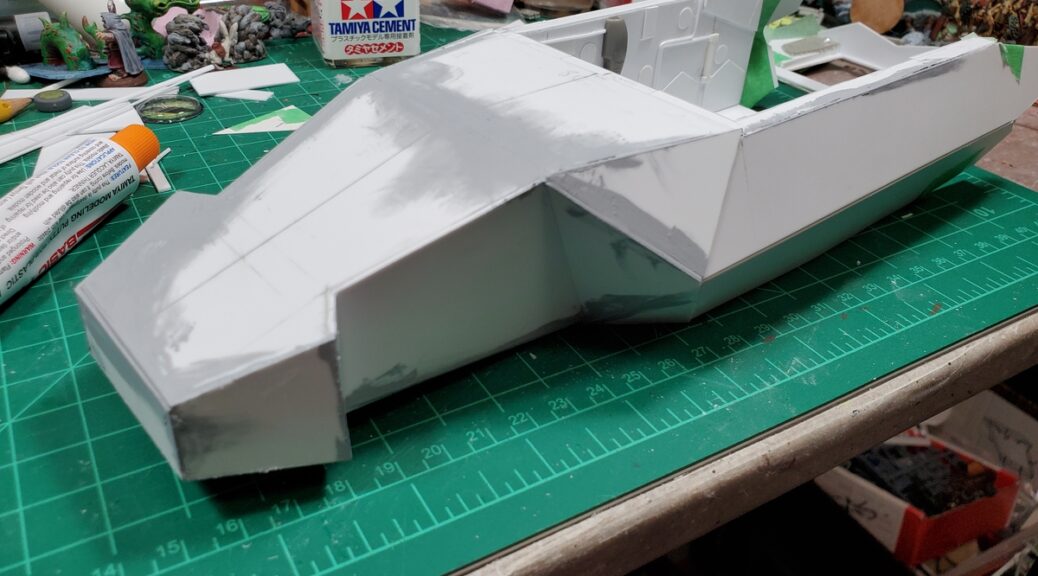
The hammerhead nose was a spur of the moment idea while planning the first mockup piece and I really like how it’s come together; the hammerhead let me play with the angles and bulk of the nose area more than a more straightforward taper would have.
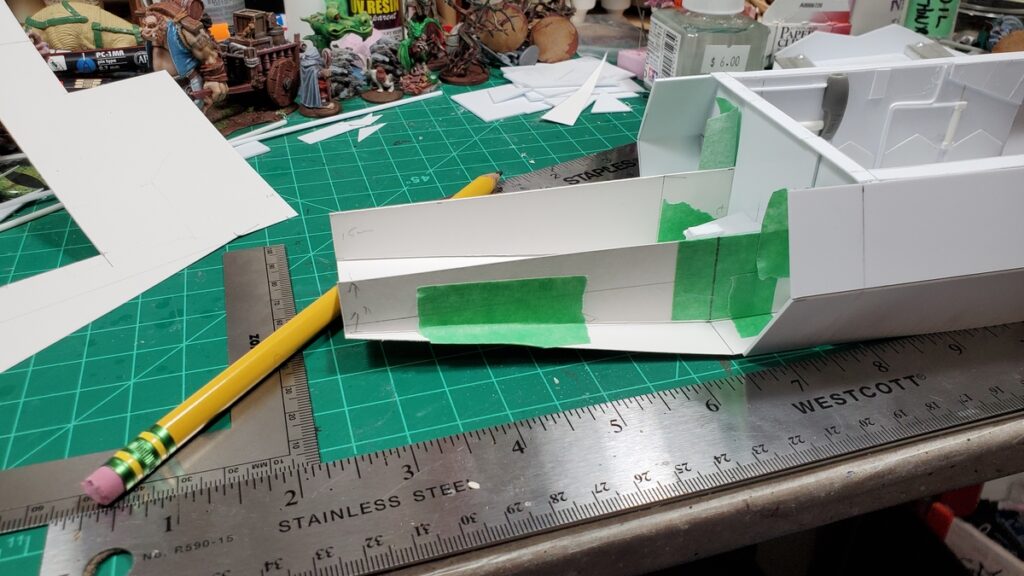
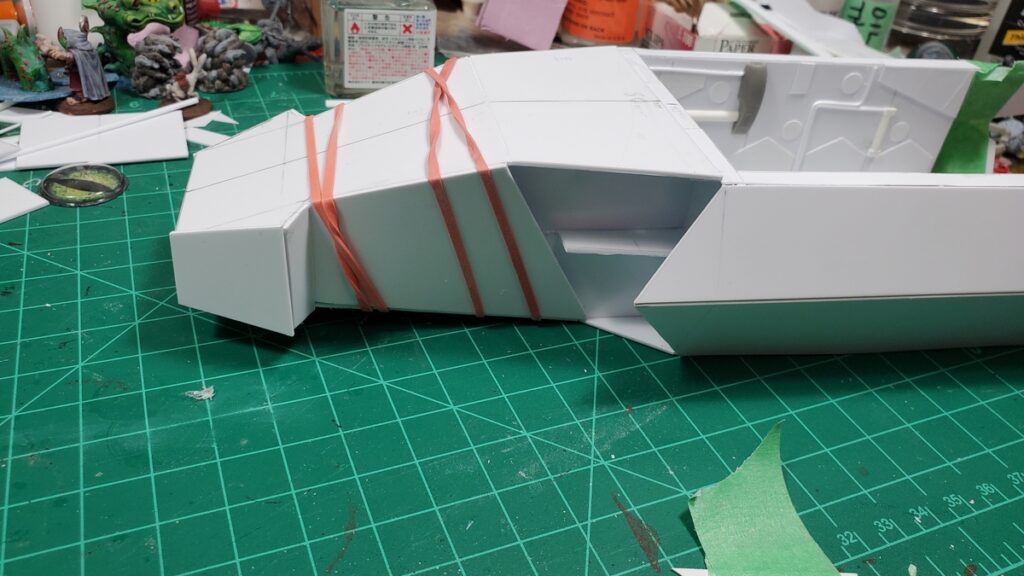
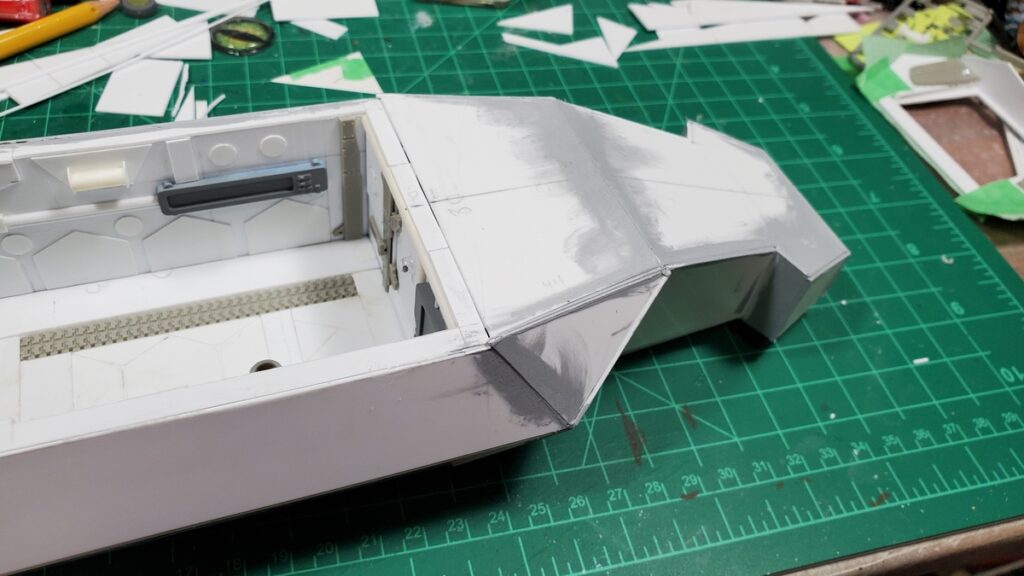
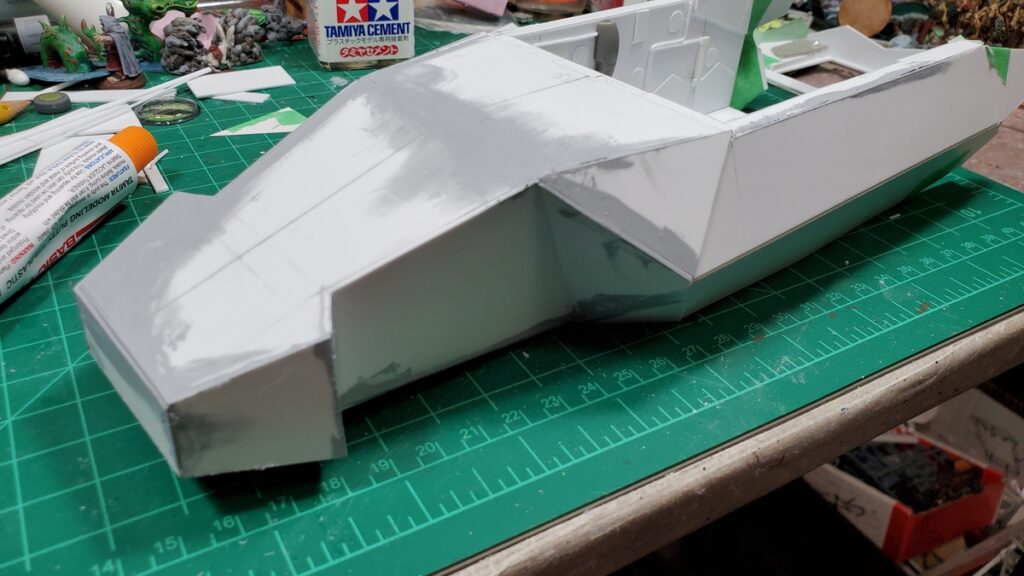
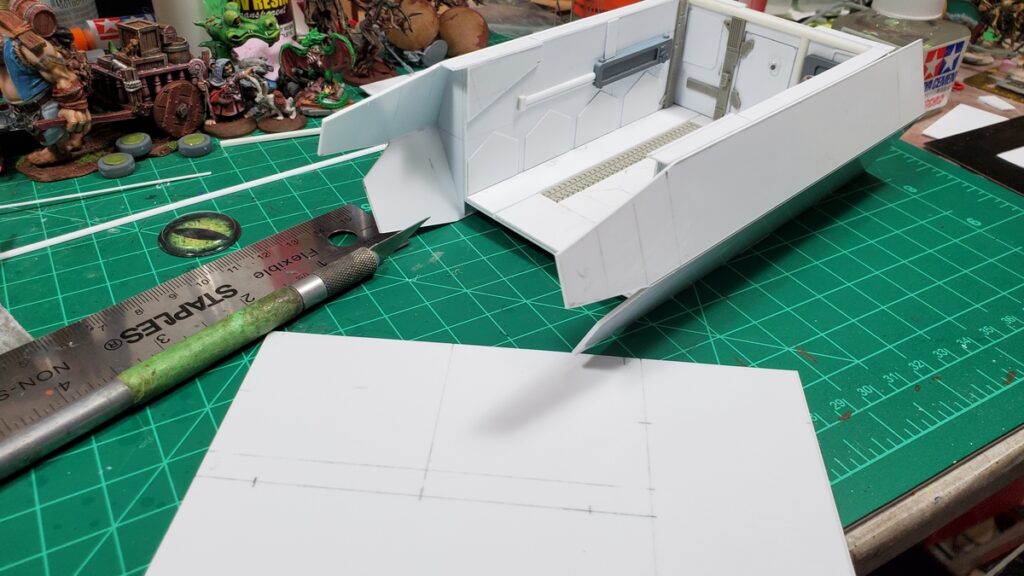
Mockup for the nose frame.Nose frame finished in 1mm styrene. I wound up cutting most of the long thin brace on the outer side off, but all the internal bracing gave me a nice solid, trouble-free start to doing the skin.Finished nose frame. The whole beast is just under 11 inches long, nose to back end, which is perfect.Closeup of the top left with skin mockups in progress.Nose skin mockup in progress, figuring out what to do between the hammerheads and the start of the body/sides.The underside of the nose, mockups in progress.Finally cutting styrene! The big panel behind the hammerheads has a twist to it, so it got anchored down with elastic bands and left for the plastic cement to cure for a bit.Styrene skin in place, sanding and puttying cleanup started. There is going to be a LOT of sanding.Current state of the nose, with putty smeared around a lot of the seams and sanding in progress.
I really like how the whole thing is shaping up, it has a good bulky angular look to it. There’s going to be a round of detail panels over this initial skin, after the endless sanding and puttying is done – some of the seams didn’t come out quite as well fitted as I’d like, so there’s going to be some remediation before detailing can start!
Still to do, in rough order of size/complexity of the subassembly: the engine pods and wings; the roof for the cargo bay; landing gear and landing gear bay doors; skin on the belly.
I’m away this coming long weekend and have some things to get organized before we go away for the long weekend, and as mentioned, the next while is likely to be mostly sanding, so it might be ten days or so before there’s another blog-worthy update to this project!
My Build Something Contest 2025 thread on LAF is here; the rest of the contest has some very cool entries – there’s another couple of shuttles or dropships, some neat magical walking constructs, and a bunch of other cool concepts among the other contestants! Entries just closed on February 8th so everyone who’s in for this year is in!
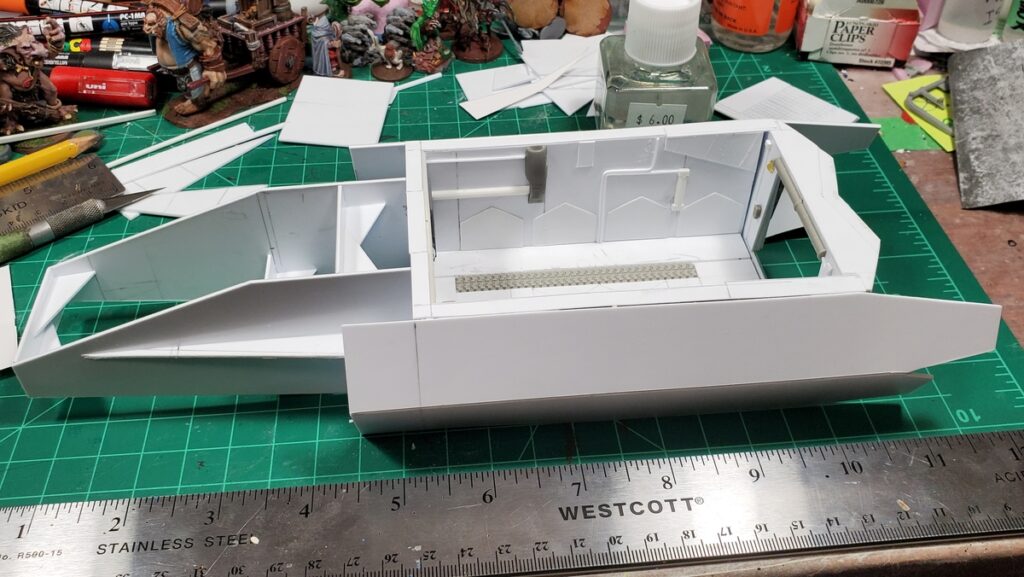
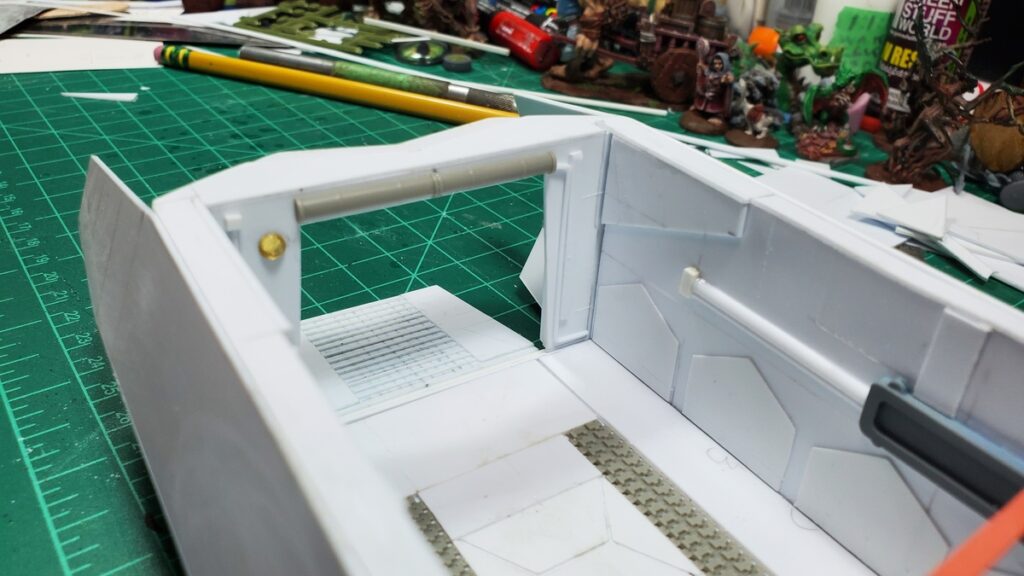
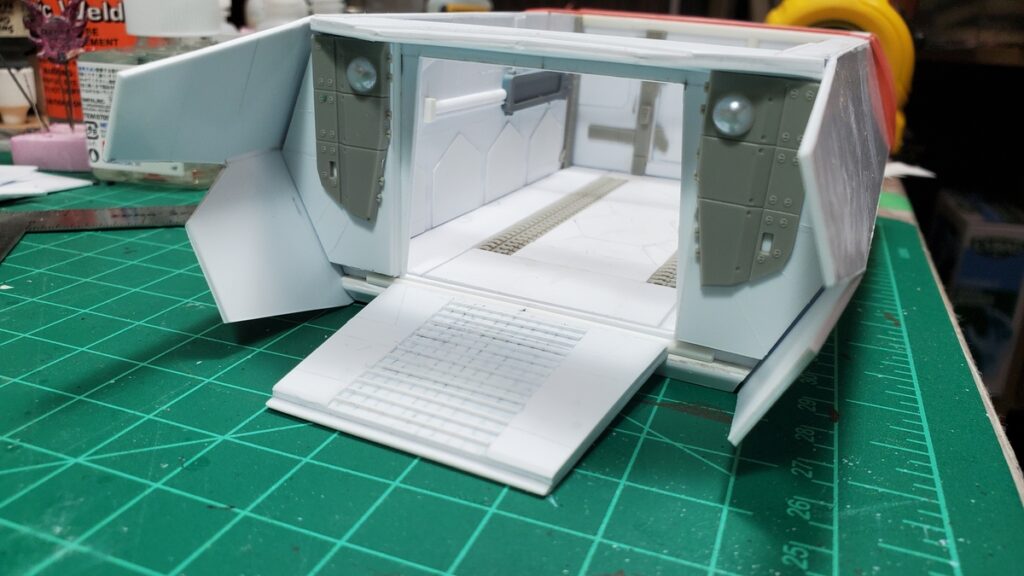
Mocking up the sides with light card. I didn’t get a photo but there’s three pieces under each of the big side panels to give strength.Mockup stage showing the in-progress underside of the shuttle.Local supervisor hard at work.Styrene sides cut and installed, with the angular extensions at the back.Designing the initial panel of the rear bulkhead.Never enough clamps. Or clothes pins in this case. Adding bulk to the underside of the extension on top of the rear bulkhead.Rear bulkhead and ramp complete and detailed, outside view.Rear bulkhead and ramp, inside view.Rear bulkhead and ramp dry fitted to the body. I won’t be gluing the subassembly in until quite late to make painting the interior easier.Rear subassembly dry fitted, outside view. There will be small panels in each lower corner to cover the groove the ramp hinge pin rides in, and detail panels on the insides of the fuselage extensions.
Very pleased with progress so far. Up next will be either the engine/wing subassemblies on either side, or the nose, depending on my mood. Both are going to require more cardstock mockups, especially figuring out how the nose is going to join up to the front of the current body assembly…
It’s Build Something Competition on the Lead Adventure Forums again and once again I’m running them, so have been a bit behind on my own entry (unlike Brian, who is racing ahead with construction).
This year’s theme is Vessel or Conveyance, so most are doing movable things like shuttles. Although we have law firms, we do have two alcohol-related entries – my distillery and Tarnegol’s brewed. May the best booze win!
Inspiration and initial thoughts
to start, I did a bunch of Googling to find good images. There’s actually a whole 3D printable stl for a distillery by MiniatureLand on MyMiniFactory, so that was a good place to look for inspiration:
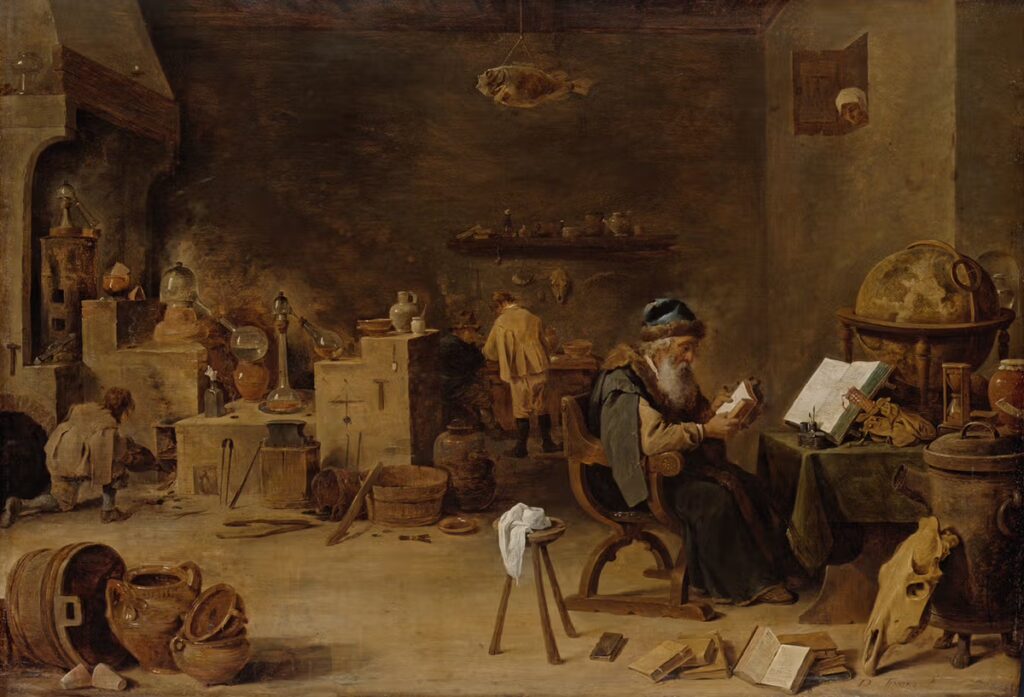
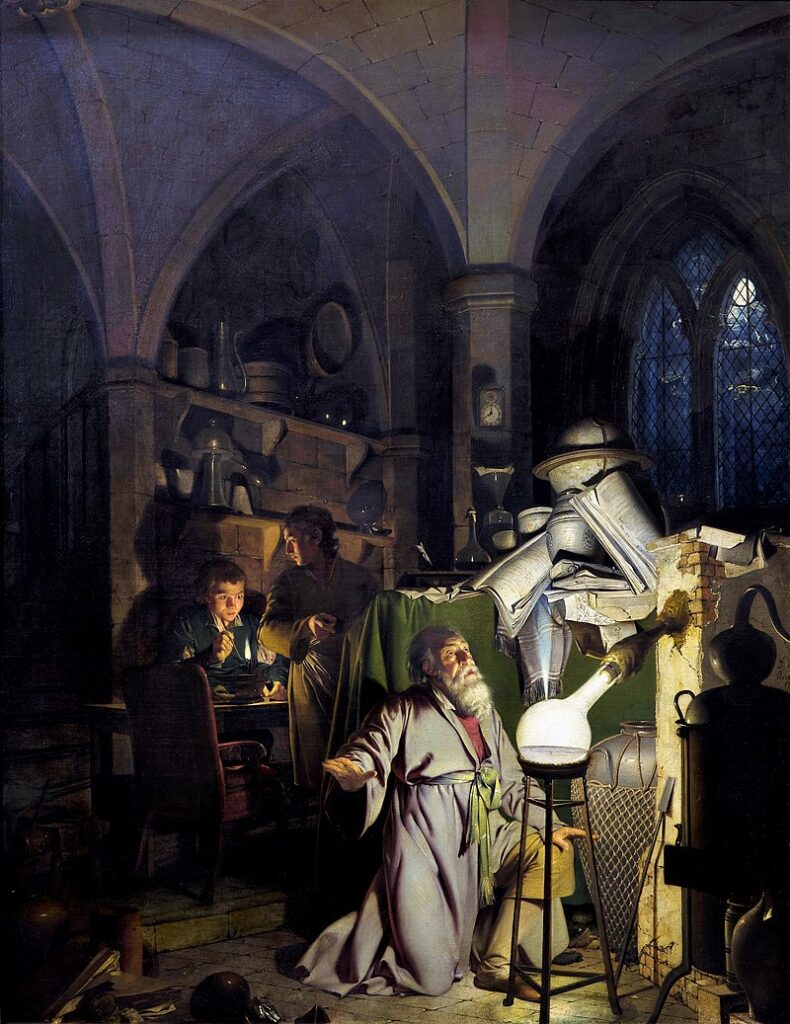
Distilling itself is a product of alchemy, which are basically the same art with different outcomes. And historically, people did a lot of a alchemy, but strangely really only started distilling drinkable alcohol in large quantities in the early Renaissance, right as European alchemists started building on what the Arabic scholars had done. That does mean we get lots of great art about alchemy:
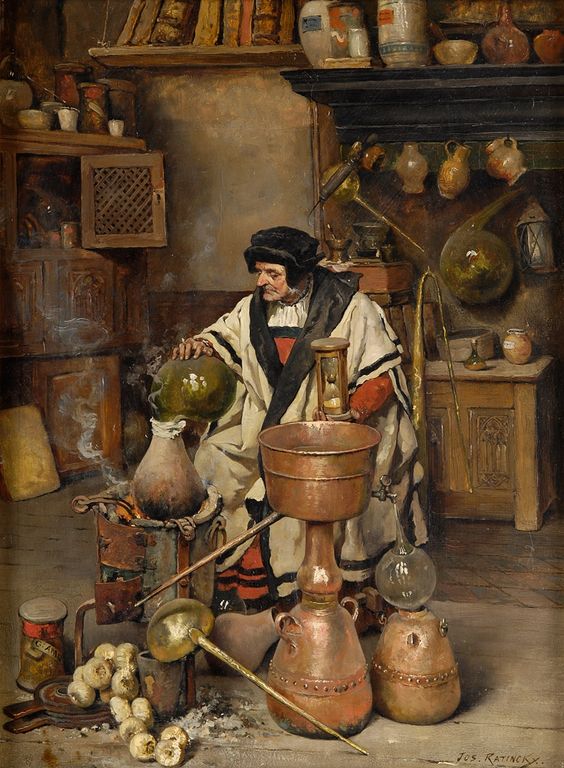
Il laboratorio dell’alchimista by Giovanni StradanoThe Alchemist by David Teniers the YoungerThe Alchymist, In Search of the Philosopher’s Stone, Discovers Phosphorus, and prays for the successful Conclusion of his operation, as was the custom of the Ancient Chymical Astrologers, by Joseph Wright of Derby
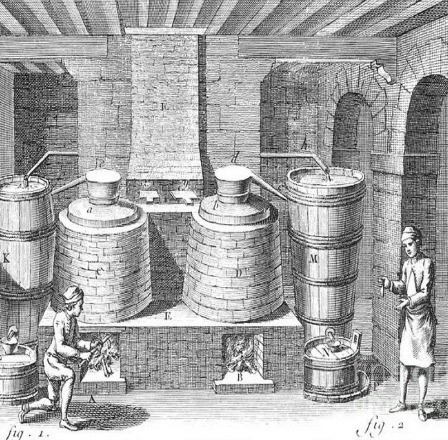
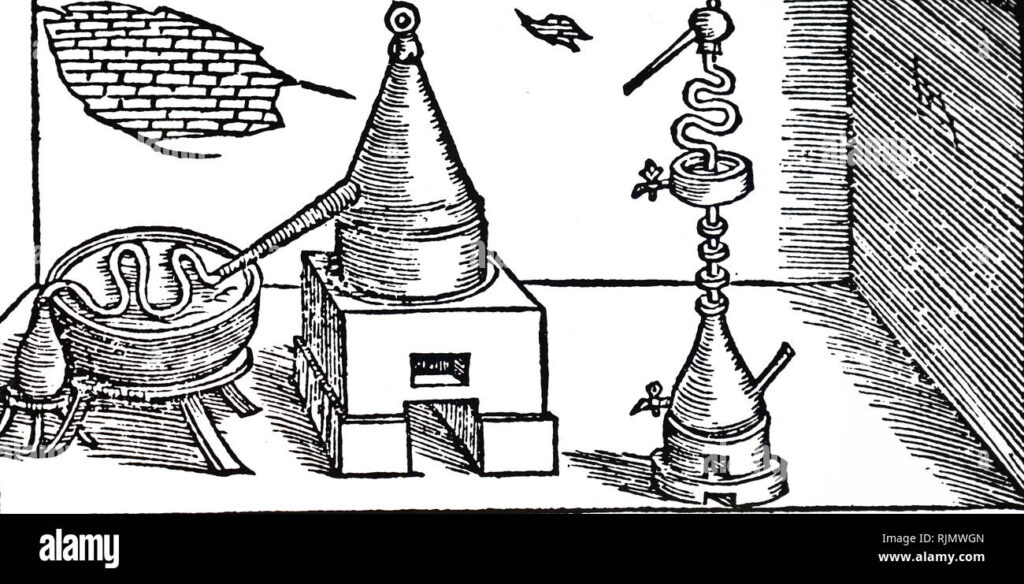
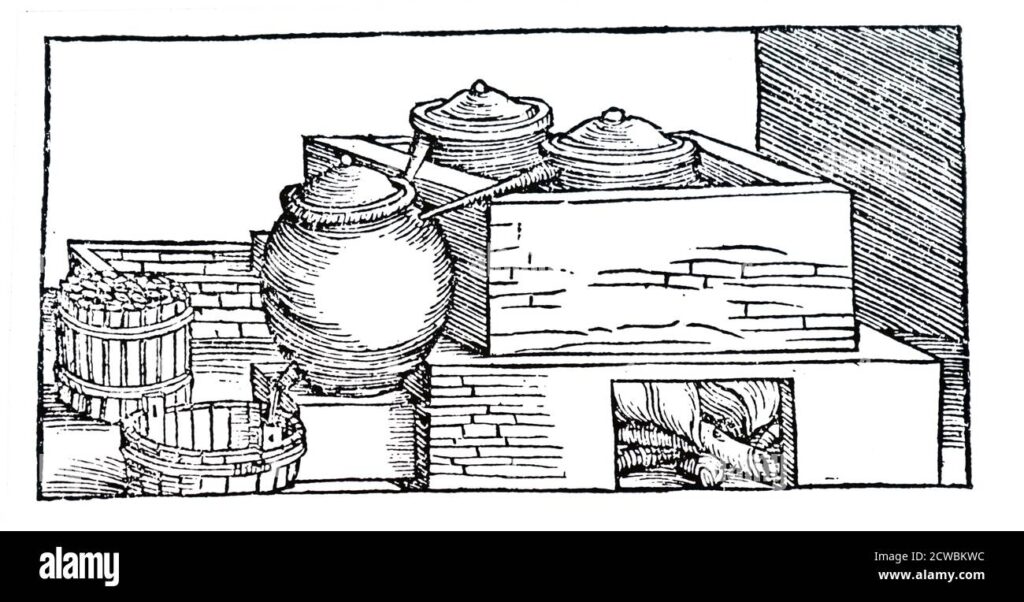
And of distilling itself, it really flourished in Renaissance Italy, which happens to be what I’m based on fantasy city on, so happy times. There are lots pieces of art of the key part of distilling: the still (the vessel from the competition theme):
Planning the building
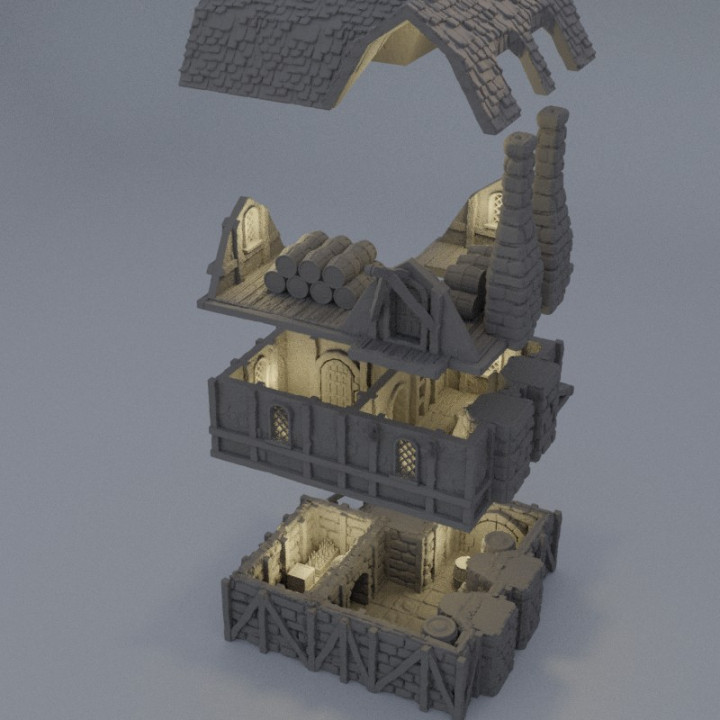
With all those inspiration pieces done, I start the process of figuring out how big I wanted to make the building. I really want to tie it into my planned sewer/basements I’m doing for my city, so that fixes one part of the building: one edge must be 3″ tall for the basement, with the building on top.
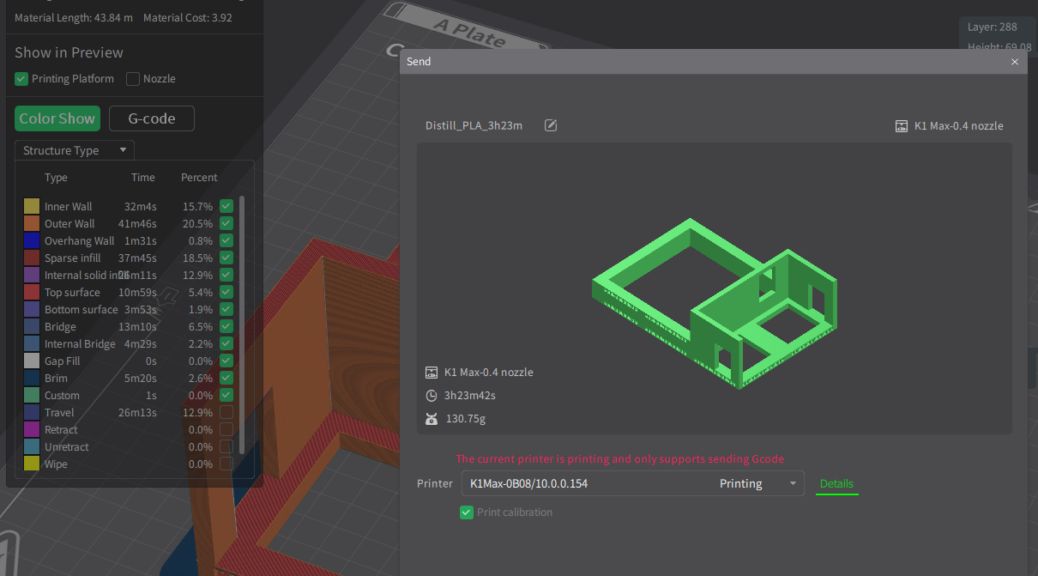
With that set, I drew up some simple plans, ultimately deciding on a 6″x9″ building, with big double doors in the long end. The base of the building will be 3D printed, with foam building on top.
Base of the building including the basement.
And thus ends today’s post – with an initial base printing. Onward to actual construction tomorrow
As mentioned last post, I’m in the Lead Adventure Forum’s Build Something Contest 2025. I’ve entered a few over the decades, finished my entries in even fewer, and ever gotten out of the first round of voting, so we shall see, but it’s always a great contest to watch even if you aren’t participating.
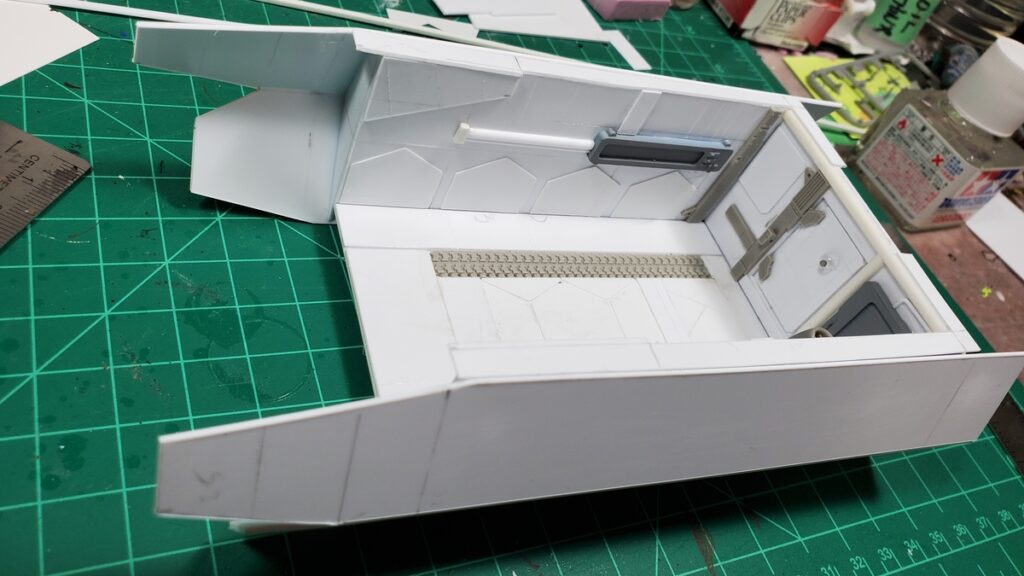
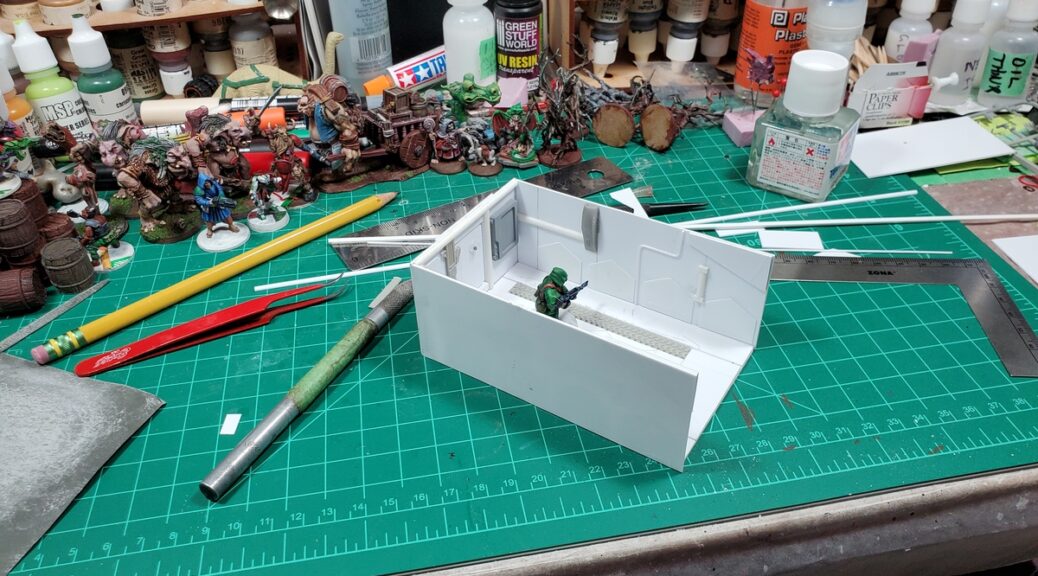
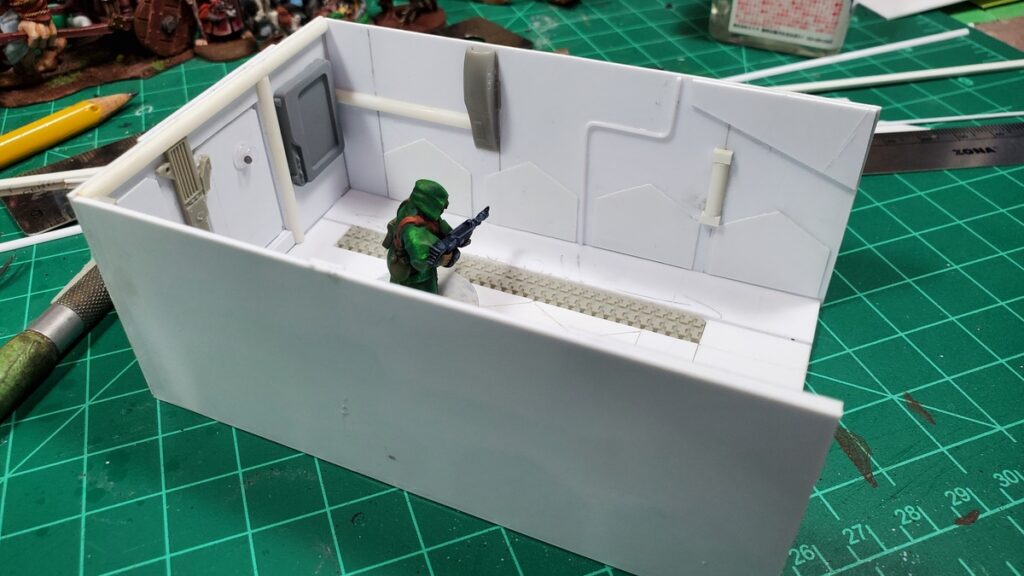
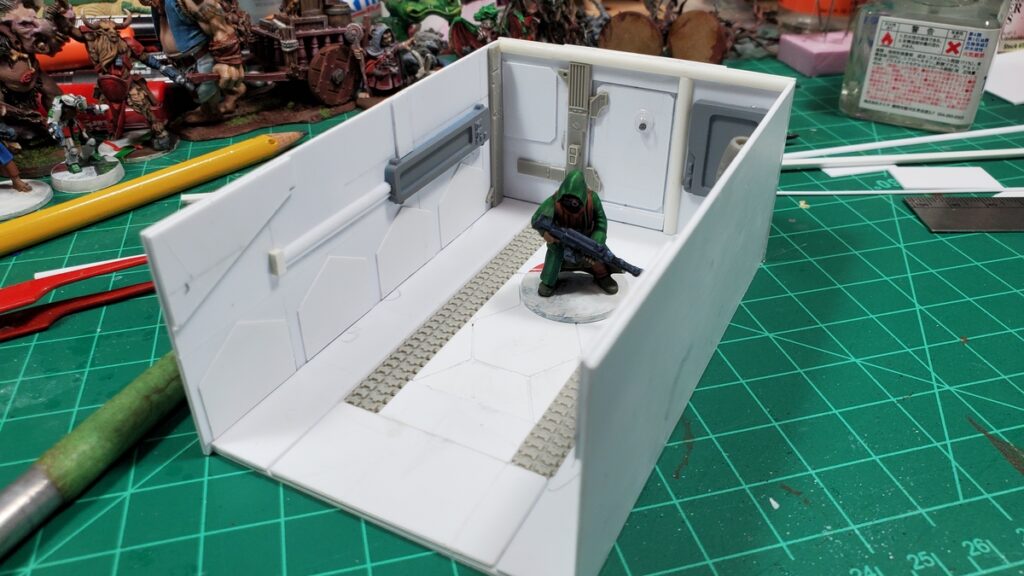
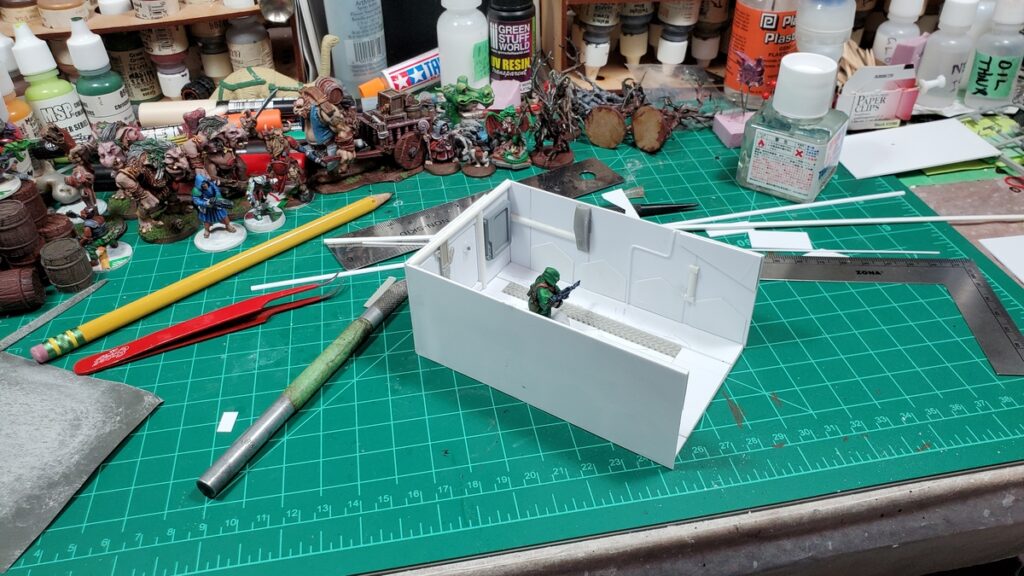
Photos to date below – today (Sat 1 Feb) I got the floor and three main walls of the cargo bay built and assembled. Engines and landing gear next, then figuring out how the actual skin of the shuttle is going to cover all this stuff!
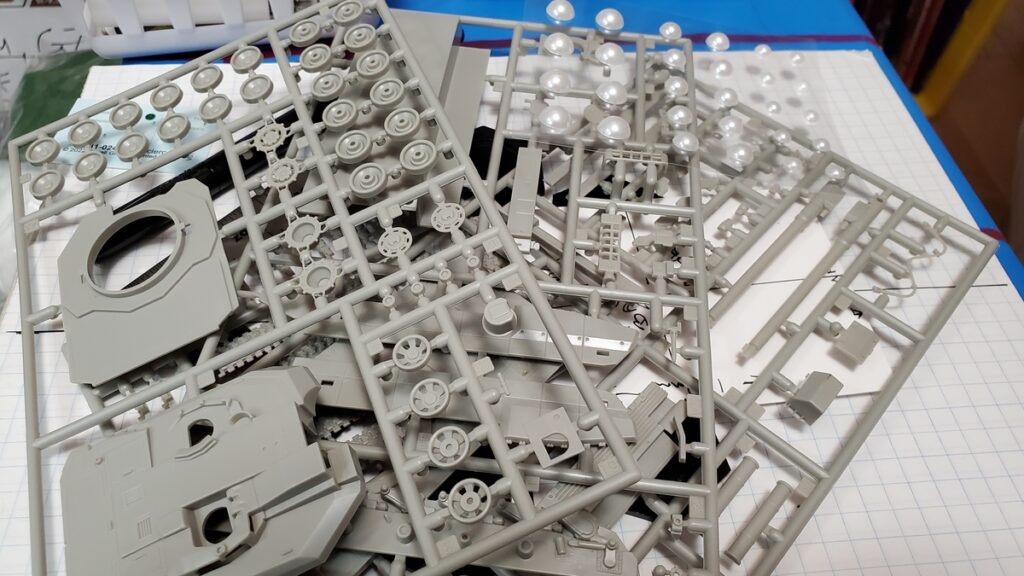
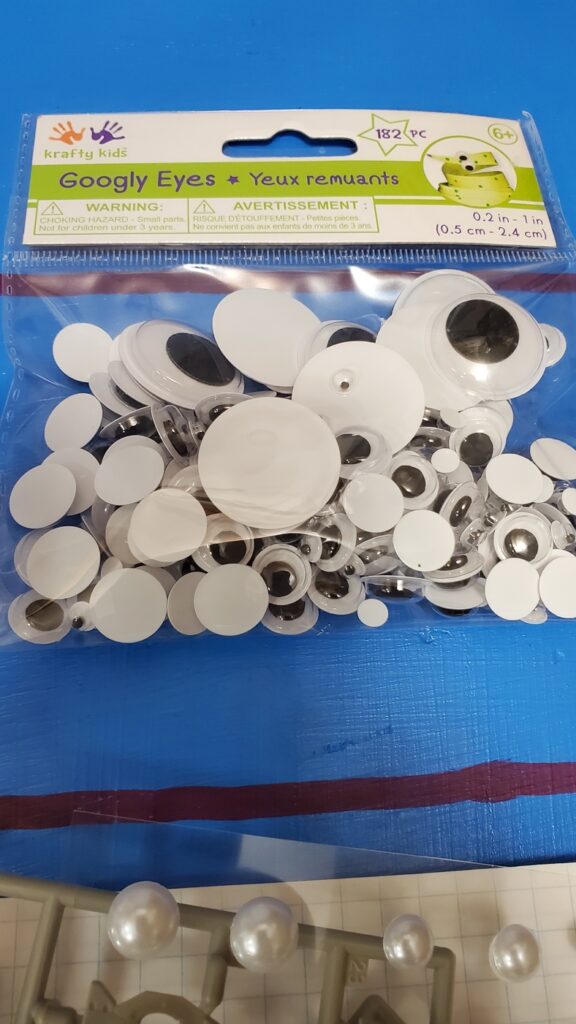
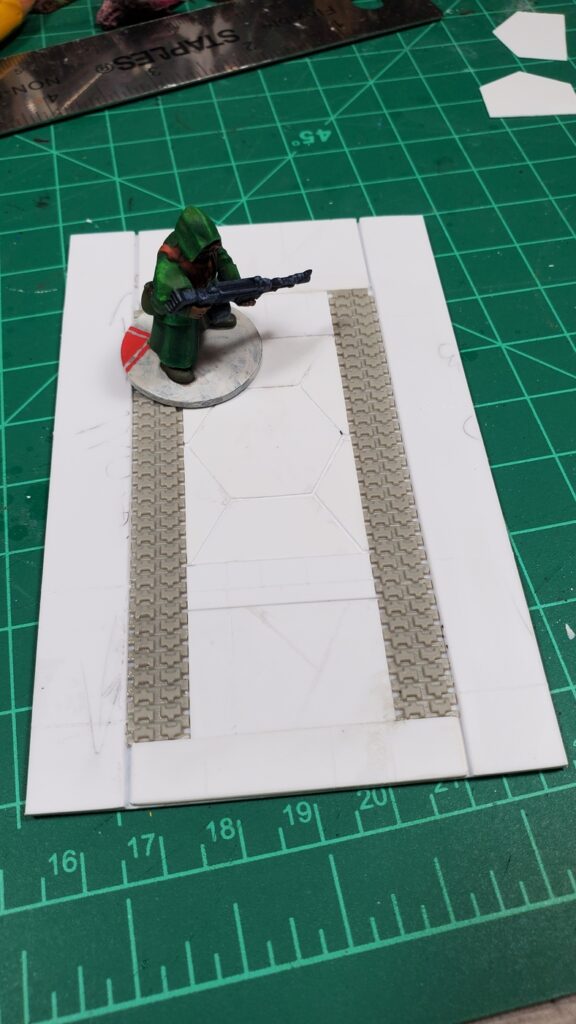
One of the classic sources of kitbashing/scratchbuilding detail parts – a 1/72 MBT, in this case a Tamiya LeClerc. Also at the top of the photo, half-round pearls from the dollar store, because you can never have enough dome shapes for sci-fi building!Also from the dollar store, an entire baggie of googly eyes. Some of these might well wind up as actual eyes in silly places, but a bunch of them are just going to be interesting shapes for kitbashing.Cargo bay floor. LeClerc track pieces for detail.The assembled cargo bay. The side walls need at least one more round of detailing!Cargo bay, showing the other side wall.Wider workbench shot.
The main thing now is going to be maintaining momentum and not getting bogged down in overthinking this damn thing. Onward!
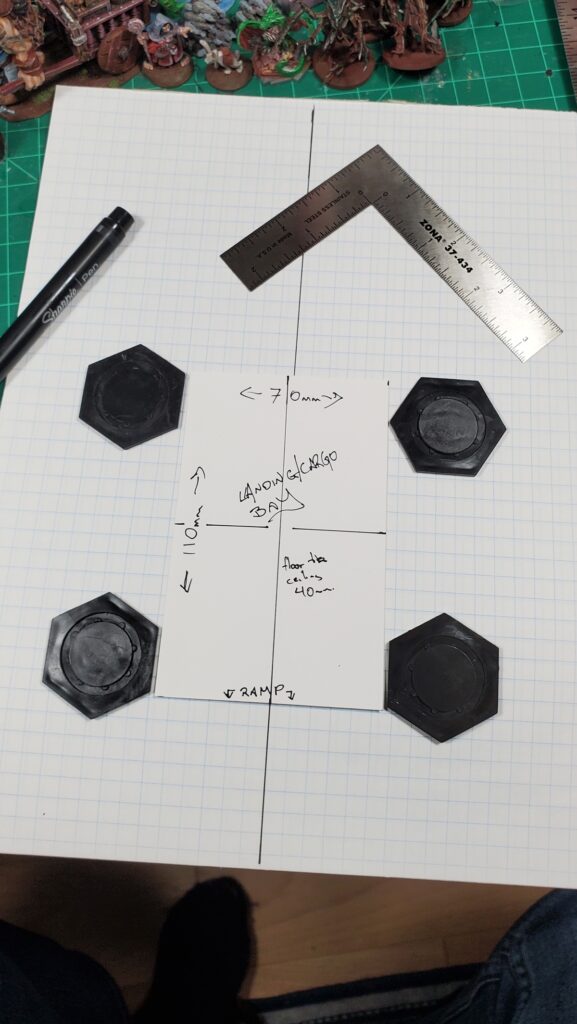
Planning a 28mm (32mm? whatever…) small shuttle suitable to get high priority cargo or a group of heavily armed ruffians/operatives/etc on and off the planet of their choice. Basically keeping it to about the footprint of a Letter/A4 sized sheet of paper, definitely inside 12″ nose to tail so it fits width-wise in a banker’s box for storage.
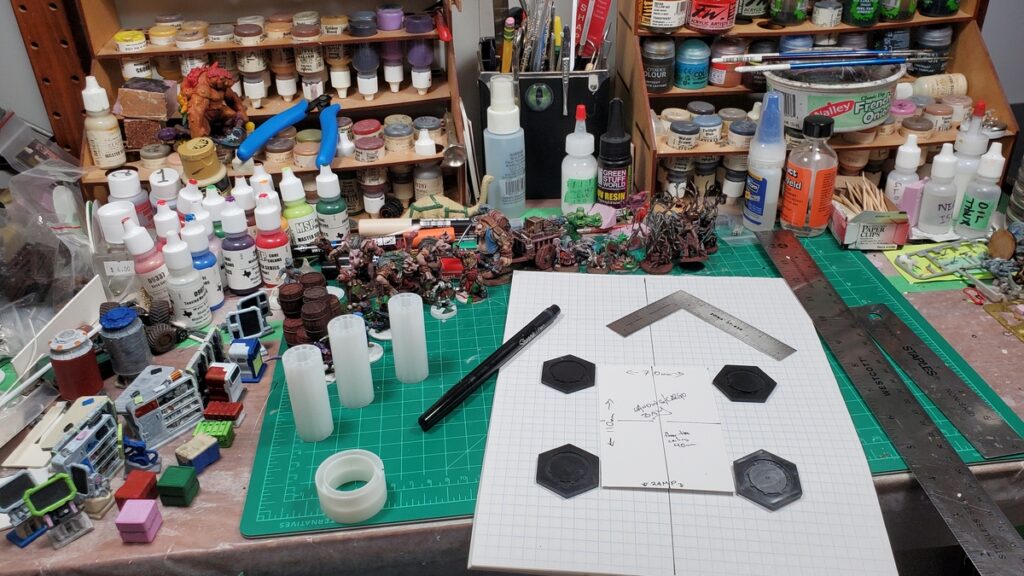
I laid a handful of figures on graph paper and figured that for the six-or-so figures I wanted the cargo bay to handle it needed to be somewhere around 70mm wide and 110mm long (and about 40mm tall internally, but that’s for later) so I cut up a few bits of card, grabbed the graph paper, raided the bits box and started laying things out.
Very early shuttle planning. The cargo bay is a separate piece of card so I can move it around. Click for larger.
The current plan is to build the box of the cargo bay first, then use the four hexagons as internal frames for two engines, then do wings under/around the engines for a stubby vaguely aerodynamic shape. Planning extended sides to protect the landing ramp from engine thrust, and a long vaguely streamlined nose at the other end.
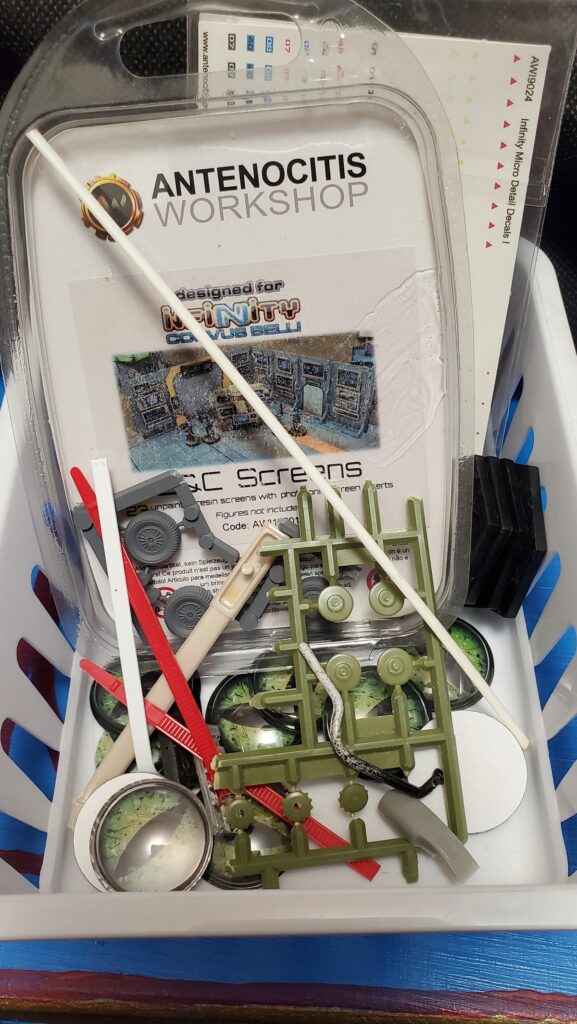
Other details very, very much To Be Determined as I start building! I have raided and sorted the Bits Mountain and in addition to the plastic hex bases seen above there’s a few other things I’ve put aside.
Stuff! Wheels from Gaslands plastics for landing gear, various other scrap or leftover plastic bits for details, a blister of resin computer screens from the late, lamented Antenociti, a couple of which will probably show up in the cargo bay.
The weird eyes are from the local dollar store, there’s various leftover plastic scrap and kit pieces, an old blister of Antenociti comm screens that’ll provide cool details inside the cargo bay, and some other bits and pieces for decades of hording/collecting this sort of stuff.
Actual building is supposed to start Feb 1st, so stay tuned!
To finish up, the traditional workbench shot. Lots of painted figures I need to move into storage to clear the decks for this shuttle build!
The workbench, with shuttle planning underway. Some Mantic Terrain Crate SF fixtures on the left, a whole clutter of mostly-painted figures at the back that need to move to storage solutions, and lots of other clutter…
Best of luck to the other BSC 2025 participants, looking forward to seeing what they do!
The campaign funded (just!) which was cool, and I put in for 3 sprues. Molding up an injection molded plastic production run takes time and it was late October 2024 before I got my loot, but communication from Pete was good the whole time.
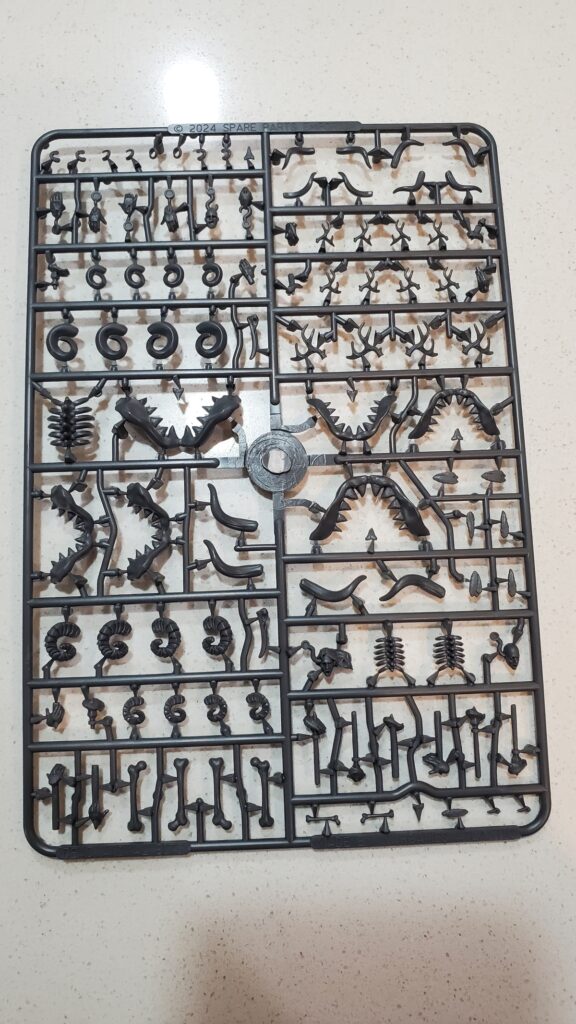
So what do you get? The sprue is roughly 6″ by 8.5″ and well-supplied with everything from shark jaws to antlers to femurs to hacked-off hands on spikes or hooks! I was mostly interested in the antlers and goat horns, but there’s lots of other neat stuff to accessorize scratchbuilding or kitbashing with!
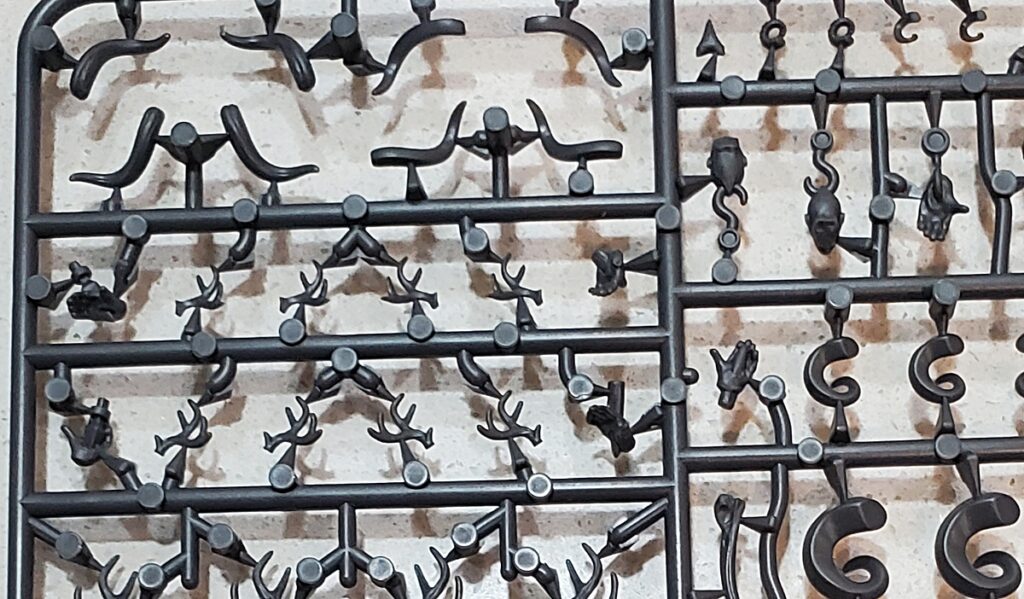
The front of the Dead Animal Bits sprue. See text for details.The back of the sprue. See text for details!
Right in the centre of the sprue there’s half a dozen big shark jaws; the top of the sprue has two different style of goat/sheep (demon?) horn each in several sizes, and deer/elk antlers in three sizes. Below the shark’s jaws there’s some feathers (the small things off to the left of the front view), some rib cages, a bunch of severed hands on spikes or hooks, another style of curled goat horn in two different sizes, a few individual shark teeth, and finally a batch of femur-looking bones, again in several sizes.
A closeup – this is the top left of the front of the sprue. Horns, antlers, hands and heads on hooks, and shark teeth here.
If you want to do whole units of antlered or horned troops you’ll likely burn through a bunch of sprues, but if you just want to add general weirdness here and there a set of these sprues should keep you happily adding weirdness for a good long while.
I’ll be adding horns and antlers to a batch of undead infantry I have in progress, and they’ll definitely be showing up in some of the stranger plans for my slow-burn 17th C pike and shot fantasy project, and in the best tradition of being inspired by random stuff that’s now in your Pile of Opportunity, I’m sure they’ll be showing up elsewhere too…
Right at the ragged end of the year, one last blog update!
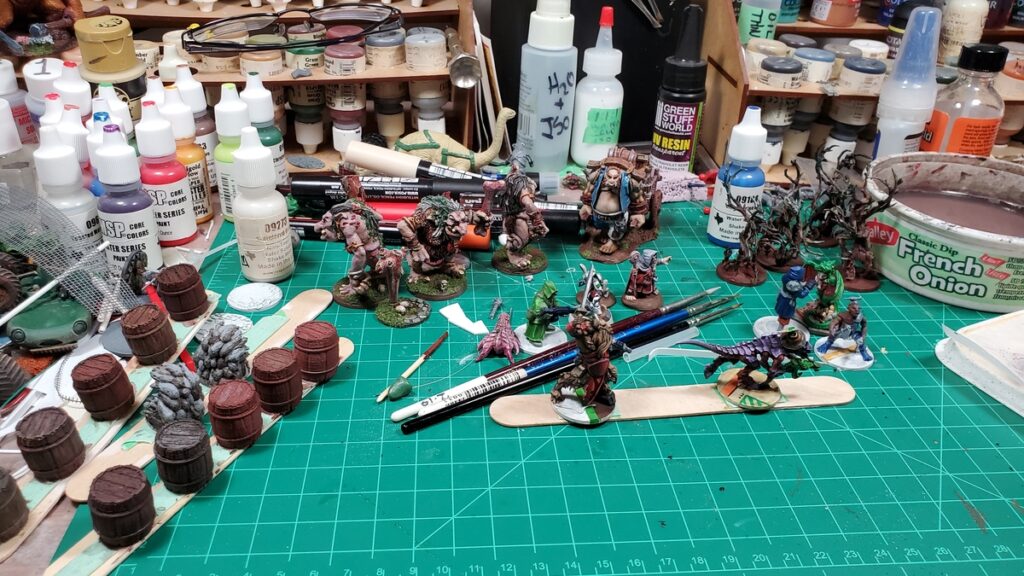
Been getting a bunch of painting done this month, including the hatted bug guy seen in the last post. There’s also some Footsore Trolls mostly done and a scattering of other stuff on the painting bench!
The workbench at the very end of 2024. A small crew of WIP science fiction figures, three lovely Footsore trolls mostly finished, a whole batch of 3d printed barrels, and a scattering of other random stuff being gradually worked on.
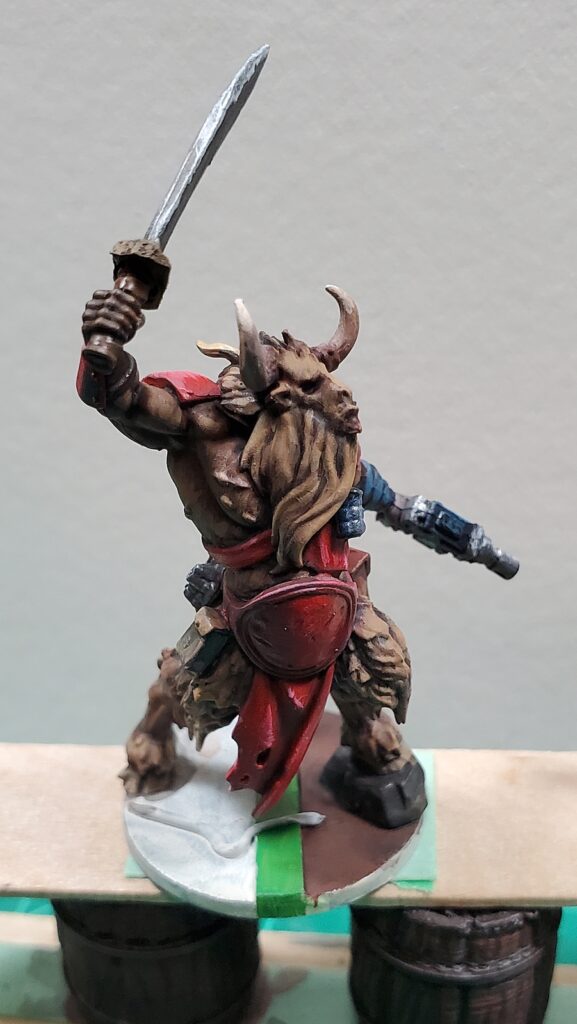
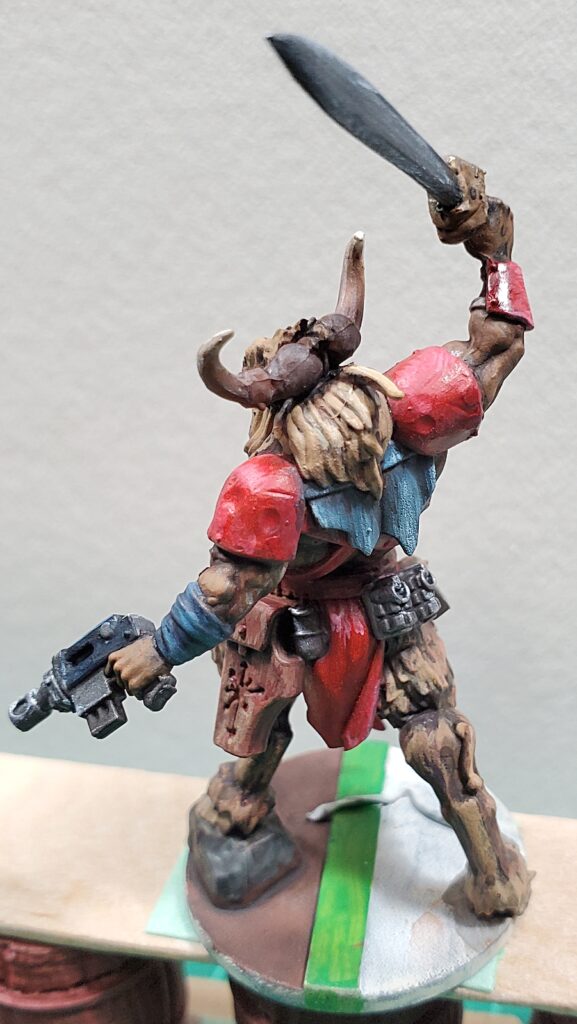
They’re not great pictures, but here’s a couple of closeups of the most recent finished-except-for-the-base figure. This is some sort of Games Workshop Chaos Beastperson minotaur, I think, snagged earlier in 2024 as GW’s free in-store figure of the month. They had a silly spiked club/mace thing that I chopped off and converted into a big choppy sword, but are otherwise stock.
Captain Spacecow front view.Captain Spacecow rear view.
I’m trying to push my highlighting and edges more than I usually do, and have also been trying to add texture with paint more. It’s most obvious on Captain Spacecow’s horns and the blue piece of cloth/armour/whatever on their back, but there’s also fur texture on the torso and lower legs that isn’t really obvious in either of these photos.
The painted fur texture was directly inspired by this video from Vince Venturella. His entire YouTube channel is worth a look, he’s got loads of great videos that I’ve been watching a bunch of the last month or two.
Happy New Year and Happy Holidays. Hope 2025 is good for you and yours!
A while ago our local GW store was giving away a single Tyranid bug-warrior figure for free. Of course I snagged one, who doesn’t want free stuff? I’m never going to bother playing 40k, but a random free figure? Sure!
I glued the critter together (GW makes some… interesting engineering choices in how their figures fit together, some of the parts are weird AF…) and then it lurked on the corner of my painting bench for months and months.
Then I realized that in Corey’s in-development Under Alien Suns rules you could run damn near anything as a crew, so I kitbashed together half a dozen figures a couple months ago and decided, for the hell of it, to grab a hat with big feathers on it from my 17th Century plastic stash and glued it to bug-guy’s head.
Then in the doldrums of the year I finally primered the whole motley crew and starting painting them. Bug-guy caught my attention and he got finished today, right from primer to done (barring some cleanup on the base) just today.
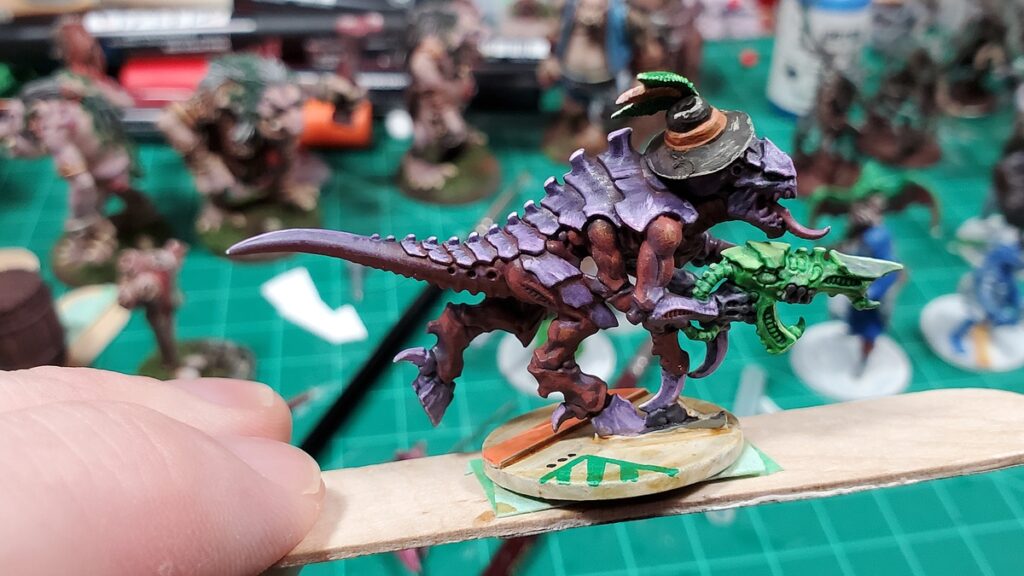
Not-a-Tyranid. That’s Specialist Ghar under a dashing hat (they never explain the hat) loping through the scruffy weird universe of Under Alien Suns, or whatever other oddball SF skirmish we get up to!
I went purple for the exoskeletal bits, dark red/black for the flesh bits, and bright green for the rifle that may or may not be grown right out of bug-guy. I’m really pleased with the highlighting, especially of the purple and the gun.
Specialist Ghar’s other side. Click, as usual, for larger.
I’ll be getting paint on the rest of his crewmates in the next few days; I don’t go back to work until Jan 6 of 2025 so probably have time to finish all of them!
PaintRack is an Android & iOS phone/tablet app I discovered a few years ago ago, used a little bit, then during a reorganization of my chaotic painting bench remembered the existence of. This little review has sat in my Drafts folder for a couple of years, but it’s worth hitting publish on because the app continues to be really solid and useful!
The core of PaintRack is a paint library/inventory system to help you track which paints you own. It comes pre-loaded with a huge library from dozens of manufacturers, and can use your device’s onboard camera to scan the barcodes on your paint bottles to make creating your inventory as painless as possible. The free version will only scan one bottle at a time, but the paid version has a feature called RapidScan that lets you do a whole batch of scanning then update your inventory all at once. The paid version is only a few bucks, I highly recommend the purchase!
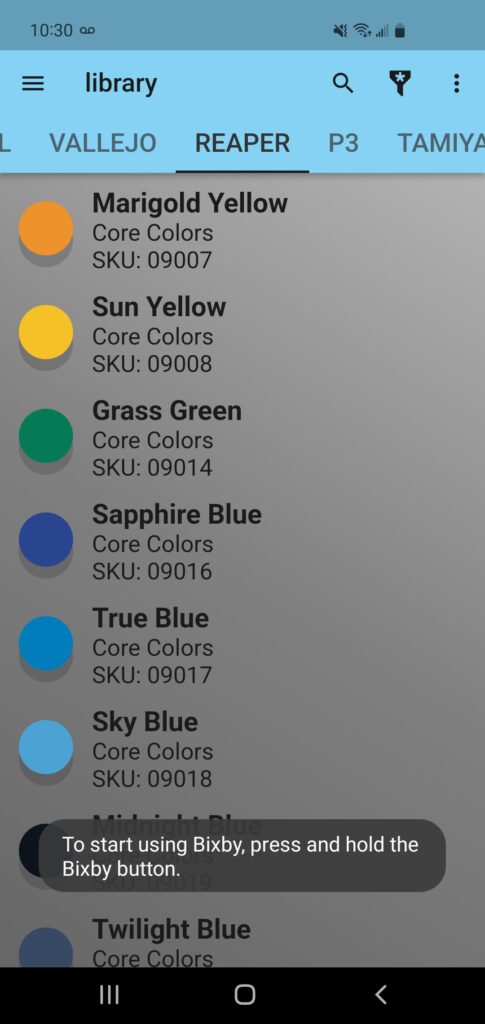
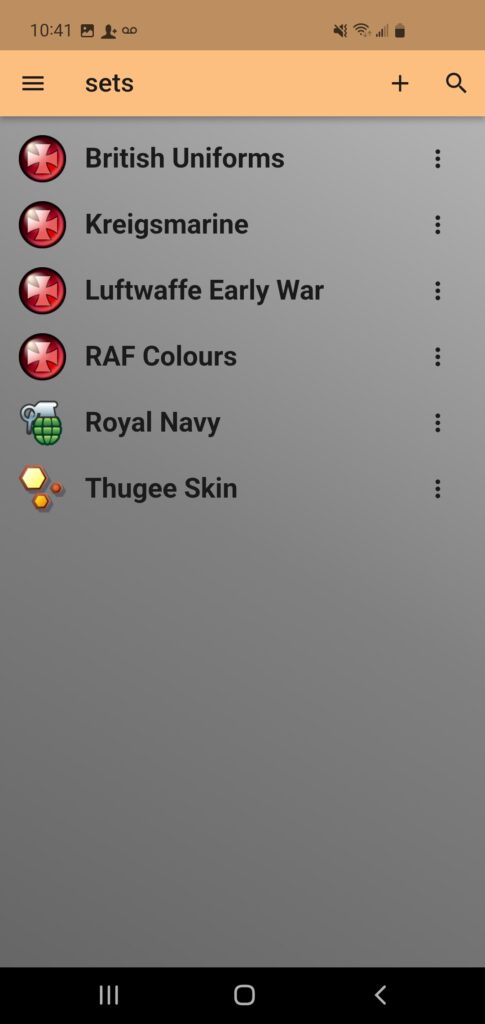
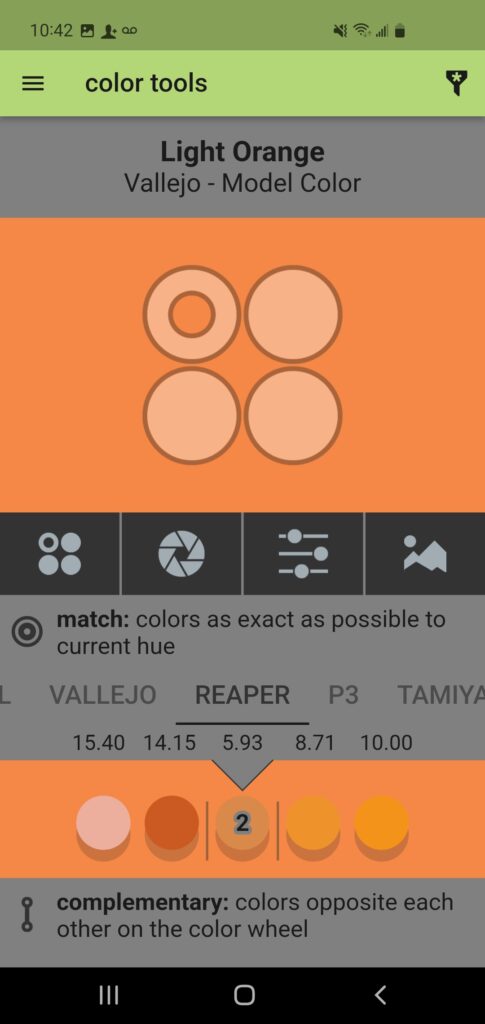
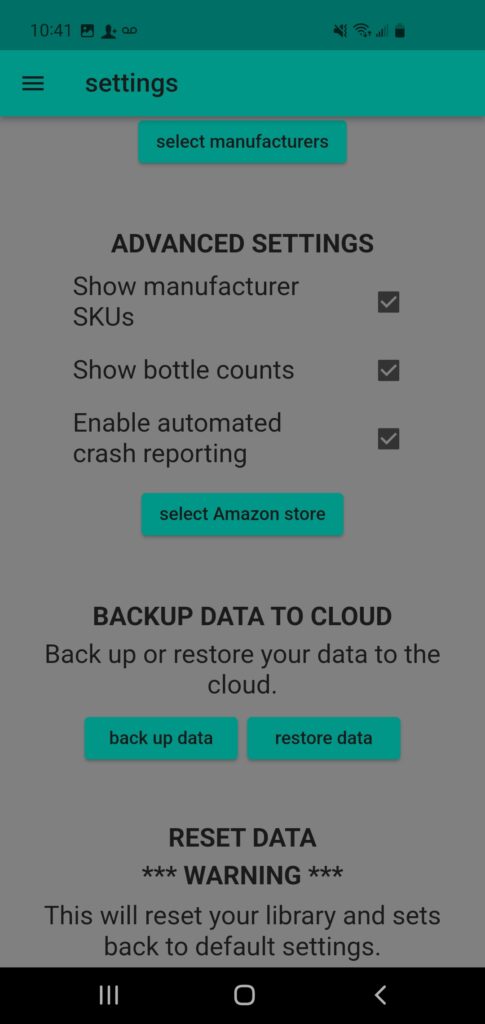
My inventory screen, with Reaper selected as that’s my main paint supplier.The RapidScan barcode scanner in action.Sets – the painting notes utility. Mostly used for WW1/WW2 stuff that has to be vaguely uniform in my case, apparently…Color Tools, figuring out which random Vallejo colour I don’t own is close to something I do own.Part of the Setting page – the app has a “backup to our website” option just in case you bork your phone. Have used that at least once…
PaintRack is actively working with various paint manufacturers to get their lines into the app, so if you’re Kickstarting the latest celebrity painter’s private line of paints the app probably already has their stuff available.
It isn’t just wargaming or model paints like Vallejo, GW, or Reaper in the onboard inventory, there’s art supply companies like Windsor & Newton and craft paints like Deco and Apple Barrel listed too, which means it can be useful for scenery painting or for those of us who branch out beyond just the game store paints.
There’s a Sets tool that’s basically a notepad for painting schemes that links into your inventory, and a set of Color Tools for developing colour schemes and picking paints for your inventory that are close matches to paints you don’t own (very useful for trying to follow other people’s painting tutorials!).
PaintRack also has a Wishlist shopping list feature, potentially very useful if you’re standing in front of a massive wall of paint at your favourite local hobby store trying desperately to remember which weirdly named colour it was you were missing at home! I think it’ll also tie into your Amazon account for online purchases, but I don’t give Noted Sociopath Jeff Bezos money if at all possible so I haven’t explored that part of the app.
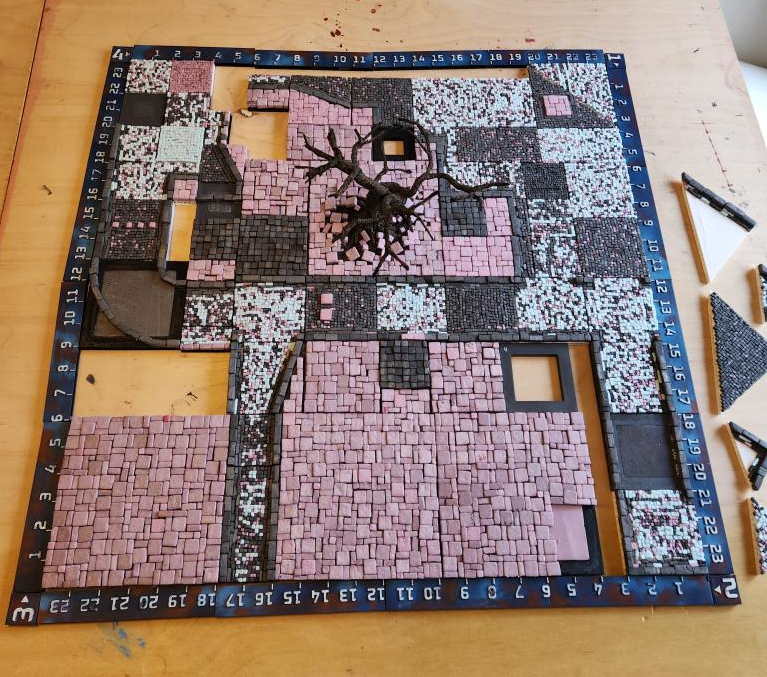
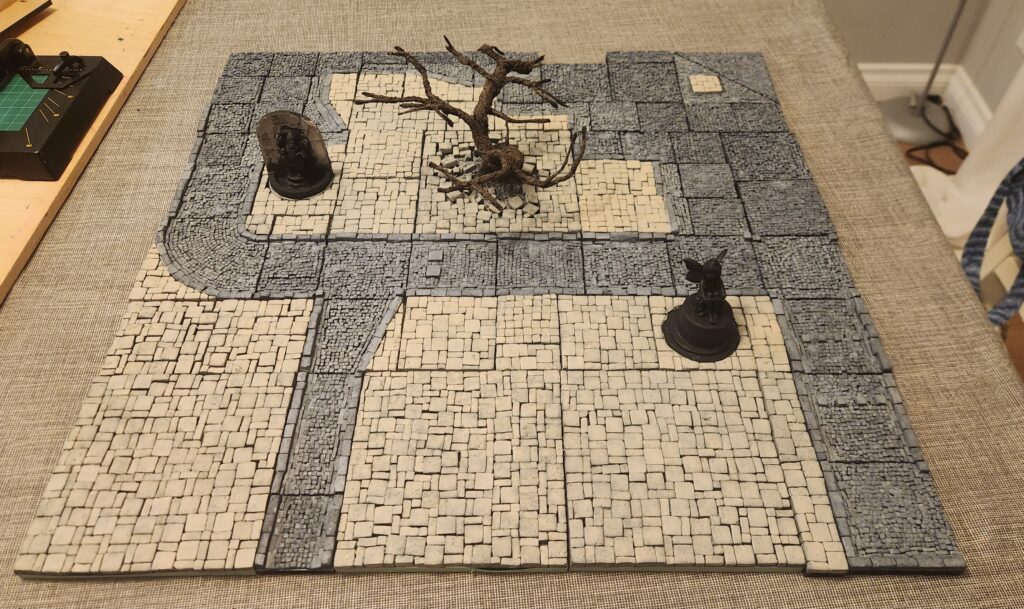
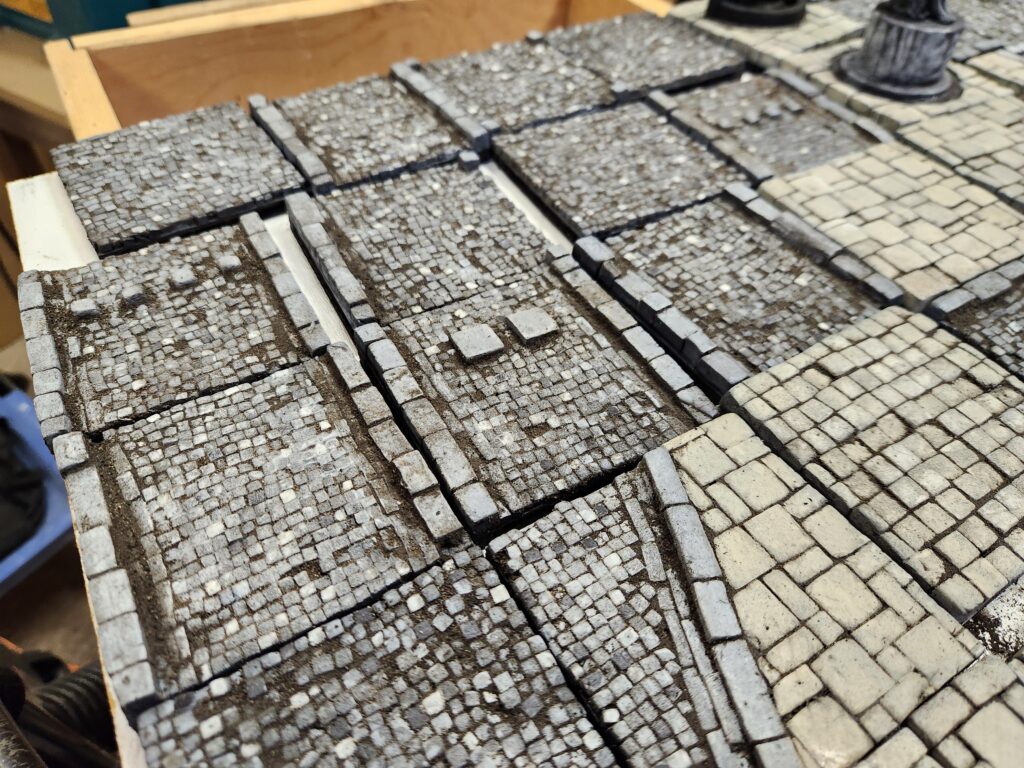
For the past year I’ve been building some modular fantasy/medieval city tiles for our Sellswords and Guilders games. It has been a long process of building as I’ve chosen the hardest method possible – laying the cut foam stones individually. But I finally have a full 2′ x 2′ square of them done. The impetus this time was our local move into Mordheim and yet another competition – this time the quarterly painting competition on Bloodbeard’s Garage Discord, which had a theme of “unfinished”. Talk about the ultimate un never finished project!
Building the tiles
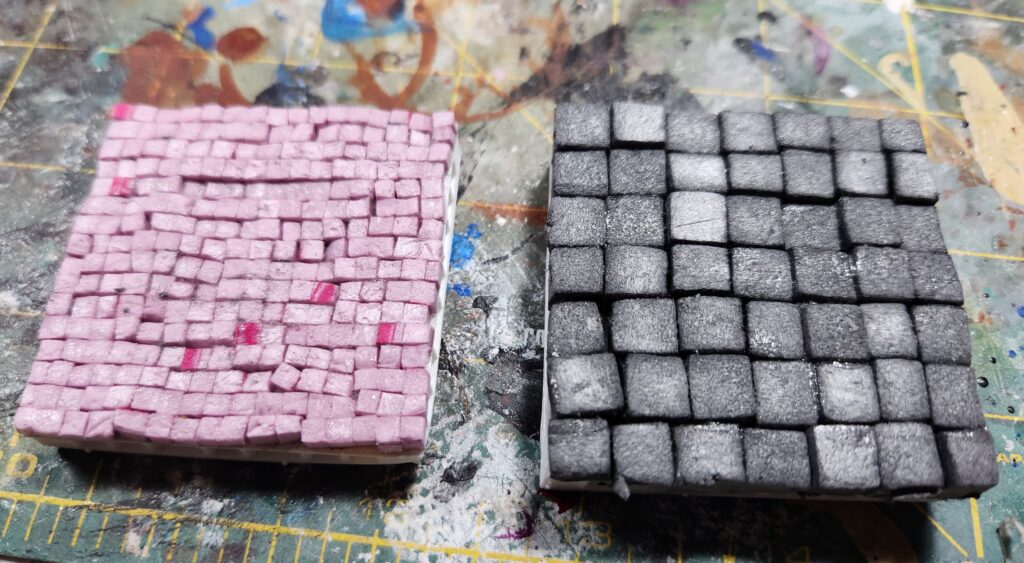
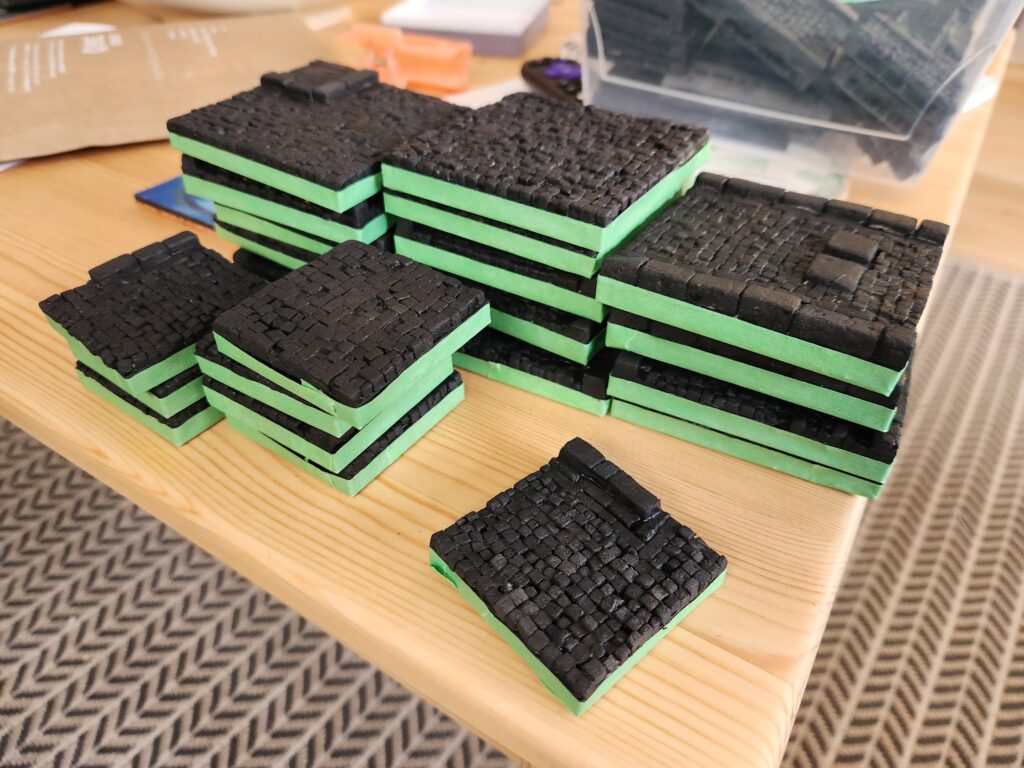
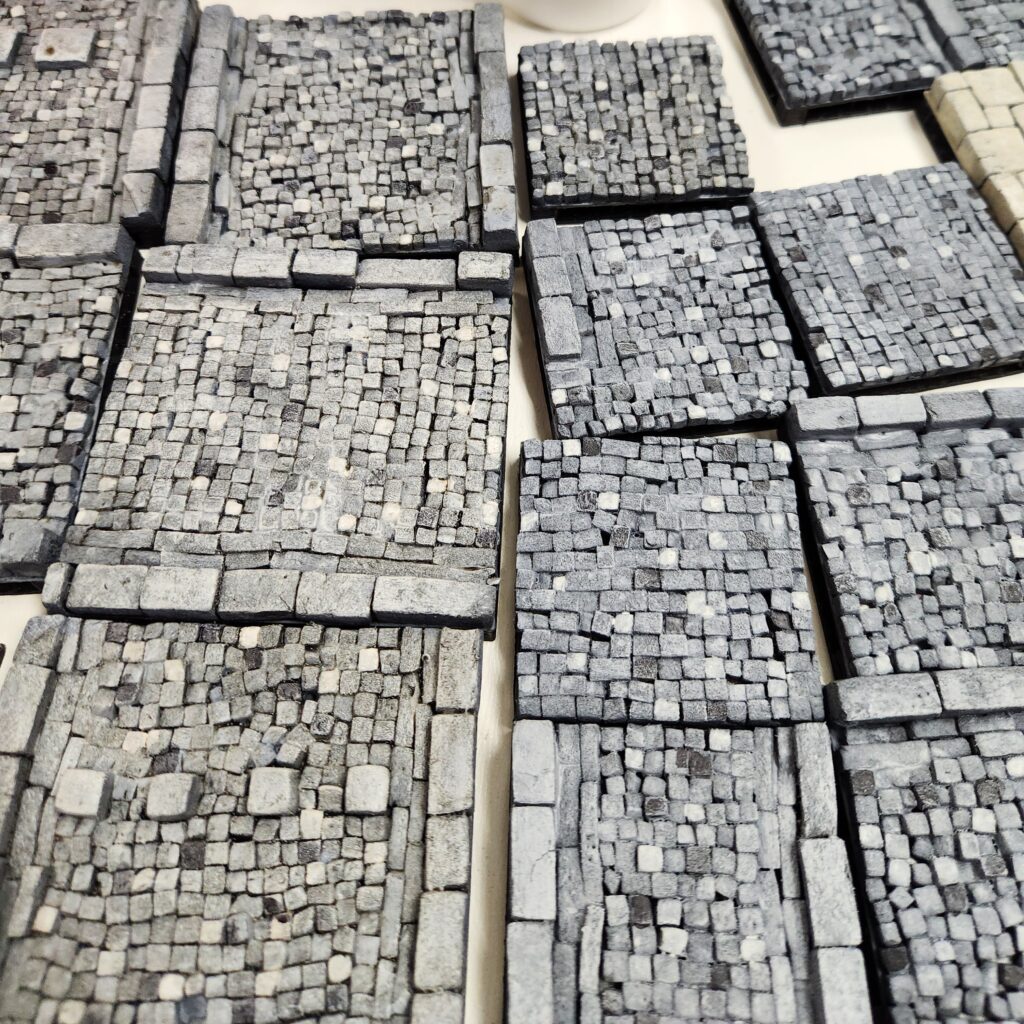
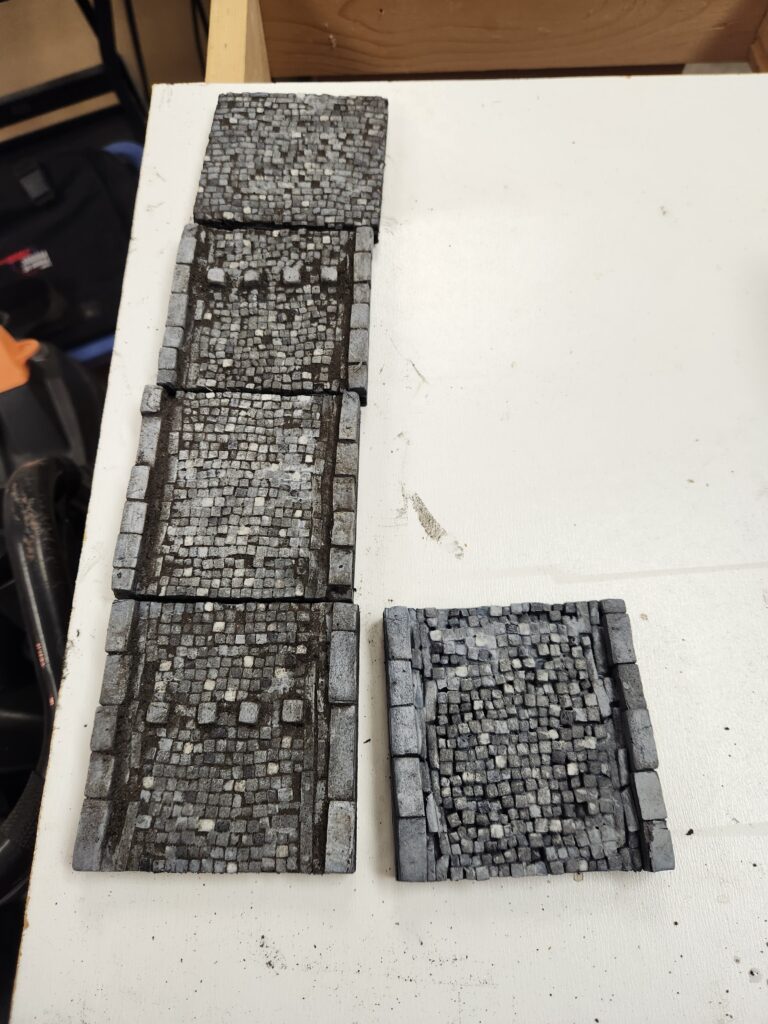
As with my other modular boards, these are all based on 3D printed Open Lock tiles. I then used my Proxxon hot wire cutter to cut a few different sizes of tiles. I tested two initially: 1/8″ and 1/4″. Ultimately, I liked the look of 1/8″ (as did my wife, but she thought it was nuts).
First test tiles
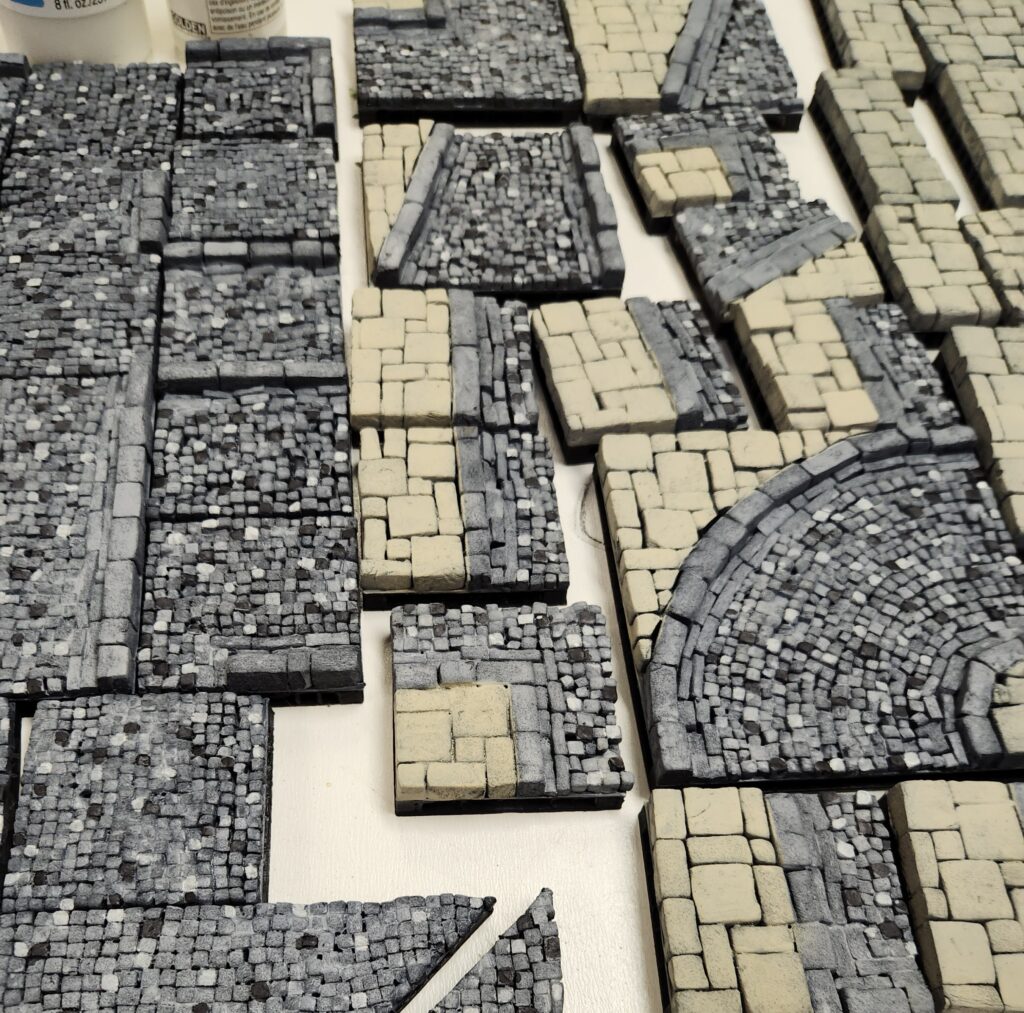
I also made a 2nd change early on – for the sidewalk I moved from just 1/4″ cubes to a mixture of 1/2″ squares, 1/2″ by 1/4″ rectangles and 1/4″ cubes, always tessalated so that no two of the same touched fully on their long side.
Original style in the upper right, new style in the other pieces
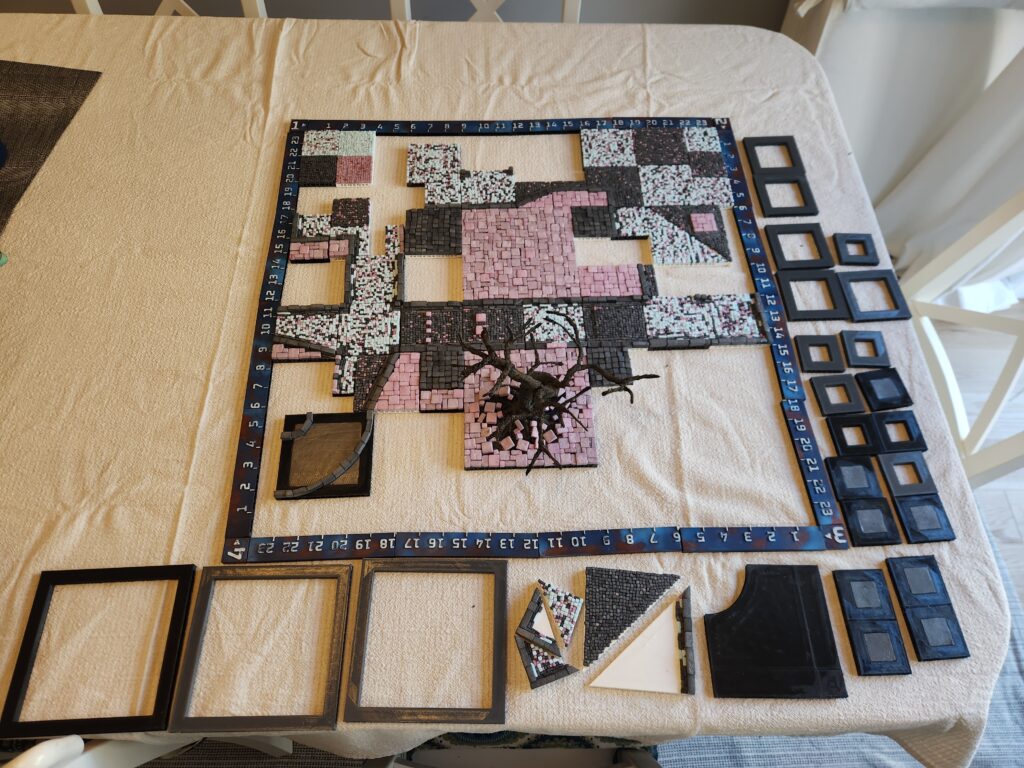
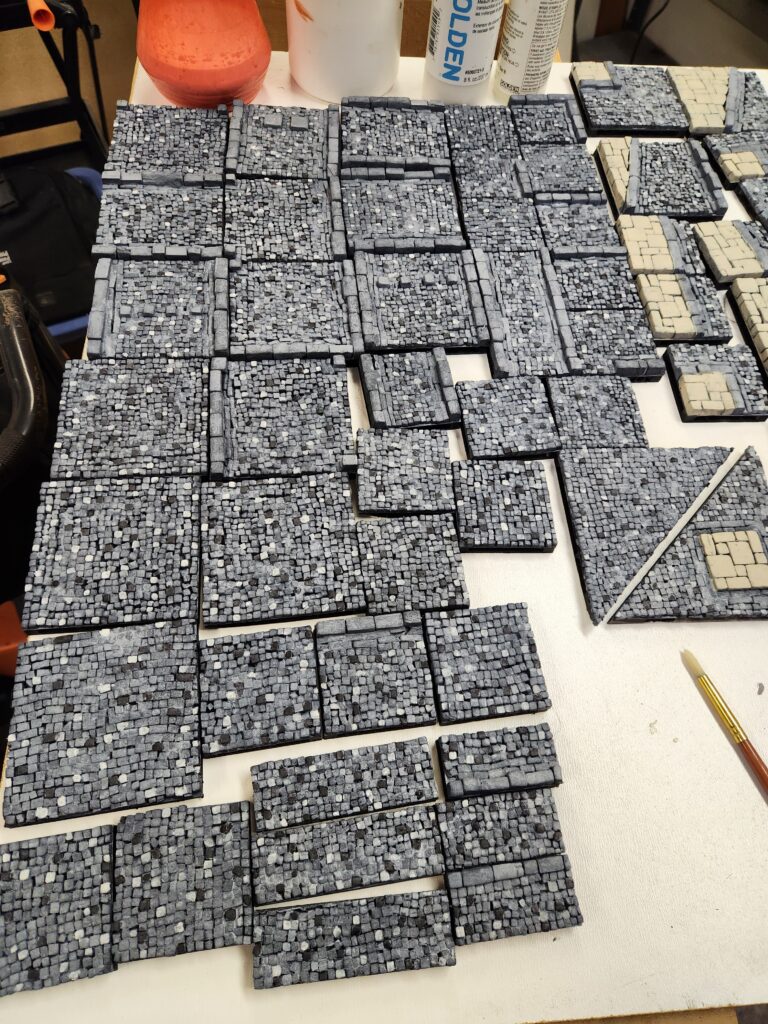
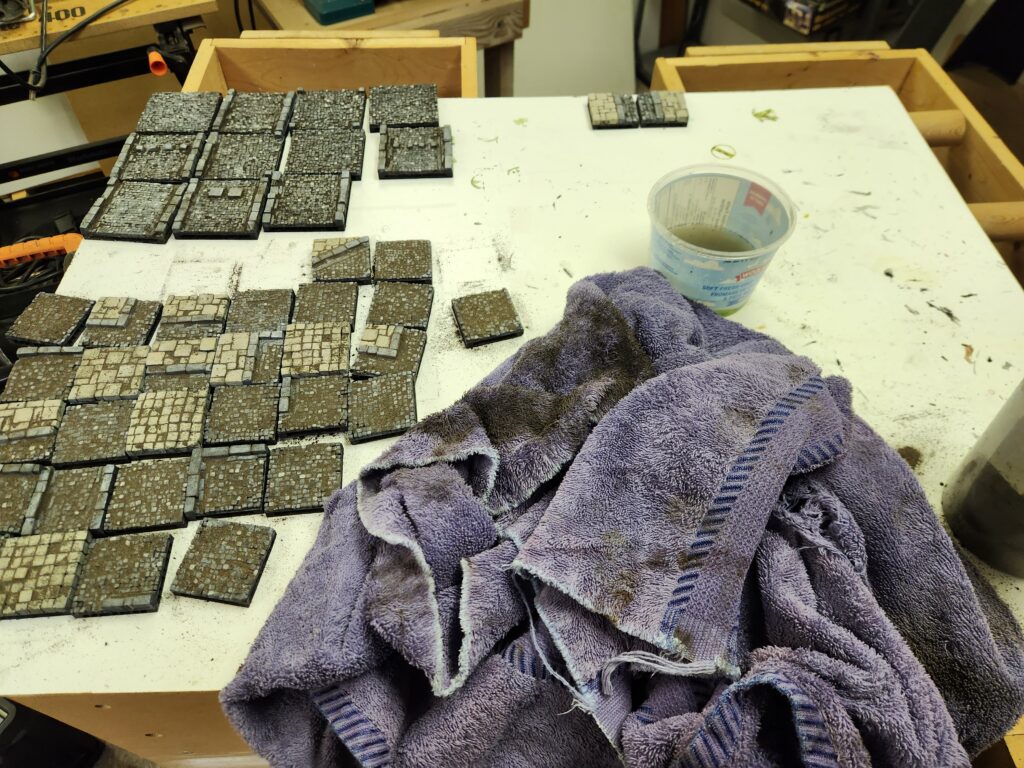
After a lot of work, I had bits and pieces of a table, but certainly nothing enough for even a 3’x3′ (our standard board size). After a hiatus, I got moving again. I also switched glues – from standard PVA to Aleene’s Tacky, which sped up production. So I planned out my initial 2′ x 2′ planned out (well, sort of, I tweaked it almost immediately):
Initial layout2nd layoutFinal layout
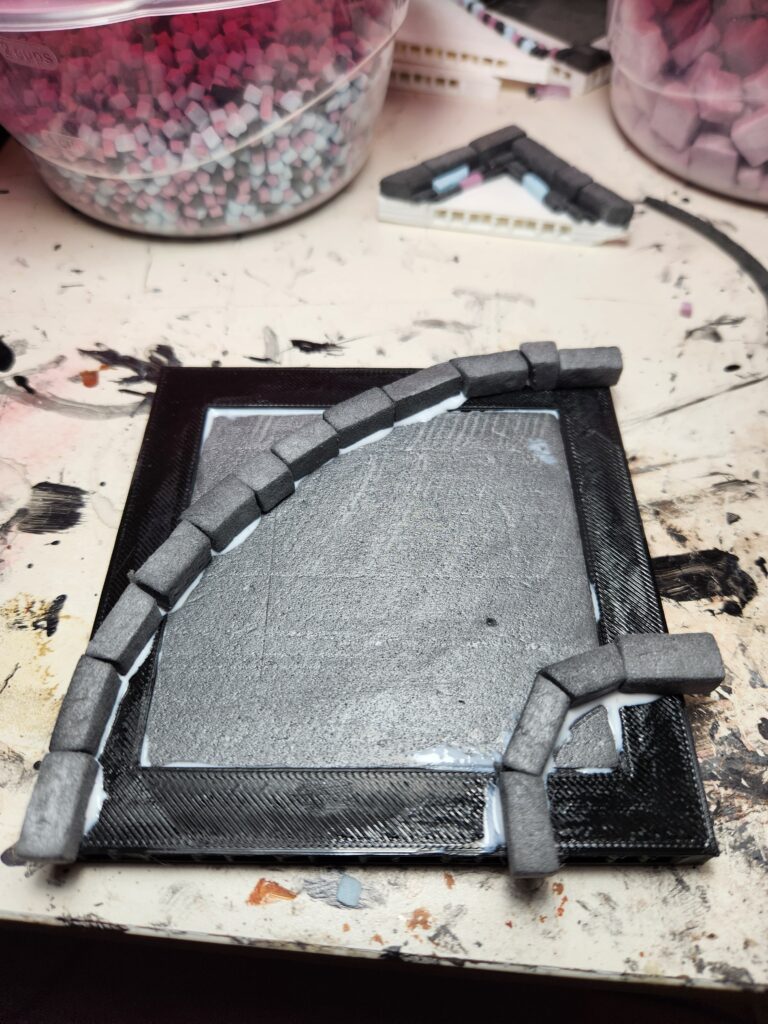
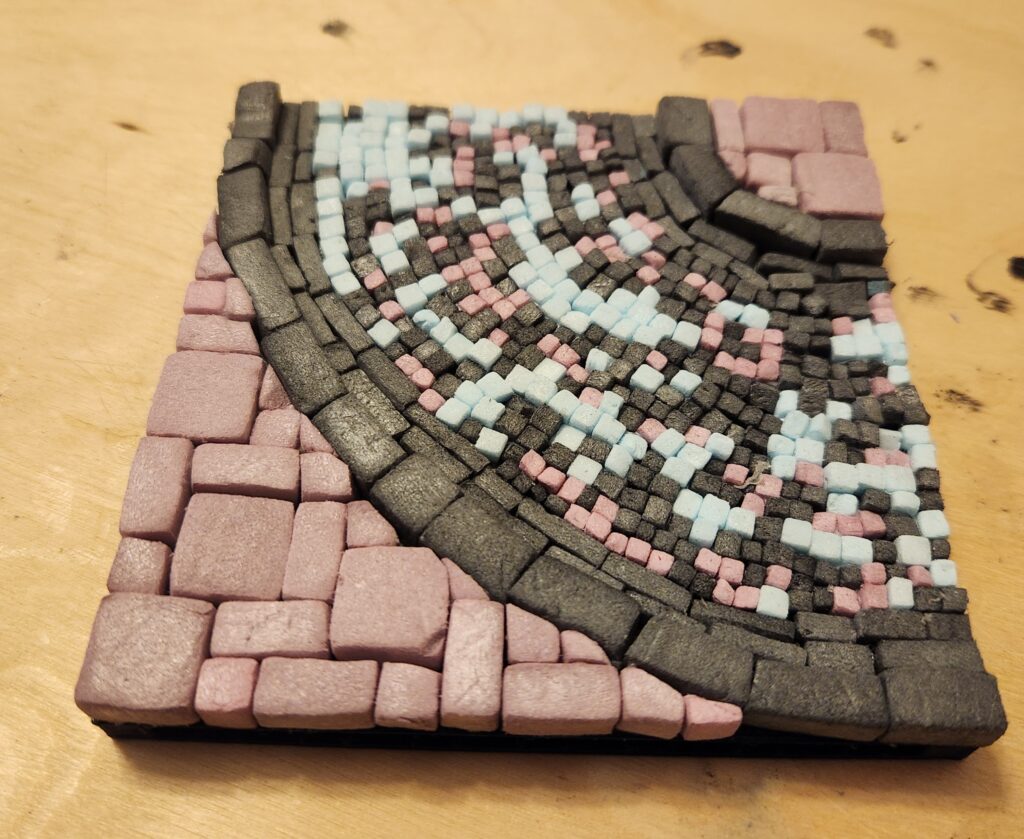
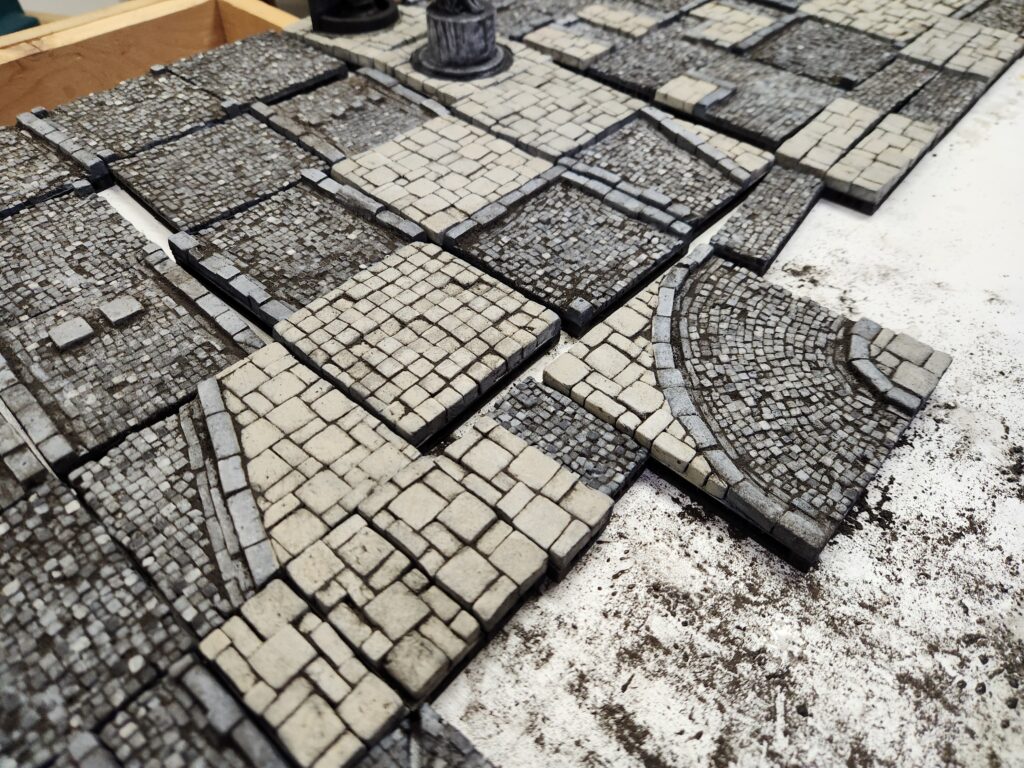
One of the pieces I’m most proud of is the curved road section. I was (w)racking my brain to figure out how to make it look good, thinking I was going to have draw lines at angles, but then I realized I could just lay the stones outward from the inner curve.
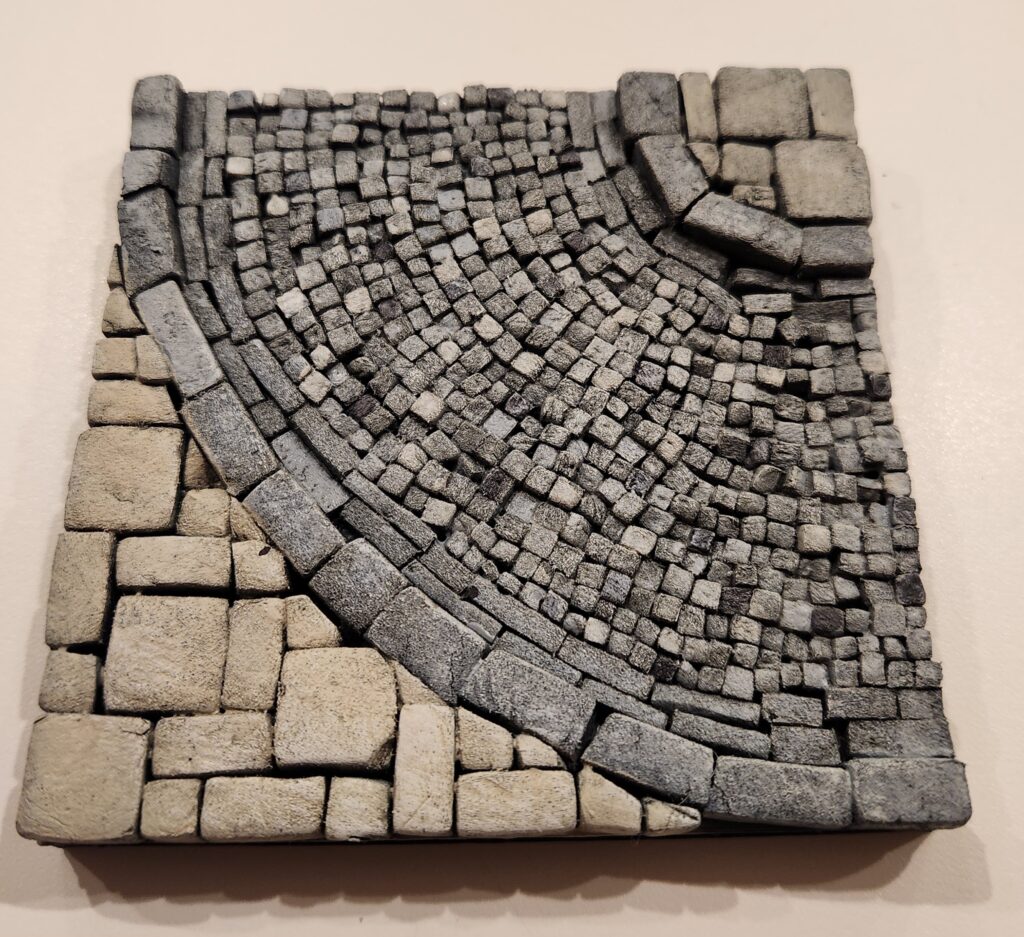
Outer curbs laidFully laidPainted but not yet dirty
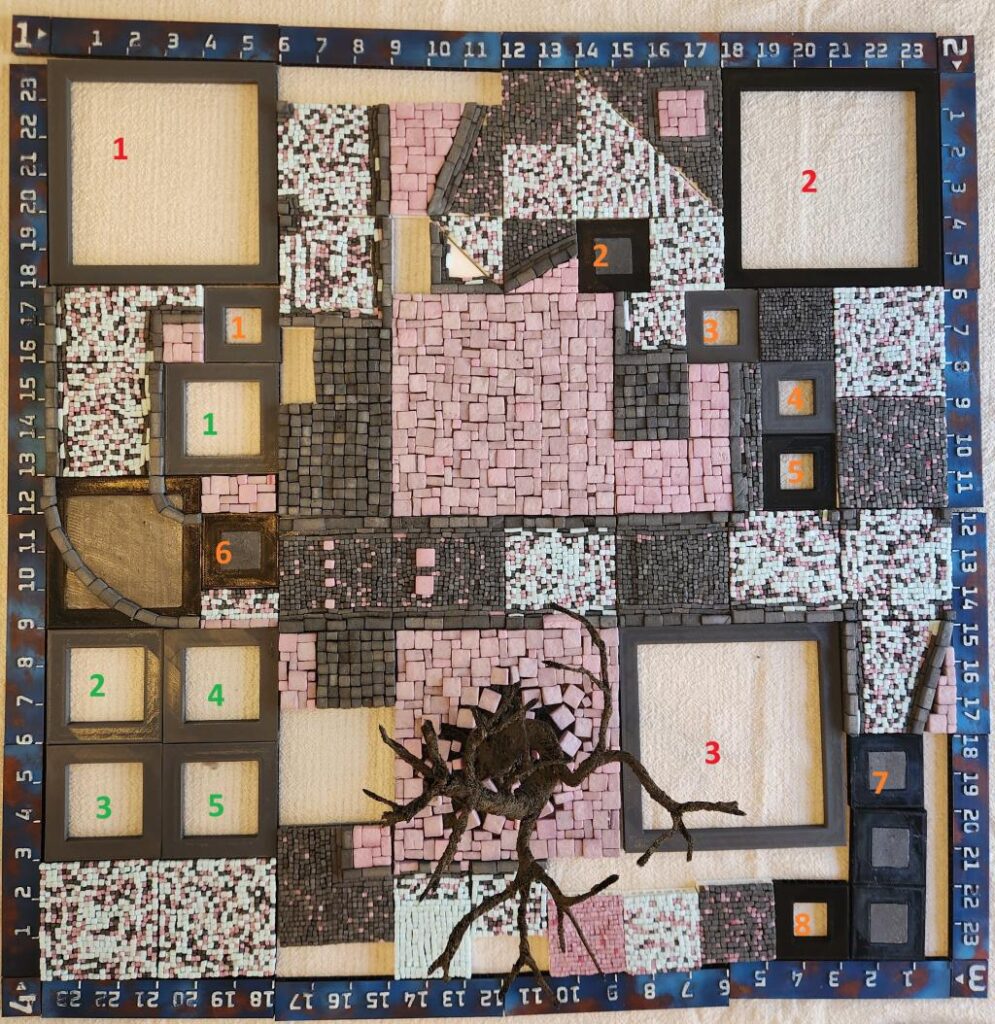
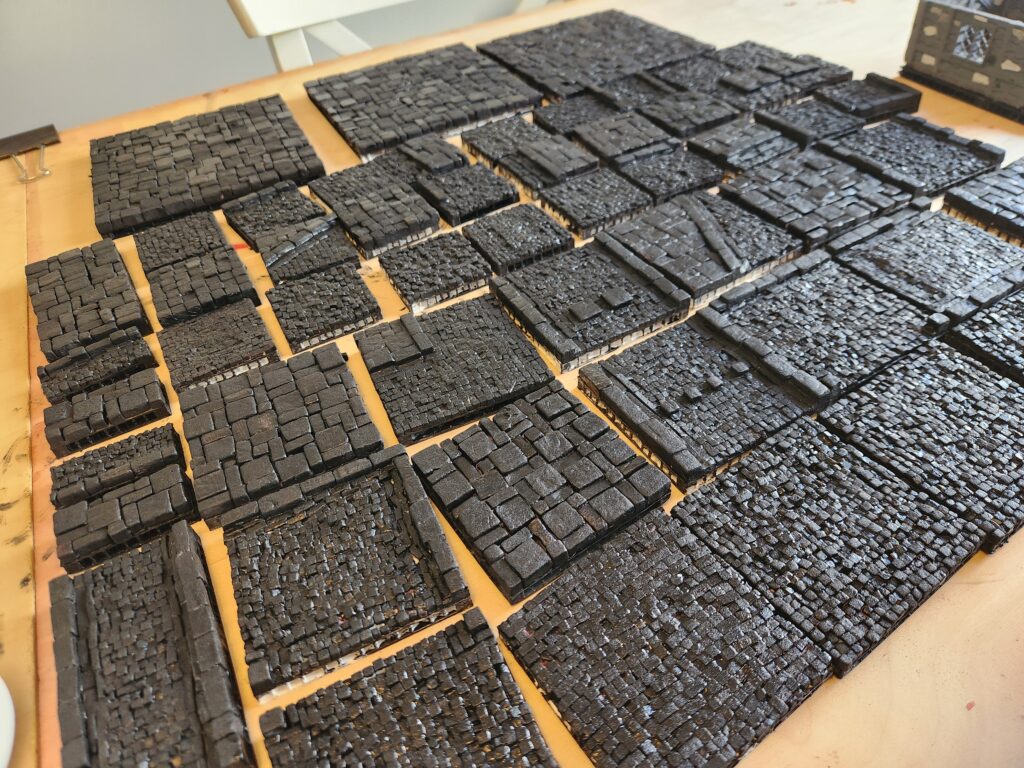
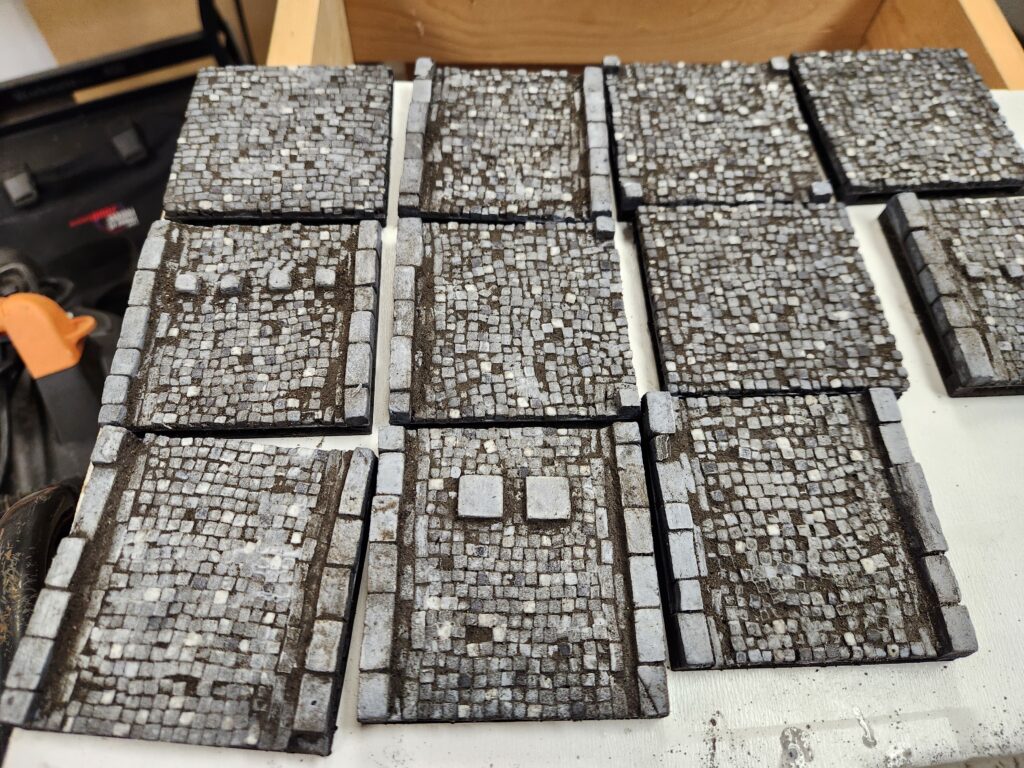
And then, a few (a small number, really) of hours later, I was finished tiling:
Construction done
Painting
For painting, I started simple – a coat of craft black paint mixed with white glue (and a bit of wetting agent to make it flow better), and then airbrushed on some thinned Vallejo Black Surface Primer (a hateful paint if I’ve ever used one).
The first black primer, to tie to all togetherTaping the edges prior to painting
I then re-watched RP Archive’s inspiring city tile video again and decided to follow his painting and weathering method as much as possible. I highly recommend it – it certainly inspired me in my project.
To start the colour, I airbrushed a neutral grey (Demco Artist acrylic) onto the cobblestones and linen (Folkart craft paint) onto the sidewalks. This is also when I noticed I’d left one 1″ x 3″ piece in the painting box. Oops.
Grey cobblestone base layer (with new tiles in the upper right)Whole board painted
Next up I highlighted some of the cobblestones with a dark grey (Army Painter Gravelord Grey Speed Paint) and light grey (Reaper Paint Misty Grey mixed with a satin glazing medium). I wasn’t too fussed about painting exactly here – there were multiple additional layers of paint and weathering coming to hide any issues.
With highlighted cobblestonesOnly cobblestones, not sidewalk, were highlighted
And then a white dry brush across the whole thing:
To finish off painting, I did a black-brown wash. Unlike RP Archive, I did it a bit heavier in pigment – 6 drops of carbon black, 3-4 of burnt umber and 3-4 of sepia in 50ml (all were Liquitex acrylic Inks). It took ~100ml to coat the full 2′ x 2′ board.
Washed tiles on the left, unwashed on the right
And then we get onto dirt. Here I also differed slightly from RP Archive. I had a dark brown grout, so I mixed it 50/50 with dirt, which I sieved with a 1/4″ chicken wire, then baked for a few hours and then sieved a second time in an old tea strainer. This left me with a very fine powder mixture of dirt/grout.
To apply the dirt, I tried the method he suggested in his video but found it didn’t work for me. So I changed it up:
Sprinkle on dry
Spray lightly with watered PVA + wetting agent
Use my fingers to smear the damp mixture around the tile
Dip my hand in water, thoroughly soak the tile
Use a towel to clean off the tile
Repeat 4 and 5 until I was happy with the level of dirt
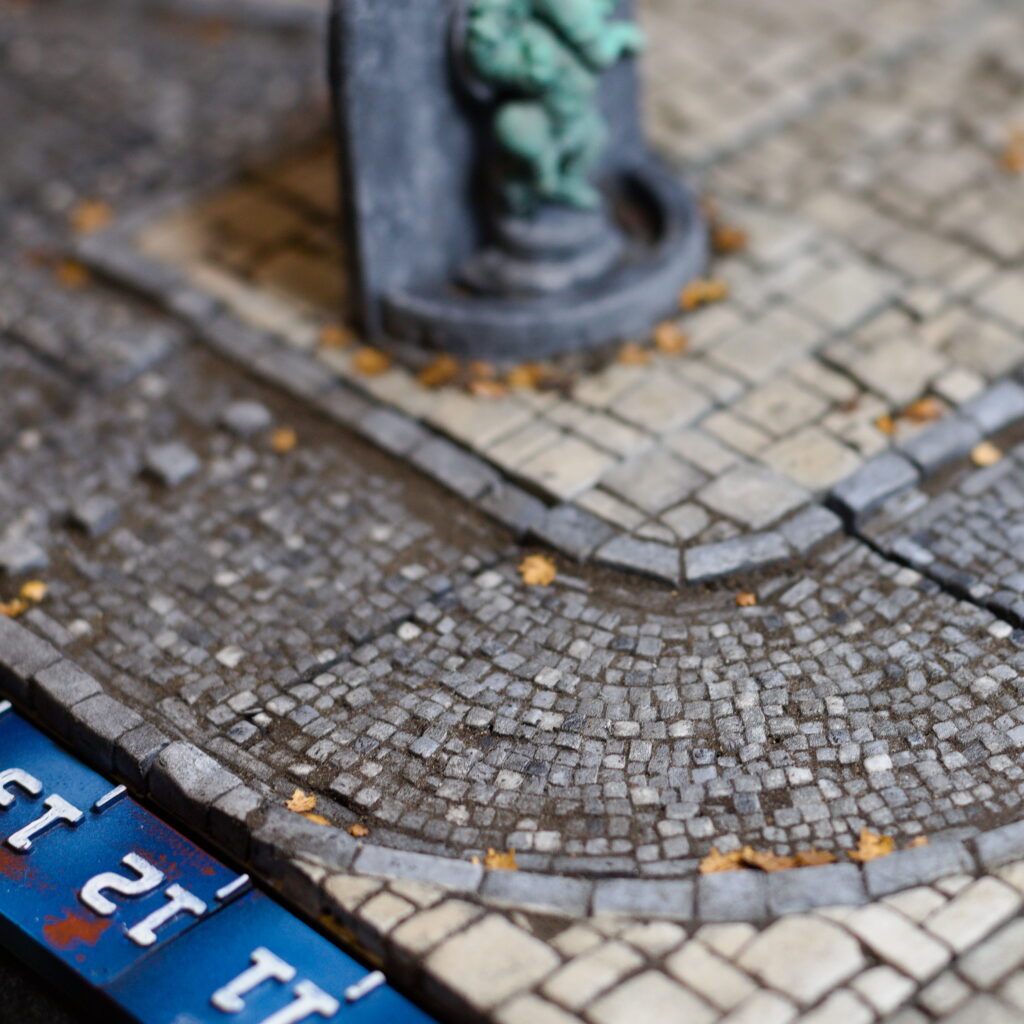
I left a fair amount of dirt on the cobblestones, especially in the corners and in deeper pockets, and almost none on the sidewalk pieces. I found the grout and dirt dried almost instantly, so by the time I was finished all the tiles, they were dry enough to take outside and soak in watered PVA to seal them in. I’m going to have to do a 2nd coat, as some of the dirt is still a bit loose.
Comparing dirty (on left) with just painted (on right)Very dirty process of dirty-ing up the tilesDirty tiles 1Dirty tiles 2Dirty tiles 3
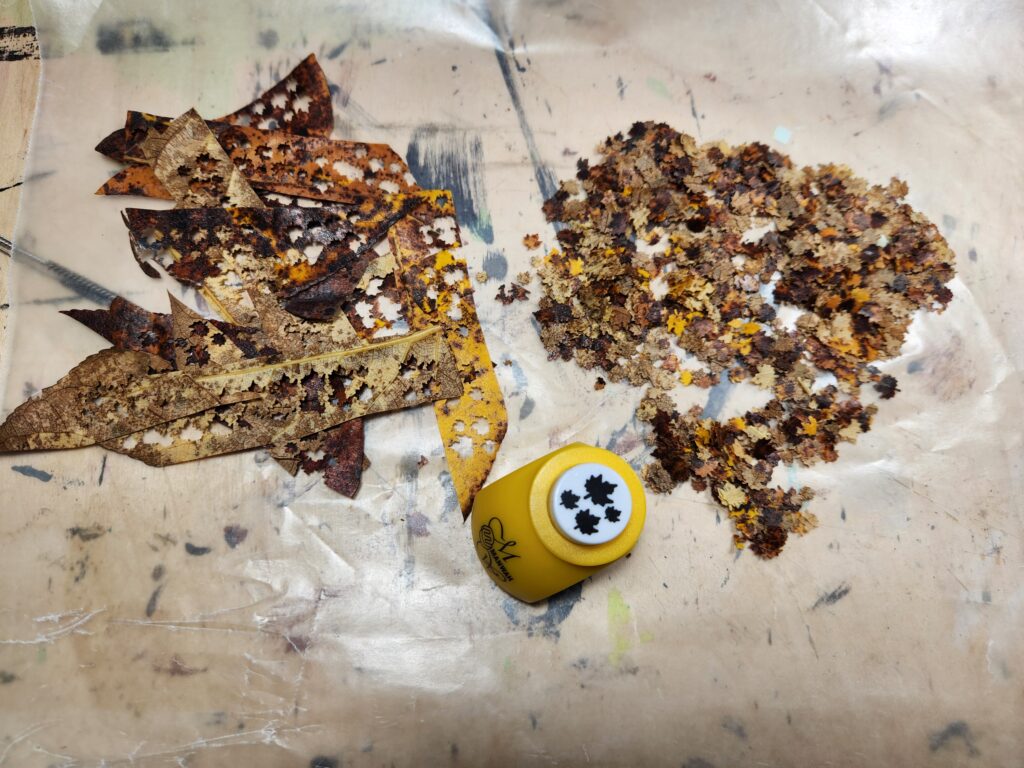
Lastly, I had punched a bunch of leaves using an AliExpress leaf punch (non-affiliate link – I used the 05 colour). I dried some straight and soaked some in glycerin first, then dried. I found the glycerin ones were slightly translucent and showed the tile through them, so I’ll use them for something else (I’m going to try dyeing with inks and fabric dye next). Note that some of the colours were lost as they were dried, which was a bit unfortunate but expected.
Punching leaves from leaves.
I glued them down on the edges where leaves would naturally blow to, a truly finnicky process as the dried leaves were quite stiff. I tried soaking them in watered down PVA, but that didn’t seem to help – although I suspect I could rehydrate them by soaking them overnight. Some definitely will still lift (and have), but they are trivial to replace.
Leaves glued in the corners
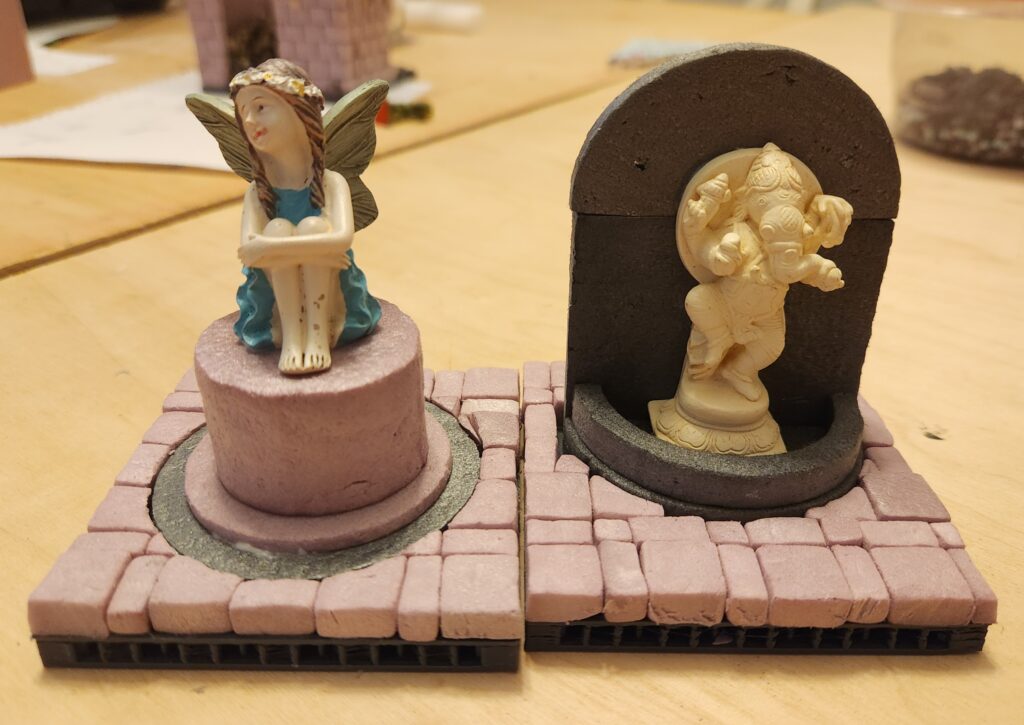
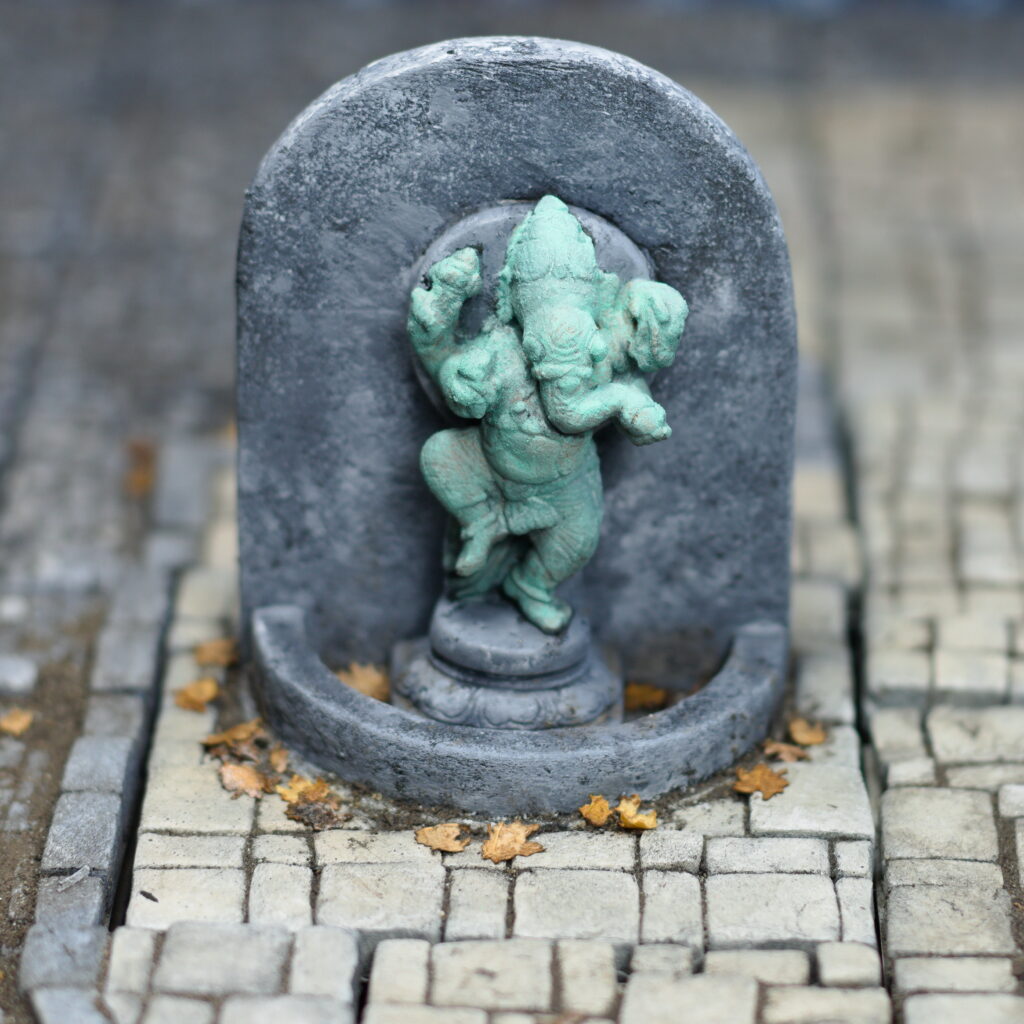
Painting the Statues
For the statues, I painted them fairly simply. They were both on foam plinths or backgrounds. They were base-coated along with the tiles.
The bleeding eyes girl was quite simple – dry brush various greys on her and her plinth, along with some thinned greys for the streaks. Her eyes are painted with Reaper Fresh Blood.
For the Ganesh statue, I painted the statue itself with Reaper Old Bronze and then found Army Painter’s Verdigris Technical Paint, which I applied in a couple of coats. It works, but honestly this paint job is a bit simple and for larger statues I’d want to follow something like Garden of Hecate’s excellent tutorial. For the stone backing, I tried some stippling and washes, but ultimately went with sponged on greys and whites.
The Tree
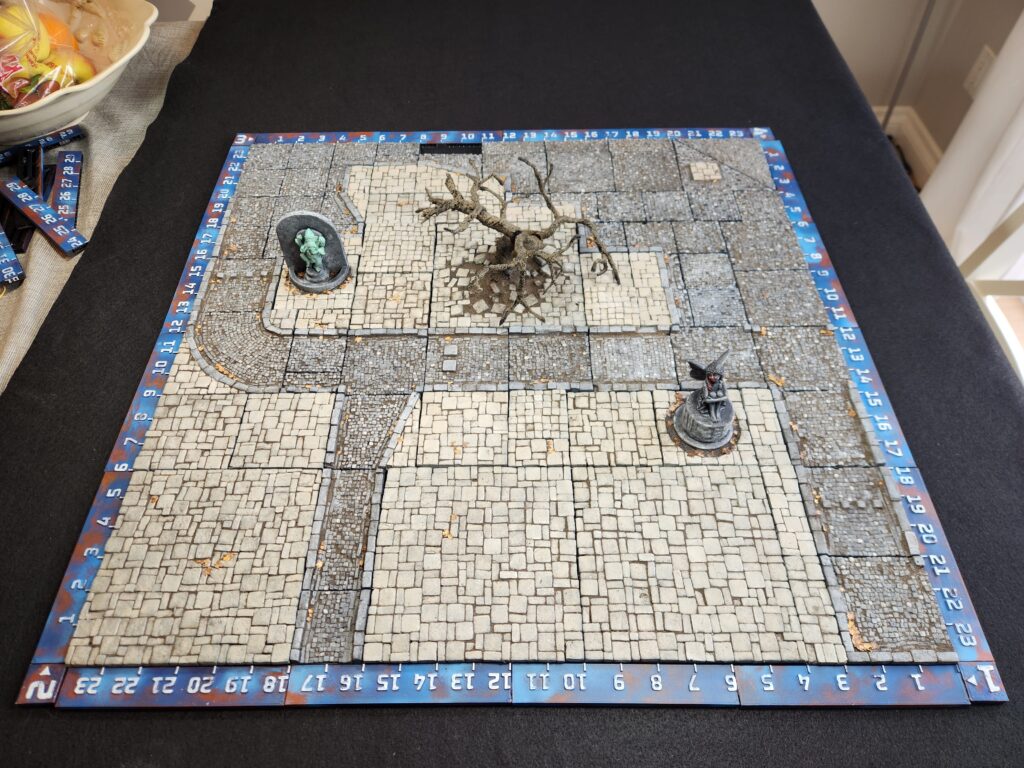
The tree is fairly simple – a bunch of pipe-cleaners twisted up and then melted, with a texture paint (in my case, a DIY texture paste of brown paint + sawdust). It isn’t done, but eventually am going to try and match some of the look here:
Finished Look
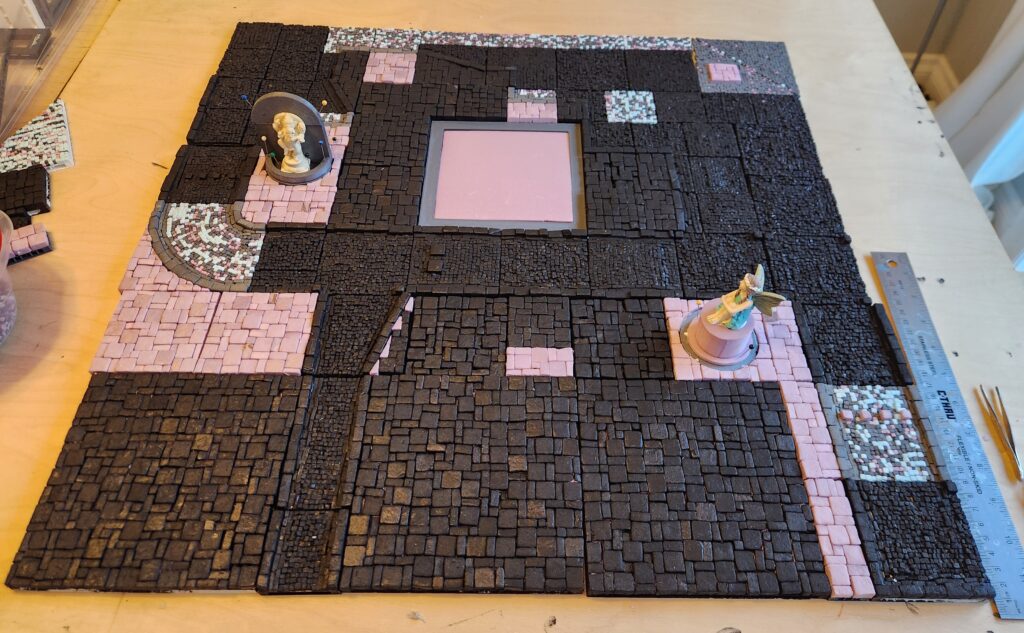
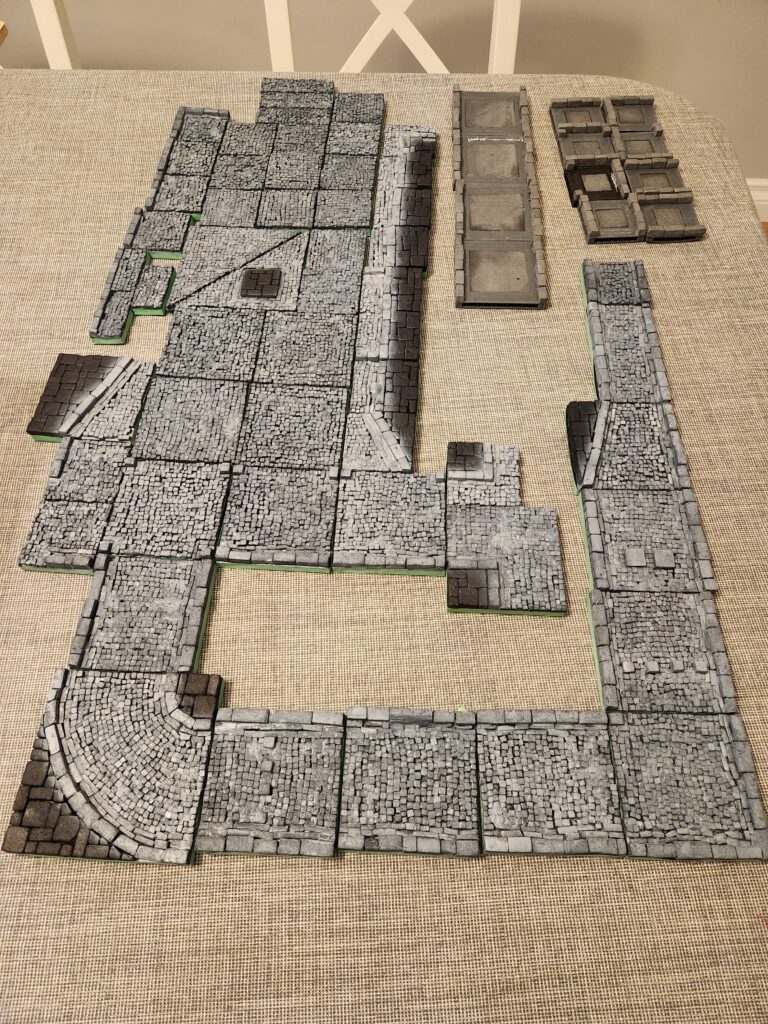
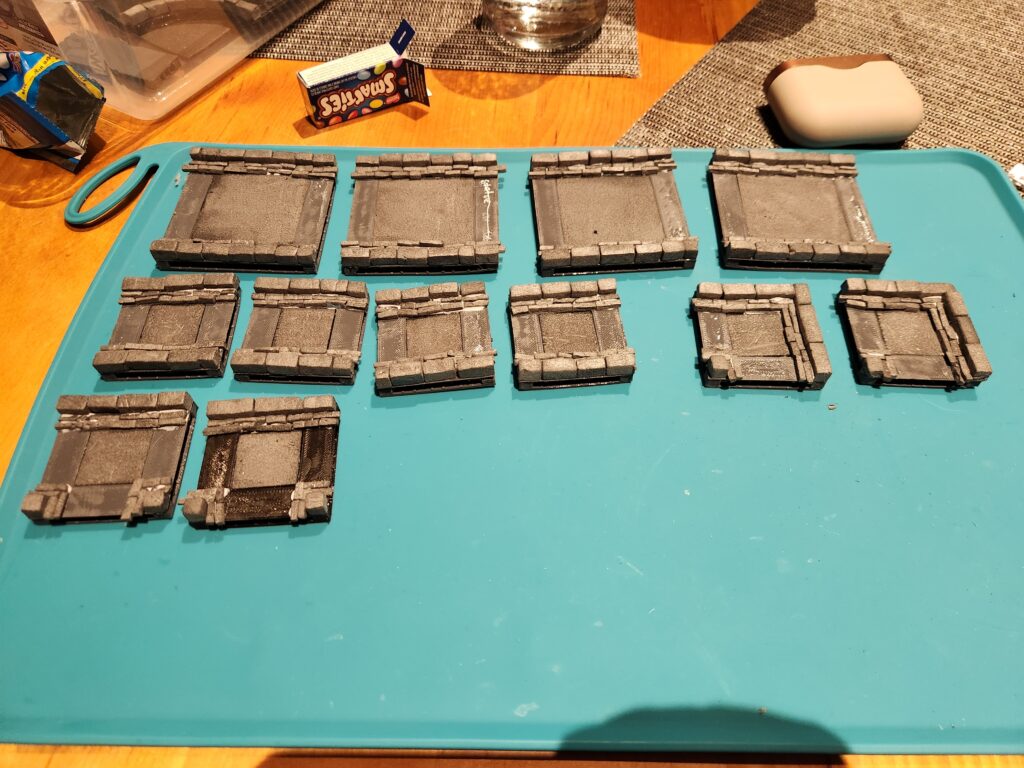
And just like that, this 2′ x 2′ set of tiles was done.
The finished tiles
But of course, I need a lot more, especially if I want to get a full 4′ x 4′ Mordheim table done. So the next set is already underway:
Well, maybe not. The next set already underway, aided by Halloween candy.