Tag Archives: airplane

Tiny Boats and Even Tinier Planes

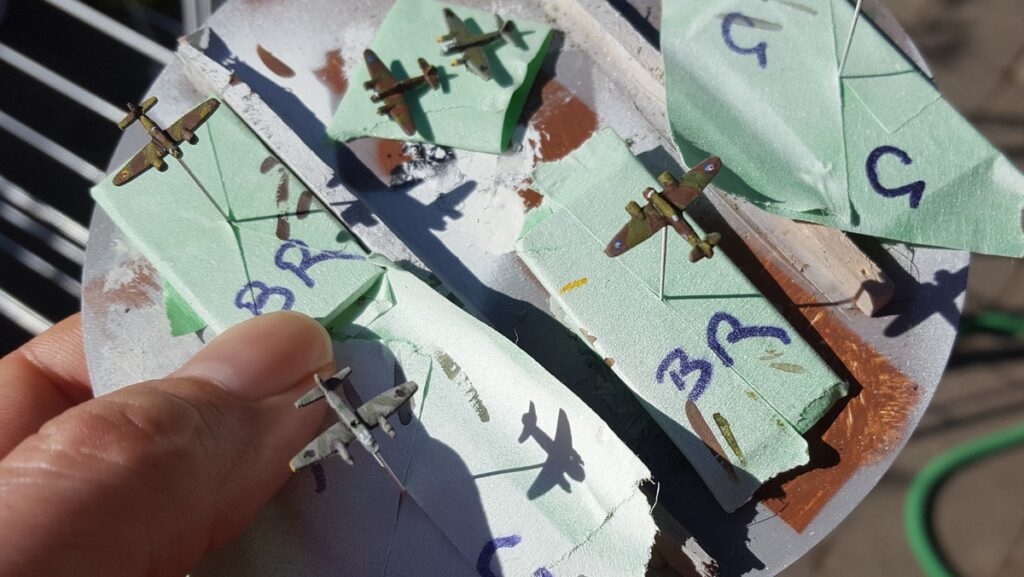
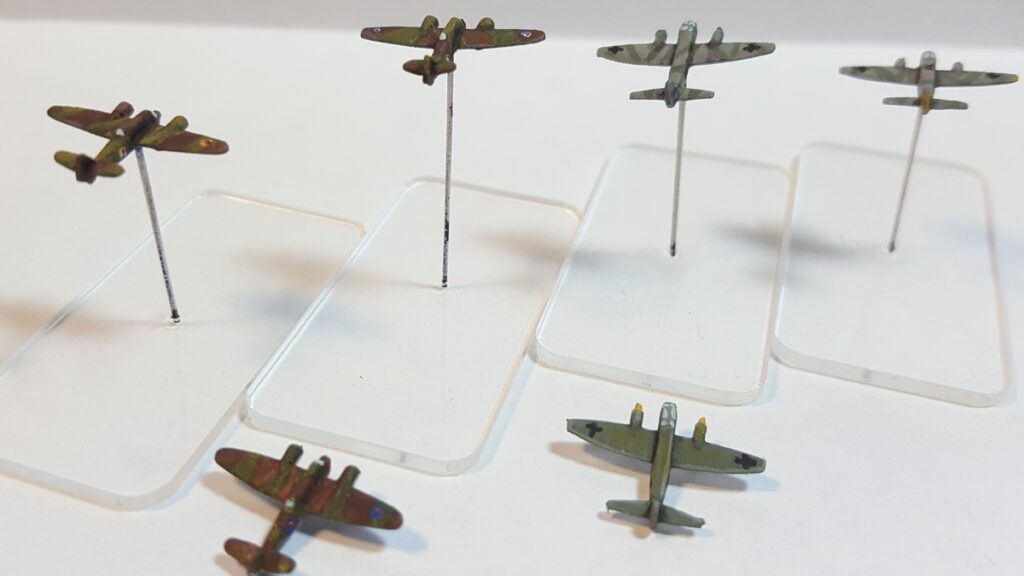
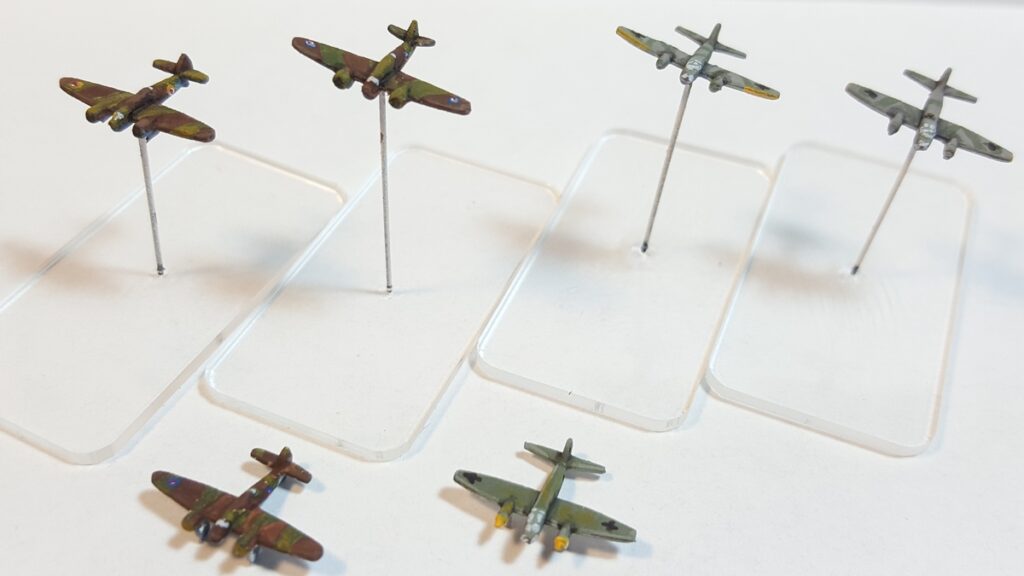
When I did my first WW2 coastal order to Last Square back in November 2019, well over six months ago now, I added a pack of British Beaufighter/Beaufort and a pack of German Ju88 for the heck of it, chosen because both types of aircraft show up in the maritime strike role for most of the war with various loadouts.

I got them, looked at them, was dumbstruck by the insanely minute size of the things, and put them aside to paint the boats up instead. Having just finished (most of) the second order of Last Square coastal naval boats and being in a get-stuff-finished mood, I decided to have another look at the tiny tiny planes and figure out how to mount and paint them.

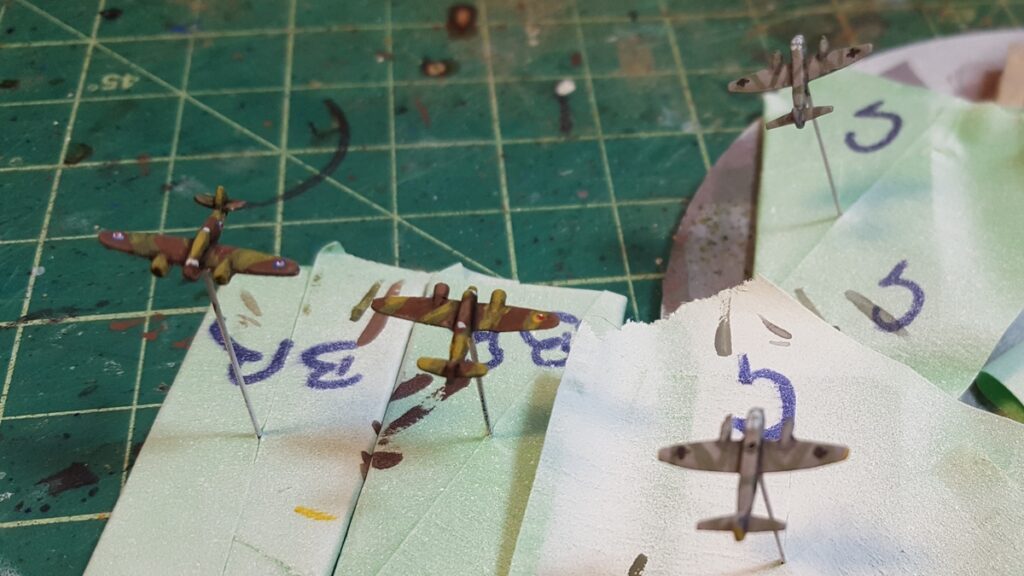
I recalled reading about using plastic broom bristles for masts and antenna previously, so I decided to test this out for creating flying stands suitable for tiny planes. I used the same 40mmx20mm thin acrylic bases I’m using for most of my boats, because I’ve got them, and I happened to have a micro-drill-bit in my tool stash almost perfectly the same size as the bristles I harvested off our household broom.

RAF Bristol Beauforts/Beaufighters, two mounted and one left loose. Click for larger.

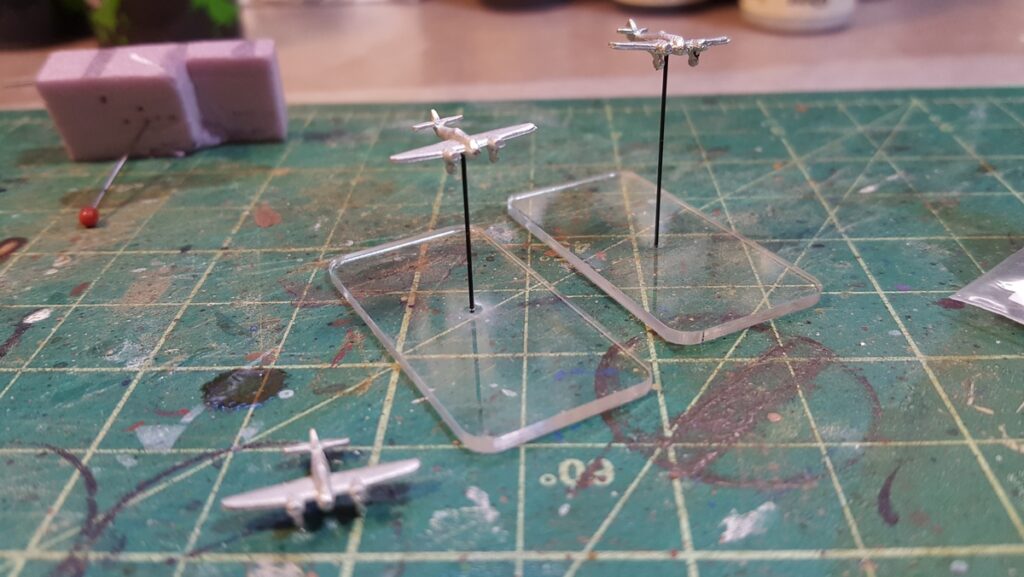
I kept the flying heights fairly short, about one inch maximum, which means these planes are all coming in at wavetop height, pretty much, which seems to make sense when attacking small coastal vessels and is way, way easier to store than taller possibly more realistic height stands!

Two Beaufighters and two Ju88 mostly done, including recognizable national insignia on these tiny, tiny planes. Click for larger.
Extreme closeup of the unmounted Beaufighter and Ju88. I’m pleased with the look of the canopies, especially on the German Ju88 with their big “greenhouse” canopies covering most of the front end. Click for larger.

Painting Notes

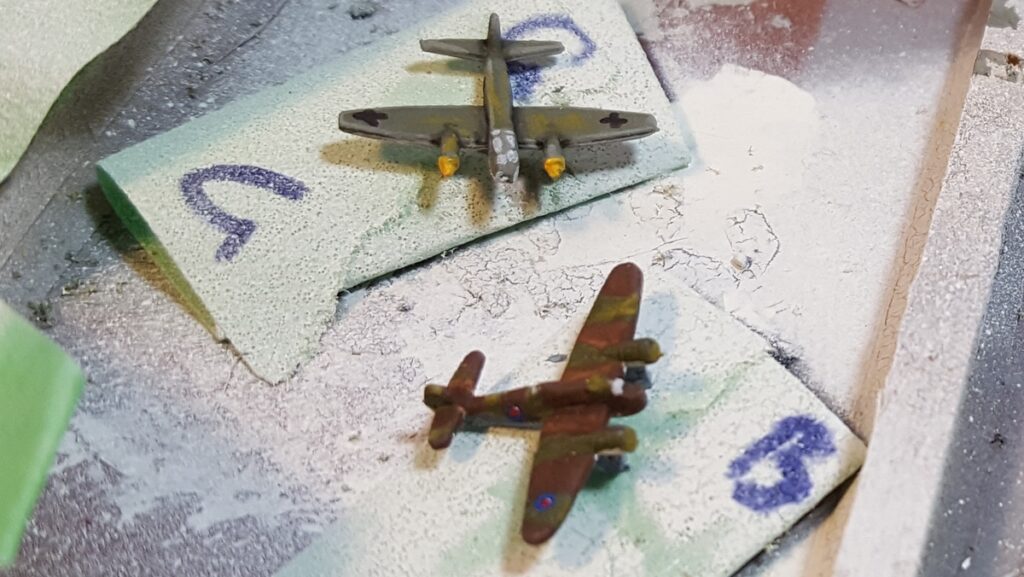
All my current paints are from the Reaper Master Paints series. All six planes got a white primer, and then for the RAF I used Muddy Brown and Military Green for the topside camo; the underside is Heather Blue mixed with Rainy Grey which seems like a good match for the RAF “sky blue” grey-blue underside paint.

The Germans were a mix of Rainy Grey and Muddy Olive 1:1 for the all-over base coat, with two of the Ju88s getting slightly darker grey-green camo added with some additional Stone Grey added to the Rainy Grey/Muddy Olive mix.

I adding some highlighting along edges mostly by mixing a bit of Rainy Grey into the relevant base colour, and the Germans got some yellow recognition patches with Marigold Yellow. I also used some Games Workshop Nuln Oil (black) and Agrax Earthshade (brown) washes, especially along the roots of the wings.

The German iron crosses are Walnut Brown, a lovely almost-black that I use all the time instead of actual Pure Black.

The RAF roundels are Marigold Yellow, Sapphire Blue, Pure White, and Carnage Red.

Windows and cockpit canopies were picked out with Ghost White, a blue-tinted off-white.

For scale, I made sure to take this photo with my thumb “in the way”. That’s a standard CD I’m using to hold the planes, just for additional scale. These things are seriously tiny. Click for larger.
Side views, RAF Beauforts/Beaufighters on the left and Luftwaffe Ju88 on the right. Click for larger.
Tail end view, Beaufort/Beaufighter left, Ju88 to the right. Click for larger.
Forward view, same arrangement as previous. Click for larger.

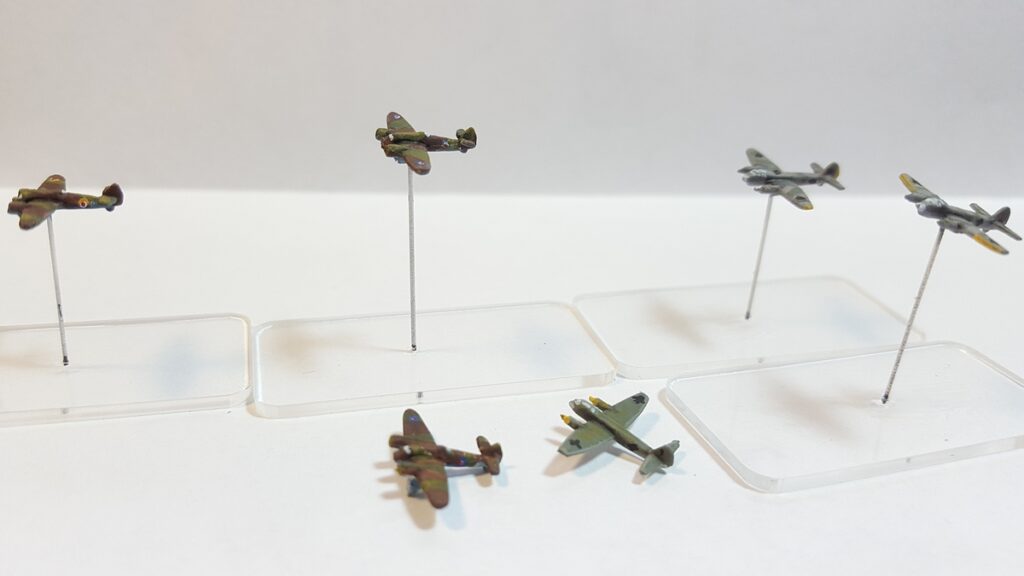
Aircraft don’t actually play a huge role in most of the engagements coastal naval vessels find themselves involved in, so I don’t think I’ll be adding to my collection of tiny aircraft anytime particularly soon, but these turned out to be fun to paint and they ended up way better looking than I was thinking they would, given the diminutive size of the things!

A Red Nieuport, Part Three

Got the star insignia finished up on the Bolshevik Nieuport 17. Some of the stars are a bit wonky, but frankly that’s historically accurate — a lot of actual insignia during the Russian Civil War had a definite hand-painted look to it!

I gave up on the red-and-white striped vertical tail as a bad job, and went with solid red to go along with the red cowling at the nose.

red17_23
Painting all done on the Nieuport, Now to swear the upper wing into position!

Now to get the upper wing into position, always a job likely to provoke swearing. At least the Nieuport only has six struts, instead of the even dozen on the SPAD! After that there’s just the landing gear and prop disc to do.

A Red Nieuport, Part Two

Got started on the insignia for the Bolshevik Nieuport. This is going to involve at least six freehand red stars; to skip one pair I’ve decided to go with a red-and-white striped tail, although freehand stripes might make freehand stars look easy…

Anyway, here’s the current state of the beast. Like the SPAD, this Nieuport has roundels moulded right into the wing surfaces, so I’ve used those to put the stars in white circles. This appears to have been fairly common on Bolshevik aircraft, for the simple reason that the Imperial Russian Air Service roundel had to be blanked out somehow!

red21apr
The Bolshie Nieuport upside down, showing four of the six Red stars on it. The upper wing has insignia on both the upper and lower surfaces of the wing, which was fairly common for Nieuports.

The insignia and tail stripes will get at least one more coat of paint, and they need some cleanup, then highlighting. Colours, for anyone following along at home, are Reaper Master Series Clotted Red and Reaper MS Leather White; highlights will be with Reaper MS Pure White and Carnage Red. I might yet abandon the striped tail in favour of a red tail, possibly with white star. It depends on how frustrated freehand pinstriping gets me…

A Red Nieuport, Part One

Having built the White Russians a SPAD (Parts One, Two, Three), it’s time to build the Nieuport 17 for my Bolshevik forces!

As I mentioned in my original RCW Aviation article, the basic scheme for the Nieuport in Red service will be silver/grey dope with as many red stars as I can stand to freehand onto the thing. At a minimum, I”m committed to six: two on the vertical tail, two on the upper surface of the top wing, two on the lower surface of the bottom wing. Nieuports, because of their very small bottom wing, often had insignia on the lower surface of the upper too. We shall see.

Thankfully the Reds freehanded their star insignia too, so lumpy, misshapen and odd stars abound!

Here’s all the kit parts laid out on my cutting mat. Only about two dozen parts all told, and a much simpler strut setup than the SPAD which will hopefully be easier to assemble than the SPAD’s upper wing… (the fuselage is in two halves, I just had them popped together to check the fit when I took this photo.)

red17_19Apr
The Testors Classic Nieuport 17 kit all laid out.

Here’s the current state of the Nieuport. Basic assembly of fuselage and lower wing done, and basecoat of silver, red (on the nose) and white (on the tail) done.

red17_20Apr
The Bolshevik Nieuport 17, base colours done, ready for insigia then weathering.

On to freehand stars!

Transporting the SPAD

Almost all of my gaming is done away from home, at other houses, up at the university on the weekend (our local miniatures group takes over a classroom up there every Sunday) and at conventions. So everything has to be portable or it’s useless to me. Given the relative fragility of the White Russian SPAD, especially that damned upper wing, I needed a solid way to protect it in transit.

Some scrap cardboard, a dip into my stockpile of cheap upholstery foam (normally used for lining figure cases) and some work with razor knife and hot glue gun, and I had the SPAD Caddy:

spad_caddy
A SPAD Caddy, for secure transport of my White Russian SPAD to games. Click for slightly larger version.

The base is a square of scrap cardboard, then two layers of half-inch foam with a cutout to accommodate the body and wings of the plane, and a deeper square cutout (through both layers of foam) at the front for the wheels and propeller. More scrap foam protects the tail and wingtips, and the two bits of foam forward of the tail hold the whole thing securely. The extra strip of cardboard across the front helps protect the propeller and landing gear as well as provide a convenient spot for a label.

I used the SPAD Caddy to get the SPAD and the rest of my Russian scenery and figures to Trumpeter Salute at the end of March, and it worked exactly as planned. There’s even room in my Russian Civil War scenery box (just!) for a similar caddy for the Nieuport I plan on doing for the Reds.

A SPAD for the Whites, Part Three

Finally swore the upper wing into place this evening. It’s been years since I built a biplane model, I’d forgotten what a total bugger the struts and upper wing can be. The SPAD 13 as 12 struts, only two of which are especially solidly mounted when it comes to getting the upper wing positioned, the rest of which wobble entertainingly.

Even now the upper wing is very slightly skew and I have doubts about it’s long-term stability when the plane is in wargaming use, but we shall see. After getting the upper wing fixed, the landing gear and prop disc were painless.

spad5
The White Russian SPAD completely assembled, needing only some touchup painting here and there.

Major Vodcanovitch of the White Russian army provides scale; he’s a 28mm Brigade Games officer.

spad6
The White Russian SPAD from the front.

That’s the SPAD largely finished, except for a bit of touchup painting and two struts I need to reinforce to help solidify the upper wing.

Now, back to finishing that crowd of White Russian riflemen and officers you see cluttering the background of the SPAD photos!

A SPAD for the Whites, Part Two

Inspired by this image from Wings Palette, I decided to give a bit of freehand a try.

Via Wings Palette, a Russian SPAD 7 with a nifty skull-and-bones squadron insignia on the rudder.

My version:

spad4
Skull and crossbones insignia on the rudder, and weathering on the fuselage.

There’s a (nearly) matching skull on the other side of the rudder, of course, although this one turned out better so I’ll have to always remember to photograph this plane heading right! I also used thinned paint and washes to dirty up the fuselage, especially around the nose where the engine and guns make a mess.

I’ve also put a half-inch wood screw up into the belly of the plane, right behind the main landing gear, to serve as an attachment point for a flying stand. There’s two layers of plastic there, from the wing and the body, and the screw seems solid so far, especially with a drop of superglue to lock it in place. I had thought about using a block of wood or blob of milliput inside the fuselage before I assembled it to provide a solid attachment point, but got impatient to assemble the plane! Hopefully the screw will be solid enough as-is, worst case scenario I can always carve a hole in the belly of the plane, stuff the hole with milliput and sculpt a patch.

Up next, one last touchup of the roundels and other paint, then final assembly: cursing the upper wing into place, adding the landing gear and prop disc. That’ll be it, then it’s back to my neglected horde of White & Red infantry who need painting up!

A SPAD for the Whites, Part One

I should be working on finishing White Russian infantry, but I’ve allowed myself to become distracted by aircraft, specifically the SPAD 13 I wrote about a few days ago, earmarked to support my White Russian forces.

Here’s the SPAD all laid out on my workbench. As I mentioned in the first post, these are incredibly basic kits. The SPAD has 26 parts, at least one third of which are wing struts!

spad1
The Testors Classics SPAD 13 kit laid out. The grid on the cutting mat is quarter inch.

The kit needed minimal cleanup as far as flash, molding gates and such went, so after a quick shot of grey primer it was off to the paint racks. I used multiple coats of well-thinned Reaper Master Series acrylics, and always brushed the same way, from the front of the plane toward the back. This gave the body and especially the wings a nice weathered, mottled appearance without having to do a lot of actual weathering. The wings are Swamp Green; the front of the fuselage is Tanned Leather with a wash of GW Gryphonne Sepia; the undersides of both wings are Polished Bone, with a drop of Khaki Shadow in the base coat. The white is Leather White highlighted with Pure White; the red Clotted Red highlighted with Carnage Red and washed with GW Baal Red; the blue is Old Navy highlighted with Heather Blue.

spad2
The SPAD with basic colours completed.

This kit actually has roundels (RAF or French) molded right into the skin of the wings, so doing Russian roundels as used by the Imperial Russian Air Service pre-Revolution and the Whites after was easier than I’d thought it would be. The photo below is the roundels after only the first coat of paint, minimal cleanup and no highlighting.

spad3
The Russian roundels – bottom of the lower wing, top of the upper wing.

In the background of the last photo, you can see the clear plastic disc I cut to replace the kit’s prop with a “spinning” prop. I put the disc down on a sheet of 600 grit finishing paper and rotated it around a few times by hand, so it has fairly convincing rotating look to it. It’ll also be a lot stronger than the kit prop.

More to come, I’ve done some freehand insignia on the rudder of the SPAD and of course there’s final assembly of the beast!