Tag Archives: Russian Civil War

A SPAD for the Whites, Part One

I should be working on finishing White Russian infantry, but I’ve allowed myself to become distracted by aircraft, specifically the SPAD 13 I wrote about a few days ago, earmarked to support my White Russian forces.

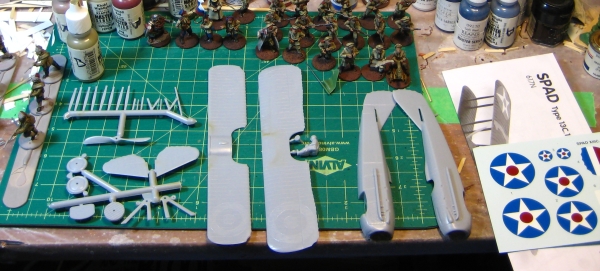
Here’s the SPAD all laid out on my workbench. As I mentioned in the first post, these are incredibly basic kits. The SPAD has 26 parts, at least one third of which are wing struts!

spad1
The Testors Classics SPAD 13 kit laid out. The grid on the cutting mat is quarter inch.

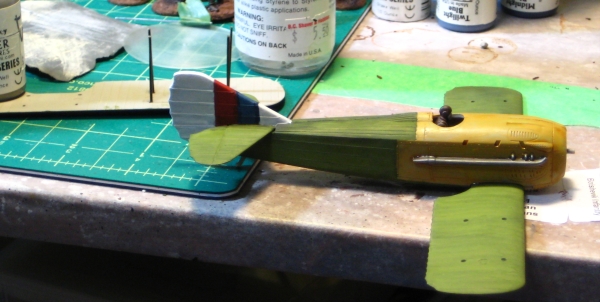
The kit needed minimal cleanup as far as flash, molding gates and such went, so after a quick shot of grey primer it was off to the paint racks. I used multiple coats of well-thinned Reaper Master Series acrylics, and always brushed the same way, from the front of the plane toward the back. This gave the body and especially the wings a nice weathered, mottled appearance without having to do a lot of actual weathering. The wings are Swamp Green; the front of the fuselage is Tanned Leather with a wash of GW Gryphonne Sepia; the undersides of both wings are Polished Bone, with a drop of Khaki Shadow in the base coat. The white is Leather White highlighted with Pure White; the red Clotted Red highlighted with Carnage Red and washed with GW Baal Red; the blue is Old Navy highlighted with Heather Blue.

spad2
The SPAD with basic colours completed.

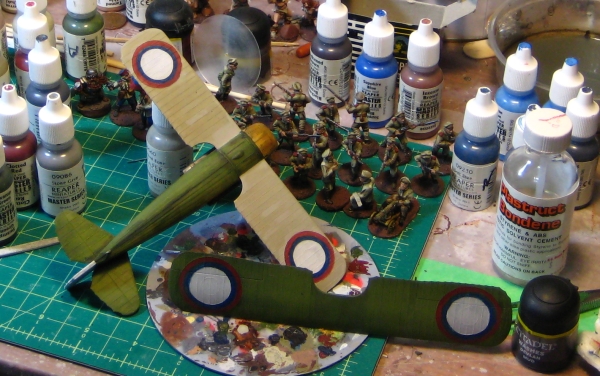
This kit actually has roundels (RAF or French) molded right into the skin of the wings, so doing Russian roundels as used by the Imperial Russian Air Service pre-Revolution and the Whites after was easier than I’d thought it would be. The photo below is the roundels after only the first coat of paint, minimal cleanup and no highlighting.

spad3
The Russian roundels – bottom of the lower wing, top of the upper wing.

In the background of the last photo, you can see the clear plastic disc I cut to replace the kit’s prop with a “spinning” prop. I put the disc down on a sheet of 600 grit finishing paper and rotated it around a few times by hand, so it has fairly convincing rotating look to it. It’ll also be a lot stronger than the kit prop.

More to come, I’ve done some freehand insignia on the rudder of the SPAD and of course there’s final assembly of the beast!

Russian Civil War Aviation

Rummaging around our local hobby store, I found the Testors Classics line of 1/48 scale aircraft. They’re cheap (under $10 Cdn per kit) and basic little kits, just right (I hope) for wargaming purposes. I got the shop to order a SPAD Type 13 and a Nieuport Type 17 for me, and finally picked them up earlier in the week.

The Spad 13 apparently never made it to Russia (it was only just entering French service when the Russian Revolution occurred) but the very similar, earlier Spad 7 was in Imperial Russian Air Service use, so close enough for wargaming purposes.

The Nieuport 17 was in pre-Revolutionary Russian service, so I don’t have to fudge at all to include it in my RCW forces.

I’ve decided the Bolsheviks will get the Nieuport and the Whites the Spad. I’ll rig both with a screw or something similar out of the belly to attach to a flying stand, and probably use large washers and steel wire for the flying stand, with an alligator clip at the top so the planes are positionable and removable.

For painting, the classic colour for a Nieuport is dull silver, that being the basic dope the French used on them. The Russian website Wings Palette has a huge collection of colour plates of aircraft from all over, and their page on Red Russian Nieuports includes some nice examples, as does Modelling the VVS: Nieuport 17. I’ll probably go with silver doped body and wings, a white vertical tail, red stars on the tail and as many other places as I can stand to freehand a red star… (actually, I should head back to the hobby shop and rummage through their bins of spare and orphaned decals in search of some basic red stars!)

The Modelling the VVS article on the Nieuport 24 also has some great Red schemes. Red tail, red fuselage stripes, red nose and about twelve red stars plastered everywhere? Apparently a real RCW scheme!

The White Russian Spad will likely be either tan or dark green, for contrast to the Nieuport, with Russian roundels (simlar to RAF or French roundels, except with thin rings of red and blue around a much larger central white circle). Again the Wings Palette page on the Spad 7 in Imperial Russian service has some inspiration, as does White Falcons: Anti-Bolshevik Air Forces. I’m torn between a bold Russian tricolour on the tail, and the awesome skull-and-crossbones on a few of the Wings Palette examples!

A Russian Spad VII, with death’s head tail. Image via Wings Palette.

The Wings Palette Nieuport 17 in White Guard service also has some interesting paint schemes — the diagonal tricolour tail is striking.

Anyway, before I tackle airplanes I have whole platoons of 28mm infantry to finish, but I thought I’d share some links and research first!

The Russian Civil War at Trumpeter Salute

Sent off my request for a table to run a Russian Civil War game at Trumpeter Salute 2012 over in Vancouver (March 30, April 1 & 2, for those interested!), using the excellent Through The Mud & The Blood rules from TooFatLardies, of course.

I’ve got a pretty good handle on the painting of 50+ White Russians and nearly 70 Reds. The Whites have turned out to be more fun to paint than I thought, as they had some very individualistic units running around, and the habit of wearing items of dress uniform into the field where they could. Pygmy Wars has been a huge help in this regard; if you’re into RCW at all that site is a goldmine of information, and written by a wargamer so it’s far more focused on gamer-friendly information than other sources! I also have a couple of more colourful Red units, so not everything colourful on the table will be White!

As I’ve done in the past, because my mind can work in odd ways, I’ve started a poster (possibly a magazine cover?) for the game. I’m not entirely happy with the current version, although I think the basic idea (a map burnt through, basically) is sound enough. The Devil, as always, is in the details, and those aren’t right yet. Nevertheless:
easposter_draft

Onion Domes, Part One

Finally made it up to the local branch of Micheal’s craft store after work Wednesday to hunt down material for the two domes of the Russian church. I had planned on using 1″ wooden spheres, but the shelves of random wooden shapes were fairly well picked over and they had no wooden spheres of that size at all.

They did have 1″ wide turned wooden shapes advertised as “decorative rod ends”, though, and I realized they’d make much more interesting onion domes than the simple spheres I’d been planning on.

When I got them home I drilled holes in the top and inserted lengths of wire. One useful thing about turned wood shapes, it’s usually fairly easy to find the centre point, as the lathe tools always leave small ring impressions on the wood. The wire got superglued in, then I used a twist of tinfoil to form the core of the uppermost section of the onion shape. Terracotta Milliput is cheap, sure, but tinfoil is even cheaper!

After that I mixed a small batch of terracotta Milliput and worked it around the wire and foil. I used a 1″ circle I’d cut out of styrene as a rough guide to keep the upward concave curve consistent, and smoothed things down with a wet fingertip. I didn’t fuss with the surface finishing much, a bit of wet sanding after the milliput is dry and another thin layer of putty will finish everything off nicely in due course.

So, behold the domes of the Church of St. Boris the Intoxicated, with the putty still setting on them!

ruschurch_domes1
The onion domes take shape. Click for slightly larger, see text for details!

Aside from the domes, the roofs are finished structurally, all shingles and trim in place. I still have to finish the trim around the door and windows, then it’s off to painting.

Small Russian Church WiP

A quick pair of photos of the small Russian church I’m building for Russian Civil War gaming in 28mm. Earlier in January I discussed some planning and thoughts I had for a wargame-scale small church, and while it isn’t going as fast as I had hoped progress is being made!

ruschurchwip
My work-in-progress Russian church, alongside the two earlier Russian huts.

As with the huts, the basic structure is mattboard with coffee stirsticks providing the woodwork.

ruschurchwip2
A slightly more recent work-in-progress shot. Shingle roofs are slow going…

The roofs of the church are going to be shingled rather than thatched, and while doing shingles with built-up strips looks good, it is frankly tedious… The smaller roof is done except for trim, though, and the main roof is about half done, then it’s on to the domes to provide that very Russian look that’s so distinctive.

Russian Huts Finished

It’s been a bit of a slow ten days or so on the wargaming front around here; I wish I could say there was a proper reason, but I just haven’t spent much time at the workbench. One of those weeks.

Regardless, earlier this month I did finish both small Russian huts/farmhouses that I started over Christmas, and the Russian church is coming along nicely.

Here they are together, with a pair of Brigade Games’ 28mm White Russian officers for scale. The walls are mattboard and wood from coffee stirsticks, the roofs are towel with cardboard structure underneath.

rusbldg_jan12
The fronts of a pair of Russian rural buildings – huts, small barns, possibly small farmhouses.

The smaller one on the left is 3″x2″ and roughly 2″tall, the slightly larger one on the right is 4″x2″and about 3″ tall.

rusroof1
Removable thatch roofs from towel.

The hipped roofs are mattboard and light card underneath with towel soaked in diluted white glue as the thatch.

The roofs removed, showing their structure slightly.

Here you can see the roofs removed and flipped over. The structure of the roofs is all just cardboard and I’ve had no warping at all despite the towel for thatch being fairly liberally soaked in diluted white glue after it’s glued down.

Both buildings got a basecoat of black paint mixed with white glue (my standard scenery basecoat), the woodwork was drybrushed with a grey mixed with some tan followed by a second drybrush of paler grey. The thatch got the same black/white glue base then a couple of drybrushings with various brown/tan/grey mixes. The towel soaks up paint and glue as well as you expect towel to, even during drybrushing — expect to go through paint like crazy.

I have vague plans for a couple more buildings for a Russian hamlet, maybe something in whitewashed plaster more suited to the southern portions of the country, and of course the Russian church is nicely underway. More about that tomorrow!

The Next Building Project

I don’t usually like to talk about plans and ideas before there’s at least some progress to show off, but while I was away over the New Year I had time to do some quick sketching and thinking about a building that would be at the centre of any Russian village or hamlet during the Russian Civil War, and which really is iconic when you want to remind players the game is, in fact, set in Russia.

notebook_jan2011
Some pages from my notebook – possible plans for a feature building for my RCW table!

Google Image Search is really indispensable when looking for prototypes and inspiration, although it’s very easy to get a building that’s just too big for the table. The church at top left would have been over 8″ long and 4 wide, far too big for a scenery piece that is basically just a Line of Sight blocker. The design shrank from there (top right page) then grew slightly on the bottom page and I’m fairly confident the finished result will be something like the two-part double-dome design on those pages, with a footprint roughly 5″x3″ and an overall height somewhere around 6″.

I saved this image from the web but forgot to write down where I found it or any details of the actual building, but it’s become my main reference. I also can’t currently find this picture again via GIS…anyway, it’s a perfect-sized building for my purposes and should help me get a lot of details right.

rus_church
Russian Church found via Google Image Search, except I didn’t save any info on where I found the image… sorry.

Second Russian House WiP

Started another Russian farmhouse on Boxing Day evening, this one slightly bigger than the first at 4″x2″.

I mentioned in the previous article that I used coffee stir sticks for the wood siding. The workbench photo below should explain some of how I’ve been doing these buildings.

rushut2
Two WiP photos of Russian huts. See text for details, click for full size.

Basically, I split stir sticks lengthwise, then glue them along mattboard walls I’ve already cut the doors and windows out of. It’s easier to go back afterward and cut the stir sticks out of the openings than it is to premeasure! You can see one long side already trimmed above, and the other three sides waiting for trimming.

Incidentally, for this kind of trimming, I highly recommend an X-Acto #17 chisel blade instead of the classic scalpel blade (the #11 blade). Being able to cut straight down makes clean cuts in the windows easier, and it’s an easy way to trim thin wood and other strip materials.

The second photo of the pair above shows the new house with the walls assembled but no trim addded yet, and the first hut finished, except for the roof which is drying off-camera.

I’ve already assembled the thatch roof for the new building, and didn’t get any WiP photos of that, but I”ll try to get some progress photos of the next thatch roof I make, I promise. It is kind of difficult to smear glue everywhere and handle a camera, though…

Off for a week tomorrow, so see you all next year!

Night Before the Night Before…

… and over at my place, I was hiding out, enjoying the last evening of solitary, productive peace and quiet I”ll have for a while, as the holiday season proper lands on us tomorrow.

In between beer, sending out festive email, and a little bit of painting on some White Russian troops, I cranked out this:

rcw_hut
A very small hut is investigated by a pair of Brigade Games 28mm Russian officers.

It’s tiny, only 2″ x 3″ – but I’ve always liked the philosophy of making your buildings a bit smaller but having more of them. A hamlet of four or six buildings looks more convincing as a hamlet than a pair of buildings taking up the same space on the wargaming table.

Construction is almost all mattboard, with the siding created from thin wooden coffee stir sticks split lengthwise. The roof is towel over a mattboard framework, and removable. There’s a door to glue into place as well.

The roof needs a lot more painting, which it might get on Boxing Day or else in the New Year, but I’m fairly happy with the greyish tone of the walls at this point. I might wind up rebuilding the roof, as I got a bit too enthusiastic with the scissors and haven’t left much in the way of eves over the walls. The simplest fix for that might just be to slap another layer of towel down over the existing one.

This little building was mostly a test of the wood siding idea, and of building the hipped roofs so typical of rural buildings in early 20th C Russia (and elsewhere, of course). They’re fussier, but this one works and so does the woodwork, so the new year should see a nice little Russian hamlet taking shape here.

Hope everyone has an excellent holiday season, however you celebrate it, Merry Christmas, Happy New Year, and such!

RCW: Blundering Into Each Other

rcw_encounter
Early in the game, with most forces still on Blinds. Whites in the top corner, Reds in the foreground. Click through to Flickr for larger version.

We had another round of Mud & Blood powered Russian Civil War action this afternoon, with a White composite platoon under a very dynamic officer meeting a spread-out Red platoon on the outskirts of a South Russian village and defeating them fairly soundly.

Once again Stout Hearts & Iron Troopers was our starting point, this time Scenario Seven, A Baptism At Bleid, which is a German-vs-French encounter battle, with the French unit resting in a farmyard, more French off-table down the road, and the Germans coming on cautiously as everyone advances into Belgium in 1914. The scenario also has the whole table covered in thick mist, so spotting is considerably more difficult.

We swapped in White Russians for Germans and a Red Guard platoon for the French and went at it. Due to lack of painted figures we had about half the troop density the scenario calls for, but it was still a fun game and really showed the power of a high-Status Big Man in M&B. The Whites had the energetic Capt. Rumelski, Status IV, leading their composite platoon, plus Dynamic Leader (bonus Big Man moves) and Heroic Leader (one heroic act per game by a Big Man) cards in the deck. While the Whites had some initial trouble getting their platoon moving, once they got going they never stopped, and comprehensively shattered the Reds before the Red reinforcements could get onto the table to help out.

Reds scout down the road. Photo by Corey

I was commanding the Reds, and really being too aggressive for the quality and quantity of troops I had available. I also launched one unsupported and unwise assault just because we hadn’t yet seen the M&B close combat rules in action yet. Now that we have, I won’t be doing that again… I badly damaged one White section, but utterly destroyed my largest rifle section doing so. Close combat in M&B is indeed decisive and bloody!

White Russian Cossacks. Photo by Corey

There’s still more Russians on my painting table, both Reds & Whites, and I’m looking forward to getting them into the game!