After months of doing absolutely zilch on the gaming front I saw the year out in some style, at least, with a whole bunch of English Civil War 28mm figures pushed through from “almost done” to actually finished in my time off between Christmas and New Years.
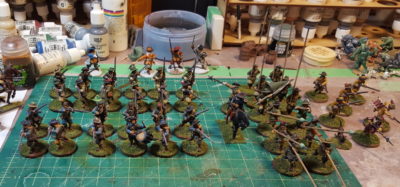
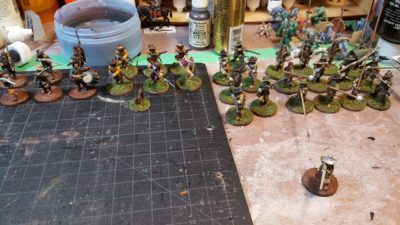
Two units of musket, one of pike, one of firelocks, all DONE! Click for larger, see text for details.
This means that all of the regular soldier figures seen on the workbench back in June are now finished and ready to game with, just the four officer/character figures seen there still to finish off.
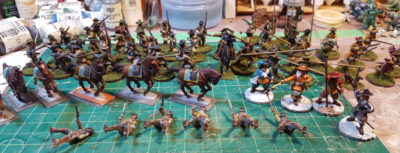
The cavalry on the table now include five figures that I “finished” for the Lead Painter’s League way, way back in early 2011 (!) that have sat around ever since. I had thought these ECW figures had sat around for four or five years, but apparently it’s been more like seven. Yikes. “Finished” is in scare quotes in here because I was never happy with some of the details and finish on the riders, having put most of the effort in the horses. They’re back on the painting table for touchups, as are the other seven cavalry figures from that box of 12, and the first six heavy Cuirassiers for extra cavalry punch.
Cavalry of various flavours in various stages of completion, and the four officer figures. Click for larger.
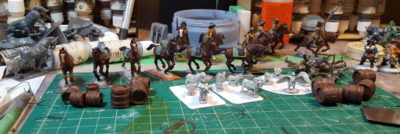
Finally, I pulled out a bunch of farm animals from my Warbases order of early 2017 and cleaned up and based six sheep, two cart horses, and a flock of geese, just for fun and extra flavour in games. They can act as loot markers in Pikeman’s Lament, just as scenery, or (especially the geese, geese are evil!) as unique hazards in Pulp Alley games!
Cavalry, sheep, geese, and some barrels. The unpainted horse on the far left are for the cuirassiers. Click for larger.
Looking forward to a bit more gaming in 2018 than 2017 had to offer, including more Infinity and some games at Trumpeter Salute 2018 in a few months!
I’m fairly sure the last time I touched a paintbrush was back in July. Maybe August. As posts here will show, all wargaming activity of any sort coasted to a stop sometime in the first week or so of September, mostly due to a brain- and free-time-destroying family health crisis and associated astronomical levels of stress.
Most of that is sorted and past now, thankfully, and I did some fun non-wargaming creative stuff before Christmas so I’m finally sitting back down at the painting desk and getting stuff moving again.
I’ve committed to running at least two games at Trumpeter Salute 2018, as I mentioned last post, so I need a bunch of my ongoing English Civil War figures and scenery done by March. To that end, I’ve started cranking through the long-neglected ECW figures, most of the plastic Warlord figures.
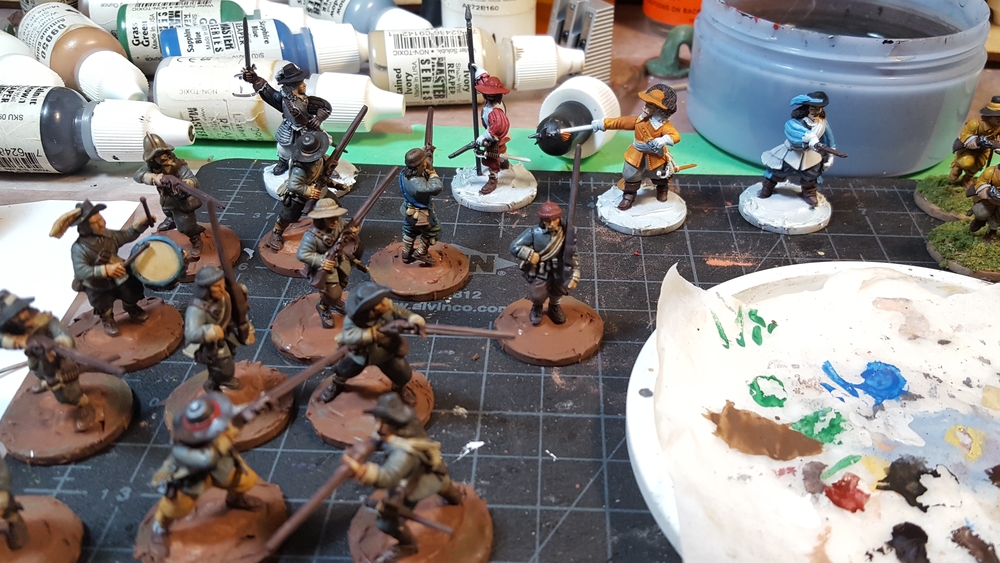
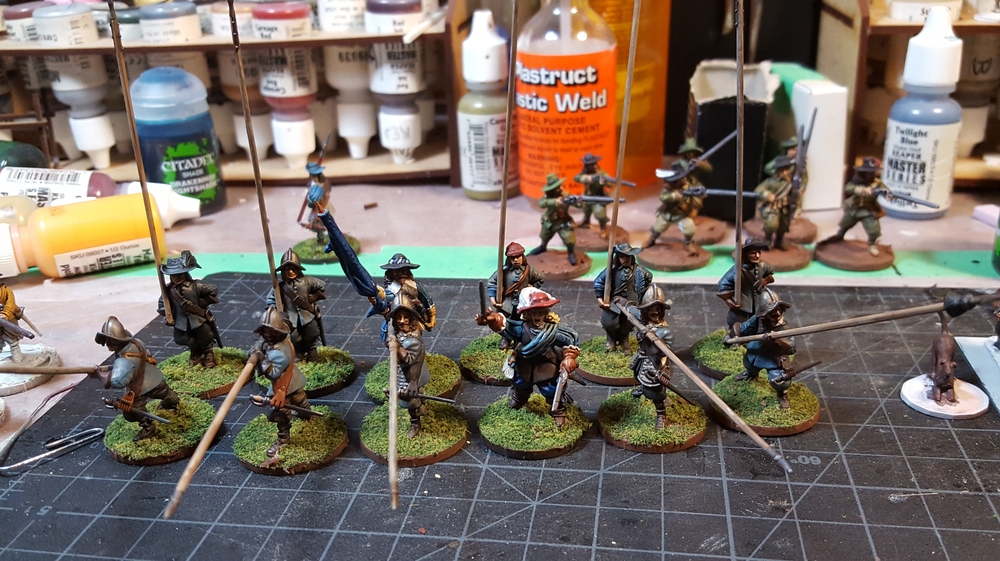
I finished the last details and added flocking to a unit of six firelock musketeers, half a unit of regular musketeers, a full unit of a dozen pike, and a dog.
I’ve since moved on to another dozen mostly-finished musketeers and four more officer/character figures. The officer/character types are a chance to bust out some fun colours, as officers rarely wore uniforms in this period and often dressed like the gaudy wealthy gentlemen they were.
Finished figures – six firelock musketeers in mustard yellow, six regular musketeers in blue, and a full dozen pike in blue. And a dog. Click for larger.Four colourful officers in the background and part of a unit of a dozen muskets in blue in the foreground. Click for larger.
I have this week between Christmas and New Years off, so before the end of 2017 I might actually get a usable 24 point Pikeman’s Lament force finished by forcing myself to deal with a lot of the mostly-painted figures!
The Assault Group (TAG) has a huge range of Thirty Year’s War/English Civil War/general Renaissance figures that I’d heard good things about, including that they were fairly compatible in size and style to the Warlord figures that make up the entirety of my TYW/ECW collection so far.
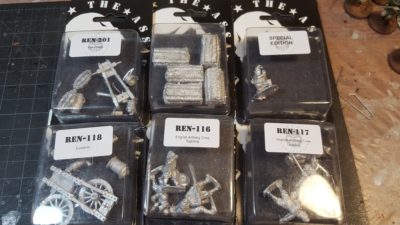
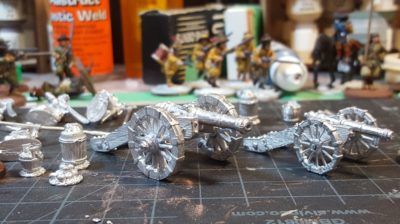
The only major piece missing from my 17th C forces so far are guns, so I ordered TAG’s English Battery Builder pack which has a culverin, eight crew, and accessories. To give me some game options I also picked up a falconette light gun on it’s own. That gives me a light gun, a heavier field gun, enough crew to do a full six man gun crew per the Pikeman’s Lament rules for either of them, and some nice extra bits for base decoration – gunpowder barrels, piles of shot, that sort of thing.
Then I waited.
And waited some more.
Then I got an email apologizing for the wait.
This wasn’t a surprise by this point, because a significant number of posts on the TAG blog are, in fact, posts explaining how backlogged their orders are.
Then I waited a while longer.
My initial order was made on June 22nd. The “we’re backed up” email came through on August 4th. My order was apparently “completed” on August 11th. It showed up in Canada on September 11th.
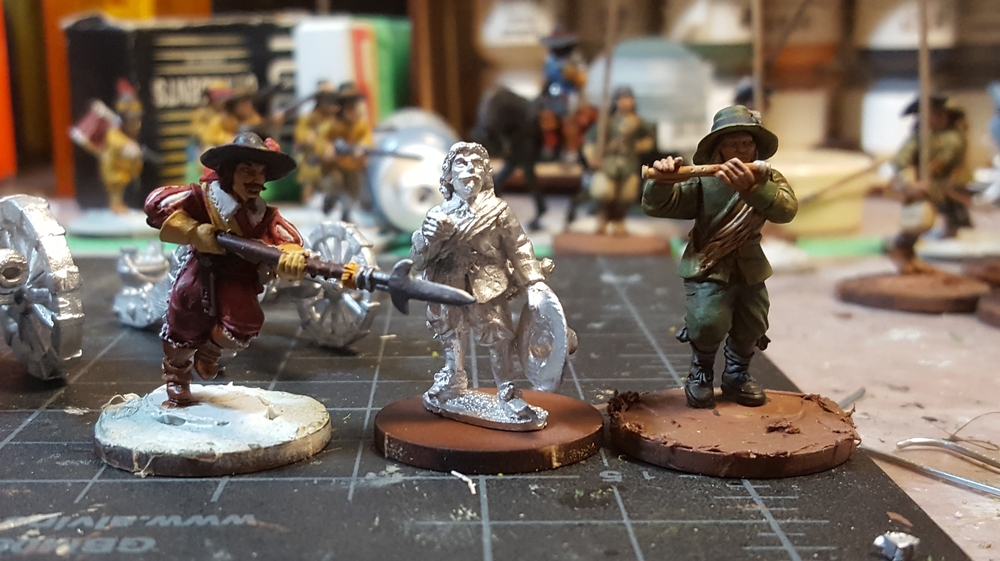
Nearly three months wait for this! The culverin, both crew packs, and the gabions are part of the Battery Deal; the falconette was separate; and the praying cavalryman is, as the sticker says, the ECW/TYW Bonus Figure, apparently. Click for larger.
That’s… goddamn glacial. In nearly two decades of ordering stuff from overseas for wargaming I don’t think I’ve ever had an order take so long from initial order to the toys actually showing up, even back in the late 1990s when I was just starting out and an order to the UK or the States meant snail mail, paper order forms filled out by hand, and an International Money Order.
So, don’t order from TAG if you’re in any sort of hurry for your toys. I have a generous backlog of painting and loads of scenery projects to distract me, thankfully.
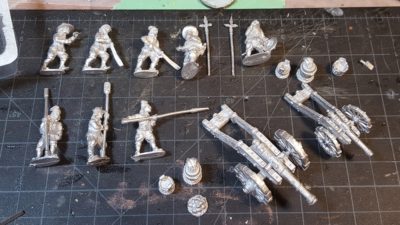
Eight figures, two guns, and accessories. Click for larger.
Now that they’re finally here, what about the figures themselves? I quite like them, the casts are very clean, the sculpting is well proportioned and nicely detailed, and while they’re mostly a little bit smaller than the Warlord figures they’ll look fine in adjacent units on the table!
Warlord’s plastic figures are actually slightly bigger than most of their metal figures; their metal ones are a pretty close match for TAG’s while Warlord plastics are bigger. Odd that Warlord has that difference between the two materials they produce figures in…
Left to right: Warlord Firelock officer (metal), TAG artillery officer (metal), and Warlord musician (plastic). The two metal figures are a pretty good match, the plastic guy is half or one-third of a head taller than either. Click for larger.
The two guns are four parts, two wheels, the stock (carriage?), and the barrel, and fit together easily. Mold lines and flash are minimal, just a few minutes cleanup for the whole lot.
The two crew packs are available separately as English Artillery crew loading and English Artillery crew sighting, each consisting of an officer/sergeant figure and three crew. The loaders have a powder scoop, rammer, and swab; the sighting crew have two with large timber levers to adjust the gun’s wheels and a gunner doing the actual sighting.
Both guns and most of the extra bits they come with. Click for larger.
The culverin is also available separately; it comes with the gun, a powder barrel, a water bucket, and a small pile of cannon balls. The falconette has the gun, a wedge, water bucket, and a bucket of small shot.
I still haven’t quite settled on how I’m going to base the guns and their crew, but I’m looking forward to assembling and painting them up; the whole unit should be pretty quick to paint up, and while I usually base figures before painting them, I might well tack these guys down to craft sticks to get them painted before I make any basing decisions. Basing might involve a custom movement tray of some sort ordered from Warbases that can fit six crew on 25mm bases and the unbased gun, to match the 2mm MDF movement trays I’ve already got.
I’ll probably order from TAG again; they have some different figures that Warlord don’t offer, I like their sculpting style, and variety is always useful, but the insanely long order times are offputting.
First unit of foot for my English Civil War project is done!
28mm pike from Warlord on 25mm wide bases. Click for larger.
Ten pikemen, an officer, and a flag ensign all lined up ready for battle.
I’m plugging away at the shot in blue to go along with these guys… the musketeers have a lot more equipment hanging off them and are a lot slower to paint than pikemen!
There’s also a second unit of pike almost finished, these ones in green uniforms, as well as six firelock musketeers for a forlorn hope or commanded shot unit. The mounted commander from my last post has also had a few more details completed and is inching toward the finish line. Lots of assembly line style painting currently, which makes for really boring photos to share here until a unit is suddenly done…
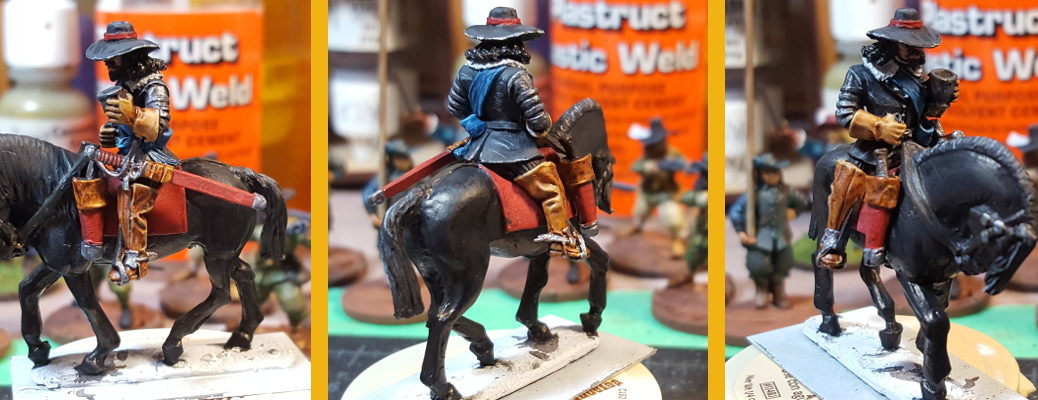
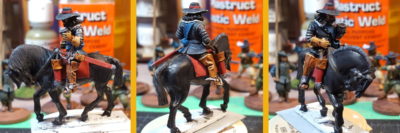
Got a couple of half decent photos of Warlord’s Pike & Shotte Mounted Commander that I’ve got on my painting bench right now, along with a whole bunch of pike & shot soldiers for him to command.
This is one of Warlord’s all-metal figures, and very nice too, a good level of detail and a pose full of attitude as he slouches along, pewter wine cup in one hand and a huge broadsword on his hip. There’s an eyepatch under that wide hat too, although I don’t think you can actually see it in these photos!
An officer of the English Civil Wars; 28mm figure by Warlord Games. Click for larger.
I set myself the painting challenge of doing a black horse, black coat and hat, and black hair on the commander. The clothing is done with a base of Reaper Walnut Brown (a very, very dark almost black brown) with a few drops of Pure Black in it, highlighted with Rainy Grey; the horse is mostly Pure Black with some Walnut Brown highlights and then a coat of artist’s India Ink over the whole horse except the mane and tail.
Loads of highlighting and some detail painting left to do, but I’m happy with the progress so far and thought I’d show him off here!
A semi-random collection of links that have caught my eye recently!
Swamp grass from cheap paintbrushes via Rob Hawkin’s awesome blog. Hmm, I just picked up a 5-pack of Home Depot paintbrushes that look exactly like the one he uses in his tutorial, and I’m planning some stream/swamp sections! Lots of other good stuff on Mr. Hawkin’s blog, it’s well worth rummaging through his archive.
The crowded English Civil War – Royalist & Parliamentary garrisons in a 14 mile by 14 mile area of the West Midlands! I looked a few of these locations up on Google Maps – it’s mostly the suburban/semi-urban sprawl and absorbed villages on the edges of Birmingham these days. One thing that fascinates me about the ECW is just how damn small the UK is. A lot of the historical counties are 50-75 km each way or less, and for the small skirmishing squabbles of the ECW competing garrisons only a few miles apart wouldn’t be uncommon.
Tiny Furniture is a fairly new company with some neat science fiction furniture and detailing bits for your tabletop terrain projects. They’re running a Kickstarter as I write this for some retro-apocalypse (Fallout-style) furniture that looks pretty cool.
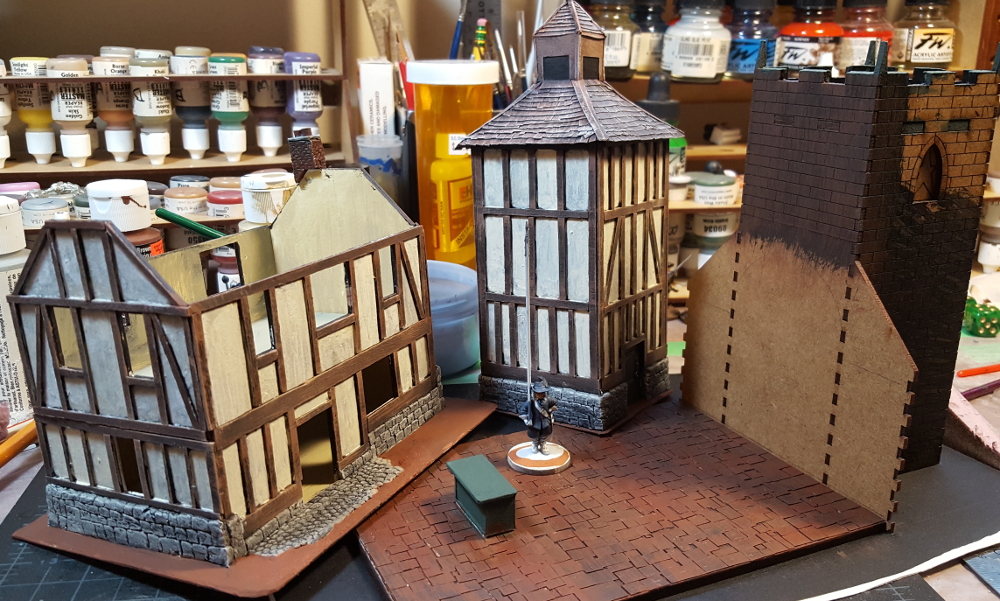
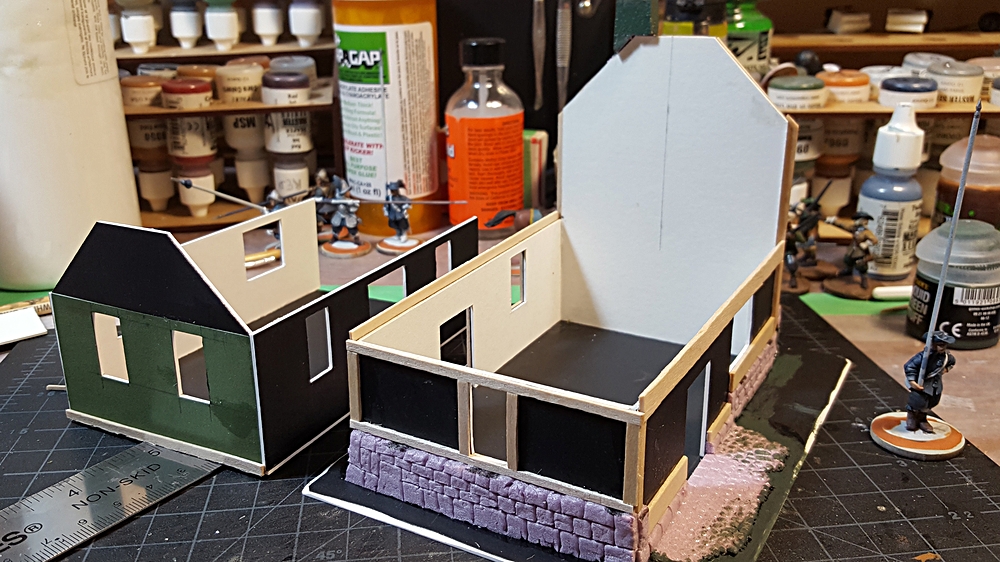
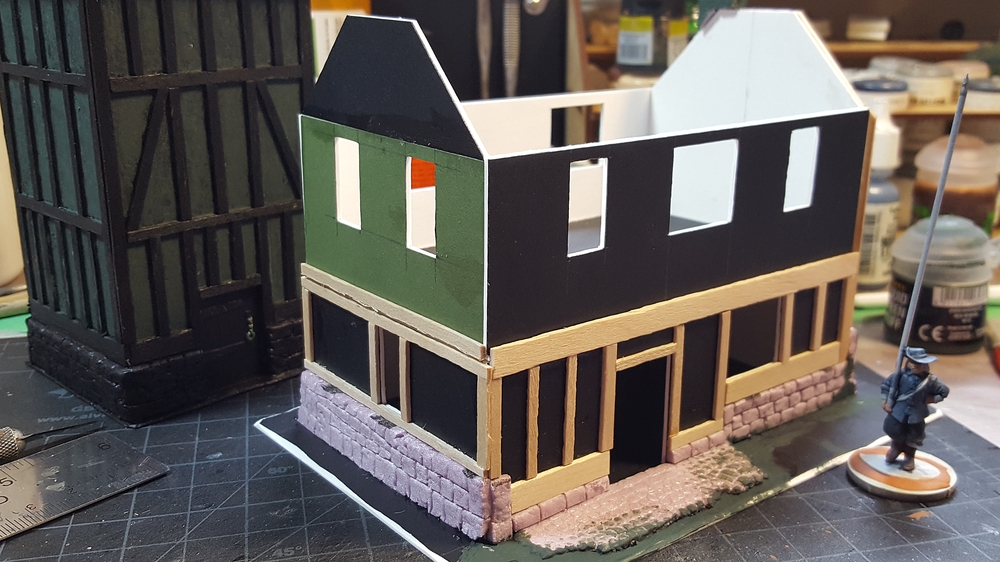
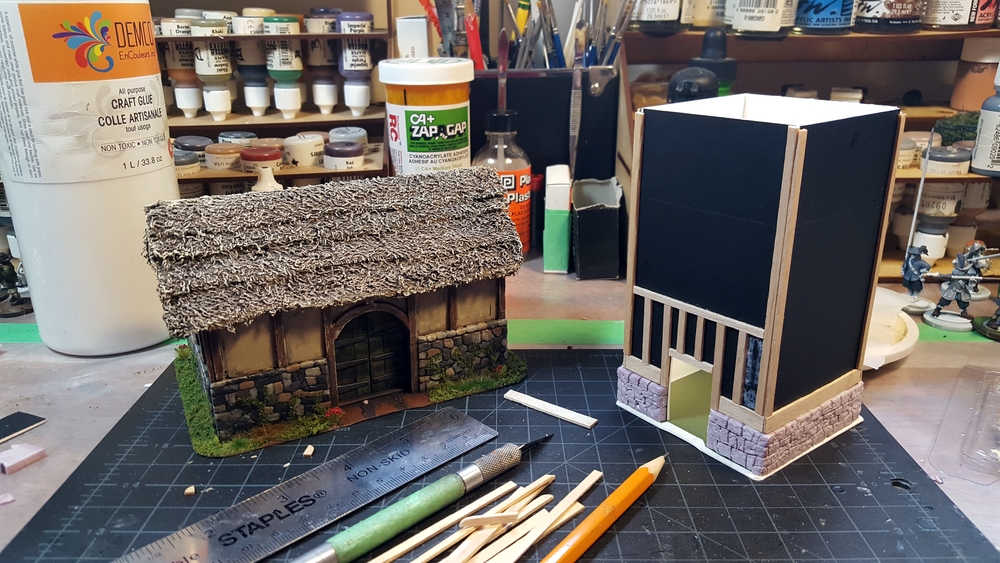
I’ve been painting the dovecote and farmhouse together, so rather than separate updates I’ll just do combined “state of the ECW scenery” update today!
Both buildings have had most of their painting finished, with touchup and work on the bases the main things left to do, along with the roof of the farmhouse.
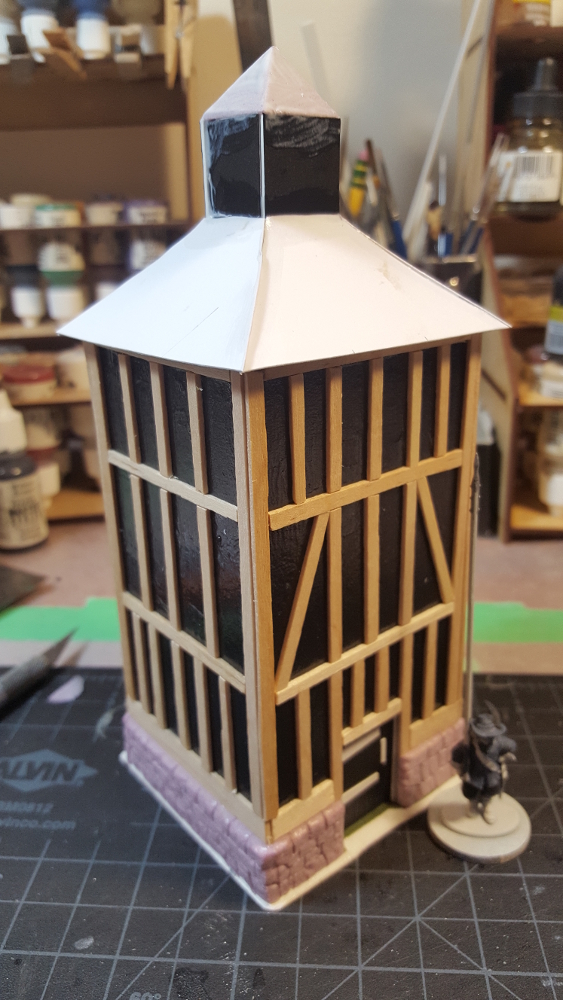
I’ve also glued the tower section of the Warbases church down to the base, which had already had the floor glued down and cardstock flagstones added earlier. I haven’t posted about the church yet, I’ll do a separate post soon about it, but it’s a nice basic MDF kit that I’m planning on dressing up considerably!
Farmhouse on the left, dovecote centre, and Warbases church on the right and in the foreground. Click for larger.
I’m not entirely happy with the roof and cupola/tower of the dovecote, so might go back and add some more details there, and I think it needs at least one more round of paint to really get the slate tiles (from thin card) looking really good. I’m really pleased with how the rest of both buildings have come together, though, espcially now that they’re painted.
Both buildings got a black undercoat across everything, then the woodwork got a heavy drybrush of very dark brown (brown + black paint mixed), then a lighter drybrush of brown, and finally a very light drybrush of tan mostly on the corners and edges of the bigger beams. The plaster areas between the timber got a brown coat, very thinned, then tan paint, also very thinned, then a final coat of white with a bit of the tan paint mixed in, also very thin. The final colour is a great blotchy not-quite-white that varies between panels.
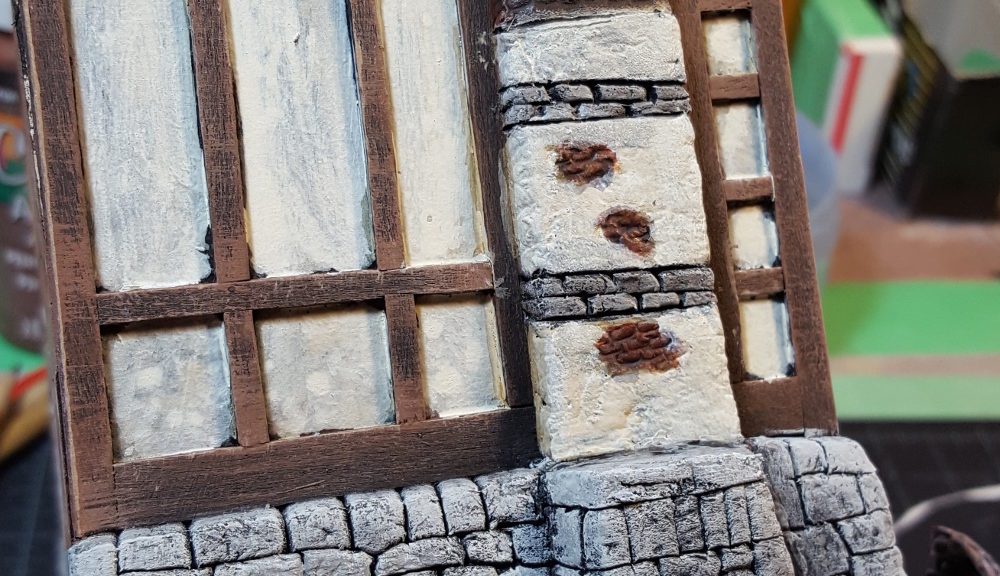
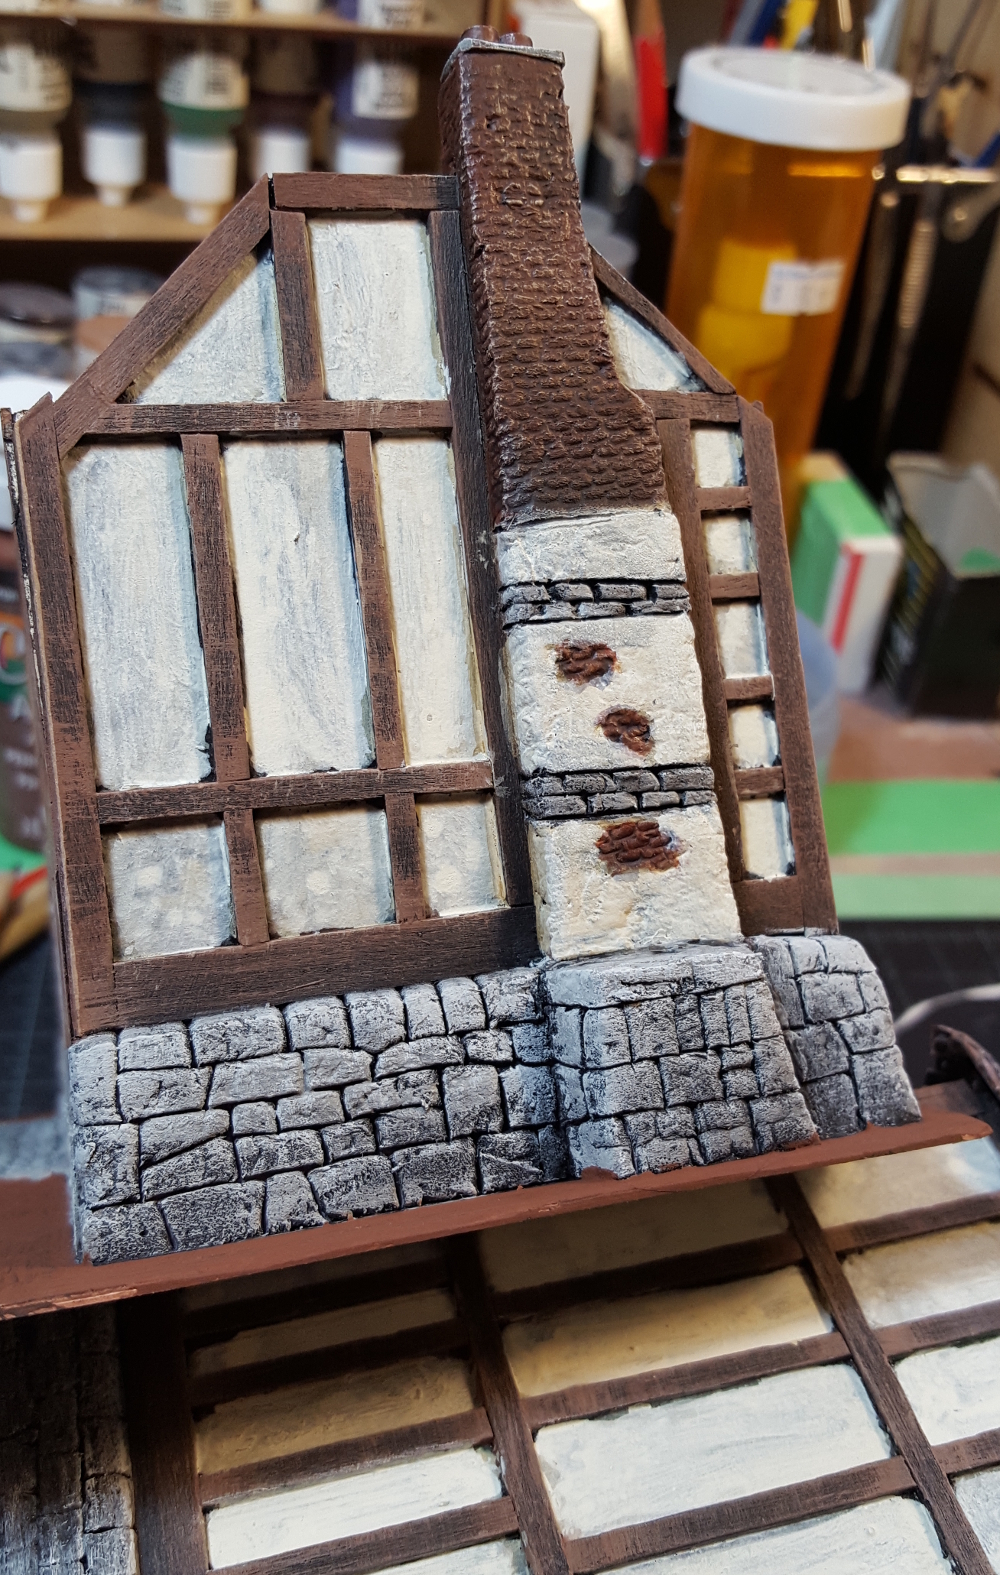
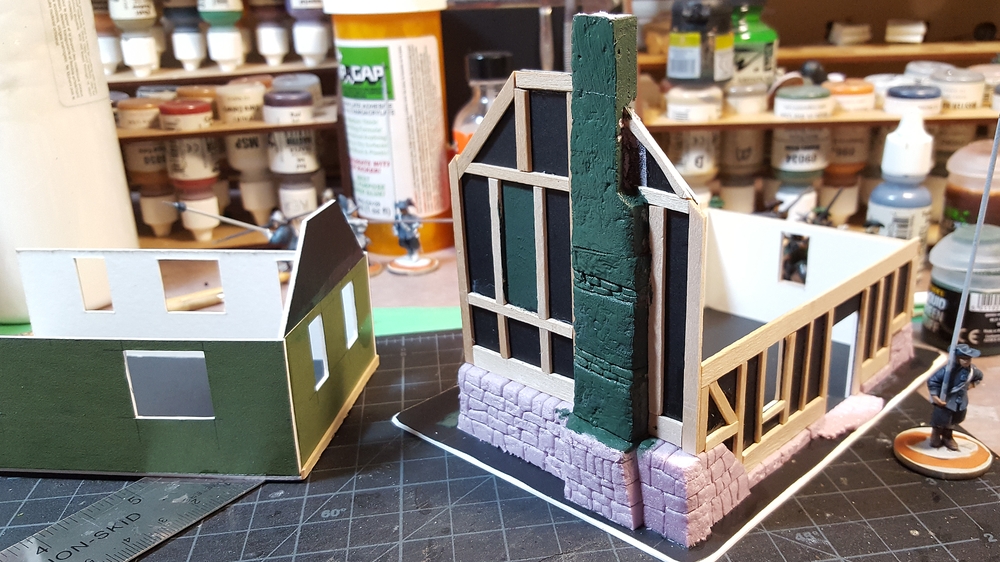
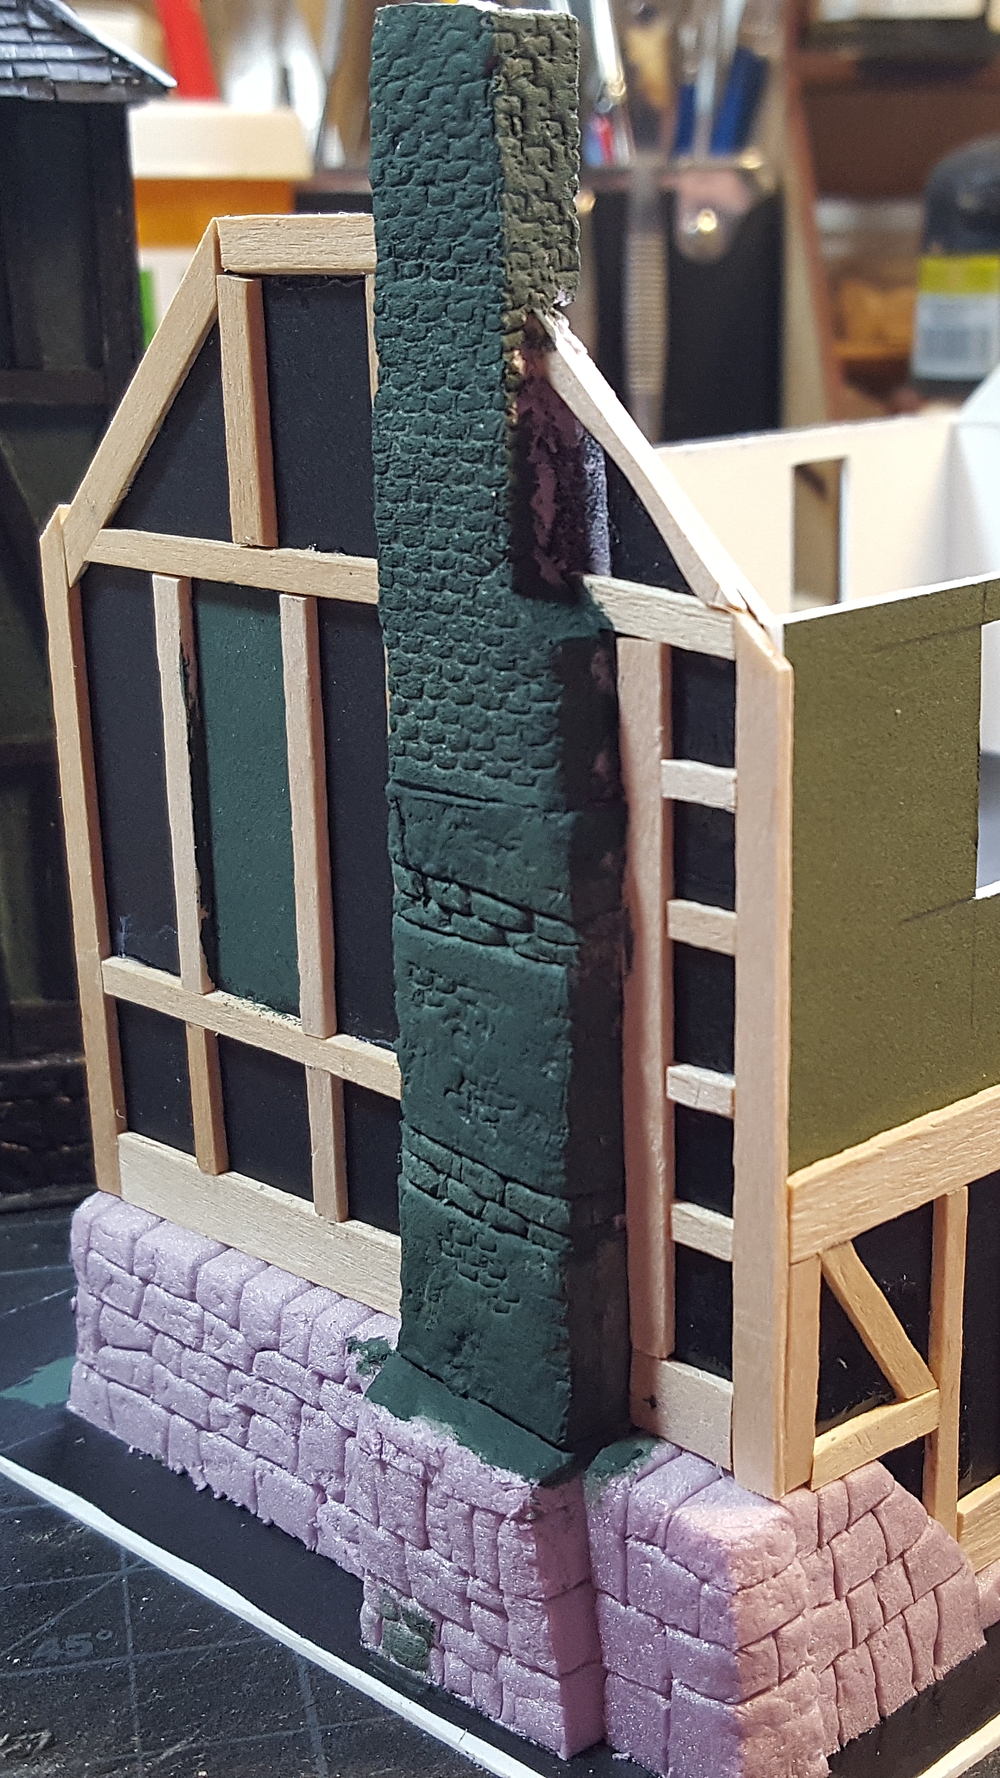
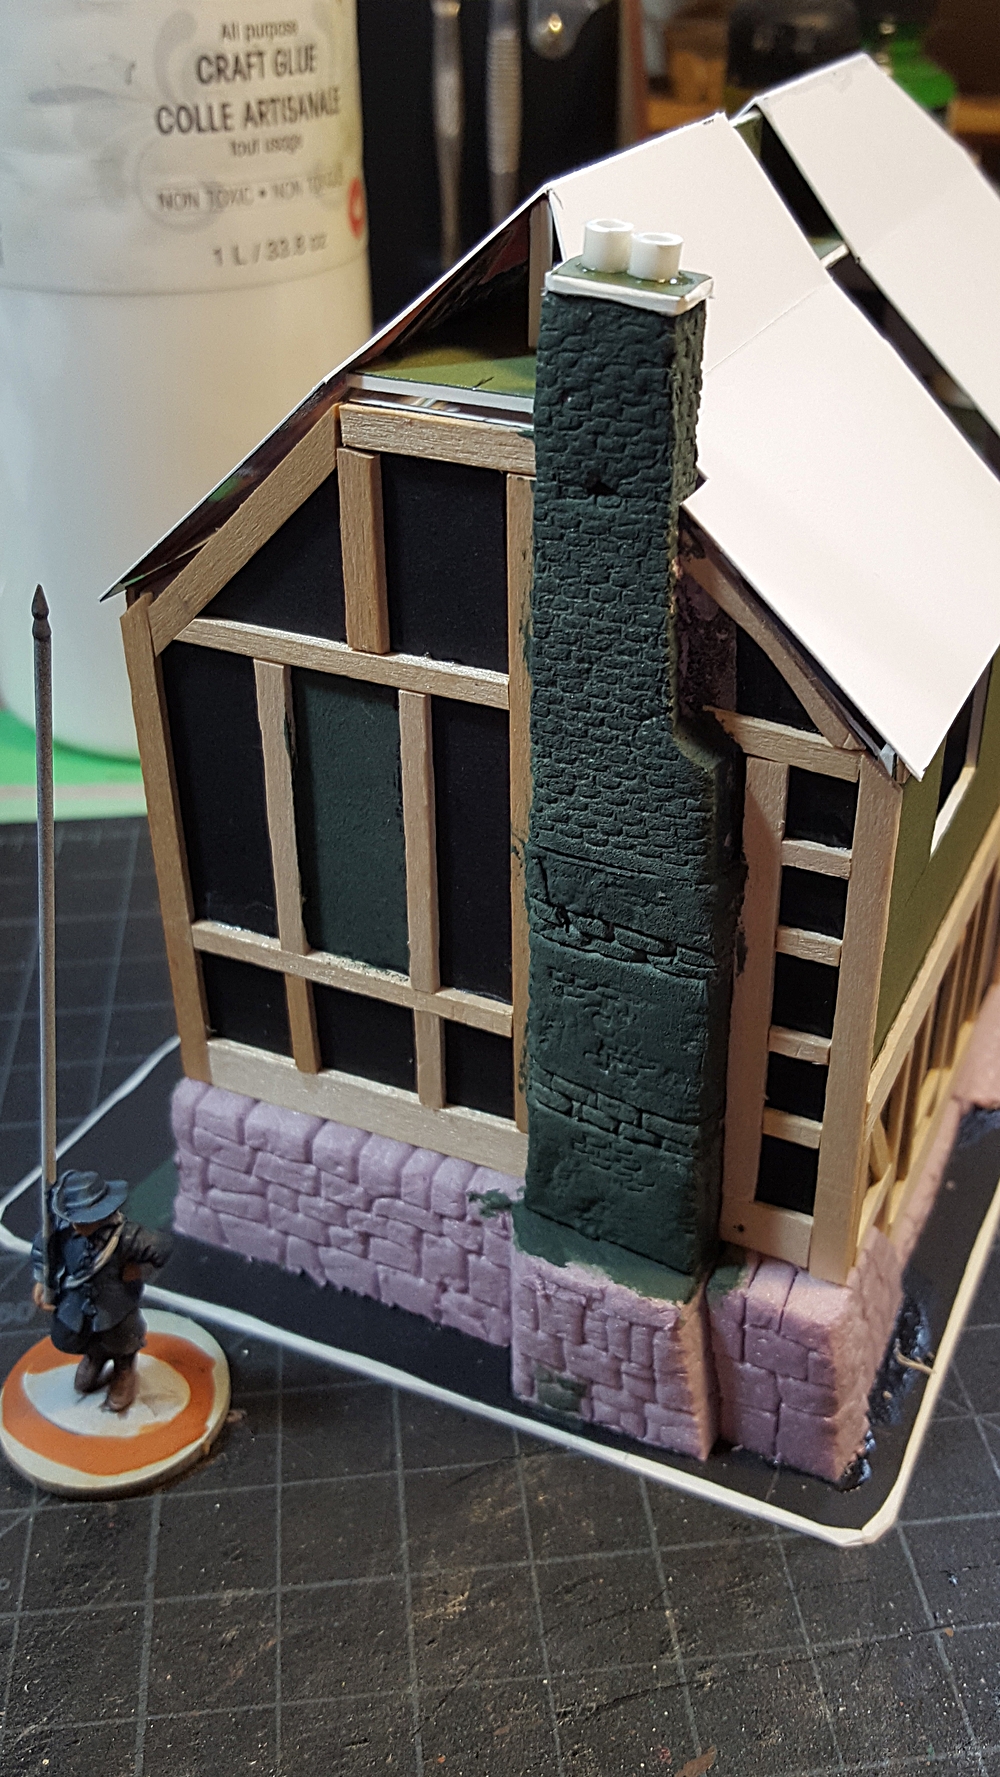
The chimney and end wall of the half-timber farmhouse. Click for larger.
I am really pleased with how the big chimney up the end wall of the farmhouse has turned out. It’s a mix of stone, brick, and plastered areas (some broken with brick showing through) and came out looking great. Paint on the brick is brown base, red oxide, then washes of GW Nuln Oil and Seraphim Sepia, and finally a light drybrush with red oxide and tan. The plaster areas got the same paint mix as the walls.
More soon; I’ll be building a couple of small cottages, hovels, and outbuildings to finish off a bit of a rural hamlet or farm for English Civil War gaming or pulp games set in the English countryside.
After getting the dovecote constructed (although not yet painted) I decided the next building would be a bit more substantial, and that a farmhouse would be the obvious counterpart to the dovecote.
It’s not quite a manor house, except maybe in some rather backwoods shire, but it’s a substantial two storey building with a big chimney rambling up one end. The main structure is all 1/16th matt board, the stonework is pink styrofoam insulation, and the timbering is thin wooden coffee stir sticks, mostly split lengthwise into thinner pieces.
The dimensions, roughly, are 5″ long, 3″ wide, and about 5″ tall to the top of the chimney, which is about where the roof peak will fall too once that’s done. The walls are 40mm high; the total base is about 7″ long and 5″ wide or so.
The earliest construction photo I remembered to take. Walls all up, foam stonework in progress, started the half-timbering on the back wall and one long wall. Second floor off to the left. Click for larger.
The other end, early in construction. Stonework in place and half-timbering just begun on the first floor. Click for larger.
For the cobblestone patches outside each door and the bricks up the chimney, I used two different old paintbrushes that I yanked the worn-out bristles from and then re-shaped the metal ferrule with a pair of needle nose pliers and a small file. The smallest brush became the brick press tool, and a slightly larger round one became the cobblestone tool. There’s also a larger rectangular one that doesn’t appear on this project but will at some point in the near future. I’ll get a photo of the press tools for a future post, they’re a great easy way to do bricks, cobbles, and other semi-regular or regular masonry patterns.
Upper floor in place; it’s basically a three-sided tray held in place by the horizontal half-timbering along the sides. Click for larger.
The second floor is three-sided to make building the big chimney down the back wall easier, rather than splitting the chimney into two or three pieces. The second floor is held in place by the half-timbering horizontal beams along the two long sides of the house, and the beams overlap at the back corners so the join between the floors and walls is nearly invisible when the house is all assembled.
Close up of the end wall, with brick patterning all done on the chimney. The pink foam has been coated in GW Liquid Greenstuff for strength and texture. Click for larger.
Wider view of the chimney end of the farmhouse, with 28mm Warlord pikeman on a 25mm base for scale. Click for larger.
The top cap of the chimney is a scrap of matt board and two little segments of styrene tube, all coated in more GW Liquid Greenstuff for texture.
Timbering all complete and roof structure started. Click for larger.
The roof will be thatch, once I get around to picking up another cheap handtowel to chop up for thatching. The understructure is a mix of 1/16th matt board and lighter card, and will all be buried under towel in due course.
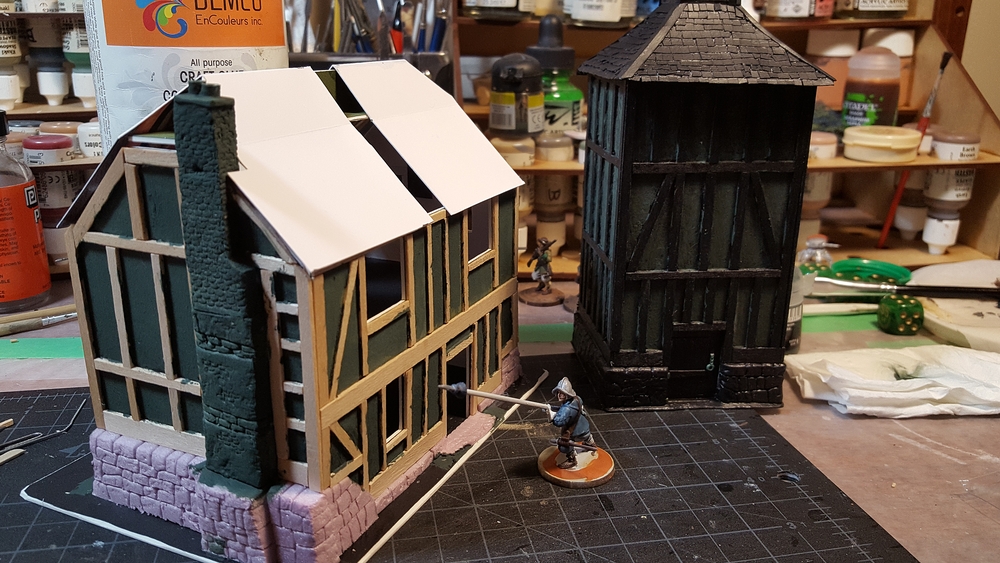
In the background of the last photo you can see the current state of the dovecote, all black primered with yet more GW Liquid Greenstuff to add texture to the wattle & daub panels between the timbering.
I’ll probably paint both buildings together, now that they’re both at the primered stage. More on that soon!
As I mentioned in my last post about the things I brought home from Trumpeter Salute, one of them was a copy of Issue #87 of Wargames, Soldiers, and Strategy, their ECW special. One of the articles in there was by Tony Harwood, also known as Dampfpanzerwagon around the internet, including on the Lead Adventure Forum.
Wanting more buildings suitable for an English Civil War game (and possibly for early 20th C pulp games set in the English countryside!) I decided to build my own version of Tony’s dovecote. It’s a great building for wargaming, having a minimal footprint but nice presence because of it’s height.
My version of Tony’s dovecote has walls 60mm wide and a total footprint, including minimal base, of about 65mm by 65mm. It’s 120mm (12cm) to the tops of the walls. I haven’t actually measured to the top of the roof, but it’s somewhere around 20cm or so total height.
Dovecote started, with the finally-completed barn on the left! Click for larger.
The walls and base are 1/16th” matt board (picture framing card). The stone foundation is thin (about 1/8th” or so) styrofoam insulation, carved with an Xacto blade and pencil. The half-timbering is all wooden coffee stir sticks, most of them split lengthwise to make narrower beams.
The half-timbering took a couple of hours all told, done in bits and pieces in between household chores on a Saturday. Do the big vertical corner beams first, then the horizontals, then the infill verticals or diagonals. The pattern of the half timbering is slightly different on all four walls, which seems pretty typical of this sort of Medieval/Renaissance building!
Roof structure installed, half timbering done. Click for larger.
The central “tower” on the roof is more 1/16th matt board, 20mm a side. The sloping pieces of the main roof are lighter card, cut to fit by trial and error. The tower roof is a scrap of styrofoam insulation, cut with a fresh Xacto blade into a four-side pyramid. All eight roof surfaces will get “slate” tiles from medium weight card, and the top of the tower will get some basic detailing from card as well.
For texture in the panels between the timbers, Tony uses air drying clay in his original dovecote. Lacking air drying clay, I’m trying out stippling a fairly heavy coat of white glue over the card. I’ll slap some paint over it soon and see how it looks; the white glue I’m using currently dries very glossy which makes it hard to see how much texture I’m actually getting.
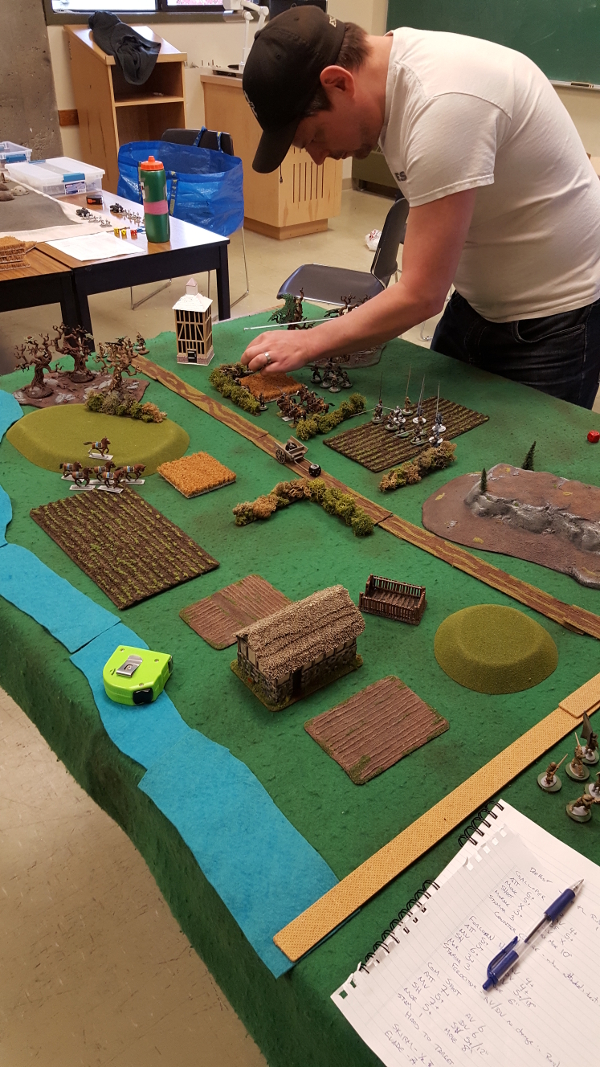
The dovecote at the far end of the table during our first games of Pikeman’s Lament. Good game, look for a proper review here sometime soon! Click for larger.
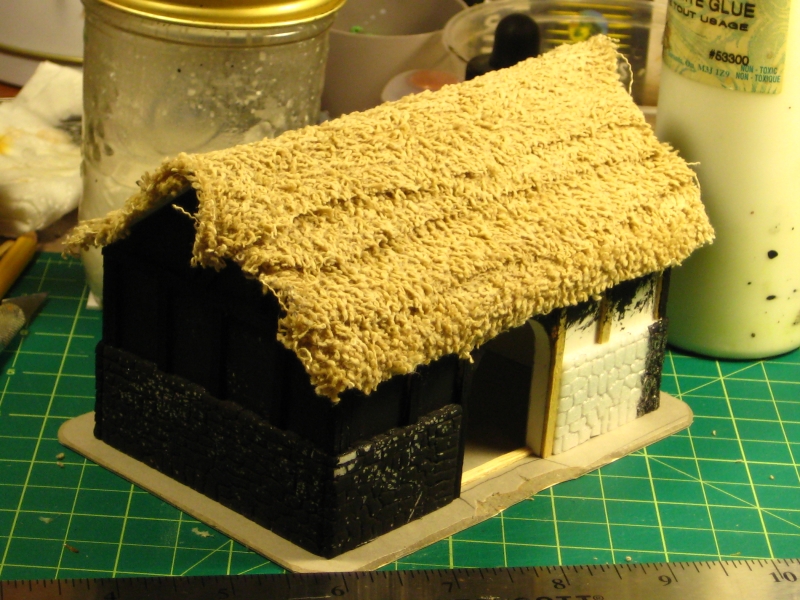
Picked up a cheap towel to use as thatching. Here it is in a quickie late-night photograph, glue still wet on the roof of the half-timber barn.
Towel strips as thatch on the half-timber barn. As usual, click for full size.
The roof has a base of sheet styrene. I used white glue to stick the towel strips down, then more thinned white glue to soak the towel, which (when it eventually dries!) should solidify it nicely.
The barn has also been given a base of mattboard and mostly primed. My usual scenery primer is a 1:1 mix of white glue and black paint, mixed right on the model. It seals and protects the scenery surface nicely, even fairly fragile stuff like styrofoam toughens up a bit!
The main arched doors are also in progress, but I forgot to get a photo of them.
Still to-do for the roof, trim the edges and glue them under the eves for a more finished look, then paint and more paint. I also need to do basswood rafters under the roof, both for looks and for actual structural support, as the roof will still be removable when this building is finished.
The roof still looks a bit too towel-like right now, hopefully finishing the edges and painting will sort that!