Tag Archives: RCW

Armstrong-Whitworth Armoured Car, Part Three

It’s been a bit quiet around here lately, which is entirely due to the fact that I finally bought a new computer and have spent the last week setting it up and transferring seven years of stuff off my old computer. New monitor and other peripherals with the new computer, and I’ve realized how bad some of the photos I’ve published have been, and how burnt-out the old monitor was!

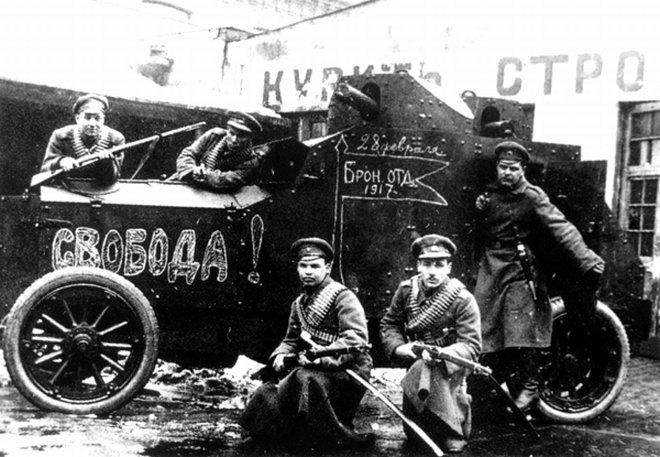
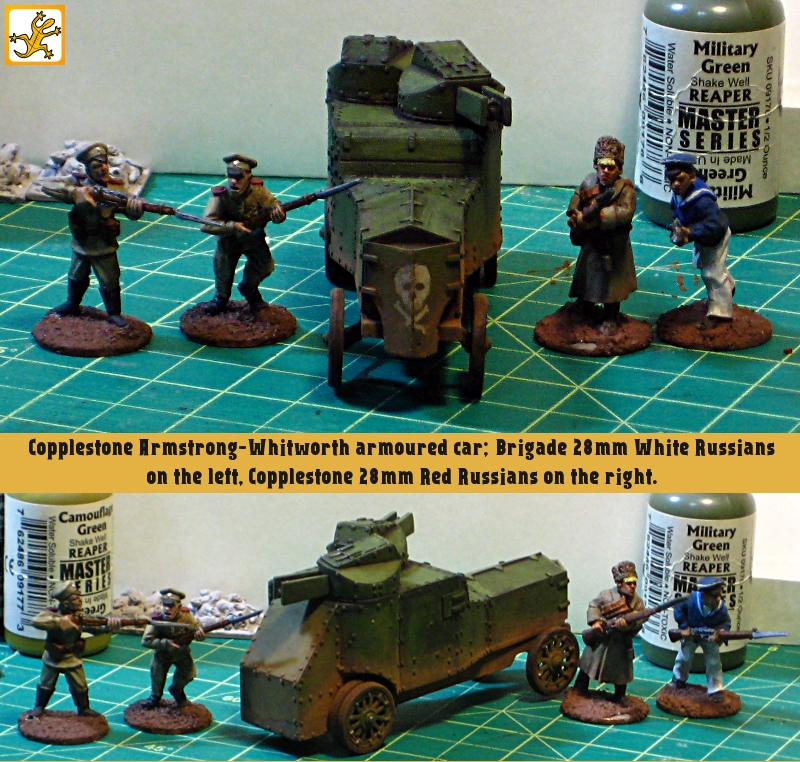
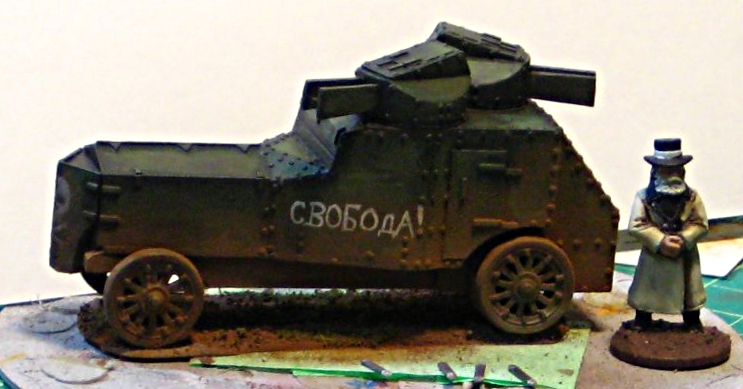
Anyway, I got back to the painting bench finally, and finished the Copplestone 28mm Armstrong-Whitworth Armoured Car for my Russian Civil War forces. It’s deliberately generic, able to show up in anyone’s service, Red, White or other, and with that in mind I asked over on the Lead Adventure Forum for some good generic Russian names for the beast. One of LAF’s resident Russians suggested “Freedom” as a good universal name, and so here we have the armoured car “Freedom”, ready for service!

ac10may

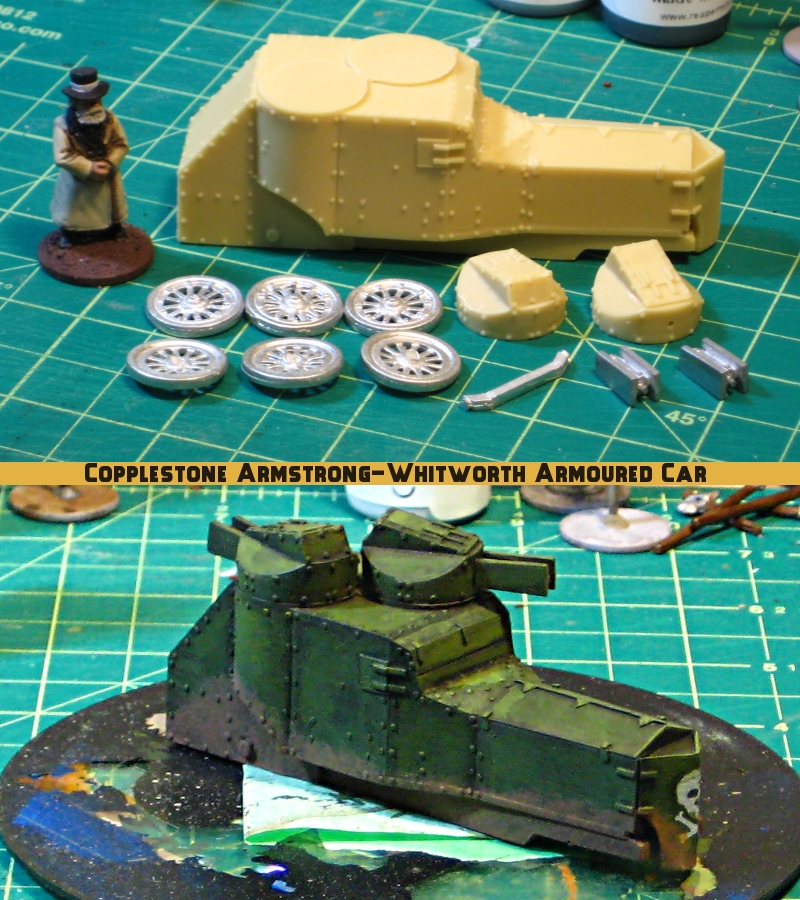
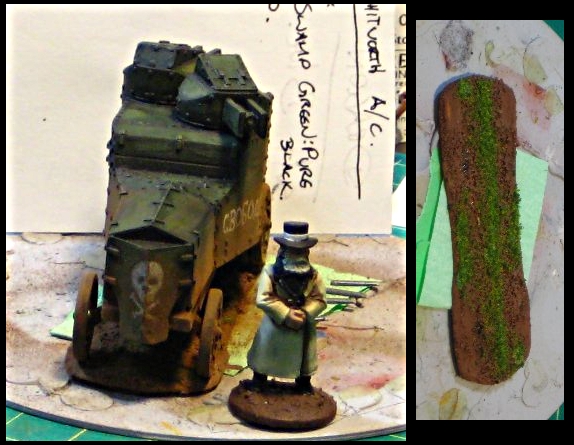
The figure is the same 28mm Brigade Games Russian priest as in other pictures. Here’s the front of the vehicle, with the skull & crossbones on the armour protecting the radiator. Random Russian trivia: apparently the skull & crossbones is known as “Adam’s head” in Russian. The smaller photo to the right is the base of the armoured car before I glued the car to it. The base is 1mm plastic car with some Milliput ruts and ridges, a bit of sand, paint, then some basic flock. It’s cut just big enough to encompass the wheels, designed as a brace for the wheels rather than the sort of base you’d handle the vehicle by. I’m always a fan of minimalist bases, and these thin little “shadow” bases are perfect.

ac10may2

These photos were taken after dark on my painting bench, so they’re not the greatest, but I’ll try and get some photos in daylight this weekend, after the last few touches are finished on this vehicle and it’s had a coat of Dullcoat to protect the pastel dust weathering.

Armstrong-Whitworth Armoured Car, Part Two

The first armoured car for my Russian Civil War forces now has wheels attached, and I did the first round of weathering with pastel chalk dust. Before I talk about my model, though, check this photograph out:

rcw_ac_real
A 1917 photograph showing soldiers of the interim Russian government (after the February revolution but before the Bolshevik Revolution of October/November) posing with an awfully familiar looking armoured car. The word chalked on the side of the hood is “Freedom”.

That photo also nicely answers the question about the scale of the Copplestone vehicles — they’re pretty much right on scale!

Weathering with Pastel Chalk

You can buy pre-made “weathering powders”, but I’m not sure why you would when a couple sticks of cheap pastel chalk will set you up for life. I bought a black stick and two shades of brown (burnt umber, technically) for a few dollars from one of our local art supply stores. Run an Xacto knife edge along the pastel stick to create powder, then use a beat-up dry paintbrush (trust me, don’t use good brushes for this) to dust it onto your model. You could also use a bit of pastel dust on your fingertip for more definite smudges.

Apply the pastel powder much more heavily than you think is reasonable, because to fix it in place you spray it lightly with Dullcote or other matte sealer spray, and that always dissolves some of the powder. I might do a second round of powder weathering on this vehicle, depending on how much the Dullcote takes off.

Here’s the current state of the car, with figures for scale. On the left, two of Brigade Games’ Storm in the East line of Russians, painted up as White Russians. To the rigt of the car, two of Copplestone’s Back of Beyond Bolsheviks, one rifleman and one sailor. The car has not yet been sprayed with Dullcote, so this is unfixed pastel chalk dust on display.

ac_26apr
My 1:56 Armstrong-Whitworth armoured car, alongside figures for scale. Click for full size, as usual.

Speaking of things on display, this is the first photo I’ve managed to get of the Bolshie sailors I painted last month. Must get proper photos of them soon!

Still to do on the Armstrong-Whitworth: the minimal base, just big enough to go under the wheels, then Dullcote and possibly more weathering. Oh, and a name for the thing, which is going to mean doing freehand painting of Cyrillic, which should be fun. The thread I started over on the Lead Adventure forum for this vehicle build has become a great source for possible vehicle names — having a Russian local active there helps with local sources (he supplied the great historical photo at the start of this post) and translations.

I’m away for the weekend, but should have the armoured car done early next week.

Armstrong-Whitworth Armoured Car, Part One

My recent order to Copplestone Castings included the first armoured vehicle for my Russian Civil War forces, a very nice resin and metal 1/56th scale model of an Armstrong-Whitworth Armoured Car. It’s a pretty typical design for a WW1/RCW Russian armoured car, with a pair of machine guns each in their own turret on a six-wheeled armoured body.

The resin and metal are all very cleanly cast, with practically no flash, no casting errors, and minimal seam lines on the metal parts. You get the resin body, two resin turrets, two metal machine gun barrels, a metal front axle, and six metal spoked wheels. The body is roughly 3.5″ long

After cleanup I drilled and pinned the gun barrels to the turrets, but haven’t bothered pinning the turrets to the body — I think there’s more than enough contact area, despite superglue’s notoriously poor shear strength.

Here’s the beast in bare metal, with a Brigade Games 28mm White Russian priest for scale, and below, as it currently sits on my workbench.

ac_25apr
Copplestone’s 1/56th Armstrong-Whitworth armoured car. The lines on the cutting mat are half-inch.

The paintjob so far (all paints Reaper Master Series acrylics) is a basecoat of 2:1 Swamp Green:Pure Black, then a GW Devlan Mud wash. The green is gradually highlighted up with straight Swamp Green, a 1:1 mix of Swamp Green:Military Green, then straight Military Green.

The skull on the armoured radiator cover is freehand from Leather White, with a bit of a highlight of Pure White.

The undercarriage got a basecoat of Blackened Steel, then a mix of browns (Earth Brown, Muddy Brown and a couple of others) to muddy it up. I used a cheap, stiff brush to stipple the browns up the body for the muddy effect.

The paint job so far on the Armstrong-Whitworth has to trace it’s inspiration to Sidney Roundwood’s spectacular article on painting British tanks for the Western Front. The plan from here is to get the wheels on and the base installed (a minimal “shadow” base from styrene card and Milliput) then break out the pastel chalk for another round of dust and dirt.

A Red Nieuport, Part Three

Got the star insignia finished up on the Bolshevik Nieuport 17. Some of the stars are a bit wonky, but frankly that’s historically accurate — a lot of actual insignia during the Russian Civil War had a definite hand-painted look to it!

I gave up on the red-and-white striped vertical tail as a bad job, and went with solid red to go along with the red cowling at the nose.

red17_23
Painting all done on the Nieuport, Now to swear the upper wing into position!

Now to get the upper wing into position, always a job likely to provoke swearing. At least the Nieuport only has six struts, instead of the even dozen on the SPAD! After that there’s just the landing gear and prop disc to do.

A Red Nieuport, Part Two

Got started on the insignia for the Bolshevik Nieuport. This is going to involve at least six freehand red stars; to skip one pair I’ve decided to go with a red-and-white striped tail, although freehand stripes might make freehand stars look easy…

Anyway, here’s the current state of the beast. Like the SPAD, this Nieuport has roundels moulded right into the wing surfaces, so I’ve used those to put the stars in white circles. This appears to have been fairly common on Bolshevik aircraft, for the simple reason that the Imperial Russian Air Service roundel had to be blanked out somehow!

red21apr
The Bolshie Nieuport upside down, showing four of the six Red stars on it. The upper wing has insignia on both the upper and lower surfaces of the wing, which was fairly common for Nieuports.

The insignia and tail stripes will get at least one more coat of paint, and they need some cleanup, then highlighting. Colours, for anyone following along at home, are Reaper Master Series Clotted Red and Reaper MS Leather White; highlights will be with Reaper MS Pure White and Carnage Red. I might yet abandon the striped tail in favour of a red tail, possibly with white star. It depends on how frustrated freehand pinstriping gets me…

A Red Nieuport, Part One

Having built the White Russians a SPAD (Parts One, Two, Three), it’s time to build the Nieuport 17 for my Bolshevik forces!

As I mentioned in my original RCW Aviation article, the basic scheme for the Nieuport in Red service will be silver/grey dope with as many red stars as I can stand to freehand onto the thing. At a minimum, I”m committed to six: two on the vertical tail, two on the upper surface of the top wing, two on the lower surface of the bottom wing. Nieuports, because of their very small bottom wing, often had insignia on the lower surface of the upper too. We shall see.

Thankfully the Reds freehanded their star insignia too, so lumpy, misshapen and odd stars abound!

Here’s all the kit parts laid out on my cutting mat. Only about two dozen parts all told, and a much simpler strut setup than the SPAD which will hopefully be easier to assemble than the SPAD’s upper wing… (the fuselage is in two halves, I just had them popped together to check the fit when I took this photo.)

red17_19Apr
The Testors Classic Nieuport 17 kit all laid out.

Here’s the current state of the Nieuport. Basic assembly of fuselage and lower wing done, and basecoat of silver, red (on the nose) and white (on the tail) done.

red17_20Apr
The Bolshevik Nieuport 17, base colours done, ready for insigia then weathering.

On to freehand stars!

White Cossacks vs Red Machineguns

Introduced another local gamer to our Mud & Blood-powered Russian Civil War gaming on Sunday afternoon, it was a good little game although my attacking Whites kind of stampeded his defending Bolsheviks, despite the heavy machinegun they had to assist.

The scenario was another lift out of the great M&B scenario book, Stout Hearts & Iron Troopers, this time the very first scenario, “Attack on a Strongpoint”, which has two infantry sections with an HMG defending against an attacking platoon.

My attacking Whites were able to stay mostly in cover until they were very close to the edge of the hamlet, screening themselves from that lethal machinegun for the most part. There were a few tense moments when the MG caught one White section and another was thrown back after attempting to close assault one of the Red sections, but then the gun jammed, I was able to get another section in to launch a brutal close assault on the same Red section, and on the other flank my single flanking section poured some terrifyingly accurate rifle fire into the other Red section, and it was all over.

Here’s the table fairly early in the game, with my Whites in the foreground advancing and Reds visible on the edge of the hamlet.

Advance to Attack!

The one White Blind (the Russian tricolour marker on the far side of the table) is a rifle section I was able to keep on Blinds right until I got them to the hedgeline behind the church, where they unmasked and proceed to slam the Red machinegun in a hail of fire. Units coming off Blinds get bonus dice to fire, which proved devastating.

We’ll hopefully get a chance to do a larger RCW game in the next few weeks, but today’s smaller game was interesting and Nathan was interested in another go at the system sometime in the future. I’ve got another fifteen or so Bolsheviks to get off the painting table sometime soon, which will finally give me enough Red figures that they don’t have to be on the defensive all the time!

Oh, and I also have an inbound order from Copplestone with some shiny new stuff. It won’t be just infantry in our RCW games shortly, let’s just say!

A Russian Plank-Roofed Hut

Inspired by Tony’s plank-roof hut tutorial that I linked to in my recent links of interest post, I sat down with stir sticks and my Xacto knives to do up my own version of his hut.

plankroof1
A Russian-style plank-roof hut, after Tony’s tutorial.

My version is 3 inches across the front, 2 inches deep and about 2.5 inches tall to the top of the chimney.

I’ve also been amusing myself recently with fake fur and fabric dye, searching for good loking long grass. I’ll have to write up my discoveries sometime soon, it’s been… interesting.

The new hut will have it’s final paintjob this weekend, more photos of that when it happens.

Transporting the SPAD

Almost all of my gaming is done away from home, at other houses, up at the university on the weekend (our local miniatures group takes over a classroom up there every Sunday) and at conventions. So everything has to be portable or it’s useless to me. Given the relative fragility of the White Russian SPAD, especially that damned upper wing, I needed a solid way to protect it in transit.

Some scrap cardboard, a dip into my stockpile of cheap upholstery foam (normally used for lining figure cases) and some work with razor knife and hot glue gun, and I had the SPAD Caddy:

spad_caddy
A SPAD Caddy, for secure transport of my White Russian SPAD to games. Click for slightly larger version.

The base is a square of scrap cardboard, then two layers of half-inch foam with a cutout to accommodate the body and wings of the plane, and a deeper square cutout (through both layers of foam) at the front for the wheels and propeller. More scrap foam protects the tail and wingtips, and the two bits of foam forward of the tail hold the whole thing securely. The extra strip of cardboard across the front helps protect the propeller and landing gear as well as provide a convenient spot for a label.

I used the SPAD Caddy to get the SPAD and the rest of my Russian scenery and figures to Trumpeter Salute at the end of March, and it worked exactly as planned. There’s even room in my Russian Civil War scenery box (just!) for a similar caddy for the Nieuport I plan on doing for the Reds.

Even Whites Bleed Red, A RCW Encounter

The Trumpeter Salute convention last weekend saw the first full outing of my Russian Civil War forces, in a scenario I called Even Whites Bleed Red. I’m a pulp gamer at heart, so a punchy, interesting scenario title appeals, what can I say?

The scenario is set “somewhere south of Moscow, sometime early in the Russian Civil War” and has a disorganized scratch platoon of Red Guard defending a hamlet from a composite company of White forces, composed of a shorthanded platoon of White riflemen and a plaston (infantry platoon) of Cossacks, lead by an energetic and capable group of Cossack officers.

I threw in my White Russian SPAD, for additional “Ooo shiny” factor and because I had the thing painted, and off we went, with two players on each side and me GMing.

Trumpeter Salute 2012: Even Whites Bleed Red I

The SPAD appeared very early in the game, although never had much impact, neither strafing run doing much. Above, the plane machine-guns the Reds in the churchyard,

Trumpeter Salute 2012: Even Whites Bleed Red II

This game, the Reds got themselves shaken out and in position fairly quickly. They were able to get most of the Whites pinned down well outside the hamlet, and the Whites never got into position to launch more than a token assault on the place.

Trumpeter Salute 2012:  Even Whites Bleed Red III

Above, the White rifle platoon advances, one section in the foreground on the crest of the ridge, the other two behind it. In the far background, one of the Cossack sections can be seen advancing. The Cossacks had far less cover than the rifles, and the White players might have been better off funnelling their entire advance up the near edge of the board, sacrificing one section to hold the flank while the rest of the composite company pressed in toward the hamlet.

Trumpeter Salute 2012:  Even Whites Bleed Red IV

Above was the high point of the White advance, with one rifle section thrown back after attempting to storm across the railway embankment and attack the Reds along the stone wall. The Red reinforcements, one section of Red sailors and another section of Red Guard, also appeared just after this assault was thrown back, and the White players conceded the game at this point.

I’ve got some thoughts on why this game went so differently for the Whites when compared to our squirrel-obsessed playtest version, but I’ll save those for a longer followup post. Suffice to say that all four players enjoyed themselves, I enjoyed running the game, and we actually got done surprisingly quickly. Start to finish, including introducing the game to four players who’d never played it before, we were done in under three hours. Near-perfect convention game length, in other words. We could even have gone a bit longer and still had plenty of time for cleanup.

As it was, I had time to run a little demo session with a “stacked” deck to give two interested bystanders a chance to see how the Mud & Blood system worked, and get everything put away in good order!