As a diversion from painting Russians, I’ve painted up the first part of my recent Renedra plastics order from J&M Miniatures. I ordered two sprues of the mixed tents, and as I mentioned in my review, was very pleased with them. They’re solidly and cleanly cast and well proportioned, and they’ll suit a huge range of genres and eras.
Here’s the first sprue of tents painted up. The colours are a variety of khaki shades from the Reaper Master Series line, plus GW Gryhonne Sepia ink.
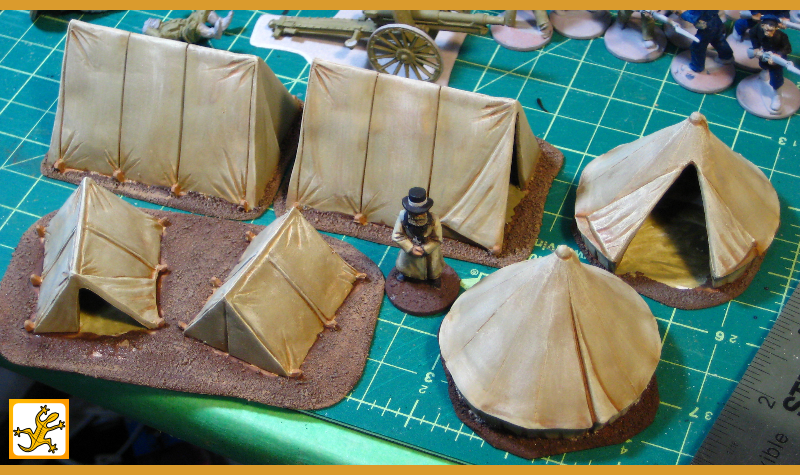
One sprue’s worth of Renedra tents all painted up. Once again Father Vodkanov of the White Russians provides scale. Click for larger.
I’ve got another sprue of tents still untouched (same six again), as well as the barrel and graveyard sprues still to do something with. They’re going to wait until after our local gaming convention the first weekend of February, though.
A few weeks ago, I took advantage of J & M Miniatures’ offer of free shipping for all of December to order a few bits and pieces of Renedra’s injection-molded plastic bits and pieces.
Before I move on to my quick review of the Renedra stuff, I just have to give a quick shout-out to James of J & M. I was already following his great wargaming blog Rabbits In My Basement, so when he announced he and a friend were launching a web/mail-order wargaming business I checked the site out. He’s got all sorts of good stuff from Perry, Renedra, 4Ground, Plastic Soldier Company and other companies, and is (as far as I can tell) the sole Canadian seller of some of these ranges. Given that domestic shipping is cheaper and skips the expense and irritation of occasionally being dinged by the nice folks at Canada Customs, as well as the great customer service I’ve gotten so far from James, I think it’s safe to say that a reasonable portion of my hobby budget will be heading toward Ontario in the future!
Moving on to the Renedra bits, I ordered two packs of their Mixed Tents, two packs of Barrels, and one pack of Gravestones.
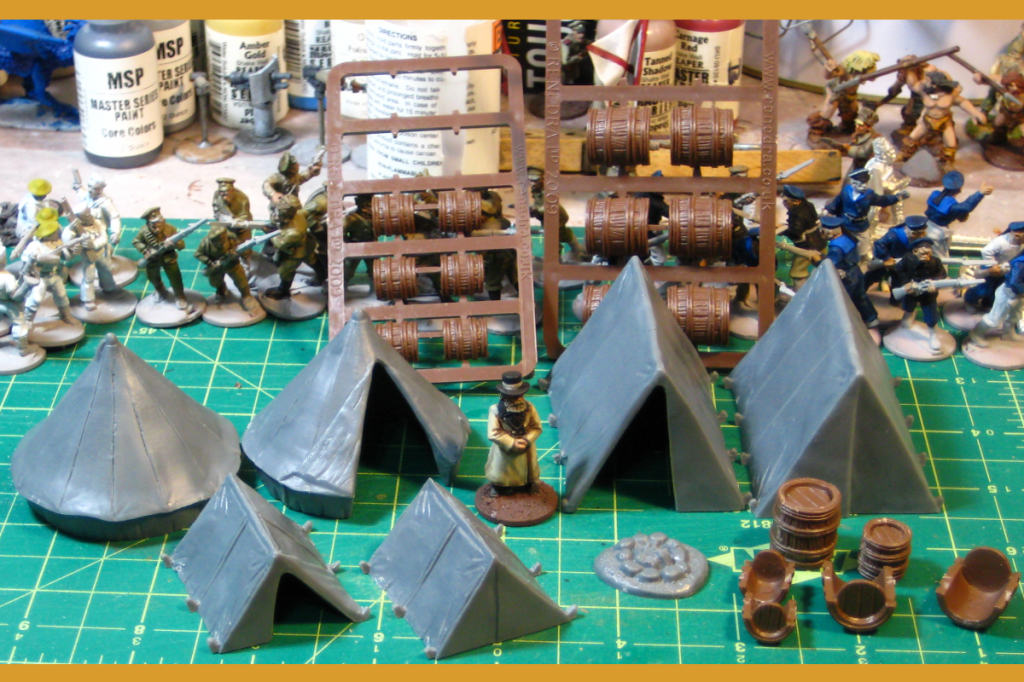
Tents and barrels – all six tents from one of the Renedra sprues, the barrels assembled and unassembled. In the background, barrel sprues, figures and clutter! The cutting matt has a one inch/half inch grid, the figure is a 28mm Brigade Games White Russian priest.
The Mixed Tent sprue has two bell tents, two large ridge tents, and two small ones, each done with one open door and one closed tent. The bell tents are 2″ diameter (55mm) and 1 5/8th” tall (40mm); the ridge tents are 2 3/8ths long (60mm), 1 3/4″ wide (45mm) and 1 1/2″ tall (37mm), while the small ridge tents are 1 1/2″ long (37mm), 1 3/8″ wide (35mm) and 7/8″ high (20mm). They’re done in a medium grey plastic, and very solid – even the tents with open doors don’t flex much if you squeeze them a bit. These are nearly universal tents; you could put them (especially the two types of ridge tent) in nearly any historical setting and they’d fit right in. The bell tent is a bit more specific to the 19th and early 20th Century, but iconic in it’s time and place, up to World War Two or so, maybe later in some areas.
Filling the gaps between the tents on these sprues you get a nice campfire piece about 3/4″ across and two camp beds or stretchers with legs to hold them off the ground. Nice little bits of camp clutter to add detail and life to a camp scene on the tabletop, although the beds are going to need bases of some sort if they’re going to survive transport and use on the table.
I don’t generally base buildings, but I’ll likely base these tents. The ones with open doors especially will look better with a base, with a bit of canvas groundsheet visible in the door – the bell tent especially will have an especially visible interior when on the table, because of it’s design.
The Renedra barrel set has two sprues in brown plastic, one with five large barrels, the other with five small ones. As you can see from the photo above, each barrel half has one round end, which minimizes the visible seams on the completed barrels. Unfortunately, the side hoops don’t quite seem to perfectly align when you glue the halves together, but the tiny mismatch is really only visible when you’re handling the barrels and will be totally invisible on the table! These are an older style of barrel, with thin doubled hoops (wood, maybe?) instead of flatter metal hoops, so they’re more suitable for pre-modern gaming, but will work OK as clutter and freight on most pre-WW2 tables.
Finally, the Gravestone set has two identical sprues in grey plastic. Each has a variety of monument stones, all about 1″ tall and 1/2″ wide. You get 16 slab stones (one broken into two pieces), 4 crosses, a small column, a slab/vault topping, five bases that can fit a variety of the slabs and crosses, and finally a raven. These are all done in the same solid, strong grey plastic the tents are made from, more than strong enough for tabletop use. Two minor things bug me about this sprue, one being that only a few of the stones have any texture or detail on the backs; the rest are just smooth plastic without even a basic stone texture. Fixable with a bit of sandpaper, but still a detail that could easily have been fixed. The other is even more minor – after getting the excellent Ainsty gravestones with their readable, laser-engraved lettering and details the stylus-pushed-through-putty squiggles of these Renedra stones lettering and details does feel like a minor step backward. This is still a great set of grave markers, enough in one set for quite a large graveyard, and the raven is a neat, whimsical (or possibly gothic and ominous) touch!
The last thing in my J & M order wasn’t scenery, and wasn’t something I’d even ordered, but was (I assume) thrown in as a thank you gift from J & M – a very nice large suede dice bag, about 7″ wide and 9″ tall and bright red. My own dice are in a bag I hand-sewed myself nearly twenty years ago in junior high, but I think I’ll press the new bag into service to carry the collection of card decks, markers, tape measures and random gaming accessories that normally slops around loose in my backpack. It’s large enough for a couple of pencils, too.
Rummaging through other people’s blogs (as one does) I tripped over this nice two-part series on Eastern Front gates: Part One, Part Two from August 2012 on Miniatures & Terrain.
These gates with the tiny shingle roofs over them seem fairly common in Russia & parts of Eastern Europe, and I’ve been meaning to make one as part of a larger churchyard for my Russian onion-domed church.
In some ways, this smallish order of Ainsty resin scenery bits has been a decade in the making; I discovered Ainsty sometime in the very late 1990s or early 2000s, and even though I didn’t (at that point) do much in the way of skirmish gaming in 25/28mm, the huge variety of neat stuff Ainsty made stuck with me! So back in November I finally got around to throwing a bit of money Ainsty’s way, on a mix of scenic details that will see service in various pulp skirmish adventures, Russian Civil War battles, and who knows where else.
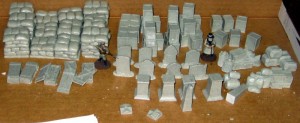
Here’s a quick late-night snapshot of what I got: Ainsty resin laid out for review. Click for full size.
General sculpting and casting quality is good and clean, although a number of the pieces have a slightly slick, greasy feel to the touch, almost certainly from the mold release used. A good scrub with dish soap and warm water should take care of that, and it should also help get rid of the last of the faint but definite smell of outgassing resin I got when I first unpacked the pieces from the small plastic bags each set was carefully packed in.
Clockwise from top left, here’s a quick review of what I got.
Top left is Trade Goods J Stacked Sacks, three each of four different roughly square sets of stacked sacks. They’re all about 1″ a side at the base, and the tallest stacks are just over 1″ tall. They’ll provide useful cover for docks and warehouses, although a bit more fabric texture on the sacks would have been nice.
Moving clockwise, I got two sets of Trade Goods B Tea Chests. This is described as 18 chests, but it’s really four stacks and three single tea chests. Again, useful cover, and like sacks, the sort of terrain bit that you could build yourself, but which can be fiddly and frustrating to mass-produce at home. I could definitely see throwing another set or two of these into any future Ainsty order; you can never have enough crates cluttering up warehouses in pulp games, especially if they’re in precarious, badly stacked piles just waiting to topple onto someone!
Bottom right we have Trade Goods L Mixed Piles x 4, which is a neat little set of crates, bales, barrels and sacks, up to about 3/4″ tall. This is pretty close to “universal cargo” for anytime from the early-mid 20th Century back at least four or five centuries. Each of the four piles is different, with two of mixed crates, sacks and other baggage, one pile of three canvas bales and one of three small-to-medium wooden barrels.
Moving clockwise once more to bottom centre, we have Mixed Memorials x4, which is a nice mix-and-match set of four bases and four tops for memorials or possibly fancy gateposts. The four base pieces are each different, with two of them having very fine (probably laser-etched?) lettering on the molded plaques on one face. The four top pieces are also each different, with two slightly different obelisk toppers and two lower pieces. One of the bases arrived with a minor chip off one corner, but given that full size monuments out in the real world get dings and chips too, I’m not going to worry about it. The tops of all the bases are finished, so you could even leave the toppers off for further variety. One of the low toppers has been sanded at a bit of a rakish angle on it’s bottom suface, but a few passes on sandpaper will correct that enough to be invisible.
At the centre of the group we have Upright Headstones x8, which are by far the most detailed pieces in my order. Each of the eight headstones is unique, and I’m almost certain they’ve been laser etched, as the lettering is actually completely readable despite being under 2mm tall. The headstones commemorate Kurt Cobain, Bella Lugosi, Gandhi, and others, including two with “A Soldier of the Great War/Known Unto God” on them, which is the wording used for unidentified soldiers buried in the Commonwealth Wargraves Commission’s cemeteries from World War One. My only minor complaint is the massive size of these headstones; the tallest is a full inch tall, or nearly shoulder height on a standing 28mm figure. There certainly are headstones this massive in real life, but memorial stones about 2/3rds this size seem a lot more common in most cemeteries I’ve seen. One of the stones had a tiny casting flaw in each side, but those will be easy to file into minor damage to the stone and won’t be an issue.
Finally, bottom left we have Trade Goods K Rifle Cases x5, with two closed and three open wooden crates holding rifles. One of the seperate crate lids has a rifle resting on it; the open crates show one or two rifles each and the greased cloth that would have been used as packing to preserve and secure the rifles. Everyone always needs more guns (well, in games, anyway), so I suspect these are going to get a lot of use in all sorts of scenarios, as loot or as objective markers of sorts. The detail is very nice on this set, with good wood grain in the crates and enough detail in the rifles to make it obvious what they are. These crates would be suitable from about the mid-19th Century up to modern day, depending on where your adventure was set.
I will definitely put another order in to Ainsty at least once in 2013, after I get this current order all painted up. Shipping time from the UK to Canada was fast, although Ainsty obviously does a lot of it’s casting to order, as there was a delay of about three weeks (November 17th to December 10th) between placement and shipping of my order. The usual fast Royal Mail-Canada Post connection worked nicely in my favour, as it usually does, though, so overall order time was entirely reasonable.
More (with better photos!) as I paint up and finish all the various bits I’ve just acquired!
(oh, and in honour of this being published on December 21st 2012: If you can read this, congratulations, the Mayan Apocalypse never happened. What a surprise…)
Been a bit quiet around here recently; blame a very strange and fractured work schedule for that, mostly, as well as the fact that I’ve got a whole bunch of projects (RCW sailors and cavalry, among other things) in the fairly early stages of development and thus not suitable for showing off here! Progress is being made, though, and I have another Russian Civil War game planned for later this month, so that’s my deadline for the horses and sailors, at least!
To tide you over (and because they relate closely to an upcoming terrain project I’m planning…) here’s a pair of useful links, both from the Empire of Ghosts blog.
The second and related is Tutorial: Making Realistic Barbed Wire Cheaply, which results in good looking barbed wire with the aid of a couple of sizes of thin wire and a drill. I’m not sure I’m going to be using this technique (I have another plan that might be even easier…) but it looks good.
More actual content soon, I promise, and Corey has several projects underway that he has promised to write up as well.
This should be worth watching: Curt of Analogue Hobbies is beginning a Great War in Greyscale project. Most figures in greyscale, officers in a very dramatic desaturated “chiaroscuro” colour scheme, and (hopefully!) greyscale terrain as well. There have been other greyscale wargaming projects out there (Curt links to a couple) and I’ve seen some very dramatic dioramas done that way, too. It’s been something I’ve considered off and on (it certainly fits with my usual pulp/interwar/WW1 focus) but have never done anything about. I’ll be watching Curt’s project with great interest!
Over on the always-excellent Lead Adventure Forum, Dr Mathias is not only winning the current Lead Painters League but has produced a very fine tutorial on big jungle-canopy trees that has me itching to clear my bench and get some scenery built. I even have a small tube that used to hold small glowsticks that could be the first tree trunk…
To round out this post, another tutorial posted on LAF, Elladan’s inspiring Making of a Teddybear-fur Mat, which is also posted over on his own website. If you’ve never seen Elladan’s website before, get over there and have a look around. All sorts of awesome stuff, and more fake-fur mat work over there too.
The English Civil War has become a definite back-burner project around here, but it is still around, along with ambitions to make some more Western European/British buildings and other scenery for dual use in both ECW and pulp gaming. Dark deeds in the pastoral countryside, that sort of thing, whether it’s with horse and musket or Mauser and sporty roadster!
It turns out that the ever-valuable Internet Archive (previously here on the Warbard) is stuffed with old books on English traditional architecture and buildings. Here’s a fairly random sampling of ones that caught my eye as being useful for inspiring suitable wargaming terrain.
Finally, you can find many more books in this vein by searching the Internet Archive’s Texts collection for Architecture, Domestic — England.
The Shire Publications book Discovering Timber-Framed Buildings is one I’ve seen recommended several places. As usual, check the various other recommendations Amazon and other customers make, good stuff there too. Shire do a whole series of inexpensive English history books that look very useful for those of us who aren’t in the UK but want some inspiration and authentic local details.
Inspired and begun by a thread over on Frothers Unite, of all places.
A few people on the Lead Adventure Forum and elsewhere have asked how the thatch on my variousRussianbuildingswas done, and I”ve been promising some in-progress photos.
I got those shot last month, and finally sat down to edit the pictures and write this tutorial. The basic materials are mattboard (good-quality picture framing card, used for most of the underlying roof structure), light card (used to bridge the spaces between the mattboard pieces and support the towel) and a cheap hand towel I picked up at the nearby dollar store, for the actual thatch.
The roofs pictured below are more complex than many, first because they’re hipped roofs, with all four sides sloping inward, and second because both buildings I happened to be building while I took these pictures have a complex floorplan, one T-shaped and the other L-shaped. I’ll discuss some of the peculiarities of doing towel thatch over a hipped roof in a bit.
I also design most of my roofs to be removable, which complicates design of the underlying structure. All that aside, the basic towel thatching technique is going to be basically the same for a simple gable roof permanently attached to a building or a complex removable roof like I’m doing here!
The roof structure - about as complex as a model roof is ever hopefully going to get!
Above, the main structure of mattboard, with light card over some of the bigger gaps in strips. I don’t bother trying to cover the whole roof, the towel is more than strong enough to support itself once all the glue on it is dry. A simple gabled roof with one ridgeline is obviously going to be a lot simpler!
Towel being glued down, cut oversized so it hangs well over the eves.
On this T-shaped roof, I started the sheet of towel on the top of the T, after putting glue over the card and along the edges of the mattboard pieces, then folded it over the main ridgeline and across the ends. I cut the towel on the hip roof ends and in the valley where the stem of the T goes out, and in several places removed triangles of towel to avoid having multiple layers of fabric piled up. The cut edges got an extra smear of white glue worked into them with a fingertip, to secure and help disguise the edge.
For these roofs, because they were complex enough already, I’ve gone with a single layer of towel, but you can get a nice extra effect by starting with strips of towel, and gluing them up from the eve toward the ridge of the roof in slightly overlapping stips. Real thatch is often laid in layers, and this recreates the look nicely. See my older English Civil War barn article for an example of thatch with strips of towel.
An illustrated explanation of how to fit towelling around a hipped roof's ends. With scissors, cut upward from the eve to the end of the ridge, removing a triangle of towel, then glue the ends over each other with an extra smear of glue to hide the edges.
The photo above should explain how to fit the towel around the sloped ends of a hipped roof, removing triangles of towel to avoid having massive amounts of overlapping fabric.
After the towel has been fitted to the roof, leave the whole thing to dry for a while. Note that the towel is hanging well over the eves at this point, and to keep that fabric from being glued to the table, I’ve propped the whole roof up on a couple of bottles of craft paint. I don’t use the building itself, because I want these roofs to be removable and the next step could easily glue my roofs down to the building by accident!
That’s because the next step is to saturate the towel with dilute white glue. I mix a jar of roughly two parts water to one part white glue, well mixed, then apply it liberally with a big paintbrush, a 1.5″ household brush I use for all sorts of scenery painting. You might think a soaking in watery glue would wreck or warp the underlying cardboard structure, but I’ve done four buildings this way in the last few months and none have warped noticeably.
Remember that you are dealing with towel. It will soak up your glue-water mix like, well, towel. Dab gently with the paintbrush, you don’t want to push the towel around or wrinkle it. After it’s well painted with your glue-water mix, leave the roof in a warm place at least overnight to dry.
After the glue-water mix dries, your thatch will be solid and pretty much self-supporting. Time to trim the eves with scissors, then slap on the first coat of paint. I use black primer, but I could probably have just started with a black towel...
After your roof dries overnight, the glue-soaked towel is basically strong enough to stand up on it’s own. Now you can trim the eves back accurately with scissors, making sure to fit the roof to the building (if it’s removable like mine are) to get a good fit and ensure the eves look good and even.
After that, basecoat with a dark colour, I go straight for black, and mix a bit more white glue into the paint to further strengthen the roof. This is also your chance to trim or re-glue any seams or areas you missed during initial construction. You could skip some of this by just starting with a black or dark brown towel — I started with tan as that was the least-objectionable colour the cheap towel I use came in.
After the black basecoat is finished, I do two drybrush coats to bring the texture of the towel out and make it look like tatch. The first, fairly heavy drybrush is with a 1:1 mix of light brown and grey paint; the second drybrush is brighter, more tan or light brown and less grey in the mix, and i concentrate on the ridgelines of the roof, to make the shape “pop” a bit. You could do more of a straw/yellow colour to your thatch, but real thatch almost always weathers to a grey/brown/black colour fairly quickly.
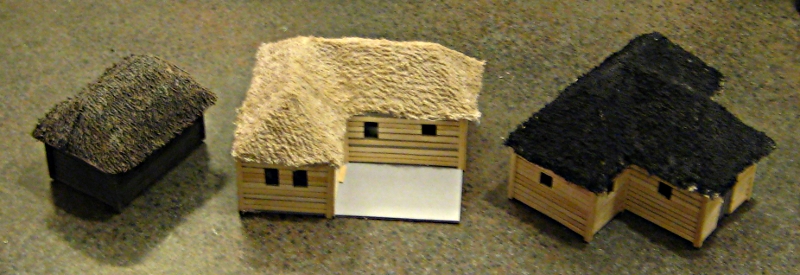
From left to right, a finished building, with thatch painted as described in the text. Centre, unpainted but with eves trimmed. Right, black basecoat only on the thatch, awaiting it's two drybrush coats.
Finally, a photo from my earlier posting about the two buildings featured in this article, with everything finished except the fence on the L-shaped building. You can see the drybrushed finish that brings out the texture on the towel, and the slight highlighting of the ridges and edges of the roofs.
A pair of new, larger Russian-style buildings for our 28mm RCW games. Click for larger.
Hopefully this helps someone out there tackle their own thatch roof from towel. Remember that the roofs I’ve used as illustration for this article are at about the outer limit of complexity for a thatch roof, being hipped, T- or L-shaped and removable all at once! A simple gable roof can just use a single strip of towel, up one side and down the other; this gets even easier if you build permanent roofs instead of removable ones.
Richard Clarke of TooFatLardies has an interesting article on using putty for thatch, if you don’t want to try towel. I’ll have to give that a shot on the next small building I do, although I think towel is easier and more economical on larger buildings.
Any comments, suggestions or questions, fire them into the comments below and I”ll do my best to respond.
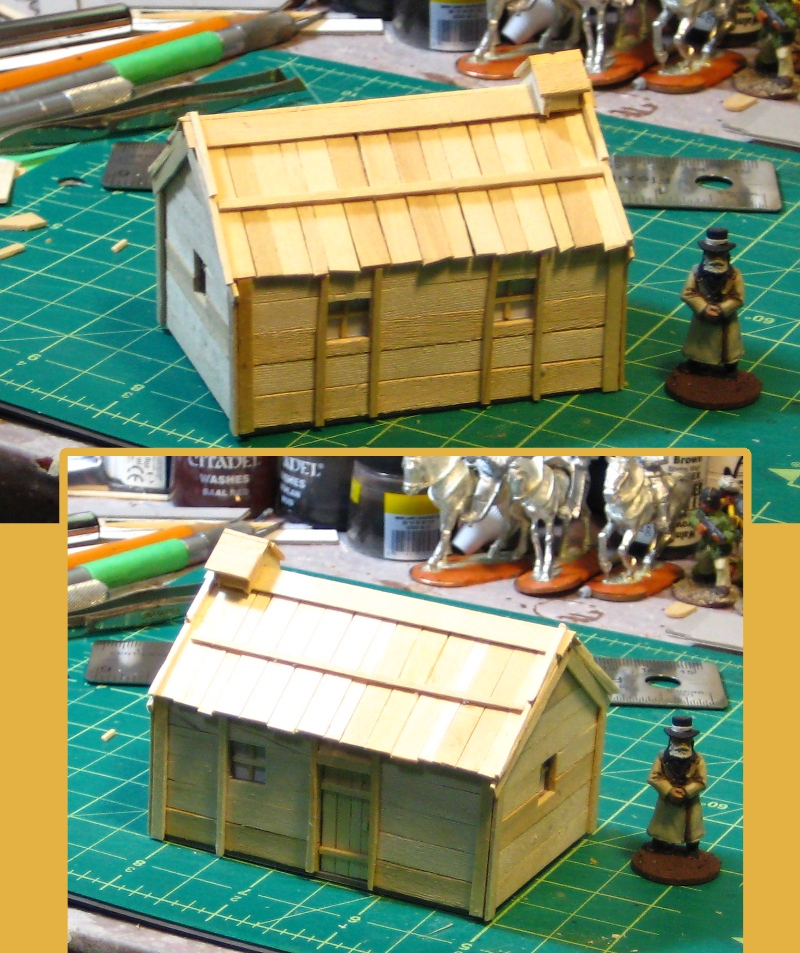
Inspired by Tony’s plank-roof hut tutorial that I linked to in my recent links of interest post, I sat down with stir sticks and my Xacto knives to do up my own version of his hut.
A Russian-style plank-roof hut, after Tony’s tutorial.
My version is 3 inches across the front, 2 inches deep and about 2.5 inches tall to the top of the chimney.
I’ve also been amusing myself recently with fake fur and fabric dye, searching for good loking long grass. I’ll have to write up my discoveries sometime soon, it’s been… interesting.
The new hut will have it’s final paintjob this weekend, more photos of that when it happens.
To celebrate (?) this fine Friday the 13th, another of my occasional posts of links.
Muskie commented on my Youtube scenery videos post to remind me of his fascinating Miniature Painting News Aggregator, which has a neat collection of feeds from all over the place, mostly focused on miniature painting but touching on a number of other hobby elements too. The aggregator apparently started as a private project, and it’s a bit GW-centric for my personal tastes, but it can throw up some neat semi-random content. Well worth a visit, and well worth bookmarking for return visits. (Incidentially, I”ll also recommend Muskie’s Better Hobby Blogging article for those of us who blog. Full of good advice.)
We talk about design, fonts, Inkscape and related topics fairly regularly here on The Warbard, and I’ve just discovered the Lost Type Co-op, a pay-what-you-want font foundry with lots of very nice Art Deco-influenced fonts and others suitable for Interwar/Early 20th C design efforts.
Further on the design and graphics front, Fantastic Maps is, well, fantastic. Jonathan Roberts also has a great collection of Tips & Tutorials that is well worth checking out.
Last but definitely not least, the Barking Irons site has a nicely illustrated Witchlands Hovel tutorial by Tony Harwood. The Witchlands are Flintloque’s version of Russia, and Tony’s article should provide inspiration for plank-roofed rural buildings for Russia and elsewhere.
In fact, I’m going to get off this computer, get some food, then start cutting coffee stir sticks for my own version of a plank-roofed hut!