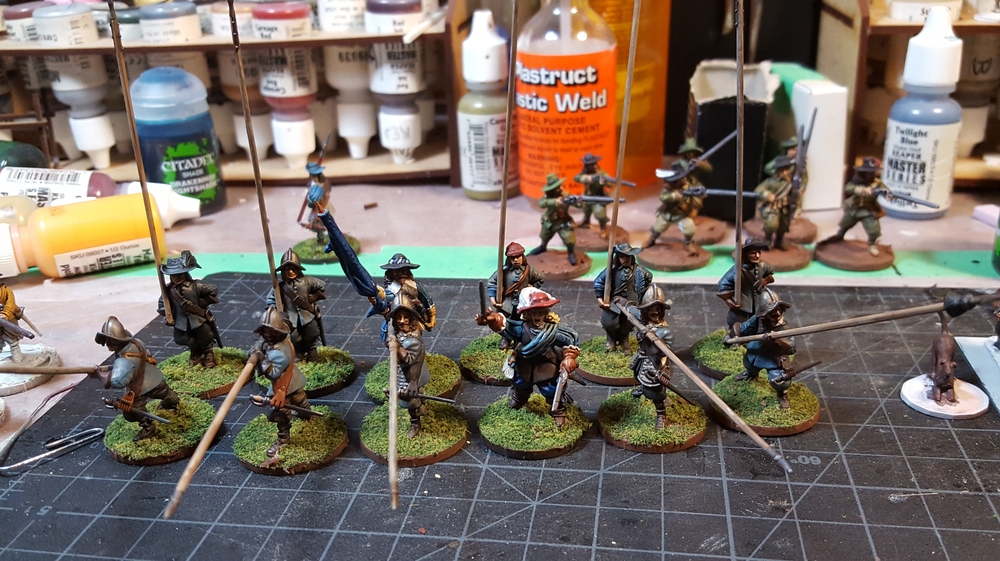
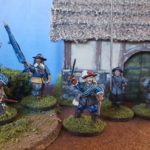
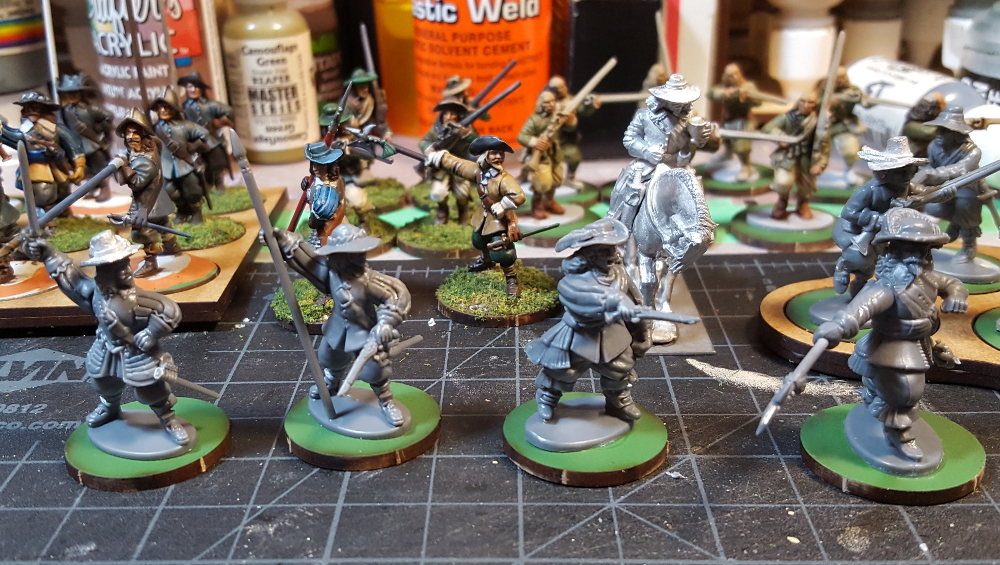
First unit of foot for my English Civil War project is done!
28mm pike from Warlord on 25mm wide bases. Click for larger.
Ten pikemen, an officer, and a flag ensign all lined up ready for battle.
I’m plugging away at the shot in blue to go along with these guys… the musketeers have a lot more equipment hanging off them and are a lot slower to paint than pikemen!
There’s also a second unit of pike almost finished, these ones in green uniforms, as well as six firelock musketeers for a forlorn hope or commanded shot unit. The mounted commander from my last post has also had a few more details completed and is inching toward the finish line. Lots of assembly line style painting currently, which makes for really boring photos to share here until a unit is suddenly done…
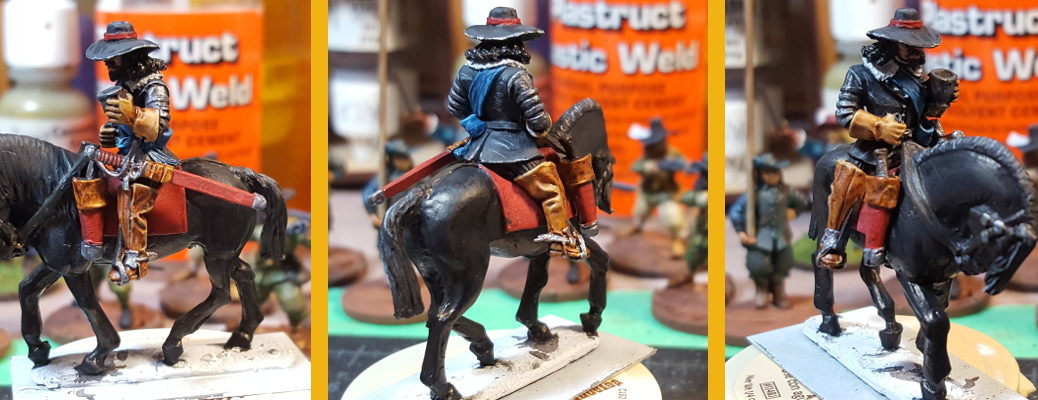
Got a couple of half decent photos of Warlord’s Pike & Shotte Mounted Commander that I’ve got on my painting bench right now, along with a whole bunch of pike & shot soldiers for him to command.
This is one of Warlord’s all-metal figures, and very nice too, a good level of detail and a pose full of attitude as he slouches along, pewter wine cup in one hand and a huge broadsword on his hip. There’s an eyepatch under that wide hat too, although I don’t think you can actually see it in these photos!
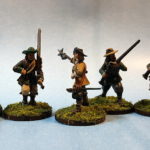
An officer of the English Civil Wars; 28mm figure by Warlord Games. Click for larger.
I set myself the painting challenge of doing a black horse, black coat and hat, and black hair on the commander. The clothing is done with a base of Reaper Walnut Brown (a very, very dark almost black brown) with a few drops of Pure Black in it, highlighted with Rainy Grey; the horse is mostly Pure Black with some Walnut Brown highlights and then a coat of artist’s India Ink over the whole horse except the mane and tail.
Loads of highlighting and some detail painting left to do, but I’m happy with the progress so far and thought I’d show him off here!
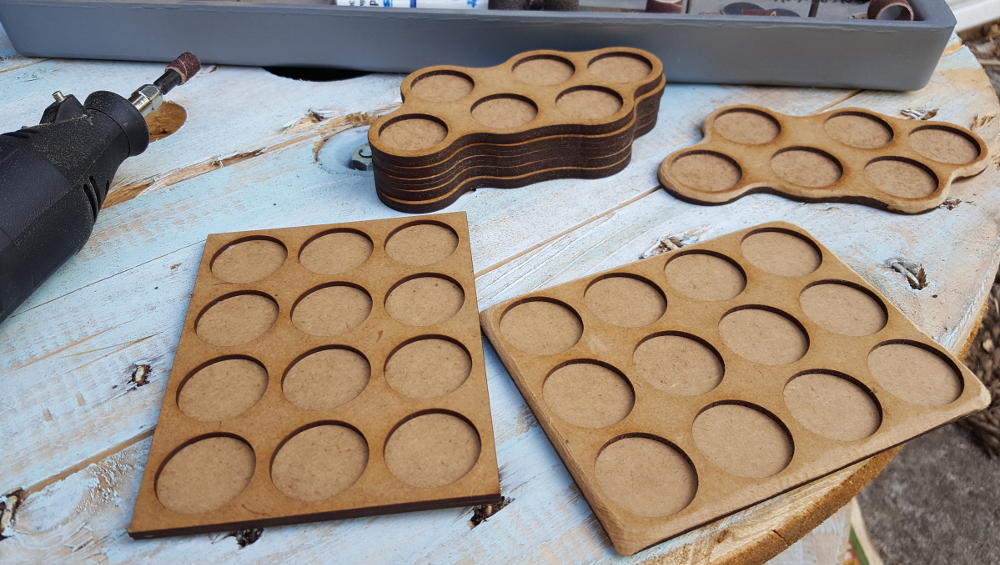
I picked up a batch of simple lasercut MDF trays sized for 25mm bases on one of my recent Warbases order. Pikeman’s Lament uses either six or twelve figures per unit as standard, so I bought a batch of six-base skirmish trays (listed on Warbases’ site as “Dux Brit/Zombie Trays“) and a pair of twelve-base three by four regiment trays for when a PL pike unit is in Close Order, both cut for the 25mm MDF bases I’m using for my English Civil War/Pikeman’s Lament project.
Each tray is two layers of 2mm MDF, lasercut and with the two layers already glued together straight from Warbases. I’d been thinking of replacing the bottom solid layer of 2mm MDF with something thinner (probably .030 plastic card) as I am not a huge fan of big thick bases, so having them arrive pre-assembled forced me to consider different options.
As an aside, if you really did want un-glued movement trays, or even just the tops so you could do your own base layers, I’m fairly sure Martin and Warbases crew can set you up that way. Chuck them an email and ask!
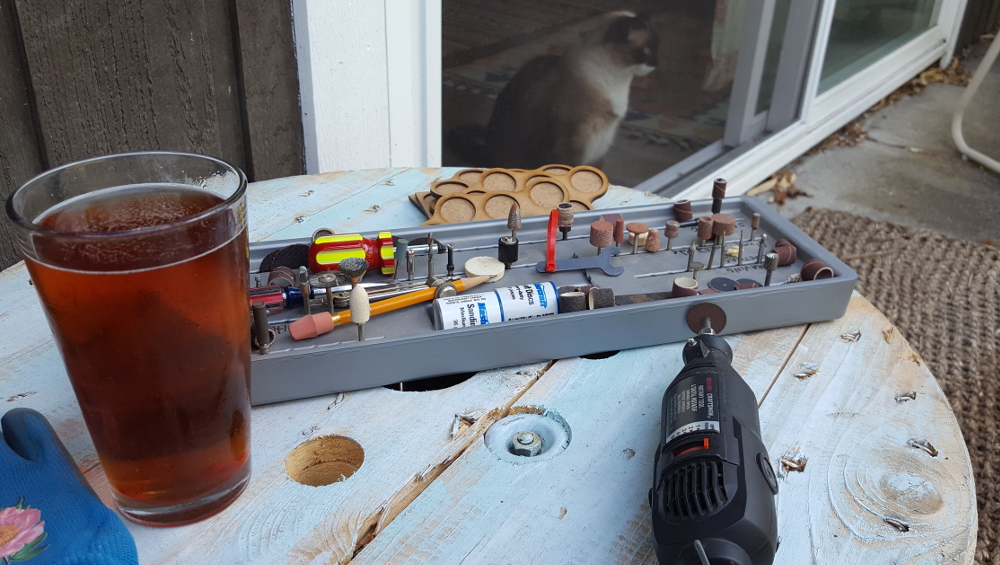
I finally broke out my grossly underused Dremel tool, poured a pint of excellent beer, and sat down on the back patio with this unwise combination to modify my movement trays to my liking!
Beer and power tools, an excellent combination! Also pictured, grumpy cat wondering why it’s so damn hot and why her human servant is insane. Click for larger.
A Note Of Warning: Power tools capable of 30,000 RPM and alcohol is not a recommended combination. Sanding MDF without wearing some sort of filter mask is also not recommended. Even though I was outside while doing this, I can still taste MDF dust on the back of my mouth over a day later. Wear a dust mask of some sort. Don’t combine power tools and beer, even very good beer. Dear readers, be smarter than me. Thank you. Also, should you not be smarter than me, don’t send lawyers after me. They’re scary. Thank you again.
Anyway…
A couple of minutes with a sanding drum on the Dremel per base rounded the top edges off nicely, and the corners of the regiment bases. I touched up a few scuffs from the Dremel by hand with regular sandpaper, knocked the nasty MDF dust off, and then brought everything – including the beer – inside to my workbench to add a bit of sand here and there to the trays.
First two bases done on the right, untouched ones on the left. Click for larger.
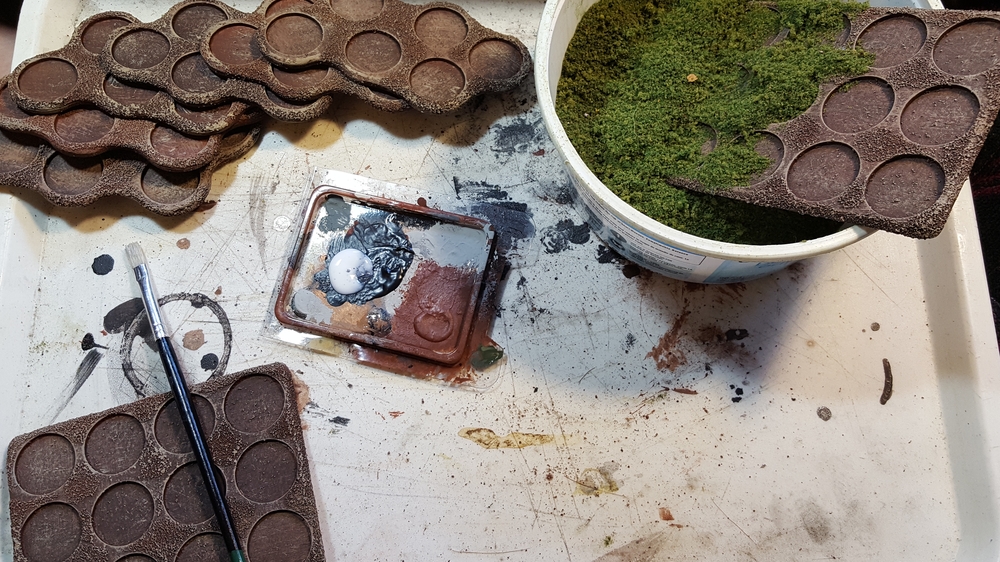
With that done, I put the Dremel away, poured another pint of beer, and put a bit of sand around the edges of the trays, being careful to keep it out of the holes. Dark brown base paint followed, then some drybrushing after that was dry, and finally some of my usual flock/turf mix here and there to help blend everything together.
Sand, base paint, and drybrush done, starting flock. Click for larger.
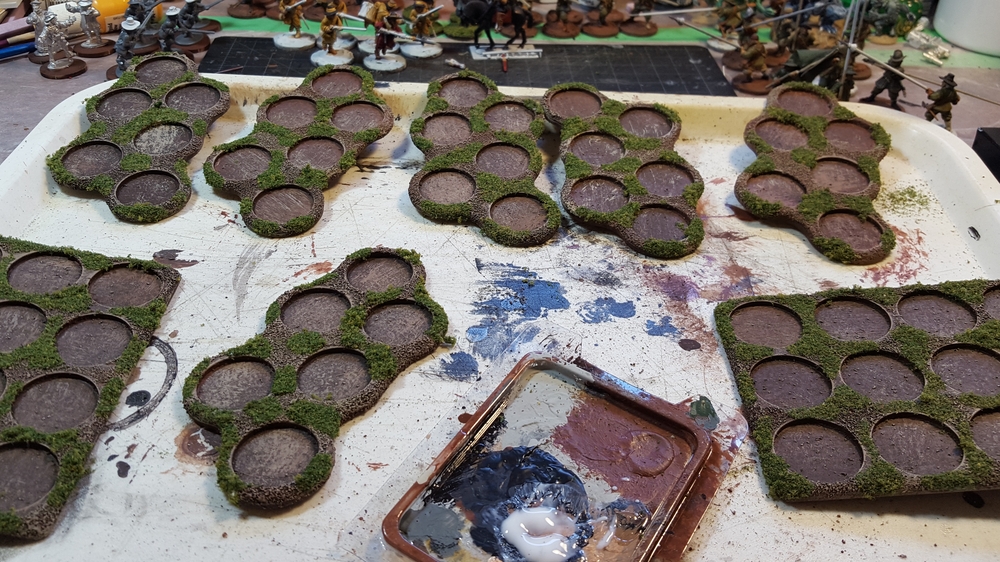
Flock all done. I might add some tufts or other detail bits eventually, but this will do nicely for now! Click for larger.
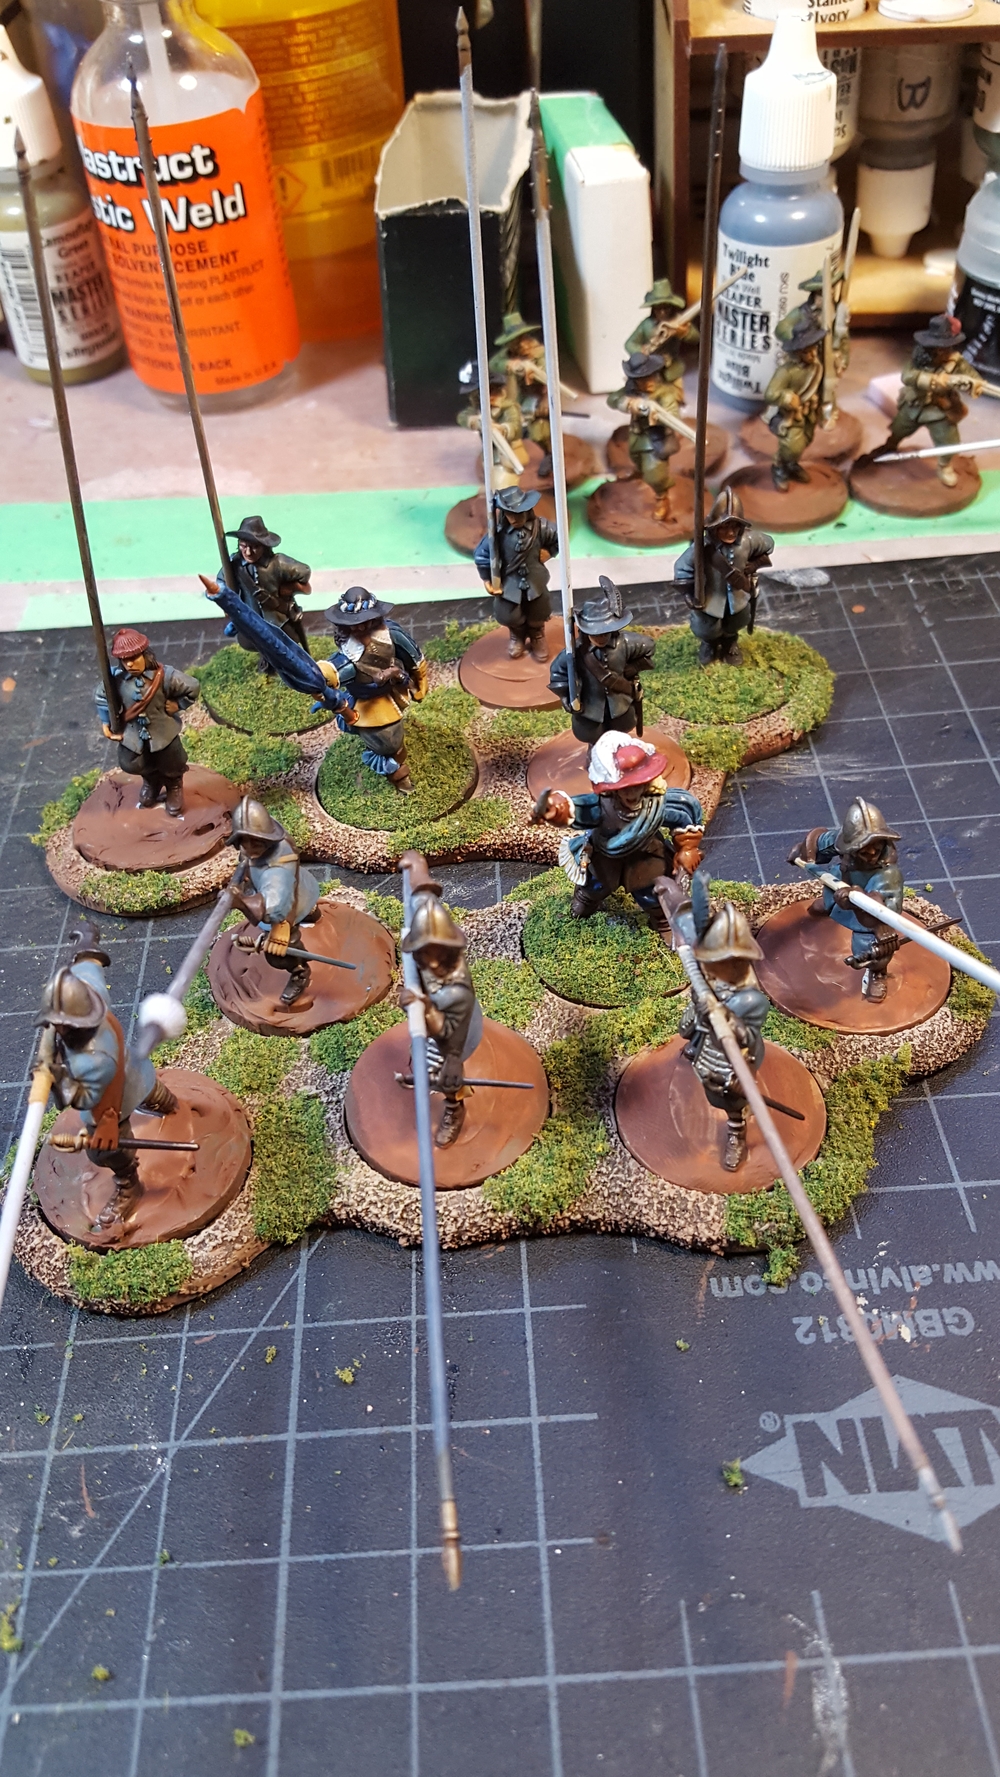
The bases in use with Warlord pike in various stages of completion. Click for larger.
These movement trays are a great value and will make “big” skirmish games a bit easier to manage! I’ll definitely be getting more, especially of the six-base irregular trays, and might contact Warbases about some custom irregular trays for my cavalry, who are mostly on 20mm by 40mm rectangular bases, or my artillery, when I add some guns to my Pikeman’s Lament forces. Having the entire force on similar movement trays would look really sharp and make games a bit more streamlined, especially if I’m running convention games for other people.
I posted my Round 1 entry for the recently concluded Lead Painters League 11 (run over on the awesome Lead Adventure Forum) way back in mid-April but never got around to posting my other entries.
So here they are all at once, including Round 1 again for completeness sake.
Note that I repeated one entry in a later round, so there are only nine entries here instead of ten. My Round 2 entry, Patients of Ward 13, were re-run as my Round 9 entry after the English Civil War musketeers I’d hoped to run didn’t get finished in time. Interestingly, the Patients lost their initial round but won their re-appearance, which is unusual as repeat figures rarely win LPL rounds in my experience!
There’s captions for each photo with more details, including manufacturer info for all the figures.
LPL11 Round One – Old Sabertooth’s Clan. Pulp Figures 28mm pulp cave-persons!
LPL11 Round 2 – The Patients of Ward 13. Statuesque Miniature’s Pulp Asylum line, 28mm. A strong contender for my favourite set of figures in my LPL11 entries, and they also wound up being my Round 9 entry after the planned ECW figures didn’t get finished in time.
LPL11 Round 3 – Backalley Bruisers. Thugs and petty criminals from Pulp Figures.
LPL11 Round 4 – The Young Majarah And His Minders. 28mm Pulp Figures, probably my favourite group of figures and favourite photo of this LPL!
LPL11 Round 5 – Last Hydrant For 12 Parsecs. Really old 25mm Vargr dog-aliens from the Traveller universe, produced by MegaMinis at least ten years ago and finally finished!
LPL11 Round 6 – For the King And England! 28mm Warlord ECW figures.
LPL11 Round 8 – Parliament And England! 28mm Warlord ECW figures; my least favourite round of all. The figures were rushed and incomplete and the photo is just straight-up bad!
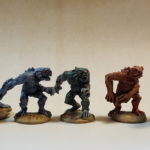
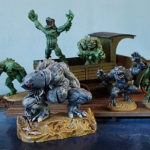
LPL11 Round 10 – Dagon At Dockside. The bonus theme was “Big Brother/Little Brother”, and I happened to have Pulp Figures’ Dagon and fishmen around!
Bonus photo – this was the setup for Round 6’s English Civil War shot, on my dining room table!
If you want to see all 300+ entries (30+ participants, 10 rounds!) you can head over to the LPL 11 forum on Lead Adventure Forum. I highly recommend it, loads of awesomely talented painters participate, not just hacks like me!
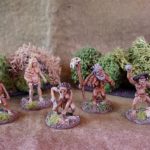
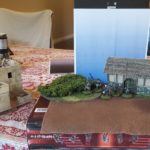
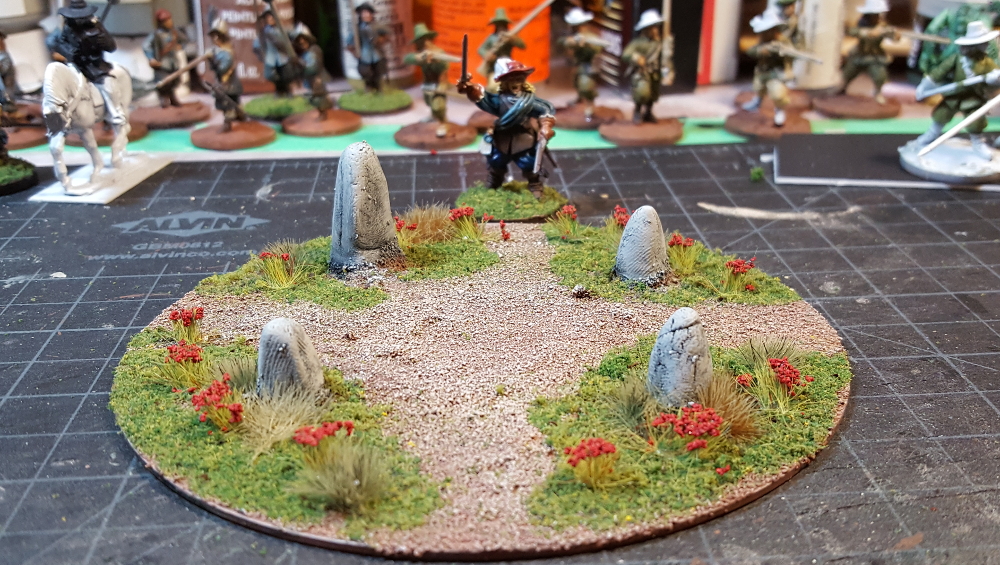
Not every stone circle is a gigantic trilithon monument like Stonehenge. Some of them might be barely recognizable as stone circles, in fact, until you realize that plants grown in strange patterns around the stones, or you wander past on certain very specific nights of the year…
This little project started out as a way to use up leftover putty; whenever I had excess greenstuff or Milliput I’d squish it into a rough stone shape and let it dry on one corner of my bench. This weekend I wanted a quick project as a distraction, so I grabbed four of these stones, hot-glued them to a scrap CD, and added sand. That got left to dry overnight, then I basecoated it dark brown, let that dry a few hours, and drybrushed the sand to bring up the texture with various shades of pale brown, tan, and very pale grey.
The stones got a black basecoat, the drybrushed with various shades of grey, tan, and finally white.
The flocked areas are my usual mix of ground foam and static grass, and then I added various tufts from Army Painter and the flowers from Rain City Hobbies. The flowers form a ring around the outside of the stones, and I kept the foliage inside the stones to a minimum.
Stone circle, overhead view, with a 28mm Warlord pike & shot officer for scale on a 25mm base. Click for larger.
The circle from something close to model eye level or just above, with the same Warlord officer. Click for larger.
My ongoing English Civil War project might well shade over into some sort of gunpowder fantasy version of the ECW or TYW, in which case the circle will be right at home, and in the meantime it can add a little touch of strangeness to some lonely corner of my tabletops… who meets in the centre of this flower’d circle, with it’s well-trodden paths? Be ye for King, Parliament… or some far older Power?!
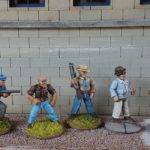
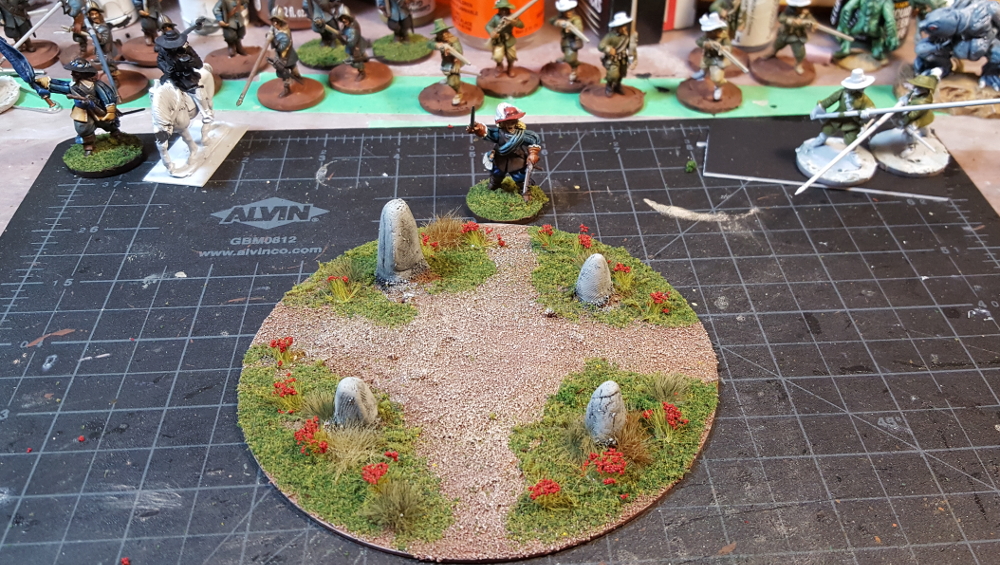
Much chaos in my non-gaming life, so time and brainpower to actually paint is kind of hard to come by, but this weekend I sat down and organized my pike & shot foot figures for Pikeman’s Lament and other English Civil War or Thirty Year’s War gaming.
I now have exactly 60 figures assembled, based, and in progress for this project; I know it’s exactly 60 because the 4Ground 25mm bases I’m using come in batches of 60 and I just finished the first batch of two that I’ve bought!
All the pike & shot foot so far. See text for details, and click for larger.
Starting from the far left, there’s a unit of musketeers in blue uniforms, then a pike unit in blue (on the close-order base from Warbases). To the right off the back edge of the cutting mat is another dozen musketeers, this time in green. In front of them is six foot characters/officers/leaders and one mounted officer, and on the skirmish base to the right is the first six forlorn hope firelock musketeers. Finally in the front right corner is another dozen pikemen, in green uniforms. All the figures are from the Warlord Games Pike & Shotte range, all plastic from their infantry regiment box. This is one full infantry regiment box plus a couple of extra sprues picked up separately, except for the firelock/forlorn hope figures who are the first of the Forlorn Hope/Firelock Storming Party box I’ve assembled.
The blue pikes are closest to being done, and a few of the green musketeers got finished as part of LPL11 recently. Most of the bare grey plastic figures were assembled just this weekend to fill out various units and add some more leader/officer/character figures to fill out some units.
Unassembled, I’ve got another 14 musketeers, enough for a second full unit of “blue” musketeers. That will give me a “full” pike and shot unit of 2:1 shot:pike ratio, which will look good on the table! There’s also another 12 firelock musketeers, and a dozen cuirassier heavy cavalry. Finally I’ve got another dozen regular cavalry fully assembled but not shown above; six of them are fully painted and the other six have been almost finished for… about four years now, or maybe longer…
Four new foot characters, and some finished ones behind. Click for larger.
The four new officer/character figures are made with arms from the Warlord plastic pike & shot infantry command sprue, and a mix of pikeman bodies and bodies from the command sprue. The two on the left are pike bodies; the two on the right are command sprue bodies. The two completely finished and based figures in back alongside the mounted officer are also made the same way, with two spare pike bodies. I have more command or character type figures than I’m ever likely to need for Pikeman’s Lament, but they’re fun to assemble and there’s lots of single-figure small skirmish games out there like Pulp Alley that I could see tweaking for an ECW setting!
As soon as I saw how the figure on the far right came together I thought about cutting the head of the halberd off and turning it into a magic-user’s staff of some sort! Hmmm, mix and match the fantasy Dragon Rampant with Pikeman’s Lament? Dragon’s Lament? Pikeman Rampant? The two games use the same basic core rules, so it might be possible, and gunpowder/Renaissance fantasy (vs more standard medieval fantasy) has always been an interest of mine!
I haven’t actually sat down with the Pikeman’s Lament rules to put together some companies, but the figures assembled and based here are enough for a full size 24pt force with some different build options. I’m going to try to get one or two of the almost-finished units actually pushed through to completion this week, and hopefully get a PL game of some sort in next Sunday, but we shall see…
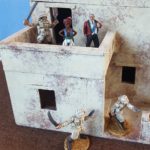
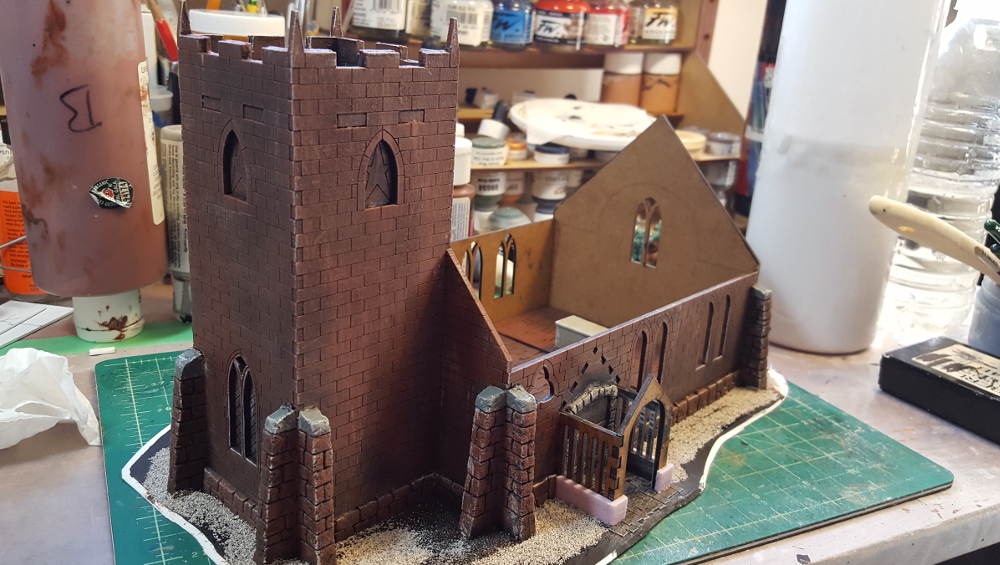
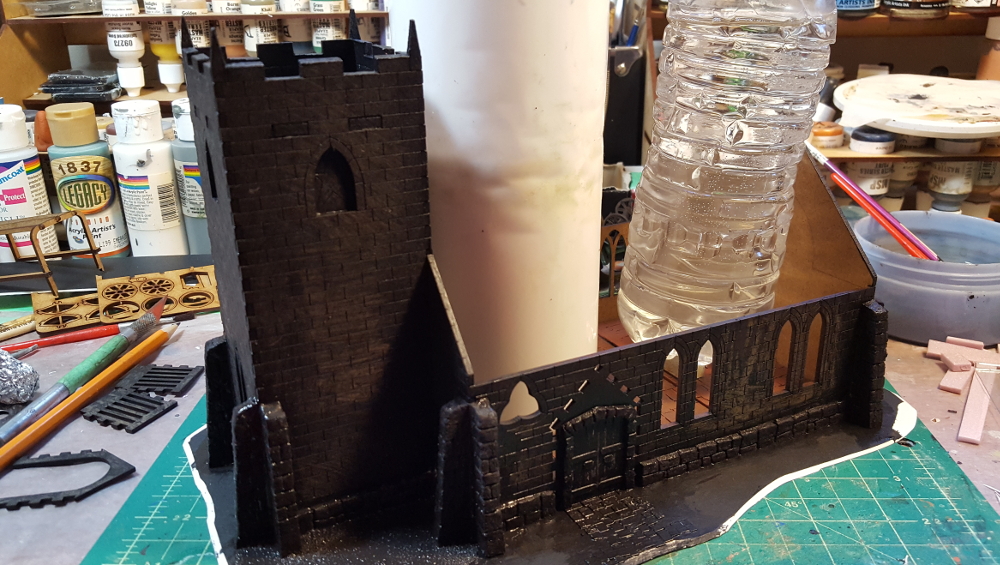
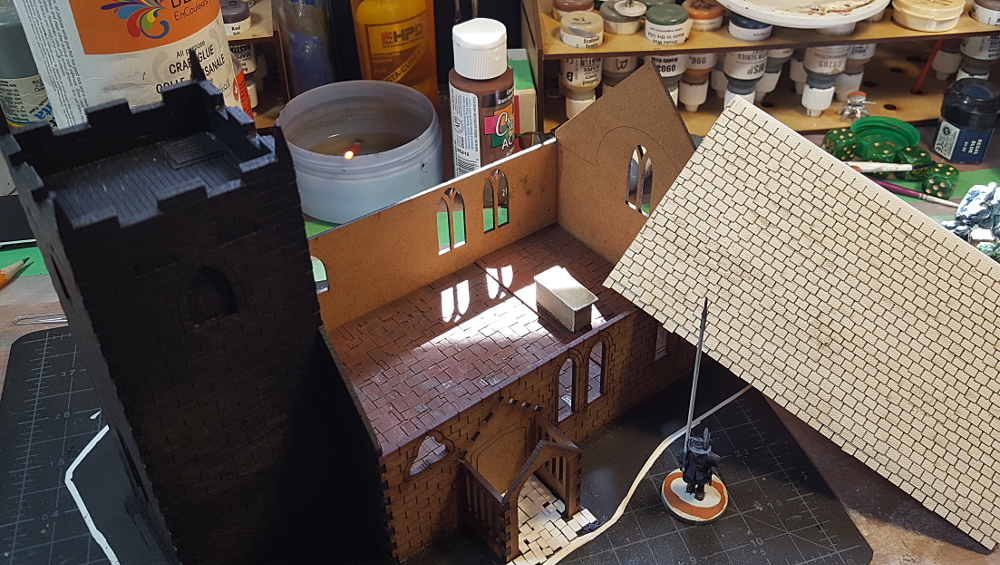
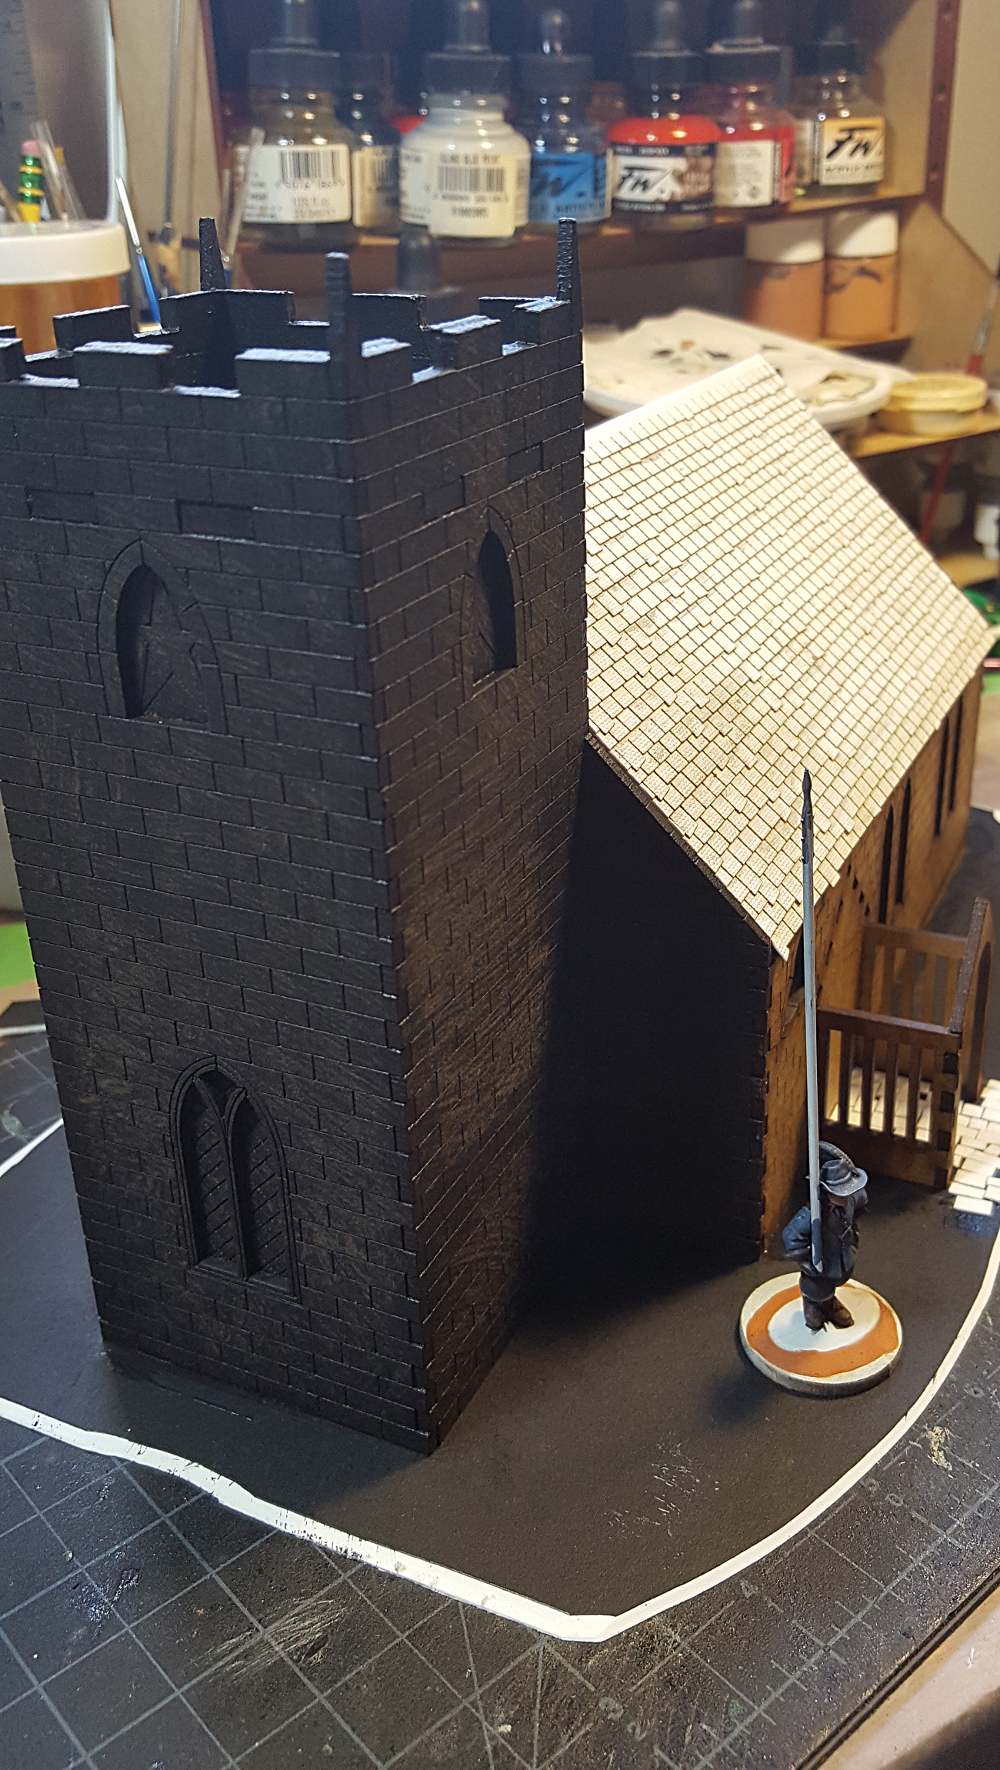
More progress on detailing the lasercut MDF church from Warbases that I started previously.
Stonework & Doors
Buttresses and a double row of foundation stonework have been added with pink styrofoam insulation cut with a new Xacto knife. I used scrap card to create a small jig to keep the angle of the front of the buttresses the same across the fourteen buttresses around the outside of the church. The buttresses are roughly a quarter inch wide, two inches tall, and about half an inch deep at the base of each.
Styrofoam stonework in place on the church; Warlord 28mm pikeman on 25mm base for scale. Click for larger.
Buttresses and stonework on the other two sides of the church. The extra stone partway down the side disguises a join in the foundation strips. Click for larger.
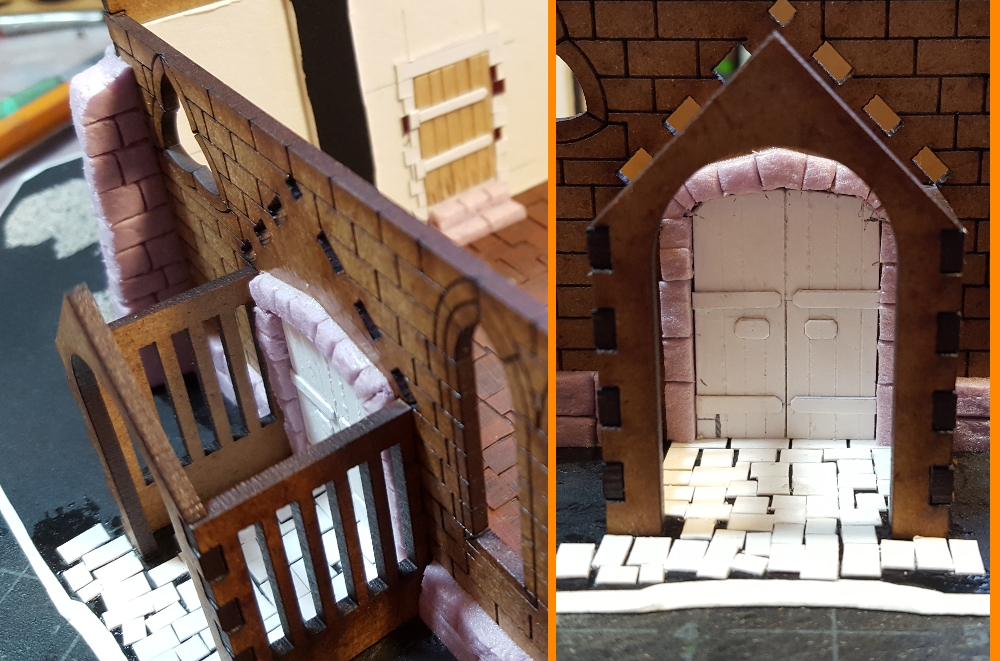
The front door is card with planks scored into it, with more light card for the hinges and handles. The door arch is more pink styrofoam. Inside the church I’ve added an interior wall of 1/16th matt board on the tower end to hide the tabs where the tower walls slot into the end wall. That’s had some added detail with matt board and card, and the door was done with offcuts of coffee stir stick wood and card.
On the left, both doors at once, with the porch walls in position but not glued. Right, close-up of the front door. Click for larger.
All of the styrofoam was glued down then carved and textured after the glue had dried; I used a ball of tin foil to add a stone texture, then my usual knife-and-pencil stone carving technique.
Priming & Painting
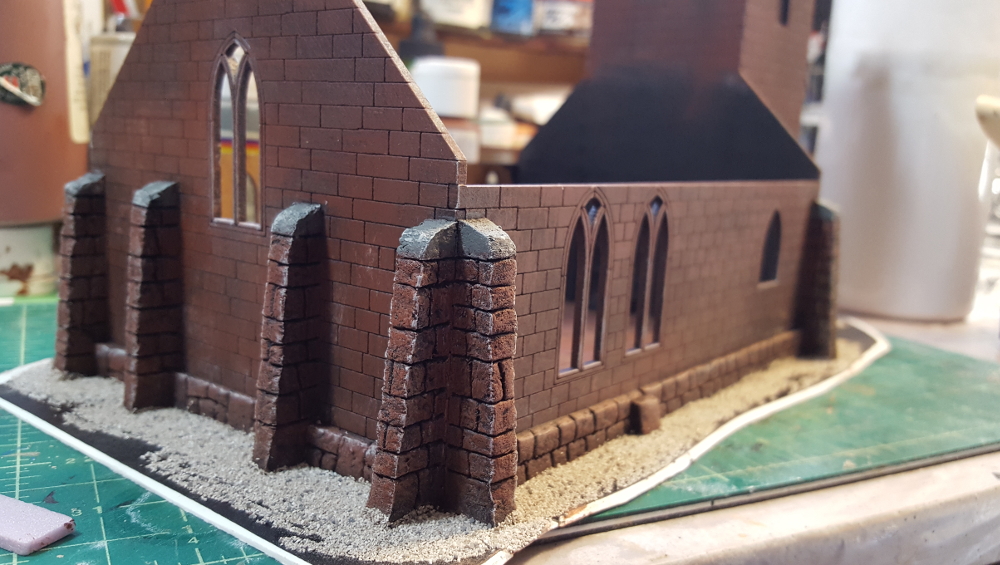
The whole building got a coat of black paint as primer. Rather than the default grey stone that I always seem to use I took some inspiration from churches I’ve seen online from Shropshire county in England and decided to do mostly reddish stone with some grey stone used as accents, similar to the Cound Church of St Peter
I started with brown paint drybrushed heavily on, then a fairly light grey paint, and finally a drybrush of red oxide/burnt umber. I’ve done a bit of edge highlighting so far, but will do more and might yet do another paler drybrush over the whole building to pop some more details out.
The capping stones on each buttress were done in dark grey then drybrushed a paler grey, as was the arch around the main door. I might yet do more stones in grey, just to add some variation to the building. I also glued the porch walls and front down, and added more strips of styrofoam for the foundation of the porch.
Black primer paint drying, with some weight inside the building to keep the base from warping. Click for larger.
Tower end of the church all painted, and with the porch glued down and stonework added around the base of it. Click for larger.
Altar end of the church all painted. Click for larger.
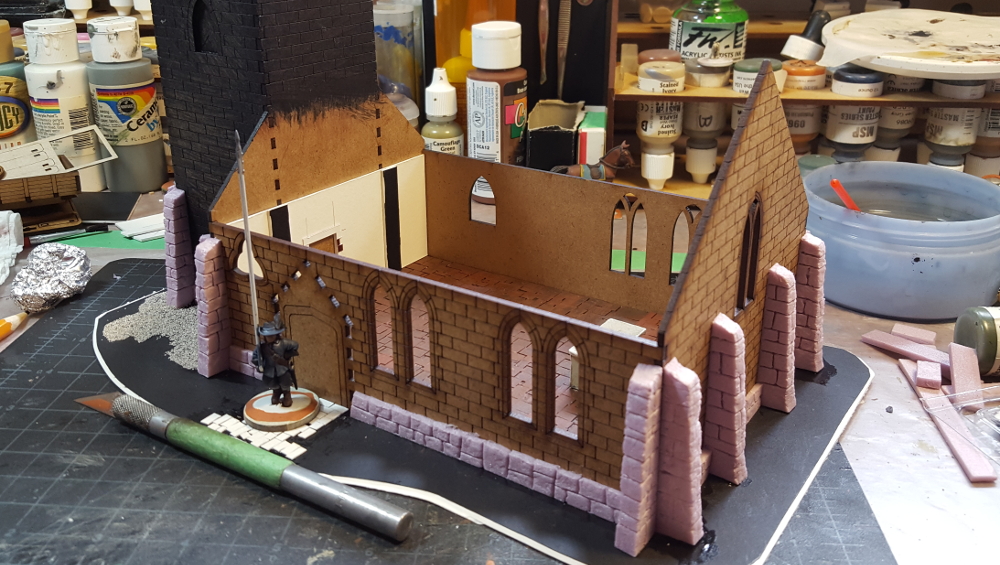
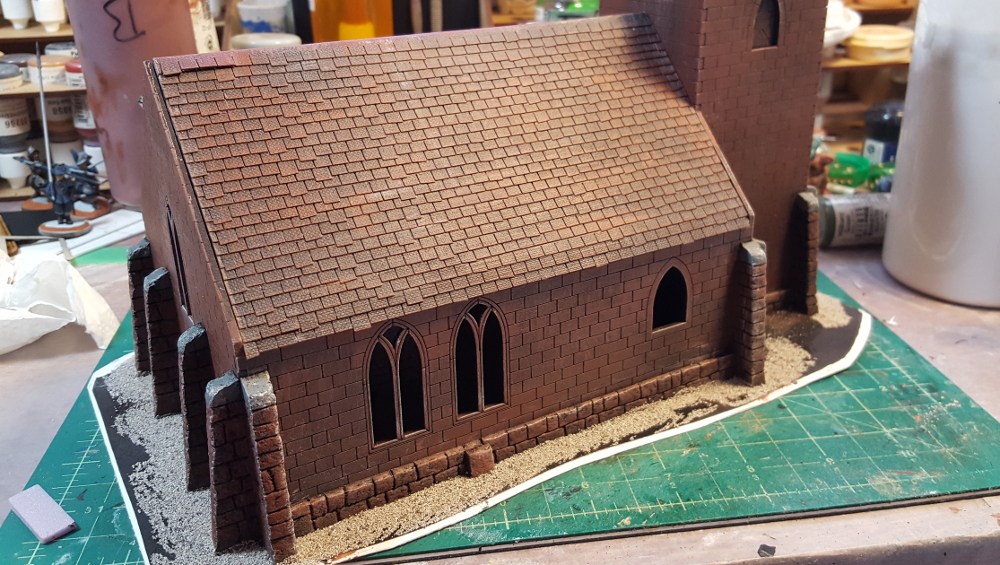
The Roof(s)
Both the main roof and the porch roof got covered in Warbases’ very nice lasercut slate tiles and primed black like the rest of the building. So far the main roof is painted more or less the same as the rest of the building, with an extra grey drybrush to pop the texture a bit more and make it look a bit different from the walls.
Main roof, painting in progress. Click for larger.
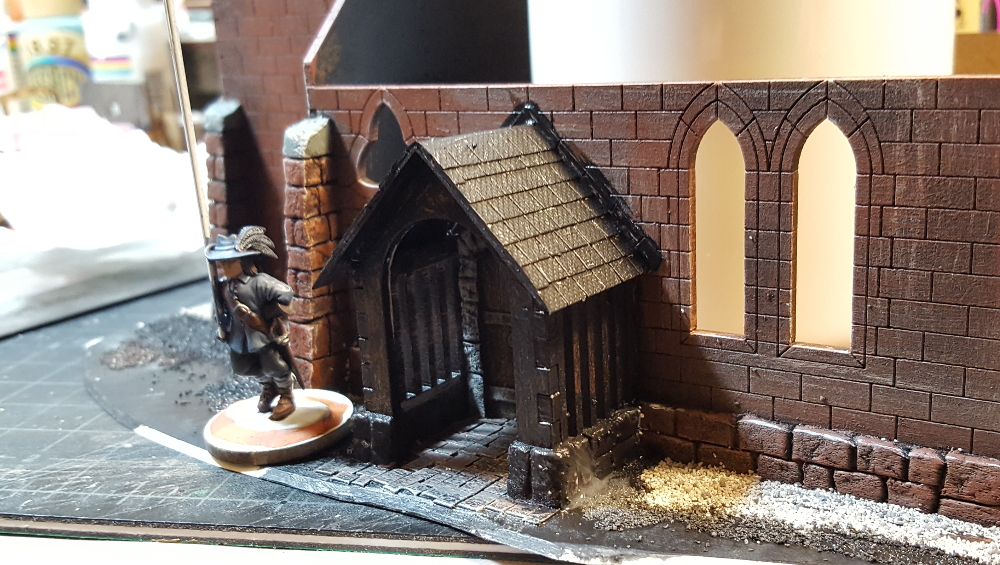
The porch comes with MDF panels for the roof, but they look quite thick so I cut a strip of light card the same size, folded it, and glued it into place. Before gluing the roof down I added strips of card against the stone wall to hide the slots where the MDF roof panels should slot in; they’ll be painted to look like lead flashing eventually. As mentioned, the porch roof got more of the Warbases lasercut slate tiles, and will get bargeboards on the front edges eventually to hide the edges of the slate.
Porch roofed and primered, with Warlord pikeman for scale. Click for larger.
Up on the roof of the tower I doubled the thickness of the walls with matt board, then put down a wooden floor using styrene plank sheet, with a roof hatch from a bit more styrene. The upper edges of the walls got a bit of GW Liquid Greenstuff to help disguise the line between the MDF wall and the matt board additions, and painting is in progress.
Tower roof and main roof from overhead. Click for larger.
Still To Do…
The outside edges of the base has a layer of fine scenery grit – coarse sand – glued down and mostly painted black; I’ll paint it up dark brown with a bit of a drybrush, then put various kinds of flock and turf around.
The porch still needs work, mostly paint, and a bit of detailing on the roof. The tower roof also needs painting, and I’m not entirely happy with the colours on the main roof.
Inside is still the big job. The Warbases kit comes with solid lasercut windows that look good from the outside but will make the accessible interior look a bit odd. I might use square grid plastic mesh – the same stuff you use in screen doors – to fill the windows, with inside walls of more matt board, like I did with the inside of the wall between the tower and church proper. Still, with the exterior done including scenic groundwork I’ll be happy to put the church on the table and put finishing the interior off for a bit!
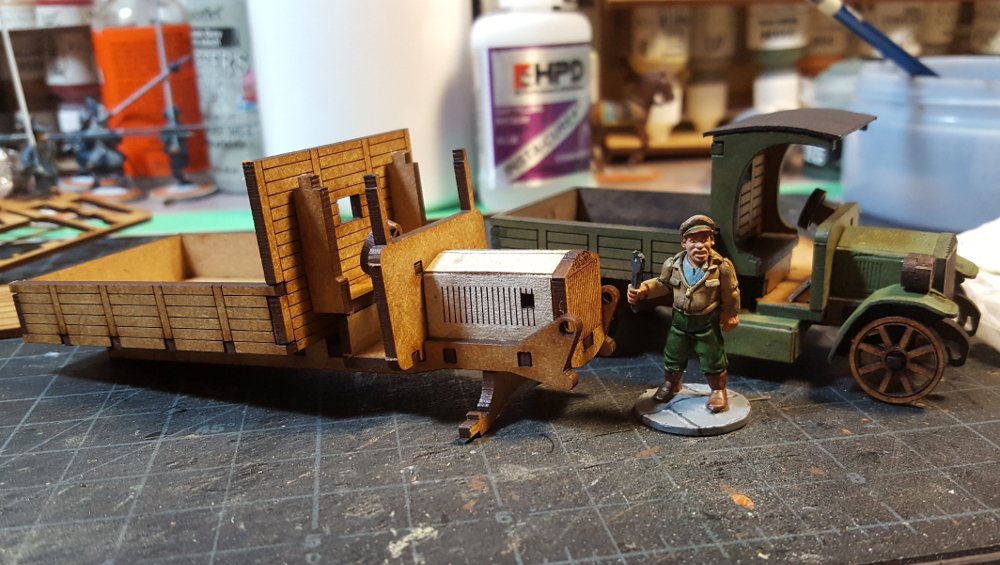
Warbases started doing vehicles in lasercut MDF and cardboard (greyboard) a few years ago and I was intrigued right away; a lot of 28mm vehicles are fairly expensive or (especially for World War One, Russian Civil War, or other early 20th C gaming) simply don’t exist.
It took me a while to get around to ordering any of the vehicles, but I now have a Pierce Arrow truck and an Albion truck that I’ve built, and I’m pleased to say these are really nice kits, great value for their cost, and quite easy to build!
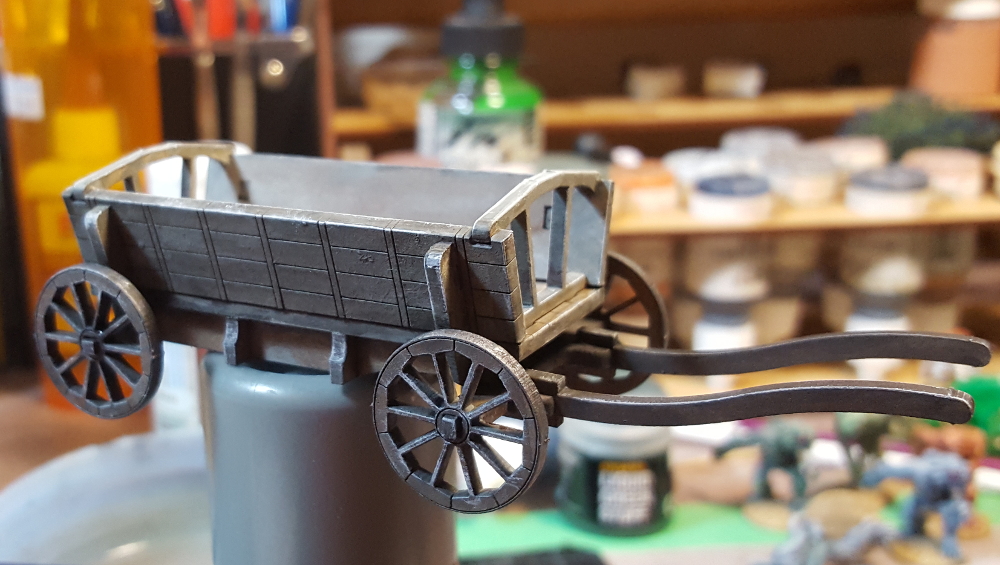
The Peasant Cart
I also picked up Warbases’ Peasant Cart 2, which is part of their Carts & Wagons line, listed separately from the Vehicles line. This is a straightforward little model, about 20 pieces including the wheels, and produces a nice solid piece of wargaming scenery. It’s called a cart, but it is a full four wheel wagon.
Assembly and painting didn’t take much time at all, maybe half an hour. I used a random grubby wash of green-grey over the whole wagon, added a bit of pale grey for the insides of the wagon, then did a bit of edge highlighting with a grey-white mix just to pop some of the edges a bit. I’ll probably glue some straw (cut from manila cord) down to the inside of the wagon just for a bit more easy detailing.
Assembled and painted wagon, resting on top of a paint jar. Click for larger.
The wagon is big enough that two or three figures on 20mm bases could fit in the bed of it, although it’s too narrow for 25mm or larger bases to fit flat.
The Trucks
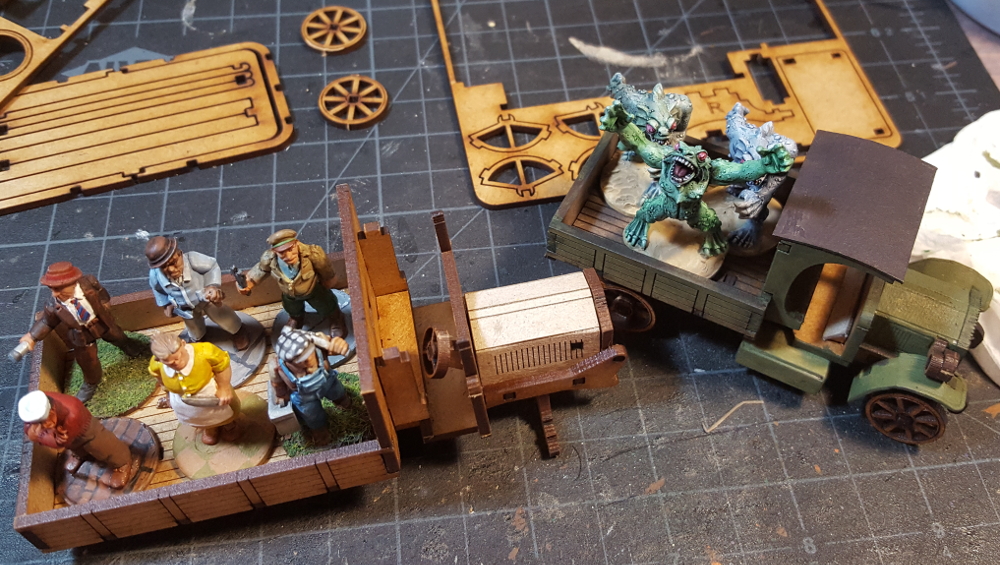
The Pierce Arrow is a relatively small truck, with room for two or three figures in the truck bed. The Albion is quite a bit larger, with room for 6 figures on 20mm bases or 3-4 figures on 25mm bases in the bed.
Albion truck under construction in the foreground, Pierce Arrow in the background. The figure is a 28mm Pulp Figures mechanic on a 20mm base. Click for larger.
Each truck comes as a couple of small sheets of MDF and an even smaller (business-card sized, roughly) sheet of greyboard card, with roughly 30 or so parts per vehicle. The instructions are photo-illustrated PDFs on the Warbases website, which does mean you can check them out before purchase. It sometimes takes a bit of peering at some of the photos to figure out which part is being fitted where, and as always I highly, highly recommend carefully dryfitting everything before you start adding glue!
One thing I noticed and appreciated about both trucks and the wagon is that any part that isn’t unique is actually identical to any corresponding part – the sides of the truck beds are identical and interchangeable, for example. Most parts aren’t labelled or numbered, but this nice design touch makes it hard to screw up the build process. Warbases has also put on-sprue/on-sheet photos of the parts of all three of these kits on their website, which helps sometimes with keeping track of parts.
The Pierce Arrow truck took me maybe an hour to assemble and paint to the point you can see in these photos; it’s got a bit of detail painting and cleanup left to do, and maybe some more weathering, so these are fast kits to assemble and get onto the table. I stopped assembling the Albion at the point you see in these photos so that I could paint the undercarriage before adding the wheels and fenders, as the Pierce got a bit cramped to paint with the wheels in place and the Albion has fenders on all four wheels, not just the front. I’ve also skipped putting the cab roof on the Albion for now to make painting the inside of the cab less painful.
Top view of both trucks with figures on 20mm bases in both. Six fit easily in the Albion (left) while three only just fit in the Pierce Arrow (right) with the third one overlapping. Figures all by Bob Murch/Pulp Figures. Click for larger.
The Pierce Arrow has been basecoated dark green with a black roof; I’ll do a round of highlighting (mostly of the edges) and there’s some detail areas like the wheels, headlight, and front grille left to paint. I haven’t decided what colour to do the bigger Albion; possibly dark grey or tan. Both colour schemes will do for either military or civilian vehicles of the era, especially in the chaos of the Russian Civil War!
The fenders, incidentally, are the only really fiddly bit of these kits. They’re lasercut card (greyboard) that you have to bend gently and then glue to an MDF inside piece to get them to hold the needed curve. Neither fender on the Pierce Arrow is quite right, although both are acceptable given the battering such fenders would take on the real vehicles! The instructions from Warbases say to bend the fenders over a pen or the handle of an Xacto, but doing this caused the greyboard to crease for me. I had better luck gently pressing the pieces against the pad of my thumb with another finger and gently flexing the card into a sort of curve that way.
That quibble aside, these are great kits and I’m sure I’ll get more eventually. They’re very sturdy once assembled, well designed for easy assembly, and it’s nice to have such an inexpensive source of vehicles for Early 20th C gaming!
Not much activity on the wargaming front in the last couple weeks, for a variety of mostly-irritating reasons, but I have made a bit of progress on the Warbases church I first mentioned in a post a few weeks back.
This is a nicely proportioned building, not so big as to dominate the table, and it’s of a basic design that can literally be found all over the world, anywhere Europeans (especially the Brits) hung out long enough to build churches. You could assemble the basic church in just a few minutes, paint it up quickly, and have a solid and respectable piece of wargaming terrain to use for years. Inspired by the really nicely upgraded example shown on the Warbases website, though, I’ve decided to do some extra detailing and really make this building pop.
I started by assembling the tower, then glued it and the floor to a piece of matt board roughly 11″ long by 7″ wide. I used light card to put flagstones on the floor, with another piece of mattboard at one end of the floor to raise the altar just a bit. The altar itself is more bits of matt board assembled into a rectangle about 1″ wide and half an inch deep. The altar got a coat of GW Liquid Greenstuff for texture, then painted grey with various washes, and a quick edge highlight of much lighter grey.
Warbases church assembled, roof on the right. 28mm Warlord pikeman for scale on a 25mm wide base. Click for larger.
The floor was primed black, then heavily drybrushed with a couple of shades of brown, red oxide, and burnt umber craft paints to get a good reddish stone colour. Most of the church is going to be that colour, with grey stone trim, as a change from the default grey stone!
The entry way on the side of the church has similar flagstone laid down and will eventually be painted the same as the inside floor.
It’s kind of hard to see on the photo above but at the top of the tower I’ve added wood plank flooring from sheet styrene, a trap door in one corner (more sheet styrene), and added matt board to the inside surfaces of the crenelated tops of the walls to double the thickness and make it look more like stonework.
Tower end of the church with the roof properly in place. Click for larger.
The roof got covered in Warbases slate tiles, sold in sheets lasercut from heavy paper (light card? Hard to say, really) with an interesting texture to it. Certainly easier than cutting my own tiles, I got the entire roof covered in just over half an hour of work!
Next up will be adding stone piers to the corners of the building from pink styrofoam, and adding some other stonework detailing with either styrofoam or greenstuff putty.
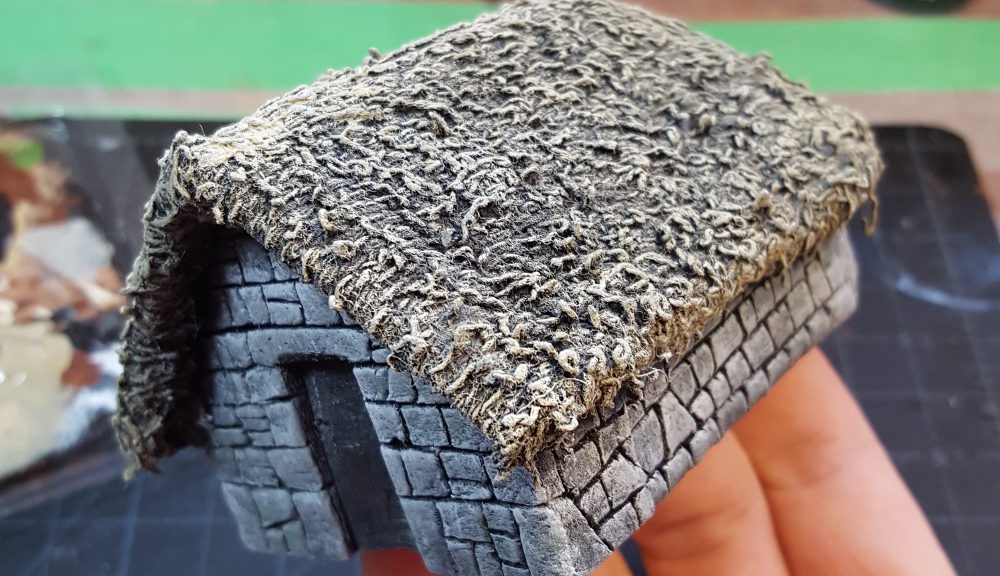
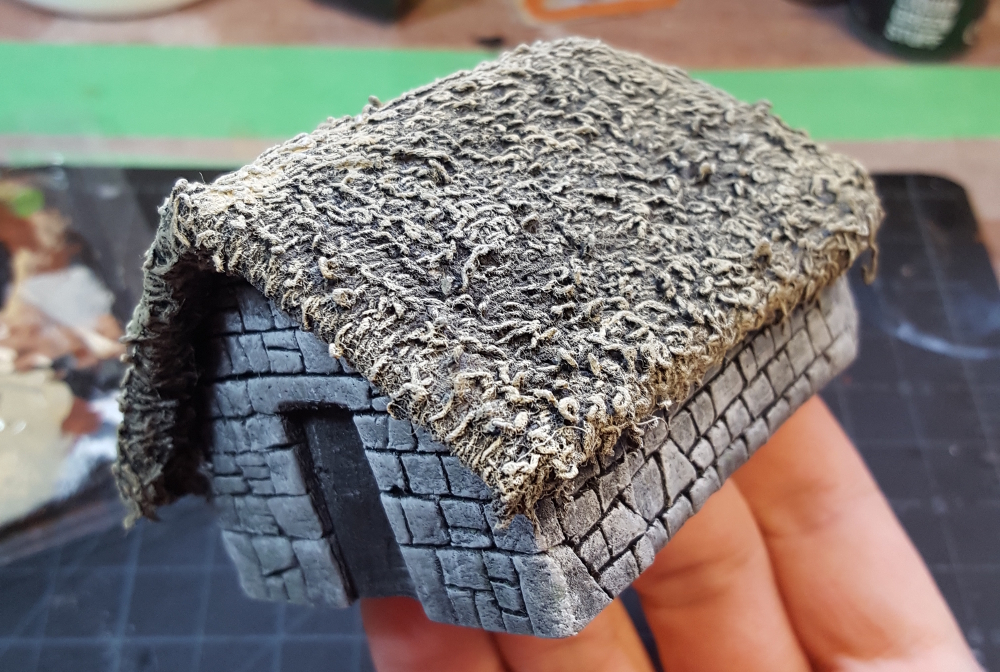
Glued down the towel thatching, slapped a coat of paint over the small stone building, added the door, and declared it done!
The towel got cut into a rough rectangle, big enough to hang an inch or so over the edges of the cardboard roof on all sides. I used a hot glue gun to glue the towel over the cardboard roof, including wrapping it around the edges and underside of the sides of the roof. This gave the roof the nice thick edge you see on a lot of thatch roofs. To fit the roof around the curve at the rear of the building I cut up to the peak of the curved part and layered the towel over itself further down, trimming a bit away so the overlap wasn’t too large.
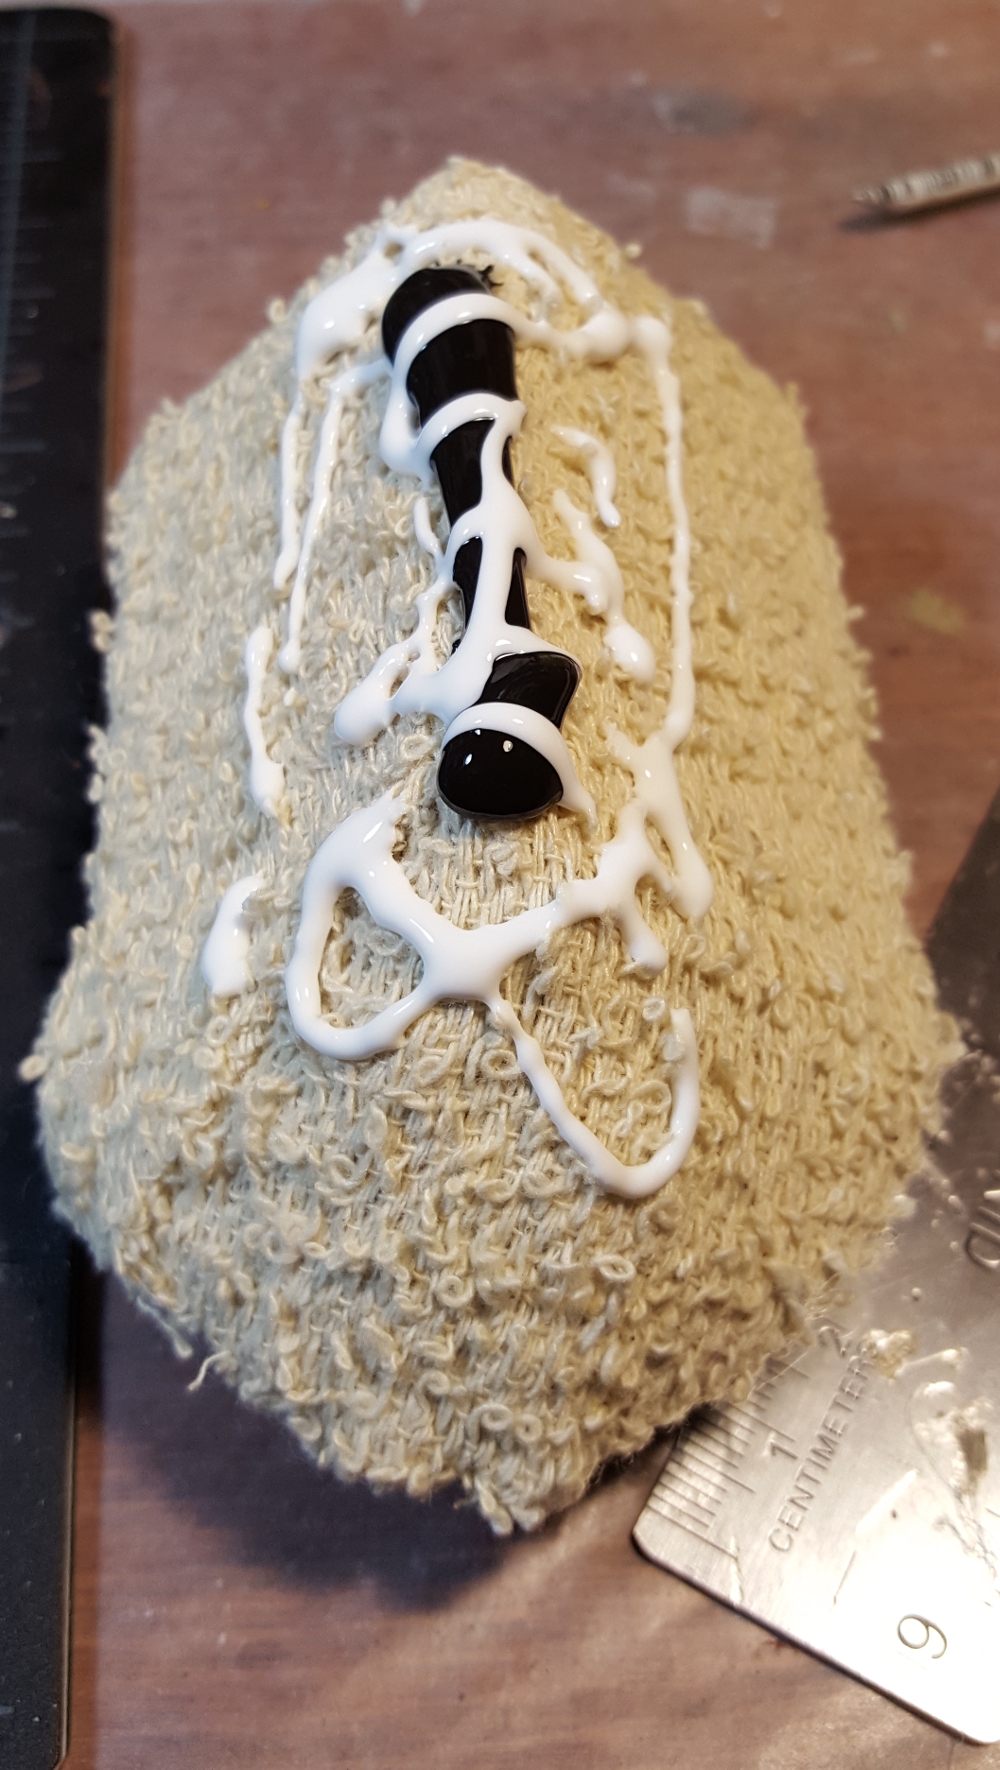
Adding black paint and glue to the roof. Click for larger.
The first layer of painting was actually a mix of paint and white glue, generously applied with a fairly large brush, with a bit of water to help move the paint around. Towel soaks liquid up like, well, towel, so expect to use more paint and more glue than you first thing you’ll need! After this mix has dried overnight it’s really solid and gamer-proof. One of the reasons I usually use a tan or off-white towel for thatch, even though I always paint over it, is that any bits of towel that don’t get painted still look reasonable, which wouldn’t be the case if I used a colourful towel &mdhas; thatch ain’t usually blue or red…
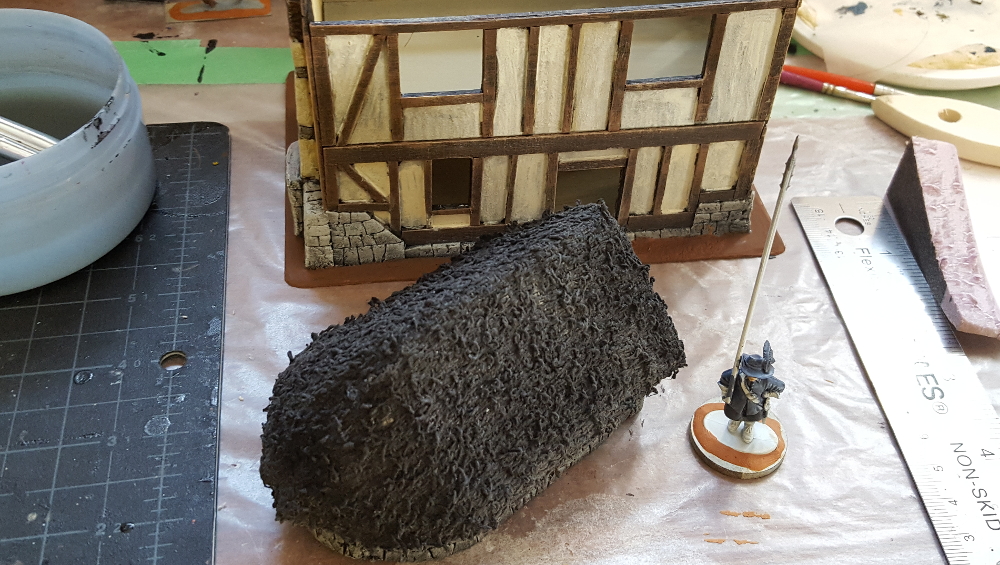
Basecoat on the thatch, with the farmhouse in the background and a 28mm Warlord pikeman for scale. Click for larger.
After the black paint has dried overnight I drybrushed various shades of brown and tan over the thatch, ending with a fairly bright yellow-tan colour mixed with a bit of white, applied mostly along the ridgeline and edges of the roof, just to make them pop a little. As with the base coat, don’t bother using a small brush for this, I used a 3/4″ wide cheap house painting brush for all of this work!
The stonework had also been based black. I put a few blotches of green and brown down here and there, and then drybrushed a dark grey, a pale grey, and finally a mix of pale grey and white over the stones.
I didn’t get a photo of the door, but it was done on a rectangle of light card with narrow pieces of scrap wood from coffee stir sticks, glued down with hot glue, then hit with a heavy dark wash (mostly GW Nuln Oil) so it looked like heavily weathered wood.
Painting all done, just the door left to install. Click for larger.
Stonework from styrofoam is a lot of fun and fast to do; I might do a few more stone cottages or something eventually. Maybe a ruined abbey or something suitable for pulp/English Civil War crossover gaming? We shall see!