I’ve been house- and cat-sitting for a relative in town the last ten days, so not a lot of action here on the blog, but I did take advantage of having extra space available to get a bunch of wargaming scenery built.
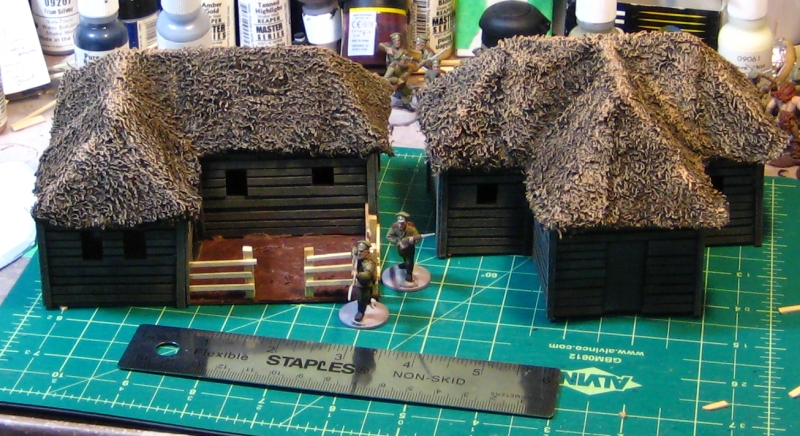
The most interesting pieces are a pair of houses for my growing Russian hamlet. The first is T-shaped, the second L-shaped with a fenced garden/yard area. Both have thatch roofs from towel; building and covering the more complex roof shapes was an interesting challenge. I even got some step-by-step photographs of the roof-building and thatching process, so expect an illustrated tutorial at some point in April here on the Warbard!
A pair of new, larger Russian-style buildings for our 28mm RCW games. Click for larger.
Both buildings have a 5″x4″ footprint and are about 3.5″ to the peaks of the double-hipped roofs. Unlike my earlier church, these two have doors or windows on all sides, so they’re potentially tactically useful instead of just being a line-of-sight blocker like the church.
In addition to the two buildings, I built two large hills (which can butt against each other to form one long ridge) and a smaller hill. I’ve needed more hills for ages, so it was nice to get these made finally. No photos of them, I’m afraid, as they’re buried in the bottom of one of my scenery boxes at present.
I”e also got about about ten new pieces of scatter terrain in progress, not all of which will be ready for my Trumpeter Salute RCW game in ten days, but I hope some of it will be. Photos of that as time allows in the countdown to Trumpeter!
We had an excellent Russian Civil War game using the TFL Mud & Blood rules Sunday afternoon. More people than I’ve seen in a while up at our gaming club’s Sunday meet but for a lot of folks it was a day to socialize, do a bit of painting or figure prep or similar – the RCW game would up being the only full game running.
Red defending the village at the start
I acted as referee/gamemaster, and three of the four players had never played Mud & Blood before. We still finished the game in under three hours of play and everyone apparently had a good time, so that was all good.
Whites advance
The scenario was fairly straightforward, with a disorganized Red force defending the outskirts of a small village from a slightly larger but much better led force of White Russians. Continue reading Reds, Squirrels, Whites and Others→
Bit of a quiet week here on the Warbard. I’ve been burning up all my available hobby time painting Russian Civil War figures. There’s two dozen Cossack infantry finished, another three dozen regular White riflemen nearly finished, twenty Red infantry in progress, and a new unit of ten Red sailors well underway. Yes, if you total that up, it’s nearly 100 figures, all 28mm. I’ve been a busy chap. There’s six or eight half-written articles in the Drafts queue here on the Warbard, but I haven’t touched any of them in days!
Nevertheless, a short Saturday evening diversion from the painting table… we are well known to love zeppelins here. We have to bow down to the gentleman featured in this Popular Science article, though. (via Bayou Renaissance Man, who has more photos)
Even better? By my quick admittedly rough calculations, a 20ft-long model of the USS Macon is roughly 1:56th scale, ie 28mm… the gentleman in California has created a wargaming model, possibly without knowing it!
Tomorrow we game the Russian Civil War again using the Mud & Blood rules, photos and a game report tomorrow evening!
Well, dozens at least. We have recently decided to start down the Zulu War path, but haven’t made it very far down that path. In fact, I think we made it about 1/4 across the table today, our first Zulu Wars game.
As my Warlord Games figures have not yet shown up, we were quite light on the troops. I borrowed the 4th Coy of the 14th Fernwood, Malcolm ran his 3rd Coy, Bruce had a wagon train, and Dale another unit of infantry and a gatling gun. We pretty much all died.
I got to lead the whole day, an “honour” for which my slain commander, Captain Bromhead, scored our first Victoria’s Cross. At first, the Zulus were just a hazy sight in the distance (made hazier by Bromhead having lost an eye in the Indian Mutiny of 1857).
Zulus in the distance
However, the Zulus very rapidly became not-so-hazy. Very distinct as a matter of fact. They were kind enough to remain at a distance, allowing me to very sportingly shoot them. (Later arrivals weren’t nearly so accommodating. Hence the VC.)
Zulus in the rough
Bored at being out of action, our gatling gun decided to go and discover some Zulus via running to our extreme left flank. Shortly Zulus were discovered, and sent packing. The Horns of the Buffalo card meant that “sent packing” actually meant “gone to get their friends.” Amusing result on the right flank was a herd of cattle. Horn of the cattle more like.
Battle is joined
The left flank went from “Gee, I don’t think they should be all the way over there” to “Oh crap, we are overrun” in very short order. Colonel Spiffer, shiny white uniform and all, quickly found himself surrounded. Being a hero, he was able to extricate himself. Our gatling gun, on the other hand… Let’s just say that rumours of the Zulus using a gatling gun a month later are totally untrue. Slanderous treason, in fact.
(Nearly) surrounded
All this action to flank quickly evolved into action across the entire front as Zulus, hot off their success against our gatling gun, attempted a front assault. Flesh was pressed, personal details (and bodily fluids) were exchanged, and everybody got screwed in the deal.
Completely engaged
In due course this wave of Zulus was sent packing, but the next wave sent both my brave 4th of the 14th, and Dale’s scurrying for the rear. Which leaves only the 3rd to hold the line. I think the next two pictures tell the story.
Near the end now
The end now
And so ends our first action of the Zulu War. We can only hope that better painted troops will fare better (although that is likely to hold true for the Zulus as well).
Our rules are based very loosely off of Triumph and Tragedy (from the superlative Lead Adventure forums) with a great deal of rules changed. First and foremost, we ran our Zulus as AI-controlled with dice to determine action. There are many on the fly changes to the modifiers, as we sought to get the right “feel”. We also changed from i-go-you-go to alternating half-way through, again to test rules.
We also experimented where the overall commander, in this case Malcolm, handed out two order cards (from the standard T&T deck) to each player at the start of each turn. This led to a lot of jockeying for a specific card, especially as our situation became more desperate.
Figures are mostly Warlord Games, with some Empress, Wargames Factory and Essex. Terrain is a mixture of mine and Malcolm’s.
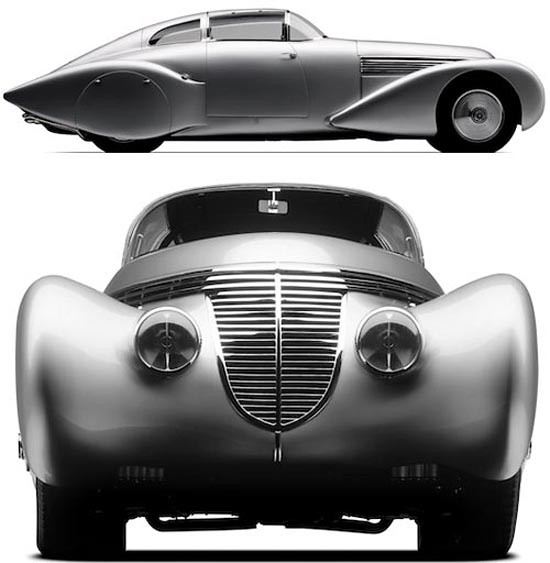
This has minimal bearing on the 28mm pulp gaming we usually do that might involve a zeppelin, but it’s such a cool and masterful technique I have to share: Creating Zeppelin bodies with foam insulation.
Basically, take long billets of foam, run a hot wire knife across a profile, and rotate the billet to create that distinctive “faceted” look of a Zepp body. Very cool.
Of course, I once calculated a 1/56 (28mm) scale of Graf Zeppelin would be about 19 feet long (nearly six metres!), so doing the gondola and a bit of the body in 28mm is (marginally!) saner. Only marginally, mind you. The small-scale foam zepps in the first link are a lot smaller and saner; they’re still about 3ft long, though.
If you are minded to do some zeppelin construction, in whatever scale, you could do worse than following the useful links from this Propnomicon posting called “Zeppelin Goldmine“, which has links to high-quality scans of a book of speculative 1920s designs for a Graf Zepp-sized trans-Atlantic zeppelin. The gondolas of those look fairly buildable as 28mm skirmish terrain, actually. One of these days…
Everybody has played Cowboys and Indians before, but not many have experienced the insanity that is Pony Wars, a game designed deliberately to emulate the Western TV shows of the 20th century (now give the rules were written in the 20th century, this isn’t surprising). The miniatures (and the rules) were courtesy of one of the long-standing members of our gaming club, Dale, who like most other long-term gamers has all kinds of interesting things collecting dust. Joining in the fun were a few other regulars as well as Josh, a random walk-in we immediately made Colonel (that we couldn’t agree on who should be in charge made this decision much easier).
The table was laid out in a fairly basic pattern, with the US Cavalry fort at one end, two passes in the middle, plus a town, three homesteads, a mining encampment, and an Indian village. Unlike most adversarial games, all the players are nominally on one side: US Cavalry commanders of some rank or another. The Indians and all the civilians controlled through card-driven events and dicing on tables for reactions. In fact, the game was very table-heavy, as is common for games of the ear (1980’s)
I rarely take pictures of the whole table, so here is one taken by another player:
Given our inability to agree on a commander, our inability to agree on an overall strategy meant that we ended up streaming out of the fort without specific orders. David, who had US Indian-ally Dando with him, decided to head off to the far corner of the board to bravely burn out the Indian village, held by old men, women, and children. Malcolm headed off to hold the passes with his artillery and scouts, and the rest of us buggered off to do our own thing. Given the rules told us to head out in single file (it looks better), the looked something like this:
Exiting the fort
The game, like all good stories, has a few chapters in which our heroes get their asses handed to them. Ours included Dando, after heroically deciding not to burn down the Indian village right now, getting slaughtered in one-to-one combat with the Indian chief, Big Eagle, despite Dando have ridiculously good odds. Karma, not yet imported to America, was still a bitch. I got half of my cavalry troopers, on detached duty, chopped up by Indians, moments after telling my fellow commanders I risked defeat in detail. Ah details, never liked them.
After Dando's blunder, civilians pay the price
Other hilarious moments included me failing to bring the wagon train under control (this required a dice roll, which I naturally failed many times) right up until the wagon train ,having crossed the entire board, spotted the Indians. They took a few potshots then freaked out and circled the wagons. Dando’s blunder also lead to the only civilians we lost getting massacred by Big Eagle, which sets us up for our climatic battle for the town.
Oh, there you are! My cavalry "discovers" the Indians
With fresh US Cavalry that entered the board near the town, headed most of the board to the fort then turned around and headed back to the town, I managed to stream my troopers right into Big Eagle, fresh off his scalping of our brave settlers (evil land-stealers to the Indians). You can shoot yourself dry in this game in an awful hurry, which I proceeded to do. I then discovered I had retreated to the saloon. Needless to say, that was it for my troopers. They were “conserving ammo” in case more Indians arrived. None did, and other brave soldiers drove off Big Eagle, so we called the game at that point with no Indians on the table and turns before any would arrive.
"Defending" the Saloon
All in all, it was a blast. The 15mm figures of Dale were beautifully painted, and his town was amazing. Playing with what amounted to AI-controlled enemies allowed us to see what our upcoming Zulu Wars game might be like, and added a nice level of aggravation for their players (Damn civilians, stop running around and get to the fort). The best part of the story-driven aspect was that it allowed all the players to feel involved, even when you could spend several turns do nothing but moving around. For those visual types, I have a few more pictures in my flickr set of the game.
Back one of the before-Christmas sales, I picked up a Fiskars circle cutter on deep discount from one of the local art supply stores. It’s been on my toys-I-want list for ages, and a chance to get it at 40% was too good to pass up.
It’s proven to be a useful gadget, although with some limitations. It will cut paper, light card and styrene up to about .020″ or .030″ thickness no problem; anything heavier than that it’ll score but not cut. With thicker styrene you can score then clean up with a file or sandpaper later, but this obviously means cutting heavier card is out.
Exact alignment of the circle to be cut out can be a bit tricky, but the central rubber “foot” does pull off to reveal a more compass-like needle foot which makes alignment easier. Of course, I only realized the needle foot option existed a few days ago, when I finally got around to reading the “Instructions and Tips” PDF from Fiskar’s site. Amazing what you learn when you read the instructions, isn’t it?
The other work-around for imprecise cutting is to design graphics that don’t have to be cut terribly precisely, of course. That’s what I did when I laid out the graphics for a batch of 1″ circular markers for use in our Russian Civil War games.
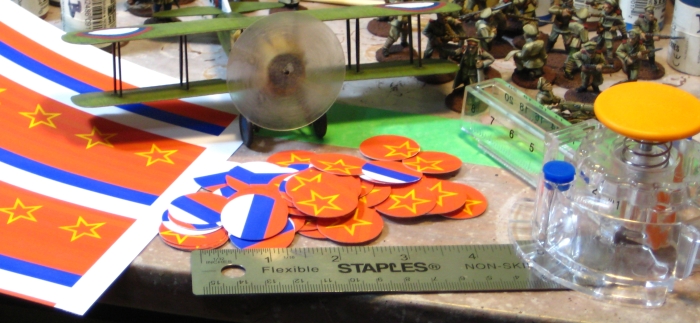
On the right, the Fiskars Circle Cutter. Central, the prop disc and M&B markers cut with it. On the left, the sheet of markers I made in Inkscape.
The markers will mostly be used for showing which Big Men & units have activated in any given turn, as we noticed it can be easy to loose track of which units have been activated with multiple Big Men running around in Through The Mud & The Blood. They can also be used to mark things like sustained fire lanes for machine guns or similar, of course.
On the left of the photo, notice the sheet I laid out in Inkscape for the markers; except for the star the solid colours are fairly forgiving of cutter placement. A few of the Red star markers have had their tips clipped by the cutter, but they’re still obviously Red Army stars, so I’m not fussed. Now that I’ve discovered the cutter’s needle foot option, I should be able to cut out the remaining marker discs perfectly.
The SPAD’s prop disc was cut from leftover heavy clear plastic from a blister pack, then put down on a sheet of 600 grit sandpaper and spun by hand to get the hint of motion blur in it. I wound up taping the piece of plastic to my cutting mat, then the cutter worked nicely on it.
So, the Fiskars Circle Cutter. A useful piece of kit, within it’s limits. I’m sure I’ll get years of use out of it — but wait until you find one on sale before getting it!
Finally swore the upper wing into place this evening. It’s been years since I built a biplane model, I’d forgotten what a total bugger the struts and upper wing can be. The SPAD 13 as 12 struts, only two of which are especially solidly mounted when it comes to getting the upper wing positioned, the rest of which wobble entertainingly.
Even now the upper wing is very slightly skew and I have doubts about it’s long-term stability when the plane is in wargaming use, but we shall see. After getting the upper wing fixed, the landing gear and prop disc were painless.
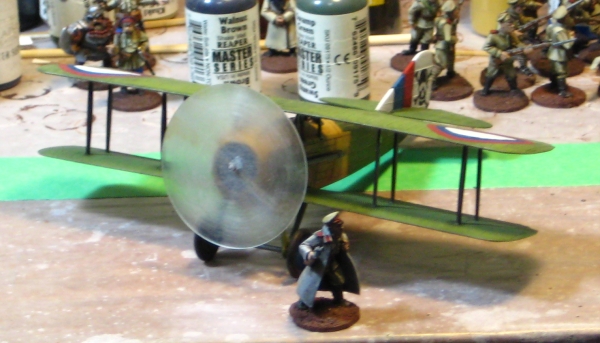
The White Russian SPAD completely assembled, needing only some touchup painting here and there.
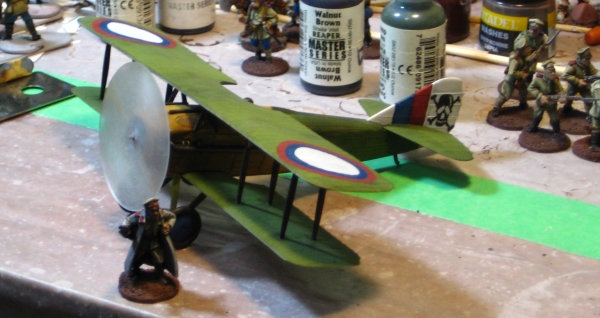
Major Vodcanovitch of the White Russian army provides scale; he’s a 28mm Brigade Games officer.
The White Russian SPAD from the front.
That’s the SPAD largely finished, except for a bit of touchup painting and two struts I need to reinforce to help solidify the upper wing.
Now, back to finishing that crowd of White Russian riflemen and officers you see cluttering the background of the SPAD photos!
Inspired by this image from Wings Palette, I decided to give a bit of freehand a try.
Via Wings Palette, a Russian SPAD 7 with a nifty skull-and-bones squadron insignia on the rudder.
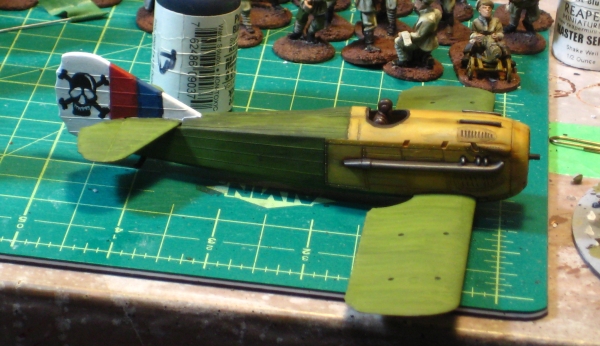
My version:
Skull and crossbones insignia on the rudder, and weathering on the fuselage.
There’s a (nearly) matching skull on the other side of the rudder, of course, although this one turned out better so I’ll have to always remember to photograph this plane heading right! I also used thinned paint and washes to dirty up the fuselage, especially around the nose where the engine and guns make a mess.
I’ve also put a half-inch wood screw up into the belly of the plane, right behind the main landing gear, to serve as an attachment point for a flying stand. There’s two layers of plastic there, from the wing and the body, and the screw seems solid so far, especially with a drop of superglue to lock it in place. I had thought about using a block of wood or blob of milliput inside the fuselage before I assembled it to provide a solid attachment point, but got impatient to assemble the plane! Hopefully the screw will be solid enough as-is, worst case scenario I can always carve a hole in the belly of the plane, stuff the hole with milliput and sculpt a patch.
Up next, one last touchup of the roundels and other paint, then final assembly: cursing the upper wing into place, adding the landing gear and prop disc. That’ll be it, then it’s back to my neglected horde of White & Red infantry who need painting up!


 surrounded")


")