Posts, articles and links mostly concerning the painting of miniatures. Lead Painters League posts, links to resources and inspiration elsewhere, and such.
Speaking of YouTube, Dr Alexander Clarke has an interesting channel with WW2 and interwar naval stuff, mostly British. Similarly, Drachinifel does mostly WW2 naval history videos as well, more American navy but some others.
Boom & Zoom Graphics have a set of really approachable, humourous, but (far as I can tell) complete introductions to WW2 aircraft markings, painting, and camo, with entries for each of the major combatants. Superb reference for WW2 air if that’s largely a new field to you as it is to me!
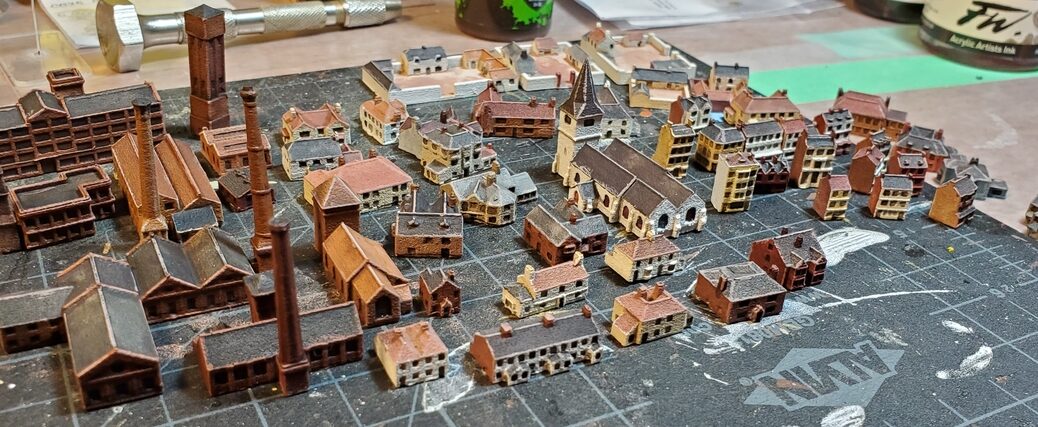
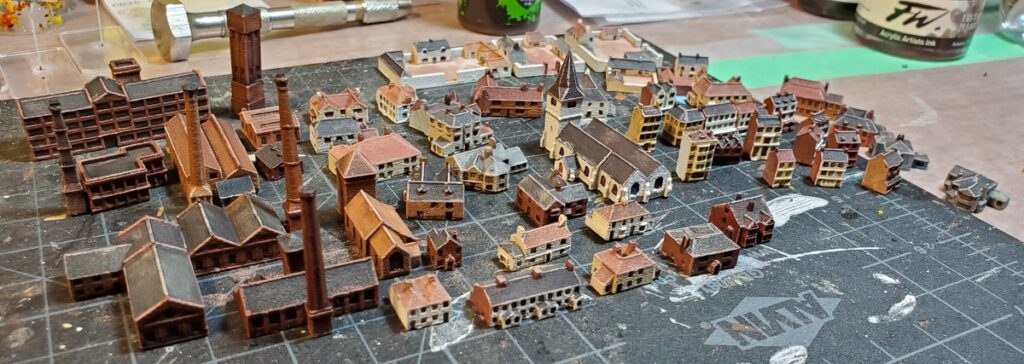
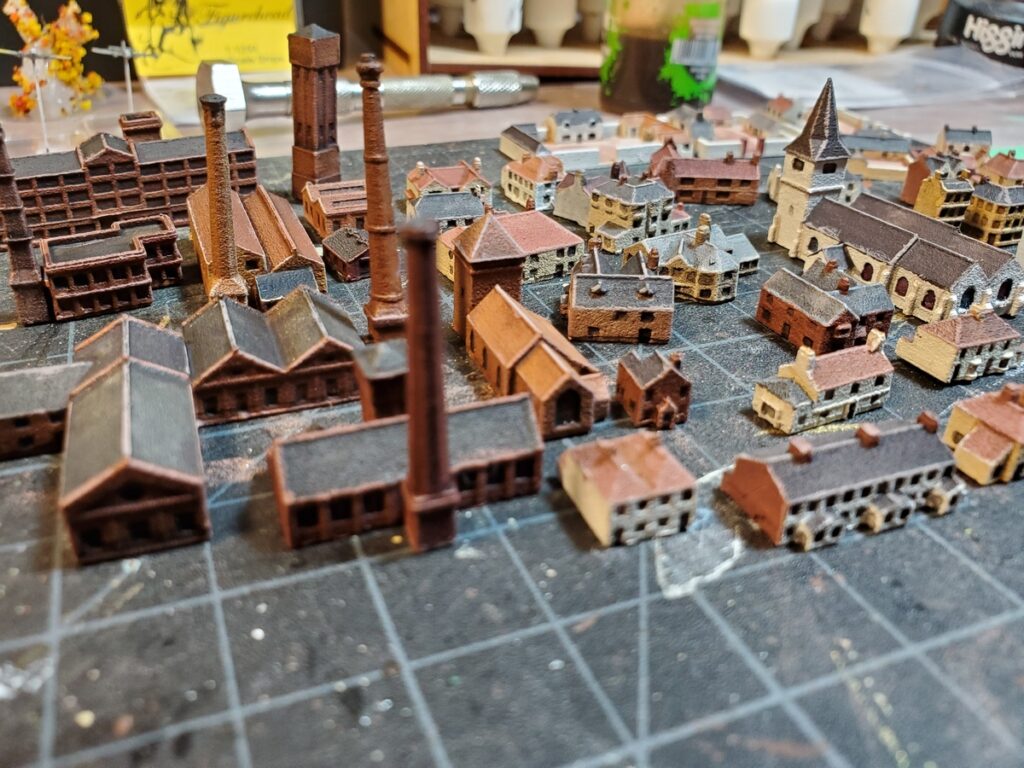
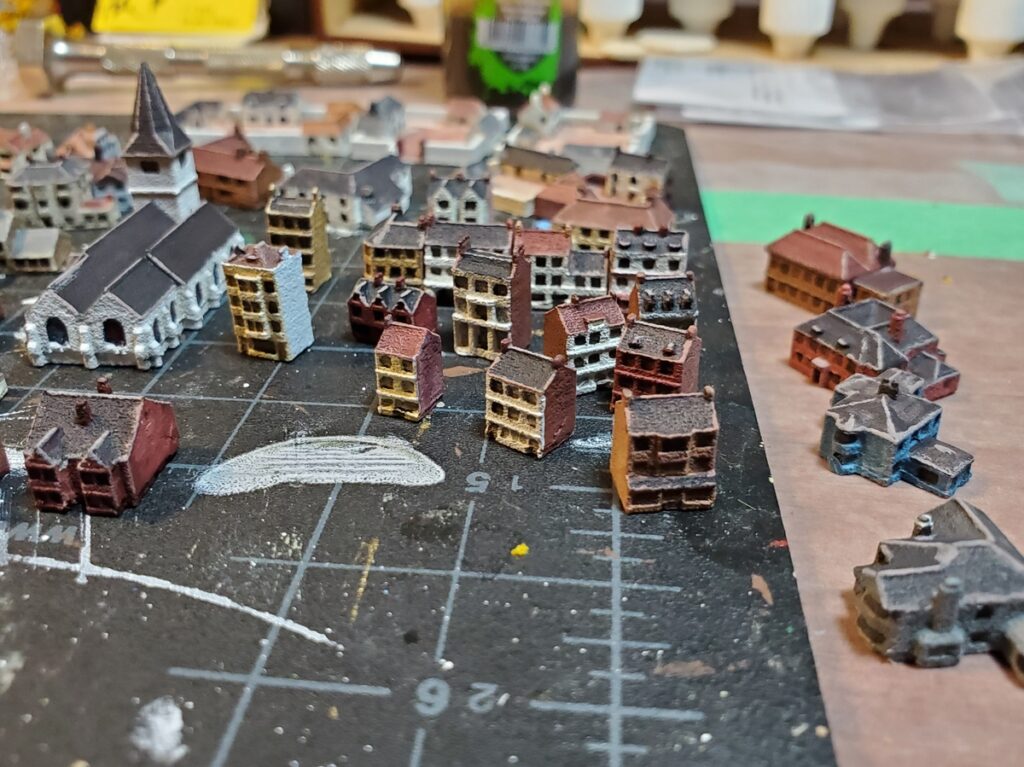
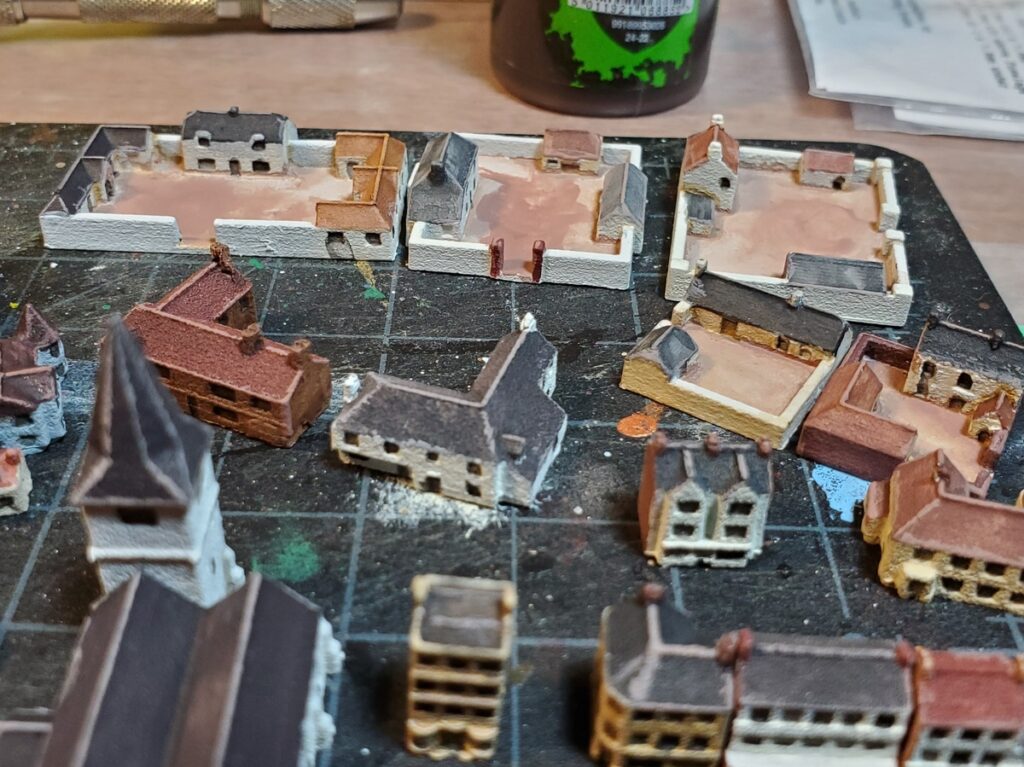
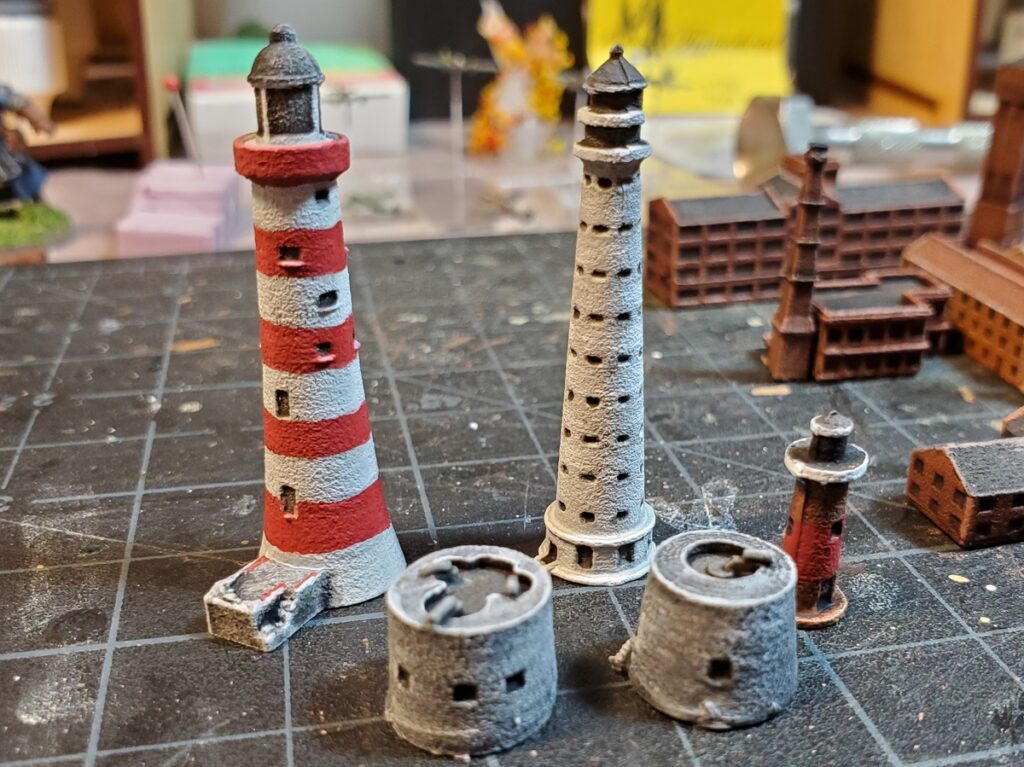
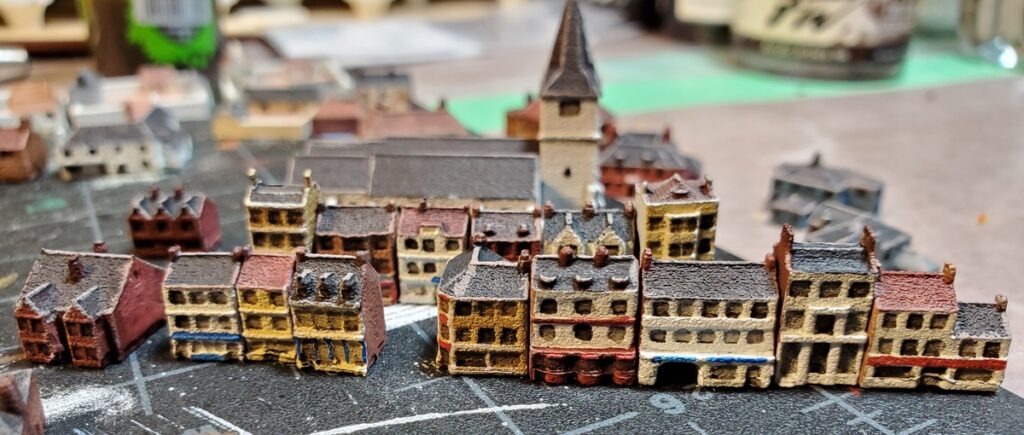
I’ve finished painting the last buildings of my first Brigade Models Small Scale Scenics order, before I start in on painting the buildings and scenic bits I got in my second Brigade order. This batch has the British town, village, and suburban buildings I didn’t use previously, a bunch of industrial buildings, and a couple of lighthouses.
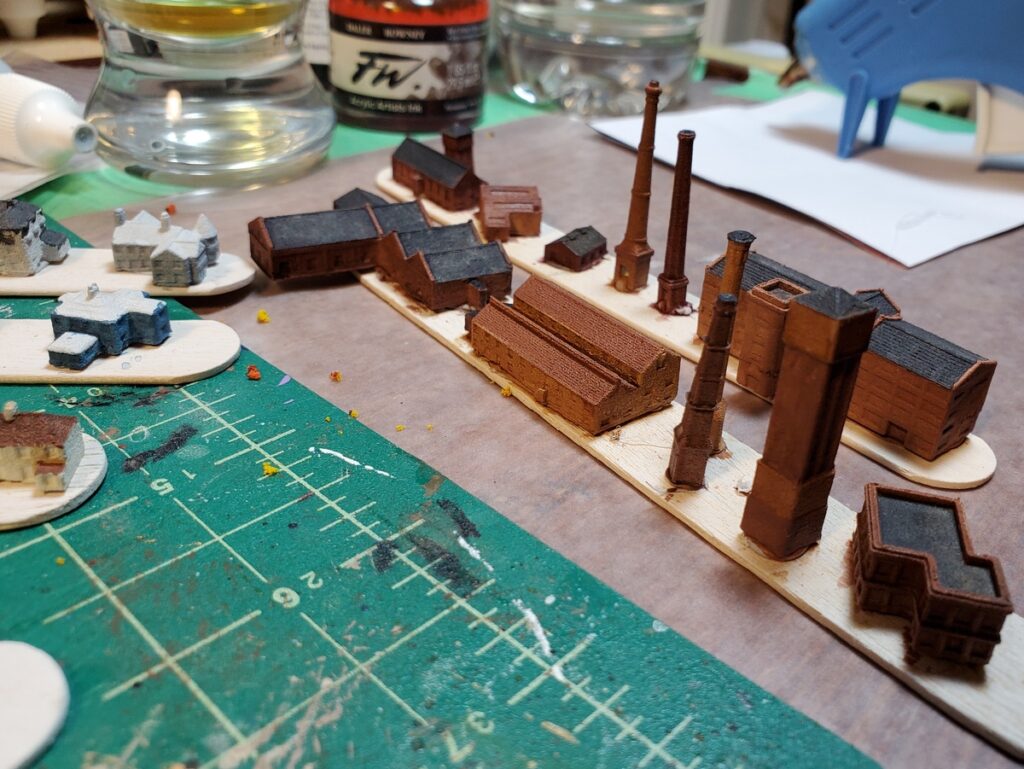
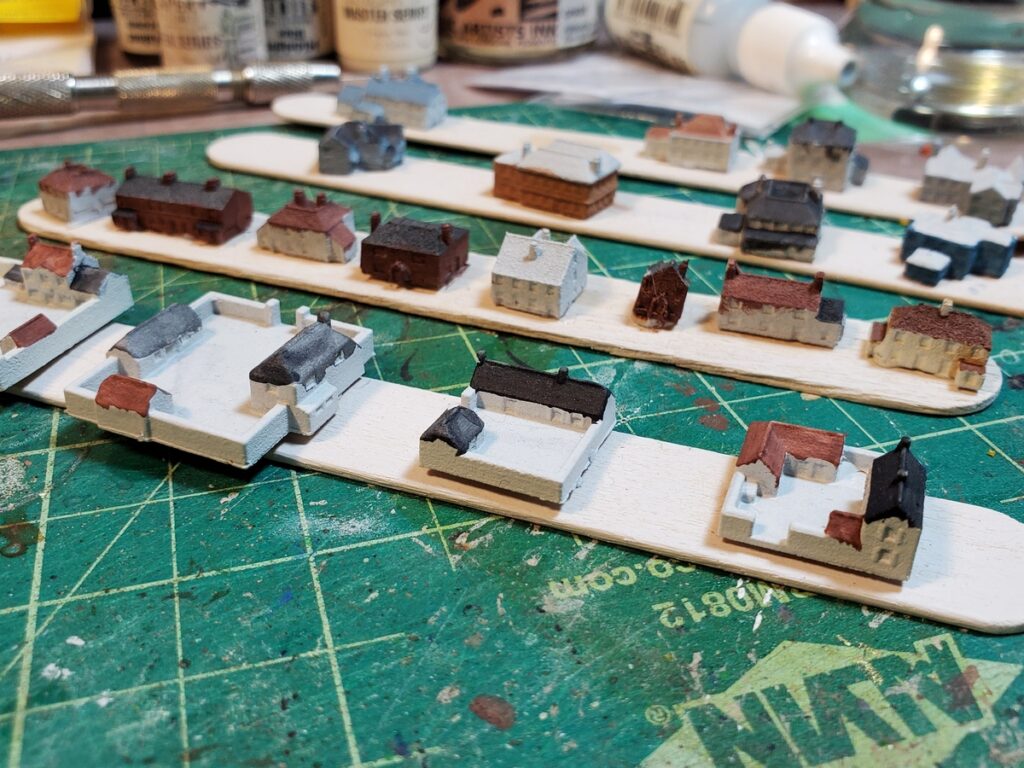
The cutting mat in all of these photos is a one inch/half inch grid, for scale. The largest of these buildings is less than two inches long, and the smokestacks are all between an inch and an inch and a quarter tall.
In progress industrial buildings, in various shades of grubby brick. Click for larger.Walled farmyards and various houses and such behind. Click for larger.Everything all finished and off the painting sticks. Industrial buildings over on the left, two churches and a variety of detached houses centre, various town/village buildings on the right. Farms in the background. Click for larger.The industrial buildings, churches, and a variety of houses. Click for larger.Town and village buildings, and some more large detached houses on the right. Click for larger.The farmyards, still with some work to do on the actual yards but the buildings complete at least. Click for larger.Lighthouses and Martello towers. Click for larger.A streetscape of sorts, most of the village/town buildings pushed together roughly with the larger church behind. Keep in mind most of these buildings are about 1/4 inch wide! Click for larger.
Now that these are all done they’re getting varnished and then put back into storage for now, so that I can move on and finish some more partially finished projects before I come back to building more coastal modules and starting on the buildings from my second Brigade order.
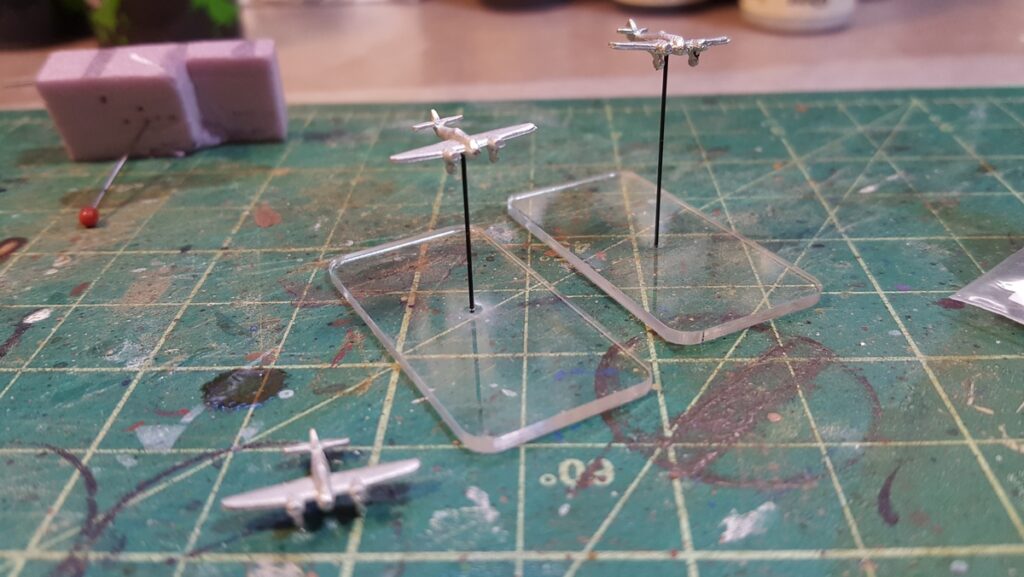
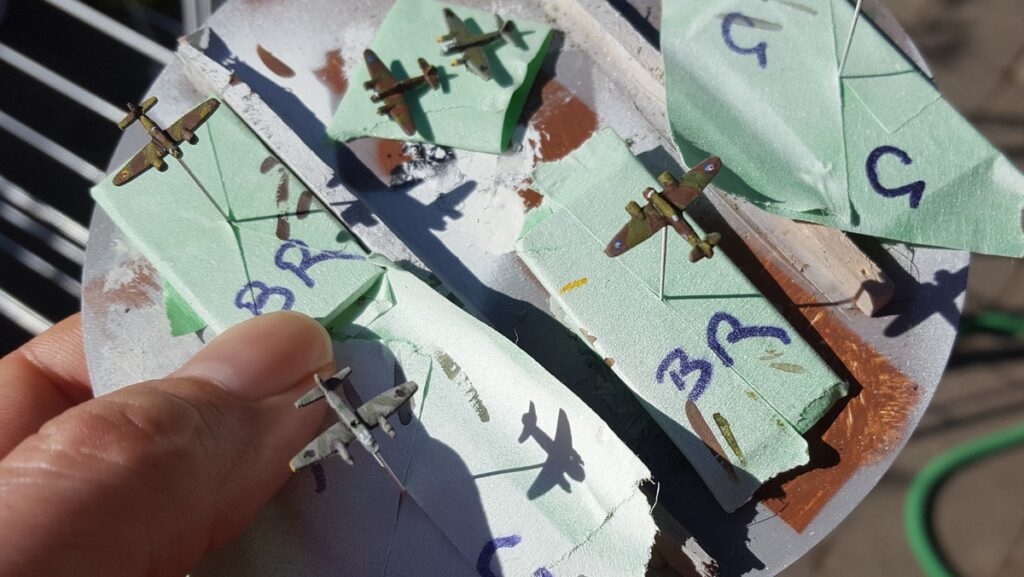
When I did my first WW2 coastal order to Last Square back in November 2019, well over six months ago now, I added a pack of British Beaufighter/Beaufort and a pack of German Ju88 for the heck of it, chosen because both types of aircraft show up in the maritime strike role for most of the war with various loadouts.
I got them, looked at them, was dumbstruck by the insanely minute size of the things, and put them aside to paint the boats up instead. Having just finished (most of) the second order of Last Square coastal naval boats and being in a get-stuff-finished mood, I decided to have another look at the tiny tiny planes and figure out how to mount and paint them.
I recalled reading about using plastic broom bristles for masts and antenna previously, so I decided to test this out for creating flying stands suitable for tiny planes. I used the same 40mmx20mm thin acrylic bases I’m using for most of my boats, because I’ve got them, and I happened to have a micro-drill-bit in my tool stash almost perfectly the same size as the bristles I harvested off our household broom.
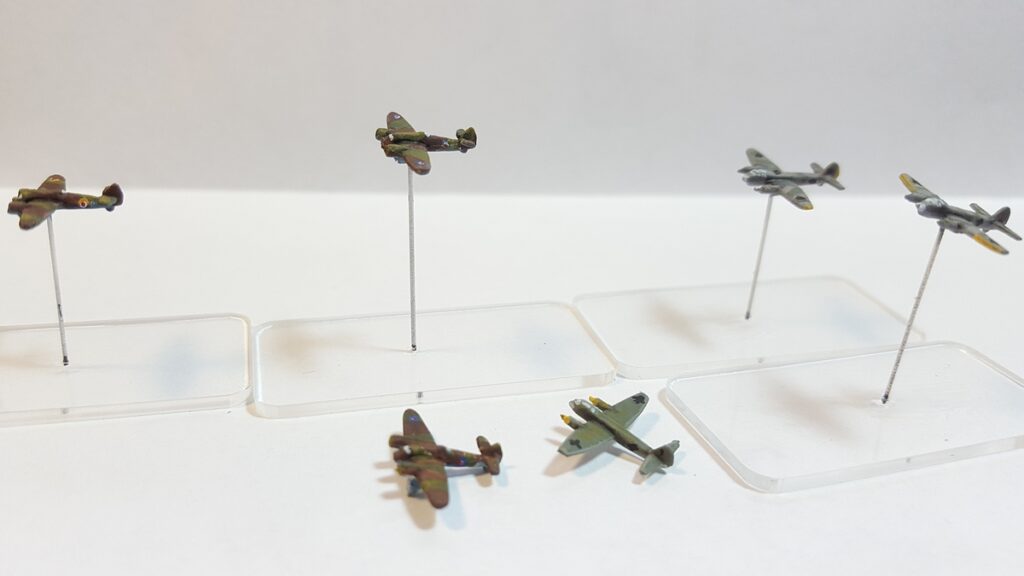
RAF Bristol Beauforts/Beaufighters, two mounted and one left loose. Click for larger.
I kept the flying heights fairly short, about one inch maximum, which means these planes are all coming in at wavetop height, pretty much, which seems to make sense when attacking small coastal vessels and is way, way easier to store than taller possibly more realistic height stands!
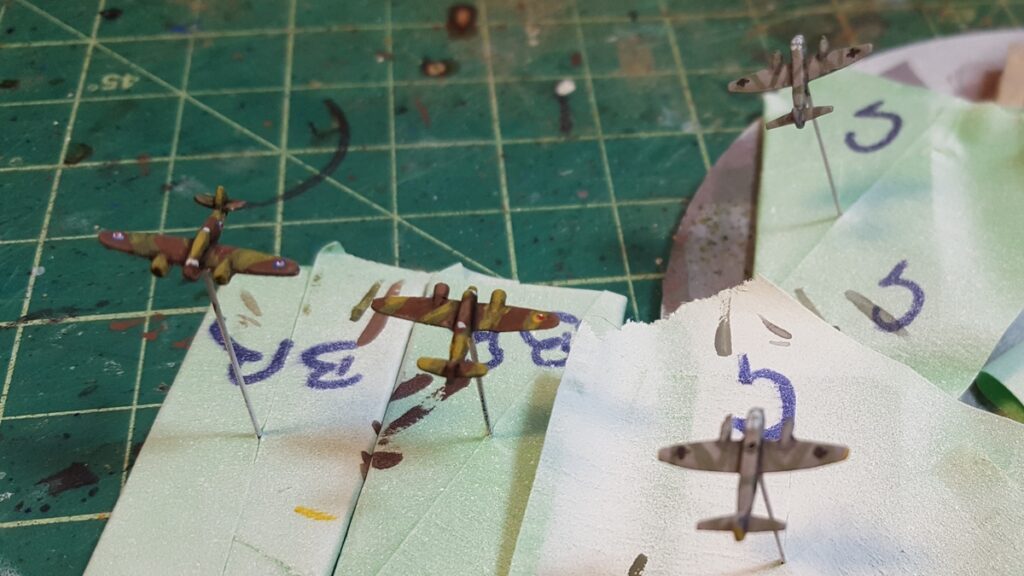
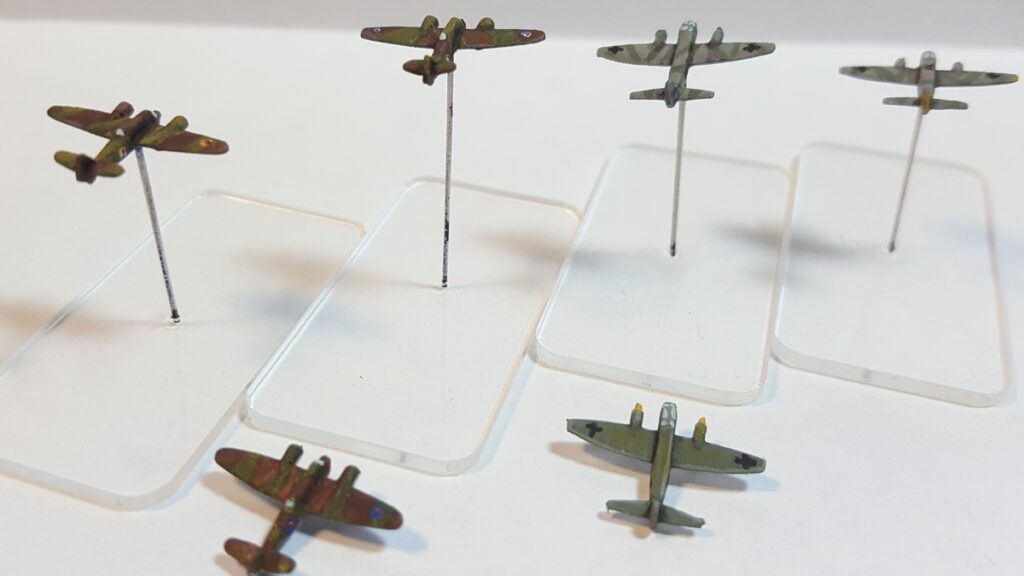
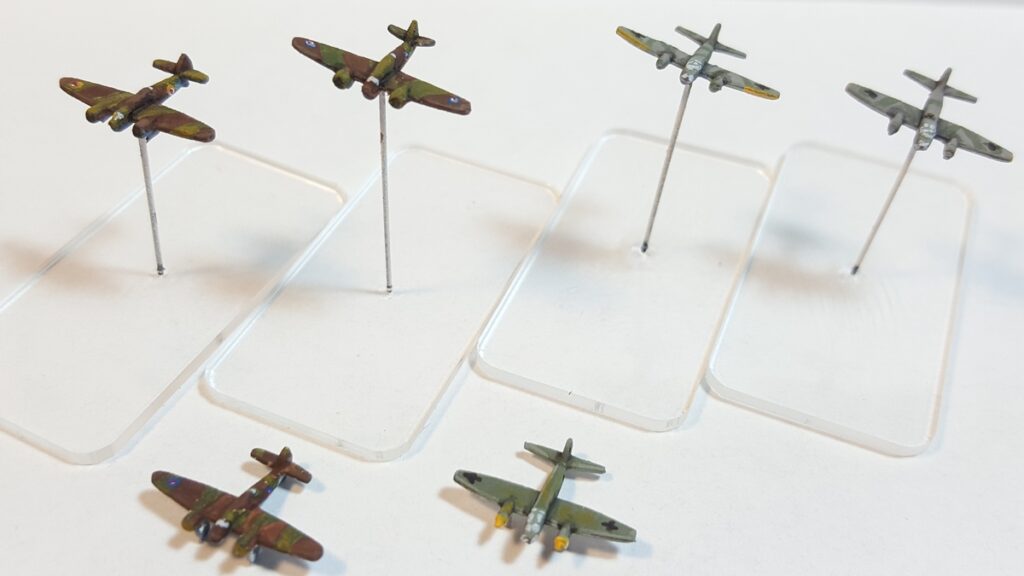
Two Beaufighters and two Ju88 mostly done, including recognizable national insignia on these tiny, tiny planes. Click for larger.Extreme closeup of the unmounted Beaufighter and Ju88. I’m pleased with the look of the canopies, especially on the German Ju88 with their big “greenhouse” canopies covering most of the front end. Click for larger.
Painting Notes
All my current paints are from the Reaper Master Paints series. All six planes got a white primer, and then for the RAF I used Muddy Brown and Military Green for the topside camo; the underside is Heather Blue mixed with Rainy Grey which seems like a good match for the RAF “sky blue” grey-blue underside paint.
The Germans were a mix of Rainy Grey and Muddy Olive 1:1 for the all-over base coat, with two of the Ju88s getting slightly darker grey-green camo added with some additional Stone Grey added to the Rainy Grey/Muddy Olive mix.
I adding some highlighting along edges mostly by mixing a bit of Rainy Grey into the relevant base colour, and the Germans got some yellow recognition patches with Marigold Yellow. I also used some Games Workshop Nuln Oil (black) and Agrax Earthshade (brown) washes, especially along the roots of the wings.
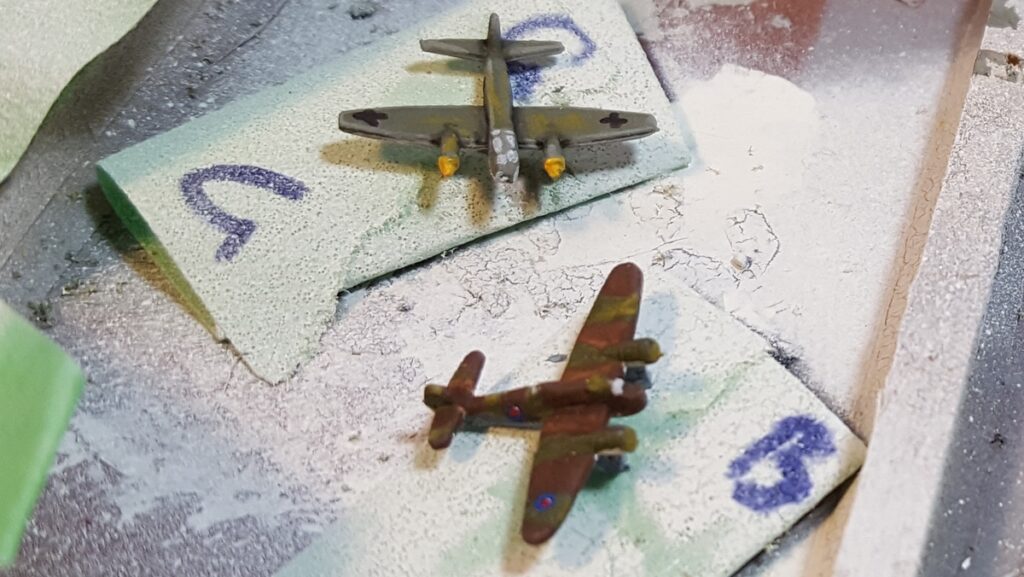
The German iron crosses are Walnut Brown, a lovely almost-black that I use all the time instead of actual Pure Black.
The RAF roundels are Marigold Yellow, Sapphire Blue, Pure White, and Carnage Red.
Windows and cockpit canopies were picked out with Ghost White, a blue-tinted off-white.
For scale, I made sure to take this photo with my thumb “in the way”. That’s a standard CD I’m using to hold the planes, just for additional scale. These things are seriously tiny. Click for larger.Side views, RAF Beauforts/Beaufighters on the left and Luftwaffe Ju88 on the right. Click for larger.Tail end view, Beaufort/Beaufighter left, Ju88 to the right. Click for larger.Forward view, same arrangement as previous. Click for larger.
Aircraft don’t actually play a huge role in most of the engagements coastal naval vessels find themselves involved in, so I don’t think I’ll be adding to my collection of tiny aircraft anytime particularly soon, but these turned out to be fun to paint and they ended up way better looking than I was thinking they would, given the diminutive size of the things!
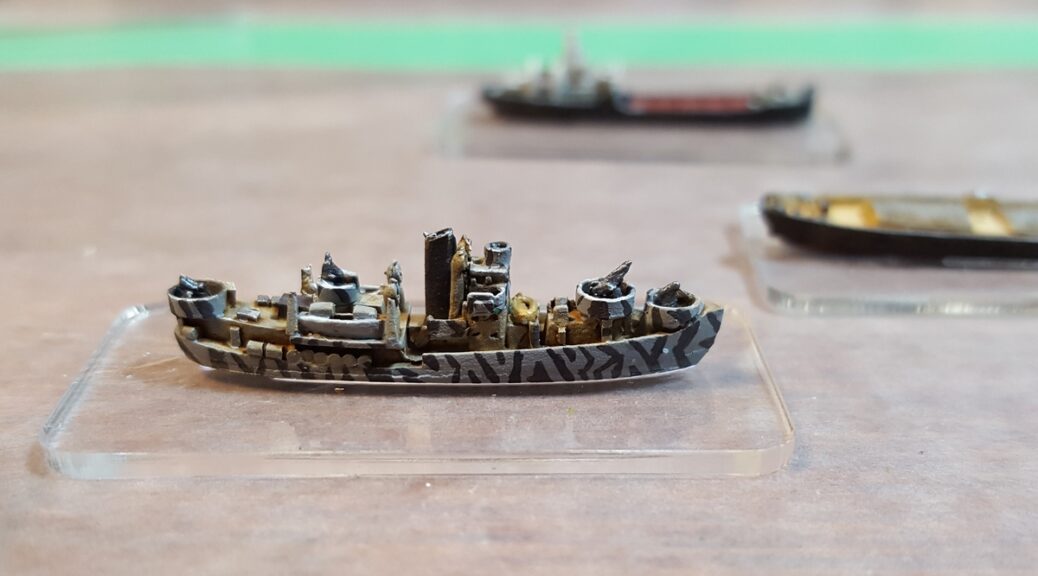
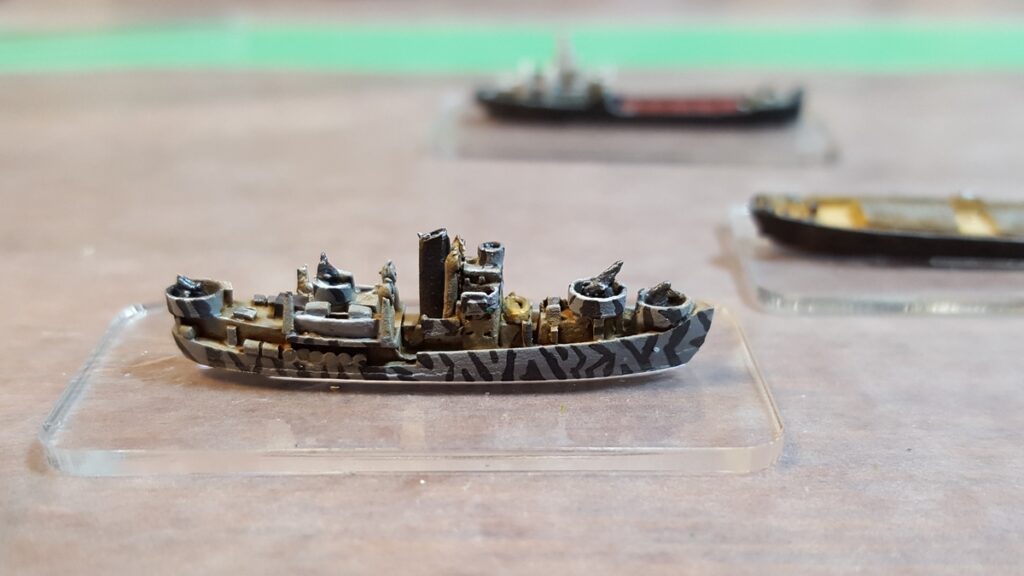
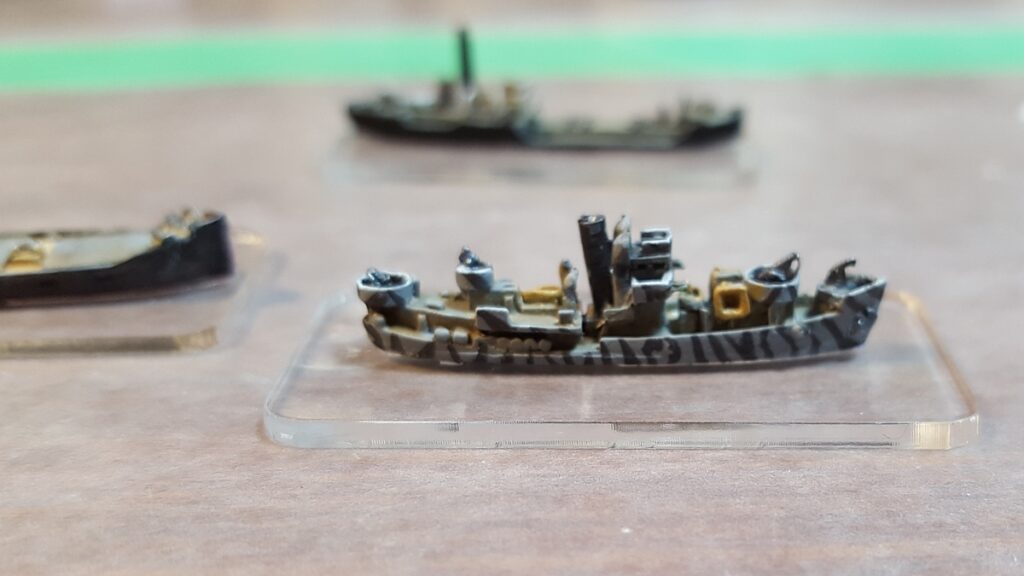
Latest batch of World War Two coastal naval vessels in 1/1200 scale is done and based. As with the previous vessels, these are all Figurehead from Last Square in the States. I’m especially pleased with the two German patrol trawlers (Vorpostenboote) with their dazzle/disruption camo scheme.
First of two Vorpostenboot. Click for larger.Second Vorpostenboot. The two models are actually different, which is cool when representing these notably heterogeneous craft (almost all requisitioned trawlers pressed into service as escorts) on the table. Click for larger.
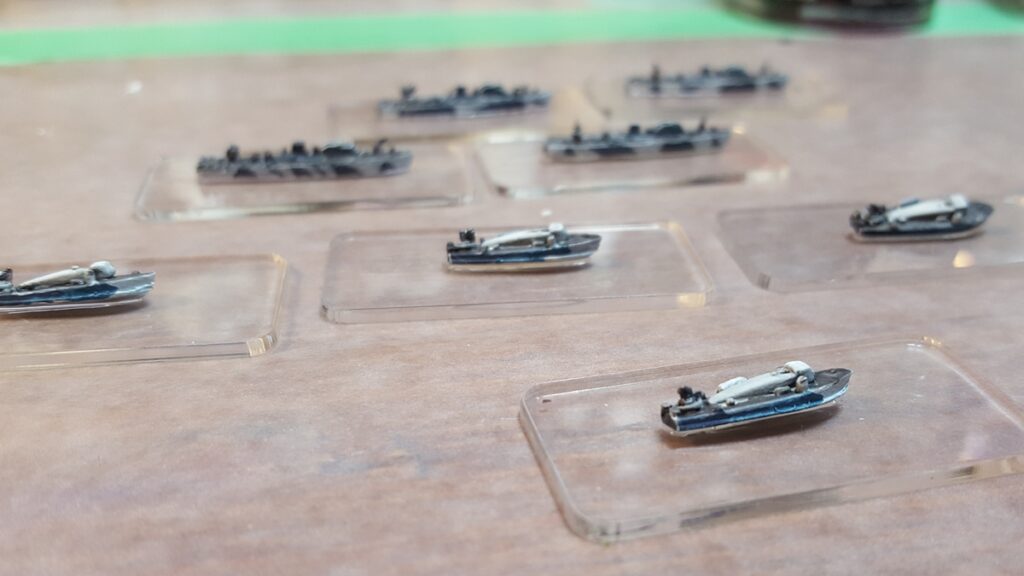
I also did up a few more Royal Navy Coastal Command craft, four Fairmile B Motor Launches and four 70′ British Power Boat (BPB) Motor Gun Boats. The BPBs are really tiny at 1/1200 scale, under 20mm long!
Four BPB Motor Gun Boats in the foreground and four Fairmile B Motor Launches in the background, all on 40mm long acrylic bases. Click for larger.
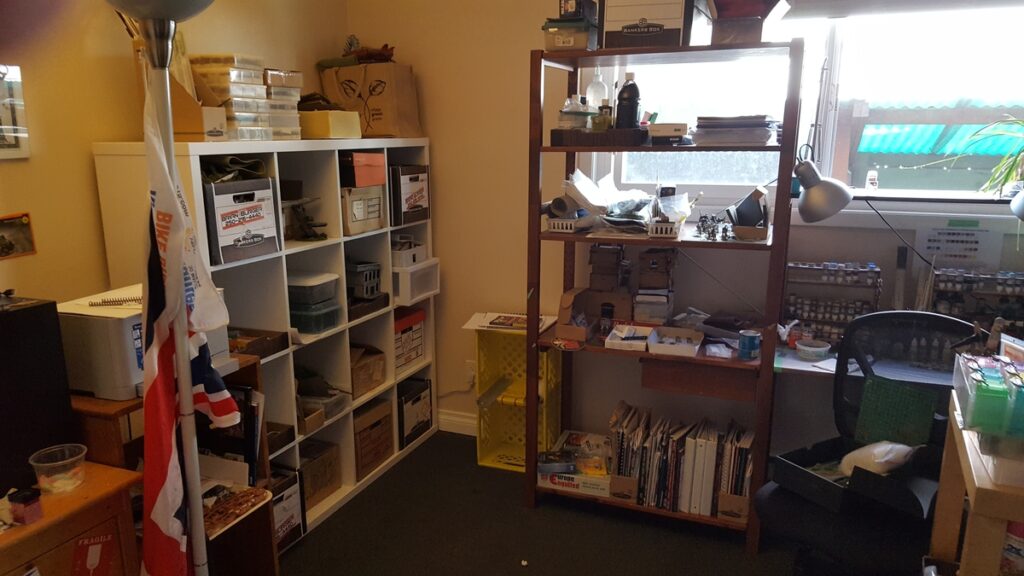
And the reason it’s been quiet here on the blog for the last couple of weeks is that I’ve been completely pulling my hobby/painting area apart and have finally mostly put it together again, all with the aim of installing a big Ikea shelving unit in one corner, a Kallax 57′ x 57′ monster.
The partially-rebuilt painting/hobby/game storage area! Click, as always, for larger.
The cubicles of the Kallax will fit a banker’s box (there’s a couple in there already) which is already my standard method of storing and transporting scenery. I’m still planning a massive sort of my scenery stockpile, which will (to be honest) probably take another couple of months in bits and pieces. There’s stuff in the stash that hasn’t hit the table in years and year because it’s buried under other things or just straight up been misplaced and I don’t actually know where it is!
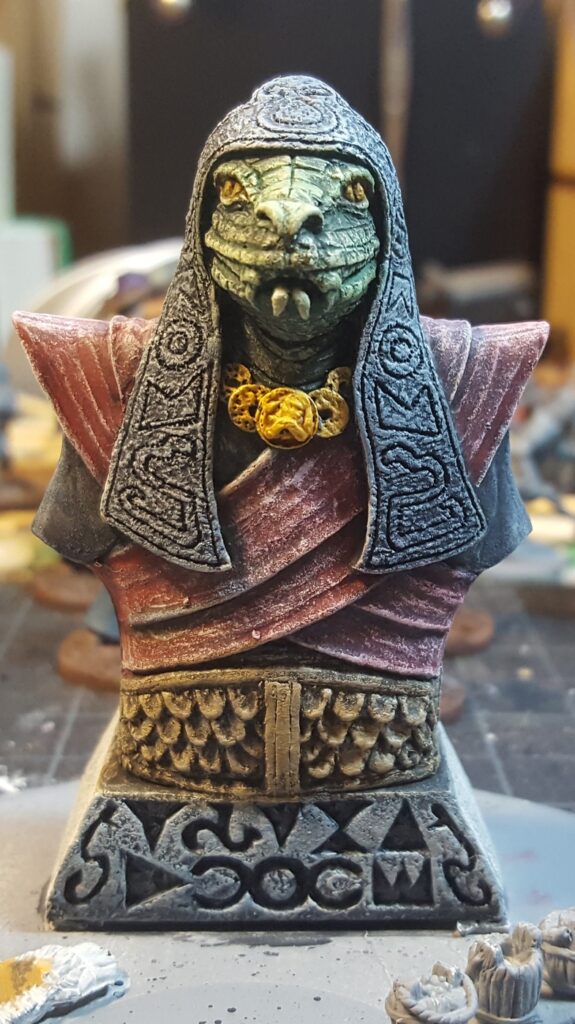
Painted this guy up fairly quickly over a couple of days, after getting it a few weeks ago from Forge of Ice. I wasn’t sure if I wanted to do the statue up in bare stone, painted, or a mix, but it wound up being mostly painted. Basecoat in black, and then lots of drybrushing in various tans up to a bit of pure white, and then I used inks and washes to add the colour while keeping the drybrushed highlighting visible.
Snake idol, front view. The base is about 1.5″ wide, and the whole thing is just under 2.75″ tall. Click for larger.
The final product looks like an ancient statue painted a very, very long time ago, which seems right for something either in a ruin somewhere or populating an unimaginably old Lost World temple complex!
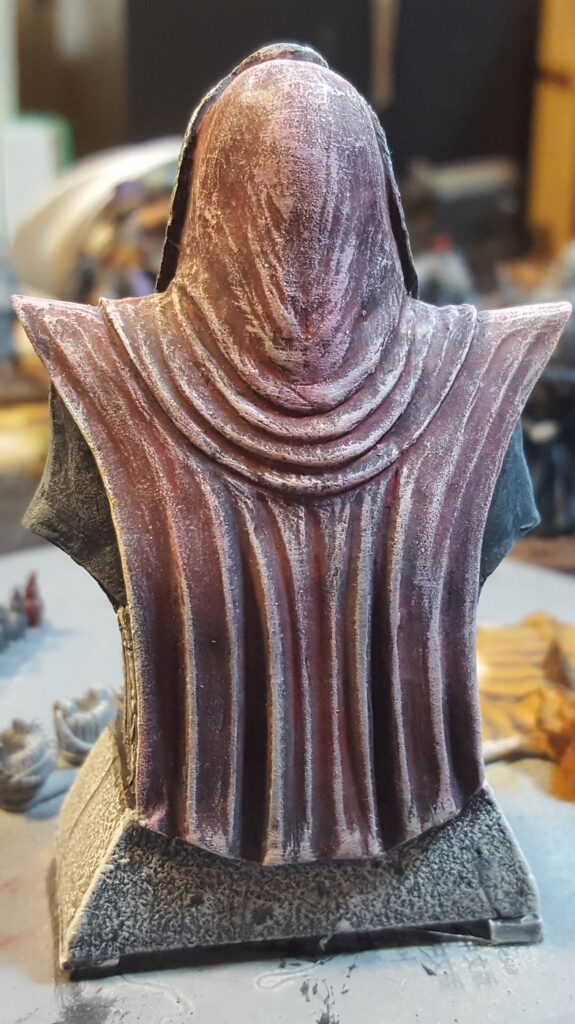
Rear of the snake idol, nice sculpted folds in the hood and robe. Click for larger.
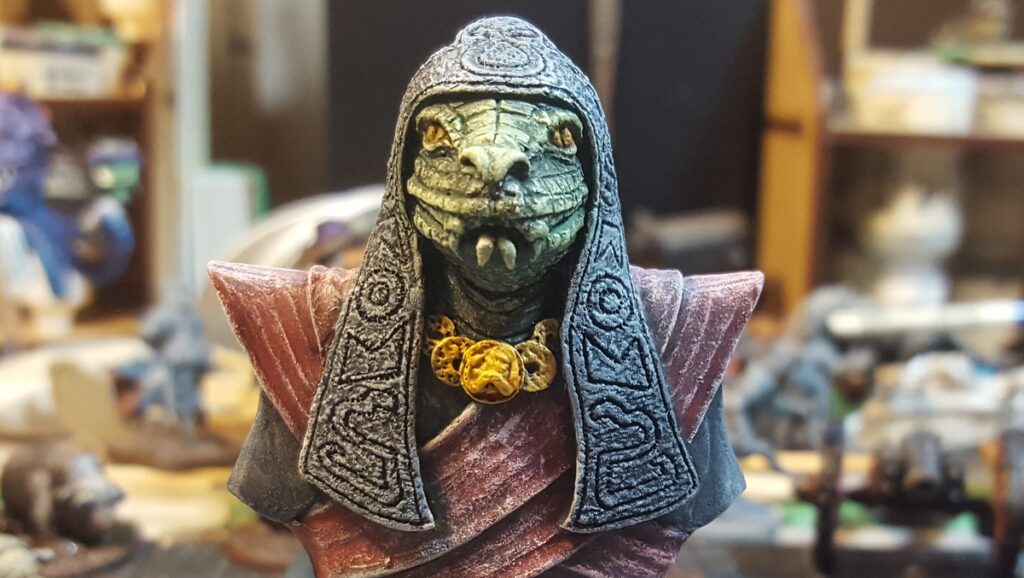
Closeup of the upper half of the snake statue, just for fun. Click for larger.
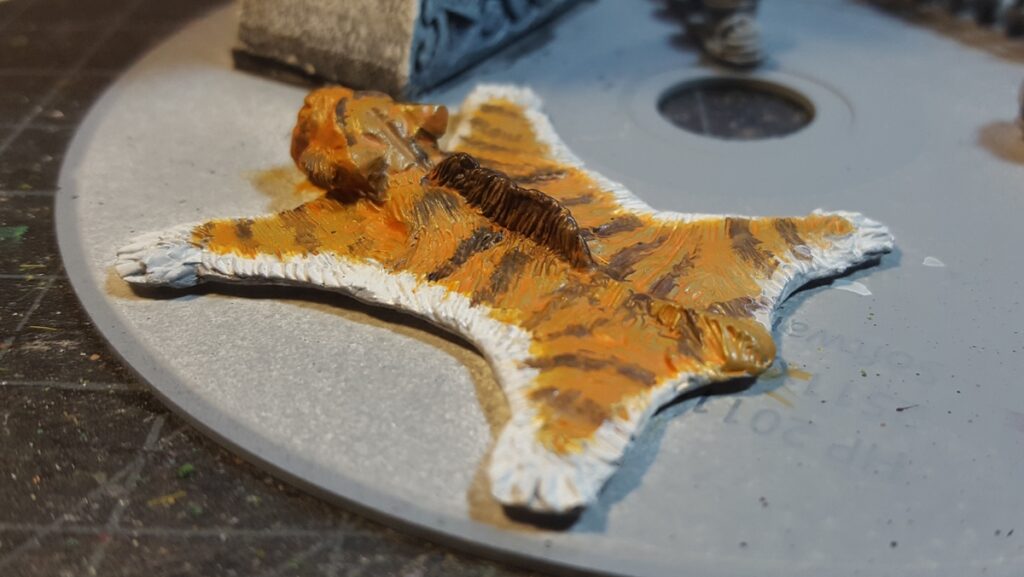
I also have this fun sabretooth tiger skin rug in progress, and I like the blends I’ve been getting so far on the fur, thanks partially to using glaze medium. Just a few details to finish up on this one.
Just the right decoration for a timetraveler’s study or somewhere in a Lost World. Forge of Ice sabretooth tiger skin rug! Click for larger.
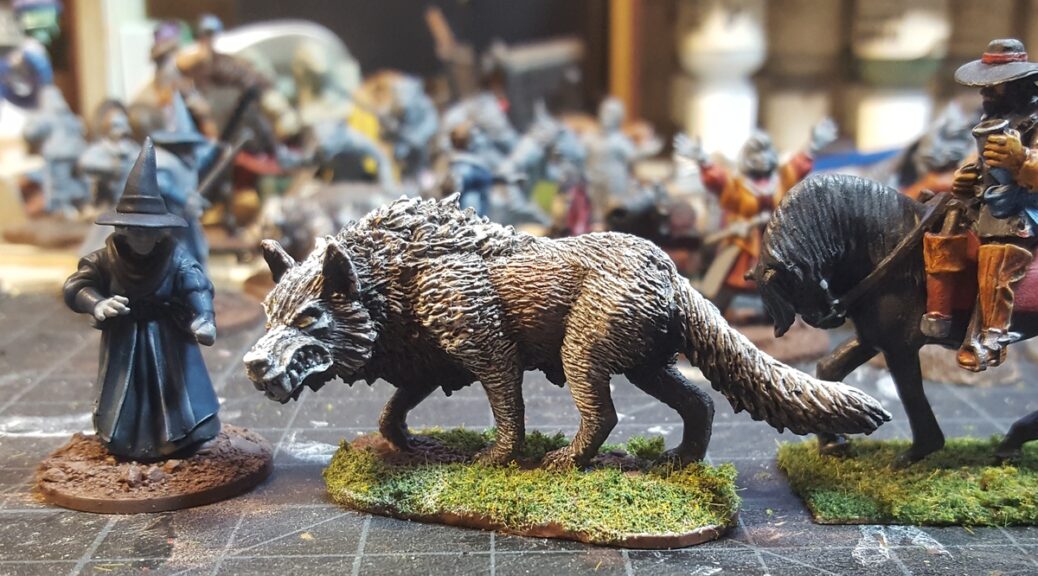
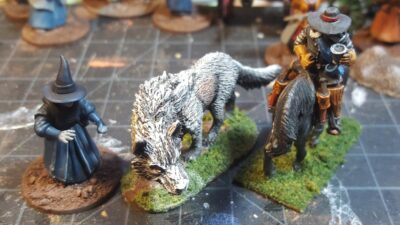
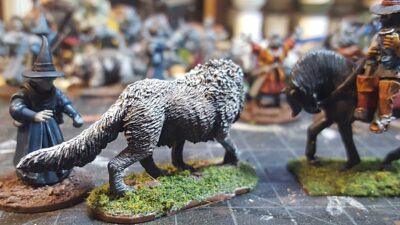
Rummaging through one of my boxes of random figures last week (as one does…) I came across one of the random Reaper fantasy figures I’d picked up on clearance over the years, the massive wolf-like Warg. No modern Bones resin-plastic lightweight here, this is a solid pewter beast nearly as big as a 28mm horse!
Reaper Warg in the middle, flanked by a 28mm Frostgrave witch on a 25mm base, and a 28mm Warlord mounted officer on 20mm by 40mm base to the right. Click for larger.
The base was assembled from three pennies and a bunch of Milliput, the warg got primed, and then it went into storage sometime in early 2014 (when the first paragraph above was written…) until just after New Years 2020, when I said to myself, as I was painting other demon dogs and werewolves, “Self, don’t you have a massive great pewter warg somewhere, bought many years ago?”, and after more rummaging in more boxes of miniatures than I’d like to admit to, the warg saw the painting bench for the first time in six years or so, and it was good.
The thing is even bigger than I remembered it being, over head high at the shoulder next to a similarly based 28mm figure and taller and bulkier than a warhorse. The base is roughly 20mm wide and 45mm long, and muzzle and tail stick out over both ends.
Big warg, demon dog, or some sort of hell-wolf! 28mm Frostgrave plastic witch on the left, mounted 17th C officer from Warlord on the right. Click for larger.
Looking forward to seeing this guy loping across the playing field, eating people and stealing souls, or perhaps the other way around! You never know with demonic canines…
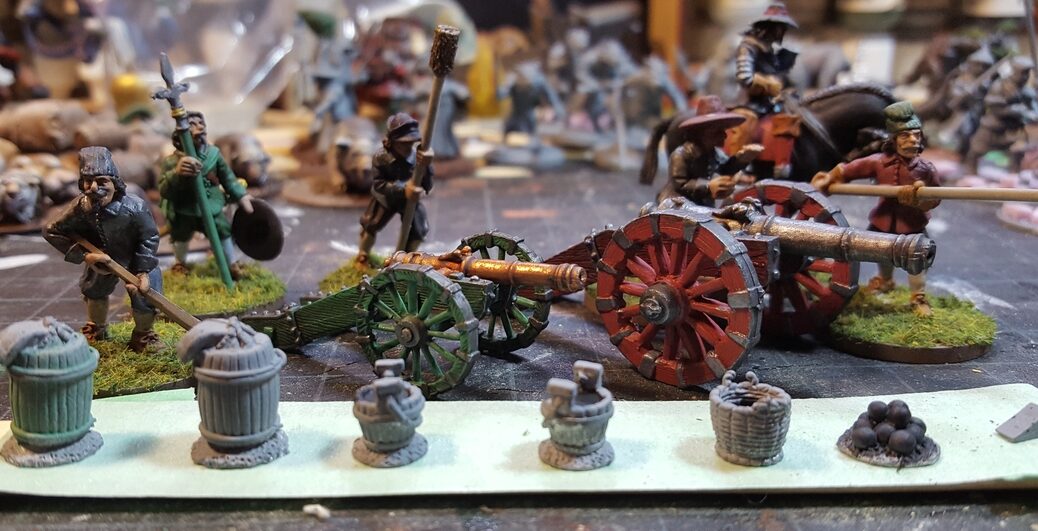
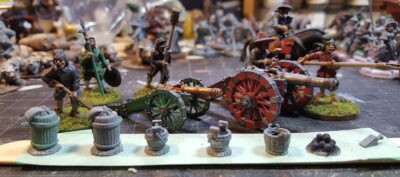
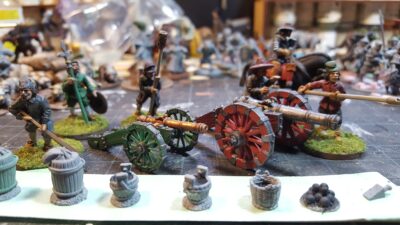
This pair of guns were ordered from The Assault Group as part of the insanely slow to arrive order of June-September 2017. I finished the artillery crew at least a year ago and the guns have sat on one corner of my painting bench the whole time, cleaned up and dry-fit together but otherwise untouched.
The guns are nicely sculpted and cleanly cast, needing minimal cleanup. I spray primed and did most of the painting before assembling either gun, and on the basis of no research whatsoever decided to do the big culverin with a dark red frame and the smaller lighter falconette in green. Each gun has the body and tail as a single piece cast, the two wheels, and the barrel, and the wheels fit on much better than I’m used to with white metal parts, hardly any nudging of the axle pieces around to get everything square and solid.
Both Assault Group guns, some of the crew, the accessories still being painted in the foreground, and a Warlord Games mounted officer just because. Click for larger.
Nothing fancy about the painting, just a couple shades of Reaper paints, various washes (mostly GW), and a bit of edge highlighting that totally doesn’t show in either of these photos. Ah well.
The eventual plan (once they reopen…) is to get a pair of custom artillery bases lasercut in 2mm MDF by the excellent folks at Warbases that will have round holes for six crew figures to slot into and a flat area for whichever gun is in use, so that the crew aren’t weirdly raised over their gun because they’re based and it isn’t.
Slightly higher angle view of the guns. Click for larger.
I’m still not sure I’ll ever order anything from The Assault Group in the future, but if I do I’ll do it expecting a four to six month wait for my stuff, and rather like these guns, I’ll make sure it’s for figures or bits that I don’t need in any particular hurry or have an actual timetable built around! Given that I have no plans to do large scale 28mm battles in the English Civil War, 30 Years War, or any 17th C-theme gunpowder fantasy equivalent, a mixed pair of guns should be all I’ll need for now!
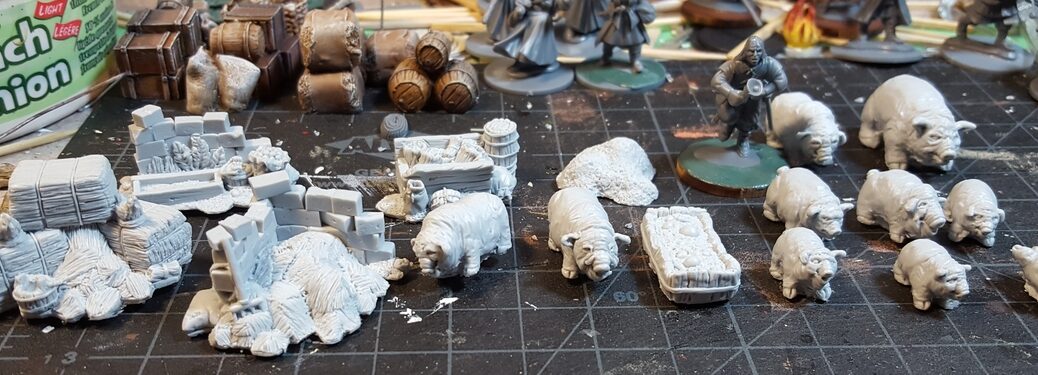
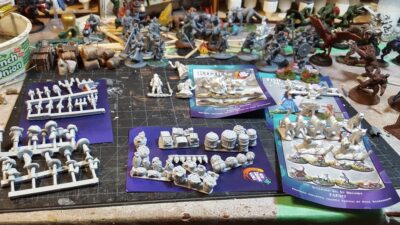
Ordered a few things from the excellent and varied ranges of Bad Squiddo Games back in March; things took longer to get from the UK to here than I’m used to, almost like some major world event is disrupting trans-Atlantic flights or something. However, everything was dispatched from the UK in good time and I am certainly not going to blame Anne of Bad Squiddo or the various postal services involved for a lack of air mail capacity…
I got a fairly mixed bag of stuff. A few ladies that will probably show up mostly as players or civilians in my English Civil War/Weird ECW games, a fine herd of pigs and some farm scenery, a bunch of cats, and some small scenery to add detail here and there, including a whole lot of mushrooms and toadstools for suitably creepy weird fantasy/horror forest bits.
Most of the Bad Squiddo haul all laid out. Clockwise from lower left: mushrooms/toadstools, candles, several female characters, cats, fish seller w/ cats, skoggskattar, and finally in front centre a batch of food. Click for larger.
Skoggskattar – giant Scandinavian cats. Compare to the 28mm Warlord guy jogging past them on the right right there. Click for larger.
Everything is really cleanly cast and beautifully sculpted. The scenics are mostly by the very talented Ristul and in an interesting slightly flexible grey resin; the white metal sculpts are by a variety of sculptors and all really well done.
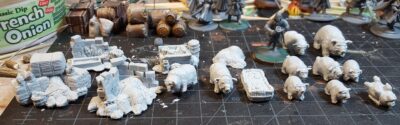
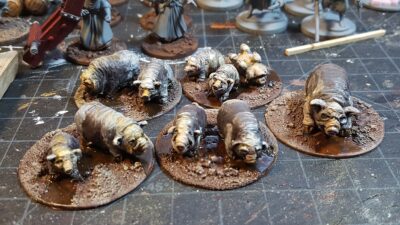
Not pictured above is the pigs, my favourite single part of this purchase. I indulged in the Pigtopia bundle deal which got me ten pigs and six bits of pigsty/farm scenery. I’ve already painted the pigs up, basing them in small groups on 40mm bases.
Bad Squiddo pigs! Ten pigs, six pieces of pig-related scenery. Click for larger.
I painted the pigs up to vaguely resemble one of the oldest heritage breeds of pig in the UK, a black-and-white breed that I now can’t find or remember the name of. Anyway, they painted up nicely and I look forward to watching them chase players around the table or be part of someone’s provisions on the hoof in a scenario.
Pigs all painted up, all on 40mm bases. Just a bit of greenery to add and they’re all done. Click for larger.
(Or, The Workbench This Week, 12 April 2020, also known as the 43rd of Marprilay, Blursday the Somethingth of Pandemic)
Strange times, faithful readers. Strange and stressful, and one of my stress responses is to flit from project to project, starting things and then flitting off before they get very far.
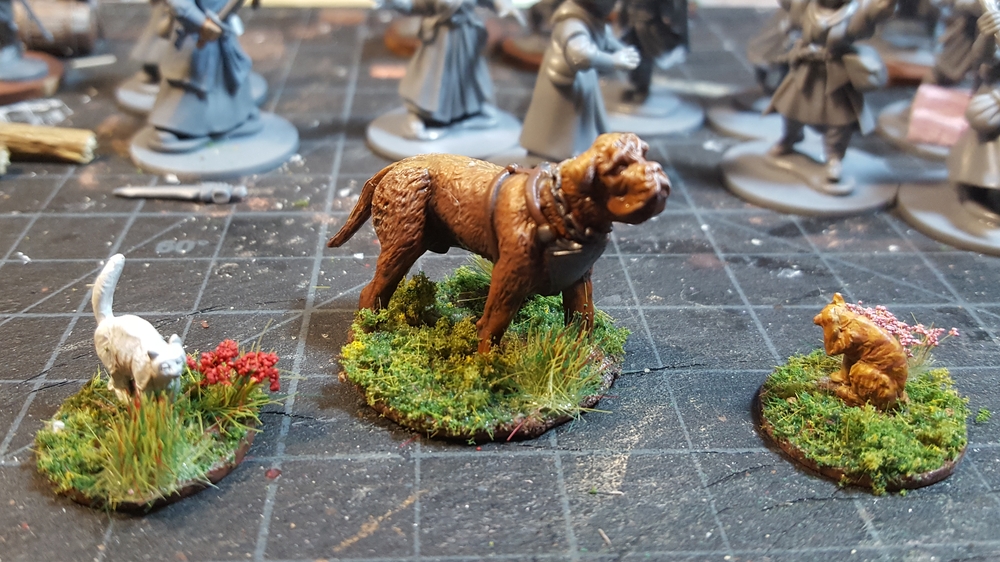
This long Easter weekend, though, I’ve been nudging myself to actually move a few things noticeably closer to actual completion. The first small sign of this is the three critters below, two cats (from Eureka, I think) and a Reaper War Dog finally moved along to the flocking-and-base-detailing stages.
Two housecats and a war dog. Click for larger.
The cats have been on the edges of my painting table for almost exactly five years now, as my email archives tell me I made the Eureka USA order for them (and other stuff) back in March 2015. There’s another two of them somewhere in the “nominally in progress” mountain somewhere, but this white cat and the orange tabby will have to do for now.
No idea how they’ll be used in games yet… maybe I’ll come up with a Pulp Alley games that involves chasing cats around a quaint English village looking for a clue one of them has attached to their collar. No gunfire, you’ll scare the cats into hiding!
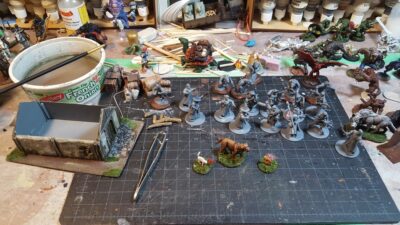
The rest of the workbench. L to R: ECW cav, Renedra building, Frostgrave and ECW plastics, the critters, werewolves, and such! Click for larger.
So what else is on the rest of the workbench, hopefully lurching closer to completion? A whole mix of stuff (surprise…)! I’m quite please with the progress I’ve made on the nice little Renedra Wattle & Daub Outbuilding, some long-neglected ECW cuirassier are seeing basing progress, I’ve been building some Frostgrave wizards and soliders as mentioned in my last post, and the whole mess of werewolves (over on the far right of the photo above) are meandering onward.
Stay home, stay safe, attempt to stay sane, and I hope you and yours are well.
Way back in December 2018 on Twitter, Bears Head Miniatures showed off pictures of their new Beholder-alike floating eye beastie, Narthoks the Excellent. I made an offhand comment of, “With that expression, somehow I see him as the wholly unexpected barkeep behind a very strange bar somewhere, towel draped over one tentacle, goblets and beer mugs in the other tentacles…”
With that expression, somehow I see him as the wholly unexpected barkeep behind a very strange bar somewhere, towel draped over one tentacle, goblets and beer mugs in the other tentacles…
A drawing of the Kickstarter exclusive Narthoks The Excellent Bartender. Drawn by @MartinWhitmore . To whet your appetite whilst the sculpting happens. pic.twitter.com/xOP9tCF6W6
…and naturally I had to join their Kickstarter, even though I had no particular use then or now for a Beholder, in bartender guise or otherwise! (is a bartending Beholder actually a Beerholder? A Barholder?)
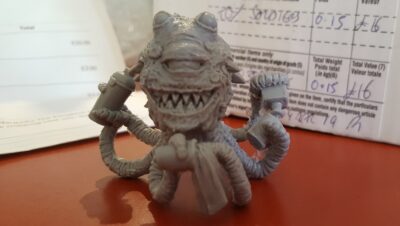
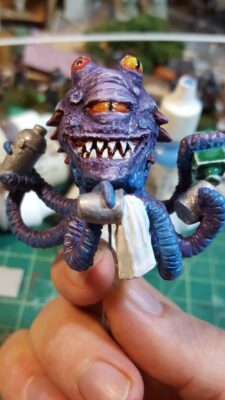
So what did I get for my offhand comment? Narthoks is a big chap, roughly 2 and a half inches across at the tentacles and about 2 inches tall from bottom of tentacles to top of head/topmost eyeball. Taller than that once he’s on his flying base, of course. He’s got a towel and glass in his frontmost tentacles, a cocktail shaker in his right-hand tentacles, and a bottle and glass in the left. All the bar-ware is scaled to Narthoks, which means the glasses and shaker are the size of barrels from a human viewpoint!
Bare resin Narthoks straight out of the box from Bear’s Head back in May 2019. Click for larger.
The figure is resin and nicely cast, with only a bit of cleanup along seams and some casting flash. He’s in two parts, tentacles and base/neck (?) and then head, and while the seam between them has more gaps than I’d normally like to see, the textured nature of his skin makes disguising this seam easy once you break out the greenstuff.
Anyway, after Narthoks the Barholder showed up in May 2019 he sat in his box until just a few weeks ago (end of January 2020), when I felt the need to radically change up my painting after painting a couple of dozen lovely but fussy and tiny 1:1200 WW2 naval boats!
Blending basecoat in progress. Almost all the paint you can see here is still wet, as the glaze medium slows drying time. Makes for fun and dynamic painting on a big figure like this! Click for larger.
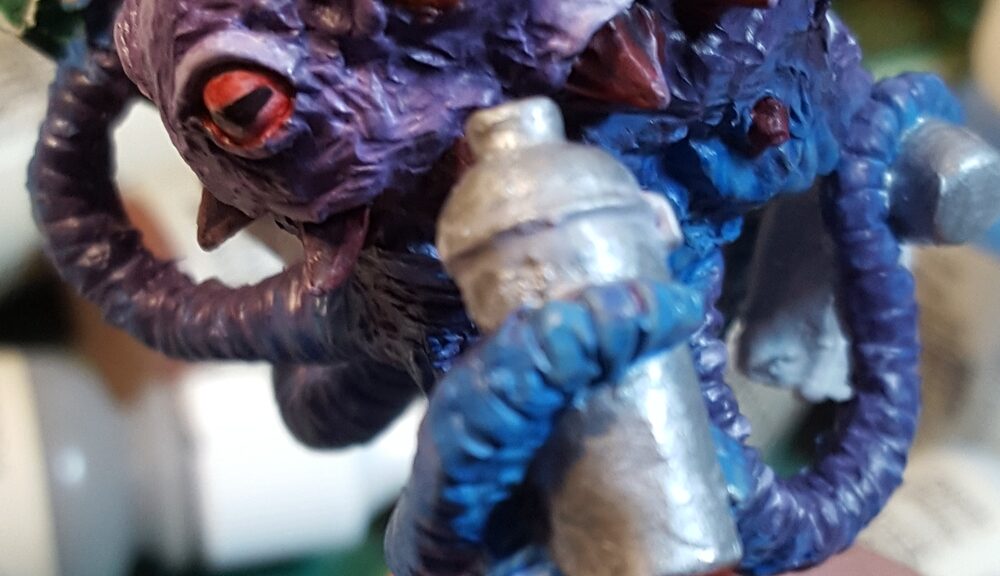
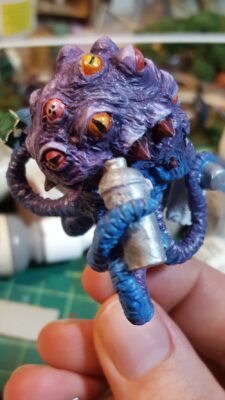
Narthoks’ underside is various shades of bright blue, his topside is mostly Imperial Purple, shaded down with Nightshade Purple and highlighted with Amethyst Purple. The eyeballs were painted Pure White then glazed with a variety of yellows, reds, and oranges.
Basecoating done, eyeballs and other detail parts included. Click for larger.
Final highlights on Narthoks’ body were a mix of Amethyst Purple, Pure White, and glaze medium, 1:1:1; this is most visible on the eyelids and on the bits just above the “horns” along each side of the body. The eyeballs have all had a coat of gloss medium, although as I haven’t given the whole miniature the usual coat or three of protective matte varnish, this gloss will have to be redone in due course. Ah well.
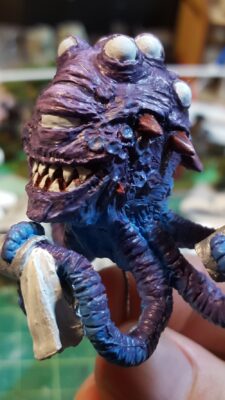
Narthoks all finished except for basing. Go on, tell the bartender your troubles! Click for larger.
Left side of Narthoks. I really like how the shading of the horns and above them has come out. Click for larger.
Narthoks’ right side. The eyeballs have turned out nicely too. Click for larger.
Narthoks comes with a standard clear plastic flying base; I ran a length of paper clip wire up into him for a painting handle and to help pin the two halves of his body together. I’ll trim that short and slot it into the post of the flying base, but I might replace the clear plastic base with something more bar-like, either flagstones or a wood floor. I’m actually tempted to get a small display dome for Narthoks and put him on one corner of my home bar cabinet as a mascot of sorts, as I currently have absolutely no actual gaming-related use for this awesome figure!