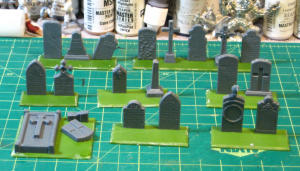
Back in 2013 half of them (one of the two identical sprues) got cleaned up, based, sand added to the bases, and grey primed, and that was it. For more than five years.
The original 2013 batch of graves, based but not yet primed. Click for slightly larger.
In early 2018 I pulled the 2013 bits out of storage and got them painted up and flocked fairly quickly for the game I ran at Trumpeter Salute 2018.
The paintjob was pretty simple. I hit all of them with a wash (GW Nuln Oil or Earthshade), then drybrushed and scrubbed various other colours across the stones. Two different shades of grey, some dark green, two shades of tan, and two shades of off-white applied in different amounts to different stones give a bit of variation to each stone.
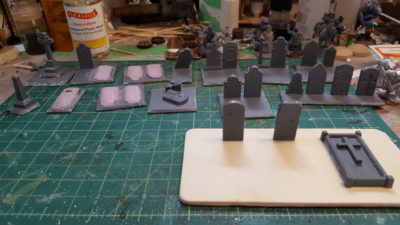
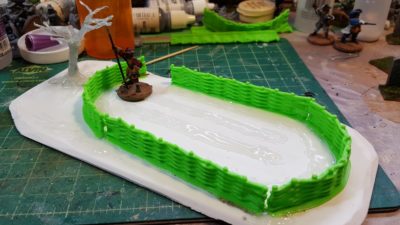
Finally, this week I’ve pulled the second sprue out and got them all based up.
Latest graveyard stuff all based up. Click for larger.
The bases are all leftovers from various Warlord ECW plastic box sets. I think the newer stuff is from the Firelock Infantry box and the older from either the regular infantry or cavalry box. Waste not, want not, and I wasn’t ever going to use them for figures! The freshly dug graves (great potential plot points!) are just scrap styrofoam glued down and then sanded.
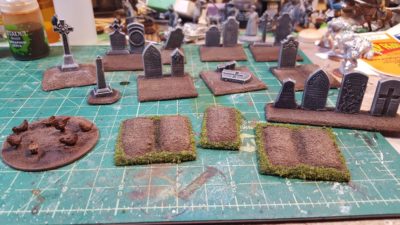
Latest graveyard bits. Fresh graves in front, regular gravestones behind. On the left is a base of chickens from Warbases, just for fun. Click for larger.
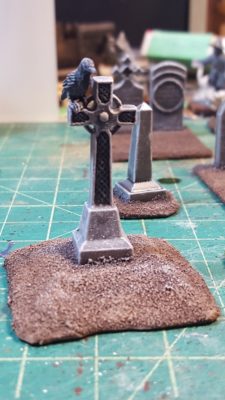
I’ve used the Celtic cross and some of the base pedestal bits to create a roadside cross or shrine. Just the thing to lurk on a dark and misty moor or something!
The roadside cross, still in progress. Complete with ominous raven! Click, as usual, for larger.
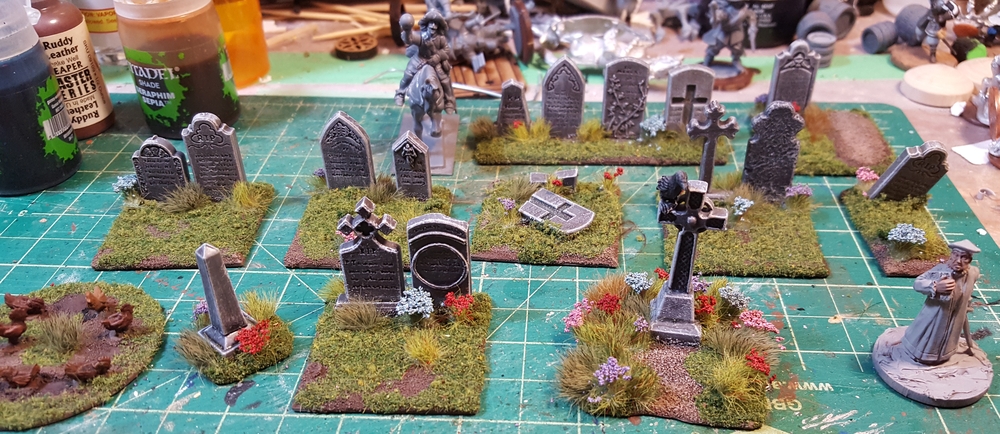
Finally, I used Rain City Hobbies tufts and flowers to add some detail and interest over my usual mix of flock. I really like the little pops of colour the flowers provide, and they’re becoming a standard feature on my scenery, especially the English Civil War items.
Finished, all these years later! I’ll get some photos of the full graveyard setup soon. Click for larger.
Should you want your own gravestones the two-sprue set is still available from Renedra which is definitely not always the case when coming back to some products after this long. Hopefully you take less than seven years to get yours ready for the tabletop!
Trumpeter Salute 2019 has come and gone. This was the first Trumpeter in many years where I didn’t run a game which felt kind of strange, but that did leave more time for other people’s games!
It was also the kick in the butt I apparently needed to devote a bit more time to gaming, after most of a year (two?) of basically doing squat except watch my gaming stuff gather dust.
Among the things I bought at Trumpeter was a pack of Frostgrave Wizards in plastic. I’ve been musing for a while now about mixing up 17th Century English Civil War/Thirty Year’s War figures with magic and fantasy stuff of some sort, and while a lot of things like wands or wizard’s staffs would be easy enough to add to figures with wire and putty, a couple of sprues of ready-made bits seemed like a good plan.
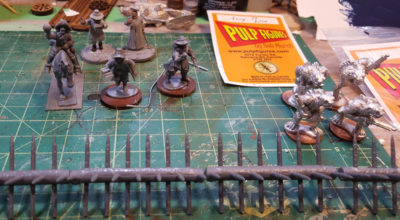
The Trumpeter Salute 2019 haul. First three Warlord/Frostgrave magic users on the left, new frogs on the right, chevaux in the foreground. Click, as usual, for larger.
It turns out the Warlord plastic ECW figures and the North Star plastic Frostgrave figures are pretty much perfectly compatible. Very similar heights and proportions, and heads and hands similarly scaled. The arms are jointed identically at the shoulders on both, too, although the heads & necks are separate on the Frostgrave figures but integral to the bodies on the Warlord stuff, so if/when I want to start doing headswaps I’ll need to do some surgery.
I also got a pack of four “Frogs with French rifles” from Pulp Figures, to give my Cthulhoid fishmen/frogmen forces some actual firepower. I’m not sure if these will be sold via Pulp Figures or Crucible Crush, but they’re awesome!
Finally, I picked up a pack of Renedra’s Chevaux de Frise for more barricades to scatter around – perfect for some of the Pikeman’s Lament scenarios that call for a line of barricades or a barricaded village. The pack contains a pair of sprue frames that will give me about 18″ or so of chevaux de frise all told.
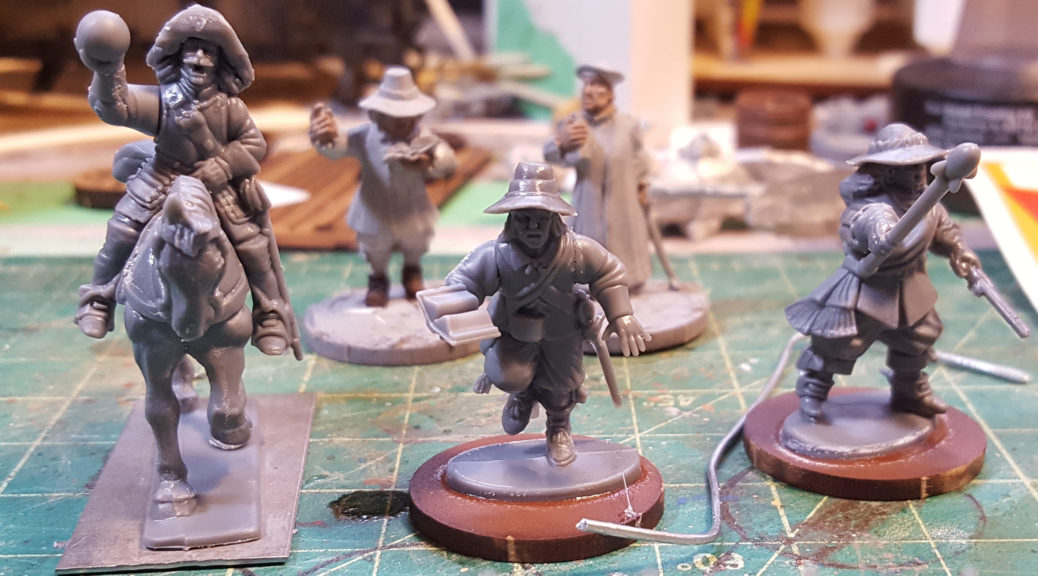
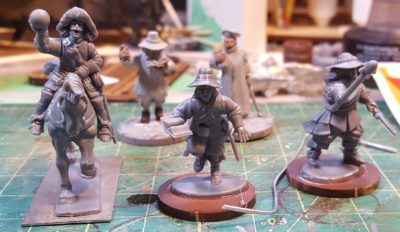
First three magic users! See text for details, click for larger.
I whipped up the first three “weird ECW” magic users already. On the left is one of the regular Warlord cavalry figures with an arm and hip pouch from the Frostgrave wizards; centre is a Warlord firelock body with both arms from Frostgrave (usable as a religiously-inspired figure in straight historical games too), and on the right is a body from the Warlord infantry command sprue with arms from the same sprue and a wizard’s staff from the Frostgrave set.
I’ve got a whole bunch of photos still on my camera from the actual Trumpeter Salute show; I’ll try and get them edited and uploaded this coming weekend.
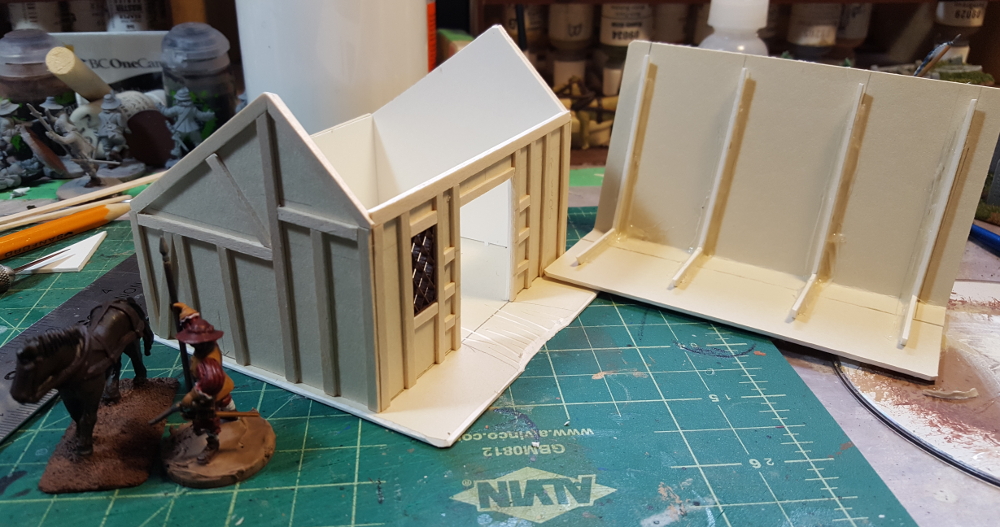
After finishing the three little cottages on Saturday, I decided to do something slightly different on Sunday and made a building that could serve as a stable or other outbuilding for a manor farm on my ECW/English pulp tables.
It’s 3″ deep and 4″ wide, so actually larger in footprint than the little hovels. Horse need their space, tenant farmers not so much! Same construction, 1/16th mattboard (picture framing card) with wooden coffee stir sticks for the timbering. The roof is assymetric, with the peak closer to the front of the building instead of down the centreline, for no other reason than it looked more interesting and on a gaming table, people spend a lot of time looking down at rooftops!
Stable “blank” assembled, with window and horse both from Warbases. Click for larger.
A roof with a pitch like this should probably be shakes or slate or something, because a steep pitch is part of what helps keep a thatch roof watertight, but towel thatch is a heck of a lot faster to assemble than a shingled roof, even with Warbases’ nifty lasercut tile cards available! Perhaps I’ll go back and rebuild this roof with tile card in the future, when I’m not under a pre-convention time crunch… but don’t hold your breath!
All the half-timbering complete and unthatched roof in place. Click for larger.
Roof off, showing the card “beams” to give it some strength. Click for larger.
Towel thatch in place, including an extra strip across the top ridge. Paint to follow! Click for larger.
I’ll add open doors on the big doorway on the front; the doors are built but not installed yet. I might whip up a couple of horse stall walls to put in the interior, but honestly that seems like a post-Trumpeter addition to me…
With the clock running on toward Trumpeter Salute 2018, I need to get serious about producing the new scenery the linked pair of games I’m running there need!
I’ve got more than enough hedges, dirt roads, and other greenery bits from previous scenery projects, but the farmhouse/manor, dovecote, and barn I’ve built previously need more buildings to hit the table along with them if I want to do a 17th Century English hamlet up properly.
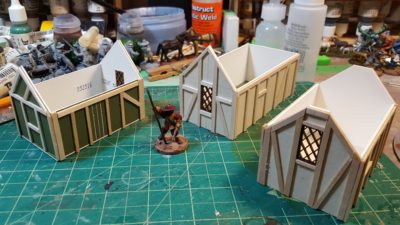
This weekend I sat down and cranked out a trio of little (tiny, really!) thatched and half-timbered cottages or hovels, along with a pair of fenced gardens.
Three cottages underway. 28mm Warlord officer on a 25mm base for scale. Click for larger.
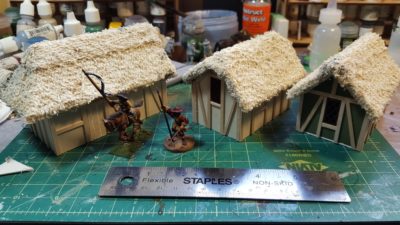
These are simple little buildings of 1/16th” mattboard with half-timbering from wooden coffee stirrers and thatch from towel. The windows are lasercut from Warbases in the UK. For a bit more bulk the roofs have a substructure of corrugated cardboard with the towel hot-glued to that and then further stiffened with white glue. All three roofs are removable.
Large fenced garden with a tree. 28mm Warlord officer on 25mm base for scale. Click for larger.
The tree has a core of paperclip wire, bulked out with soft iron craft wire, then covered in hot glue to fill in between the wires. The garden beds are also just hot glue “sculpted” into place with the hot tip of the glue gun.
Painted cottages and painted and flocked garden. Click for larger.
I’ve also done a second garden piece, slightly smaller, but haven’t gotten a photo of it yet. The cottage roofs need one more drybrush to really pop the thatch texture, but the cottages themselves are all done, and the gardens are fully painted and flocked outside the fence. The tree needs some foliage, and the gardens inside the fences need greenery and detail, but not bad for part of a weekend’s focused effort!
Dogs and cats living together! Chaos and disorder!
Well, something like that. Horses and armour, at least.
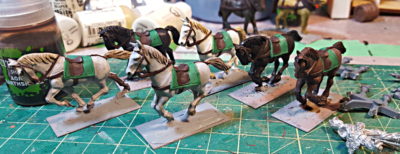
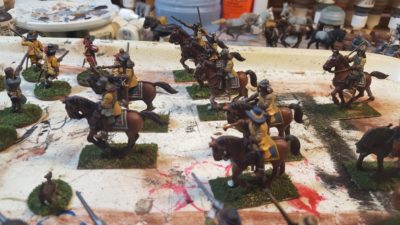
I realized that all twelve horses for my regular ECW cavalry are all brown. Every last one of them. There’s a bunch of variation in tone, mane colour, stuff like that, but they’re all bay, which is horse-speak for brown. Well, some of them might be chestnut, which is horse-speak for “lighter reddish brown”, more or less. For the six horses I needed for the current batch of cuirassier I decided to mix it up a lot. There’s a white horse, two different shades of grey, two different bay, and one black horse.
All six cuirassier horse. Hair, mane, and tail all done. Hooves, tack, and some details still to do. Click for larger.
Unfortunately I totally forgot to write down any of the paint mixes or layers I used for this batch of painting, so I’ll have to re-invent the wheel, or at least the horse paint, next time I do horses!
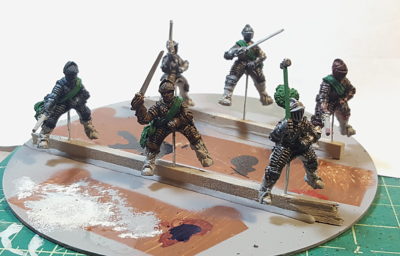
For the armour, I put pins up into the backsides of all six cuirassier, making them extra-long to make painting easier. Then I used a scrap CD, two lengths of scrap wood, and my hot glue gun to create a very useful little painting stand, seen in the photo below.
All six riders got all their armour basecoated bright silver (Reaper’s True Silver), then various inks and washes were layered over to try for a treated-metal appearance as discussed in my last post on coloured armour.
GW’s washes don’t work as a base layer for this, I discovered right away. They’re not designed to stay on flat surfaces particularly well, although they shade crevices and lower areas of a surface very nicely. I used India ink for the three blacked armour sets, Reaper’s Red Ink for the russeted armour, and FW Artist’s Acrylic Inks for most of the rest of the colour.
The three blacked armour riders were basically done after one coat of thinned India ink, and then I went back in with metallic paint to do some of the edges and highlights, especially on the rider in the foreground of the photo with the hammer and plume.
Armoured riders. Front right blacked with silver edging, rightmost russet, two background guys both blacked, blued armour on the far left, then the second russet armour guy foreground centre. Click for larger.
The two russetted armour guys and the one blued rider (far left) got at least a couple of more layers, including either very, very thin India ink or GW’s Nuln Oil to darken the bright initial ink coat. The blue guy especially looked incredibly bright and weird after his first coat of just blue ink – my girlfriend saw him and said, “Seventeenth Century Power Ranger!” and damned if she wasn’t right…
I’ve also discovered that these guys are nearly impossible to get a decent photo of in their current setup, the above blown out and fairly crap photo is less crap than all the rest. I’ll try for better pictures once the riders and horses are all attached to each other. Still to do is boots, saddles, faces, and weapons.
I’m really pleased with how these guys are turning out so far, and I think they’ll look great on the tabletop once they’re all finished. Ink over silver is definitely a win for doing coloured armour!
I’ve posted links to horse painting articles and tutorials before, including the exhaustive “horse of a different colour” series over at Trouble at t’Mill. Mike even gives you some rough math on what colours any given troop/regiment/herd/group of horses should be: “One tip – if you’re batch painting, the maths works out roughly that you should pick out your hero horses that are going to be fancy colours, then split about a quarter of the rest off and earmark them for chestnuts, split a quarter of the leftovers from those off and earmark them as blacks, and paint the rest (which should be a bit over half) bay. The further back in history you go, the fewer chestnuts you’ll probably have.”
But what about the riders? Unarmoured or mostly unarmoured riders provide obvious opportunity for colour, depending on the army or era you’re modelling, but if it’s knights or early 17th Century cuirassier in full plate it’s all going to be silver/grey metal armour, right?
Armour can, in fact, be lots of colours than just “shiny metal”. It probably should be, in fact. Blacking, russeting, or even painting seems to have been fairly common. Keeping armour “white” (shiny) was a lot of work on an ongoing basis so a lot of munition-grade ordinary armour was finished in some way.
A lot of the armour in museums that’s shiny these days probably shouldn’t be. As the Wallace Collection says on their website about one partial suit of 17th C armour, “Like the others of its group, this one originally had a ‘black-from-the-hammer’ finish, but was polished bright comparatively recently, almost certainly in the 19th century.” Another thing we can blame the Victorian era for!
Russeting, blacking, and other forms of surface finish are done with various oils, acids, and other chemicals along with heat to seal the surface of the metal and protect it from rust and other corrosion. An interesting and informative thread over on My Armory (an arms/armour collector and creator forum) talks about various historic and modern treatments and the various shades that can be achieved. One essay on russeting I found uses modern Clorox bleach and baby oil!
Heating metal produces a coloration of the surface, which changes from yellow to purple to deep blue as the heat increases. When taken out of the fire at a particular temperature, the metal retains this color. Considerable skill is required to achieve a consistent and even heat-patination of large areas (e.g., a breastplate) or groups of objects (e.g., a complete armor, 32.130.6
). The favored color for armor, edged weapons, and firearm barrels was a deep blue, in a process is referred to as “bluing.” A range of colors could also be produced chemically, using a variety of different recipes, such as a rich brown color that was popular on firearm barrels in the late eighteenth and nineteenth century. Besides being attractive, patination and painting also inhibit rust on metal surfaces.
This gorget is contemporary with the English Civil War (c. 1640) and is blued with gilt edging. Image off the Wallace Collection website. Click image to see the listing there.
The entire Wallace Collection website is well worth looking through, by the way. It includes a huge collection of arms and armour through the ages, and a really well organized Advanced Search function to make things (slightly!) easier to find.
Also from the Wallace Collection is a “black and white” set of cavalry armour, almost certainly from an officer, with distinctive polished/silver bands around the edges of otherwise blackened armour. The Wallace writeup say, “Most military armours worn by lower-ranking troopers or infantrymen were left ‘black from the hammer’, that is, the metal was worked only up to the point when the armour would function as required. The surface finish was left black and hammer-marked. Bodies of cavalry wearing such armour were therefore often described as ‘Schwarze Reiter’- black riders. The armours of officers commanding groups of men armed in this way often had the bands and borders of their armour polished bright, producing the distinctive visual effect characteristic of ‘black and white’ armours.”
For a straight-up painted helmet, this one is 15th C, much earlier than the period I’m currently concerned with, but had red and white (now discoloured almost to yellow) paint that is still colourful and must have been spectacular when it was new. I don’t think, from what I’ve seen, that full on painted armour was still current by the mid-17th C, but blacked, blued, russeted, and even gilded surface treatments were certainly in regular use.
When it comes to miniature painting and armour, I’m thinking that the best way to represent coloured armour would be a metallic base coat and then inks or washes over that. I’m going to do some experimenting on the six cuirassier current on my painting bench and will report back!
Incidentally, if someone managed to save a copy of the Games Workshop article from back in 2011 I once linked to here I’d love to have it. I recall it opened with joking about how the author just painted all horses brown until his daughter told him his horses were boring, or similar!
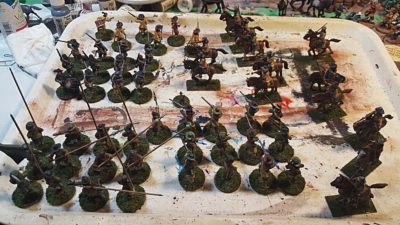
Not the greatest photographs going, but so far the only ones I’ve gotten of all of my recently completed 28mm ECW figures all together!
Every figure finished recently! See text for details, and click for larger.
Starting top left, the dark yellow coats belong to six firelock musketeers (in Pikeman’s Lament terms, either a Forlorn Hope or Commanded Shot). Clockwise we have two troops of regular horse, six per troop. One unit is brand-new and the other had most of it’s painting done years ago but have been touched up and re-based just recently. Somewhere in amongst the other horsemen is the mounted commander as well, finally finished and based.
The bottom centre infantry unit is a dozen muskets in green, then a dozen pike in green, and finally a dozen muskets in blue. There’s a couple of extra officer/sergeant figures in there as well.
The only unit not on the tray in the photo above is the twelve pike in blue I finished back in July 2017.
The new horse, with blue and white horse blankets, as well as some of the older horse with blue and yellow on the horses. Click for larger.
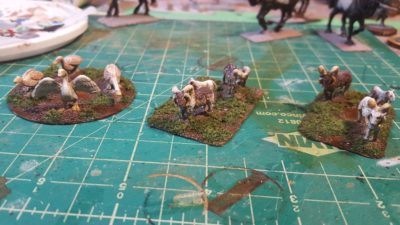
Finally, for fun and extra colour, I’ve been painting up the farm animals I got from Warbases early in 2017.
Geese and sheep, all from Warbases. See text for details, click for larger.
The geese are on a 40mm round styrene base, while the two sets of sheep are on roughly rectangular bases about 1″x2″. They’ll mostly be just scenery, or objectives in games that need loot tokens, but I’m also planning on using the flock of geese as a hazard in games of Pulp Alley, because big geese can be scary psycho critters!
Still in progress on the farm animal side are five or six ducks to go in and around the ponds I made in 2017, two big cart horses, and a couple of goats. I’ll probably get a few more animals on my next Warbases order, they’re fun to paint and provide great extra detail and colour on the tabletop.
On the ECW figure side of things the first six cuirassier heavy horse are in progress, and I’ll be doing up at least one more unit of firelock muskets. There’s also six officer/sergeant/character figures in progress – more on them in another post!
After months of doing absolutely zilch on the gaming front I saw the year out in some style, at least, with a whole bunch of English Civil War 28mm figures pushed through from “almost done” to actually finished in my time off between Christmas and New Years.
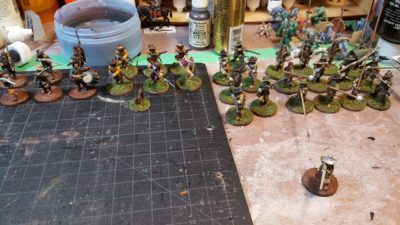
Two units of musket, one of pike, one of firelocks, all DONE! Click for larger, see text for details.
This means that all of the regular soldier figures seen on the workbench back in June are now finished and ready to game with, just the four officer/character figures seen there still to finish off.
The cavalry on the table now include five figures that I “finished” for the Lead Painter’s League way, way back in early 2011 (!) that have sat around ever since. I had thought these ECW figures had sat around for four or five years, but apparently it’s been more like seven. Yikes. “Finished” is in scare quotes in here because I was never happy with some of the details and finish on the riders, having put most of the effort in the horses. They’re back on the painting table for touchups, as are the other seven cavalry figures from that box of 12, and the first six heavy Cuirassiers for extra cavalry punch.
Cavalry of various flavours in various stages of completion, and the four officer figures. Click for larger.
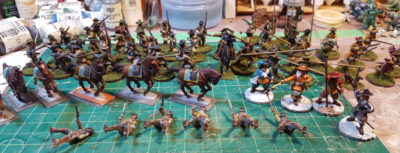
Finally, I pulled out a bunch of farm animals from my Warbases order of early 2017 and cleaned up and based six sheep, two cart horses, and a flock of geese, just for fun and extra flavour in games. They can act as loot markers in Pikeman’s Lament, just as scenery, or (especially the geese, geese are evil!) as unique hazards in Pulp Alley games!
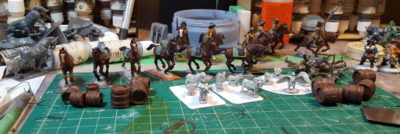
Cavalry, sheep, geese, and some barrels. The unpainted horse on the far left are for the cuirassiers. Click for larger.
Looking forward to a bit more gaming in 2018 than 2017 had to offer, including more Infinity and some games at Trumpeter Salute 2018 in a few months!
I’m fairly sure the last time I touched a paintbrush was back in July. Maybe August. As posts here will show, all wargaming activity of any sort coasted to a stop sometime in the first week or so of September, mostly due to a brain- and free-time-destroying family health crisis and associated astronomical levels of stress.
Most of that is sorted and past now, thankfully, and I did some fun non-wargaming creative stuff before Christmas so I’m finally sitting back down at the painting desk and getting stuff moving again.
I’ve committed to running at least two games at Trumpeter Salute 2018, as I mentioned last post, so I need a bunch of my ongoing English Civil War figures and scenery done by March. To that end, I’ve started cranking through the long-neglected ECW figures, most of the plastic Warlord figures.
I finished the last details and added flocking to a unit of six firelock musketeers, half a unit of regular musketeers, a full unit of a dozen pike, and a dog.
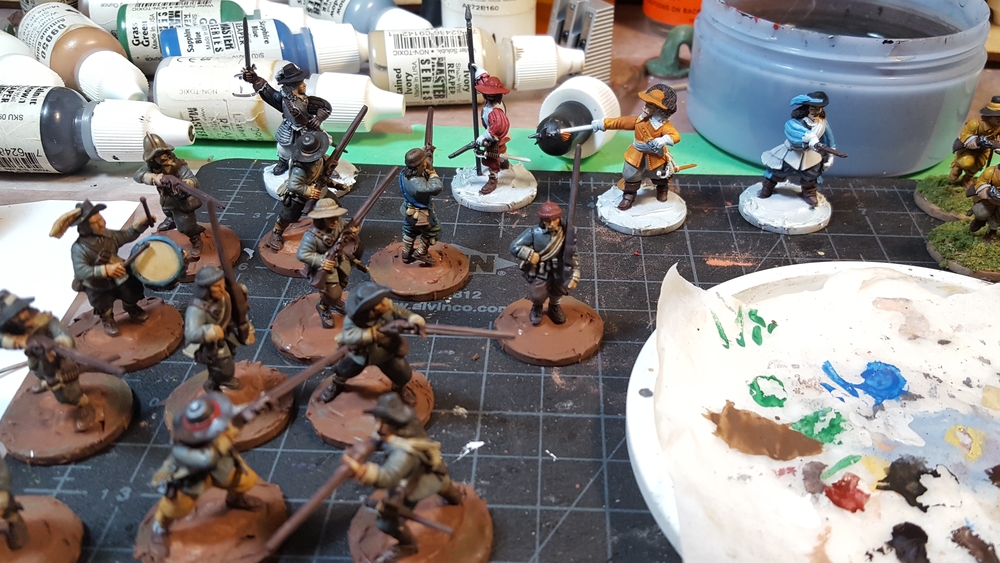
I’ve since moved on to another dozen mostly-finished musketeers and four more officer/character figures. The officer/character types are a chance to bust out some fun colours, as officers rarely wore uniforms in this period and often dressed like the gaudy wealthy gentlemen they were.
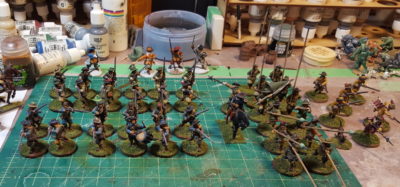
Finished figures – six firelock musketeers in mustard yellow, six regular musketeers in blue, and a full dozen pike in blue. And a dog. Click for larger.
Four colourful officers in the background and part of a unit of a dozen muskets in blue in the foreground. Click for larger.
I have this week between Christmas and New Years off, so before the end of 2017 I might actually get a usable 24 point Pikeman’s Lament force finished by forcing myself to deal with a lot of the mostly-painted figures!
First unit of foot for my English Civil War project is done!
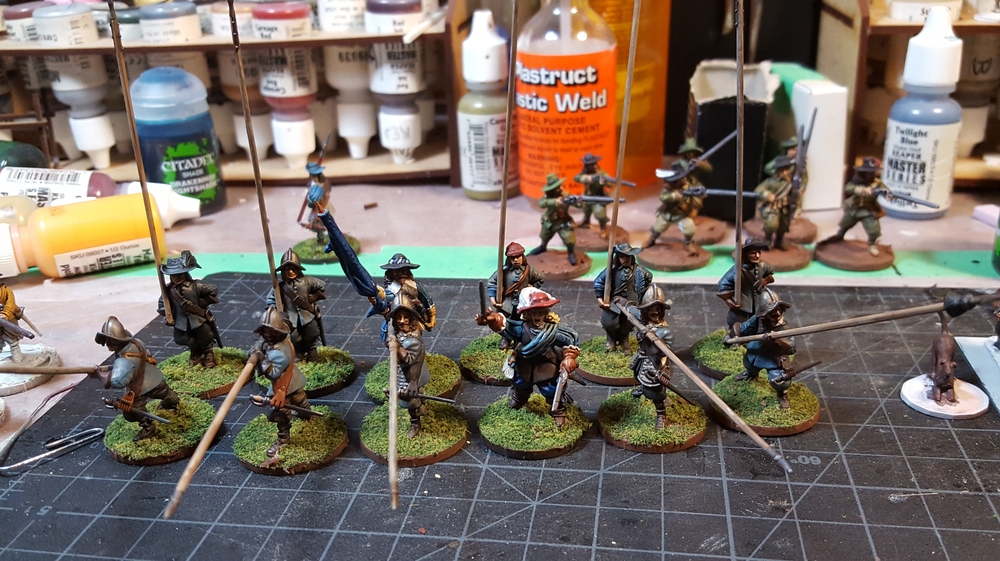
28mm pike from Warlord on 25mm wide bases. Click for larger.
Ten pikemen, an officer, and a flag ensign all lined up ready for battle.
I’m plugging away at the shot in blue to go along with these guys… the musketeers have a lot more equipment hanging off them and are a lot slower to paint than pikemen!
There’s also a second unit of pike almost finished, these ones in green uniforms, as well as six firelock musketeers for a forlorn hope or commanded shot unit. The mounted commander from my last post has also had a few more details completed and is inching toward the finish line. Lots of assembly line style painting currently, which makes for really boring photos to share here until a unit is suddenly done…