I’ve always know that hanging paint brushes bristles down to dry was better for them, but never bothered doing anything about it. Recently my selection of brushes has expended as I’m using cheap makeup brushes for drybrushing and, right at the other end of the brush quality spectrum, my wife spoiled me at Christmas with a trio of gorgeous W&N Series 7 brushes, the seriously expensive ones.
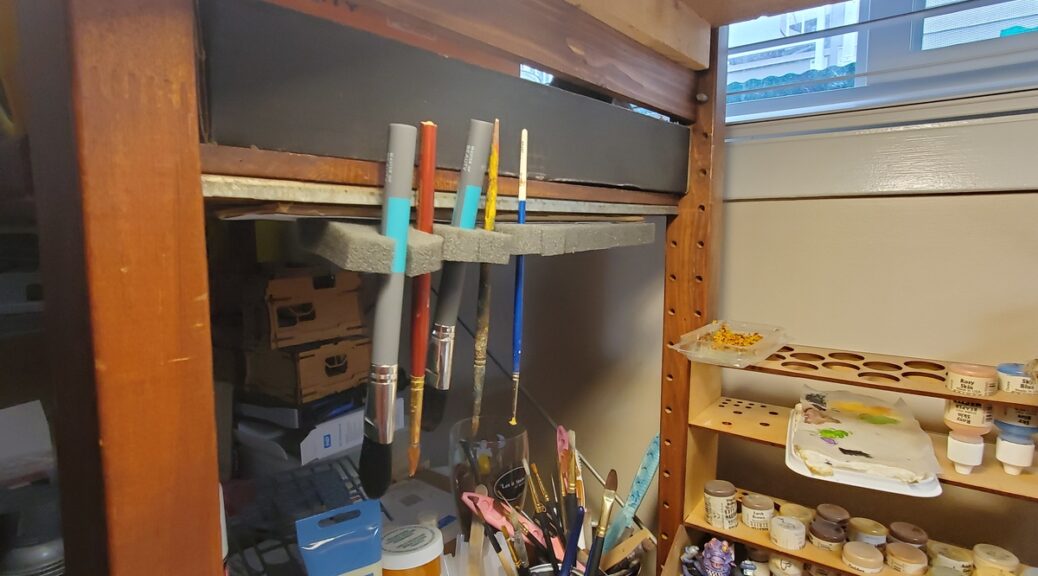
My painting bench is an old Ikea modular shelving unit, and I realized I could add a brush rack to the underside of one of the shelves just off my actual painting area, where it would be out of the way but close at hand for convenience.
Even better, I realized with a few seconds of experimenting that I could make a functional brush rack from scrap foam and recycled cardboard! The foam happens to be sheets from Infinity box sets, about 4″ by 6″ or so; I took one sheet of that, cut it in half lengthwise, and then cut a series of slits about an inch apart and maybe an inch and a half deep.
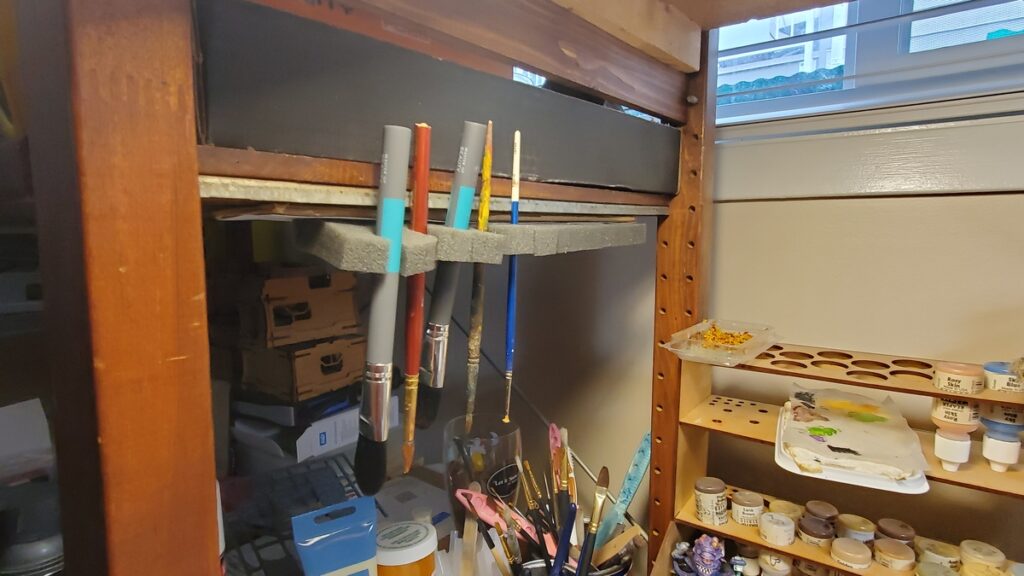
New drying and storage rack in position. The foam will even hold the fat-handled makeup brushes I’ve just started using for drybrushing. Click for larger.
I hot glued the foam to scrap cardboard from the recycling bin, then hot glued the whole assembly into place on the underside of the shelf just on the left hand edge of my painting bench. If I ever decide to replace it or move it, the hot glue can be popped off the wood of the shelf fairly easily.
The slit foam will even hold the wide handles of the cheap makeup brushes I’ve started using recently for drybrushing and the 2.5″ housepainting brush I use on big scenery projects. Given it cost me exactly nothing to make, took just a couple of minutes, and uses a spot on my hobby bench that was previously empty space, I’m very pleased with this little project!
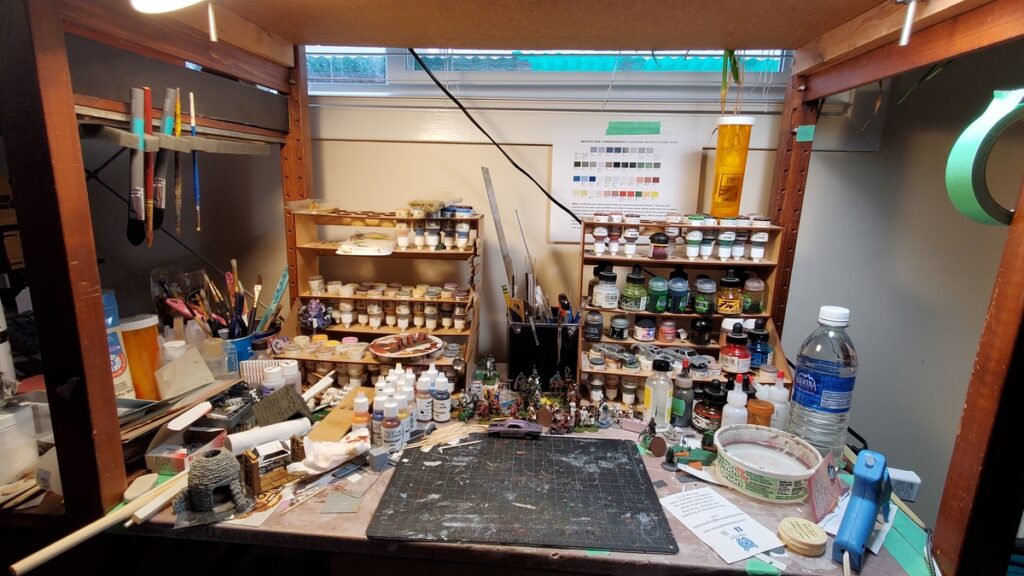
The paint brush rack in context, top left corner of the photo. Yes, I need to de-clutter my bench, move a whole bunch of completed figures into storage, and such. Next weekend. Click for larger.
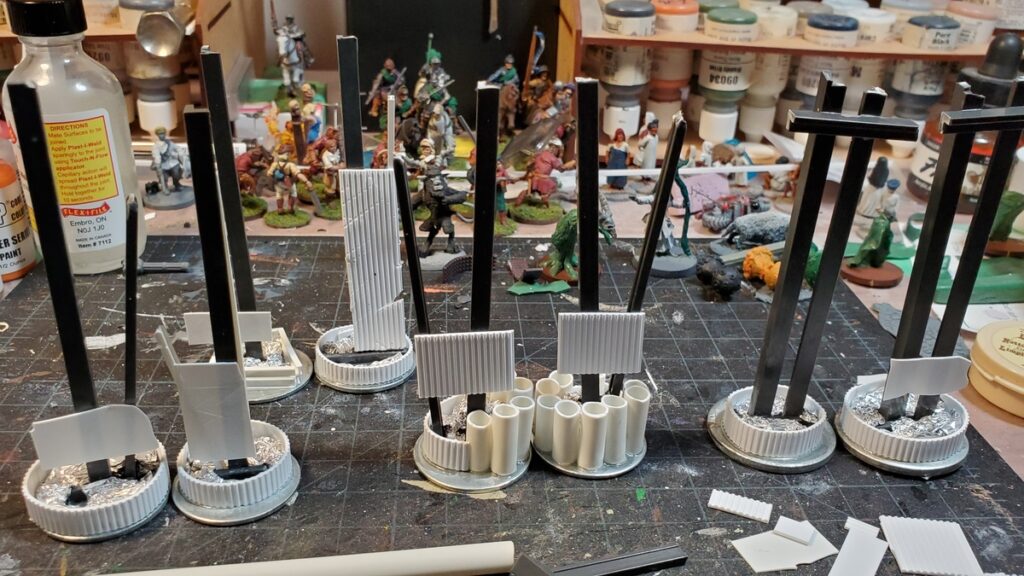
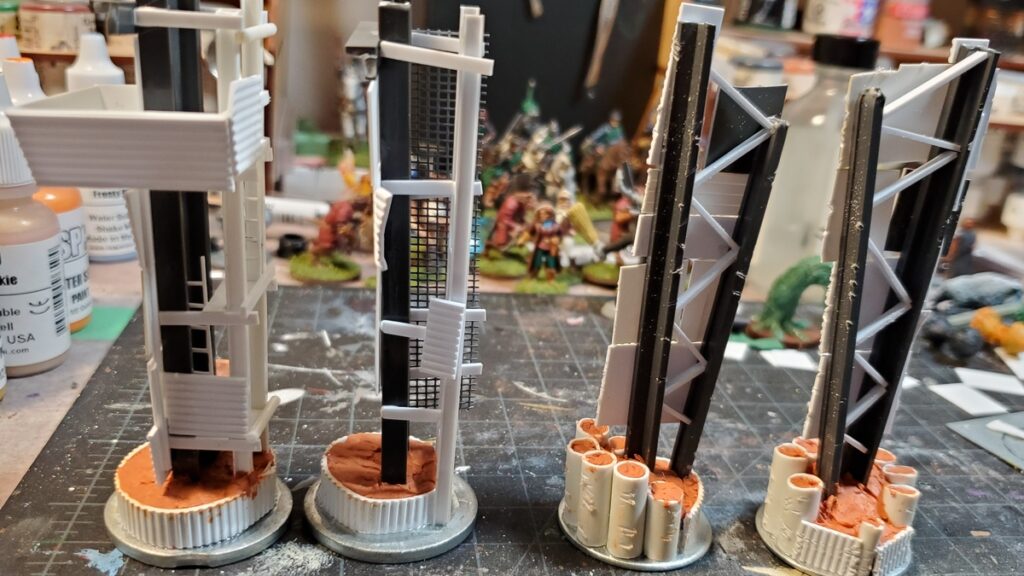
The Death Race scenario for Gaslands calls for at least three or four gates, for start/finish line (which might not be the same gate) and a couple along the course. We’ve been using various random scenery bits, which works fine, but proper gates have been a obvious piece of scenery I wanted to make.
The scrap metal look worked well for the jumps I made last year, so it was the asthetic I followed for the gates as well. I decided to do freestanding gate pillars, essentially, with no permanent overhead horizontal pieces but with the vertical construction to allow modular overhead gantries to slot in if desired.
To keep the tall gate posts ballasted I started with solid 1 1/4″ washers from the stash, then sank the main vertical beams for each into a footing of styrene plastic filled with Milliput epoxy putty, which dries rock hard. Because it’s a fast technique and super cheap, I filled the lower levels of the foundation footings with crumpled tinfoil tacked in place with superglue, then put a layer of Milliput over that.
Early in construction, tinfoil filler visible in the footings. The three course gates are on the left, and rightmost is the start line, which is more substantial. Click for larger.
I used a couple of different methods to construct the footings; roughly circular lengths of corrugated sheet styrene were fast and easy but I really like how the vertically-embedded heavy pipe (styrene tube) came out.
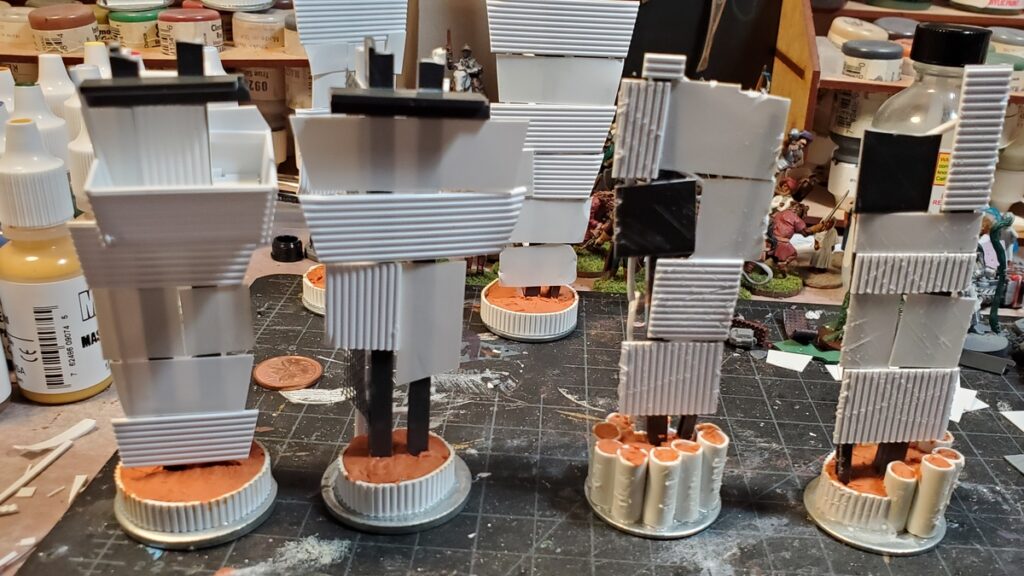
This entire project was done from the Ancient Stash of Doom; I’m pretty sure some of these random girder pieces date back to the family model railroad we had in the early 1990s when I was in junior high. The dark grey plastic is all Plastruct; all the white plastic is Evergreen Plastics. There’s three or four sizes and styles of girder, a couple sizes of tube, and sheet styrene in at least four thicknesses and styles.
Beyond making sure all the main vertical beams were roughly the same length (about 4 inches) I did very little planning ahead. Each pair of gate pieces is in roughly the same style… more or less. After making sure the main vertical beams were solidly anchored to the washers, I filled in the rest of the structure from whatever sheet and beam bits were handy and looked the part.
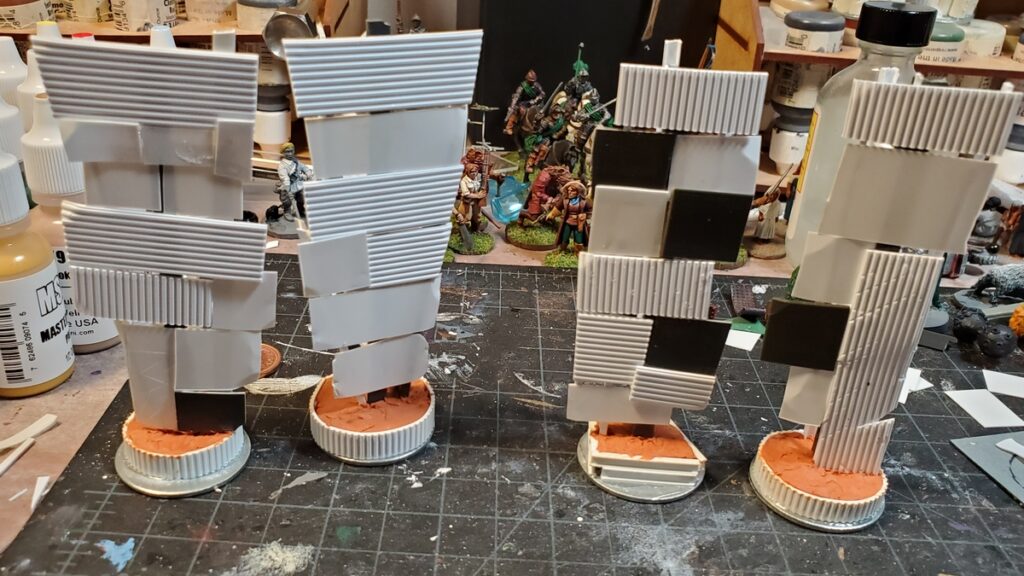
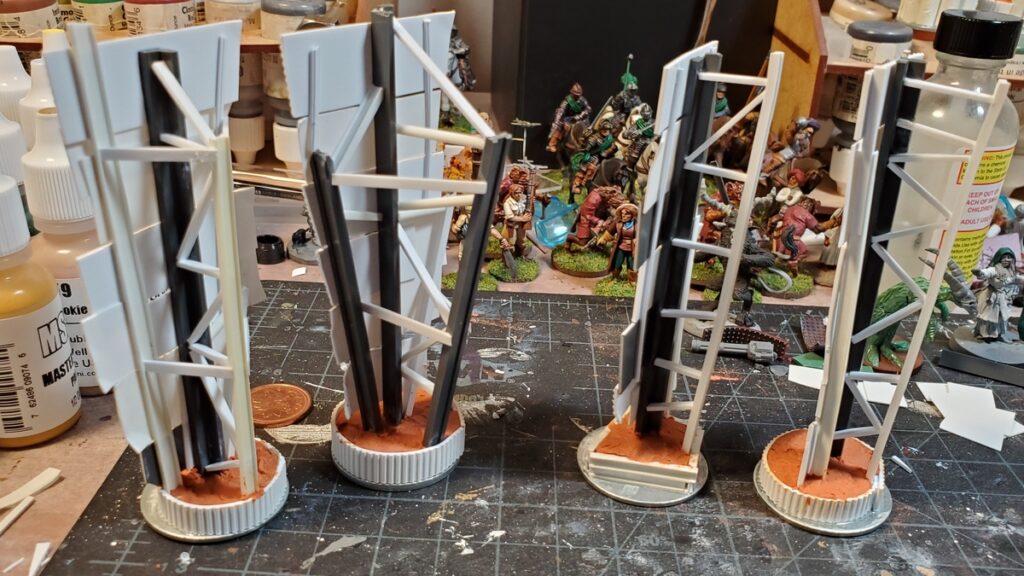
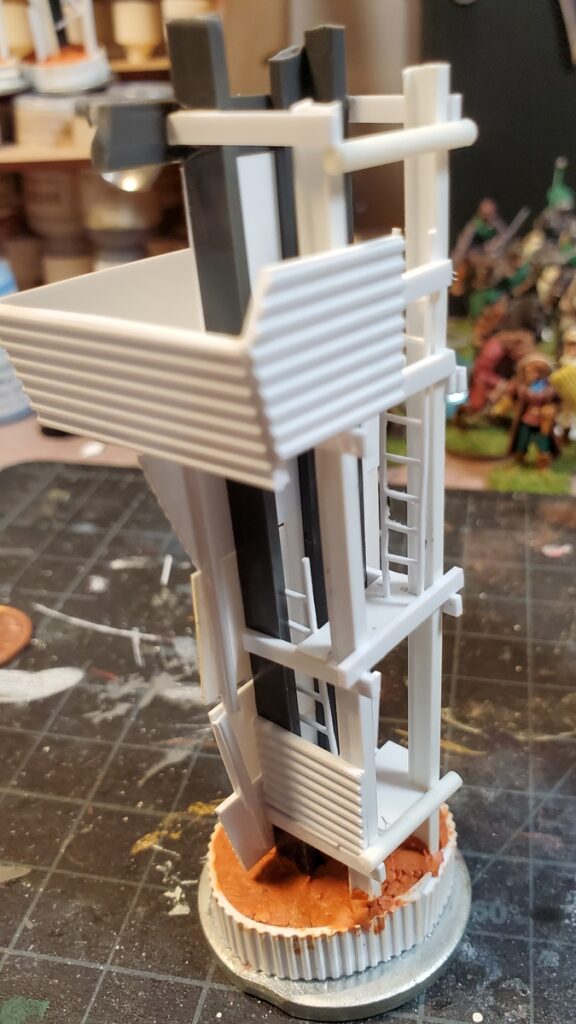
Left, the Start Gates, with an elevated box for race officials, announcers, media, etc. I’ve decided that the “pipe” gates are Gate One, for no particular reason. Click for larger.Gates Two and Three, basically finished and awaiting primer. Click for larger.The backs of Gates Two and Three. The scrap-built girder structures are actually fairly solid now! Click for larger.The backs/sides of the Start Line Gate and Gate One. Gate One has by far the simplest struture, but I really like how it turned out and if we need more gates will definitely be copying the basic design. Click for larger.
Gates One, Two, and Three are basically done, structurally, although I might yet put more details (floodlights, maybe loudspeakers) on them, and the plan for all three is to get Corey to 3d print lettering for “GATE” and then add the gate number in sheet styrene like they were cut out of sheet metal.
The Start Line Gate is still undergoing detailing. There’s ladders to get the crew up into the announcer’s cab, and I’ll be covering the sides and back with some solid metal sheet and a bunch of mesh – you can see the first piece of that on the offside Start Gate pillar, second from left above. The ladders are scratchbuilt from very thin strips of styrene; I’d have used HO scale plastic ladders but my awesome local hobby shop was out of stock.
The Start Gate is also going to get a fairly substantial horizontal gantry spanning the course between the two pillars. It’ll have floodlights, speakers, and a 3d printed “Esquimalt Thunderdome” sign on it, or will when Corey coaxes his 3d printer back to life. I’ve got some very cool openwork styrene girders to form the main central part of that gantry.
The main vertical part of the Start Line Gate, with partially constructed announcer’s cab. This photo was mostly taken to show off the scratchbuilt ladders, which came out really well. Click for larger.
More on these gates soon, and in the meantime stay safe, everyone.
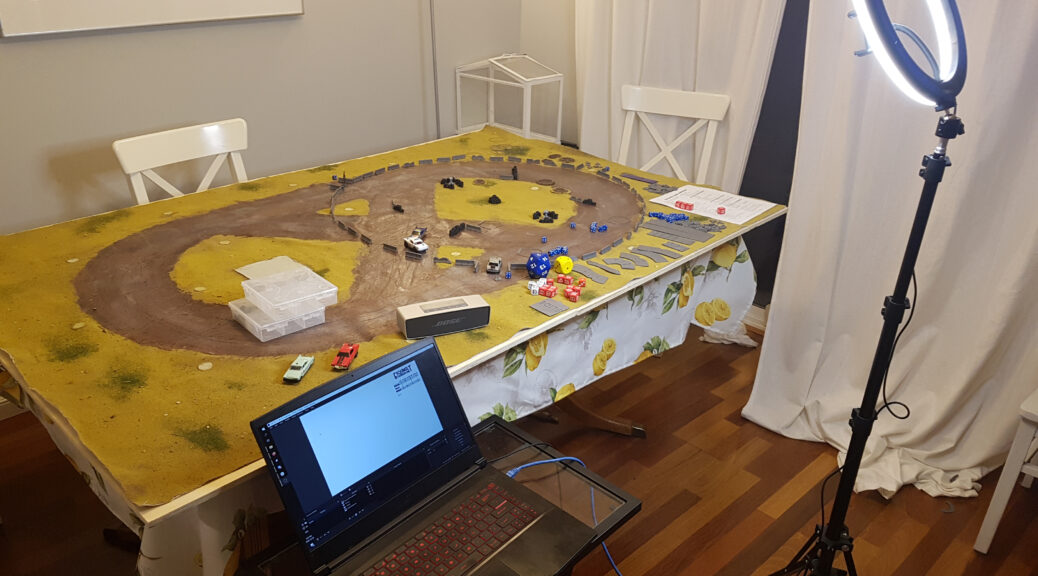
The second wave of COVID-19 is here and with it, new restrictions on in-person events like gaming. While in British Columbia we don’t have a strict lockdown, we are limited to our “core bubble” aka our immediate household. Which means no in-person gaming. Our little gaming group (myself, Brian and our friend Sean) took a break, we wanted to get gaming again and preferably avoid fully-online solutions like TTS. Enter the webcam.
Attempt 1: Ancient webcam + gotomeeting
Our first attempt used an ancient webcam that spits out low resolution image, plus using Gotomeeting. I shared my screen, which had the default Windows camera app up on this. It worked, but was very difficult to see.
We were also challenged with how to track stats – gear, hazards, damage, etc. Brian tracked it on his computer and I tracked gear phase and hazards on the gaming board. Neither really worked – we couldn’t see what Brian was tracking and due to the webcam, nobody could see the hazards I’d placed on the board.
Attempt 2: Phone as webcam + OBS + Discord
Having tried the old webcam and realized it didn’t work, plus the need to track stats, I decided to download and play with OBS Studio. I figured I could overlay a Google sheet to track stats, plus bring in the camera feed.
To deal with the poor image quality, I downloaded #LiveDroid, an Android app that streams your phone’s camera over a local server. To help with low light, I used my new ring light that my wife had bought me for Christmas.
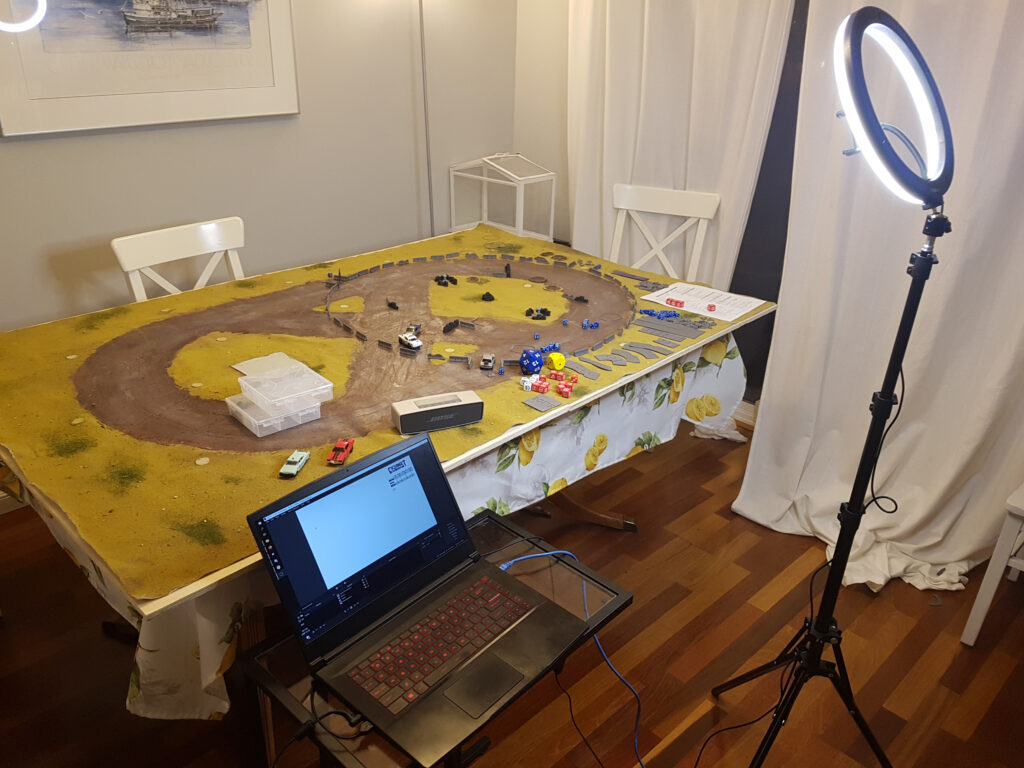
At the end of the third game. My phone was in the light ring holder, hence why OBS is showing a blank image right now.
Setting up Open Broadcast Studio
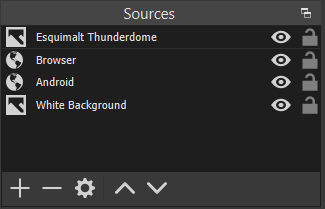
OBS sources
OBS is pretty easy to setup – this was my first attempt at using it and it ran flawlessly. I had four different sources: cam link from phone (as a browser source), read-only Google sheet (as another browser link), white image for a background and the Esquimalt Thunderdome branding image. Note that I didn’t run any audio through OBS, as we were talking via Discord.
For stats via Google sheet, I first setup the needed columns and then cropped the source down using a Crop/Pad Effects Filter to only show the key part of the stats. This method is easy to change on the fly, which we did when I forgot to add Gear Phase to the initial sheet.
Streaming from your phone
I downloaded #LiveDroid, a free Android app that streams your camera to a browser on your local network. You will need to set the resolution for both the camera and in OBS. I set the phone to be 1920×1280 and the OBS source to 1280×960. For me, Camera 0 was my rear camera.
#LiveDroid setup
OBS setup for camera
I also tried DroidCam, which has an OBS plugin, but that stuck an ugly watermark on the image.
Connecting it all together
Finally, I shared the OBS window out using a virtual webcam. On the bottom left of the OBS window, it is labelled Start Virtual Camera. We then started a video call in Discord and I changed my webcam source to OBS Virtual Webcam.
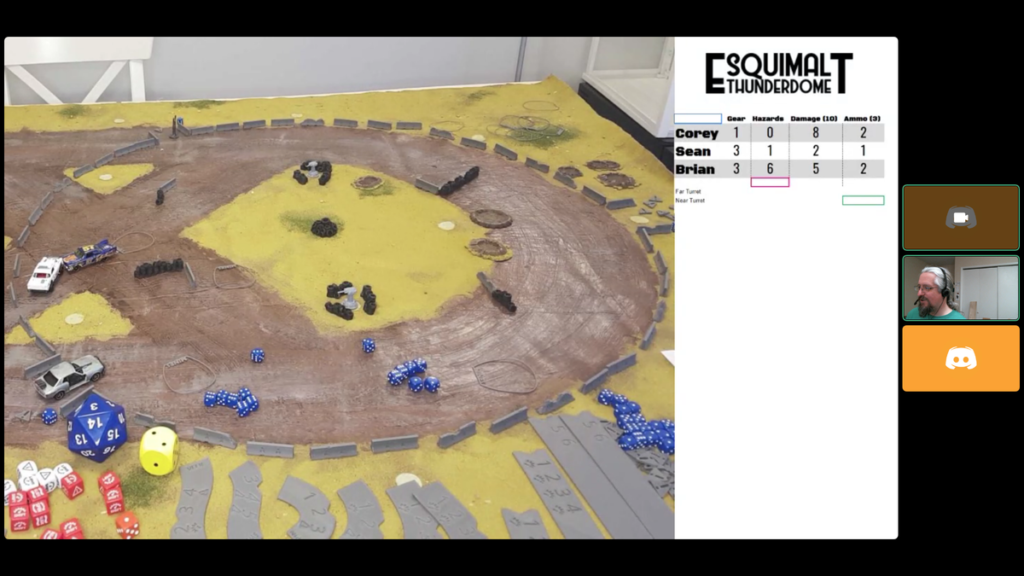
If you’re the presenter, don’t be alarmed when your webcam looks like this:
Discord helpfully flips the webcam image, which works great for your face. Not so much for this.
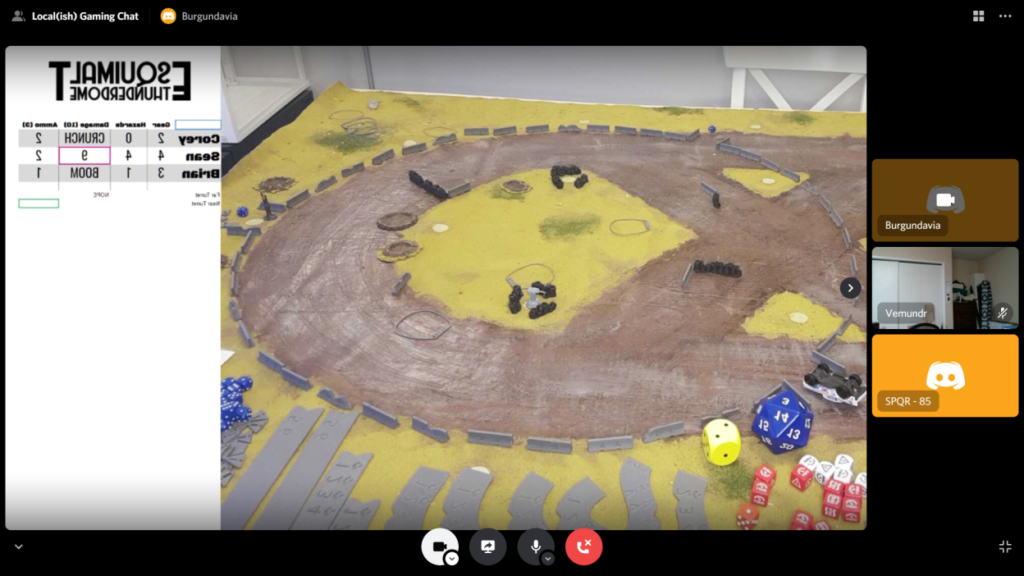
But for everybody else, the combination works well. This was Brian’s view of the final hit of the game.
Modifying Gaslands to play via webcam
For those playing remotely, the hardest challenge is spatial sense. A lot of Gaslands is about choosing the right template. Also, play will be slower, so plan for that.
Adjusting the template rules
The touch it, use it and no pre-measuring rules from Gaslands assume you have a good view of the table, which remote players really don’t. So we changed the template rules a bit. They could ask me about what a template would look like and sometimes I would even lay it down after they’d described what they wanted to do.
Keeping the cars and game simple
In order to keep the game from bogging down, we decided to institute a few simplifications to the game:
Everybody drives the same car, in our case a car with a single HMG forward facing & a mine layer aft
No sponsors
Easy scenario – we ran both a modified flag tag and arena of death
Have a record keeper (and track stats locally and remotely)
The person moving the cars and running the feed doesn’t have the time to deal with record keeping that others can see. So we ended up tracking the key stats both on the game board (so I could see them) and in the Google sheet. So Brian, sitting at his computer, could track the stats for everybody, leaving me free to move cars and keep the game moving
Be ruthless about whipping people along
In order to complete a game, you’ll need the person who is moving the cars to be a ruthless GM. They need to keep the game moving via ensuring each player moves, constantly asking all the key questions like “How many dice do you want to roll”.
What’s next?
Overall, the second game ran really well. OBS made it a lot simpler for everybody to see all the stats.
One of the key problems we ran into was seeing the dice. Instead of an online dice roller, I rolled everybody’s dice in person. For the next game, I plan on using the crappy old webcam as a dice cam – set it up vertically over a dice rolling box.
I also need to play with the colour balance, contrast and saturation of the webcam. Unsurprisingly, all the various pieces of software being used tried to do some sort of correction and not all of it worked.
Where to get the software
OBS is free and runs on most major OSes, while #LiveDroid is Android-only.
Speaking of YouTube, Dr Alexander Clarke has an interesting channel with WW2 and interwar naval stuff, mostly British. Similarly, Drachinifel does mostly WW2 naval history videos as well, more American navy but some others.
Boom & Zoom Graphics have a set of really approachable, humourous, but (far as I can tell) complete introductions to WW2 aircraft markings, painting, and camo, with entries for each of the major combatants. Superb reference for WW2 air if that’s largely a new field to you as it is to me!
There aren’t a lot of small scale scenery tutorials out there, either as videos or traditional blog post writeups. Viv on RubbishInRubbishOut, though, did some YouTube videos of Dystopian Wars scenery a few years ago, and it turns out that DW is in something approximating 1/1200 scale, more or less.
Also, Dispatches from the Front has been working on some fantasy naval scenery for Man’O’War using the Brigade Models buildings and it looks fantastic. Fantasy microscale terrain has a definite appeal, you can get grandiose epic terrain on the table that wouldn’t work at all in any larger scale!
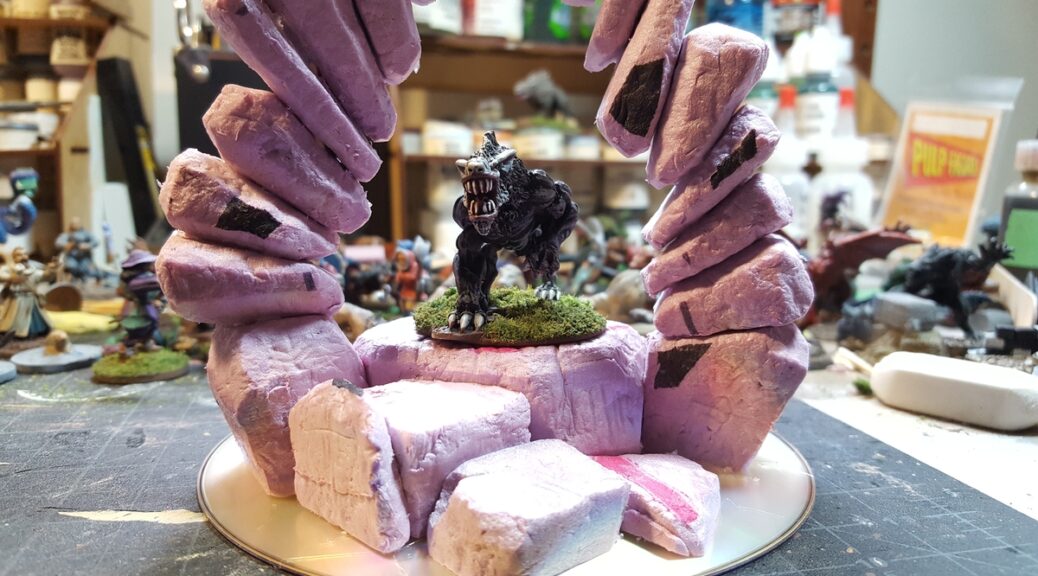
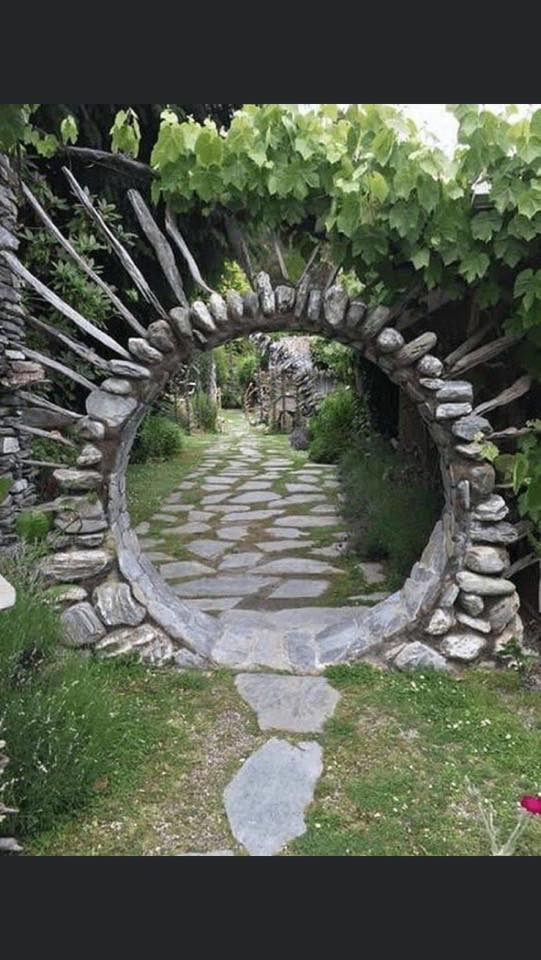
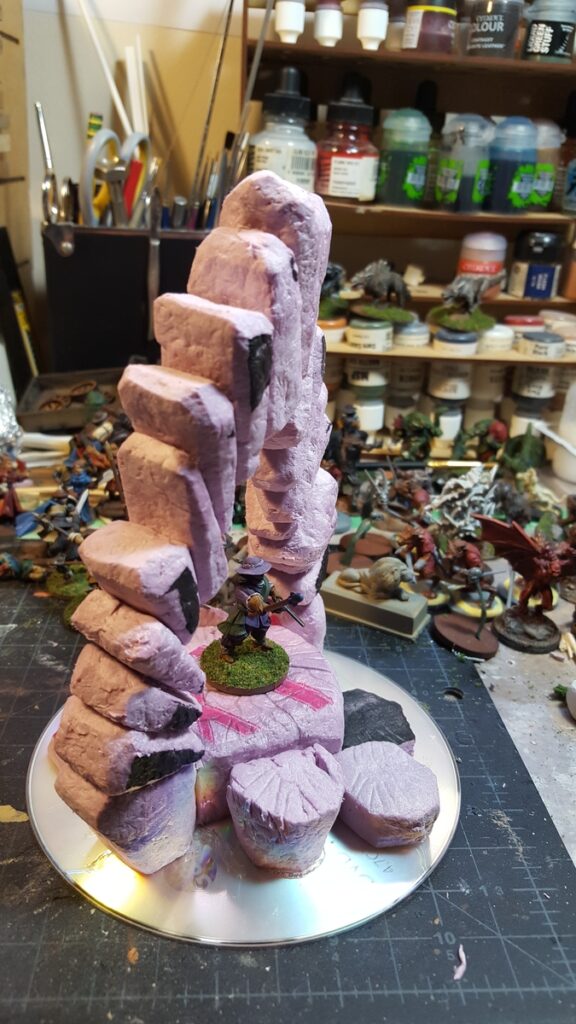
Decided to crank out another piece of fantasy terrain this weekend. I’d been thinking of gateways, portals, and fantastic archways off and on for a while, after someone shared this rather cool garden gate on one of the Facebook terrain groups.
No idea where this is from originally; it’s been shared around so much reverse image search is a cluttered mess. The general idea seems to be called a “moon gate”, though, and there’s lots of other neat images around the web.
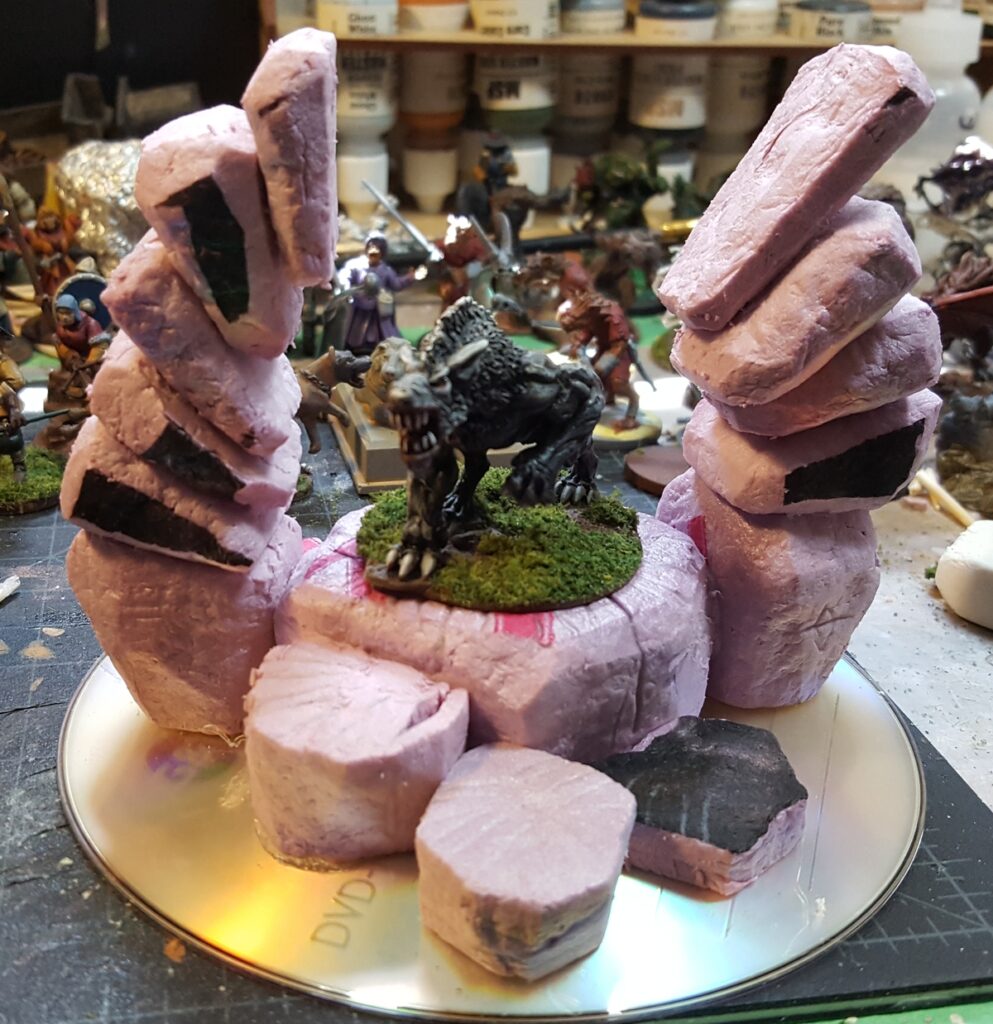
I decided on a CD-sized base, because why break good habits, and wanted the portal gate to be solid enough to block line of sight, with a raised platform that can hold several 25mm based figures or one monster on a 40mm base.
Test fitting a Reaper demon dog on a 40mm wide base. I wound up cutting the topmost stone on the left off and replacing it to improve the fit. Click for larger.
The whole thing is made up of dense pink insulation styrofoam, cut with a knife and textured with a ball of crumpled tinfoil. There wasn’t a lot of planning, just repeated test fittings with various figures like the Reaper demon hound above to make sure figures (and fingers) would fit.
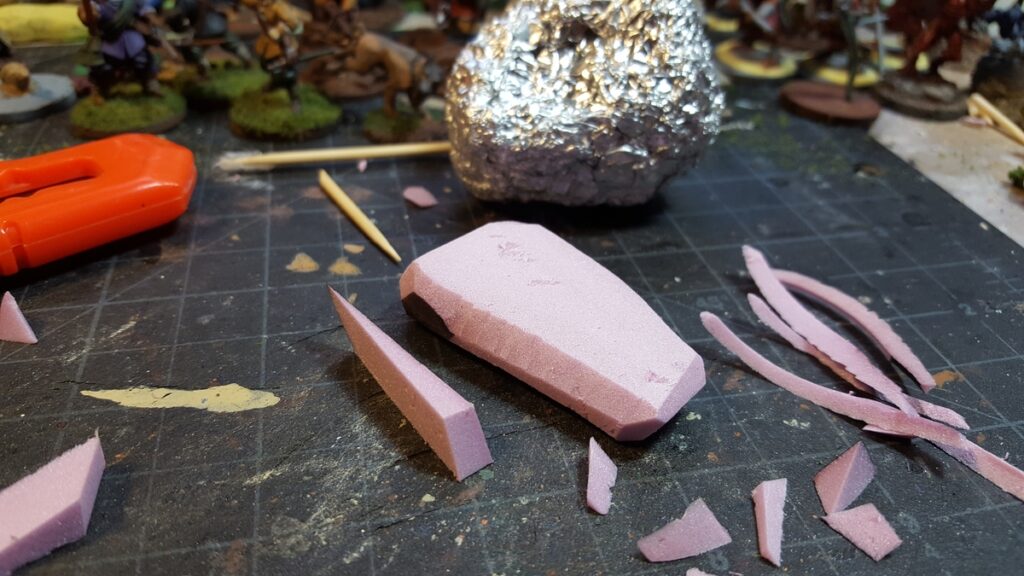
One of the stones in progress, cut and shaped but not textured. Chunk of hard styrofoam, sharp knife, tinfoil ball for textures, toothpicks for strength. Not shown, hot glue gun for fast assembly. Click for larger.
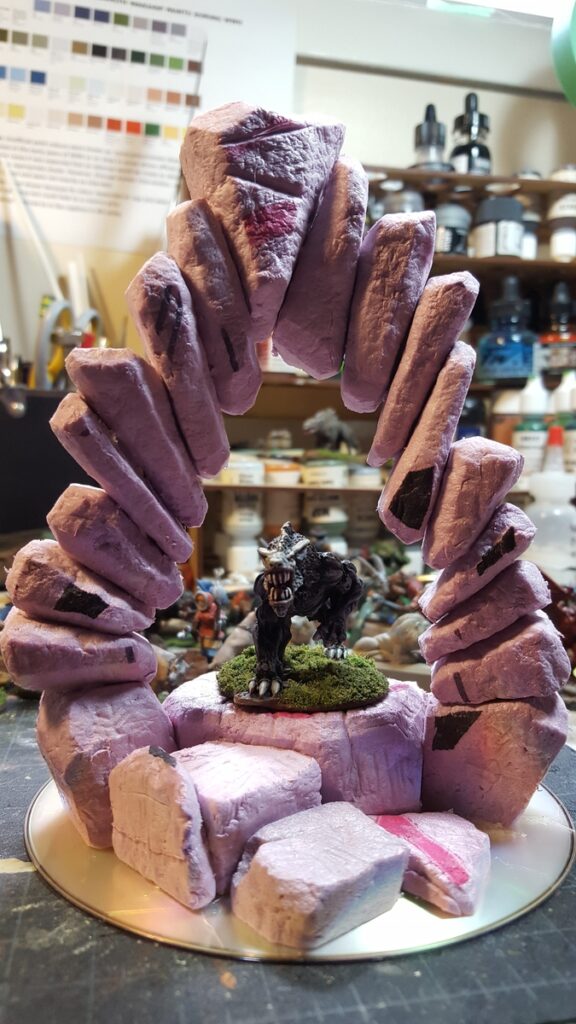
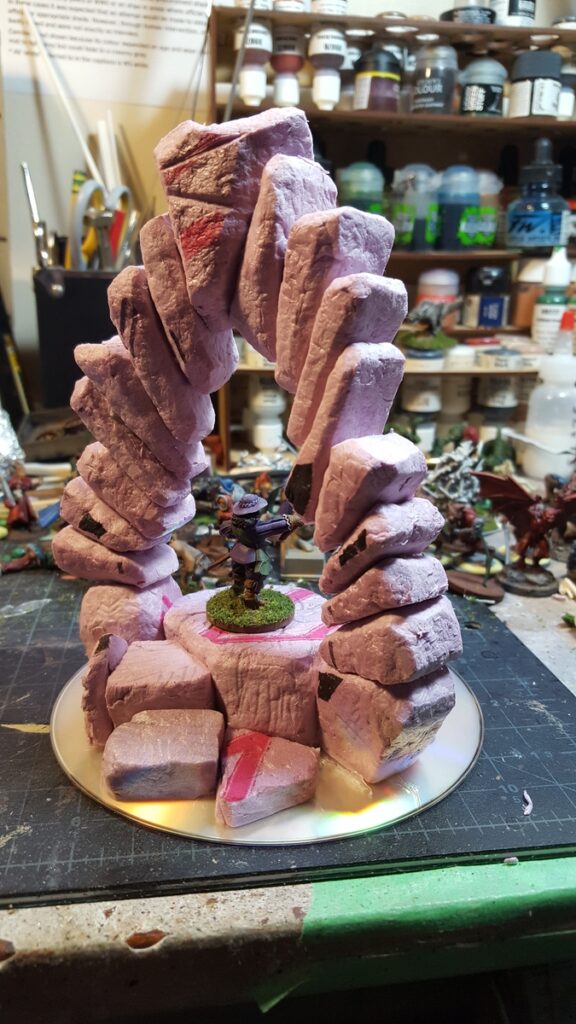
Assembling the arch took a few hours, most of it working fairly casually with a beer to one side of my workbench. I used hot glue for speed, and there’s a partial toothpick holding each stone to the one below it so the whole thing is solid and should be gamer-proof. The top of the arch is about 6″ above table height and flat enough to put a 25mm base on, just for fun.
Complete portal, with demon dog. Click for larger.Side view. The arch has a twist to it as it rises. 28mm Warlord figure (kitbashed) on 25mm base for scale. Click for larger.
Except for checking clearance on the demon dog and a couple of bigger figures as the arch went up I didn’t do a lot more planning or measuring, just cut and shaped stones that looked like they’d fit.
The big keystone at the top of the arch started as a random roughly triangular foam offcut and I shaped and textured it early, then fit the last few stones at the top of the arch to make the keystone sit where I wanted it.
Other side of the structure, same figure as previous image. The whole arch has a twist to it as it rises. Click for larger.
I think for painting I’ll basecoat the archway in white instead of my usual black, then start painting the stones with a heavy drybrush of black so the deep grooves between the stones stay white, possibly with a blue or green wash over them to make it look like magical energy is flowing through this thing, holding it together and powering whatever arcane process the archway contains. The base will probably get the normal black basecoat and then the same drybrushing up for texture.
Reaper Moor Hound bounding through a portal from whatever dread fae realm such horrors belong in. Click for larger.
Painting in the next few days, anyway, as we’re doing a stat holiday game this coming Wednesday (not like there’s going to be any big Canada Day celebrations to go to, right?) and I’d like to get this one the table then. Stay well, stay safe, and stay sane.
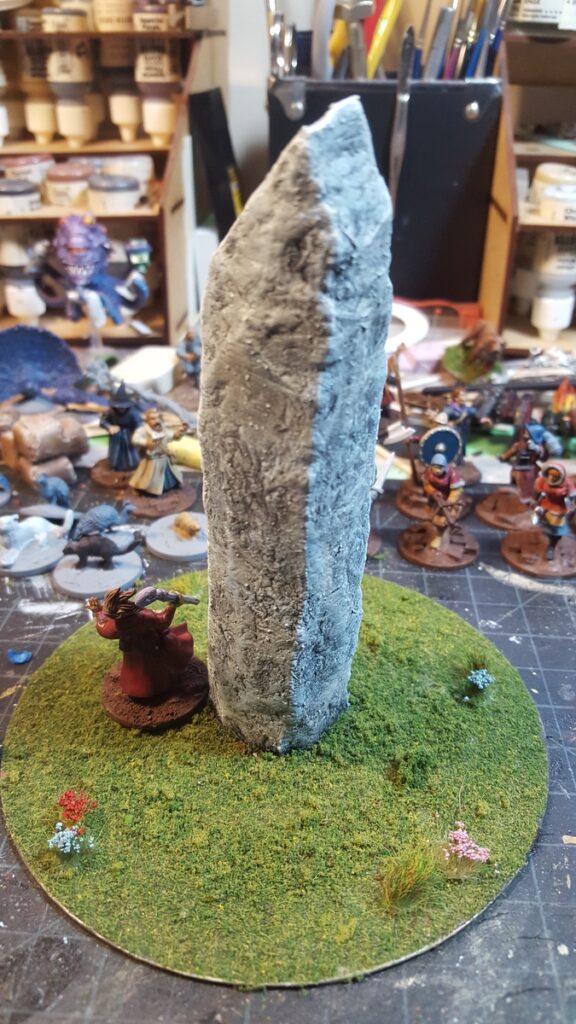
Nice simple bit of terrain I recently cranked out. I realized that the mushroom ring I built recently was nowhere near gamer-proof; it started shedding mushrooms as soon as it left my workbench so I popped the mushrooms off to rebuild the whole thing in such a way as to let me pin the mushrooms to the base with wire. More on that later, but this left me with a flocked and decorated CD base with nothing on it and it seemed a shame to waste it.
I took a scrap of 2″ thick pink styrofoam insulation, sliced off a piece about two inches wide, and craved bits off until it looks about right for a tall thin standing stone or monolith. Then I took a ball of tinfoil and rolled it all over the piece, which gives a really nice random stone texture. I put a few cracks and lines in with a pencil then rolled the tinfoil over those marks again, then glued the monolith into the centre of the CD with a healthy blob of hot glue.
Unfortunately I didn’t get a single photo of this piece during assembly or basecoating, but it got my usual mix of black paint and white glue as a basecoat, then once that was dry (overnight) it got drybrushed up with dark grey, pale grey, tan, light blue, more lighter grey, and finally white. The pale blue is subtle but makes the piece really pop, and I’ll definitely be using that on more stonework in the future.
Finally, I highlighted all the edges with pure white. It doesn’t show up all that well in the photos I’ve gotten so far, but in person that final step really makes the edges pop and makes the piece look bigger. After that it was just a bit of extra flock around the base of the stone and to cover the spots where mushrooms had originally been glued down.
Monolith with 28mm Frostgrave wizard for scale on a 25mm base. Click for larger.Monolith from the other side (back? sure…) Click for larger.
The Rebuilt Mushroom Ring
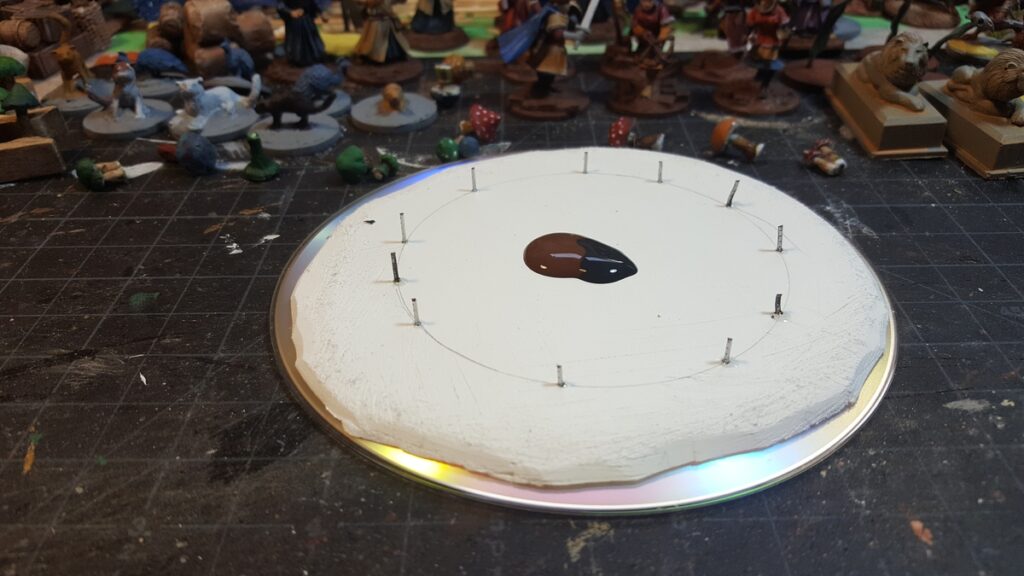
As for the mushrooms, I took a scrap of 3mm plastic board, carved and sanded it so it fit onto a new CD, hot glued it down solidly, then marked out a circle and drilled a bunch of holes with a tiny drill bit. Those got overlength pieces of paperclip wire stuck into them with superglue. The wire was trimmed short after the glue had cured, and then mushrooms with holes drilled into the bottoms of their stems were superglued on.
New mushroom ring base with wire mounts superglued in place, getting a coat of dark brown paint as a basecoat before mushrooms get glued down onto the wires. Click for larger.
The lovely Bad Squiddo mushrooms got glued down (some got repainted beforehand, because I’ve just gotten some new shades of green paint, so why not?) and then the whole thing got my usual turf mix and will eventually get some flowers and other tufts to finish decorating it.
Both “new” pieces together. Reaper 28mm demon in the middle of the rebuilt mushroom ring, which still needs flower tufts to finish it off. Click for larger.
My Turf Mix
I had someone over on Lead Adventure Forum ask about my turf mix. It’s not an exact mix and has been changing gently over the years, but the base is Woodland Scenics mixed fine turf, with WS dark and medium green fine and coarse turf, some Games Workshop summer grass flock, and at least a couple random brands and colours I’m forgetting about in there.
That mix lives in a big 1 litre margarine tub that’s large enough to comfortably put an entire CD-sized terrain base in. For these pieces with fairly wild heavy turf on them I’ll leave the entire base in the turf mix for at least an hour or so before removing it and shaking excess back into the tub, to give a nice heavy scruffy layer of grass. For more manicured lawn-like grass, I’ll take the piece out of the tub right away and shake it off back into the tub, leaving a much shallower layer of turf.
Wargames Designs is partly a webstore, with some good looking historical wargaming flags in a variety of scales, among other things, but they also have this listing of English Civil War coat colours by regiment, which is also a great resource for ECW-era names.
More on coat colours, and much other good stuff as well over on Keep Your Powder Dry.
Over on the micro-scale gaming side, this really fantastic project to depict Constantinople in 2mm for siege games. This is an ongoing project, so look for more recent updates on that blog when you visit!
I feel like I’ve linked to 6mm ACW before, but that website really does have some great 6mm terrain tips that aren’t just limited to those gaming the Slaveholder’s Insurrection.
My most recent YouTube channel discovery is Miscast out of Australia, with a series of painting and terrain videos that tend to be short (this is good) and well edited (also good). I rather like this How To Make a Crystal Elven Waystone for D&D & AoS, which I’ll also embed below. He’s got an accompanying miscast.co website with some interesting stuff on it.
This is actually cardboard, if you can believe it. Well worth four minutes and a few seconds of your time.
Stay safe, stay sane, and try to keep creating things, faithful readers.
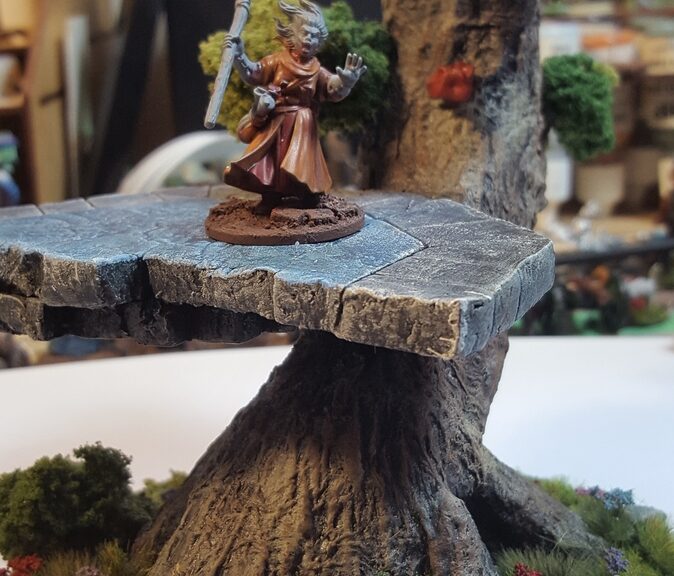
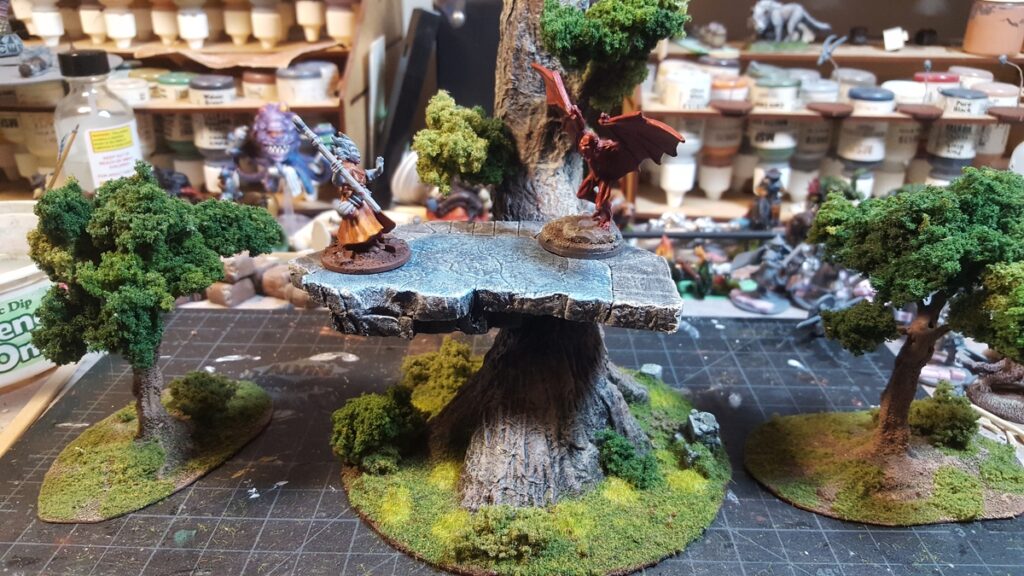
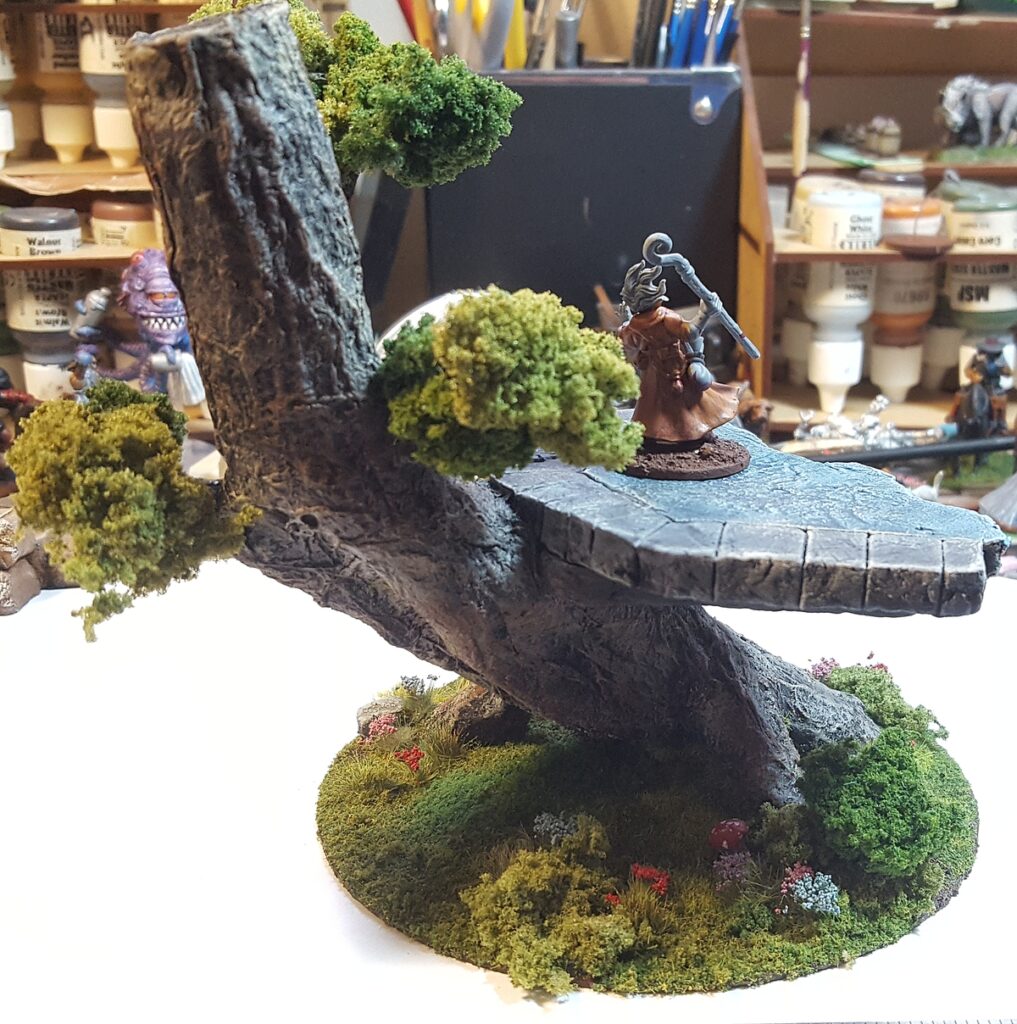
For our Forestgrave games I wanted some decidedly weird scenery, stuff from the other side of reality that doesn’t quite look like it obeys physics as we understand it. I wanted a lush, not-quite-overgrown-but-almost faery realm thing going on, what in D&D is called the Faewild.
It turns out that, far as I can tell, that’s not a super common theme for wargaming terrain, which surprised me. Maybe I haven’t discovered the magic search terms in Google or YouTube to let me find the other folks doing weird natural terrain yet. If you know of any, let me know in comments, please!
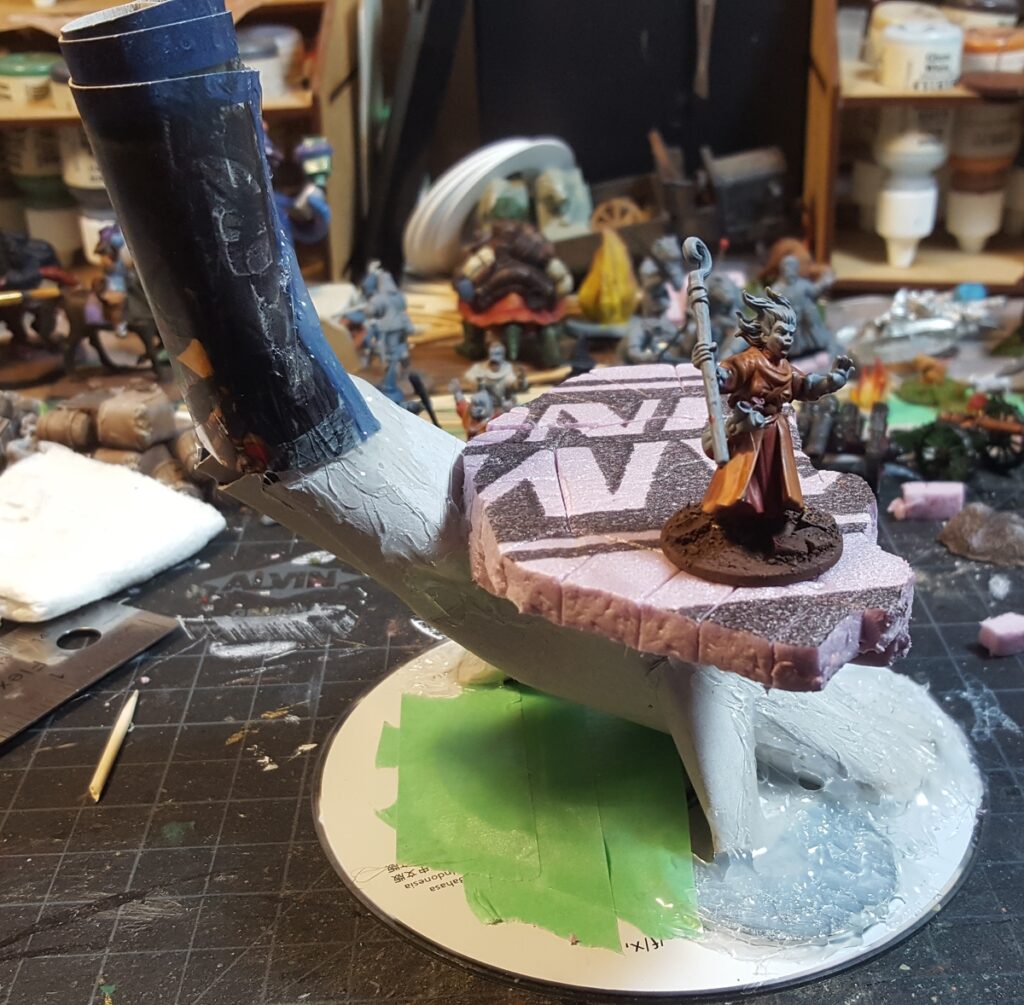
Anyway, I started with a scrap CD, hot glued some washers to it for ballast (because I knew I wanted my final tree to be five or six inches tall), and then used the light cardstock from a Frostgrave figure box to start forming the trunk, with lots (and lots) of hot glue to hold everything down and together, fill gaps, and add some texture to the trunk.
Initial construction underway. Rolled up and scrunched around light card for the trunks and root structures, washers and tape on the base, and loads of hot glue everywhere. Click for larger.
The stone platform is half inch foam insulation, cut as if it had at one point been octagonal before splitting in half somehow. I spiked a toothpick into the foam and then down into the cardboard of the trunk, and it’s solid enough to hold large metal figures without worrying me, even though it’s only attached to the trunk at a single point.
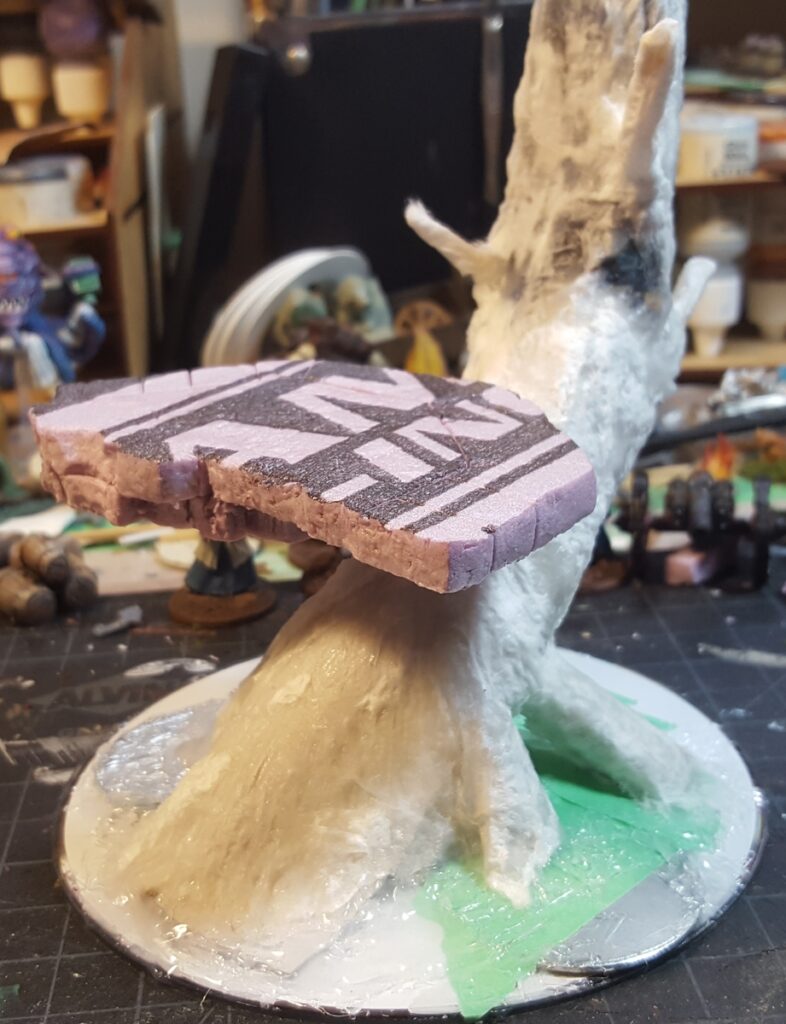
The whole trunk and roots covered in toilet paper and white glue. Fantastic easy bark texture. Click for larger.
I pushed a couple of toothpicks into the trunk in a few places, securing them with more hot glue, then covered the entire tree with clean toilet paper slathered with white glue. Push it around a bit with a stiff wet paintbrush and extra white glue as needed, let it dry overnight, and it’s fantastic easy cheap bark texture for bigger trees. I first used this on my big jungle trees for Infinity a few years ago, and it’s fantastic.
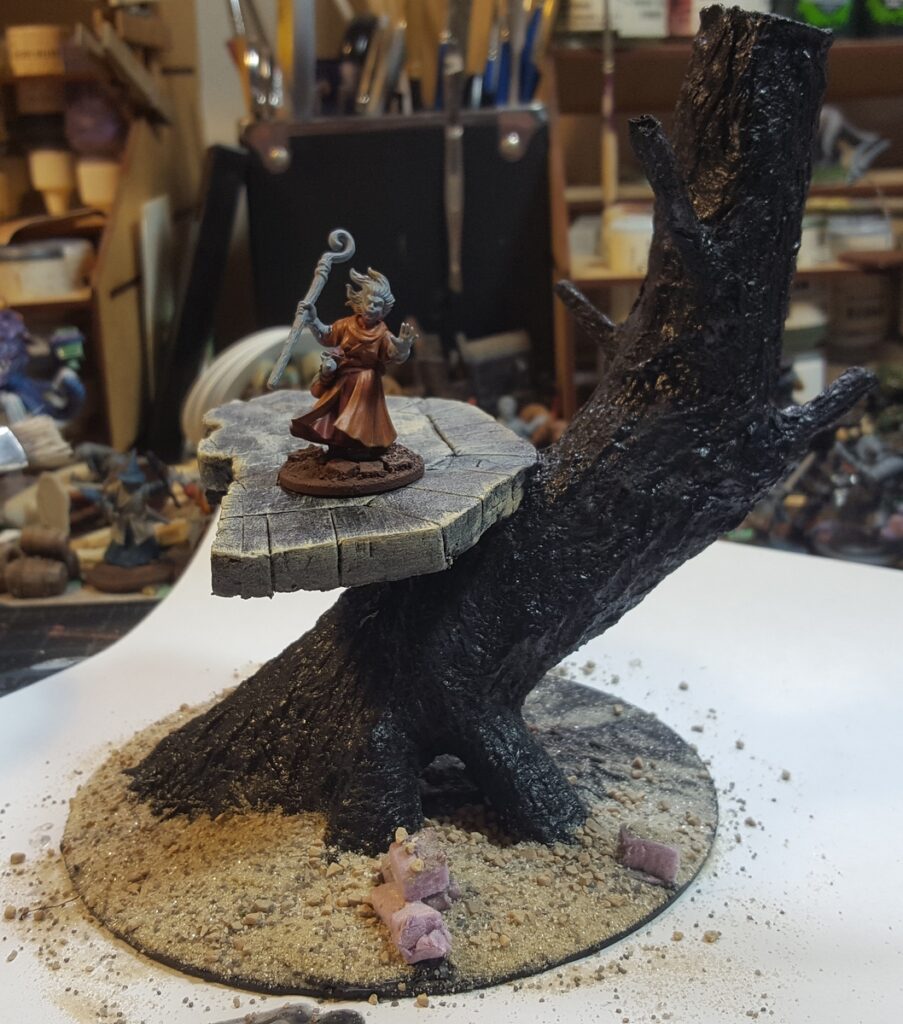
Black primer everywhere, start of paint on the platform, and grit going down on the base. Click for larger.
Next step was black acrylic craft paint, mixed with a generous amount of white glue for extra strength. That took a while to dry on the tree, so I stuck sand and grit onto the base while it was still wet, as well as adding a few bits of scrap foam for stone blocks.
Foam foliage on the trees, base flock and bushes on the base, paint mostly done on the platform. Frostgrave female wizard facing off against a Reaper demon. Click for larger.
The platform got the same black primer, then various shades of grey, tan, pale blue, and white on the stone. I shaded the centre section with blue ink, then used both pale blue and white as final drybrushed highlights.
The two smaller trees in the photo above, incidentially, were made from wire and hot glue several years ago, got put away unfinished, and I just found them last week while looking for something else. They got extra basing materials and tree foliage alongside the big one, and are finally finished, at least five years after I started them. Yeah, I’m organized.
The base got foam foliage bushes, a base coat of my usual mixed grass flock, patches of several other types of flock, a few mushrooms from Bad Squiddo Games, and then a lot of tufts, both grass and flowers.
Tree complete. Mushrooms, bushes, grass, and flowers on the base in abundance. Click for larger.
The grass and flower tufts are mostly from Rain City Hobbies, who do all sorts of great stuff including a bunch of styles of grass and flower stuffs at really good prices. I’ve been using the flowers on my English Civil War/generic English terrain already, and dailling them up higher to get that fae-touched lush look was the right choice, I think.
Weird tree all finished, front view. For my next trick I need to finish that Frostgrave summoner, her apprentice, the rest of her warband, and the demons she summons… Click for larger.
There’s still room for figures on the base, despite the abundant plant life, and I’m looking forward to doing more scenery like this soon!
And again, if you have a line on good inspiration for this sort of faewild overgrown haunted woods scenery, please let me know!
Dogs and cats living together! Chaos and disorder!
Well, something like that. Horses and armour, at least.
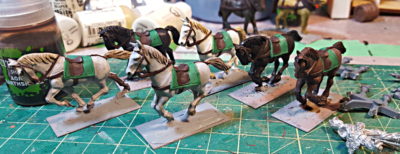
I realized that all twelve horses for my regular ECW cavalry are all brown. Every last one of them. There’s a bunch of variation in tone, mane colour, stuff like that, but they’re all bay, which is horse-speak for brown. Well, some of them might be chestnut, which is horse-speak for “lighter reddish brown”, more or less. For the six horses I needed for the current batch of cuirassier I decided to mix it up a lot. There’s a white horse, two different shades of grey, two different bay, and one black horse.
All six cuirassier horse. Hair, mane, and tail all done. Hooves, tack, and some details still to do. Click for larger.
Unfortunately I totally forgot to write down any of the paint mixes or layers I used for this batch of painting, so I’ll have to re-invent the wheel, or at least the horse paint, next time I do horses!
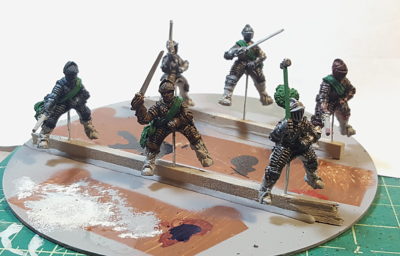
For the armour, I put pins up into the backsides of all six cuirassier, making them extra-long to make painting easier. Then I used a scrap CD, two lengths of scrap wood, and my hot glue gun to create a very useful little painting stand, seen in the photo below.
All six riders got all their armour basecoated bright silver (Reaper’s True Silver), then various inks and washes were layered over to try for a treated-metal appearance as discussed in my last post on coloured armour.
GW’s washes don’t work as a base layer for this, I discovered right away. They’re not designed to stay on flat surfaces particularly well, although they shade crevices and lower areas of a surface very nicely. I used India ink for the three blacked armour sets, Reaper’s Red Ink for the russeted armour, and FW Artist’s Acrylic Inks for most of the rest of the colour.
The three blacked armour riders were basically done after one coat of thinned India ink, and then I went back in with metallic paint to do some of the edges and highlights, especially on the rider in the foreground of the photo with the hammer and plume.
Armoured riders. Front right blacked with silver edging, rightmost russet, two background guys both blacked, blued armour on the far left, then the second russet armour guy foreground centre. Click for larger.
The two russetted armour guys and the one blued rider (far left) got at least a couple of more layers, including either very, very thin India ink or GW’s Nuln Oil to darken the bright initial ink coat. The blue guy especially looked incredibly bright and weird after his first coat of just blue ink – my girlfriend saw him and said, “Seventeenth Century Power Ranger!” and damned if she wasn’t right…
I’ve also discovered that these guys are nearly impossible to get a decent photo of in their current setup, the above blown out and fairly crap photo is less crap than all the rest. I’ll try for better pictures once the riders and horses are all attached to each other. Still to do is boots, saddles, faces, and weapons.
I’m really pleased with how these guys are turning out so far, and I think they’ll look great on the tabletop once they’re all finished. Ink over silver is definitely a win for doing coloured armour!