Quiet here the last week or so because I’ve been thoroughly distracted by Lead Adventure Forum’s Build Something Contest 2021!
Lots of cool entries in progress over on the BSC subforum of LAF. Posting WIP photos elsewhere is discouraged but I’ve taken lots of photos so far of the rocky moor piece I’m doing and I’ll be sharing them here in a month or so when the contest is concluded.
I do have some other stuff I’ll be showing off, including some scatter pieces I just finished that I’m quite happy with, so it won’t be totally dead here but go check out the BSC and look for my updates there!
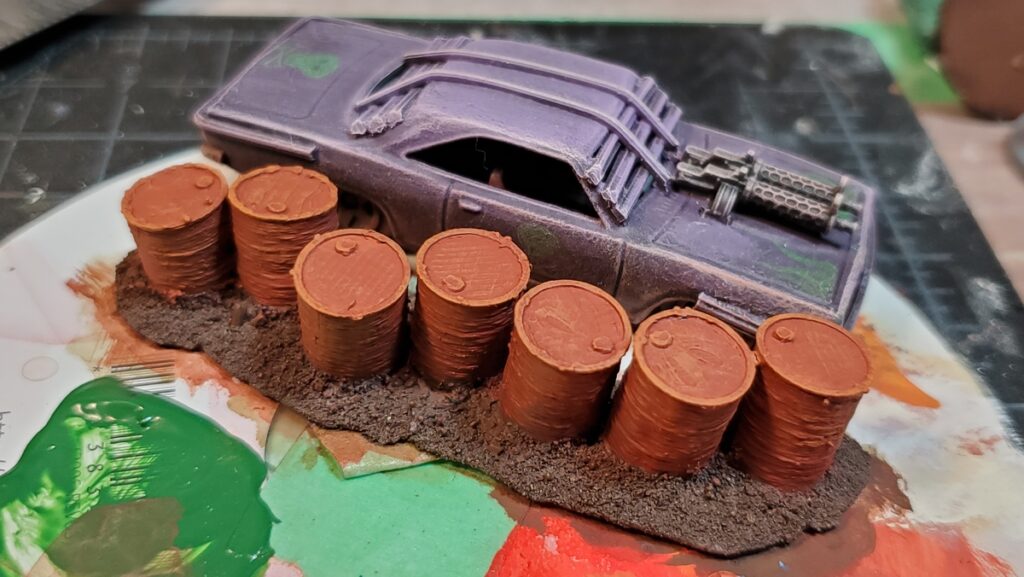
Corey has a 3d printer, as has featured here many times, and a little while ago he cranked out half a dozen barrels in Gaslands-ish scale. His printer was being temperamental, however, and they wound up a bit lumpy and mis-printed. The care and feeding of 3d printers appears to be an entire hobby unto itself, one I’m happy to leave to him…
Waste not, want not, though and on a post-apoc deathtrack battered misshapen barrels seem more likely than pristine clean ones anyway, so I took them, stuck them in a rough line on a base made of a lump of Milliput, and chucked some paint on ’em.
Rust basecoat after priming.
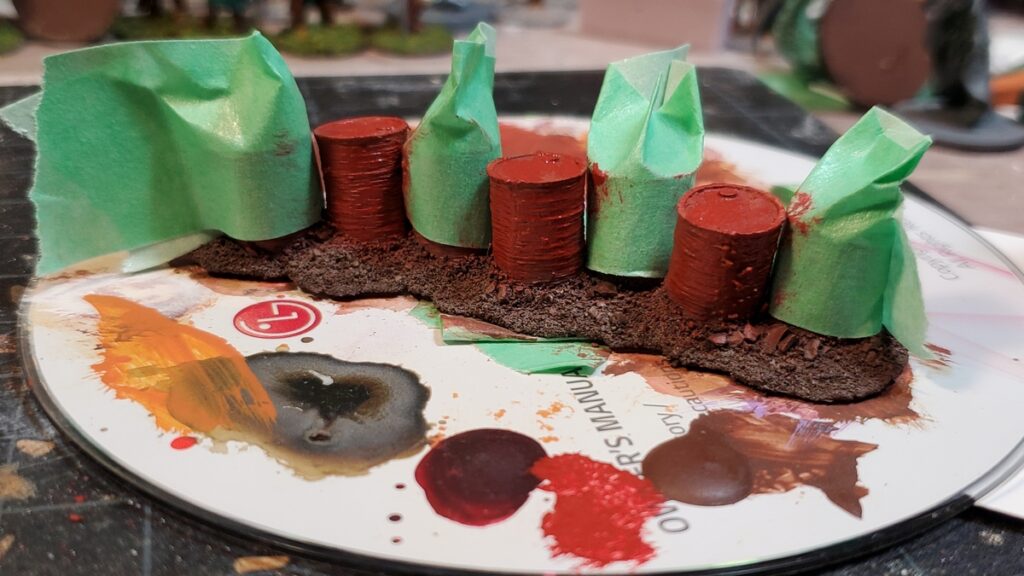
After my usual grey spray primer the barrels got a reddish-orange rust basecoat, then I painted them alternating white and red, to fit with the general colour scheme on our Gaslands arenas.
White barrels masked while I paint the red ones.
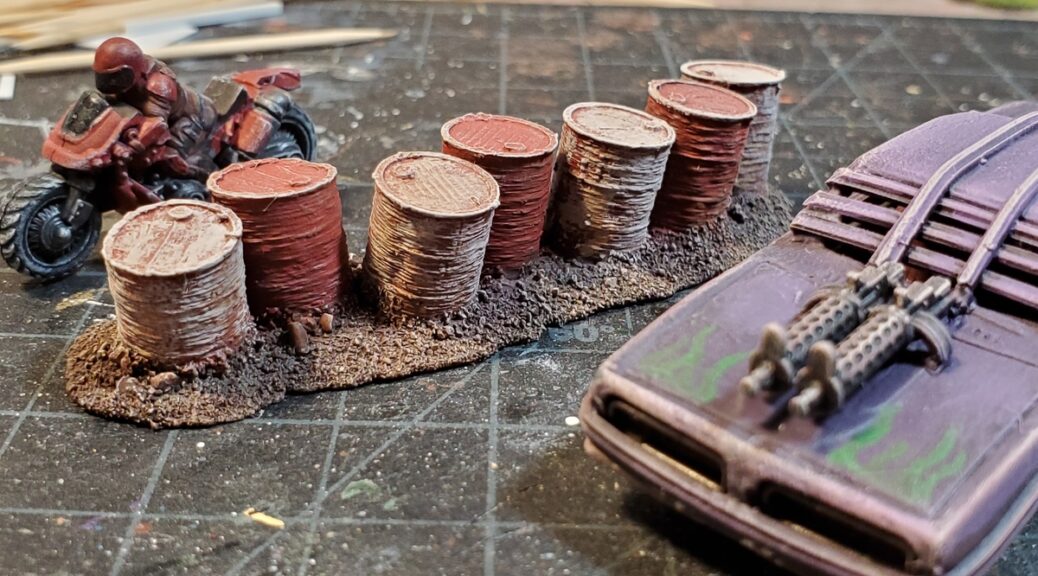
All the paint was stippled on to be deliberately scruffy and let the rust basecoat show through, and then I drybrushed various shades of rust, dust, and grime back over everything. I think there was a dark brown wash in there too, but can’t actually recall.
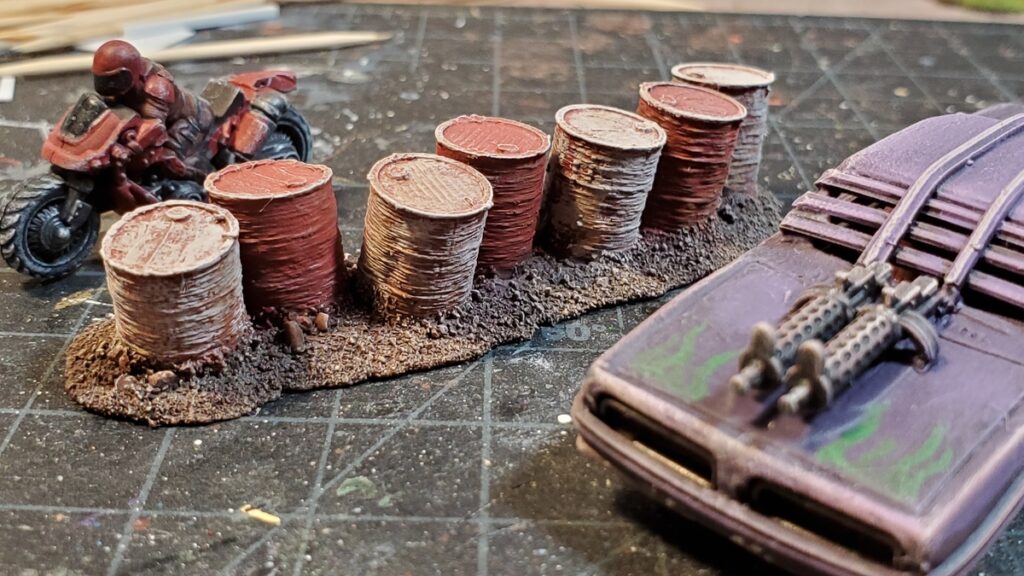
Finished and ready to be put out in the arena to be crashed into!
This was a nice quick little barricade, done over a couple of short sessions, and a good way to reuse slightly misprinted but still basically intact bits!
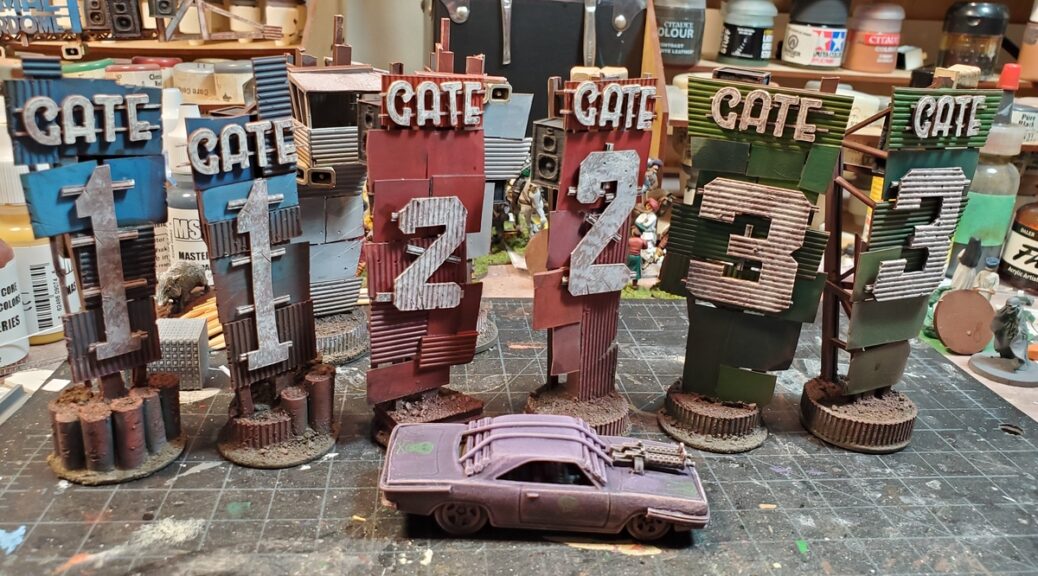
Up next was the “GATE” lettering and giant numbers for the three numbered gates.
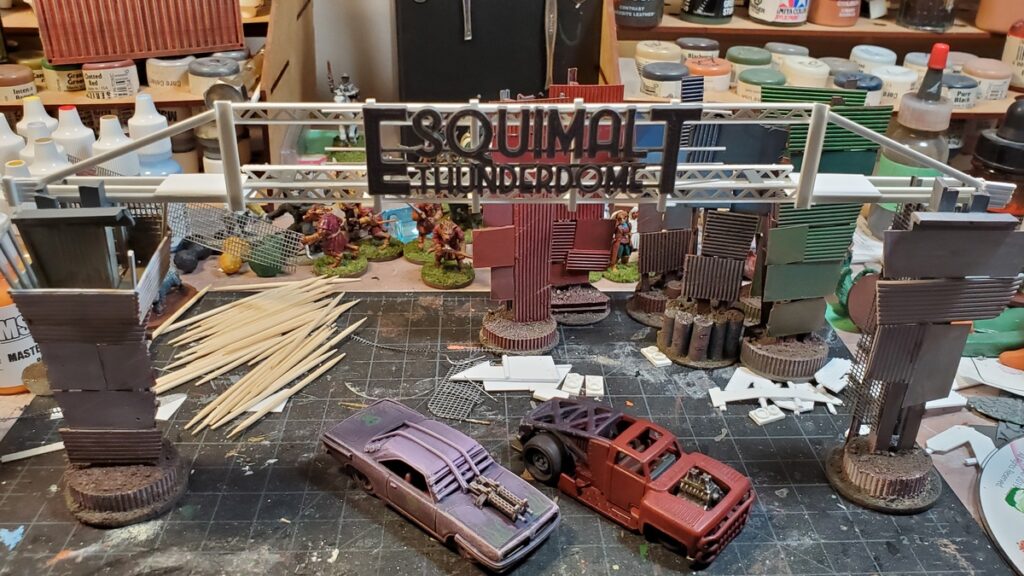
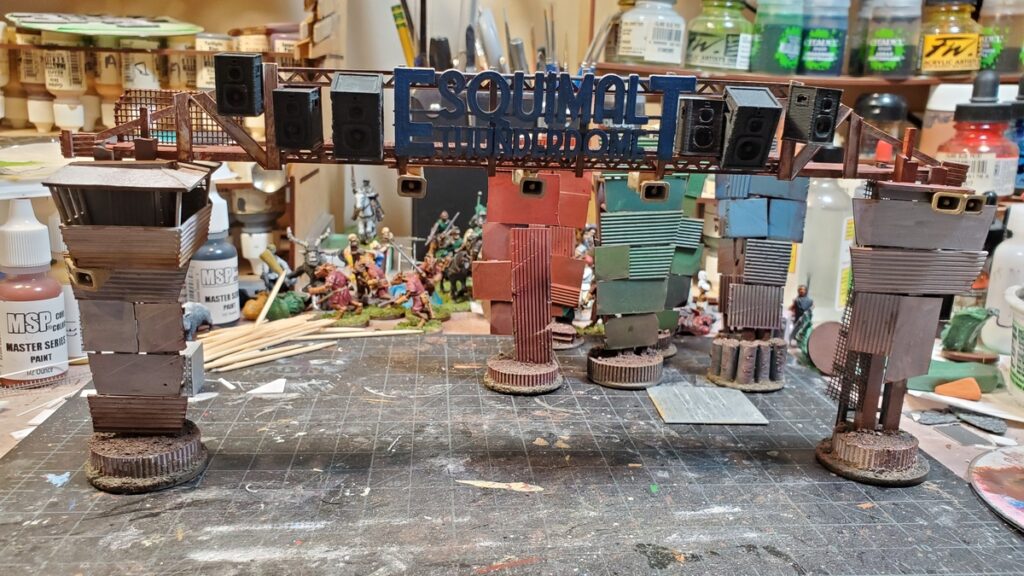
Mid-project roundup. Rust basecoat on the big numbers, front centre; GATE lettering primed on the right, and the gate towers all lined up behind and overhead. Click for larger.
I cut the giant numbers from sheet styrene and mounted them on strips of scrap styrene. The GATE lettering was 3d printed as separate letters and then mounted on very thin square section styrene strip. To make that easy I taped long pieces of the styrene strip down to my cutting mat, glued the letters down, then once the glue had cured cut each word out.
Everything got spray primed grey and then basecoated the same blotchy rust I’d used on the overhead gantry and elsewhere. I stippled and drybrushed everything with a couple of different shades of off-white (Reaper Linen White and Leather White, primarily) before a final drybrush of Reaper Pure White.
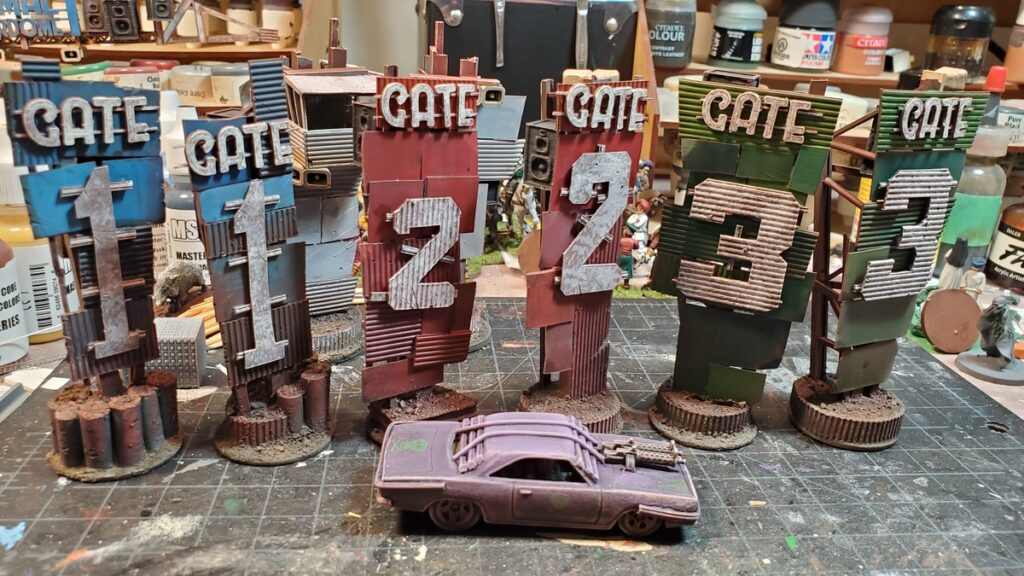
The GATE signs and numbers all mounted and final weathering begun. Click for larger.
After that it was back to the weathering, primarily drybrushing with a big soft makeup brush. I only just picked one of these up, a super cheap dollar store special, and it really is the bomb for drybrushing! I used a fairly random selection of browns, reds, tans, and off-whites for this, going back and forth over all the towers and the gantry as well.
Back view of the six gate towers, with speaker cabinets and loudspeakers mounted. Click for larger.
While adding the lettering I had finally primed, painted, and installed the roof on the announcer/race official cab on the lefthand start gate tower. I thought about installing mesh on the windows but decided to leave them open for now; I might go back in and add some additional protection for the folks who wave the chequered flags but the current form will do for now!
Roof installed on the announcer/official cab. It had to be cut to fit around the fairly random structure of the tower itself. Click for larger.
Final touches and some finished shots soon as this project finally wraps up and might actually hit the table sometime soon!
When we last saw our gates they were basecoated but stalled due to missing 3d printed parts. Those arrived, thanks to my brother’s 3d printer, and I was able to move on with the project.
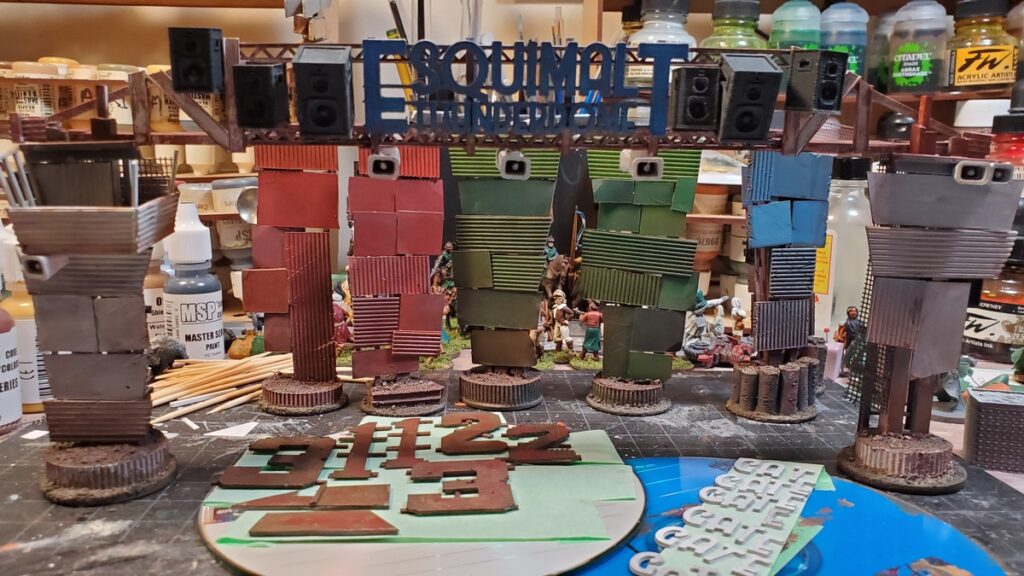
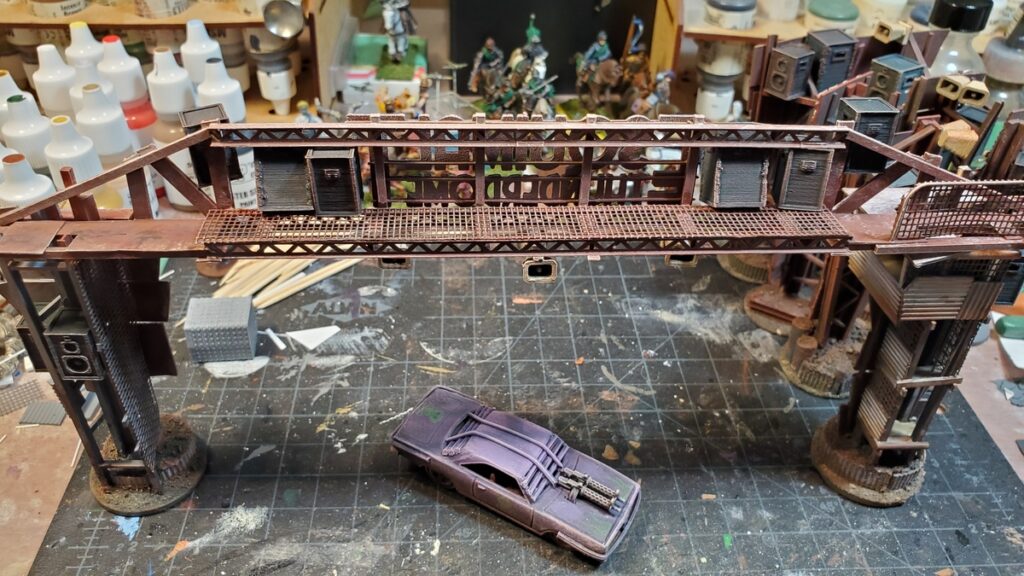
I didn’t want to start the overhead gantry on the Start/Finish gate until I had the 3d printed “Esquimalt Thunderdome” sign in hand, but once I had that the basic construction went together quickly.
The three openwork girders have been in my stash for decades and the packaging is long gone, but they’re from Plastruct – possibly these ones, which seem to be about the right size. You can find all the similar openwork web girders from Plastruct by searching their site for “web”.
The girders are only six inches long, so I knew I’d need to extend the gantry with other materials as the Gaslands rules call for gates the same width as a Long Straight movement template, which is roughly 7 inches long, and Corey’s Thunderdome racetrack dirt track is roughly 8 inches wide. Fully finished, this gantry is almost 10 inches long, and slots into the roof structure of the two vertical gate towers to hold everything together.
The start of the overhead gantry. I later pulled off the plastic mesh as it was getting in the way of construction and painting, and replaced it much later in the process. Click for larger.
The rest of the gantry was a random scatter of styrene shapes from the stash – there’s some flat C-channel, different T- and H-girder bits, and lots of square or rectangular cross section stuff. It had to both look structurally sound and actually have a certain amount of structural integrity, but the beauty of post-apoc engineering is that it still looks great if you bodge extra bits on to fix earlier problems!
in progress but before priming. You can see here how the gantry’s beams slot into the tops of the two gate towers. Click for larger.
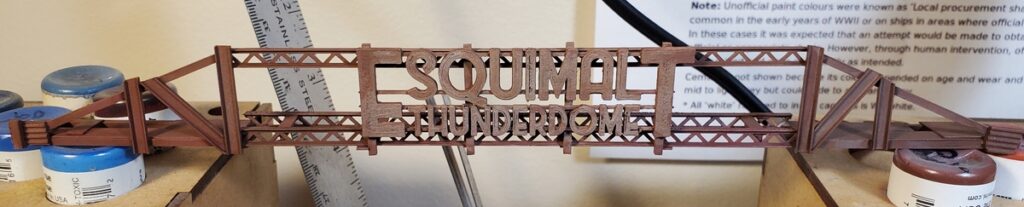
After grey primer I covered the whole thing in a blotchy rust coat using a couple of different shades of browns, reds, and oranges.
Rust coated. Click for larger.
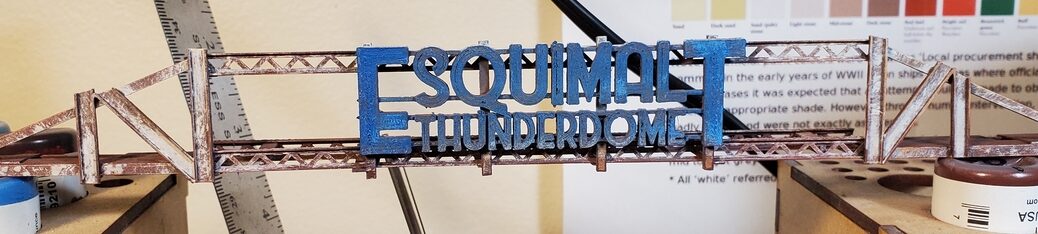
After the rust coat I did a blotchy coat of white, partly drybrushed and partly stippled into place. This came out far better than I’d hoped, and really looks like white paint that’s flaking off as the metal under it rusts and weathers.
Stippled and drybrushed white, and first coats of blue on the sign. Painting of the actual gantry is basically done at this point; the sign got a bunch more weathering and highlighting and touchups. Click for larger.
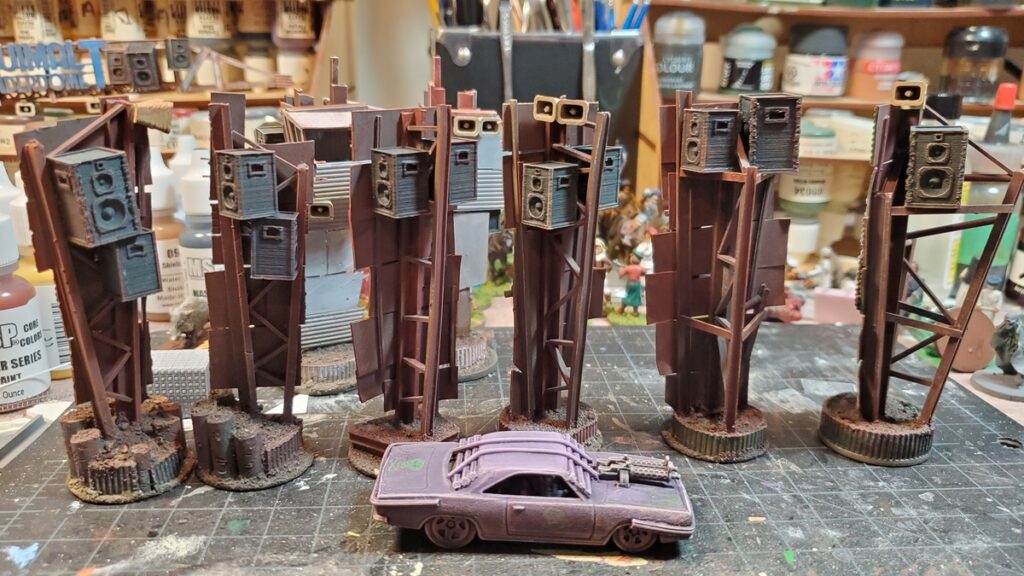
The speaker cabinets and loudspeaker horns were 3d printed from STLs on Thingiverse, both from a very nice collection of Gaslands parts. The speaker cabinets were printed in two different sizes, which added some visual interest.
Speaker cabinets and loudspeaker horns in place and weathering started. Click for larger.
The speakers got painted a blotchy off-black (Reaper Pure Black with a dot of one of their greys mixed in) and the loudspeakers got one of the many tan off-whites in my collection, I can’t remember which one.
The clutter of speakers and loudspeakers really makes this piece pop, it’s exactly the visual clutter I’d pictured in my head when first thinking these designs up!
I’d like to add some light fixtures, but it seems nobody makes 20mm 3d printable floodlight fixtures, at least not that I can find, and I’d want enough of them that scratchbuilding isn’t really an option unless I can come up with a really simple design…
The back of the gate, with mesh back on the walkway and all the 3d printed stuff getting weathered.
Next up, painting and installing the big “GATE” signs and numbers on the rest of the gates, and loads more weathering. So much weathering…
For my naval gaming I knew I needed a proper mat eventually; I thought about doing up a sheet of grey felt with spraypaint and such, but then I found the Cold Waters mat from Cigar Box Battles and figured it was worth the investment.
A lot of mats are designed for Mediterranean or tropical games (pirates!) or the Pacific and are way too blue or blue/green for the North Sea or English Channel where all of our WW2 small boat stuff has taken place so far. The Cold Waters mat is described as “the perfect mat to use with your North Sea WW1 Jutland fleets” and the colour looked good, so I decided to order it.
I ordered the mat February 1st and it showed up on the 20th from wherever it is in the US that Cigar Box Battles are based. I didn’t get a shipping notification or tracking number, oddly, which I was expecting given the cost of the thing. No matter, it made it, and a three week turnaround is good in normal circumstances, nevermind our current COVID-FUBAR’d postal mess!
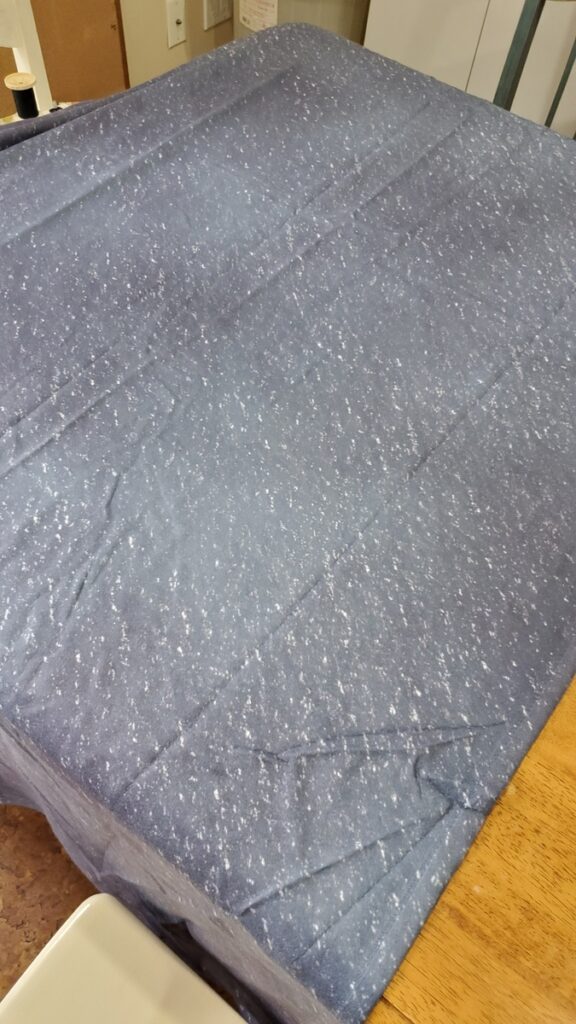
A portion of the mat spread over one end of my dining room table. You can see the colour variation and nicely consistent whitecaps really well here. Click for larger.
Honestly the mat looks even better in person than in the photos on the Cigar Box website. The colour varies randomly across the mat from quite a dark blue to a lighter grey-blue, with whitecaps across it in the fairly consistent pattern you’d expect. There’s no obvious repeats of the pattern created by lazy graphic design, which is definitely not the case with some of the other sea mats out there.
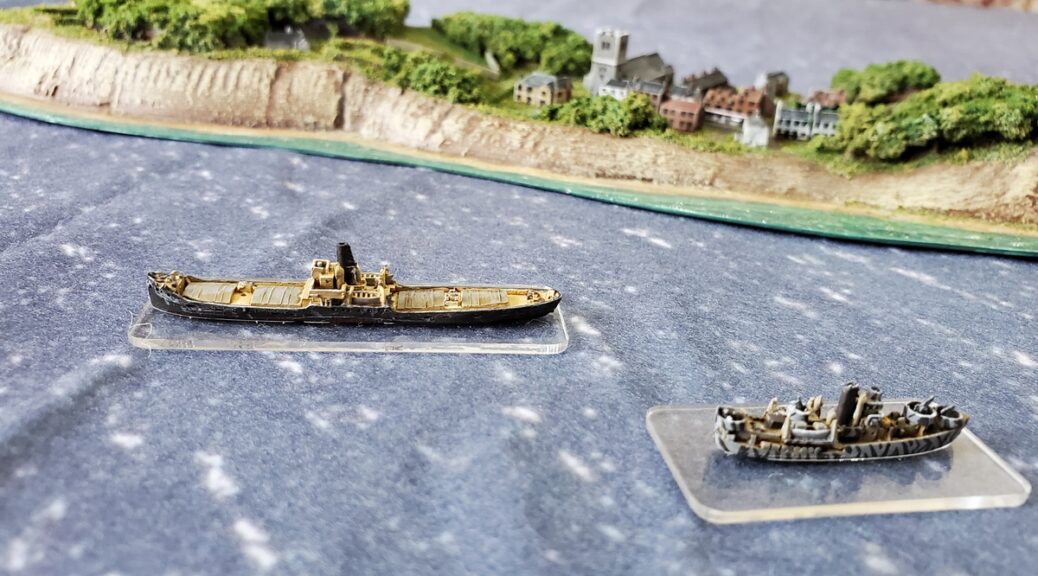
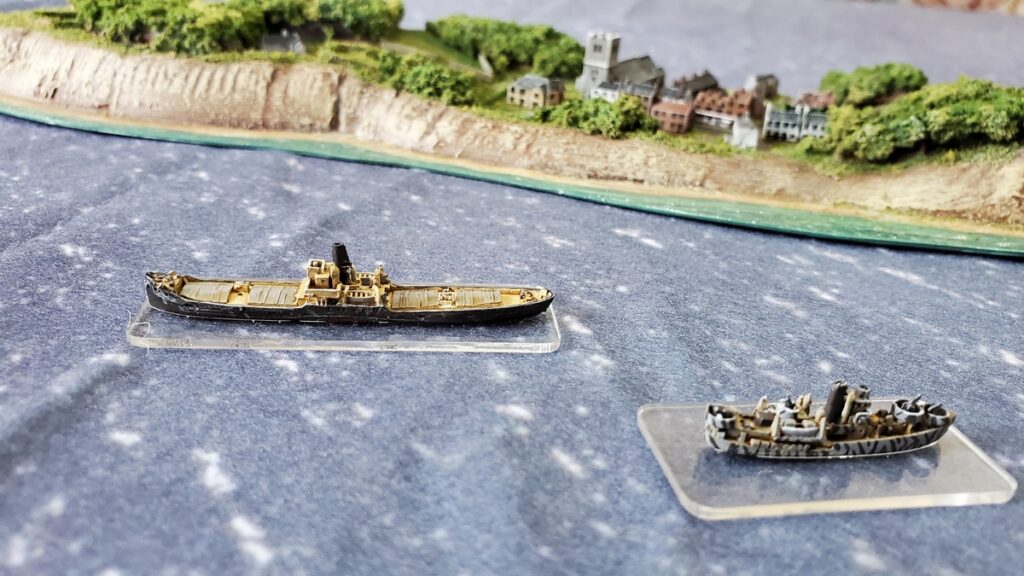
Closeup with a couple of my 1/1200 WW2 coastal boats and one of my coast segments. It looks bluer in closeups. Click for larger.
The mat is a lightweight fleece blanket material and only printed on one side, which is fine. The fabric has a bit of a shine to it, again just fine on a seascape, and just a bit of fleece fuzz texture. It lays nicely flat, no curling at the corners or edges, and the creases you can see in the photos are about the largest on the whole thing right now. I’ll iron it eventually, and then store it either rolled around something or crumpled up loosely so it doesn’t get long straight creases in it again.
I think it’ll stand up to years of gaming use, and according to Cigar Box it’s washable in case someone does spill on it once in-person gaming is a thing again.
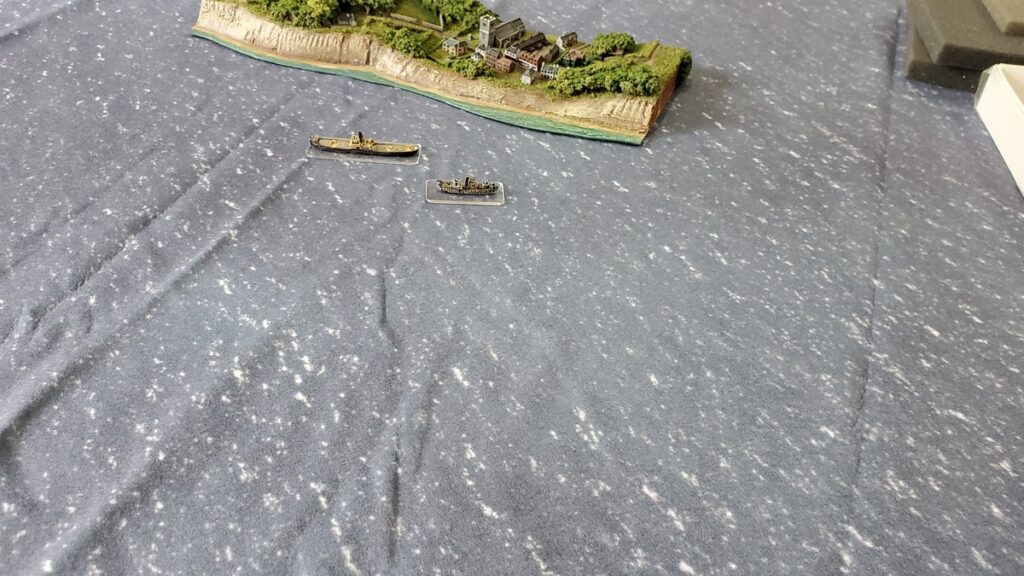
Middle distance shot. I’ll probably iron it to get the storage and transport creases out, then store it either crumpled up or rolled around something to avoid future creases. Click for larger.
The mat has fairly flat seams along each edge; if you were laying several out overlapping the ridge along the edges wouldn’t be too disruptive even with small ship models. It’s advertised as “4 x 6 Plus” which I think means it’s four to six inches bigger than that in each direction; I’ve not actually bothered to measure yet.
Absolutely a good value and solid looking product, with good shipping times. I’m not sure when I’ll next need a mat for something else, but Cigar Box will be on the shortlist if and when I do!
Kind of slow on the gaming front around here; we are still in COVID lockdown so no in-person gaming is permitted, but Thursday evening Gaslands by webcam is still going strong – we’ve had six players the last couple of games, which is probably pretty close to the limit for webcam gaming and keeping things organized and moving.
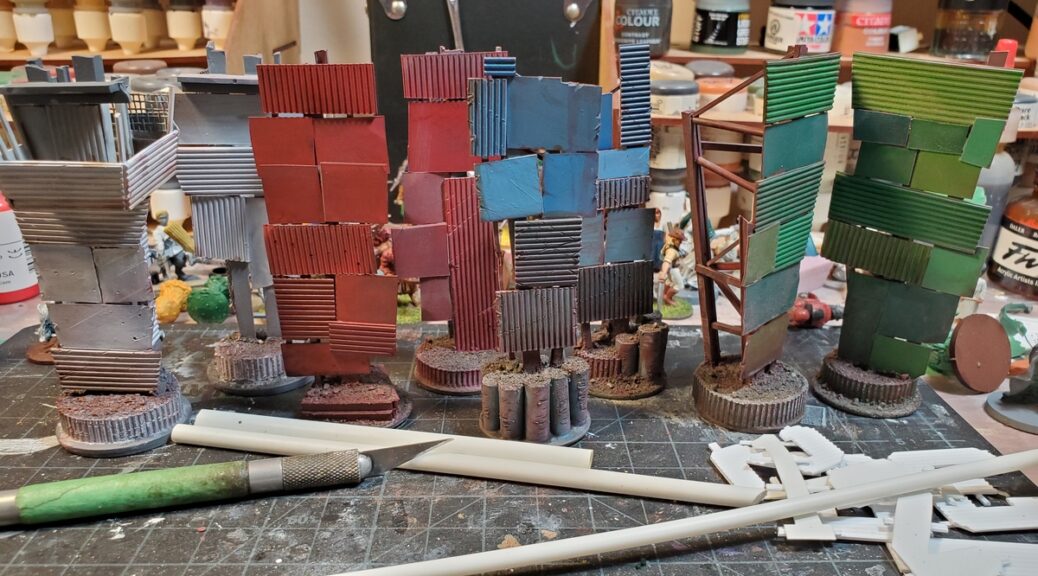
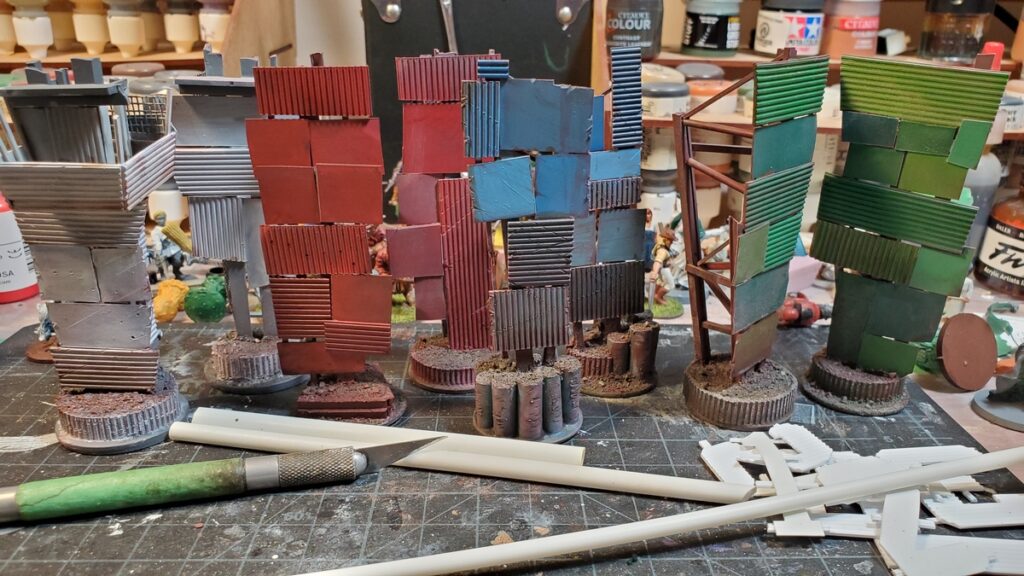
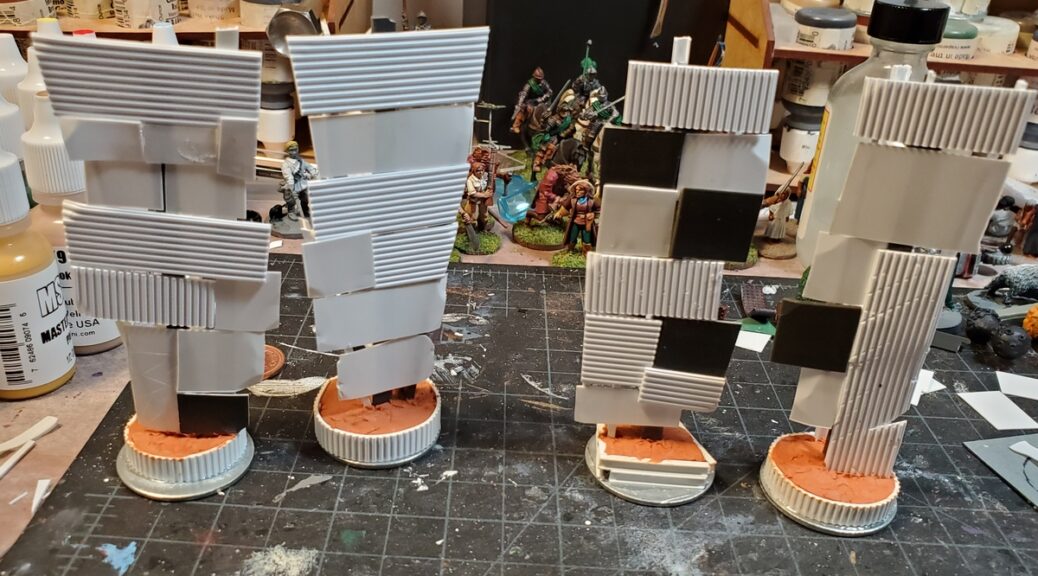
The gates have their basecoats and a first pass of weathering done, at least. I’m especially fond of the blue pair, they’ve taken the weathering really well so far.
Base colours and a bit of weathering on all four gate towers. Click for larger.
We had a blast of unusually cold weather and snow which has meant that my brother’s 3d printer (which lives in his garage) has been out of order, so everything is on hold until he can print the “GATE” lettering the six or eight times I need to add to each gate. It’s warmed up to normal winter temps again so hopefully he can get that done this week and I’ll be able to finish these up!
Got the base gate towers primed, and cut out the huge numbers that will go on each gate.
Primed gate towers. I forgot to add damage and scuffing to most of them before priming, hence the white streaks on the leftmost tower. Most of that was done with a small file, with bullet holes added with a very small drillbit in a pin vise. Click for larger, as always.
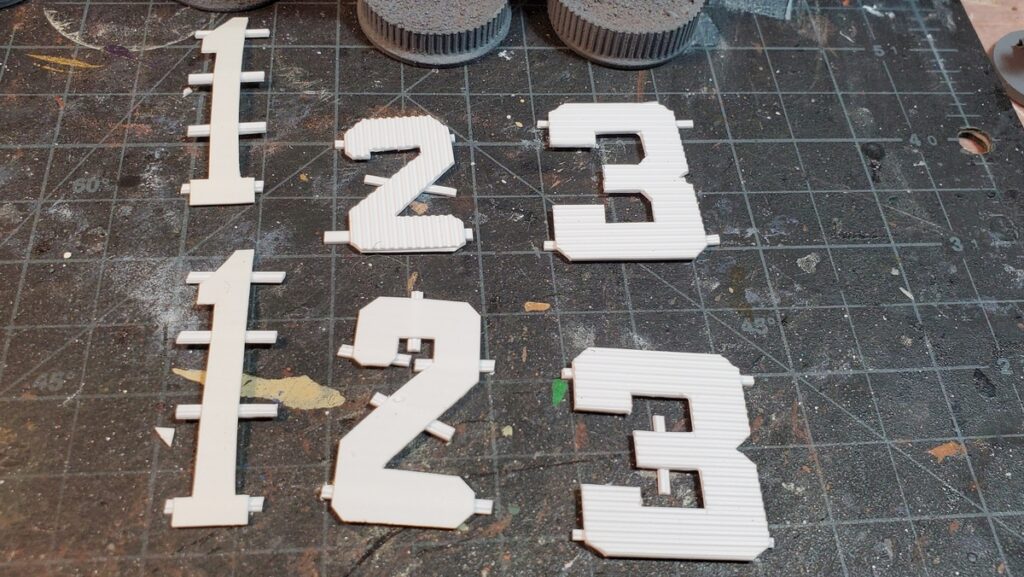
The plan is to label each pair of gates with large numbers cut from scrap styrene sheet, and to have 3d printed lettering for “GATE” above that, because I do not want to create styrene sheet lettering six or eight times if an alternative creation method can be found!
I’m going to scar up and then do the base colours on all the towers before the lettering goes on, so that I don’t have to try to paint under the lettering. But I cut the huge numbers last night and added the scrap bars that lift them off the surface of each tower.
Numerals for Gates 1, 2, and 3. The squares on the cutting mat are half inch; the 1s are just under 2″ tall and the 2s and 3s are between an inch and a quarter and an inch and a half tall. Click for larger.
Base colours tonight and priming the lettering, then I kind of have to pause until Corey gets his 3d printer fully functional again before I can add the GATE signs and start work on the overhead gantry for the Start/Finish line.
The Death Race scenario for Gaslands calls for at least three or four gates, for start/finish line (which might not be the same gate) and a couple along the course. We’ve been using various random scenery bits, which works fine, but proper gates have been a obvious piece of scenery I wanted to make.
The scrap metal look worked well for the jumps I made last year, so it was the asthetic I followed for the gates as well. I decided to do freestanding gate pillars, essentially, with no permanent overhead horizontal pieces but with the vertical construction to allow modular overhead gantries to slot in if desired.
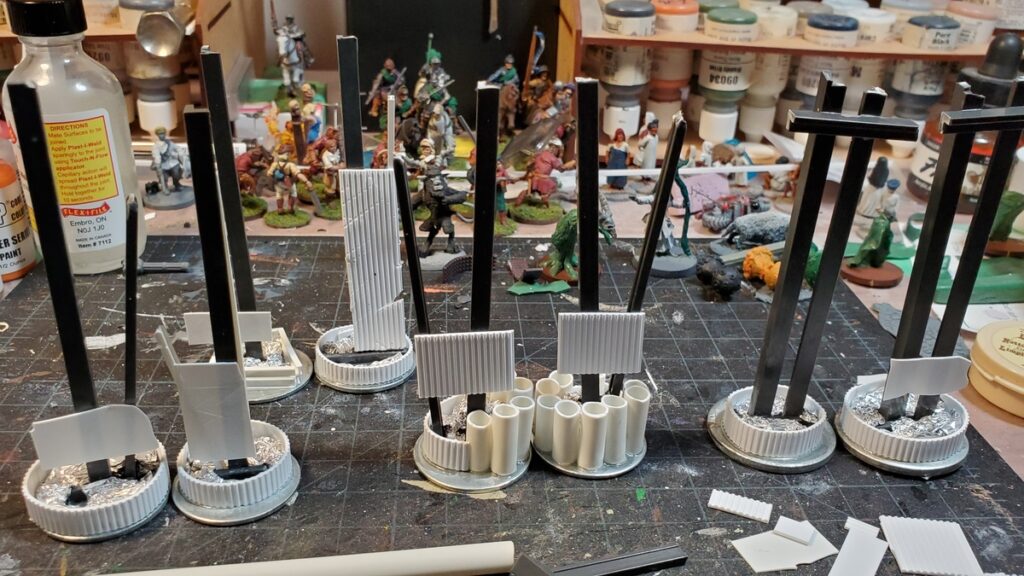
To keep the tall gate posts ballasted I started with solid 1 1/4″ washers from the stash, then sank the main vertical beams for each into a footing of styrene plastic filled with Milliput epoxy putty, which dries rock hard. Because it’s a fast technique and super cheap, I filled the lower levels of the foundation footings with crumpled tinfoil tacked in place with superglue, then put a layer of Milliput over that.
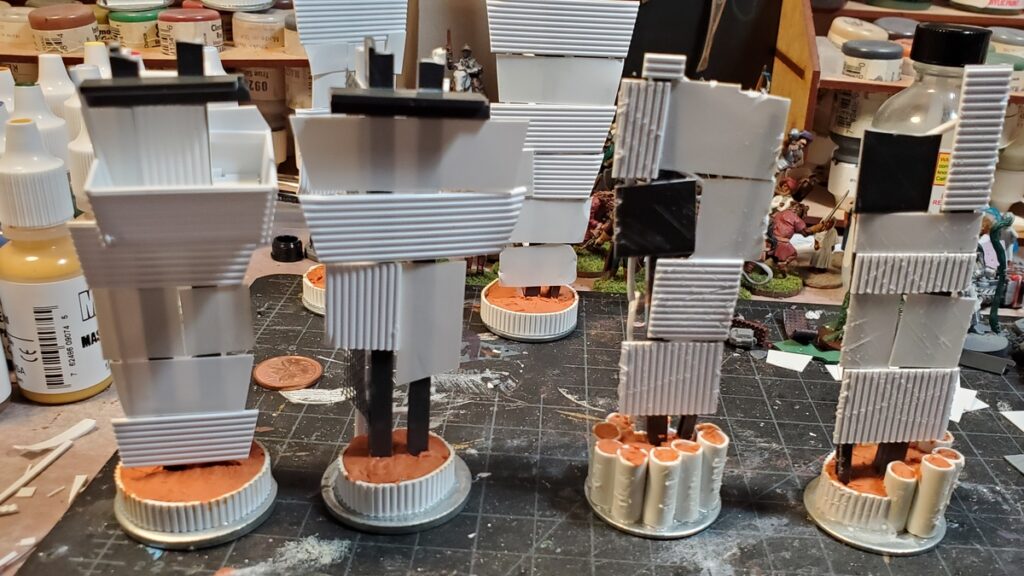
Early in construction, tinfoil filler visible in the footings. The three course gates are on the left, and rightmost is the start line, which is more substantial. Click for larger.
I used a couple of different methods to construct the footings; roughly circular lengths of corrugated sheet styrene were fast and easy but I really like how the vertically-embedded heavy pipe (styrene tube) came out.
This entire project was done from the Ancient Stash of Doom; I’m pretty sure some of these random girder pieces date back to the family model railroad we had in the early 1990s when I was in junior high. The dark grey plastic is all Plastruct; all the white plastic is Evergreen Plastics. There’s three or four sizes and styles of girder, a couple sizes of tube, and sheet styrene in at least four thicknesses and styles.
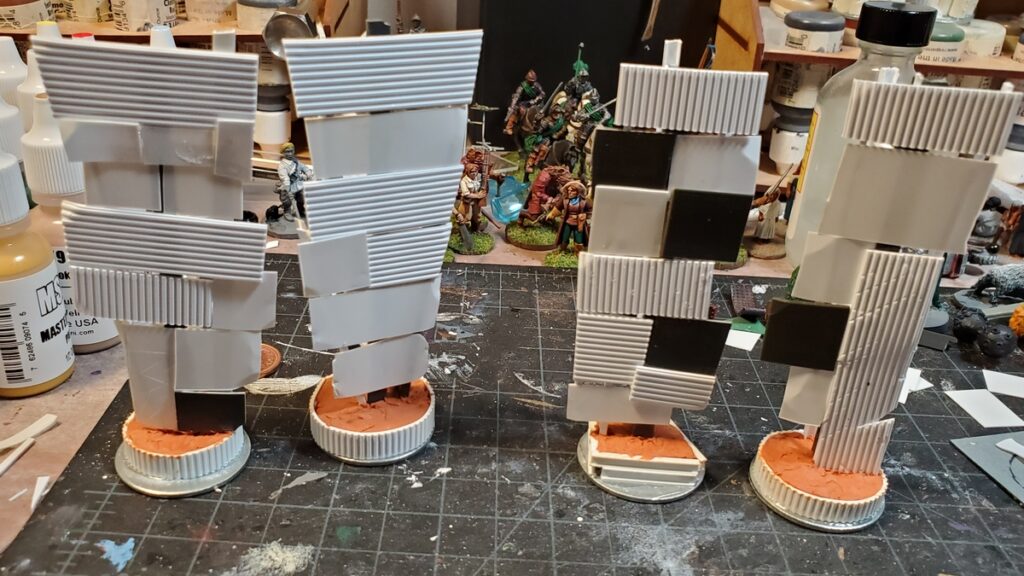
Beyond making sure all the main vertical beams were roughly the same length (about 4 inches) I did very little planning ahead. Each pair of gate pieces is in roughly the same style… more or less. After making sure the main vertical beams were solidly anchored to the washers, I filled in the rest of the structure from whatever sheet and beam bits were handy and looked the part.
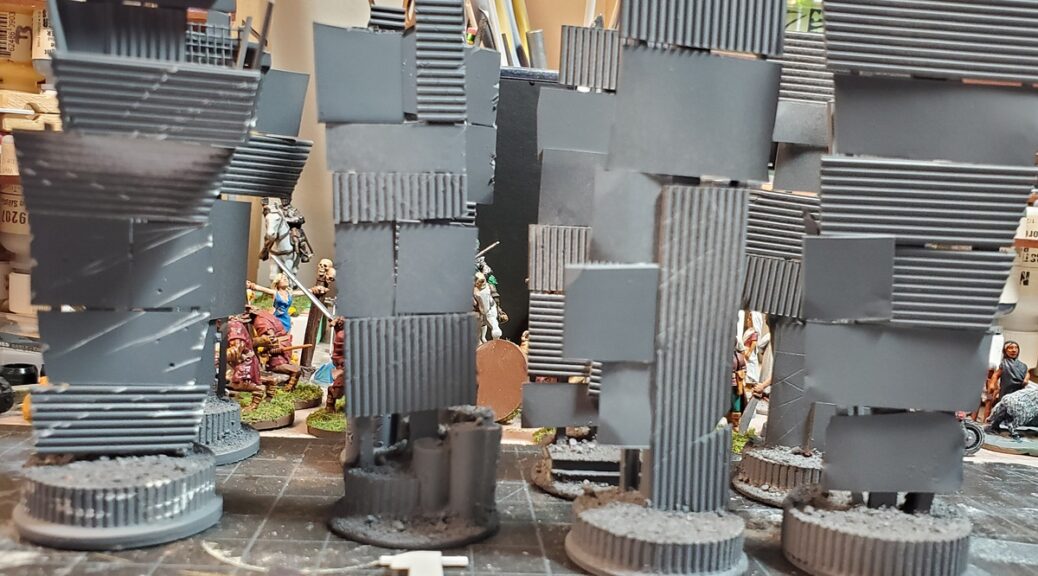
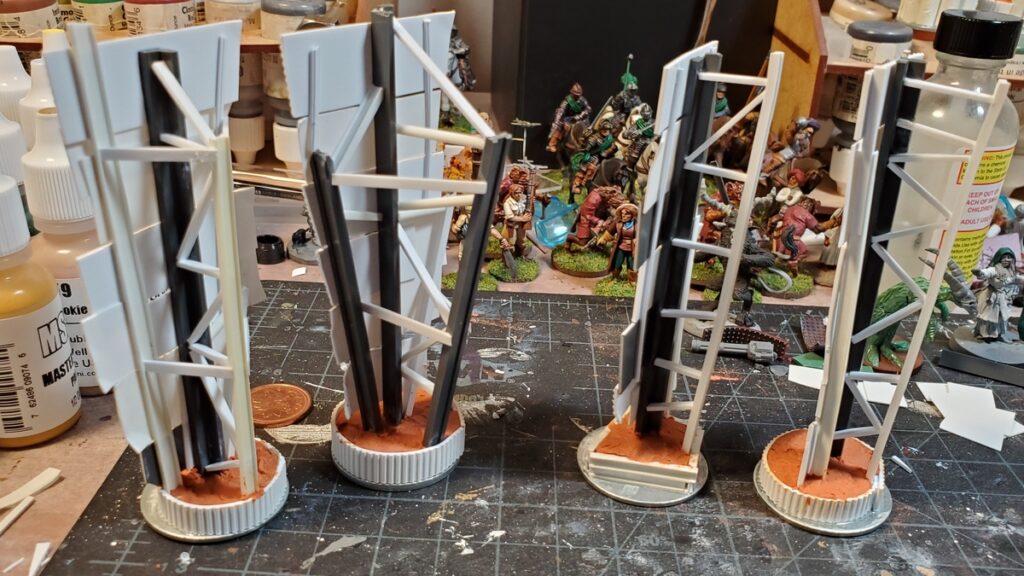
Left, the Start Gates, with an elevated box for race officials, announcers, media, etc. I’ve decided that the “pipe” gates are Gate One, for no particular reason. Click for larger.Gates Two and Three, basically finished and awaiting primer. Click for larger.The backs of Gates Two and Three. The scrap-built girder structures are actually fairly solid now! Click for larger.The backs/sides of the Start Line Gate and Gate One. Gate One has by far the simplest struture, but I really like how it turned out and if we need more gates will definitely be copying the basic design. Click for larger.
Gates One, Two, and Three are basically done, structurally, although I might yet put more details (floodlights, maybe loudspeakers) on them, and the plan for all three is to get Corey to 3d print lettering for “GATE” and then add the gate number in sheet styrene like they were cut out of sheet metal.
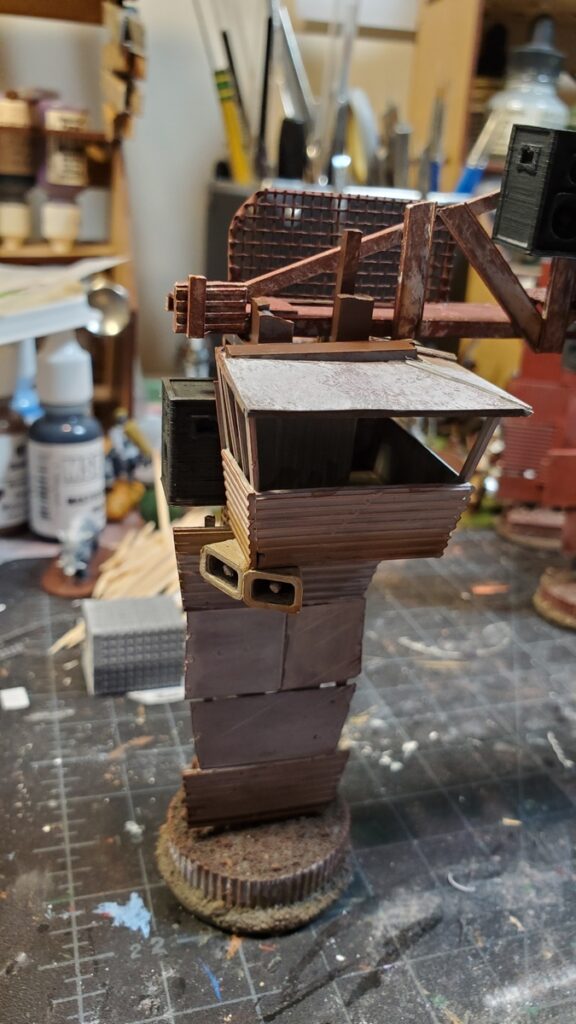
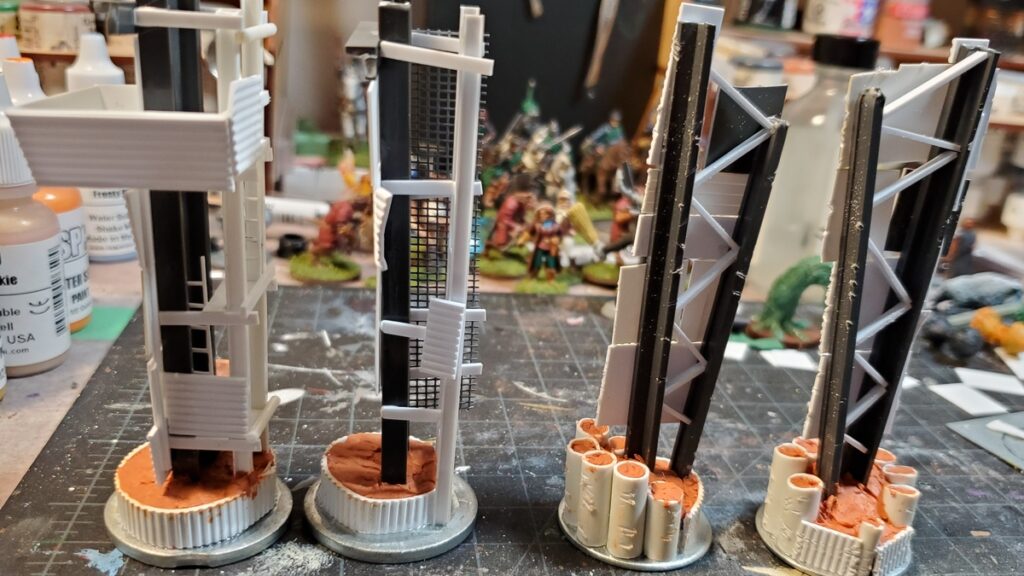
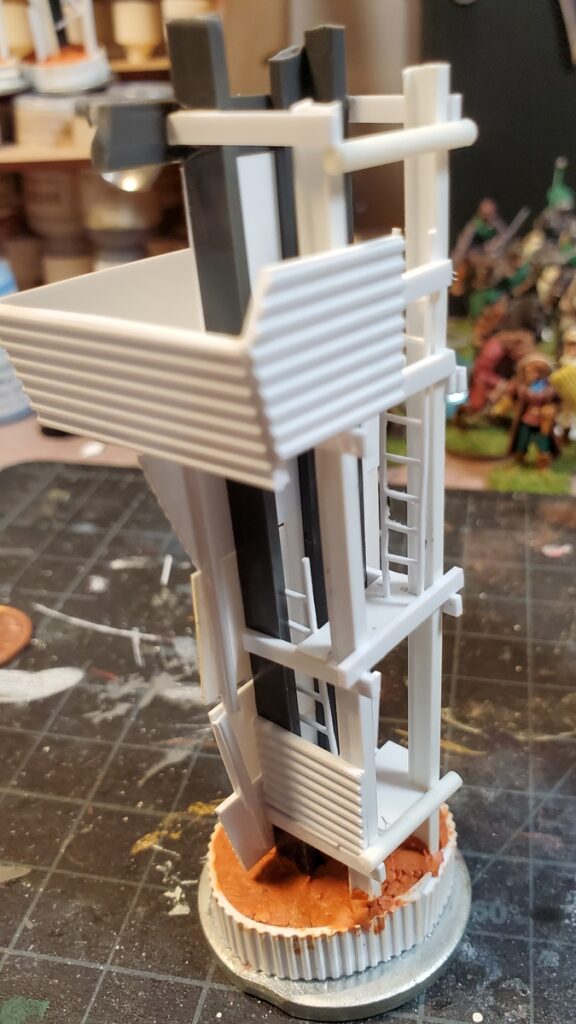
The Start Line Gate is still undergoing detailing. There’s ladders to get the crew up into the announcer’s cab, and I’ll be covering the sides and back with some solid metal sheet and a bunch of mesh – you can see the first piece of that on the offside Start Gate pillar, second from left above. The ladders are scratchbuilt from very thin strips of styrene; I’d have used HO scale plastic ladders but my awesome local hobby shop was out of stock.
The Start Gate is also going to get a fairly substantial horizontal gantry spanning the course between the two pillars. It’ll have floodlights, speakers, and a 3d printed “Esquimalt Thunderdome” sign on it, or will when Corey coaxes his 3d printer back to life. I’ve got some very cool openwork styrene girders to form the main central part of that gantry.
The main vertical part of the Start Line Gate, with partially constructed announcer’s cab. This photo was mostly taken to show off the scratchbuilt ladders, which came out really well. Click for larger.
More on these gates soon, and in the meantime stay safe, everyone.
No conventions, no in-person gaming at all for a good part of the year thanks to our local COVID precautions, and yet things still got painted, finished, and even played with.
Before COVID (Remember That?)
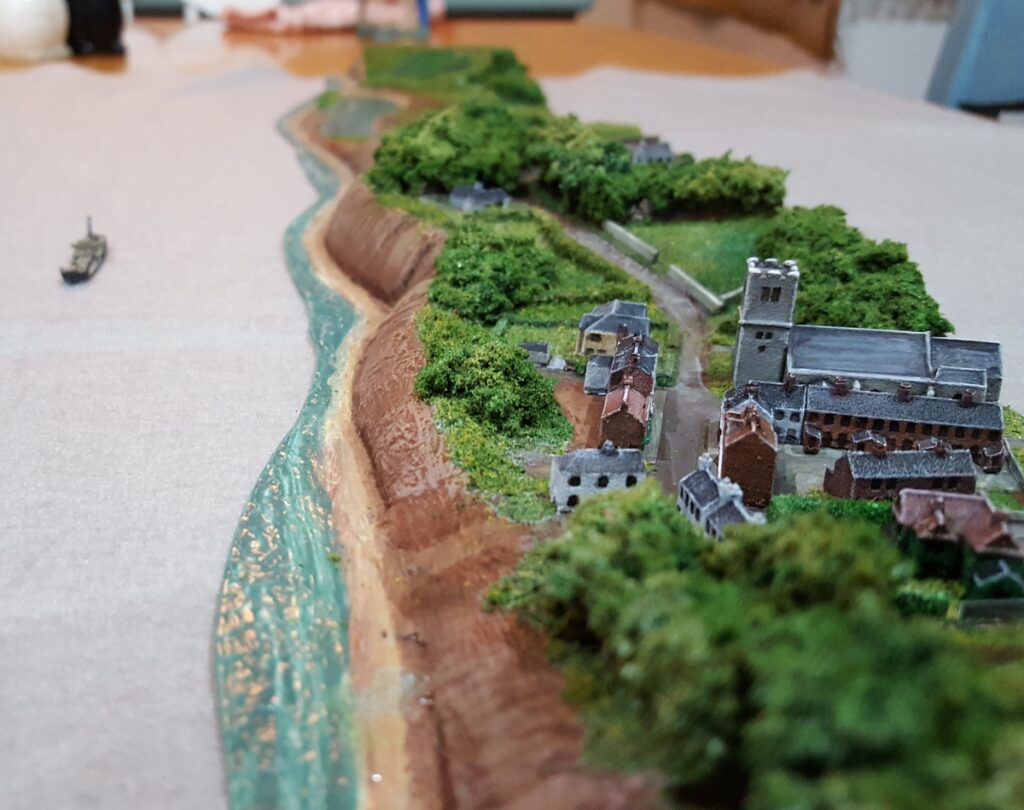
Low over the coastline, approaching the village. Click for larger.
We started the year damp and cold off the 1/1200 coasts of England with a lot of naval gaming and scenery for that, then we were briefly visited by a very strange bartender indeed and got a few games of tiny ships done in-person.
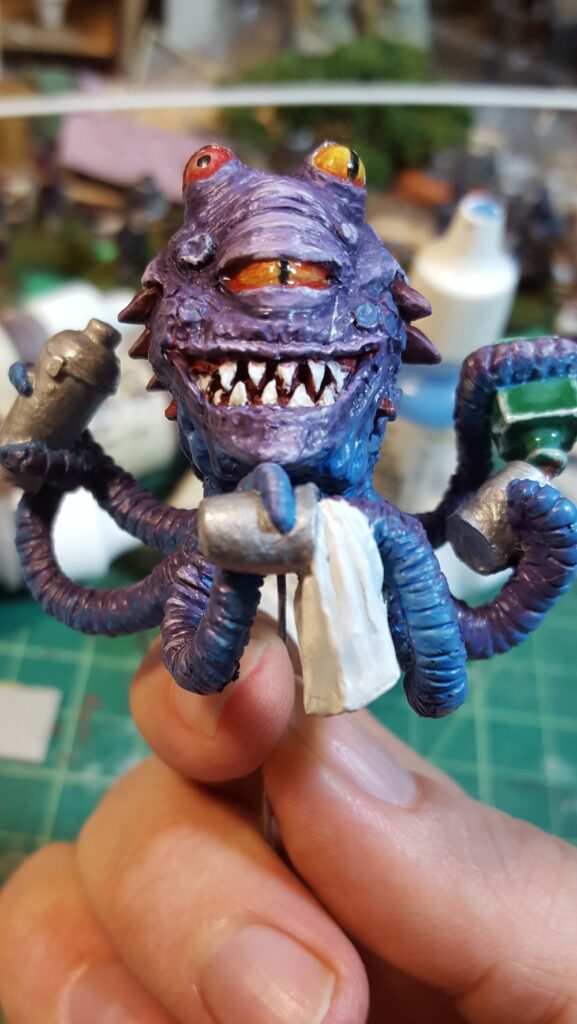
Narthoks all finished except for basing. Go on, tell the bartender your troubles! Click for larger.
The Weird Begins…
March was when it all went weird. The high point of my own gaming year, Trumpeter Salute over in Vancouver, was cancelled on less than two weeks notice, work-from-home started abruptly, and all sorts of other things went very, very sideways. I did spend some of the money I’d have ordinarily have spent on other things on orders from Bad Squiddo and Forge of Ice, two tiny one-person companies I’ve been meaning to order from for many years now, so that part was nice, but the fact that March/April/May 2020 have fewer blog entries here, combined, than I made in January indicates how off-kilter everything was!
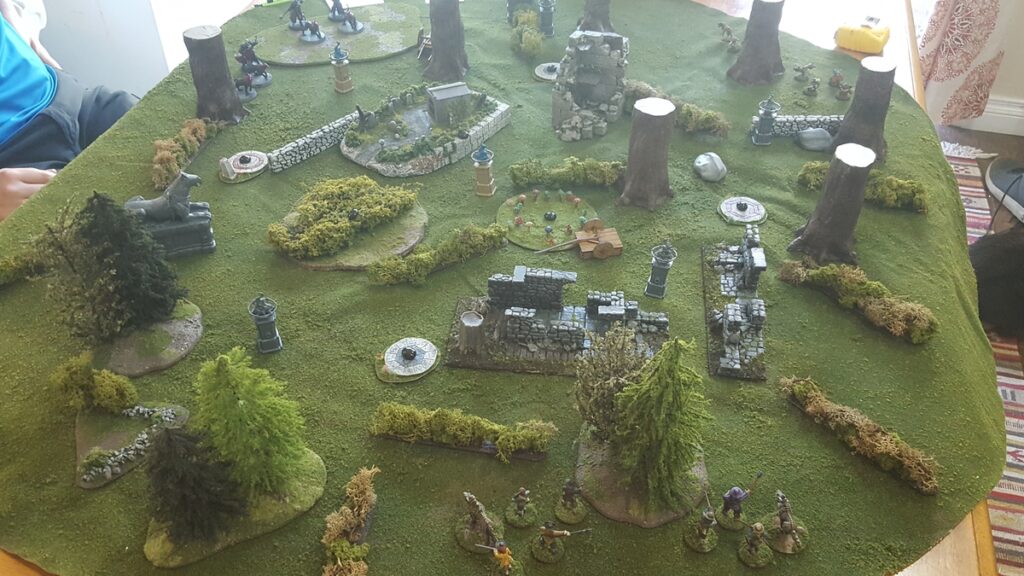
The end of May did see the modification of our local COVID restrictions so that we could have “pods” of up to six or so people, so my brother and a friend resumed gaming most Sundays, starting up a Frostgrave campaign that eventually morphed into a fantasy-flavoured Pulp Alley campaign.
Start of the game. My chaps centre foreground, Sean’s ogre ladies top left, Corey’s mousling bravos top right. Click for larger.
COVID Bubble Gaming
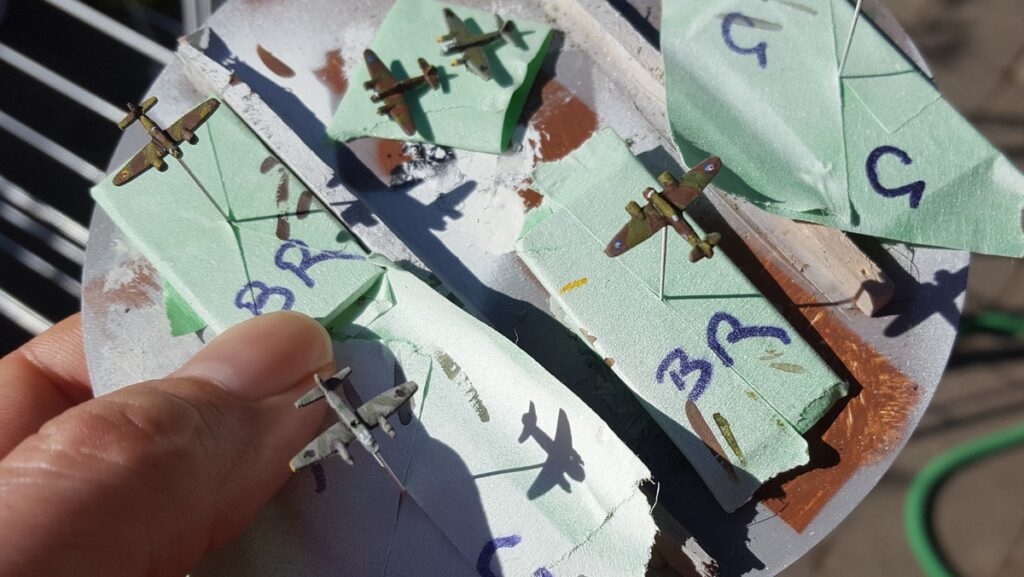
June and July saw something like a normal posting pace resume here as I cranked out a bunch of fun quick fantasy scenery to add to our Forestgrave tables including a standing stone and a big tree. There were also a few impossibly tiny planes as a diversion from fantasy!
Tiny, tiny 1/1200 RAF and Luftwaffe airplanes to trouble boats not quite as tiny.
August saw a return to naval stuff and small scale scenery, and September saw the arrival of Gaslands on the scene, which has provided much pandemic diversion since!
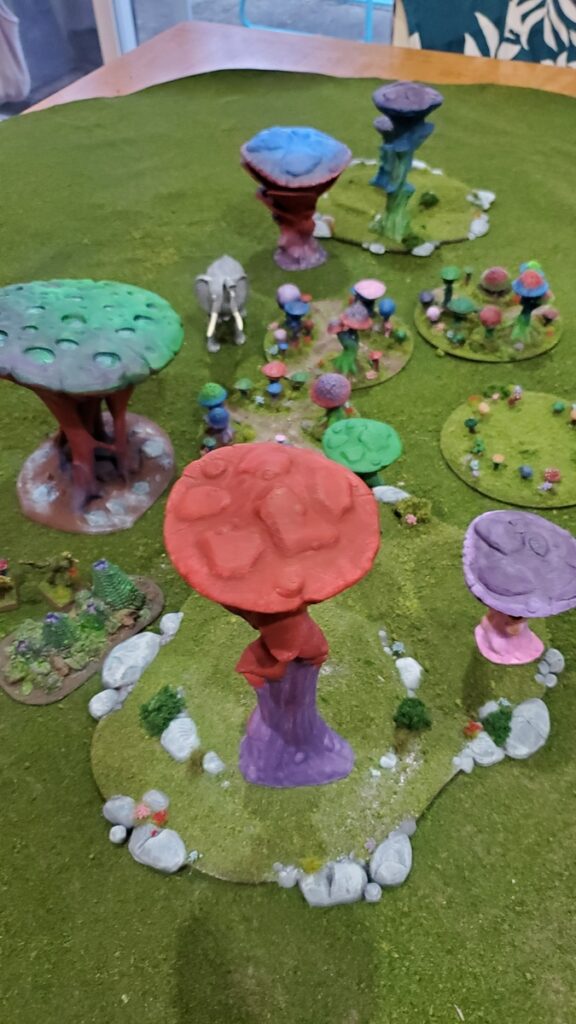
Mad mushroom jungles for properly fantastical fantasy gaming!
The Bubble Bursts…
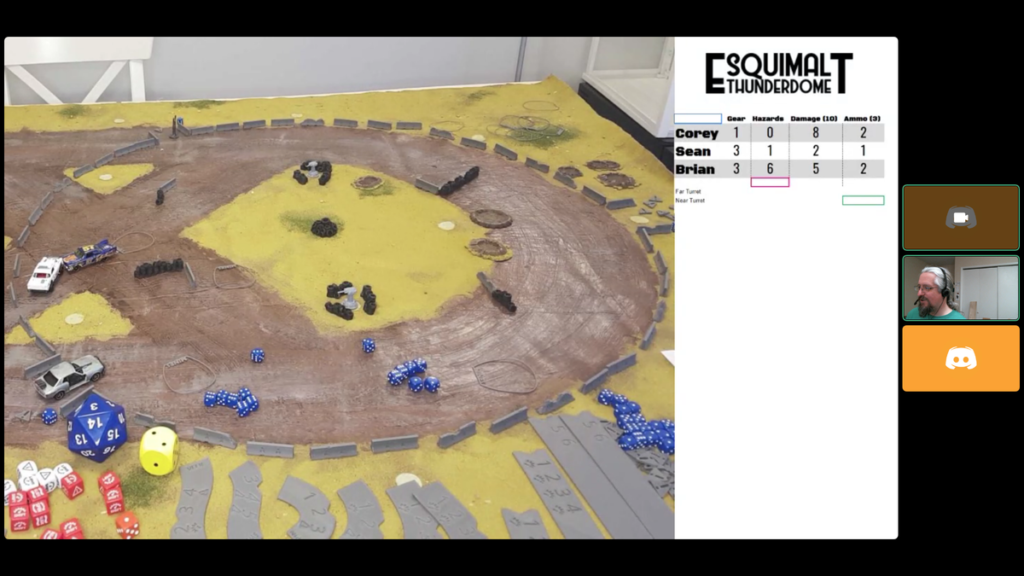
The last quarter of 2020 saw tightening of our local COVID restrictions and the end of even limited in-person gaming, but before that we did get to see some mad mushroom jungle terrain and some other weird fantasy terrain before we finally turned to that most 2020 of communication solutions, online webcam conferencing, for a Gaslands gaming fix.
Gaslands by webcam, via OBS and Discord.
So, that was our 2020 here at the Warbard! A weird, stressful, very strange year but here’s hoping that sometime before the end of 2021 we’re back to in-person gaming, conventions, and something vaguely like pre-pandemic normality.
In the meantime, wear a mask, keep an eye on how soon you can get your COVID vaccine, try to get some hobby time in if your situation allows, and stay safe. Happy New Year, I guess!
I’ve talked up Rain City Hobbies on this blog before, but only for their very nice grass and flower tufts. They also do a huge range of resin bases, but because I rarely use elaborate complex bases they’ve not interested me much.
I do own a few of their resin bases, however, picked up from the “production seconds by weight” bin sold by Rain City at gaming conventions. (remember gaming conventions from the Before Times? I miss them…)
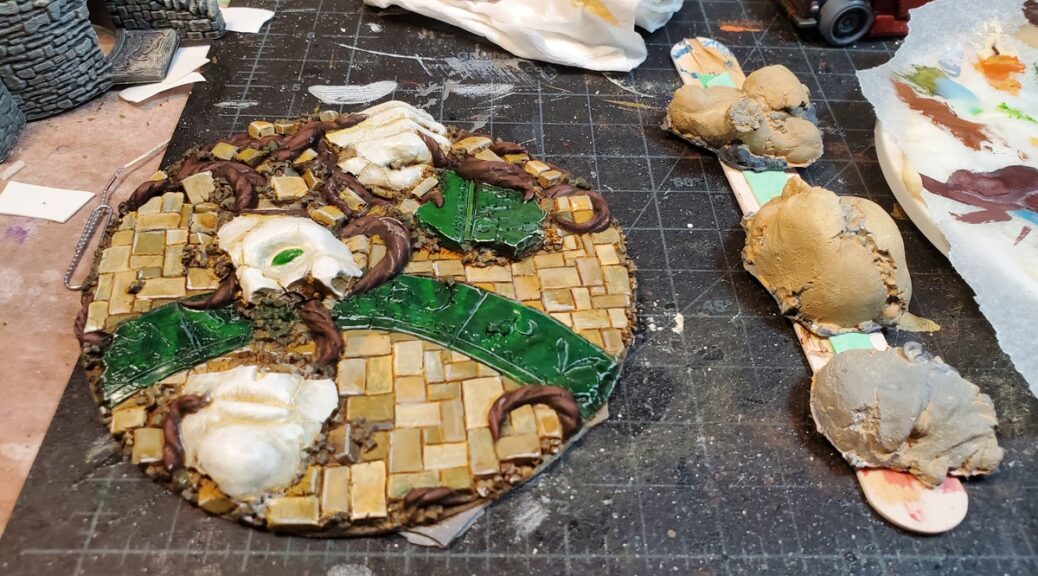
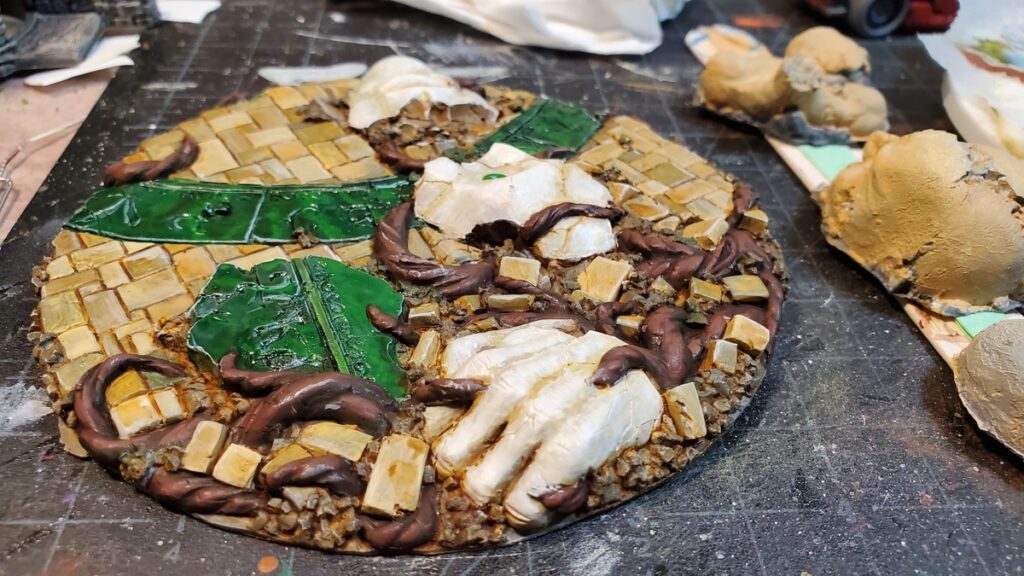
Needing a distraction from current events I decided to paint up the biggest of these, an elaborate ruined temple base nearly the size of a CD, their Huge Ruined Sanctuary insert. 120mm (~4 and a quarter inches, roughly) across, the production second one I have has nearly perfect molding of all the details, but it warped before the resin had fully cured so won’t lie flat.
The ruined sanctuary base all painted up. Click for larger.
I tried out a bunch of different stone painting techniques on this base and I’m really pleased with how it turned out. The three big chunks of shattered statue were based in light tan, then progressively highlighted with whiter and whiter paints well diluted with glaze medium, which really got a translucent polished stone effect going.
The green arc and big green fragment were basecoated fairly dark green, then given marble-like veins with brighter greens, again well mixed with glaze medium. They got a good coat of gloss varnish, and then some highlighting with almost pure white.
The flagstones got basecoated with four or five off-white/tan shades, washed with GW Sepia and Earthshade washes, then highlighted with light tan and off-white. The tree roots are various shades of reddish brown.
The big base from the other side. Click for larger.
Because of the warp across the width, I’ll probably base this onto a larger piece of thin plastic, then use putty and then foliage to merge the lifted corners back into the base, making this look like a fragment that has been largely swallowed by forest or jungle.
I’ve also got a few more random bases I might finish up, and those three tan pieces to the right in both photos above are the Large Broken Statuary Base Accessories that I will be using either together with the big base or on their own as scenery elements. More on them in some future post when I get them finished.
Stay safe, stay home, try to get something creative done, mask up when required out in public, and better days (actual gaming conventions!) shall come again.